
Random field cinema 4d где
В этом уроке вы узнаете, как получить быстрый красивый рендер без каких-либо артефактов в Cinema 4D.
2 thoughts on “ Cinema 4D: Random Extrude ”
Привет Майк,
у меня к тебе 3 очень простых вопроса:
1. Как перемещаться шорткатами в Обджект Менеджере, я видел ты это делаешь в уроках, но незнаю комбинации.
2. Как убрать подсказки для несуществующих граней, а то порой напрягает видеть голубенькие линии.
3. Как в Xpresso – соединять две ноды шорткатом, я видел как у тебя полосочка сама рисовалась от одной ноде к другой, вроде зеленого цвета была.
1. Если между объектами, то только стрелками вниз и вверх. Стрелка вправо поднимет на следующий уровень иерархии. Только эти знаю)
2. В меню вьюпорта нужно выбрать Filter > N-gon lines.
3. Это был просто глюк при захвате видео с экрана. Связи рисуются только мышкой))
How often do you use the top menu tabs in Cinema4D? Chances are, you probably have a handful of tools you use, but what about those random features you haven’t tried yet? We're taking a look at the hidden gems in the top menus, and we're just getting started.

In this tutorial, we’ll be doing a deep dive on the simulate tab. It holds many of the settings available to make your objects react to gravity—from particles, to hair.
IT'S NEVER TOO LATE TO SIMULATE!
Here are the 3 main things you should use in the Cinema 4D Simulate menu:
- Emitter/Thinking Particles
- Force Field (Field Force)
- Add Hair
Look at you!
Design based around physics is a popular design aesthetic utilized by some of the biggest studios in the world. While these tools are nowhere near as complex as the simulation systems found in software like Houdini, they are a great entry point for artists looking to add simulations to their work.
2. Простой риг со сплайнами
Второй риг использует сплайны, по которым будет двигаться камера. Нарисуйте сплайн при помощи пера (меню Create > Spline > Pen). Затем сделайте правый клик по вашей камере и выберите Cinema 4D Tags > Align to Spline, а в теге, который только что добавили укажите свой сплайн как путь. Бум! Все, что вам нужно сделать — анимировать свойство «Position» у тега, чтобы заставить камеру двигаться по сплайну.
Немного советов по сплайнам: если хотите получить плавные дуги, то используйте B-Spline (Pen Tool > Type > B-Spline). Это максимально сгладит путь между двумя точками и упростит вам жизнь. Во-вторых, если у вас нет цели для камеры, то можно заставить её смотреть вниз по сплайну, как на американских горках. Просто нажмите кнопку «tangential» в теге Align to Spline.
Одним из достоинств такого подхода является то, что он упрощает корректировку пути постфактум. Просто выберите точки сплайна и перемещайте. Ой-ой, клиент требует, чтобы камера облетала все компьютеры? Да без проблем!
F-Stop (диафрагма) и Depth of Field (DOF, или глубина резкости)
На настоящей камере F-Stop определяет, насколько широко раскрыта диафрагма (и сколько света попадает на матрицу), а также определяет глубину резкости (диапазон фокусировки и размытость фона). В этой статье мы разбираем самые азы, но для большего упрощения вещей вы должны знать:
F-Stop меньше = глубина резкости больше (фон размыт сильнее)
F-Stop больше = глубина резкости меньше (менее размытый фон)
Если вы стремитесь к фотореализму при работе с камерами в Cinema 4D, учтите, что любая версия C4D кроме Lite и Prime позволяет воссоздать эффекты глубины резкости с помощью Physical Renderer. Чтобы включить его, перейдите к меню Render > Edit Render Settings и убедитесь, что в выпадающем списке выбран «Physical». Также, в настройках Physical > Basic Tab включите Depth of Field.
Подсказка: создание сцен с учетом масштабов реального мира даст вам предсказуемые результаты. Если ваша сцена больше или меньше реального мира, то вам придётся преувеличивать значение F-Stop для компенсации (например, F/0.025 вместо F/1.4)
Now get out there and simulate your heart out!
Фокус
Теперь, когда вы познакомились с DOF, как вы решаете, что будет находиться в фокусе? Под тегом Object камеры вы определяете фокусное расстояние вводя нужное значение, либо выбирая значок стрелки и кликая на объект во вьюпорте, который должен быть в фокусе. Однако, как только вы начнёте анимировать камеру оба параметра поломаются, т.к. придётся анимировать и фокусное расстояние, чтобы держать объекты в фокусе. И тут в игру вступает Focus Object.
Вы можете контролировать фокус, просто перетаскивая объект в нужную область и не важно, где находится камера — фокус на месте. Чтобы достичь более высокой гибкости, используйте Null-объект как фокусный. Таким образом, вы можете его анимировать и легко видеть визуальное отображение во вьюпорте.
Фокусное расстояние
Если не погружаться в технические детали, фокусное расстояние объектива камеры определяет, насколько широкий или узкий угол обзора вы получите. Создайте камеру в Cinema 4D (меню Create > Camera > Camera), и вы увидите параметр фокусного расстояния под свойствами объекта в диспетчере атрибутов. Небольшое фокусное расстояние, например 10 мм даёт широкий угол обзора, а длинное (100-200 мм) считается телефотографическим.
Как правило, с более длинными объективами вам придётся отодвигать камеру дальше, чтобы уместить объекты в кадре. С короткими объективами наоборот.
Есть множество деталей, которые необходимо учитывать в отношении фокусного расстояния, поэтому если хотите знать больше — вы в нужном месте, читайте дальше (конечно, если любите читать).
Если мы будем уменьшать фокусное расстояние, а камеру двигать ближе к объектам — можем получить довольно крутой эффект. Он называется dolly zoom (спасибо Ирмину Робертсу), которого вы, без сомнения, видели раньше, благодаря парням по имени Хичкок и Спилберг.
Возможно, вы слышали о таких.
Выдержка (скорость затвора)
С помощью выдержки мы можем контролировать силу размытия в движении на наших рендерах. При работе с камерами в Cinema 4D, мы можем регулировать интенсивность размытия повышая или понижая выдержку.
По заданным фильтрам ничего не найдено
Попробуйте изменить критерий поиска, или сбросить фильтры.
Комментарии 78
Да. с отражениями еще мне учиться и учиться.
Вот что у меня получилось)
Скачивается только готовый файл проекта - текстур нет. Совсем. Исправьте, пожалуйста.
Добрый день, а есть у кого-нибудь текстурки и HDR карты от этого урока? спасибо
можно вопрос? почему проект идет без текстур?
Автор, если не секрет, у тебя какая машина то собрана?
У меня i5 4570 3.2GHz + Radeon R9 + 16Memory - рендер раз в 10 слабее твоего. Или для уроков вы используете Тимрендер.
Если есть грамотная статья по железу для синемы - дайте ссылочку, а то постоянно комплексую.
Исправте пожалуйста в файле проекте только готовый файлик, нет файла самой модели
По ссылке скачивается только файл проекта, архив с текстурами отсутствует.
Добрый день.Может подскажите,почему у меня R16 при рендере в формате OpenEXR After Affects не читает Compositing File,а в версии R15 вообще пишет "не удаётся записать файл"
Точно такая же проблема, нет никакого архива, а просто уже готовый проект, в котором ничего делать уже и не надо, а только исправлять проблему с ошибкой в рендере и пытаться восстановить потерянные файлы. Почему не исправят эту ошибку и не выложат архив, который должен быть, а не готовый проект с ошибками.
жаль текстуры не все, в "скачать проект" только car.c4d, архива нет, поэтому ошибка при рендере:
AsphaltDamaged0035_1_M.jpg (Mat.4, D:\Textures\Roads)
28_antwerp_station_red_ceiling.hdr (Reflect Material, D:\HDRI\Aversis HDRi Complete Pack\Interior 1)
HDM_05_003_emblem.jpg (ml logo)
HDM_05_003_windows.jpg (front window)
HDM_05_003_brake_disc.jpg (brake discs)
28_antwerp_station_red_ceiling.hdr (Light Material, D:\HDRI\Aversis HDRi Complete Pack\Interior 1)
Не достаточно текстур, где их качать?
ошибку при рендере выдает
В скачанном проекте отсутствуют эти текстуры? Проверьте
Столкнулся с проблемой анимирования автомобиля в движении, вернее имитация движения, подскажите, каким приемом это проще сделать? анимация текстур?
А что это, при рендере высвечивается
Проверьте путь, по которому рендерите. Попробуйте рендерить в другую директорию.
Попытался эту машину внедрить в видео. Получилось, но есть проблема!
Отражение на машине не соответствует окружающей среде. Например: у меня сбоку машина отражает землю, на которой стоит - это логично, но крыша, багажник, стекла и т.д. при смене положения камеры отражают всю ту же землю, хотя вокруг машины есть другие объекты из видео, которые должны отражаться. Что нужно сделать, дабы отражение соответствовало окружающей среде?
Если вы в этом деле новичок, то информация ниже поможет вам сделать шаги вперёд. Поскольку камеры в Cinema 4D построены по образу и подобию камер из реальности, будет полезным обратить внимание на основные принципы фотографии. Загрузите файлы проекта и следуйте инструкциям
Using Field Force in the C4D Simulate Menu
By default, the Emitter shoots particles in a straight line. It’s a little boring, but that’s because it expects you to combined in some Forces. So let’s oblige it by looking at one of the most useful Forces, the Field Force.

Which is like a force field, rather than a group of soldiers in the field as this editor previously assumed
This Force is honestly one of the most versatile of the entire list. You could achieve a lot of the same results as other Forces by using this one alone. Let me explain.
Field Force only works with Falloff Fields such as Spherical, Linear, etc.

Now let’s say you want to create the same effect as the Attractor and suck in particles towards a point. Simply create a Spherical field. By default, Field Force will attempt to make the particles go to the center of the Spherical Field. Increase the Strength to see it more clearly.
Maybe you want to do the opposite and have your particles avoid a point. That’s also very simple, set the Strength to a negative value. Those particles will now move away from the point.
This effect is what you would get with a Deflector. However, the Deflector works as a flat object that bounces particles. The Force Field gives you the ability to use different shapes to work as your bounce object.
Let’s say you want to use Turbulence and give your particles a randomized motion path. This, too, is easily achieved with the Field Force. Create a Random Field and your particles will now have much more organic motion.
In your Random Field, adjust the Noise settings to control the Noise type, Scale, and even Animation Speed. You can create a completely custom turbulence field here. None of these options are available in the standard Turbulence force.

These are just some examples of what it can do! As with MoGraph, you can combine the Fields to create much more complex and customized effects. Definitely worth your time and experimentation!

Also, keep in mind that these forces can be used on objects with a dynamics tag, so that tip about adding tags to your emitters from earlier? It works doubly so here!
Adding Hair in the C4D Simulate Menu
While you are in the Simulate menu, you may have noticed the Add Hair option. This object does pretty much exactly what you would expect and makes your selected object very hairy.

It does require a bit of finessing to get it to look correct. By default, the Hair object is set to create hair on the Vertex Points. Change it to Polygon Area if you want the hairs to cover the entire object evenly.

But don't expect to see the actual hair results in the viewport. You’ll be seeing Guides on your object.
These act as proxies to the actual hair on your object. A quick click on the Render View button will show you how your object actually looks.

If you want to see the Hairs in the viewport without doing a Render View, go to the Editor tab on the Hair object. In Display, set it to Hair Lines. This will show the hairs more accurately.

By default, the Hair object sets the hair to be Dynamic and will react to gravity if you press play on your timeline.
Be aware that if the hair is dynamic, it may make it difficult to style the hair using the Hair Tools. These allow you to comb the hair, cut it, curl it, clump it and straighten it.

Definitely play around with the tools as they are the only way to get the hair to look exactly how you want it to.
If you want to change the color of the hair from the default Brown. There’s a Material created for you called “Hair Material”. All of the properties of the hair are here. This includes color, as well as 17 other options!

Activate the ones you want to modify and dive into each tab. If you have your Hair Display to Hair Lines, you can actually see the effects each of these tabs have on the hair directly in the viewport, no need to use your Render View!
Cinema 4D automatically sets your render settings to include Hair options. So, you are good to render immediately after creating the object. All you have to do is make the hair look fabulous.
Перемещение камеры
Чтобы двигать камеру, пока вы смотрите через неё, убедитесь, что она выбрана путём активации кнопки «Active Camera» в менеджере объектов, либо выбрав камеру через меню вьюпорта Cameras > Use Camera. Когда смотрите через камеру, можете использовать инструменты навигации для перемещения/вращения/зума во вьюпорте. Конечно, вы также можете свободно перемещать и вращать камеру из других видов.
Небольшой бонусный совет по одной вещи, с которой вы, возможно, уже сталкивались, когда работали с камерами в Cinema 4D: по мере того, как вы вращаете камеру в окне перспективы, вы можете случайно повернуть камеру в 2D-окне, что может несколько отвлечь. Просто зажмите Shift+Alt и верните вьюпорт к нормальному виду. Вуаля!
Cinema 4D Basecamp
If you're looking to get the most out of Cinema 4D, maybe it's time to take a more proactive step in your professional development. That's why we put together Cinema 4D Basecamp, a course designed to get you from zero to hero in 12 weeks.
And if you think you're ready for the next level in 3D development, check out our all new course, Cinema 4D Ascent!
Тег Vibrate
Иногда хочется добавить камере немного «человечности», возможно, имитировать съемку с рук. В таком случае добавьте тег Vibrate на камеру и включите вращение и/или перемещение на малые значения.
What are Fields?
Imagine Fields as a spatial distribution of strength values that control an effect.
Something like a three-dimensional Noise that defines the strength of an effect using its grayscale gradient. The effect is strongest where the Noise is white and weakest where it’s black, and the grayscale values having a corresponding influence. The simplest Field is the Spherical Field:

The default Spherical Field’s strength is greatest at its origin and diminishes outwards linearly to 0.
What is the spatial distribution of values good for? This distribution of values can, for example, be used by MoGraph Effectors to control the spatial strength of their effect (e.g., Y-offset of clones by 100cm or rotation of 30°, etc.). Or the Bend deformer uses a Field whose values define the strength of deformation for each object point position to be deformed. Below you will find a description of what Fields can be used to affect.
Spatial strength values will be made available primarily by the Fields mentioned above. Values from other objects and tags can also be used, for example:
These Fields and tags can be placed in ,Field lists’ (setting name Field or Fields). These can most often be found in objects or tags with an object/tag named ,Falloff’ or ,Fields’ (where they can be blended with each other. More info about this here.) These can, in part, also be converted into each other: e.g., a Spherical Field can be used to assign values to a Vertex map or Polygon Selection tag; or a Polygon Selection tag can be converted to a Vertex map or vice-versa.
Tip:
When learning how to use Fields you can assign a Spherical Field to a Plain Effector, for example, and then combine multiple Spherical Fields and observe the effect this has. Try out other Fields and modification layers and observe their effect.
Finally, test the effect (without an Effector) on less obvious elements (see below) such as tags, Deformers, etc. This is the best way to master the art of using the powerful and at times complex Fields. It’s worth the effort.
What do Fields affect?
Fields can be used to affect the following elements (these each have a Field list with a list named Field or Fields ):
Fields go much farther in their functionality than before and are not at all restricted to use with MoGraph elements.
Fields can, for example:
… and so on. To sum it up: the settings of various elements can affect one another and in part even be converted into one another (e.g., tag to tag).

Fields can be used to affect many elements. Not pictured is the XPresso Falloff node, which makes the Field function available to even more areas in Cinema 4D.
This diverse range of effects makes it possible for Fields to affect many areas simultaneously. In the following image, 1 Field is controlling each of the Vertex Color tags and the Vertex Color tag in turn textures the sphere via a Vertex Map shader and also colors the matrix using a Plain Effector.

How are layers blended?
For other areas of use, simply imagine simple masked object points (e.g., Deformers) or point weighting (e.g., Vertex Maps) instead of offset clones.
Blending colors and vectors is done analogously.
Since several Fields can be implemented simultaneously, they have to be combined with one another. This is done as follows in the respective Field list:

The arrangement of the 4 Fields (disabled here) on a Matrix object.
Pictured is a Matrix object that is affected by 4 Fields (the Fields are in a Plain Effector that raises the clones by 100cm, the value trim for the Field list from 0%-100% is disabled; Icon bottom right). Note the various Blending modes (strength always set to 100%).

The most important Blending modes.
What exactly do the Blending modes calculate?
Example: 2 intersecting Spherical Fields:

The spread of values for the radius (this way the 1 does not have to begin at the center - and it can, for example, be a 3 instead of 1) can be defined using the settings in the Remapping tag.
The red position lies within both Fields. A value can be ascertained (sampled) for each Field. The Spherical Field a ascertains a value of 0.1 and the Spherical Field b a value of 0.6. Both of these values will - depending on the Blending mode defined - be added, subtracted, multiplied, etc. Imagine many clone or point positions to be sampled for the red position, to which a corresponding effect will be added.
Of course, there are not only geometric Fields. There are also others such as the Step Field, which does not ascertain values from the center to an outer radius but does so based on the numbering of object points or clone numbers. Other Fields ascertain a value from animation times and the Random Field calculates random values.
All of these Fields’ values are combined to an overall result to create a final effect.
Sometimes you will find drop-down sub-folders for certain Fields or Layers (e.g., Radial Field or Time Layer), as in the example below for the Time Field Layer:

This sub-folder can even be made a subordinate of a sub-field. Explicitly for this value (and not for the entire layer), separate Fields can be defined that only affect the distribution of values for this setting.
If the Field objects in the Object Manager are selected, these will have an additional tab with the name of the sub-field setting to be affected. This does not apply to Field and Modifier Layers because these are not listed as separate objects in the Object Manager and only exist in the Fields list. It doesn’t make a difference if you generate sub-fields for Field objects via this tab or directly in the Fields list - both lists are identical/synchronized and only look differently.
Shift + clicking on a sub-folder will make newly created Fields and Layers subordinate to this folder.
Compared to Cinema 4D R20, you have a much better overview of the sub-fields being used.

Here, a Random Field affects a Decay layer. In this case, the Effect Strength setting varies for each element.
General Tips and Tricks
’Reading’ a Field scene
If you open a scene that contains multiple Fields, it can be difficult to understand because of the many dependencies that cannot be sorted out in the Object Manager. In this case you can do the following:
Fields and MoGraph Effectors

By separating the functions that define falloff to different Fields, you gain wide-ranging control over the Effectors’ effect.
New workflow for falloff

The old falloff types (and many more) can be found as a Field in the Field list. If the list is left empty, no restrictions will be applied. Noise is captured in the Random Field. To establish a source (e.g., a polygon object/Generator, spline or Emitter), simply drag the respective object into the Field list.
The Plain Effector can now be used to create multiple effects. All you have to do is feed it with the respective Fields or layer effects. The following Effectors can be replaced by a Plain Effector with the corresponding Field:
All other Effectors offer functions that - currently - cannot be entirely generated by such combinations. The Random Effector, for example, appears to be able to be replaced by the Random Field at first glance. However, contrary to the Random Effector, the Random Field cannot create separate random values for X, Y and Z (the X, Y and Z coordinates would, for example, be 354, 354, 354 or 23, 23, 23 and so on (i.e., identical)).
It’s basically easier to understand working with Fields and Plain Effectors than with Fields and old Effectors (e.g., Random Effector with a Random Field) even though such combinations will also work.
Loading old MoGraph scenes (< Cinema 4D R20)
Old MoGraph scenes will be loaded with unmodified Effectors - with the old Falloff tab - so that they work as usual (the description for the old Falloff tab is, however, no longer present in the documentation).
Tip:
We recommend switching to the Field workflow since all old Falloff functions will not be supported much longer (BTW: as soon as you get used to the Fields you probably won’t want to go back to the old system anyway).
A Switch to Field button will be displayed in the Falloff tab with which the Effector will be switched to Fields (cannot be undone). However, old Falloff settings will not automatically be assumed. These must be recreated using Fields, which can be done quite easily (see New Falloff workflow) since the shape Fields have the same names.
When an old scene is loaded: old Falloff tab
When a new Effector is created: new tab with Field list
If coloring using Effectors was not so clear in previous versions of Cinema 4D, it is now. Now, Fields are used to define the colors and do the coloring. In the Effector itself, make sure that Fields Color is selected in the Parameter tab’ Color menu.
How do Fields create colors? Most fields apply spatial effect fields with which an effect is controlled. Imagine the distribution of the effect as a grayscale Gradient. These levels of gray can now be converted to colors using remapping. All Fields have a Color Remap tab with settings that can be used to control coloring. The levels of gray can then be replaced with an individual color or a color range (similar to the Colorizer shader) and passed on to the Effector.
A few special Fields also exist that do not create colors based on their effect strength but do so in a different way. These are, for example, the Shader, Sound and Random Fields as well as tags that have their own colors (e.g., Vertex Color tag). These can pass on colors directly to the Effector - without having to use color remapping.

On the left a Box Field colors a group of clones using its quantized values; on the right is a Vertex Color tag painted onto a sphere and a group of clones. A Plain Effector is used in both examples.
In the Effector’s Field list, the colors of multiple Fields can be combined with different blend modes.
On the following pages you will find descriptions of all elements that can be added to the Field list.
The term Values on the following pages refers to the 3 channels Values , Colors and Direction , which can be used to affect Fields and layers.

В этот раз попытаемся освоить такой жанр, как разбор готового проекта. Поехали!
Итак, сегодня мы обсудим, как сделать вот такое видео.

Текстовый сплайн необходимо настроить с правильным параметром Intermediate points, таким образом, чтобы получившийся в результате Extrude NURBS в итоге имел необходимое количество подразделений. У последнего, на вкладке Caps, также задаем разбиение на фрагменты.
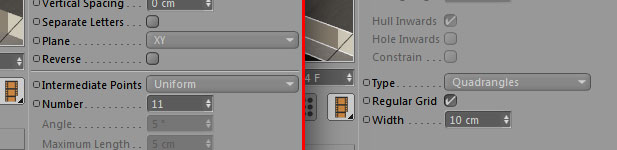
Добавляем эффекторы. В первую очередь нам понадобятся Random и Plain. Помещаем оба на вкладку Effectors объекта Extrude. В параметрах первого отмечаем изменение позиции на 500 единиц у второго на минус 25 или смотрите на глаз, кому как нравится. Первый эффектор случайным образом приводит в движение выдавленные фрагменты текста, второй сразу после него поднимает их на фиксированную высоту. Чтобы анимация Random-эффектора смотрелась интереснее, вкладку Effector настроим следующим образом.

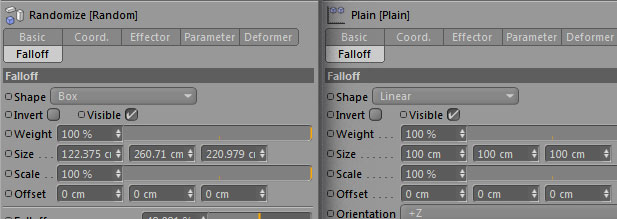
Random-эффектор должен действовать не на весь текст, а только на определенный участок, поэтому на вкладке Falloff выставим форму Box, и вручную зададим размеры и ослабление. Примерно таким же образом настраиваем Plain-эффектор: на вкладке Falloff выставим форму Linear и ослабление.

Теперь создадим анимацию появления текста. Анимировать одинаковым образом все объекты не имеет смысла, поэтому мы выделим один главный объект, пусть это будет Random-эффектор, а все остальное поместим к нему на дочерний уровень. Таким образом главный объект будет тащить за собой и второй эффектор и несколько камер.
Последний эффектор, Delay, придаст движению выдавленных фрагментов плавность. Настроить его нужно следующим образом: Strenght — 65%, Mode — Blend. И не забываем применить его, поместив во вкладку Effectors объекта Extrude.
Переключаться между камерами в разные моменты времени можно используя Stage объект. О том, как это cделать, в этом блоге есть отдельный видеоурок. Все остальные настройки и параметры сцены вы сможете узнать из файла проекта.
На сегодня все, друзья! Творческих успехов! 😉
Риг камеры в Cinema 4D
Анимировать камеру и правда можно, просто таская её по сцене и расставляя ключи, но если вы хотите повысить свой навык и, к тому же, упростить задачу — стоит использовать какой-нибудь риг.
Риги могут быть настолько сложными, насколько требуется, но начнём с простых вариантов.
Using Emitter in the C4D Simulate Menu
Everybody loves themselves a good particle system. However, most are expensive 3rd party tools. Luckily for us, Cinema 4D has a built-in particle system.

While nowhere near as complex and powerful as XParticles, these built in tools are no slouch! When used with Forces objects, you can create really interesting particle systems. Need to make some nice embers for your medieval title card? Drop in a Turbulence force and increase it’s strength.
By default, the emitter will create white lines. These will not actually render. So, to render them, create a new object like a Sphere and drop it as a child of the Emitter. It’s also a good idea to scale the sphere down a bit.

Now, activate Show Objects. This will show your sphere in place of the particles.

Drop in as many objects you want as children to the emitter. The emitter will shoot them out sequentially. Unfortunately, there is no way to set the emission to random.

However, you do have the option to turn your particles Dynamic and have them have gravity and collide with objects. Apply the Rigid Body tag to the Emitter. Apply the Collider Body tag to another object so you can see the particles fall and bounce around.
For abstract effects, make sure you go to Project, Dynamics and set Gravity to 0% so your particles float and collide as if they were in space.
Now, if you want to get the most bang for your particle buck, there is a much more advanced version of the Emitter called Thinking Particles. Honestly, it is such an advanced tool that to even attempt to explain how it works would require the rest of the article. I mean, they require Xpresso to even work!
Thinking Particles are worth learning just to grasp how powerful they truly are, and understanding the sheer amount of capabilities you have at your fingertips.

Sticking with the standard Emitter, let’s look at how to control your particles using Forces.
По заданным фильтрам ничего не найдено
Попробуйте изменить критерий поиска, или сбросить фильтры.
Комментарии 78
Да. с отражениями еще мне учиться и учиться.
Вот что у меня получилось)
Скачивается только готовый файл проекта - текстур нет. Совсем. Исправьте, пожалуйста.
Добрый день, а есть у кого-нибудь текстурки и HDR карты от этого урока? спасибо
можно вопрос? почему проект идет без текстур?
Автор, если не секрет, у тебя какая машина то собрана?
У меня i5 4570 3.2GHz + Radeon R9 + 16Memory - рендер раз в 10 слабее твоего. Или для уроков вы используете Тимрендер.
Если есть грамотная статья по железу для синемы - дайте ссылочку, а то постоянно комплексую.
Исправте пожалуйста в файле проекте только готовый файлик, нет файла самой модели
По ссылке скачивается только файл проекта, архив с текстурами отсутствует.
Добрый день.Может подскажите,почему у меня R16 при рендере в формате OpenEXR After Affects не читает Compositing File,а в версии R15 вообще пишет "не удаётся записать файл"
Точно такая же проблема, нет никакого архива, а просто уже готовый проект, в котором ничего делать уже и не надо, а только исправлять проблему с ошибкой в рендере и пытаться восстановить потерянные файлы. Почему не исправят эту ошибку и не выложат архив, который должен быть, а не готовый проект с ошибками.
жаль текстуры не все, в "скачать проект" только car.c4d, архива нет, поэтому ошибка при рендере:
AsphaltDamaged0035_1_M.jpg (Mat.4, D:\Textures\Roads)
28_antwerp_station_red_ceiling.hdr (Reflect Material, D:\HDRI\Aversis HDRi Complete Pack\Interior 1)
HDM_05_003_emblem.jpg (ml logo)
HDM_05_003_windows.jpg (front window)
HDM_05_003_brake_disc.jpg (brake discs)
28_antwerp_station_red_ceiling.hdr (Light Material, D:\HDRI\Aversis HDRi Complete Pack\Interior 1)
Не достаточно текстур, где их качать?
ошибку при рендере выдает
В скачанном проекте отсутствуют эти текстуры? Проверьте
Столкнулся с проблемой анимирования автомобиля в движении, вернее имитация движения, подскажите, каким приемом это проще сделать? анимация текстур?
А что это, при рендере высвечивается
Проверьте путь, по которому рендерите. Попробуйте рендерить в другую директорию.
Попытался эту машину внедрить в видео. Получилось, но есть проблема!
Отражение на машине не соответствует окружающей среде. Например: у меня сбоку машина отражает землю, на которой стоит - это логично, но крыша, багажник, стекла и т.д. при смене положения камеры отражают всю ту же землю, хотя вокруг машины есть другие объекты из видео, которые должны отражаться. Что нужно сделать, дабы отражение соответствовало окружающей среде?
Если вы в этом деле новичок, то информация ниже поможет вам сделать шаги вперёд. Поскольку камеры в Cinema 4D построены по образу и подобию камер из реальности, будет полезным обратить внимание на основные принципы фотографии. Загрузите файлы проекта и следуйте инструкциям
1. Простой риг камеры (2 Node)
Этот риг завязан на использовании пары нулевых объектов, которые помогают разделить задачи, в частности, мы будем отдельно указывать, на что смотрит камера и по какой орбите она движется. Если вы пользовались After Effects — вам это знакомо как Two Node Camera.
Создайте два нулевых объекта и переименуйте один в «Target», а другой в «Parent». Выберите камеру, сделайте правый клик > Cinema 4D Tags > Target. Как вы могли догадаться по названию, этот тег направляет камеру в сторону указанного объекта, в нашем случае выбираем нуль «Target» и камера должна повернуться в его сторону. Теперь сделайте камеру дочерним слоем нуля «Parent». Теперь, если вы перемещаете его, то камера следует за ним, но всегда направлена в сторону «Target». Круто? Ещё бы. А самой крутой фишкой является то, что после анимации двух нулей мы можем свободно анимировать саму камеру отдельно.
Экспозиция
Чтобы добиться фотореализма с использованием F-Stop, нужно включить опцию «exposure» на вкладке Physical у камеры. Повышая значение F-Stop, мы затемняем картинку и уменьшаем глубину резкости, а понижая — высвечиваем изображение и повышаем глубину резкости. Как и в реальности, мы можем настроить выдержку так, чтобы компенсировать экспозицию.
Читайте также: