
Подключение к бд oracle
These instructions are to enable you to login and connect to a database after you have installed SQL*Plus. You can connect to the default database you created during installation, or to another existing Oracle database.
Управление данными в базе данных Oracle
Обычными способами взаимодействия с базами данных является выполнение команд SQL в редакторе SQL или использование интерфейсов управления базами данных. Например, у базы данных Oracle XE имеется интерфейс на основе браузера, посредством которого можно осуществлять администрирование базы данных, управлять объектами базы данных и манипулировать данными.
Хотя пользователи могут выполнить большую часть задач, связанных с базами данных с помощью интерфейса управления базами данных Oracle в этом учебном руководстве демонстрируется использование редактора SQL в IDE NetBeans для выполнения некоторых из этих задач. В приведенных ниже упражнениях показано, как создавать новых пользователей, быстро воссоздавать таблицы и копировать данные таблиц.
Secure External Password Store
As a command-line alternative for large-scale deployments where applications use password credentials to connect to databases, it is possible to store such credentials in a client-side Oracle wallet. An Oracle wallet is a secure software container that is used to store authentication and signing credentials.
Storing database password credentials in a client-side Oracle wallet eliminates the need to embed usernames and passwords in application code, batch jobs, or scripts. This reduces the risk of exposing passwords in the clear in scripts and application code, and simplifies maintenance because you need not change your code each time usernames and passwords change. In addition, not having to change application code also makes it easier to enforce password management policies for these user accounts.
When you configure a client to use the external password store, applications can use the following syntax to connect to databases that use password authentication:
Note that you need not specify database login credentials in this CONNECT statement. Instead your system looks for database login credentials in the client wallet.
Oracle Database Administrator's Guide for information about configuring your client to use secure external password store and for information about managing credentials in it.
Expired Password
In the command-line interface, if your password has expired, SQL*Plus prompts you to change it when you attempt to log in. You are logged in once you successfully change your password.
Options
The following sections contain descriptions of SQLPLUS command options:
HELP Option
Displays the usage and syntax for the SQLPLUS command, and then returns control to the operating system.
VERSION Option
Displays the current version and level number for SQL*Plus, and then returns control to the operating system.
COMPATIBILITY Option
Sets the value of the SQLPLUSCOMPATIBILITY system variable to the SQL*Plus release specified by x . y [. z ]. Where x is the version number, y is the release number, and z is the update number. For example, 9.0.1 or 10.2. For more information, see the SET SQLPLUSCOMPAT[IBILITY] system variable.
FAILOVER Option - obsolete
FAILOVER behavior to receive FAN events from a RAC database is permanently enabled on UNIX/Linux. The FAILOVER option introduced in SQL*Plus Release 11.1 has been removed.
LOGON Option
Specifies not to reprompt for username or password if the initial connection does not succeed. This can be useful in operating system scripts that must either succeed or fail and you don't want to be reprompted for connection details if the database server is not running.
MARKUP Options
You can use the MARKUP option to generate a complete stand alone web page from your query or script. MARKUP currently supports HTML 4.0 transitional.
Depending on your operating system, the complete markup_option clause for the SQLPLUS command may need to be contained in quotes.
Use SQLPLUS -MARKUP HTML ON or SQLPLUS -MARKUP HTML ON SPOOL ON to produce standalone web pages. SQL*Plus will generate complete HTML pages automatically encapsulated with and tags. The HTML tags in a spool file are closed when SPOOL OFF is executed or SQL*Plus exits.
The -SILENT and -RESTRICT command-line options may be useful when used in conjunction with -MARKUP.
You can use MARKUP HTML ON to produce HTML output in either the tag or in an HTML table. Output to a table uses standard HTML , and tags to automatically encode the rows and columns resulting from a query. Output to an HTML table is the default behavior when the HTML option is set ON. You can generate output using HTML tags by setting PREFORMAT ON.
In SQL*Plus, use the SHOW MARKUP command to view the status of MARKUP options.
The SQLPLUS -MARKUP command has the same options and functionality as the SET MARKUP command. These options are described in this section. For other information on the SET MARKUP command, see the SET command.
HTML is a mandatory MARKUP argument which specifies that the type of output to be generated is HTML. The optional HTML arguments, ON and OFF, specify whether or not to generate HTML output. The default is OFF.
MARKUP HTML ON generates HTML output using the specified MARKUP options.
You can turn HTML output ON and OFF as required during a session. The default is OFF.
The HEAD text option enables you to specify content for the tag. By default, text includes a default in-line cascading style sheet and title.
If text includes spaces, it must be enclosed in quotes. SQL*Plus does not test this free text entry for HTML validity. You must ensure that the text you enter is valid for the HTML tag. This gives you the flexibility to customize output for your browser or special needs.
The BODY text option enables you to specify attributes for the tag. By default, there are no attributes. If text includes spaces, it must be enclosed in quotes. SQL*Plus does not test this free text entry for HTML validity. You must ensure that the text you enter is valid for the HTML tag. This gives you the flexibility to customize output for your browser or special needs.
The TABLE text option enables you to enter attributes for the tag. You can use TABLE text to set HTML tag attributes such as BORDER, CELLPADDING, CELLSPACING and WIDTH. By default, the WIDTH attribute is set to 90% and the BORDER attribute is set to 1.
If text includes spaces, it must be enclosed in quotes. SQL*Plus does not test this free text entry for HTML validity. You must ensure that the text you enter is valid for the HTML tag. This gives you the flexibility to customize output for your browser or special needs.
ENTMAP ON or OFF specifies whether or not SQL*Plus replaces special characters , " and & with the HTML entities <, >, " and & respectively. ENTMAP is set ON by default.
You can turn ENTMAP ON and OFF as required during a session. For example, with ENTMAP OFF, SQL*Plus screen output is:
With ENTMAP ON, SQL*Plus screen output is:
As entities in the and tags are not mapped, you must ensure that valid entities are used in the MARKUP HEAD and BODY options.
If entities are not mapped, web browsers may treat data as invalid HTML and all subsequent output may display incorrectly. ENTMAP OFF enables users to write their own HTML tags to customize output.
ENTMAP only takes effect when the HTML option is set ON. For more information about using entities in your output, see the COLUMN command.
SPOOL ON or OFF specifies whether or not SQL*Plus writes the HTML opening tags, and
, and the closing tags, and , to the start and end of each file created by the SQL*Plus SPOOL filename command. The default is OFF.You can turn SPOOL ON and OFF as required during a session.
It is important to distinguish between the SET MARKUP HTML SPOOL option, and the SQLPLUS SPOOL filename command.
The SET MARKUP HTML SPOOL ON option enables the writing of the tag to the spool file. The spool file is not created, and the header and footer tags enabled by the SET MARKUP HTML SPOOL ON option are not written to the spool file until you issue the SQLPLUS SPOOL filename command . See the SPOOL command for more information.
SQL*Plus writes several HTML tags to the spool file when you issue the SPOOL filename command.
When you issue any of the SQL*Plus commands: EXIT, SPOOL OFF or SPOOL filename, SQL*Plus appends the following end tags and closes the file:
You can specify tag contents and attributes using the HEAD and BODY options
PREFORMAT ON or OFF specifies whether or not SQL*Plus writes output to the tag or to an HTML table. The default is OFF, so output is written to a HTML table by default. You can turn PREFORMAT ON and OFF as required during a session.
To produce report output using the HTML tag, you must set PREFORMAT ON. For example:
SQLPLUS -M "HTML ON PREFORMAT ON"
SET MARKUP HTML ON PREFORMAT ON
MARKUP Usage Notes
When MARKUP HTML ON PREFORMAT OFF is used, commands originally intended to format paper reports have different meaning for reports intended for web tables:
PAGESIZE is the number of rows in an HTML table, not the number of lines. Each row may contain multiple lines. The TTITLE, BTITLE and column headings are repeated every PAGESIZE rows.
LINESIZE may have an effect on data if wrapping is on, or for very long data. Depending on data size, output may be generated on separate lines, which a browser may interpret as a space character.
TTITLE and BTITLE content is output to three line positions: left, center and right, and the maximum line width is preset to 90% of the browser window. These elements may not align with the main output as expected due to the way they are handled for web output. Entity mapping in TTITLE and BTITLE is the same as the general ENTMAP setting specified in the MARKUP command.
If you use a title in your output, then SQL*Plus starts a new HTML table for output rows that appear after the title. Your browser may format column widths of each table differently, depending on the width of data in each column.
SET COLSEP, RECSEP and UNDERLINE only produce output in HTML reports when PREFORMAT is ON.
RESTRICT Option
Enables you to disable certain commands that interact with the operating system. This is similar to disabling the same commands in the Product User Profile (PUP) table. However, commands disabled with the -RESTRICT option are disabled even if there is no connection to a server, and remain disabled until SQL*Plus terminates.
If no -RESTRICT option is active, than all commands can be used, unless disabled in the PUP table.
If -RESTRICT 3 is used, then LOGIN.SQL is not read. GLOGIN.SQL is read but restricted commands used will fail.
IDE NetBeans включает встроенную поддержку для баз данных Oracle. Пользователь может без труда установить подключение к ней из среды IDE и начать работу в базе данных. В данном учебном курсе показано, как использовать локально установленный экземпляр базы данных Oracle 10_g_ Express Edition (Oracle Database XE), упрощенной базы данных, открытой для бесплатных развертывания, распространения и разработки для нее.
В этом документе описывается настройка соединения для локальной установки базы данных Oracle XE из IDE NetBeans, использования встроенного редактора SQL IDE для обработки данных базы данных, а также включения расширения PHP OCI 8 для написания кода PHP, выполняющего соединения с базой данных Oracle.
Для работы с этим учебным курсом требуется следующее программное обеспечение и ресурсы.
7.2, 7.3, 7.4, 8.0, пакет Java EE
10 g Express Edition
[2] клиент SQL * Plus
Oracle предоставляет инструменты SQL * Plus для подключения, как показано ниже:

Основной интерфейс для подключения выглядит следующим образом:

Здесь необходимо указать строку хоста, по умолчанию локальный компьютер может войти в orcl.
Интерфейс успешного подключения выглядит следующим образом:

Starting Command-line SQL*Plus
To begin using SQL*Plus, you must first understand how to start and stop SQL*Plus.
Example 3-7 Starting SQL*Plus
This example shows you how to start SQL*Plus :
Make sure that SQL*Plus has been installed on your computer.
Log on to the operating system (if required).
Enter the command, SQLPLUS , and press Return.
Some operating systems expect you to enter commands in lowercase letters. If your system expects lowercase, enter the SQLPLUS command in lowercase.
SQL*Plus displays its version number, the current date, and copyright information, and prompts you for your username (the text displayed on your system may differ slightly):
Enter your username and press Return. SQL*Plus displays the prompt "Enter password:".
Enter your password and press Return again. For your protection, your password does not appear on the screen.
The process of entering your username and password is called logging in . SQL*Plus displays the version of Oracle Database to which you connected and the versions of available tools such as PL/SQL.
Next, SQL*Plus displays the SQL*Plus command prompt :
The SQL*Plus command prompt indicates that SQL*Plus is ready to accept your commands.
If SQL*Plus does not start, you should see a message to help you correct the problem.
Настройка подключения к базе данных Oracle Database 18c Express Edition (XE)
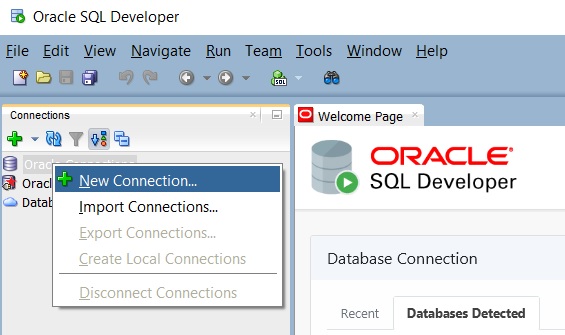
Переходим к настройке подключения к базе данных Oracle Database 18c Express Edition (XE), для этого щелкаем на плюсик и выбираем «New Connection».
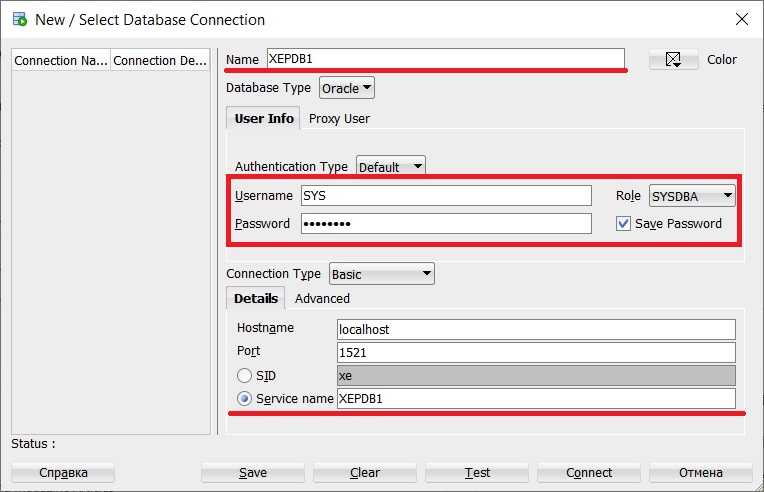
После чего у Вас откроется окно настройки подключения, необходимо ввести следующие данные:
- Name – имя подключения (придумываете сами);
- Username – имя пользователя, в данном случае подключаемся от имени системного пользователя SYS;
- Password – пароль пользователя SYS, это тот пароль, который Вы задали во время установки Oracle Database XE;
- Role – SYSDBA (пользовательSYS является администратором сервера, поэтому выбираем соответствующую роль);
- Hostname – адрес сервера, если Oracle Database установлен на этом же компьютере, то в поле оставляем Localhost;
- Port – порт подключения, по умолчанию 1521;
- Servicename – имя подключаемой базы данных Oracle Database. По умолчанию в Oracle Database 18c Express Edition (XE) создается база данных с именем XEPDB1, поэтому чтобы сразу подключиться к этой базе, вводим в это поле ее название, т.е. XEPDB
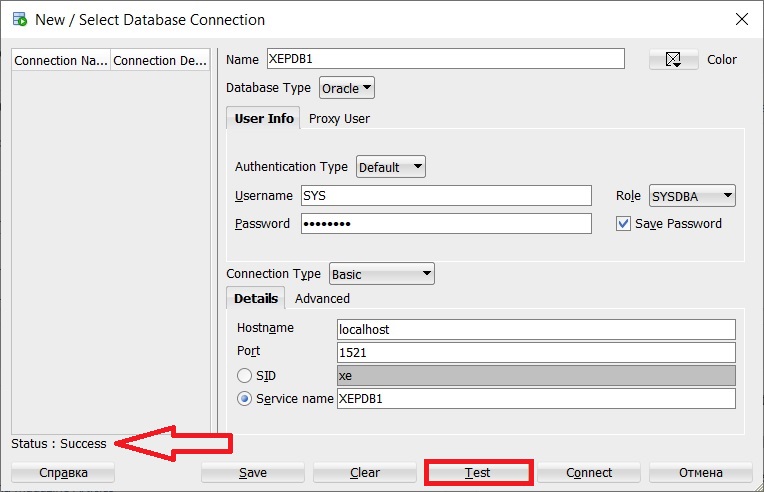
Чтобы проверить корректность всех введенных настроек, можно нажать на кнопку Test, и если Вы получили ответ в строке состояния «Успех», т.е. «Status: Success», то это означает, что все хорошо, сервер доступен и мы можем к нему подключиться с указанными настройками подключения.
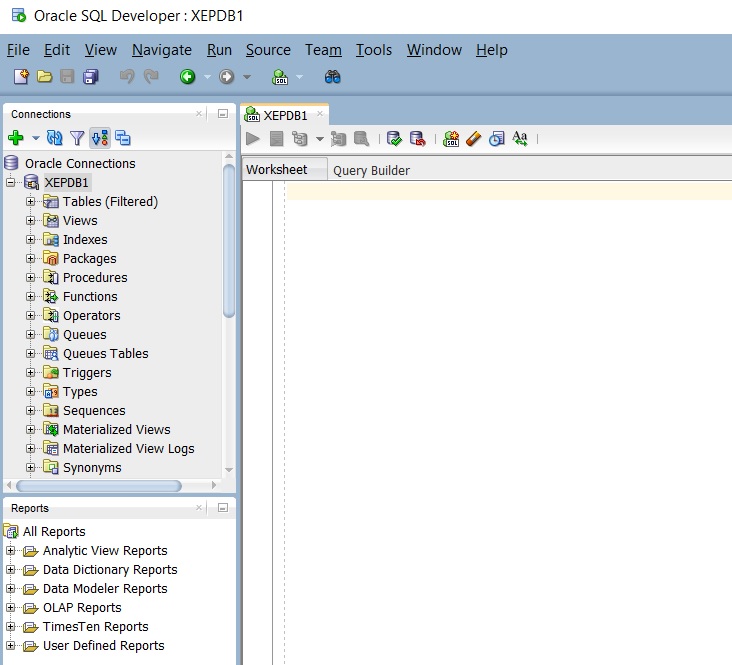
Для сохранения подключения нажимаем «Save».
В результате Вы подключитесь к серверу и у Вас отобразится обозреватель объектов и окно для написания SQL запросов.
В Oracle Database 18c Express Edition (XE) есть схема «HR», которую можно использовать, например, для изучения языка SQL.
Заметка! Если Вас интересует язык SQL, то рекомендую почитать книгу «SQL код» – это самоучитель по языку SQL для начинающих программистов. В ней язык SQL рассматривается как стандарт, чтобы после прочтения данной книги можно было работать с языком SQL в любой системе управления базами данных.
Connecting to a Different Database
From an existing command-line session, enter a CONNECT command in the form:
You are prompted to enter your password.
SQLPLUS Program Syntax
You use the SQLPLUS command at the operating system prompt to start command-line SQL*Plus :
and markup_option has the following syntax:
where Logon has the following syntax:
where Start has the following syntax:
Including your password in plain text is a security risk. You can avoid this risk by omitting the password, and entering it only when the system prompts for it.
You have the option of entering logon. If you do not specify logon but do specify start, SQL*Plus assumes that the first line of the script contains a valid logon. If neither start nor logon are specified, SQL*Plus prompts for logon information.
Running your first Query
To describe a database object, for example, column details for EMP_DETAILS_VIEW, enter a DESCRIBE command like:
which produces the following output:
To rename the column headings, and to select data from the HR sample schema view, EMP_DETAILS_VIEW, enter
Connecting to a Database
You must connect to an Oracle Database (instance) before you can query or modify data in that database. You can connect to the default database and to other databases accessible through your network. To connect to another database over a network, both databases must have Oracle Net configured, and have compatible network drivers. You must enter either a connection identifier or a net service name to connect to a database other than the default.
The connection identifier or net service name is entered:
as an argument to the SQLPLUS Program Syntax when starting a command-line session.
as an argument to the CONNECT command from a current session.
Setting Environment Variables on the Windows Platform
On the Win dows platform, environment variables are stored in the Windows registry, and are automatically set for you. You need not take any action involving environment variables before initiating a database connection.
Sample Schemas and SQL*Plus
Sample schemas are included with the Oracle Database. Examples in this guide use the EMP_DETAILS_VIEW view of the Human Resources (HR) sample schema. This schema contains personnel records for a fictitious company. To view column details for the view, EMP_DETAILS_VIEW, enter
For more information about the sample schemas, see the Oracle Database Sample Schemas guide.
Unlocking the Sample Tables
The Human Resources (HR) Sample Schema is installed as part of the default Oracle Database installation. The HR account is locked by default.
You need to unlock the HR account before you can use the HR sample schema. To unlock the HR account, log in as the SYSTEM user and enter the following command, where your_password is the password you want to define for the user HR:
For further information about unlocking the HR account, see the Oracle Database Sample Schemas guide. The HR user is primarily to enable you to access the HR sample schema and is necessary to enable you to run the examples in this guide.
Each table in the database is "owned" by a particular user. You may wish to have your own copies of the sample tables to use as you try the examples in this guide. To get your own copies of the HR tables , see your DBA or see the Oracle Database Sample Schemas guide, or you can create the HR tables with the script HR_MAIN.SQL which is located in the following directory on UNIX:
And on the following directory on Windows:
To create the HR tables from command-line SQL*Plus, do the following:
Ask your DBA for your Oracle Database account username and password.
Login to SQL*Plus.
On UNIX, enter the following command at the SQL*Plus prompt:
On Windows, enter the following command at the SQL*Plus prompt:
To remove the sample tables, perform the same steps but substitute HR_DROP.SQL for HR_MAIN.SQL.
Создание таблицы
Существует несколько способов создания таблицы в базе данных с помощью IDE NetBeans. Например, можно запустить файл SQL (щелкните правой кнопкой мыши файл и выберите 'Запустить файл'), выполните команду SQL (щелкните правой кнопкой мыши узел подключения и выберите 'Выполнить команду') или используйте диалоговое окно 'Создать таблицу' (щелкните правой кнопкой мыши узел 'Таблицы' и выберите 'Создать таблицу'). В этом упражнении мы воссоздадим таблицу, используя структуру другой таблицы.
В данном примере нам нужно, чтобы пользователь jim создал копию таблицы Departments в своей схеме, воссоздав таблицу из базы данных hr . Перед созданием таблицы будет необходимо отключиться от сервера и войти в систему как пользователь jim .
Щелкните правой кнопкой мыши узел подключения OracleDB в окне Services ("Службы") и выберите Disconnect ("Отключить").
Щелкните правой кнопкой мыши узел подключения OracleDB , выберите Connect ("Подключить") и войдите как jim .
Разверните узел Tables ("Таблицы") под схемой HR и убедитесь, что только таблица Departments доступна пользователю jim .
При создании пользователя jim право выполнения выбора было ограничено таблицей Departments .

Щелкните правой кнопкой мыши узел таблицы Departments и выберите Grab Structure ("Копировать структуру"). Сохраните файл .grab у себя на диске.
Раверните схему JIM , щелкните правой кнопкой мыши узел Таблицы и выберите 'Повторно создать таблицу'. Укажите на созданный файл .grab .


При нажатии кнопки "ОК" новая таблица DEPARTMENTS будет создана и появится под узлом схемы JIM . При щелчке правой кнопкой мыши узла таблицы и выборе 'Просмотреть данные' будет видно, что таблица пустая.
Если нужно скопировать данные из исходной таблицы Departments в новую таблицу, данные можно ввести вручную в редактор таблиц, либо выполнить сценарий SQL для заполнения новой таблицы.
Для ввода данных вручную выполните следующие действия.
Щелкните правой кнопкой мыши таблицу DEPARTMENTS в схеме JIM и выберите View Data ("Просмотр данных").
Щелкните значок Insert Records ("Вставить записи") на панели инструментов View Data ("Просмотр данных"), чтобы открыть окно вставления записей.

Например, можно ввести следующие значения из исходной таблицы DEPARTMENTS .
You can define an Oracle SQL Developer connection to your database in the cloud to perform operations as you would with an on-premises database.
How you make a SQL Developer connection to the Oracle Database depends on whether the Oracle Net Listener port has been unblocked. When a Database Classic Cloud Service database deployment is created on Oracle Cloud Infrastructure Classic , the Oracle Net Listener port is blocked to ensure network security. For information about unblocking a port, see Enabling Access to a Compute Node Port.
Before You Begin
Before you use Oracle SQL Developer to connect to a database deployment, you need the following:
The IP address of the compute node
The IP address of a compute node associated with a database deployment on Oracle Database Classic Cloud Service is listed on the Oracle Database Classic Cloud Service Overview page. For instructions to display this page, see Viewing Detailed Information for a Database Deployment.
The SSH private key file that matches the public key associated with the deployment.
Creating a SQL Developer Connection When the Listener Port Is Unblocked
To create a SQL Developer connection to a database deployment when the Oracle Net Listener port is unblocked:
Open SQL Developer. Right-click Connections and select New Connection .
If you are using a version of SQL Developer in which the Connections panel shows both "Connections" and "Cloud Connections", right-click Connections . Do not right-click Cloud Connections, which is for Oracle Database Exadata Express Cloud Service.
The New / Select Database Connection dialog appears.
Provide the following information and then click Test .
Connection Name : Create a name for this connection.
Username : Name of the database user for the connection. This user must have sufficient privileges to perform the tasks that you want to perform while connected to the database, such as creating, editing, and deleting tables, views, and other objects.
Password : Provide the "Administration" password that you specified when you created the database deployment.
Hostname : Provide the Public IP address for the database deployment compute node you are connecting to.
Port : Provide the listener port number that you specified when you created the database deployment.
SID or Service Name : If you are connecting to Oracle Database 11g (non-CDB) or Oracle Database 12c or later (CDB), provide the SID. If you are connecting to an Oracle Database 12c or later pluggable database (PDB), provide the service name instead of the SID.
If your test results show success, click Connect . You have connected SQL Developer to your database deployment in Oracle Database Enterprise Cloud Service. Now you can use SQL Developer as you normally would with an on-premises database.
Creating a SQL Developer Connection When the Listener Port Is Blocked
If the listener port has not been unblocked by enabling the ora_p2_dblistener access rule, you can define an SSH connection in Oracle SQL Developer 4.0.3 or later, with functionality to connect to a database through port forwarding. In that case, you will not need to follow the instructions in Enabling Access to a Compute Node Port.
From the View menu, select SSH .
In the SSH Hosts navigation panel, right click SSH Hosts and select New SSH Host .
In the New SSH Host dialog:
Enter a name for the SSH Host.
In the Host field, enter the IP address of your database deployment.
In the Username field, enter oracle or opc .
Check Use key file , and browse for your private SSH key file.
Select Add a Local Port Forward .
Leave the Name field as Default . Leave the Host field as localhost . Set the Port field to the listener port number that you specified when you created the database deployment. Keep the default of Automatically assign local port .
Login Username and Password
When you start SQL*Plus, you need a username and password to login to an Oracle Database schema. Your username and password identify you as an authorized user of the Oracle Database schema.
The database administrator (DBA) is responsible for creating your database account with the necessary privileges and giving you the username and password that enables you to access your account.
Logins are created and displayed in messages during Oracle Database installation.
For further information about the default logins, see the Oracle Database Administrator's Guide .
Once you have logged in, you can connect under a different username using the CONNECT command. The username and password must be valid for the database. For example, to connect the username TODD to the default database using the password FOX, you could enter
You are prompted to enter the password, FOX.
In the command-line interface, if you omit the username and password, SQL*Plus prompts you for them. Because CONNECT first disconnects you from your current database, you will be left unconnected to any database if you use an invalid username and password in your CONNECT command.
If you log on or connect as a user whose account has expired, you are prompted to change your password before you can connect.
If an account is locked, a message is displayed and connection as this user is not permitted until the account is unlocked by your DBA.
You can use the DISCONNECT command to disconnect from a database without leaving SQL*Plus.
Starting SQL*Plus Command-line
The SQL*Plus executable is usually installed in $ORACLE_HOME /bin, which is usually included in your operating system PATH environment variable. You may need to change directory to the $ORACLE_HOME /bin directory to start SQL*Plus.
In the following examples, you are prompted to enter the database account password.
An example using an Easy Connection identifier to connect to the HR schema in the MYDB database running on mymachine is:
An example using a Net Service Name is:
Net Service Names can be stored in a number of places, including Oracle Names. See the Net Services Reference Guide for more information.
If you want to use Net Service Names configured in a local Oracle Net tnsnames.ora file, then set the environment variable TNS_ADMIN to the directory containing the tnsnames.ora file. For example, on UNIX, if your tnsnames.ora file is in /home/user1 and it defines the Net Service Name MYDB2:
This example assumes the ORACLE_HOME environment variable is set, and the $ORACLE_HOME/network/admin/tnsnames.ora or ORACLE_HOME\network\admin\tnsnames.ora file defines the Net Service Name MYDB3:
The TWO_TASK (on UNIX) or LOCAL (on Windows) environment variable can be set to a connection identifier. This removes the need to explicitly enter the connection identifier whenever a connection is made in SQL*Plus or SQL*Plus Instant Client. This UNIX example connects to the database known as MYDB4:
To start SQL*Plus and connect to the default database
Open a UNIX or a Windows terminal and enter the SQL*Plus command:
When prompted, enter your Oracle Database username and password. If you do not know your Oracle Database username and password, ask your Database Administrator.
Alternatively, enter the SQL*Plus command in the form:
You are prompted to enter your password.
SQL*Plus starts and connects to the default database.
Now you can start entering and executing SQL, PL/SQL and SQL*Plus statements and commands at the SQL> prompt.
To start SQL*Plus and connect to a database other than the default
Open a UNIX or a Windows terminal and enter the SQL*Plus command:
You are prompted to enter your password.
Exiting SQL*Plus Command-line
If you cannot log in to SQL*Plus because your username or password is invalid or for some other reason, SQL*Plus returns an error status equivalent to an EXIT FAILURE command. See the EXIT command for further information.
When you are done working with SQL*Plus and wish to return to the operating system, enter EXIT or QUIT at the SQL*Plus prompt, or enter the end of file character, Ctrl+D on UNIX or Ctrl+Z on Windows.
SQL*Plus displays the version of Oracle Database from which you disconnected and the versions of tools available through SQL*Plus before you return to the operating system prompt.
About Remote Connections
Connectin g remotely means running the SQL Command Line (or any other Oracle command-line utility) on a computer other than the Oracle Database XE host computer, and then initiating a database connection from the SQL Command Line (or other utility) over the network.
Oracle Client Software
Oracle Database Express Edition Client (Oracle Database XE)
When you install Oracle Database XE, Oracle Database Express Edition Client is also installed on the same computer. You can install Oracle Database XE separately on remote computers. It is available at
Instan t Clie nt
Instant Client is available at
Oracle client software for Oracle Database Enterprise Edition or Standard Edition (all supported releases of Oracle Database)
All Oracle client software includes Oracle Net, which is the Oracle network software that enables client applications on one computer to connect to databases on another computer over a network.
To connect remotely, you must supply not just a user name and password, but a complete Oracle Net conne ct string. In addition to the database user name and password, a connect string includes a host name or host IP address, an optional TCP port number, and an optional database service name. These additional parameters are required to help Oracle Net find the right host computer and connect to Oracle Database XE. An Oracle Net connect string has the following format:
host is the host name or IP address of the computer that is running Oracle Database XE
port (optional) is the TCP port number on which the Oracle Net listener is listening. If not specified, the default port number 1521 is assumed.
service_name (optional) is the name of the database service to which to connect. For Oracle Database XE, the service name is XE . If service_name is omitted, Oracle Database XE Client appends a request for the default database service , which is configured during installation as XE .
Only Oracle Database XE supports the notion of a default database service. If you connect remotely from any Oracle client software other than Oracle Database XE, you must include the XE service name.
Figure 3-2 Remote Connection
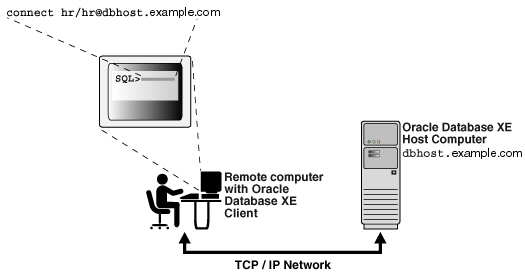
Description of "Figure 3-2 Remote Connection"
Before making a remote connection from Linux, you must set environment variables. See "Setting Environment Variables" for more information.
Remote Connection Examples
Example 1 This example initiates a remote connection from Oracle Database XE, using the default port number.
Example 2 This example initiates a remote connection from Oracle Database XE, using a nondefault port number (1522):
Example 3 This example initiates a remote connection using the default port number, and includes the optional service name.
SQL*Plus Overview
SQL*Plus is an interactive and batch query tool that is installed with every Oracle Database installation. It has a command-line user interface.
There is also the SQL*Plus Instant Client which is a stand-alone command-line interface available on platforms that support the OCI Instant Client. SQL*Plus Instant Client connects to any available Oracle database, but does not require its own Oracle database installation. See the Oracle Call Interface Programmer’s Guide for more information on the OCI Instant Client.
SQL*Plus has its own commands and environment, and it provides access to the Oracle Database. It enables you to enter and execute SQL, PL/SQL, SQL*Plus and operating system commands to perform the following:
Format, perform calculations on, store, and print from query results
Examine table and object definitions
Develop and run batch scripts
Perform database administration
You can use SQL*Plus to generate reports interactively, to generate reports as batch processes, and to output the results to text file, to screen, or to HTML file for browsing on the Internet. You can generate reports dynamically using the HTML output facility of SQL*Plus.
Who Can Use SQL*Plus
The SQL*Plus, SQL, and PL/SQL command languages are powerful enough to serve the needs of users with some database experience, yet straightforward enough for new users who are just learning to work with the Oracle Database.
The SQL*Plus language is easy to use. For example, to rename a column labelled LAST_NAME with the heading "Family Name", enter the command:
Similarly, to list column definitions for the EMPLOYEES table, enter the command:
How Can I Learn SQL*Plus
There are several sources available to assist you to learn SQL*Plus:
Part II of this Guide, Using SQL*Plus
Help for SQL*Plus, Command-line help
Oracle Database 11 g : SQL Fundamentals
An instructor-led course run by Oracle. This is a comprehensive hands-on course taking the student through all aspects of using SQL*Plus to access Oracle Database.
More Oracle Database 11 g Training
How to Use the SQL*Plus Guide
This guide provides information about SQL*Plus that applies to all operating systems. It also includes some Windows and UNIX specific information. Some aspects of SQL*Plus may differ on each operating system. Operating system specific details are covered in the Oracle Database Installation Guide provided for your system. Use these operating system specific guides in conjunction with this SQL*Plus User’s Guide and Reference .
Throughout this guide, examples showing how to enter commands use a common command syntax and a common set of sample tables. The tables are described in "Sample Schemas and SQL*Plus".
SQL*Plus Command-line Architecture
SQL*Plus command-line uses a two-tier model comprising:
Client (command-line user interface).
Database (Oracle Database).
The two tiers may be on the same machine.
SQL*Plus Client
The command-line user interface is the character-based terminal implementation.
Oracle Database
Oracle Database Net components provide communication between the SQL*Plus Client and Oracle Database.
About Local Connections
Connect ing locally means running the SQL Command Line (or any other Oracle command-line utility) on the same host computer where Oracle Database XE is installed (the "Oracle Database XE host computer") and then initiating a database connection from the SQL Command Line (or other utility), or using SQL Developer to connect as a local database user. To connect locally, you must supply only a database user name and password. For example, Figure 3-1 shows a user connecting locally with the SQL Command Line and entering a connect command that supplies the user name hr and password hr .
Figure 3-1 Local Connection
Before making a local connection on Linux, you must set environment variables. See "Setting Environment Variables" for more information.
Logging in to the Oracle Database XE host computer with an ssh (or telnet ) session and then starting the SQL Command Line (or other Oracle command-line utility) is considered a local connection, even though you start the ssh (or telnet ) application on a remote computer.
Setting Environment Variables
the SQL Command Line (SQL*Plus) and other Oracle utilities retrieve configuration information from operating system environment variables. This section explains how to set these environment variables, and contains the following topics:
Getting Command-line Help
To access command-line help for SQL*Plus commands, type HELP or ? followed by the command name at the SQL command prompt or in the i SQL*Plus Workspace Input area. See the HELP command for more information. For example:
To display a list of SQL*Plus commands, type HELP followed by either TOPICS or INDEX. HELP TOPICS displays a single column list of SQL*Plus commands. HELP INDEX displays a four column list of SQL*Plus commands which fits in a standard screen. For example:
Connectionless Session with /NOLOG
In the command-line interface, it is possible to start SQL*Plus without connecting to a database. This is useful for performing some database administration tasks, writing transportable scripts, or to use SQL*Plus editing commands to write or edit scripts.
You use the /NOLOG argument to the SQLPLUS command to start a connectionless command-line session. After SQL*Plus has started you can connect to a database with the CONNECT command.
Example 3-6 Start a connectionless SQL*Plus session with /NOLOG
Установка Oracle SQL Developer на Windows 10
Сейчас мы рассмотрим те шаги, которые необходимо выполнить, чтобы начать использовать Oracle SQL Developer на Windows 10.
Шаг 1 – Скачивание программы
Oracle SQL Developer доступен на официальном сайте Oracle, и его можно скачать абсолютно бесплатно, единственное, как и в случае с самой СУБД, необходимо авторизоваться или зарегистрироваться на сайте, при этом если Вы скачивали и устанавливали Oracle Database XE, то у Вас уже есть учетная запись Oracle и Вам достаточно авторизоваться на сайте.
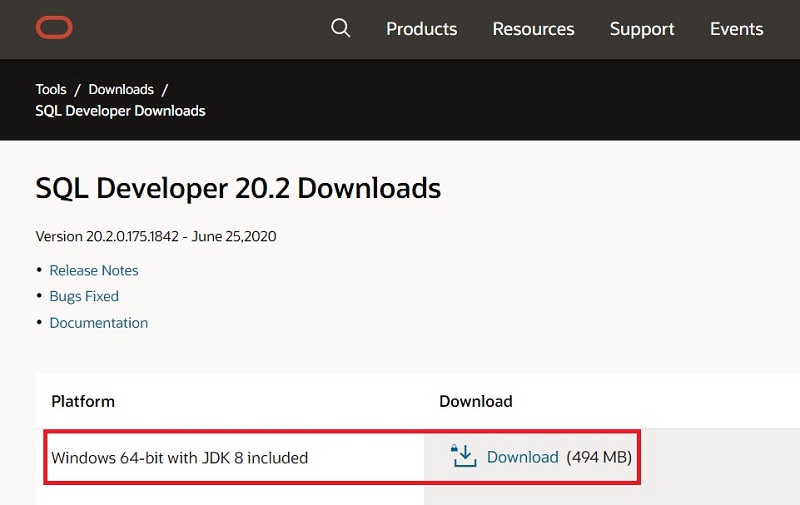
Итак, переходим на страницу загрузки Oracle SQL Developer, вот она
Далее, нажимаем на ссылку «Download» в разделе Windows 64-bit with JDK 8 included.
После этого соглашаемся с условиями, отметив соответствующую галочку, и нажимаем на кнопку «Download sqldeveloper-20.2.0.175.1842-x64.zip». Если Вы еще не авторизованы на сайте, Вас перенаправит на страницу авторизации (где можно и зарегистрироваться), а если Вы уже авторизованы, то сразу начнется процесс загрузки.
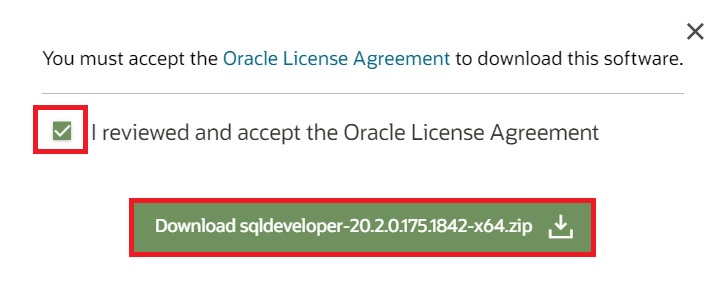
В результате у Вас должен загрузиться ZIP-архив «sqldeveloper-20.2.0.175.1842-x64.zip» (на момент написания статьи это актуальная версия) размером около 500 мегабайт, в данном архиве находятся все необходимые для SQL Developer файлы.
Шаг 2 – Распаковка архива и запуск программы
После того как архив загрузится, его необходимо распаковать и запустить файл «sqldeveloper.exe».
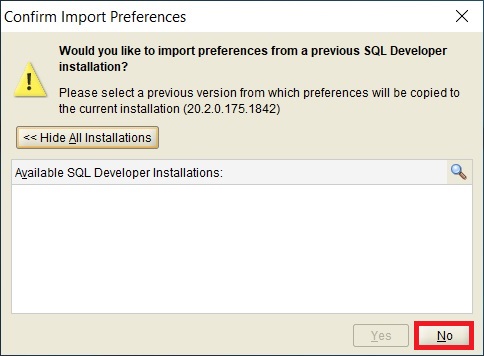
При первом запуске у Вас могут спросить, есть ли у Вас сохраненные настройки, которые Вам хотелось бы импортировать, у нас таких нет, отвечаем «No».
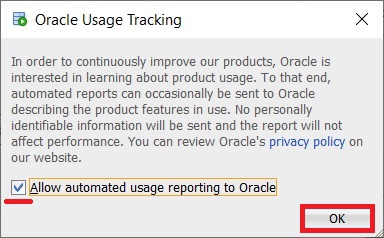
В результате запустится программа и сначала появится окно, в котором Вас спросят, хотите ли Вы автоматически отправлять отчеты по работе программы в компанию Oracle, если не хотите, то снимите галочку и нажмите «OK».
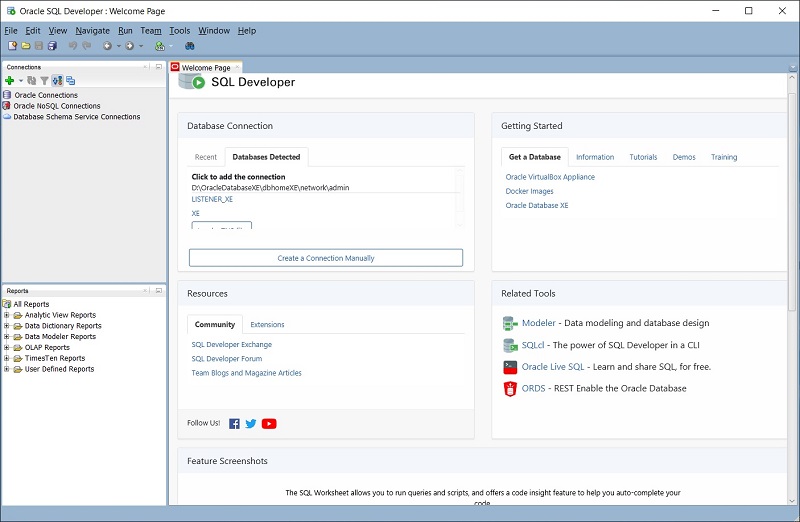
Интерфейс Oracle SQL Developer выглядит следующим образом.
Создание пользователя
Давайте создадим новую учетную запись пользователя базы данных для управления таблицами и данными в базе данных. Чтобы создать нового пользователя, необходимо войти в систему, используя учетную запись администратора базы данных, в нашем случае учетную запись по умолчанию system , созданную при установке базы данных.
В окне 'Службы' щелкните правой кнопкой мыши узел подключения OracleDB и выберите 'Выполнить команду'. При этом открывается редактор SQL IDE NetBeans, в котором можно указать команды, которые будут отправлены базе данных.

Чтобы создать нового пользователя, введите приведенную ниже команду в окне редактора SQL и нажмите кнопку Run SQL ("Выполнить SQL") на панели инструментов.

В результате выполнения данной команды будет создан новый пользователь jim с паролем mypassword . Табличным пространством по умолчанию является users , а выделенное пространство не ограничено.
Следующий этап – предоставить jim права учетной записи пользователя на выполнение действий с базой данных. Необходимо разрешить пользователю подключаться к базе данных, создавать и изменять таблицы в табличном пространстве пользователя по умолчанию и выполнять доступ к таблице Employees в примере базы данных hr .
На практике администратор базы данных обычно создает особые роли и аккуратно настраивает полномочия для каждой из них. Но в целях нашего учебного курса мы можем использовать заранее определенную роль, такую как CONNECT . Дополнительные сведения о ролях и полномочиях приведены в документе Oracle Database Security Guide ("Руководство по безопасности базы данных Oracle").
SQL*Plus Resources
Net Service Name
Your DBA is responsible for creating the databases you use and defining net service names for them in the tnsnames.ora file.
A net service name definition in the tnsnames.ora file has the syntax:
To use a net service name (alias), it must have an entry in the tnsnames.ora file on the machine running SQL*Plus. An entry in tnsnames.ora is not required if you use a connection identifier.
Example 3-1 The tnsnames.ora entry for the sales database
Example 3-2 Start a command-line session to the sales database using the net service name
See the Oracle Database Net Services Reference and the Oracle Database Net Services Administrator's Guide for more information about database connections and net service name definitions.
[1] Использование инструментов PLSQL
Как показано ниже:

Как использовать sqlplus для подключения к базе данных Oracle, расположенной на другом хосте, без изменения моего собственного tnsnames.ora
Я хочу подключиться к базе данных оракула, расположенной на другом хосте, используя sqlplus. На этой странице было предложено добавить элемент в мои tnsnames для подключения к этой базе данных.
а затем использовать это в sqlplus
Однако в моих обстоятельствах изменение локальных имен tnsname невозможно. Можно ли подключиться к удаленной базе данных, просто используя аргумент sqlplus, не меняя tnsnames? Что-то вроде
Возможно, и это может зависеть от среды командной строки, которую вы используете, вам нужно заключить строку в кавычки, что-то вроде
Вы можете использовать Easy Connect для этого:
Чтобы включить easy connect на вашем компьютере, вам нужно добавить его NAMES.DIRECTORY_PATH в файл sqlnet.ora, например:
На самом деле кажется, что вы должны указать имя службы, а не SID; они могут быть одинаковыми, но если нет, вам нужно получить их с сервера.
Создайте копию файла tnsnames.ora в каталоге, в который вы можете записать, измените файл соответствующим образом, затем установите переменную среды TNS_ADMIN в расположение этого каталога.
В системе Unix / Linux вы можете использовать файлы конфигурации уровня пользователя для переопределения записей уровня системы.
Файлы конфигурации системного уровня можно найти в каталоге $TNS_ADMIN . Если переменная TNS_ADMIN не установлена, то они ищутся в каталоге $ORACLE_HOME/network/admin .
Файлы конфигурации уровня пользователя не заменяют файлы конфигурации уровня системы в целом (так как TNS_ADMIN каталог заменяет весь $ORACLE_HOME/network/admin каталог), но они добавляют или изменяют записи файлов конфигурации уровня системы. Если запись существует в файле конфигурации на уровне пользователя, то используется эта запись, если она не существует в файле конфигурации на уровне пользователя, то используется запись в файле конфигурации на уровне системы.
Табличные пространства в базах данных Oracle
Табличное пространство – это блок логической памяти во всех базах данных Oracle. На самом деле, все данные баз данных хранятся в табличных пространствах. Таблицы создаются внутри выделенных табличных пространств. Если табличное пространство по умолчанию не выделяется пользователю напрямую, то, по умолчанию, используется табличное пространство системы (этой ситуации лучше избегать).
Дополнительные сведения о концепции табличного пространства см. Часто задаваемые вопросы по Oracle: табличные простнранства
SQL*Plus Prerequisites
SQL*Plus is a component of Oracle Database. SQL*Plus is installed by default when you install the Oracle Database.
Some aspects of Oracle Database and SQL*Plus differ from one computer and operating system to another. These topics are discussed in the Oracle Database Installation Guide for each operating system that SQL*Plus supports.
What is necessary before you can run SQL*Plus?
Obtain an Oracle Database login username and password during installation or from your Database Administrator. See Login Username and Password.
Ensure a sample database is installed and that you have a login username and password for it during Oracle Database installation. See Sample Schemas and SQL*Plus.
Create a default database during installation or obtain the connection identifier for the Oracle Database you want to connect to from your Database Administrator. See Connecting to a Database.
Ensure the database you want to connect to is started. See the STARTUP command.
SQL*Plus Date Format
The default date format in SQL*Plus is determined by the database NLS_DATE_FORMAT parameter and may use a date format displaying two digit years. You can use the SQL TO_CHAR function, or the SQL*Plus COLUMN FORMAT command in your SELECT statements to control the way dates are displayed in your report.
Changing your Password
In the command-line interface, you can change your password with the PASSWORD command. See PASSWORD.
Starting SQL*Plus
If you are connecting to a remote Oracle database, make sure your Oracle Net software is installed and working properly. For more information, see the Oracle Database Net Services Administrator's Guide .
When you start a SQL*Plus command-line session, and after a CONNECT command in that session, the site profile, glogin.sql , and the user profile file, login.sql , are processed:
After SQL*Plus starts and connects, and prior to displaying the first prompt.
After SQL*Plus starts and connects, and prior to running a script specified on the command line.
Prior to the first prompt when /NOLOG is specified on the command line and no connection is made.
The site profile file, glogin.sql is processed first, then the user profile file, login.sql .
Behavior in SQL*Plus 10.1 may be unexpected depending on the setting of SET SQLPLUSCOMPATIBILITY. For example, processing glogin.sql and login.sql after a CONNECT command only occurs with the default SQLPLUSCOMPATIBILITY setting of 10.1. For more information, see SET SQLPLUSCOMPAT[IBILITY] .
Перед началом работы
Перед началом прохождения данного учебного курса обратите внимание на следующее:
В данном учебном курсе описано подключение к экземпляру базы данных Oracle XE на локальном компьютере, но те же действия также могут быть применены при подключении к удаленному экземпляру. В случае подключения к локальном экземпляру необходимо загрузить и установить базу данных Oracle XE. Процесс установки прост и интуитивен, но если все же возникнут проблемы, ознакомьтесь с Руководством по установке базы данных Oracle XE для своей платформы.
Существуют две категории драйверов JDBC Oracle: OCI и JDBC Thin.
Драйвер Oracle JDBC Thin основан на Java и не зависит от платформы. Этот автономный драйвер не требует присутствия других библиотек Oracle и обеспечивает прямое подключение к базе данных Oracle. Он используется для подключения к базе данных Oracle в данном учебном курсе. Перед прохождением данного учебного курса необходимо загрузить файл ojdbc6.jar и сохранить его на своей системе.
| Windows может изменить расширение загруженного файла с .jar на .zip. Но он при этом остается файлом .jar. Расширение можно просто заменить на .jar. |
Драйвер OCI Oracle использует встроенные клиентские библиотеки Oracle для связи с базами данных. Эти библиотеки входят в состав Oracle Instant Client. Хотя драйвер Thin являеся достаточным в большей части случаев, также рекомендуется использовать драйвер OCI путем выполнения шагов, описанных в разделе Использование драйвера OCI JDBC с IDE NetBeans. Хорошим примером использования драйвера OCI является подключение к удаленной базе данных Oracle из приложения PHP с помощью библиотек Oracle Instant Client. Дополнительные сведения о включении расширения OCI8 для PHP см. в разделе этого учебного руководства OCI 8 и IDE NetBeans для PHP.
Если вы не использовали базу данных Oracle XE ранее, прочитайте Руководство по началу работы с базой данных Oracle XE.
Предупреждение для пользователей GlassFish. Домашняя страница базы данных Oracle XE, используемая для администрирования базы данных, использует по умолчанию порт 8080. Oracle GlassFish Application Server также использует по умолчанию 8080. Если запустить обе программы одновременно, база данных Oracle XE заблокирует доступ браузеров к GlassFish на localhost:8080. В этом случае все приложения, развернутые на GlassFish, будут возвращать ошибку 404. Проще всего отключать базу данных Oracle XE, если она не нужна во время работы с GlassFish. Если нужно использовать обе эти программы одновременно, измените порт по умолчанию, используемый базой данных Oracle XE. Это проще, чем изменить порт GlassFish по умолчанию. В Интернете можно найти много описаний процесса изменения порта базы данных Oracle XE по умолчанию, включая одно на форумах Oracle.
SQL*Plus Resources
Starting SQL*Plus Instant Client
SQL*Plus Instant Client is the SQL*Plus command-line without the need to install Oracle Database. For information about using it, see Starting SQL*Plus Command-line.
Because SQL*Plus Instant Client does not include a database, it is always ‘remote’ from any database server. To connect to a database you must specify the database using an Oracle Net connection identifier.
If TNS_ADMIN is not set, then an operating system dependent set of directories is examined to find tnsnames.ora. This search path includes looking in the directory specified by the ORACLE_HOME environment variable for network/admin/tnsnames.ora. This is the only reason to set the ORACLE_HOME environment variable for SQL*Plus Instant Client. If ORACLE_HOME is set when running Instant Client applications, it must be set to a directory that exists.
Установка Oracle SQL Developer на Windows 10 и настройка подключения к базе данных
Ранее, в материале «Установка Oracle Database 18c Express Edition (XE) на Windows 10», мы подробно рассмотрели процесс установки системы управления базами данных Oracle Database в бесплатной редакции, сегодня, как было уже отмечено, мы рассмотрим процесс установки бесплатного инструмента с графическим интерфейсом, с помощью которого мы можем подключаться к базе данных Oracle, писать и выполнять различные SQL запросы и инструкции, речь идет о стандартном инструменте – Oracle SQL Developer.
Oracle SQL Developer — это бесплатная графическая среда для работы с базами данных Oracle Database, разработанная компанией Oracle. SQL Developer предназначен для разработки баз данных, бизнес-логики в базах данных, а также для написания и выполнения инструкций на языках SQL и PL/SQL.
Full Connection Identifier
Depending on your configuration, use the full connection identifier syntax like:
An INSTANCE_NAME is the name you give to the database instance during creation. It defaults to the SID you entered during database creation.
An Oracle System Identifier ( SID ) identifies a specific Oracle release 8.0 database instance.
You can optionally use an INSTANCE_NAME in place of the SERVICE_NAME phrase.
Use a SID in place of the SERVICE_NAME when connecting to an Oracle release 8.0 or earlier database.
Example 3-3 Full connection identifier for SALES1
[3] Подключение через SQL * Plus с использованием команд под DOS
Здесь вам нужно запустить командное окно как «администратор».
① sqlplus / as sysdba
Здесь, в качестве администратора базы данных, нет необходимости использовать пароль.

Sq Логин sqlplus user / passwd
Как показано ниже:

Instance Выберите экземпляр для входа в систему. Sqlplus user / passwd @ Имя экземпляра.
Это выглядит так:
④ Подключиться к удаленному экземпляру базы данных sqlplus user / passwd @ IP: порт / имя экземпляра
⑤ Удаленный вход в систему dba экземпляр sqlplus user / passwd @ IP: имя порта / экземпляра как sysdba
To interact with Oracle Database XE, you must typically connect to the database as a database user. The interaction might be through the SQL Command Line, through SQL Developer, or through utilities invoked from the system command line.
This chapter focuses on the SQL Command Line (SQL*Plus). For information about using database connections in SQL Developer, see the section about creating database connections in Oracle Database Express Edition Getting Started Guide .
This chapter covers the following topics:
Oracle-несколько способов подключения к базе данных
Соединение с базой данных в SQL Developer
Чтобы создать соединение с базой данных в SQL Developer, выполните следующие шаги:
На вкладке Connections щелкните правой кнопкой по Connections и выберите New Connection.
В окне New/Select Database Connection введите имя подключения. Введите имя пользователя и пароль схемы, к которой Вы хотите подключиться.
Из выпадающего поля Role можно выбрать или значение по умолчанию или SYSDBA (Вы выбираете SYSDBA для пользователя sys или любого пользователя с привилегиями администратора базы данных).
Можно выбрать тип подключения как:
Основной : В этом типе введите имя хоста и SID для базы данных, с которой Вы хотите соединиться. Порт устанавливается в 1521. Или можно также ввести имя Службы непосредственно, если Вы используете удаленное соединение с базой данных.
TNS : Можно выбрать любой из псевдонимов базы данных, импортированных из файла tnsnames.ora .
LDAP : Можно осуществить поиск служб баз данных в Oracle Internet Directory, которая является компонентом Oracle Identity Management.
Advanced : Можно определить пользовательский JDBC URL , чтобы соединиться с базой данных.
Щелкните по Test, чтобы убедиться, что соединение было установлено правильно.
Щелкните по Connect.
Если Вы устанавливаете флажок Save Password, пароль сохраняется в XML-файле. Так, после того, как Вы закрываете соединение SQL Developer и открываете его снова, Вам не придется вводить пароль повторно.
Соединение добавляется в Навигатор Соединений. Можно развернуть соединение, чтобы просмотреть объекты базы данных и просмотреть определения объектов, например, зависимости, подробности, статистику и так далее.
Отметьте : Из того же самого окна New/Select Database Connection можно определить соединения с источниками данных, которые не являются БД Oracle, используя вкладки Access, MySQL и SQL Server. Однако, эти соединения являются соединениями только для чтения, которые позволяют Вам просматривать объекты и данные в соответствующем источнике данных.
About Local and Remote Connections
Oracle Database XE supports connections between the SQL Command Line (SQL*Plus) and the database either locally , or remotely over a TCP/IP network. The method that you use to connect to Oracle Database XE with the SQL Command Line depends on whether you are initiating a local connection or a remote connection. Local and remote connections are explained in the following sections:
"Managing Network Connections" for information on how Oracle Database XE accepts connection requests over the network.
Русские Блоги
Установка подключения к базе данных Oracle
В этом упражнении мы создадим и протестируем новое подключение к базе данных.
Запустите базу данных Oracle.
Откройте окно "Службы", выбрав меню "Окно" > "Службы" или Ctrl-5;⌘-5 в Mac. В окне 'Службы' щелкните правой кнопкой мыши узел 'Базы данных' и выберите 'Создать подключение'.

В мастере создания подключений выберите Oracle Thin из раскрывающегося списка Driver ("Драйвер").
На панели Customize Connection ("Настроить подключение") мастера введите следующие значения и нажмите кнопку Next ("Далее").
Oracle Thin (с идентификатором службы (SID))
localhost или 127.0.0.1. Примечание. В случае удаленного соединения, укажите IP-адрес или разрешаемое имя узла компьютера, на котором установлена база данных.
1521 (по умолчанию)
Идентификатор службы (SID)
XE (SID по умолчанию для базы данных Oracle XE). Примечание. В случае подключения к удаленной базе данных запросите SID у администратора базы данных.
Введите имя пользователя. В целях данного учебного курса введите system (учетная запись по умолчанию администратора базы данных) и пароль, использованный во время установки базы данных.
Введите пароль для выбранного имени пользователя.

| До получения доступа к NetBeans необходимо разблокировать схему HR. Разблокирование базы данных HR описано в Руководстве по началу работы с базой данных Oracle XE. |
Новое подключение появится в узле Databases ("Базы данных") окна Services ("Службы"). Его можно будет развернуть и приступить к просмотру структуры объекта базы данных. Измените отображаемое имя для узла подключения: выберите Properties ("Свойства") из всплывающего меню узла и нажмите кнопку многоточия, чтобы вывести свойство Display Name ("Отображаемое имя"). Введите OracleDB в качестве отображаемого имени и нажмите кнопку OK.

| Хотя приведенные выше шаги описывают случай подключения к экземпляру локальной базы данных, шаги для подключения к удаленной базе данных такие же. Единственное отличие состоит в том, что вместо указания localhost как имени узла следует ввести IP-адрес или имя узла удаленного компьютера, на котором установлена база данных Oracle. |
Setting Environment Variables on the Linux Pla tform
On the Linux platform, before running the SQL Command Line or other Oracle utilities from a terminal session, you must set some environment variables for that session. The procedure for setting environment variables depends on whether you are connecting locally, or connecting remotely from Oracle Database XE.
Setting Environment Variables for a Local Connection
To set environment variables when connecting locally, enter one of the following commands in a terminal session.
For Bourne, Korn, or Bash shell:
There is no need to set environment variables before running the SQL Command Line from the K menu (KDE) or Applications menu (Gnome).
Setting Environment Variables for a Remote Connection
To set environment variables when connecting remotely from Oracle Database XE, enter one of the following commands in a terminal session at the remote computer:
This chapter describes how to start, login, and connect to a database, how to get help, and how to exit SQL*Plus.
Easy Connection Identifier
The easy or abbreviated connection identifier has the syntax:
Example 3-4 Start a command-line session to the sales database using the easy connection identifier
Example 3-5 CONNECT to the sales database using the easy connection identifier
The easy connection identifier can be used wherever you can use a full connection identifier, or a net service name. The easy syntax is less complex, and no tnsnames.ora entry is required.
Читайте также: