
Pathfinder illustrator где находится
Learn about how to edit, reshape, smoothen, and simplify paths using different tools available in Illustrator.
Before you reshape or edit a path, you need to select the path’s anchor points, segments, or a combination of both.
Еще немного деталей
Хотите узнать больше об огромном наборе инструментов и настроек в Adobe Illustrator? Зайдите в курсы внизу:
Быстрый совет: Преимущества использования Обтравочной Маски (Clipping Mask) над Обработкой Контуров (Pathfinder)
Быстрый совет: Преимущества использования Обтравочной Маски (Clipping Mask) над Обработкой Контуров (Pathfinder)
Выделение опорных точек
Выполните любое из следующих действий:
- Если точки видны, выберите их с помощью инструмента «Прямое выделение» . Для выбора нескольких точек удерживайте клавишу Shift.
- Выберите инструмент «Прямое выделение» и перетаскиванием обозначьте границу вокруг опорных точек . Удерживая нажатой клавишу Shift, выберите дополнительные опорные точки.
- Вы можете выбрать опорные точки в выделенном и невыделенном контуре. Перемещайте инструмент «Прямое выделение» над опорной точкой до тех пор, пока вместо указателя не отобразится пустой квадрат для невыделенного контура и заполненный квадрат для выделенного контура в увеличенном масштабе, затем нажмите на опорную точку. Удерживая клавишу Shift, выделите дополнительные опорные точки щелчком.
- Выберите инструмент «Лассо» и перетащите его вокруг опорных точек. Удерживая нажатой клавишу Shift, выберите дополнительные опорные точки.
Navigate the Pathfinder panel
You use the Pathfinder panel (Window > Pathfinder) to combine objects into new shapes.

Use the top row of buttons in the panel to make paths or compound paths. To make compound shapes, use the buttons in those rows while pressing the Alt or Option key.
Choose from the following shape modes:
Add To Shape Area
Adds the area of the component to the underlying geometry.
Subtract from Shape Area
Cuts out the area of the component from the underlying geometry.
Intersect Shape Areas
Uses the area of the component to clip the underlying geometry as a mask would.
Exclude Overlapping Shape Areas
Uses the area of the component to invert the underlying geometry, turning filled regions into holes and vice versa.
Use the bottom row of buttons in the panel, called Pathfinder effects, to create final shape combinations on the first click. (See Apply Pathfinder effects.)

A. All components in Add mode B. Subtract mode applied to squares C. Intersect mode applied to squares D. Exclude mode applied to squares
Apply a Pathfinder effect using the Pathfinder panel
To apply a Pathfinder effect to a group or layer, target the group or layer.
In the Pathfinder panel, click a pathfinder button (in the bottom row), or Alt‑click (Windows) or Option‑click (Mac OS) a Shape Mode button (in the top row).
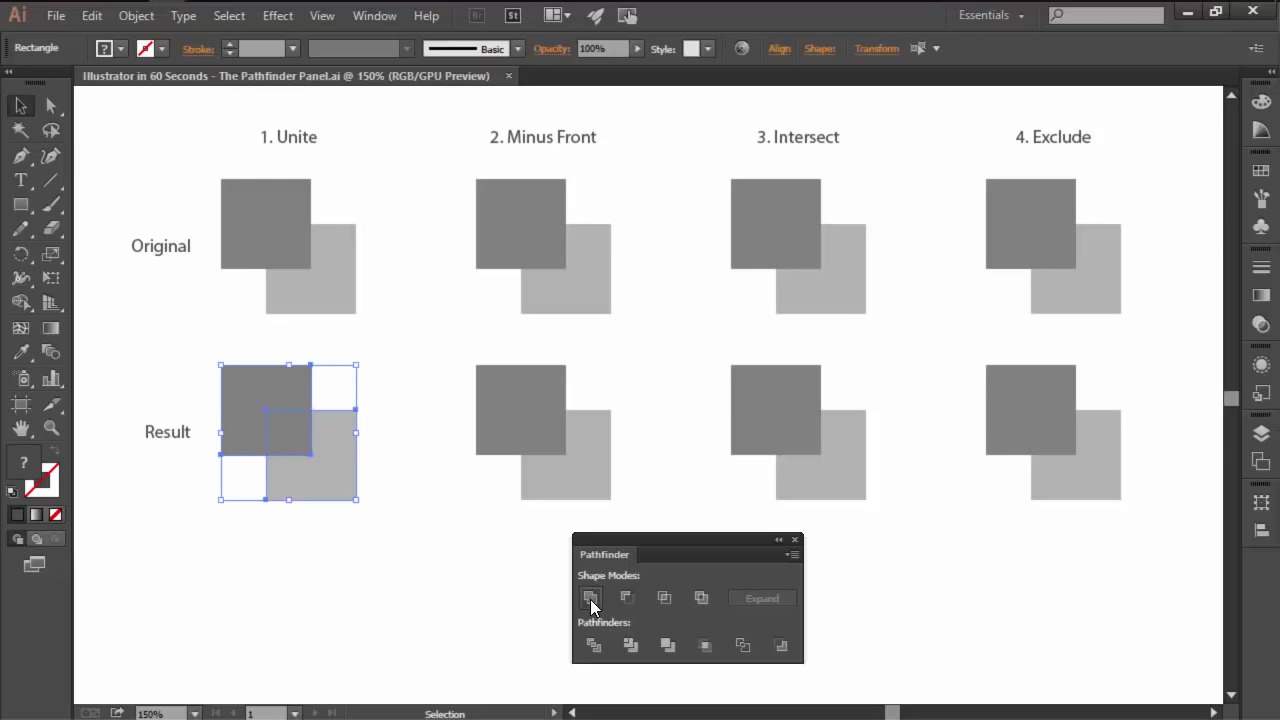
How to Use the Pathfinder Tool
To display the Pathfinder you will have to go to Window > Pathfinder to make it visible.


The first Shape Mode is Unite, which will combine all the selected objects into a single larger shape.


The second Shape Mode is Minus Front, and it allows you to use any top object to create a cutout from the one underneath.


The third option is Intersect, which will create a new shape by using the overlapping sections of the selected objects.


Last but not least, we have Exclude, which instead of removing any of the non-overlapping sections does the exact opposite and gets rid of the intersecting surfaces of the objects.


Want to see this in action? Check out the video above to see this lesson at work!
Find and delete stray anchor points
Stray anchor points are individual points that aren't connected to other anchor points. It's good practice to find and delete stray anchor points.


Как пользоваться панелью Pathfinder
Чтобы открыть панель Pathfinder (Обработка Контуров) в верхнем меню зайдите в Window > Pathfinder (Окно > Обработка Контуров).
Первый Режим Фигуры (Shape Mode) - Добавить (Unite), он объединит все выбранные фигуры в одну фигуру.
Второй Режим Фигуры (Shape Mode) - Минус Перед (Minus Front), он вырежет объект, наложенный сверху, из объекта внизу.
Третья опция - Пересечение (Intersect), которая создат новую фигуру из той области, где выбранные объекты пересекаются.
Последняя опция - Исключение (Exclude). При ее выборе вместо удаления всех непересекающихся областей произойдет обратное - удалятся все области, где объекты накладываются друг на друга.
Хотите понаблюдать это в действии? Посмотрите видео с уроком вверху!
Поиск и удаление изолированных опорных точек
Изолированными называются отдельные опорные точки, не связанные с другими опорными точками. Такие точки рекомендуется находить и удалять.
Select path segments
Do any of the following:
- Select the Direct Selection tool and click within two pixels of the segment, or drag a marquee over part of the segment. Shift-click or Shift-drag around additional path segments to select them.
- Select the Lasso tool and drag around part of the path segment. Shift-drag around additional path segments to select them.
Apply Pathfinder effects
Pathfinder effects let you create new shapes out of overlapping objects. Apply Pathfinder effects by using the Effects menu or the Pathfinder panel.
Pathfinder effects in the Effects menu can only be applied to groups, layers, and text objects. After you apply the effect, you can still select and edit the original objects. You can also use the Appearance panel to modify or remove the effect. See Apply a Pathfinder effect using the Effects menu.
Pathfinder effects in the Pathfinder panel can be applied to any combination of objects, groups, and layers. The final shape combination is created when you click a pathfinder button; after that, you can't edit the original objects. If the effect results in multiple objects, they are automatically grouped together. See Apply a Pathfinder effect using the Pathfinder panel.
Копирование контура
Выделите контур или отрезок с помощью инструмента «Прямое выделение» и выполните одно из следующих действий.
- Для копирования и вставки контуров в пределах одного приложения или между приложениями используются стандартные функции меню.
- Удерживая клавишу Alt (Windows) или Option (macOS), перетащите контур в нужное положение.
Добавление опорных точек предоставляет дополнительные возможности по управлению контуром, а также позволяет удлинять открытый контур. Однако не следует добавлять точки без необходимости, поскольку это усложняет контур. Контур с небольшим количеством точек удобнее редактировать, а также выводить на экран и на печать. Контур можно упростить, удалив из него ненужные точки.
Specify Pathfinder options
Set Pathfinder Options from the Pathfinder panel menu or by double-clicking a Pathfinder effect in the Appearance panel.
Affects how precisely the Pathfinder effects calculate an object’s path. The more precise the calculation, the more accurate the drawing and the more time is required to generate the resulting path.
Remove Redundant Points
Removes unnecessary points as you click a Pathfinder button.
Divide And Outline Will Remove Unpainted Artwork
Deletes any unfilled objects in the selected artwork as you click the Divide or Outline button.
Иллюстратор за 60 секунд: панель Pathfinder
Сложно разобраться, как пользоваться набором Shape Modes (Режимы Фигур) на панели Pathfinder (Обработка Контуров)? Можете больше не беспокоиться: это короткое видео поможет вам детально разобраться в них!
Select anchor points
Do any of the following:
- If you can see the points, click them with the Direct Selection tool to select them. Shift-click to select multiple points.
- Select the Direct Selection tool and drag a boundary around the anchor points. Shift-drag around additional anchor points to select them.
- You can select anchor points from selected or unselected paths. Move the Direct Selection tool over the anchor point until the pointer displays a hollow square for unselected and filled square for selected paths in a magnified state, and then click the anchor point. Shift-click additional anchor points to select them.
- Select the Lasso tool and drag around the anchor points. Shift-drag around additional anchor points to select them.
Выделение отрезков контура
Выполните любое из следующих действий:
- Выберите инструмент «Прямое выделение» и щелкните в пределах двух пикселей от отрезка или перетащите выделенную область через его часть. Чтобы выделить дополнительные отрезки контура, щелкните их или перетащите на них инструмент, удерживая клавишу Shift.
- Выберите инструмент «Лассо» и перетащите его вокруг части отрезка контура. Удерживая клавишу Shift, выделите дополнительные отрезки контура путем перетаскивания инструмента вокруг них.
Добавление или удаление опорной точки
Добавление опорной точки:
- Выберите инструмент Перо или Добавить опорную точку .
Примечание. Инструмент «Перо» меняется на инструмент «Добавить опорную точку», если навести его на выделенный контур. - Щелкните отрезок контура.
Удаление опорной точки:
- Выберите инструмент «Перо» или Удалить опорную точку и щелкните опорную точку.
Примечание. Инструмент «Перо» меняется на инструмент «Удалить опорную точку», если навести его на опорную точку. - Выберите точку с помощью инструмента «Прямое выделение» и нажмите на панели управления кнопку Удалить выделенные опорные точки .
Не используйте для удаления опорных точек клавиши Delete и Backspace, а также команды Редактирование > Вырезать и Редактирование > Очистить. Эти клавиши и команды также удаляют присоединенные к точке отрезки.
Select all anchor points and segments in a path
- Select the Direct Selection tool or the Lasso tool.
- Drag around the entire path.
If the path is filled, you can also click inside the path using the Direct Selection tool to select all anchor points.
Apply a Pathfinder effect using the Effects menu
Group together the objects you want to use, and select the group.
Move the objects you want to use into a separate layer, and target the layer.
To quickly apply the same Pathfinder effect again, choose Effect > Apply [effect].
A Bit More Detail
Want to learn more about the vast tools and settings in Adobe Illustrator? Check out these tutorials below:
You can combine vector objects to create shapes in a variety of ways in Illustrator. The resulting paths or shapes differ depending on the method you use to combine the objects.
Pathfinder effects
Pathfinder effects let you combine multiple objects using interaction modes. When you use Pathfinder effects, you can’t edit the interactions between objects. See Combine objects using Pathfinder effects.
Compound shapes
Compound shapes let you combine multiple objects and specify how you want each object to interact with the other objects. Compound shapes are more versatile than compound paths because they provide four kinds of interactions: add, subtract, intersect, and exclude. In addition, the underlying objects aren't changed, so you can select each object within a compound shape to edit it or change its interaction mode. See Combine objects using compound shapes.
Compound paths
Compound paths let you use an object to cut a hole in another object. For example, you can create a doughnut shape from two nested circles. Once you create a compound path, the paths act as grouped objects. You can select and manipulate the objects separately using the Direct Selection tool or Group Selection tool; or you can select and edit the combined path. See Combine objects using compound paths.
You can also add to an object by using the Blob Brush tool. When you use this brush, paths you paint are added to adjacent paths that use identical fill attributes. See Draw and merge paths with the Blob Brush tool and Building new shapes using the Shape Builder tool.
Illustrator in 60 Seconds: The Pathfinder Panel
Having trouble figuring out how to use the different Shape Modes found under the Pathfinder panel? Well, worry no more, since in this short video you’ll learn exactly how to use them!
Use this tool to create amazing vector graphics, icons, and more. And check out our Vector Graphics available on Envato Elements and Envato Market.
Add or delete an anchor point
To add an anchor point:
To delete an anchor point:
- Select the Pen tool or the Delete Anchor Point tool and click over the anchor point.
Note: The Pen tool changes to Delete Anchor Point tool as you position it over an anchor point. - Select the point with the Direct Selection tool and click Remove Selected Anchor Points in the Control panel.
Don’t use the Delete and Backspace keys or the Edit > Cut and Edit > Clear commands to delete anchor points. These keys and commands also delete the line segments that connect to that point.
Выделение всех опорных точек и отрезков в контуре
- Выберите инструмент «Прямое выделение» или «Лассо».
- Перетащите по всему контуру.
Если к контуру применена заливка, то для выделения всех опорных точек можно также использовать инструмент «Прямое выделение» внутри контура.
Summary of Pathfinder effects
Traces the outline of all objects as if they were a single, merged object. The resulting shape takes on the paint attributes of the top object.
Traces the outline of the region overlapped by all the objects.
Traces all nonoverlapping areas of the objects, and makes overlapping areas transparent. Where an even number of objects overlap, the overlap becomes transparent. Where an odd number of objects overlap, the overlap becomes filled.
Subtracts the frontmost objects from the backmost object. You can use this command to delete areas of an illustration by adjusting the stacking order.
Subtracts the objects in back from the frontmost object. You can use this command to delete areas of an illustration by adjusting the stacking order.
Separates a piece of artwork into its component-filled faces (a face is an area undivided by a line segment).
Note: When you use the Divide button in the Pathfinder panel, you can use the Direct Selection or Group Selection tool to manipulate the resulting faces independently of each other. You can also choose to delete or preserve unfilled objects when applying the Divide command.
Removes the part of a filled object that is hidden. Removes any strokes and doesn't merge objects of the same color.
Removes the part of a filled object that is hidden. Removes any strokes and merges any adjoining or overlapping objects filled with the same color.
Divides artwork into its component-filled faces, and then deletes all the parts of the artwork that fall outside the boundary of the topmost object. It also removes any strokes.
Divides an object into its component line segments, or edges. This command is useful for preparing artwork that needs a trap for overprinting objects. See Create a trap.
Note: When you use the Outline button in the Pathfinder panel, you can use the Direct Selection or Group Selection tool to manipulate each edge independently. You can also choose to delete or preserve unfilled objects when applying the Outline command.
Combines colors by choosing the highest value of each of the color components. For example, if Color 1 is 20% cyan, 66% magenta, 40% yellow, and 0% black, and Color 2 is 40% cyan, 20% magenta, 30% yellow, and 10% black, the resulting hard color is 40% cyan, 66% magenta, 40% yellow, and 10% black.
Makes the underlying colors visible through the overlapping artwork, and then divides the image into its component faces. You specify the percentage of visibility you want in the overlapping colors.
Compensates for potential gaps between colors in artwork by creating a small area of overlap (called a trap) between two adjoining colors.
A compound shape is editable art consisting of two or more objects, each assigned a shape mode. Compound shapes make it easy to create complex shapes because you can precisely manipulate the shape mode, stacking order, shape, location, and appearance of each path included.
Compound shapes act as grouped objects and appear as items in the Layers panel. You can use the Layers panel to show, select, and manipulate the contents of a compound shape—for example, to change the stacking order of its components. You can also use the Direct Selection tool or the Group Selection tool to select components of a compound shape.
When you create a compound shape, it takes on the paint and transparency attributes of the topmost component in Add, Intersect, or Exclude mode. Subsequently, you can change the paint, style, or transparency attributes of the compound shape. Illustrator facilitates this process by automatically targeting the whole compound shape when you select any part of it, unless you explicitly target a component in the Layers panel.

A. Original objects B. Compound shape created C. Individual shape modes applied to each component D. Style applied to entire compound shape
Узнайте, как редактировать, перерисовывать, сглаживать и упрощать контуры с помощью различных инструментов, доступных в Illustrator.
Прежде чем можно будет перерисовать или отредактировать контур, необходимо выделить его опорные точки и/или отрезки.
Copy a path
Select a path or segment using the Selection tool or Direct Selection tool, and do one of the following:
- Use the standard menu functions to copy and paste paths within or between apps.
- Hold down Alt (Windows) or Option (macOS) and drag the path to the desired position.
Adding anchor points can give you more control over a path, or it can extend an open path. However, you should not add more points unnecessarily as it makes the path complex. A path with fewer points is easier to edit, display, and print. You can reduce the complexity of a path by deleting unnecessary points.
60 секунд?
Этот урок - часть новой серии коротких видеоуроков на Envato Tuts+. Мы хотим покрыть широкий спектр тем, и все за 60 секунд - достаточных для того, чтобы пробудить ваш аппетит. Напишите в комментариях, как вам понравилось это видео, и что еще мы можем объяснить вам за 60 секунд!
Welcome to our Illustrator in 60 Seconds series, in which you can learn an Illustrator skill, feature, or technique in just a minute!
Читайте также: