
Ошибка кода hcnetsdk dll
Затем:
Поместите HCNetSDK.dll в одну из следующих папок:
Если у вас 64-битная версия Windows, то поместите файл в:
"C:WindowsSysWOW64"
Если у вас 32-битная версия Windows, то поместите файл в:
"C:WindowsSystem32"
После этого
Перезагрузите компьютер, чтобы изменения вступили в силу.
Решено: HCNetSDK.dll[7] Connection failed: device of-line or connection timout
Многие используют популярные DVR компании Hikvision, для их управления используется родной софт программа — iVMS различных версий. Она же подходит и для просмотра записей и видео с камер в реальном времени из любой точки мира, существуют версии для Windows, Mac и приложения для Android и iOS от Apple.
Приложение iVMS для Windows и Mac:
Для просмотра видео с камер через интернет согласно официальной инструкции достаточно пробросить на видеорегистратор порт 8000, но по факту в некоторых случая этого недостаточно. Я пробросил нужный порт, добавил в программу видеорегистратор, он успешно нашелся и можно было им управлять, например изменять настройки. Когда я попытался просмотреть видео с камер — получил ошибку HCNetSDK.dll[7] Connection failed: device of-line or connection timout:
Для исправления ошибки нужно пробросить еще два порта 554 и 80. Оказалось что разные версии DVR Hikvision для правильной работы требует разные порты, некоторым достаточно одного порта 8000, некоторым хватает двух 8000 и 554, а некоторым требуется еще и третий порт — 80 для корректной работы приложения через инернет.
Hikvision error code 7 shows up when you’re trying to view the cameras remotely on the iVMS-4200 camera management software. It’s caused by a misconfiguration of the local IP address on the recorder and by a port forwarding issue on the router.
The full message for this Hikvision error code is: HCNetSDK.ddl[7]. Failed to connect to the device. The device is off-line, or connection timeout caused by network.
In other cases it can be displayed as: [camera name] Logins failed. Error Code HCNetSDK.dll[7]. (Connecting to device failed. The device is offline or the network timed out).
You may see this error as “The device is off-line”, “The network is unreachable”, “Failed to connect to the device”, “Connection time-out”, “Connecting to device failed”.
![Hikvision error code 7 (HCNetSDK.ddl[7]) on iVMS-4200](https://securitycamcenter.com/wp-content/uploads/2020/05/error-code-7-hikvision.jpg)
Ошибки в настройках камеры
- Отключаем кабель питания.
- Зажимаем кнопку Reset.
- Подключаем питание обратно (кнопку Reset всё ещё держим).
- Ждём, пока камера перезагрузится.
- Настраиваем устройство заново.
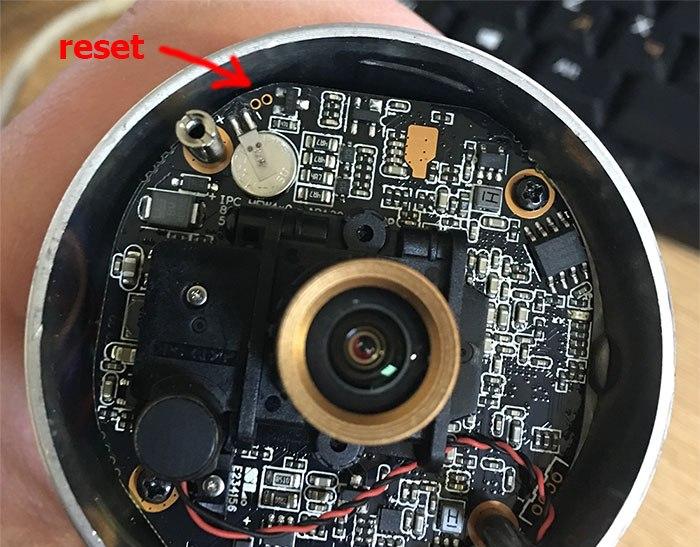
Сбрасываем настройки камеры и устанавливаем подключение заново
После сброса настроек и повторной установки ошибка не должна повторяться. Если не работает несколько камер, то можно попробовать в программе управления ими включить второй поток.
Change the camera configuration
You can change the camera configuration to control the bandwidth that comes to the iVMS-4200. Open the camera menu via a web browser or use the DVR/NVR interface for this setup. Go to the Video/Audio menu, as shown below.
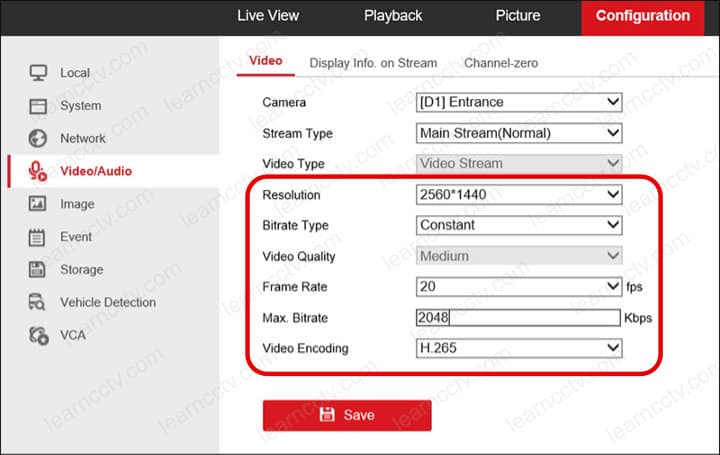
Here you can see the parameters that control the camera quality and bandwidth.
The idea is to change these parameters to have enough quality for your cameras and, at the same time, get rid of the error 800. Let's see how to do that.
Resolution
This parameter controls the number of pixels in the image; higher resolution means more quality and means more bandwidth is necessary.
You can lower the resolution if your project doesn't require too much quality, thus saving bandwidth and storage space in the recorder (DVR/NVR).
I recommend dealing with resolution later after adjusting other parameters.
Bitrate type
The camera can use constant or variable bitrate,
Constant bitrate means the camera prioritizes the quality and avoid small image problems such as pixelization but sacrifices the bitrate by keeping it constant.
Variable bitrate means the camera prioritizes the bitrate variation, and the bandwidth will increase or decrease according to the video compression.
The variable bitrate is usually better when the network bandwidth is not sufficient such as remote access. Still, it can also be used on the local system if the intention is to reduce the traffic according to the scene variation.
You can change this parameter to help to solve the problem, but I recommend trying this later if the other parameters (such as the frame rate) didn't fix the problem.
Video Quality
This parameter is available only when the variable bitrate is used.
It controls the image compression thus controlling video quality and bandwidth.
You can also deal with this parameter later if you decide to set up the system to use a variable bit rate.
Frame rate
That controls the number of frames the camera captures per second.
This parameter changes how much bandwidth the camera uses, so it's a good idea to consider how many frames you need to record carefully.
The picture shows an example with 20 FPS, which means the camera is capturing 20 frames every second, and sometimes this not necessary.
Perhaps you 15 FPS or even 12 FPS is enough.
Imagine how much bandwidth the camera can save by reducing the number of frames it captures every second from 20 to 15.
If you consider reducing the frame rate for a group of 10 cameras, it means a total of 50 frames per second or 3,000 frames per minute that is reduced and impact the bandwidth.
Max bitrate
It's possible to set a limit to the bitrate, so the camera doesn't use more than the value that is set in this parameter, but you need to be careful with such setup.
As you can see in the picture, the maximum bitrate the camera can use is 2048, which means a bandwidth of 2 Mbps.
If the other parameter (resolution and frame rate) are set to high and require higher bandwidth,let's say 4 Mbps, it's not a good idea to force the system to use only half of the bandwidth.
This type of configuration brings problems with the video quality, so adjust this parameter carefully.
Video encoding
The type of codec (compressor/decompressor) heavily impacts in the bandwidth.
The H.265 codec compresses more than the H.264 and requires more CPU power to decompress the video on the computer that uses the iVMS-4200.
Try using the H.265 first to fix the error 800 and pay attention if the computer's CPU is powerful enough to handle the decompression.
How to fix Hikvision reconnecting error code 91
Change the iVMS-4200 configuration
Open the iVMS-4200 system configuration and set up the parameter that automatically changes the video stream type.
Go the image menu and uncheck the "Auto Change Stream-Type".
See the picture below for more details.
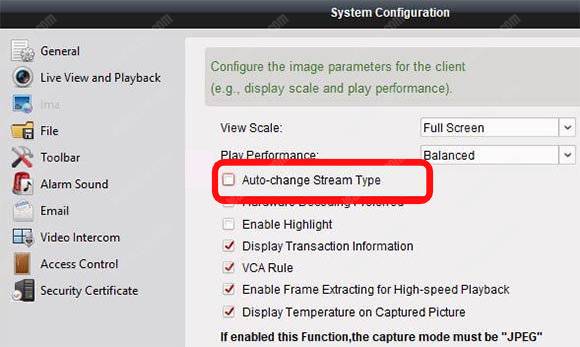
This configuration can help to fix the error 800 by keeping the stream constant.
Всё равно выдаёт ошибку HCNetSDK.dll не был найден?
Тогда придётся установить этот файл вручную. Для этого:
Зайдите в меню "Пуск".
В строчке поиска введите "cmd". И запустите найденную программу от имени администратора.
В открывшемся окне введите "regsvr32 HCNetSDK.dll ".
После этого снова перезагрузите компьютер. Теперь ошибка должна быть исправлена.
Если что-то не понятно прочитайте более подробную инструкцию – как установить dll файл. скачать dle 11.3
Часто в службу технической поддержки обращаются с проблемой подключения к IVMS-4200 устройств, уже привязанных к облаку Ezviz или Hik-Connect. Одни не знают с какой стороны подойти, а у других подключенные устройства не отображают видео.
Сегодня расскажем как решить эти проблемы самостоятельно.
An excessive number of cameras
Sometimes the system has an excessive number of cameras that generate too much traffic in the network. It's necessary to consider the bandwidth when deciding the number of cameras installed in the project.
Update the system
Some problem are solved by updating the system.
Ensure you are using the latest firmware for your IP cameras and download the newest version of the iVMS-4200 software.

Ошибка с файлом HCNetSDK появляется при использовании видеорегистратора с несколькими камерами. Часто сбой проявляется в работе только одного записывающего устройства, в то время как остальные функционируют в штатном режиме. Разбираемся с тем, что может быть причиной такого поведения камер.
What causes the error 800
Here are some common problems related to this error.
Шаг 5
Во вкладке “Device Management” выберите пункт “Group” (стрелка 1). Если устройство уже прикреплено к профилю, выберите папку с именем вашего профиля в Hik-Connect.
Если устройство добавлено только что, создайте группу (стрелка 3). Группа будет носить имя устройства (видно по стрелке 2). После того, как найдете новую папку, выделите устройство (стрелка 4) и нажмите на кнопку “Modify” (стрелка 5). Если все сделано правильно, кнопка станет активной, синего цвета.

При нажатии “Modify” в открывшемся окне в поле “Stream Key” (стрелка 1) введите верификационный код. Не забудьте нажать кнопку “ОК”.

Теперь во вкладке онлайн-просмотра все работает корректно, вместо непонятных ошибок вы увидите изображение с камеры.
Шаг 4
Если в профиле еще нет устройств, во вкладке Hik-Connect Device нажмите кнопку “Add Device” (стрелка 2).

Добавленное устройство появится в этом окне. Казалось бы, все необходимое сделано, но именно на этом этапе у многих возникают трудности. Что делать дальше?

Шаг 1
Зайдите в IVMS-4200.
Откройте вкладку “Управление устройствами” (стрелка 1).
Нажмите “Добавить новый тип устройства” (стрелка 2).

How to fix Hikvision error code 7
There are a few things you need to check and modify in order to fix this issue.
It has been reported that error code 7 can be caused by a misconfiguration of the IP settings on the recorder. Go to the network setting of your recorder and take a look at the IP address, default gateway, subnet mask, preferred DNS, and alternate DNS. Make sure they match your network.
- DVR/NVR IP address: 192.168.1.100
- DVR/NVR Subnet Mask: 255.255.255.0
- DVR/NVR Gateway (your router’s IP address): 192.168.1.1
- Preferred DNS: 8.8.8.8 (for both DVR/NVR and router)
- Alternate DNS: 8.8.4.4 (for both DVR/NVR and router)
Many users report that changing the RTSP port from 554 to something else (let’s say 8554) fixed the issue. The new port still needs to be opened on the router.
Double-check the credentials settings on the iVMS-4200. Go to the Device Manager and check the added remote device IP address, username, password, all should be correct and without spaces.
All that being said, ensure you’re using the latest version of iVMS-4200 software and that the firmware on your DVR/NVR is updated to the newest one.
The Hikvision Reconnecting.Error Code HCNetSDK.dll[91] occurs on the iVMS-4200 software and it’s an indication that there’s not enough power juice for the camera or that the Auto-change stream type is enabled.
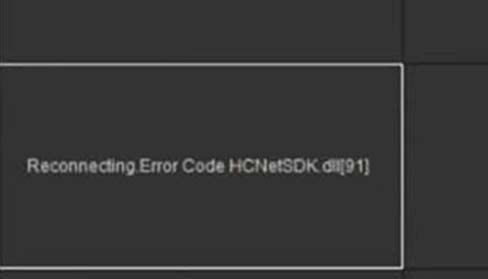
The fastest solution to solve this issue is to use a better PoE switch and turn the auto-change stream type off. In this guide, you can find steps on how to fix this reconnecting error code issue.
1. Not enough power
This is most likely the main cause of this issue. The camera is not getting enough power juice, it’s struggling and it’s going on and off.
When using a PoE switch to power up the camera, you need to make sure that the switch is certified to be used with PoE cameras and that it follows international standards. So, just make sure you’re using the correct PoE switch.
Шаг 3
Перейдите во вкладку Hik-Connect Device. Выберите страну Украина. Нажмите “Login”.

Появится окно входа. Введите свой логин, e-mail, номер телефона и пароль. Нажмите “Login”.

Camera quality
The error code 800 also shows up because the overall system configuration prioritizes quality over bandwidth, which means a spike on traffic can occur.
Другие возможные причины и способы исправления ошибки
Ошибка с упоминаем HCNetSDK.dll может возникать также по другим причинам. Если сброс параметров и повторная настройка не помогла, то проверяем следующие факторы:
- Если камера получает питание через POE (Power Over Ethernet) убеждаемся, что источник и устройство поддерживают одинаковые стандарты. Кроме того, источник должен иметь достаточную мощность и не быть перегруженным другими камерами.
- Проверяем качество витой пары. Разъёмы на обоих концах должны быть правильно обжаты, особенно если используется подключение через POE.
- В главном меню изменяем тип потока на автоматический.

Включаем автоматическое изменение типа потока в настройках регистратора
Если проблема носит массовый характер, то может помочь также обновление прошивки. Однако обычно удаётся решить проблему одним из перечисленных выше способов.
2. Turn off the auto change stream
The Hikvision IP camera or recorder (DVR NVR) uses two types of video stream: main stream and sub-stream. These types of streams depend on the resolution, frame rate and compression type (H.264, H.264+ or H.265) and when the camera auto changes the stream it can cause the picture not to show up.
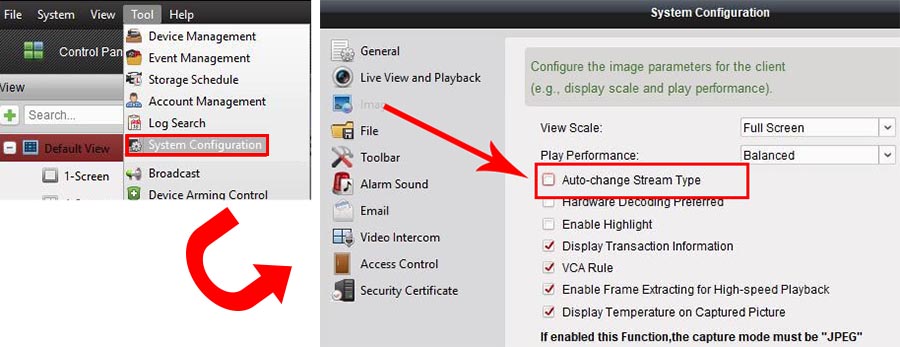
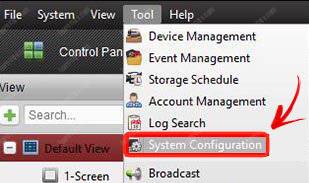
To fix the Reconnecting.Error Code HCNetSDK.dll[91] error code, open up the iVMS-4200 software, go to Tool and then System Configuration. Access the Image section and untick Auto-change Stream Type (check the picture below).
This should the job and you should be able to see your cameras on iVMS-4200 software. If not, to reboot the software, or even your computer.
The Hikvision error code 800 usually occurs when the iVMS-4200 software can't handle the IP cameras' data traffic.
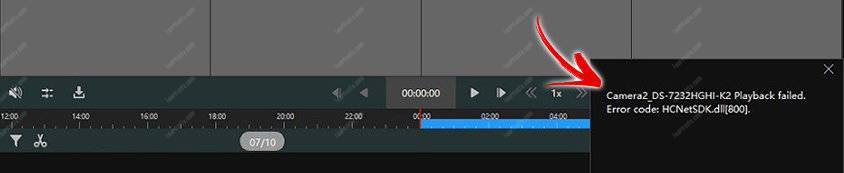
When using the software for live camera view or playback a message shows up as " Playback failed. Error code: HCNetSDK.dll[800] ".
You can fix the error by adjusting the bandwidth to make sure the iVMS-4200 can deal with the traffic coming from the camera group it's connected to.
How to fix the problem
Here's how you can fix the Hikvision error code 800.
Шаг 2
Выберите “Hik-Connect Device” или “Устройство Hik-Connect” (стрелка 1). У нас этот пункт неактивен, потому что такой тип устройства уже добавлен.
Подтвердите выбор (стрелка 2).

Читайте также: