
No matching pci ids in driverpack ini file что это
Installing Windows XP 32-bit directly from an ISO requires 3 boot stages, the first two boots must be from the E2B USB drive:
- Use the E2B+DPMS download to make your E2B drive.
- Use official Microsoft XP SP3 ISO (should be 600-800MB in size) or one of the Recommended later XP SP3 32-bit ISOs here.
- Do NOT configure the BIOS with the E2B USB drive as Drive 0 = first HDD.
The internal hard disk should be the first disk. Boot from the E2B USB drive using the BIOS Boot Selection menu and hotkey (e.g. F2, F8, F9, F10, F12, ESC – depending on system) - Boot from the E2B USB drive and choose STEP 1 for first text-mode Windows XP Setup stage (formats and copies file to hard disk)
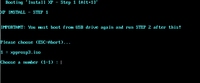
- Re-boot to the E2B USB drive again after Windows text-mode Setup stage resets and choose STEP 2
- Re-boot after Windows GUI-mode Setup stage has completed after STEP 2 (if it reboots to E2B press F7 to reboot to the hard disk – or remove E2B USB drive and reboot)
Using DPMS2 in your own grub4dos menu
If you wish you can use the DPMS2 package in your own application. The DPMS driver folders (\D\M\) must be located directly below the folder that contains the DPMS2.g4d batch file. If you wish to generate a Ram Disk driver floppy, you must specify a value for the grub4dos environment variable FIRA (1=Firadisk only, 2=FiraDisk(default)+WinVBlock, 3=WinVBlock(default)+Firadisk. If you do not set the FIRA parameter before calling DPMS2.g4b then only the SRS F6 virtual floppy (or floppies) will be made.
If there is no SRS driver required and you asked for two floppies and use FIRA=2 or FIRA=3, then one floppy will have a default driver=FiraDisk and the other default=WinVblock.
If you use FIRA=2 or 3 and ask for just one disk you will be asked to choose which driver you want loaded by default.
The DPMS2.g4b batch file also takes a parameter (optional)
(no parameter) = create maximum of two floppies
0 = create fd0 only
1 = create fd1 only
2 = create maximum of two floppies (same as no parameter)
Note that some special commands are also required in your grub4dos menu - see the ..\grub\XPStep1.g4b, ..\grub\XPStep2.g4b and ..\grub\XPStep2LowRam.g4b batch files for help.
Тут я предлагаю свой вариант, котрым пользуюсь я. Это не значит, что остальные варианты плохие и/или неправильные - это значит только то, ято этим вариантом пользуюсь я.
Ну нравится он мне.
Я постораюсь осветить вопросы где взять и как сделать.
Попадаем на страницу с самым свежим DPs_BASE, на данный момент - DPs_BASE_8125
Запускаем скачанный файл DPs_BASE_8125.exe на выполнение.
Это самораспаковывающийся архив, путь распаковки по умолчанию – в текущую папку.
Я сделал пустую папку, туда качал, там и запустил:

Можете изменить путь распаковки, мне лень…
В результате получили:

Последний – это как раз тот файл, который мы скачали и запустили.
Осталось решить, какие драйвера мы собрались ставить – я собрался ставить исключительно Mass Storage драйвера, захотите что ни будь добавить – ваше право, от этого сам процесс не меняется.

Меня в данный момент интересует именно и только подчеркнутый, то бишь Mass Storage.
Щелкаем по download напротив интересующего нас пакета драйверов, попадаем на страницу загрузки этого пакета.
Кроме как загрузить, там еще можно посмотреть, а что собственно в нем есть, какие драйвера? Список приводить не буду – все равно он достаточно часто меняется, хотя я вот делал это с месяц назад – пока не изменились, странно…
Качаем с этой странички файл DP_MassStorage_wnt5_x86-32_901.7z, можете сразу кинуть его в папку DriverPacks, что у нас получилась после распаковки первого файла.
Этот файл распаковывать не надо – и так пойдет.
Запускаем файл DPs_BASE.exe и видим:

Особо зоркие заметят нерусскую надпись «English» в чекбоксе, слева от кнопки Apply.
Вы будете смеяться, но там есть и русский, называется, правда, не по русски – Russian, да еще перед тем, как перейти на знакомый с дества (надеюсь) язык придется нажимать нерусскую кнопочку Apply:

Вот вам недостатки великого и могучего – «Загрузка конфигурационного» поместилось, а вот «файла» - нет.
Это вам потребуется на тот случай, если вы делаете эту работу в два приема, хотя что тут делать в два – не знаю…
Кнопка «Далее» не переведена – ее я специально отметил красным J
Жмем. Следующий экран прочитаете сами, скриншота делать не буду, и снова жмем:

Если кому то хочется попробовать все – пожалуйста, я же делаю только одно – интеграцию одного пакета драйверов в дистрибутив.
Потому радиокнопка отмечена возле надписи «Диск», и сильно мне не нравится надпись сереньким «OS: Н/Д» вверху.
Потому жмем кнопку «Просмотр» и выбираем папку, в которую мы скопировали дистрибутив Windows XP:

У меня в эту папку уже интегрирован SP3, что и видно:

Опять жмем стрелку вправо:

Так как в папку DriverPacks я положил только один архив с драйверами, то только его я выбрать и могу. И обязательно – ведь наша задача поставить систему на комп, в котором нет флопа, или нам лень туда совать дискету с драйверами – поставьте галочку на чекбоксе слева от надписи «DriverPack MassStorage text mode» - именно на текстовом этапе установки они нам и потребуются.
Ну, жмем опять на стрелку…

Методы… В методы я не вникал, но проверял: работают оба.
Поэтому, ничтоже сумняшись, оставляю то, что стоит по умолчанию – если бы я был таким умным, как автор сей проги, то я бы не пользовался ей, а написал бы свою. J

Хотите, найдите разницу между этими методами, не хотите – не ищите.
По секрету скажу: для нашего случая этот выбор значения не имеет, если кроме этих драйверов вы интегрируете еще какие то – выберете первый или второй, разницы особо никакой, но второй красивше J.
Опять жмем и опять ту же кнопку, и даже не один раз. Я нажал раз семь по моему, пропустив соответствующие страницы, кто хочет – разберется, для нашего случая не имеет ни малейшего значения..
Доходим до интересного экрана:.

Если вы в интернете, и вам захотелось что то еще добавить – можете смело отметить, что хочется, и нажать «Обновить выбранное».
Мне не захотелось, у меня все из того, что мне нужно – свежее, поэтому я опять жму стрелку:

Опа… А тут нет нашей любимой кнопочки, только денег просят… Хотите – дайте, я не возражаю.
А можете просто нажать кнопку «Поехали!» (чувствуете русский перевод? С космическим таким акцентом…)
Появляется вот примерно такое:

Окошко, даже сверху временами еще мелкое окошко выскакивает, но мы ждем…
Пока сверху не выскочит вот такое:

Жмем «ОК», жмем «Cancel» - все, программа свое дело сделала, она может уходить.
Что после нее осталось? Лог-файл, файл .ini, в том месте, где мы ее запускали – еще и папочка, нам не нужная, ну, заодно изменил и ту папочку, где у нас лежал дистрибутив Windows – теперь это дистрибутив готов к записи на диск.
Только не надо писать вот так вот по простому: типа я сейчас на диск запишу, а комп сам разберется, что с этим делать.
Вариантов много, я предпочитаю стандартный.
Там же есть ссылка на архив, в котором есть и сама программа, и загрузочный сектор для диска, и пример командного файла…
Ну, ежели что то я описал сильно вскользь – наезжайте, попробую дописать.
Но не обязательно – ведь лень то раньше меня родилась…
Собственно, писать на эту тему несколько уже и поздновато – все таки время ХР помаленьку отходит, что бы не говорили про Vista, а ведь есть еще семерка – Windows 7, и у обоих совершенно другой принцип инсталляции, и работать там с дистрибутивом надо совершенно по другому.
DPMS2 Output text
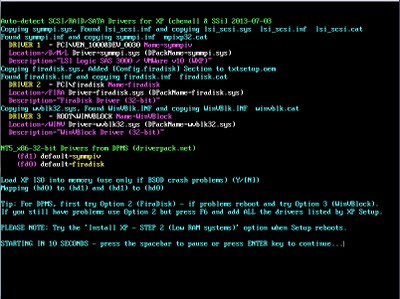
The colourful text displayed by DPMS2 will show you what drivers were selected and what two drivers will be loaded by default if you do not press F6.

If more than one OEM (SRS) driver is found, you will be asked by E2B to choose which one you want to be the default.
If more than one OEM driver is required you MUST PRESS F6 at the start of Setup and load ALL the drivers manually from the list presented. This is because the maximum number of drivers that DPMS2 can install automatically (without pressing F6) is 2 (one for each virtual floppy - and one must be the RamDisk driver FiraDisk or WinVBlock).
Known Issues
- s2k332.cat missing - If using the D/M/L driver pack, you need to unzip the s2k332.7z file.
- 0x00007B as Setup loads Windows at start of text-mode Stage 1 phase - try loading the ISO into memory (answer Y before the question times out!) or select the WinVBlock driver instead of the FiraDisk driver.
- If the E2B USB drive is a USB Hard Disk, load the ISO into memory when asked.
- If you have a DELL PC and no matter what you try you always get BSOD 0x0000007B error - re-make the XP ISO and use a special version of \i386\ntdetect,com.
- VBox Scsi (symmpiv driver) install resets at approx T-3 (almost at end of stage 2) - use WinVBlock rather than FiraDisk
- VBox SAS (symmpiv driver) IRQ_NOT_LESS_OR_EQUAL at approx T-12 - use Alt+1 (loads ISO into memory) for Step 2.
- To avoid a 0x000000A0 STOP error, press the F7 key when prompted to press F6 by XP Setup.
- If WinSetupFromUSB works but E2B does not, convert the WinSetupFromUSB USB drive to a .imgPTN file and add it to your E2B drive.
Useful Information
Refer to the XP Setup Stages Reference Guide here. The Alternate Downloads area contains an old Driver Pack that should work for Haswell Z87 systems (DPMS_Z87.zip) if the latest version in E2B does not work.

Forgot your Windows or Mac password? Can't login? Try kon-boot.
E2B DPMS2 Options
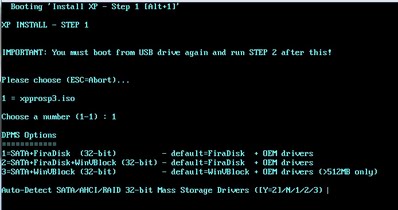
1 = OEM+FiraDisk - does not add the WinVBlock driver to the F6 floppies - use if drivers won't fit on the floppy disk using option 2
2 = OEM+FiraDisk+WinVBlock - THIS IS THE DEFAULT = Y = FiraDisk will be loaded
3 = OEM+WinVBlock+FiraDisk - the default Ram Disk driver that will be loaded will be WinVBlock - use if FiraDisk fails
If you just press the [ENTER] key then Option 2 will be selected = FiraDisk.
If you choose 1 then it is the same as Option 2 (except that the WinVBlock drivers will not be copied to the Virtual F6 floppy disks) which may save space and allow for larger Mass Storage drivers.
If you choose 3 then both FiraDisk and WinVBlock drivers are copied to the Virtual F6 floppy disks, but Windows will load the WinVblock driver automatically instead of the FiraDisk driver (unless you press F6).
The best option to use is option 2. Only use option 1 or 3 if option 2 does not work.
FailSafe: If you have a particularly difficult system that seems to crash (BSOD), use Step 1= Alt+1 - then DPMS2 option 2 = FiraDisk - then Y=load ISO into memory - then Press F6 and load all 3 drivers (OEM+Fira+WinV) - reboot - then choose Alt+2
IMPORTANT: If the Option 3 (WinVBlock driver) is used, you can only use it on 512MB+ systems because in STEP 2, you must use the 'STEP 2 - Install XP [Alt+2] (512MB+ systems]' option.
NOTE: You can use both FiraDisk and WinVBlock and an OEM disk driver, press F6 at the start of XP Setup and then load all the drivers listed.
E2B DPMS2 Options
1 = OEM+FiraDisk – does not add the WinVBlock driver to the F6 floppies – use if drivers won’t fit on the floppy disk using option 2
2 = OEM+FiraDisk+WinVBlock – THIS IS THE DEFAULT = Y = FiraDisk will be loaded
3 = OEM+WinVBlock+FiraDisk – the default Ram Disk driver that will be loaded will be WinVBlock – use if FiraDisk fails
If you just press the [ENTER] key then Option 2 will be selected = FiraDisk.
If you choose 1 then it is the same as Option 2 (except that the WinVBlock drivers will not be copied to the Virtual F6 floppy disks) which may save space and allow for larger Mass Storage drivers.
If you choose 3 then both FiraDisk and WinVBlock drivers are copied to the Virtual F6 floppy disks, but Windows will load the WinVblock driver automatically instead of the FiraDisk driver (unless you press F6).
The best option to use is option 2. Only use option 1 or 3 if option 2 does not work.
FailSafe: If you have a particularly difficult system that seems to crash (BSOD), use Step 1= Alt+1 – then DPMS2 option 2 = FiraDisk – then Y=load ISO into memory – then Press F6 and load all 3 drivers (OEM+Fira+WinV) – reboot – then choose Alt+2
IMPORTANT: If the Option 3 (WinVBlock driver) is used, you can only use it on 512MB+ systems because in STEP 2, you must use the ‘STEP 2 – Install XP [Alt+2] (512MB+ systems]’ option.
NOTE: You can use both FiraDisk and WinVBlock and an OEM disk driver, press F6 at the start of XP Setup and then load all the drivers listed.
Known Issues
- s2k332.cat missing – If using the D/M/L driver pack, you need to unzip the s2k332.7z file.
- 0x00007B as Setup loads Windows at start of text-mode Stage 1 phase – try loading the ISO into memory (answer Y before the question times out!) or select the WinVBlock driver instead of the FiraDisk driver.
- If the E2B USB drive is a USB Hard Disk, load the ISO into memory when asked.
- If you have a DELL PC and no matter what you try you always get BSOD 0x0000007B error – re-make the XP ISO and use a special version of \i386\ntdetect,com.
- VBox Scsi (symmpiv driver) install resets at approx T-3 (almost at end of stage 2) – use WinVBlock rather than FiraDisk
- VBox SAS (symmpiv driver) IRQ_NOT_LESS_OR_EQUAL at approx T-12 – use Alt+1 (loads ISO into memory) for Step 2.
- To avoid a 0x000000A0 STOP error, press the F7 key when prompted to press F6 by XP Setup.
- If WinSetupFromUSB works but E2B does not, convert the WinSetupFromUSB USB drive to a .imgPTN file and add it to your E2B drive.
No Mass Storage Driver found!
E2B will identify the PCI ID of your Mass Storage Driver (e.g. SATA disk contoller or SCSI/RAID disk controller) and look for a matching PCI ID in the DriverPack.ini file. You can check this by using the ‘List matching XP DriverPack.ini entries‘ menu in the E2B Utilities menu.
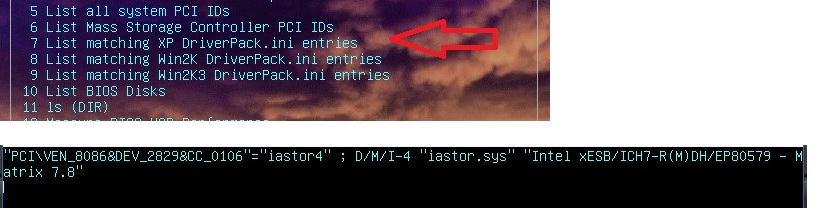
This shows a PCI Vendor ID of 8086 (Intel) and 2829 (device ID) has been detected for your Mass Storage controller and that the DriverPack.ini file points to the XP 32-bit drivers in the \_ISO\e2b\grub\DPMS\D\M\I\4 folder, which are for the ICH7 controller chip. If no text output is displayed, then E2B could not find a match for the PCI ID of your controller in the DriverPack.ini file.
To list the PCI ID of your disk controller, use the Utilities – List Mass Storage Controller PCI IDs menu entry.
You may find a more recent version of the DPMS drivers here and for how to update the DPMS driver pack (see below).
Notes:
- The E2B+DPMS process works by creating two virtual floppy disks, one containing the FiraDisk\WinVBlock driver which loads the ISO as a virtual CD and the other floppy disk which contains the correct 32-bit disk driver for XP. XP Setup will automatically load both drivers from the virtual floppy drives.
- For the most reliable installation experience (less chance of BSOD!), load the ISO into memory in STEP 1 (Alt+1 and answer Y) and then later after reboot, choose STEP 2 (use Alt+2). Loading the ISO into memory on each boot is not always necessary however – it depends on what mass storage driver is required and what BIOS/chipset the system has.
- If you want to use a unattend.txt\winnt.sif file with the ISO, refer to the Unattended Installation page.
- If you have a modern system, the Driver Pack included in E2B may be too old and may not contain a driver for your disk controller. You can update the Driver Pack by following the ‘Update DPMS’ instructions or try WinNTSetup and use a Windows 10 ISO+Win XP ISO.
- You can quickly check to see if a driver for your system is included in E2B by using the Utilities Menu – List matching XP DriverPack.ini entries menu.
Tip: If you get a ‘STOP: 0x000000A5’ BSOD error or ACPI-related error, then when Setup prompts you to press F6 to install drivers, press the F7 key. Press F5 to allow you to choose the type of system you have (e.g. ACPI type, multiprocessor, etc.).
Tip: NEVER set the USB drive as the first boot device in the BIOS Setup menu. The first boot device should always be set to the internal hard disk that is the system’s boot device – otherwise an Operating System may install boot code onto the E2B USB drive instead of the internal disk! Always use the BIOS Boot selection pop-up menu to boot from the E2B USB drive.
Instructions
1. Press Ctrl+I to select the Windows Install Menu
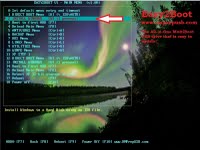
2. Press Alt+1 to run step 1

3. Choose your XP ISO file
4. At the DPMS Options prompt – hit [ENTER] for Y (equivalent to option 2). The two F6 SRS (SCSI/RAID/SATA) floppy images will automatically be made for you which contain a Ram Disk driver such as Firadisk and the correct OEM mass storage driver. (If you have problems with the Windows installation – e.g. Windows BSOD or resets just before T-3 minutes stage or have a SCSI controller, try option 3=WinVBlock instead followed by Alt+2 for the 2nd stage).
Note: If booting from an E2B USB-HDD and using FiraDisk (default) then you need to answer Yes to the ‘Load XP ISO into memory’ question or else you will get a BSOD 0x0000007B error when Setup switches to Windows protected mode!
Using DPMS in your own grub4dos menu
If you wish you can use the DPMS2 package in your own application. The DPMS driver folders (\D\M\) must be located directly below the folder that contains the DPMS2.g4d batch file. If you wish to generate a Ram Disk driver floppy, you must specify a value for the grub4dos environment variable FIRA (1=Firadisk only, 2=FiraDisk(default)+WinVBlock, 3=WinVBlock(default)+Firadisk. If you do not set the FIRA parameter before calling DPMS2.g4b then only the SRS F6 virtual floppy (or floppies) will be made.
If there is no SRS driver required and you asked for two floppies and use FIRA=2 or FIRA=3, then one floppy will have a default driver=FiraDisk and the other default=WinVblock.
If you use FIRA=2 or 3 and ask for just one disk you will be asked to choose which driver you want loaded by default.
The DPMS2.g4b batch file also takes a parameter (optional)
- (no parameter) = create maximum of two floppies
- 0 = create fd0 only
- 1 = create fd1 only
- 2 = create maximum of two floppies (same as no parameter)
Note that some special commands are also required in your grub4dos menu – see the ..\grub\XPStep1.g4b, ..\grub\XPStep2.g4b and ..\grub\XPStep2LowRam.g4b batch files for help.
937 thoughts on “ Help ”
When I switch to IDE mode, it shows red text that says “No matching PCI IDS in driverpack”.
In IDE mode there is no need to use the DPMS option, it’s only for SATA/AHCI/RAID drivers, the ones stock Windows does not include.
I have been using WinSetupFromUSB to install a number of Linux distros on my laptop without problem. However, one particular distro does not seem to work: Vector Linux 7.0 (VL7.0-STD-GOLD-LIVE.iso)
The boot process starts promisingly enough, but then stops with the error “could not find VL7.0-STD-GOLD-LIVE data directory”.
Thanks very much,
Using the second boot option- “mount hard drive partitions”, works fine here, testing VL7.0-STD-GOLD-LIVE.iso.
If that option is not selected, it seems init scripts do not mount all partitions, thus contents of the ISO file are not accessible.
No idea what went wrong with your comments, had to delete the other 3 in order the first to show up.
Thanks very much – yes second option works for me too. Strange that the first option doesn’t. Anyway, managed to install VL to a partition on my hard drive, and that’s all I wanted to do 😎
Yes, very weird about my replies not showing up – thanks for sorting that too.
One other questions if I may: I also use the tool to install Win2000 and WinXP. These are vanilla install CDs, so I have to set the SATA BIOS option to IDE emulation. I know that there is a way to tailor the Windows install CDs to incorporate the appropriate SATA drivers (slipstreaming) but I’ve never tried it as it seemed a bit of palaver. Is it easier using WinSetupFromUSB, ie is it a simple case of copying the driver files to the appropriate directory on the USB drive, or is there more to it? Perhaps at some point you could add a section to the FAQ on incorporating storage device drivers into the copy of the Windows install CD used by WinSetupFromUSB?
second option works for me too. Strange that the first option doesn’t.
All options except the second have “nohd” parameter, which apparently instructs init script not to mount any partitions on hard drives, among which is the USB disk, hence the contents are no longer accessible. You could press TAB at any of the boot menus and remove the “nohd” part.
I’ve been trying MANY supposed solutions to make a bootable USB that will install Windows 7 or Windows 8.1 from the same USB. This is the FIRST and the SIMPLIEST method I’ve found, and IT WORKS! Thank you very much.
I’ve managed finally to prepare SD card with M$ WinXP64 and Win7 distributives together with a GPartED image(kinda “mustdie diskette”). All of them lives together on a single card. Such a useful flash card, and such a great tool you’ve made!
Several weeks ago i couldn’t setup WinXP from USB stick with WinSetupFromUSB. Destination hard disk replacement(!) solved that trouble. Now it works great! The only little questions are how to remove(replace?) a distributive from prepared flashdrive and how to disable distributive name auto-accept option… Anyway, in general it’s almost brilliant!
Glad you figured it out.
What kind of source you need to remove/replace, there are 5 different types, and which exactly auto-accept option you have in mind?
If you mean the boot menu name when preparing the USB disk- there are several advanced options allowing custom names and folders. Have you looked at them?
I would like to have an option to remove Win distributive(in general, any would be great to remove any of them) without the need to rebuild whole stick. It’s not so hard to navigate through *.lst files and remove references and installation files, but wold like to have an option to minimize errors.
The auto-accept feature appears in a dialog saying “Multiple windows distributions detected”. It waits for user input 10 seconds(and discards it anyway), closes that dialog and continues the WinSetupFromUSB task 🙂
The best I could do currently, because of the very limited spare time, is to publish a tutorial how to remove and replace sources.
As for the dialogue box, as far as I remember, you need to type the new name and press OK before the timeout, otherwise the input is ignored, AutoIt limitation.
Can i help with that tutorial?
Maybe translate it in russian when ready?
With pleasure, just ask.
(1) I haven’t been able to boot the FreeBSD 10.0 ISO (FreeBSD-10.0-RELEASE-i386-dvd1.iso) – it comes up with a prompt about error 19 mounting the root file-system from cd9660 (I think). Have you any idea about this?
(2) I have been able to boot the PCLinuxOS 2014.08 iso (pclinuxos-kde-2014.08.iso), but after installing to hard drive the install won’t boot – it says something about waiting for sda5 (I had installed it to another logical partition). Worth noting is that the installer assigns sda to the memory stick and sdb to the hard drive, whereas all the other distros I’ve tried have assigned sda to the hard drive.
(3) Fragmentation of the memory stick is proving problematic: is there any way that the utility could be a bit more intelligent about (a) checking to see if there is a need to defragment the memory stick BEFORE starting the copy processs, and (b) writing ISO files contiguously (is this even possible)?
(4) Would it be possible for the utility to calculate checksums (md5, sha1, etc) for ISO files as it writes them to the memory stick and then include that information (as a comment?) in its entry in menu.lst? I can’t imagine this would add much overhead to the process.
1) *BSD does not work for now, only a few which I tested did work, because they did not need files outside kernel/initrd. Until *BSD variants start using and supporting isohybrid-ed images, or some other way to boot directly from an ISO file, there is no much I can do to place multiple *BSD on the same USB.
2) This seems to be an issue with PCLinuxOS and might well vary between each configuration and USB/internal disk type and controller.
3) It’s only Linux files which need to be defragmented, and program already does the best possible when using the auto-format option and NTFS to place the unmovable NTFS files in the beginning of the partition, providing contiguous space after them. Regular NTFS format dumps them in the middle of the volume, making defragmentation mission impossible as the disk fills in…
Going further- checking contiguous space etc. is far, far beyond the scope of this program.
There is WinContig included, and if one often adds and removes Linux sources, it should be used to provide enough contiguous free space, something I wouldn’t do programatically, as there are already tools for the purpose included.
4) On large files calculating checksums may take quite a lot of time, might include that as advanced option, but wouldn’t be any soon as spare time is very limited and I can’t even find time to code the planned and important changes due.
Have you seen this sweet little shell extension? Quite handy for this purpose.
Hi,
I am facing problems while trying to make a Windows 7 bootable usb disk from within windows xp. I have uploaded the log and backup files to the file host you had recommended. I will be grateful if you could provide some help in solving the issue.
A very pleasant day to you
Why using 1.0 beta7?
Get the latest 1.4, select auto-format option when using it for a first time and go ahead.
please help. I don’t have a degree in engineering for your website and pressing download links leads to a labyrinth of other pages.
I am sure you can do it without the need of any degrees, may the force be with you : )
Help. Won’t boot properly on UEFI system. Have to go into BIOS and change boot to BIOS (CMS). Boot the USB disk and then later change back to UEFI so system’s hard disk will boot. I recall that I needed to use FAT32 for the format so it could boot BIOS or UEFI, but did I miss something in the build? If so can I correct it now without have to rebuild the USB disk? (have windows 7 x86, 7 x64, 8.1 x86, 8.1 x64 and a password reset ISO plus LOTS of software on a 64GB USB disk. Would REALLY like not having to completely rebuild it. Thanks for any guidance you may be able to offer.
It’s FAT32. When I set BIOS to boot as BIOS, the USB drive boots properly and show the original NT6 menu, from which I select installing Windows or my Password reset. If BIOS is set for UEFI, then when it boots it only shows to install Windows 7 x64 and Windows 8.1 x64 on the menu. (as if it boots to a menu a couple of menus down the chain).
What exactly are the missing sources? Only Windows versions and utilities, including WinPE based ones, supporting EFI are added to the EFI boot menu. Do not expect to find there XP or DOS based ones for example, they won’t work under EFI anyway.
Alan, please. There is a FAQ, please read it. There is an answer, please read it carefully.
Again, only Windows versions, which support (64 bit, as nearly all consumer hardware except some tablets have 64 bit EFI) EFI are added to the EFI boot menu.
In short- Windows 7 32 bit for example do not support EFI boot, hence it’s not added. Windows 8 32 bit runs in very limited number of hardware, hence is not added.
Please read the FAQ for details.
Then it should boot in UEFI mode, you might need to play a bit with BIOS/EFI settings.
The USB drive was built with Windows 7 x86, Windows 7 x64, Windows 8.1 x86, Windows 8.1 x64 and Windows Password Reset. All are Windows 7/8.1 ISOs. It was Formatted with FAT32 and each ISO is under 4GB. When it boots “normally” I get the 0, 1, and 2 menus (1 is the NT6 stuff). You select 1 and then you get the install menu for the 4 Windows installs and the Password Reset, total of 5 items. If BIOS is set for UEFI, the first menu you see on a boot is only for the Windows 7 x64 and Windows 8.1 x64 installs.
Материнская плата asus a7v600. При установке системы выдается "Программе установки не удалось обнаружить установленные жесткие диски на этом компьютере, проверьте кабели. ".
Где найти драйвера? или как поставить систему на sata диск.
не видит ((
с загрузочного диска - диск абсолютно нормальный - но инсталяшка не видит его (как и биос в принципе)
Жека, это уже правдоподобнее - но на маме два разъема под сата есть. .
то ли доп драйвера при установке подсунуть, то ли ещё чего
BIOS не видит? ! Должен, блин, даже без дров! Покопайся в биосе, там Sata может быть тупо выключен - написано вроде "Serial ATA controller - Disable", поменяй на "Enable". Ещё "Onboard ATA Boot ROM" включи. Только на выходе из BIOS жми "Exit & Save". Когда увидел BIOS жёсткий - читай дальше.
Когда ставится ХРяк, там на синем фоне появляется внизу надпись "Нажмите F6, чтобы установить особый драйвер SCSI или RAID". На этом моменте нажимается, собственно, F6 и вставляется в дисковод ДИСКЕТА с драйвером контроллера SATA. Драйвер берётся с диска, идущего в комплекте с материнкой. Лежит это там по адресу: \Drivers\VIARAID\DriverDisk\SATA\*.* Вот все файлы оттуда кидай на дискету.
Если после нажатия F6 предложит несколько драйверов, выбирай "VIA Serial ATA RAID Controller(Windows XP)" и жми Enter, установка пойдёт дальше.
Если дисковода и дискет нет, хреново.. . Можно взять какую-нибудь сборку ХР (не очень это рекомендую, ибо делают их обычно криворукие идиоты) с уже вшитым драйвером SATA, либо всадить драйвер в имеющийся дистрибутив самому. Для этого есть программа nLite (тем и занимается, что копается в дистрибутивах) . В нете есть тьма инструкций, как это делается.
При чём здесь драйвера?
1. Проверить правильность подключения жестких дисков (интерфейсный кабель и питание)
2. В биосе включить автоопределение
и будет вам счастье
понимаешь просто установка зависет не от праграммы которая скачивается а от компа не все компы все понимают что им надо делать! рекоминдую комп APLLE очень умный мне очень нравиться на нем работать!! ! комп
Обязательно надо начать переустановку через BIOS!!
Главное; Отсоединить от компа всё. Кроме мышки,
клавиатуры, и конечно же монитора.
1 Вставишь в привод загрузочный (образ) диск с виндой и перезагружаешся!
2 При старте компа, ноутбука или нетбука, заходиш в БИОС, нажав "Delete", "F2", "F8", "F10" и т. д. (в зависимости от материнской платы)
Чтоб открыть БИОС !
3 Появится окно биоса, синего цвета - это и есть БИОС.
4 В биосе сделай загрузку с cd/rom.
(boot/cd-rom на первое место)
5 Нажав на F10 (в биосе) произойдёт сохранение и перезагрузка
6 При включении появится как обычно логотип и
надпись материнской платы.
7 Сразу после логотипа на секунд пять появится вот эта
надпись press and key from cd.
и сразу ЖМИ НА ЛЮБУЮ КНОПКУ (например пробел)
Установка системы началось))) ) Удачи.
В процессе когда появляется окошко с дисками, пометь обязательно диск С. Ниже есть "Настройки", там и форматироватируеш диск С .
Hdd надо перемычкой, в сата1 перевести (если биос, не видит) т. к. там южник via vt8237.
Да при установке, надо подсовывать драйвер сата (f6)
Но.. . самое простое, скачать винду, уже с интегрированными драйверами (сата via)в дистрибутив.
Installing Windows XP 32-bit directly from an ISO requires 3 boots, the first two boots must be from the E2B USB drive:
- Use the E2B+DPMS download to make your E2B drive.
- Use official Microsoft XP SP3 ISO (should be 600-800MB in size) or one of the Recommended later XP SP3 32-bit ISOs here.
- Do NOT configure the BIOS with the E2B USB drive as Drive 0 = first HDD.
The internal hard disk shoud be the first disk. Boot from the E2B USB drive using the BIOS Boot Selection menu and hotkey (e.g. F2, F8, F9, F10, F12, ESC - depending on system) - Boot from the E2B USB drive and choose STEP 1 for first text-mode Windows XP Setup stage (formats and copies file to hard disk)
- Re-boot to the E2B USB drive again after Windows text-mode Setup stage resets and choose STEP 2
- Re-boot after Windows GUI-mode Setup stage has completed after STEP 2 (if it reboots to E2B press F7 to reboot to the hard disk - or remove E2B USB dribe and reboot)
- For the most reliable installation experience (less chance of BSOD!), load the ISO into memory in STEP 1 (Alt+1 and answer Y) and then reboot and choose STEP 2 (use Alt+2). Loading the ISO into memory on each boot is not always necessary however - it depends on what mass storage driver is required and what BIOS/chipset the system has.
- If you want to use a unattend.txt\winnt.sif file with the ISO, refer to the Unattended Installation page.
- If you have a modern system, the Driver Pack included in E2B may be too old and may not contain a driver for your disk controller. You can update the Driver Pack by following the instructions here or try WinNTSetup and use a Windows 10 ISO+Win XP ISO.
- You can quickly check to see if a driver for your system is included in E2B by using the Utilities Menu - List matching XP DriverPack.ini entries menu.
- Tip: If you get a 'STOP: 0x000000A5' BSOD error or ACPI-related error, then when Setup prompts you to press F6 to install drivers, press the F7 key. Press F5 to allow you to choose the type of system you have (e.g. ACPI type, multiprocessor, etc.).
Tip: NEVER set the USB drive as the first boot device in the BIOS Setup menu. The first boot device should always be set to the internal hard disk that is the system's boot device - otherwise an Operating System may install boot code onto the E2B USB drive instead of the internal disk! Always use the BIOS Boot selection pop-up menu to boot from the E2B USB drive.
1. Press Ctrl+I to select the Windows Install Menu

2. Press Alt+1 to run step 1

3. Choose your XP ISO file

4. At the DPMS Options prompt - hit [ENTER] for Y (equivalent to option 2). The two F6 SRS (SCSI/RAID/SATA) floppy images will automatically be made for you which contain a Ram Disk driver such as Firadisk and the correct OEM mass storage driver. (If you have problems with the Windows installation - e.g. Windows BSOD or resets just before T-3 minutes stage or have a SCSI controller, try option 3=WinVBlock instead followed by Alt+2 for the 2nd stage)
Note: If booting from an E2B USB-HDD and using FiraDisk (default) then you need to answer Yes to the 'Load XP ISO into memory' question or else you will get a BSOD 0x0000007B error when Setup switches to Windows protected mode!
512MB systems
If booting from an E2B USB Hard Disk, you cannot install to AHCI/SCSI systems having less than 512MB of memory with Firadisk, because you need to load the ISO into memory. You can use WinVBlock instead, but WinVBlock requires loading the ISO into memory in STEP 2. For this reason, if you have AHCI/SCSI/RAID systems with 512MB or less, use E2B on a USB 'Removable' Flash drive. There are two ways around this:
Low RAM Option 1 : Use UltraISO to reduce the size of the ISO by deleting all folders from the ISO except \i386 folder, also delete all files >1MB in the i386\LANG folder. Then use the default Firadisk option and load ISO into RAM (use default options).
5. Wait for XP Setup to start - or press [ENTER] if you are impatient
Note: you can enter A for Abort or C for Command prompt (or D for Debug at command prompt) at this last prompt and then press [ENTER]. C/D drops you to the grub4dos command shell - pressing ESC from within the shell will continue where you left off and start Windows Setup).
This colourful screen shows that a Mass Storage Driver has been found for a SCSI controller.
If the fd1 and fd0 drivers are both 'firadisk.sys' then no suitable disk driver has been found and Windows XP may not be able to find your internal disk drives.
6. Now go through the normal XP install options (there is normally no need to press the F6 key). Format the drive and allow XP Setup to copy the files to the hard disk as usual.
7. When the system restarts, boot back to the E2B USB drive again (if the system boots to Windows you will get an '.asms files not found' error - just reboot back to E2B again and carry on as below).
8. Press Ctrl+I to select the Windows Install Menu again
9. Press Alt+2 - this is the safest and most reliable option for XP Step 2 (or use Alt+3 but you must leave the USB drive connected - if you used OEM+WinVBlock you MUST use Alt+2 and not Alt+3)
Now choose the SAME ISO XP install file that you chose in step 1. If you get an 'asms files not found' error, repeat the whole install again from 'Step 1' but choose the WinVBlock driver. If possible, always load the whole ISO into RAM (answer Y when prompted).
10. Windows Setup GUI Mode will run and you can complete the installation of Windows XP (after it reboots)
Note: If the FiraDisk RAMDisk driver was installed, it will be removed if you answer Y for Yes to the prompt that will appear when you get to the XP Desktop.
Although the FiraDisk driver does no harm, it does show up as as 'Unknown Device' in Device Manager. If you want to keep FiraDisk, answer N for No.
The two Virtual Floppy disks that are generated in memory will contain identical files (all driver files will be on both disks). The only difference is that one disk will contain a txtsetup.oem file with a different default driver setting from the other. ie. one txtsetup.oem file will be set to load an AHCI or SCSI driver and the other will be set to load the OEM Mass Storage driver.
If you have an IDE system and no OEM driver is required, both WinVblock (fd0) and Firadisk (fd1) will be loaded.
Install Windows from USB with WinSetupFromUSB, multiboot with Linux and a lot more
Here you can get help, access FAQ and tutorials, get support, report a bug of make feature request about WinSetupFromUSB by leaving a comment.
DPMS Output text
The colourful text displayed by DPMS will show you what 32-bit drivers were selected and what two drivers will be loaded by default if you do not press F6.
If more than one OEM (SRS) driver is found, you will be asked by E2B to choose which one you want to be the default.
If more than one OEM driver is required you MUST PRESS F6 at the start of Setup and load ALL the drivers manually from the list presented. This is because the maximum number of drivers that DPMS can install automatically (without pressing F6) is 2 (one for each virtual floppy – and one must be the RamDisk driver FiraDisk or WinVBlock).
No Mass Storage Driver found!
E2B will identify the PCI ID of your Mass Storage Driver (e.g. SATA disk contoller or SCSI/RAID disk controller) and look for a matching PCI ID in the DriverPack.ini file.
You can check this by using the 'List matching XP DriverPack.ini entries' menu in the E2B Utilities menu.
This shows a PCI Vendor ID of 8086 (Intel) and 2829 (device ID) has been detected for your Mass Storage controller and that the DriverPack.ini file points to the XP 32-bit drivers in the \_ISO\e2b\grub\DPMS\D\M\I\4 folder, which are for the ICH7 controller chip. If no text output is displayed, then E2B could not find a match for the PCI ID of your controller in the DriverPack.ini file.
To list the PCI ID of your disk controller, use the Utilities - List Mass Storage Controller PCI IDs menu entry.
You may find a more recent version of the DPMS drivers here.
See here for how to update the DPMS driver pack.
512MB systems
If booting from an E2B USB Hard Disk, you cannot install to AHCI/SCSI systems having less than 512MB of memory with Firadisk, because you need to load the ISO into memory. You can use WinVBlock instead, but WinVBlock requires loading the ISO into memory in STEP 2. For this reason, if you have AHCI/SCSI/RAID systems with 512MB or less, use E2B on a USB ‘Removable’ Flash drive. There are two ways around this:
Low RAM Option 1 : Use UltraISO to reduce the size of the ISO by deleting all folders from the ISO except \i386 folder, also delete all files >1MB in the i386\LANG folder. Then use the default Firadisk option and load ISO into RAM (use default options).
5. Wait for XP Setup to start – or press [ENTER] if you are impatient
Note: you can enter A for Abort or C for Command prompt (or D for Debug at command prompt) at this last prompt and then press [ENTER]. C/D drops you to the grub4dos command shell – pressing ESC from within the shell will continue where you left off and start Windows Setup).
This colourful screen shows that a Mass Storage Driver has been found for a SCSI controller.
If the fd1 and fd0 drivers are both ‘firadisk.sys’ then no suitable disk driver has been found and Windows XP may not be able to find your internal disk drives.
6. Now go through the normal XP install options (there is normally no need to press the F6 key). Format the drive and allow XP Setup to copy the files to the hard disk as usual.
7. When the system restarts, boot back to the E2B USB drive again (if the system boots to Windows you will get an ‘.asms files not found’ error – just reboot back to E2B again and carry on as below).
8. Press Ctrl+I to select the Windows Install Menu again
9. Press Alt+2 – this is the safest and most reliable option for XP Step 2 (or use Alt+3 but you must leave the USB drive connected – if you used OEM+WinVBlock you MUST use Alt+2 and not Alt+3)
Now choose the SAME ISO XP install file that you chose in step 1. If you get an ‘asms files not found’ error, repeat the whole install again from ‘Step 1’ but choose the WinVBlock driver. If possible, always load the whole ISO into RAM (answer Y when prompted).
10. Windows Setup GUI Mode will run and you can complete the installation of Windows XP (after it reboots)
Note: If the FiraDisk RAMDisk driver was installed, it will be removed if you answer Y for Yes to the prompt that will appear when you get to the XP Desktop.
Although the FiraDisk driver does no harm, it does show up as as ‘Unknown Device’ in Device Manager. If you want to keep FiraDisk, answer N for No.
The two Virtual Floppy disks that are generated in memory will contain identical files (all driver files will be on both disks). The only difference is that one disk will contain a txtsetup.oem file with a different default driver setting from the other. ie. one txtsetup.oem file will be set to load an AHCI or SCSI driver and the other will be set to load the OEM Mass Storage driver.
If you have an IDE system and no OEM driver is required, both WinVblock (fd0) and Firadisk (fd1) will be loaded.
Update DPMS with the latest XP 32-bit Mass Storage drivers
The version of the Mass Storage Driver Pack used in E2B can be found in the \_ISO\e2b\grub\DriverPack.ini file (e.g. v.1.72 has a modified version of MSD 1412115). If you are installing XP to a modern system, you may find that the E2B+DPMS download does not contain the new driver that is required for your chipset. In this case you will need to update your E2B USB drive using the latest DriverPack Mass Storage XP 32-bit build as follows:
Version 1412115 is here (2014-12-11). E2B uses a bugfixed version of this driver pack (DP_MassStorage_wnt5_x86-32_1412115.7z).The latest Nightly builds of driverpacks can be found near the last post on this forum thread.
Tip 1: the DPMS2 batch file in E2B parses the DriverPack.INI file to look for a matching PCI ID. You can edit the INI file to change which driver and folder is used for a particular PCI ID (if you know what you are doing!).
Tip 2: The E2B – Utilities menu has menu entries that can check if a suitable driver can be found in the DPMS Driverpack.ini file. Use one of the ‘List matching DriverPack.ini entries’ menu entries.

Читайте также: