
Настройка redshift cinema 4d
Никогда не пользовался новым редактором материалов Redshift и использовал «xpresso стайл». В этом видео покажу те недостатки, которые являются критичными для меня.
Если составлять список, то он следующий:
- Панель настройки находится отдельно от окна редактирования
- Поиск осуществляется в громоздком окне (хорошо, что хоть кей есть [C])
- Выбранная нода не добавляется по нажатию Enter, необходимо кликать мышкой
- Нет хоткея для соединения ноды с Output (в целом это можно решить через Solo Node)
- Два превью — ноды (может не отображаться), финального материал
- Нет c4d shader ноды
- Нет прямого переноса материала в окно, надо создавать ноду Reference
Для себя я не нашёл ни одной причины, зачем включать этот редактор. Возможно я просто не умею «его готовить»
Selecting Redshift as the renderer
Next we need to tell Cinema 4D to use Redshift as the current renderer. To do that, we open the Render Settings window by selecting Render from the Cinema 4D's menu bar and then Edit Render Settings.

Then in the Render Settings window we select Redshift from the renderer selection drop-down box.

After that, we select the new Redshift entry from the tree on the left side of the Renderer Settings Window. This will reveal the Redshift Render settings for our scene.

Node Tree
The left area contains a tree of all the Shader Nodes that can be added to a Graph. They are organized into groups depending on the node type or usage.
Результат урока
UPD. Мне прислали ссылку на видео, в котором показывается, как сгладить vertex map
Creating a Redshift Light
Our scene so far has only very simple lighting. Let's make it more dramatic by adding a Redshift Light.
From the Redshift menu, select Infinite Light from the Lights sub-menu.

Select and move the light to a good spot, and rotate it towards our objects. Let's take a quick look at the basic parameters of this object.

Looking in the General tab of this object, we see that this light is actually an Redshift Light where its type has been set as Infinite. You can easily switch between different light types by changing the Light Type parameter.
Next tweak our light a bit by clicking on the Shadow tab.

Here you can find the shadowing settings. Let's change the intensity of the shadows by adjusting the Transparency setting.
Now our scene will look this in the RV

Creating a Redshift Material
From the Redshift menu, select the Materials group, and within it select the Material option.
This will create a material based on Redshift's RS Material physically correct shader.
Transparency Depth
The Transparency Depth parameter puts an individual cap on how many times a transparency ray can pass straight through objects. Transparency is utilized for things like Opacity in the Redshift Material to go much deeper than complex refractions and render much faster than Refractions.
Transparency Depth is not limited by the Combined Depth parameter.
The test scene was modified specifically to demonstrate the impact of the depth settings by putting 8 panes of glass in a row in front of the camera. Each pane of glass has actual thickness meaning that in order for a ray to fully pass through one requires at least 2 rays, since there are 8 panes of glass a minimum of 16 rays is required to see through all 8 panes. You can see below that the glass on the lantern is not even visible until the refraction trace depth is high enough to get through all 8 panes of glass and then the lantern glass itself. These same limitations are imposed on each ray type by their individual caps as demonstrated in the last example where the Global Illumination and Reflection Depths are reduced well below the Combined Depth resulting in the loss of most of the reflections and the global illumination.
In this section we are going to walk through the basics of the plugin by making a simple scene and rendering it with Redshift. This guide assumes that the Redshift Cinema 4D plugin has been installed already.
Ok, let's fire up Cinema 4D and get started.
Combined Depth
The Combined Depth, and the associated depth parameters covered below, control how many times a ray of its respective type can bounce or pass through an object until it is terminated. The higher the depth value the more realistic the rendering result at the expense of render times.
The Combined Depth parameter specifies the maximum limit for global illumination, reflections, and refractions combined. This means that if the individual depth value for global illumination, reflections or refractions is higher than the Combined Depth the resulting render will still be capped at the Combined Depth value.
Increasing Depth values can quickly and greatly increase render times in scenes with many bounces. In general it is a best practice to use as few as you need to achieve the result that you desire.
Global Illumination Depth
The Global Illumination Depth parameter puts an individual cap on how many times an indirect lighting ray can bounce. Interior scenes where many indirect bounces are required for realistic lighting make this is a good parameter to increase.
Reflection Depth
The Reflection Depth parameter puts an individual cap on how many times a reflection ray can bounce.
Refraction Depth
The Refraction Depth parameter puts an individual cap on how many times a refraction ray can bounce or pass through objects.
Видеоурок по Cinema 4D: Новый Redshift 3.0.48 (интерфейс, ACES)
На дня произошло глобальное обновление Redshift, которое изменило то, как будет выглядеть рендер, связано это с тем, что теперь по умолчанию у нас другое цветовое пространство и это скорее плюс.
Но это точно непривычно, все старые сцены будут рендериться по-другому (но можно настроить). Обязательно делайте копии старых .c4d файлов, потому что разработчики предупреждали об отсутствии обратной совместимости.
В видео расскажу про новый интерфейс и как раз ACES.
Denoising
The Denoising checkbox allows you to quickly toggle denoising on and off. Denoising allows you to easily render images at a reduced baseline quality (lower sample counts) and increased speed at the expense of some potential accuracy. Denoising can only do so much and a balance must be struck between Bucket Quality and the denoiser engine of choice in order to find what works best for your project. For more information please see this page.
Видеоурок по Cinema 4D: Redshift и добавление "стикеров" без UV развертки (Простой метод)
Octane после Redshift
«В редшифт много настроек, а октан проще освоить»
«Октан сразу красиво делает, а в редшифт надо повозиться»
Идут года, а вопросы всё те же и дискуссии не меняются. Так получилось, что я полностью перешёл на редшифт, но выдался небольшой проект, который необходимо выполнить в октане и я понял причины, заставившие выбрать команду «красных».
Решил записать коротенькое видео о том, как начать работать в Redshift под Cinema 4D. По аналогии с видео про Octane. Первое впечатление redshift производит как сложного рендера с кучей настроек, но оказывается, что не всё надо крутить. А работать в нём начать крайне просто.
У меня лицензия бетатестера, версия 2.5 (предыдущая была 2.083 если не ошибаюсь), я использую 2х980ti.
Пассы

В видео забыл сказать о пассах, они находятся во вкладке AOV, цифрой указываете сколько их нужно, выбираете тип. В ранних версиях их можно было выводить только в многослойный формат, типа .exr, в актуальной (2.5) версии этой проблемы нет.
Скругленные углы

Как есть адаптер для дисплейса, так есть и адаптер для Bump. Можно делать эффект скругленных углов. Подсказал Андрей
Normal карта

Смешивания Normal и Bump карт

Normal карту грузим в ноду Normal Map, а bump карту в обычную Texture (на картинке называется BUMP), дальше подключаем её в ноду Bump Map. Это нужно для того, чтобы потом смешать их через Bump Blender. У каждого Input (помимо базового слоя, куда мы загружаем normal можно регулировать его силу). Через weight Input 0 настраиваем силу второго слоя, в некоторых ситуациях можно поставить галочку Additive Mode в RS Bump Blender.
Светящийся материал

Светящийся материал называется RS Incandescent.
Volumetric Light

Чтобы сделать объемный свет, необходимо в настройках redshift добавить атмосферу, у неё будет настройка fog. В дальнейшем у каждого источника света крутим Volume — Contribution Scale.
X-Particles

При применении тега к эмиттеру частиц, вы получаете возможность визуализации частиц как в стандартном рендере с применением X-Particles Material.
Плюсы редшифта (сравниваю с Октаном):
- Адаптивный сэмплинг ведет к большей скорости и возможности оптимизации
- Куча настроек
- Двухсторонние светящиеся материалы
- Быстро фиксят баги, частые выходы обновлений
- Есть разные режимы смешивания шейдеров/текстур (в октане только multiply)
- Высокая стабильность работы (2 месяца пользования) не крашнулся
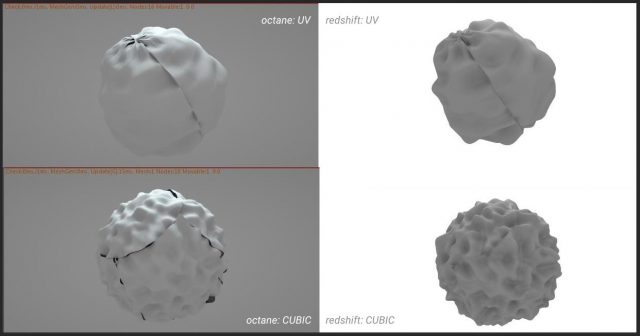
Не могу не показать сравнение алгоритмов работы дисплейса
Минусы:
- 500$ / 600$ первый год, 250$ / 300$ последующие (подробности)
- Чтобы было красиво в один клик, как в октане и светяшки освещали, надо включать GI
Вывод:
Буквально 3 месяца назад я готов был рекомендовать Octane всем и каждому, потому что красиво, потому в один клик, потому что есть косяки, но КРАСИВО ЖЕ. Сегодня ситуация меняется на глазах. Появился очень хороший и допиленный конкурент — Redshift. За те три месяца, что я им пользуюсь, он из стадии «мало что есть, но вроде рендерит» превратился в стабильный инструмент для работы (добавили поддержку Х-Партиклз, поправили разные баги, добавили поддержку с4д шейдеров и т.п.). Да, октан так же красив, но его нестабильность и медленное развитие, косяки с мографом (бывает на IPR всё норм, на финальном полсцены пропадёт) отнимает «балы» от репутации.

Redshift features two modes for approaching its render settings, a streamlined Basic mode and a more detailed Advanced mode. Basic mode consists of a small selection of frequently used render settings while Advanced mode exposes all of the available render settings. If you're just getting started with Redshift or prefer to keep things simple the Basic mode is a great way to adjust your render quality without the need to fine tune render parameters.
The render settings for the Basic mode are covered below on this page, to see information covering the Advanced mode please see the Render Settings - Advanced page.
Changes made in the Advanced mode are still active while using the Basic settings mode, any of these changes are noted in the window below the Basic settings as pictured in the image below.

C4D Modified Advanced Settings window

Maya Modified Advanced Settings window
The Modified Advanced Settings Window is not currently available in 3ds Max.

Houdini Modified Advanced Settings window
Katana UI Screenshots Coming Soon
Creating a Physical Sky and Sun
How about we go one step further with the lighting? Let's add a Physical Sun and Sky to give our scene a more realistic look.
First let's delete the Redshift Light, because it will not be necessary once we have a Sun object.
Then in the Redshift menu select the Redshift Sun & Sky Rig option from the Object sub-menu like so:

Now our scene tree will look something like this:

Let's rotate our viewport camera towards the horizon and check our RV window to see how it looks

A Redshift Sun object can be rotated and animated just like an Infinite light. Changes to the Sun's direction will also affect the behavior of the Physical Sky.
So, let's bring the sun into view by selecting the Redshift Sun object by rotating it until it faces our viewport.

You can try changing the parameters of the Redshift Sun and Redshift Sky objects, and see what other results you can get.
Adding a Texture
Open the Textures category in the Node Tree and drag a Texture node into the graph. This will create a texture sampling node. Now let's connect its Out Color port to the Diffuse Color port of the RS Material shader.

Let's tell the Texture shader node, the file we want to use. Select the Texture node and in the General settings tab, set the texture's Filename parameter by clicking the three dots button and picking a texture file from your system:
You can also set the texture by dragging and dropping files onto the preview area textures from the File Explorer / Finder or from other parts of the Cinema 4D UI (for example Bitmap Shaders)
Now let's render again to see the results

Verifying System GPUs
Let's also make sure that Redshift has detected our system's GPUs. In the previous image we can see that Redshift has detected two GPUs, and both have been activated. So, everything is working correctly and we can start Rendering!
Assigning a material
Drag and drop the new material onto the sphere in the scene or alternatively on the object in the scene tree on the top-left part of the Cinema 4D UI.
Editing the Material Shader Graph
Let's try changing the color of the shader. Select the RS Material node, and then, in the Basic Properties tab of the node's attributes change the Color parameters of the Diffuse section. Render the scene to see your changes.
Now let's make our boring gray material into something more interesting by adding a Texture!
Verifying the Installation
First of all let's make sure that the plugin has installed correctly by looking at the Redshift Preferences which are are available in the Cinema 4D Preferences window. Select the Redshift menu from the Cinema 4D's menu bar and then choose the Preferences option.

If the Redshift main menu is missing, then the plugin installation has not been successful
When selected, the Redshift Preferences are displayed

Adding Lens Effects to a Camera
We can also add lens effects to our Redshift camera, via the Exposure Bokeh and Distortion tabs.
Let's adjust some of the parameters

Here we adjusted the Shutter Time Ratio, added Vignetting and dropped a little bit the saturation amount.
Finally we added a touch of Depth-Of-Field/Bokeh by slightly increasing the CoC Radius.


Евгений Леженин ответил Сереже
Сережа, спасибо, вроде что то получилось. хотя много шума и настройки кривые, как только ставлю свет, настройка Decay ставится на Inverse и все чернеет)

Евгений, Вот этими вот параметры в RS Enviroment, можно настроить плотность и затухание, а шум это уже семплинг нужно поднимать в настройках рендера.
Евгений Леженин ответил Сереже
Евгений Леженин ответил Сереже
Евгений Леженин ответил Сереже
Сережа, еще вопрос, просто в интернете нет) когда отдаляю камеру, объекты начинают исчезать(обрывками) как это убрать? дальность прорисовки увеличить
Евгений Леженин ответил Сереже
Сережа, и последний вопрос)) у меня при рендере не меняется интенсивность отражений на текстуре. Получается что в превью текстура одна, а при рендере другая и не меняется как бы не менял. Что нужно настроить?
Motion Blur Steps
This controls the number of linear motion blur steps that Redshift will use to represent the trajectory of cameras, lights and objects. More steps means the trajectories will be more accurate but also more memory will be used.
Видеоурок по Cinema 4D: Redshift и добавление "стикеров" без UV развертки (Простой метод)
Bucket Quality
The Bucket Quality setting allows you to quickly adjust overall render quality by switching between preset sampling Threshold values. Higher quality modes decrease the Threshold value which improves render quality and reduces noise but at the cost of render time. The Custom preset is automatically switched to when you enter your own custom threshold value. For more detailed information please see the Unified Sampling page.
Basic mode uses Automatic Sampling by default, if you want manual control over your sample counts you must switch to Advanced mode to disable automatic sampling.
Видеоурок по Cinema 4D: Использование Vertex Map для создания следов (Redshift)
Листая ленту, увидел отличную работу студии Media Work и решил повторить их результат с оставлением следов от прыгающего объекта. Сразу скажу, что ребята явно сильнее меня владеют с4д, потому что у них результат оказался круче.
Тем не менее я записал урок, в котором показал решение для следов на основании Vertex Map. Обязательно отправлю автором оригинального ролика, вдруг я угадал метод решения =)
Denoising Engine
Redshift has three built-in Denoising Engines and they can easily be switched between here, each one with their own general pros and cons.
- OptiX - Very fast and can be used during interactive rendering but can have more trouble cleaning noise compared to alternatives.
- Altust Single - Slower (renders the frame once before denoising) and non-interactive but produces good results for final quality renders.
- Altus Dual - Slowest (renders the frame twice before denoising) and non-interactive but produces great results for final quality renders.
For more information on Denoising and the different Denoising Engines please see this page.
The images below were rendered with Bucket Quality Low in order to better demonstrate the differences of the different Denoising Engines due to the low sample count resulting in more visual noise.


Bucket Quality: Low
Global Illumination
The Global Illumination checkbox lets you quickly toggle bounced indirect lighting on and off. For the most realistic lighting Global Illumination should be left enabled but it will increase render times. For more information please see this page.
By default Basic mode uses a combination of Brute Force for primary bounces and Irradiance Point Cloud for secondary bounces.
In the example images below notice how the bounce lighting from the floor and wall next to the lantern is realistically filled in when Global Illumination is enabled.


Global Illumination: Disabled
Видеоурок по Cinema 4D: Композиция с телефоном (Redshift, After Effects)

У нас на курсе есть такой раздел, где обучающиеся присылают свои работы для получения фидбека, есть опытные ребята, есть новички. Иногда у меня сразу появляется идея как можно было бы сделать более интересно. В этом уроке как раз покажу, при помощи каких инструментов превратил первую картинку во вторую.
Как создать красивую 3D композицию?
Давно не записывал длинных видео, в нем разобрал процесс создание композиции с абстрактной геометрией, основные этапы, которые показаны в видео:
- подбор референсов
- грубый эскиз
- построение композиции
- рендер
Settings
This is where the Basic or Advanced mode can be toggled. For information covering the Advanced mode please see this page.
Creating a simple scene
From the Create menu select Object and then Sphere to add a sphere to our blank scene

Deformation Blur
This checkbox toggles Deformation Blur for Motion Blur on and off. Deformation Blur tracks the motion of individual vertices and can be memory-intensive, if your objects do not have animated deformation this parameter can be left disabled for increased performance. For more information please see this page.
In the example images below notice how the trajectory of the moving lantern is more appropriately rendered as the Motion Blur Steps are increased. All renders were taken from the same animation, the only thing changed was the Motion Blur Step count.


Motion Blur: Disabled
Graph Area
The center area contains the Shader Graph, which is based on Cinema 4D's Xpresso system. Nodes be added by dragging one from Node Tree and dropping it into this area. Connections can be formed by clicking on the Output Port area (red square) of a source node to select the desired output and the clicking on the Input Port area (blue square) of the target node, and selecting the input port that will be connected.
Our first render
Now, we are all set, to render our simple scene. From the Render menu in the main menu select Render View to render our object in the viewport.
You should see something like this:

Not very exciting.
Let's see if we can make things more interesting by adding materials.
Threshold
The Threshold parameter refers to Unified Sampling's Adaptive Error Threshold and is controlled by the Bucket Quality presets or by the user when set to Custom Bucket Quality. Lower Threshold values improves render quality and reduces noise but at the cost of render time. For more detailed information please see this page.
| Bucket Quality | Threshold |
|---|---|
| Low | 0.100 |
| Medium | 0.010 |
| High | 0.005 |
| Very High | 0.001 |
| Custom | User controlled |


Bucket Quality: Low
Render Time (Min:Sec) : 0:44
Node Attribute Editor
The right area holds an attribute editor for editing the parameters of the currently selected node from the center area. The editor supports all the functions of the built-in attribute editor of Cinema 4D including setting key-frames.
Our material has two Shader Nodes. The first is Material which represents the material's final outputs to the renderer. The second node is RS Material which is Redshift's physically accurate Material Shader. There are multiple material shaders in Redshift, all of which are located under the Materials category in the node tree. In the graph you also see that the shader's Out Color output is connected to the final Surface output of the material.
Creating a Redshift Camera
Let's experiment a little with this render, by changing the camera type to one of the Redshift cameras.
First let's create a Redshift camera object. In the Redshift menu select the Standard Camera from the Cameras sub-menu. The camera should match our current viewport.
Then activate the camera in the viewport by selecting from the viewport's Cameras menu the Use Camera sub-menu and then selecting our new camera. Now our viewport is looking through our new camera.

The object holds a Redshift Camera Tag, which contains the Redshift-specific attributes of our camera.
Let's check out some of the parameters.

With Camera Type you can override the camera type from the standard Cinema 4D one to one of the Redshift ones.
Let's change it to Fisheye.
Now our render camera uses a Fisheye-type lens, and looks like this.

Try the different camera types and experiment with their parameters.
Interactive Preview Rendering - IPR
Editing the scene and clicking Render every time is not only counter-productive, but also slow for complex scenes. Wouldn't it be nice if we could get some quick feedback on our scene, without having to stop our flow? Actually this is one of the many features inside the Redshift Render View (RV). Check the RenderView page, for more info.

Let's open the render view window, by navigating the application main menu to the Redshift plugin menu, and selecting Redshift RenderView
This is the RenderView window, to activate the IPR, press the Play button on the RV window tool-bar. When the IPR is activated any changes detected in the scene are automatically reflected in the RenderView. That includes Camera and Object movements, Material assignments, Material and Object parameter changes, as well Object geometry edits.
Now with the IPR active, move the viewport camera around, move an object, or try changing some material parameter. All changes will be reflected in the RV.
CGMGZN (challenge)
В ВК, сообщество CGMGZN организовали батл дизайнеров, где за определенное время необходимо сделать работу на предложенную тему. Я решил попробовать поучаствовать «на лайте», то есть не как участник.
Это стало хорошим вызовом, который показал, что многие темы даются очень сложно, а делать светлые картинки оказалось в разы труднее чем тёмные (поэтому большинство рендеров в тёмной гамме).
Что-то получилось здорово, что-то хуже. В среднем на одну картинку с нуля, с момента выбора темы, до результата уходило 5-6 часов.
Посмотреть работы можно в моем профиле на беханс.

Читать дальше
Adjusting the material settings
Select the Redshift material from the material editor. When the material is selected, the parameters of each material component (the shader nodes) can be edited directly within the Cinema 4D Attribute Editor.

Select the Jade preset from the Base Properties tab. Note that the material preview updates to reflect the changes.
Now, render the scene again, to see our new material.
Motion Blur
The Motion Blur checkbox lets you quickly toggle Motion Blur on and off. For more information please see this page.
If a Motion Vector AOV is enabled in your scene all Redshift motion blur will automatically be disabled in the beauty render as this would be undesirable for a Motion Vector AOV.
For more information on AOVs, please see here.
Editing Materials
First lets add a couple more objects to the scene to make it slightly more interesting. Add a Capsule object and a sufficiently large plane object to act as a floor for our other objects. Create another Redshift material, leaving all the settings in their default state, and assign it to the capsule object.
Now our scene would look something like this

Select the capsule material and click the Edit Shader Graph Button within the Attribute Editor

This is the Redshift Shader Graph Editor, which you can use to create and customize your materials. In Redshift materials are constructed by connecting Shader Nodes together. The Redshift Shader Graph Editor is divided into three main areas.
Видеоразбор проекта «Технологическая композиция»
В этом небольшом видео, я разберу небольшой проект, который построен на примитивах и бесплатных элементах из kitbash
Читайте также: