
Mplab x ide установка
The latest version of macOS, 10.15 Catalina, removes support for 32-bit applications. This means that current versions of MPLAB X IDE (up to version 5.40) will not run on this operating system without a patch. All current versions of MPLAB XC compilers are now compatible with this latest version of macOS.
Source Archives
| MPLAB® XC16 Compiler | MPLAB XC8 Compiler AVR® MCUs | MPLAB XC32 Compiler |
|---|---|---|
| v1.00 | v2.00 | v1.00 |
| v1.10 | v2.05 | v1.10 |
| v1.11 | v2.10 | v1.11 |
| v1.20 | v2.19 | v1.20 |
| v1.21 | v2.20 | v1.21 |
| v1.22 | v2.30 | v1.22 |
| v1.23 | v2.31 | v1.30 |
| v1.24 | v2.32 | v1.31 |
| v1.25 | v2.35 | v1.32 |
| v1.26 | v2.36 | v1.33 |
| v1.30 | v1.34 | |
| v1.31 | v1.40 | |
| v1.32B | v1.42 | |
| v1.33 | v1.43 | |
| v1.34 | v1.44 | |
| v1.35 | v2.05 | |
| v1.36b | v2.10 | |
| v1.40 | v2.15 | |
| v1.41 | v2.20 | |
| v1.49 | v2.30 | |
| v1.50 | v2.39 | |
| v1.59 | v2.40 | |
| v1.60 | v2.41 | |
| v1.61 | v2.49 | |
| v1.70 | v2.50 | |
| v2.00 | v3.00 | |
| v3.01 | ||
| v4.00 |
| MPLAB® ASM30 Assembler | MPLAB C Compiler for PIC24 MCUs and dsPIC® DSCs |
|---|---|
| v2.05 | v2.05 |
| v3.00 | v3.00 |
| v3.01 | v3.01 |
| v3.02 | v3.02 |
| v3.12 | v3.12 |
| v3.20 | v3.20 |
| v3.21 | v3.21 |
| v3.22 | v3.22 |
| v3.23 | v3.23 |
| v3.23B | v3.23B |
| v3.24 | v3.24 |
| v3.25 | v3.25 |
| v3.30 | v3.30 |
| v3.30b | v3.30b |
| v3.30c | v3.30c |
| v3.31 | v3.31 |
| MPLAB C Compiler for PIC32 Devices | |
| v1.01 | v1.05 |
| v1.02 | v1.10B |
| v1.03 | v1.11 |
| v1.12 | v2.00 |
| v2.01 | v2.02 |
PIC — как много в этом слове… для пиковода 🙂
У человека, желающего стать пиководом, имеются абсолютно те же вопросы, что и у будущих AVR-водов, STM-вцев и т.п. А именно с чего начать и куда бежать? Под катом вы узнаете основные средства для старта с микроконтроллерами семейства PIC. Начнем с самого простого — займемся основами основ в виде установки среды разработки для ведения проектов под микроконтроллеры PIC. Напомню, что данная статься пишется в апреле 2014г. Сейчас компания Microchip в качестве среды разработки продвигает MPLAB X IDE, актуальная версия 2.05. Скачав и установив MPLAB X, можно вести проекты и составлять (писать) программы для PIC-микроконтроллеров на ассемблере.

Язык ассемблер (assembler) — машинно-ориентированный язык низкого уровня с командами, обычно соответствующими командам машины, который может обеспечить дополнительные возможности вроде макрокоманд; автокод, расширенный конструкциями языков программирования высокого уровня, такими как выражения, макрокоманды, средства обеспечения модульности программ. В отличие от Си, команды ассемблера зависят от применяемого микроконтроллера. Команды описаны в документации на микроконтроллер.
Скажу сразу — ассемблер не является моим любимым языком. Только Си, ибо современные микроконтроллеры доступны, дешевы, сильны. И я не вижу причин экономить что-то, кроме времени разработки.
Язык Си — язык высокого уровня, «абстрагированный от железа». На Си написано множество библиотек и микропрограмм. Позволяет писать процессор-независимые программы. Перед преобразованием в машинные коды, Си преобразуется в ассемблер… не всегда лучшим образом. Поэтому, при наличии опыта и знаний, поставленную задачу на ассемблере удается решить более «красиво», нежели на си, но только ценой времени.

Что нужно закачать
А именно MPLAB X IDE со справкой и компиляторы XC8, XC16, XC32. MPLAB X бесплатен. Компиляторы XC имеют бесплатный и платный режимы. Бесплатный режим отличается от платного отсутствием оптимизации.
MPLAB X IDE создана на основе NetBeans IDE, что будет видно на скриншотах ниже. Так как NetBeans построен на Java и требует ее для нормальной работы, то и MPLAB X IDE имеет те же требования. С одной стороны MPLAB X IDE теперь мультиплатформенная, с другой, приложения под Java никогда не считались венцом экономии ресурсов. Да-да, готовьте мощную машинку для комфортной работы.
Доступно для скачивания описание на русском языке в виде презентации для MPLAB X, в котором рассказывается об основных возможностях программы.

| Требования: | PDF Reader |
| Категория: | PIC |
| Лицензия: | Freeware |
| Дата: | 20.05.2014 |
MPLAB IDE Archives
MPLAB Code Configurator (MCC) Libraries Archives
Установка MPLAB X
На данный момент имеет смысл устанавливать MPLAB X IDE версии 3.xx, т.к. новые версии имеют несколько новых фишек и удобств.
И вообще — пользуйтесь новым! =)
Вначале все стандартно. Приветствие, далее… Лицензионное соглашение. Далее… Путь установки. Тут имеется рекомендация устанавливать не по умолчанию в Programm, а например, в свою папку без пробелов в пути. Далее… Далее… Тут IDE споткнулась при установке драйверов. УСТАНАВЛИВАЕМ несмотря ни на что! Далее… Если флажок установлен — после установки прогуляетесь на сайт Микрочип :). Финиш. После удачной установки на рабочем столе появляются три иконки: Нас больше всего интересует первая, все остальные — фигня не достойная занимать место на рабочем столе. Запускаем MPLAB X, смотрим, закрываем.
Наступил черед устанавливать компиляторы. Как известно, Микрочип выпускает микроконтроллеры восьмибитные, шеснадцатибитные, тридцатидвухбитные. И компиляторы для них XC8, XC16, XC32 соответственно. Напоминаю, в начале этой статьи все необходимое уже скачали.
Установка XC16 и XC32
Установка компиляторов XC16 и XC32 по сути ничем не отличается от установки XC8.

Выбрали папку и далее…


Опять выбрали папку, далее…

Вот и все. Наш ПК готов к написанию первой программы для PIC.
MPLAB ® X Integrated Development Environment (IDE) is an expandable, highly configurable software program that incorporates powerful tools to help you discover, configure, develop, debug and qualify embedded designs for most of our microcontrollers and digital signal controllers. MPLAB X IDE works seamlessly with the MPLAB development ecosystem of software and tools, many of which are completely free.

MPLAB X IDE brings a host of features to help you quickly debug your projects and minimize your development time. Some newer features include:
- Data Visualizer: No need to purchase extra visualizations tools since real-time streaming data can be viewed in Data Visualizer
- I/O View: Pin states can be verified and manipulated with I/O View for fast hardware verification
- Helpful Design Resources: Save time with useful links to software libraries, datasheets and user guides that are provided automatically
- Easy to Use: Register and bit definitions are now just a click away
- Includes the MPLAB Integrated Programming Environment (IPE) for production-level programming
PICkit™ Programmer/Debugger Archives
MPLAB C Compiler for PIC18 MCUs
This compiler and its license is supported only by equipment using 32-bit operating systems. For compilers and licenses that are compatible with equipment using 64-bit operating systems, see our MPLAB XC C compiler products.
Downloads, Documentation and Other Resources
- Downloads
- Features
- Documentation
- Debug Features
MPLAB X IDE v6.00
MPLAB X IDE only supports computers with processors designed with the Intel ® 64 architecture.
MPLAB C Compiler for PIC32 MCUs
This compiler and its license is supported only by equipment using 32-bit operating systems. For compilers and licenses that are compatible with equipment using 64-bit operating systems, see our MPLAB XC C compiler products.
Language Tool Archives
| MPLAB® XC8 Compiler | MPLAB XC16 Compiler | MPLAB XC32 Compiler |
|---|---|---|
| v1.00 (WIN) (03/22/12) | v1.00 (WIN) (05/03/12) | v1.00 (WIN) (03/22/12) |
| v1.00 (Linux) (03/22/12) | v1.00 (Linux) (05/03/12) | v1.00 (Linux) (03/22/12) |
| v1.00 (OSX) (03/22/12) | v1.00 (OSX) (05/03/12) | v1.00 (OSX) (03/22/12) |
| v1.01 (WIN) (06/23/12) | v1.10 (WIN) (08/08/12) | v1.10 (WIN) (08/08/12) |
| v1.01 (Linux) (06/23/12) | v1.10 (Linux) (08/08/12) | v1.10 (Linux) (08/08/12) |
| v1.01 (OSX) (06/23/12) | v1.10 (OSX) (08/08/12) | v1.11 (OSX) (10/04/12) |
| v1.10 (WIN) (08/08/12) | v1.11 (WIN) (12/11/12) | v1.11 (WIN) (10/04/12) |
| v1.10 (Linux) (08/08/12) | v1.11 (Linux) (12/11/12) | v1.11 (Linux) (10/04/12) |
| v1.10 (OSX) (08/08/12) | v1.11 (OSX) (12/11/12) | v1.20 (OSX) (12/07/12) |
| v1.11 (WIN) (10/25/12) | v1.20 (WIN) (10/22/13) | v1.20 (WIN) (12/07/12) |
| v1.11 (Linux) (10/25/12) | v1.20 (Linux) (10/22/13) | v1.20 (Linux) (12/07/12) |
| v1.11 (OSX) (10/25/12) | v1.20 (OSX) (10/22/13) | v1.21 (OSX) (04/22/13) |
| v1.12 (OSX) (12/04/12) | v1.21 (WIN) (01/09/14) | v1.21 (WIN) (04/22/13) |
| v1.12 (WIN) (12/04/12) | v1.21 (OSX) (01/09/14) | v1.21 (Linux) (04/22/13) |
| v1.12 (Linux) (12/04/12) | v1.21 (Linux) (01/09/14) | v1.22 (OSX) (8/19/14) |
| v1.20 (OSX) (06/24/13) | v1.22 (Linux) (8/19/14) | v1.22 (WIN) (8/19/14) |
| v1.20 (WIN) (06/24/13) | v1.22 (WIN) (10/10/14) | v1.22 (Linux) (10/21/13) |
| v1.21 (Linux) (10/04/13) | v1.22 (OSX) (10/10/14) | v1.30 (OSX) (11/13/2013) |
| v1.21 (OSX) (10/04/13) | v1.23 (Linux) (9/25/14) | v1.30 (Linux) (11/13/2013) |
| v1.21 (WIN) (10/04/13) | v1.23 (WIN) (9/25/14) | v1.30 (WIN) (11/13/2013) |
| v1.30 (WIN) (01/13/14) | v1.23 (OSX) (9/25/14) | v1.31 (WIN) (12/20/2013) |
| v1.30 (OSX) (01/13/14) | v1.24 (Linux) (12/19/14) | v1.31 (OSX) (12/20/2013) |
| v1.30 (Linux) (01/13/14) | v1.24 (WIN) (12/19/14) | v1.31 (Linux) (12/20/2013) |
| v1.31 (WIN) (03/28/14) | v1.24 (OSX) (12/19/14) | v1.32 (WIN) (05/30/2014) |
| v1.31 (OSX) (03/28/14) | v1.25 (Linux) (6/30/15) | v1.32 (OSX) (05/30/2014) |
| v1.31 (Linux) (03/28/14) | v1.25 (WIN) (6/30/15) | v1.32 (Linux) (05/30/2014) |
| v1.32 (WIN) (06/05/14) | v1.25 (OSX) (6/30/15) | v1.33 (WIN) (07/22/14) |
| v1.32 (Linux) (06/05/14) | v1.26 (Linux) (2/19/16) | v1.33 (Linux) (07/22/14) |
| v1.32 (OSX) (06/05/14) | v1.26 (WIN) (2/19/16) | v1.33 (OSX) (07/22/14) |
| v1.33 (WIN) (08/25/14) | v1.26 (OSX) (2/19/16) | v1.34 (WIN) (02/16/15) |
| v1.33 (Linux) (08/25/14) | v1.30 (Linux) (2/22/16) | v1.34 (Linux) (02/16/15) |
| v1.33 (OSX) (08/25/14) | v1.30 (WIN) (2/22/16) | v1.34 (OSX) (02/16/15) |
| v1.34 (Linux) (02/16/15) | v1.30 (OSX) (2/22/16) | v1.40 (WIN) (6/3/15) |
| v1.34 (OSX) (02/16/15) | v1.31 (Linux) (2/10/2017) | v1.40 (Linux) (6/3/15) |
| v1.34 (WIN) (02/16/15) | v1.31 (WIN) (2/10/17) | v1.40 (OSX) (6/3/15) |
| v1.35 (Linux) (7/7/15) | v1.31 (OSX) (2/10/17) | v1.42 (WIN) (6/1/16) |
| v1.35 (OSX) (7/7/15) | v1.32B (Linux) (8/15/2017) | v1.42 (Linux) (6/1/16) |
| v1.35 (WIN) (7/7/15) | v1.32B (WIN) (8/15/2017) | v1.42 (OSX) (6/1/16) |
| v1.36 (Linux) (1/14/16) | v1.32B (OSX) (8/15/2017) | v1.43 (WIN) (3/1/17) |
| v1.36 (OSX) (1/14/16) | v1.33 (Linux) (10/9/17) | v1.43 (Linux) (3/1/17) |
| v1.36 (WIN) (1/14/16) | v1.33 (WIN) (10/9/17) | v1.43 (OSX) (3/1/17) |
| v1.37 (Linux) (3/10/16) | v1.33 (OSX) (10/9/17) | v1.44 (WIN) (6/5/17) |
| v1.37 (OSX) (3/10/16) | v1.34 (Linux) (3/21/18) | v1.44 (Linux) (6/5/17) |
| v1.37 (OSX) (3/10/16) | v1.34 (WIN) (3/21/18) | v1.44 (OSX) (6/5/17) |
| v1.38 (Linux) (6/30/16) | v1.34 (OSX) (3/21/18) | v2.05 (WIN) (1/9/18) |
| v1.38 (OSX) (6/30/16) | v1.35 (Linux) (5/30/18) | v2.05 (Linux) (1/9/18) |
| v1.38 (WIN) (6/30/16) | v1.35 (WIN) (5/30/18) | v2.05 (OSX) (1/9/18) |
| v1.40 (Linux) (11/30/16) | v1.35 (OSX) (5/30/18) | v2.10 (WIN) (1/9/18) |
| v1.40 (OSX) (11/30/16) | v1.36b (Linux) (1/25/19) | v2.10 (Linux) (1/9/18) |
| v1.40 (WIN) (11/30/16) | v1.36b (WIN) (1/25/19) | v2.10 (OSX) (1/9/18) |
| v1.41 (Linux) (1/24/17) | v1.36b (OSX) (1/25/19) | v2.15 (WIN) (12/15/18) |
| v1.41 (OSX) (1/24/17) | v1.41 (Linux) (9/16/19) | v2.15 (Linux) (12/15/18) |
| v1.41 (WIN) (1/24/17) | v1.41(WIN) (9/16/19) | v2.15 (OSX) (12/15/18) |
| v1.42 (Linux) (4/12/17) | v1.41 (OSX) (9/16/19) | v2.20 (WIN) (5/17/19) |
| v1.42 (WIN) (4/12/17) | v1.50 (Linux) (1/16/20) | v2.20 (Linux) (5/17/19) |
| v1.42 (OSX) (4/12/17) | v1.50 (WIN) (1/16/20) | v2.20 (OSX) (5/17/19) |
| v1.43 (Linux) (7/24/17) | v1.50 (OSX) (1/16/20) | v2.30 (WIN) (8/14/19) |
| v1.43 (WIN) (7/24/17) | v1.60 (Linux) (7/27/20) | v2.30 (Linux) (8/14/19) |
| v1.43 (OSX) (7/24/17) | v1.60 (WIN) (7/27/20) | v2.30 (OSX) (8/14/19) |
| v1.44 (Linux) (9/22/17) | v1.60 (OSX) (7/27/20) | v2.40 (WIN) (2/7/20) |
| v1.44 (WIN) (9/22/17) | v1.61 (Linux) (10/23/20) | v2.40 (Linux) (2/7/20) |
| v1.44 (OSX) (9/22/17) | v1.61 (WIN) (10/23/20) | v2.40 (OSX) (2/7/20) |
| v1.45 (Linux) (12/7/17) | v1.61 (OSX) (10/23/20) | v2.41 (WIN) (4/24/20) |
| v1.45 (WIN) (12/7/17) | v1.70 (WIN) (3/26/21) | v2.41 (Linux) (4/24/20) |
| v1.45 (OSX) (12/7/17) | v1.70 (OSX) (3/26/21) | v2.41 (OSX) (4/24/20) |
| v2.00 (WIN) (5/27/18) | v1.70 (Linux) (3/26/21) | v2.50 (WIN) |
| v2.00 (OSX) (5/27/18) | v2.50 (Linux) | |
| v2.00 (Linux) (5/27/18) | v2.50 (OSX) | |
| v2.05 (WIN) (12/20/18) | v3.00 (WIN) | |
| v2.05 (OSX) (12/20/18) | v3.00 (Linux) | |
| v2.05 (Linux) (12/20/18) | v3.00 (OSX) | |
| v2.10 (WIN) (7/28/19) | v3.01 (WIN) (6/2/21) | |
| v2.10 (OSX) (7/28/19) | v3.01 (OSX)(6/2/21) | |
| v2.10 (Linux) (7/28/19) | v3.01 (Linux)(6/2/21) | |
| v2.20 (WIN) (4/8/20) | ||
| v2.20 (OSX) (4/8/20) | ||
| v2.20 (Linux) (4/8/20) | ||
| v2.30 (WIN) (5/17/20) | ||
| v2.30 (OSX) (5/17/20) | ||
| v2.30 (Linux) (5/17/20) | ||
| v2.32 (WIN) (2/18/2021) | ||
| v2.32 (OSX) (2/18/2021) | ||
| v2.32 (Linux) (2/18/2021) | ||
| v2.35 (WIN) (1/4/2022) | ||
| v2.35 (OSX) (1/4/2022) | ||
| v2.35 (Linux) (1/4/2022) |
MPLAB X IDE Features
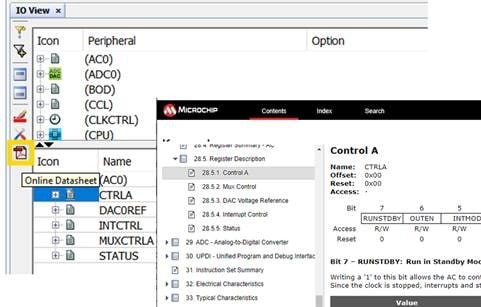
I/O View gives a register overview of the target device for the current project, serving as a quick reference during design. When debugging, a live view of the registers is displayed and bits can be directly manipulated for fast hardware verification.

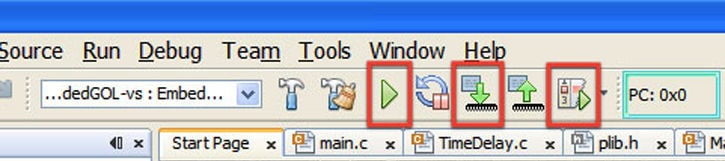
Unlike other IDEs where you need to build, connect to the hardware tool, program the target and then start your debug session, all these functions are offered in one action button. Run, Program, or Debug Run starts ‘Make’, which will check for changes and build any relevant updates, connect to the tool program the images and either start a debug session or start an execution of the programmed image. If you prefer, you can choose to perform these functions individually.
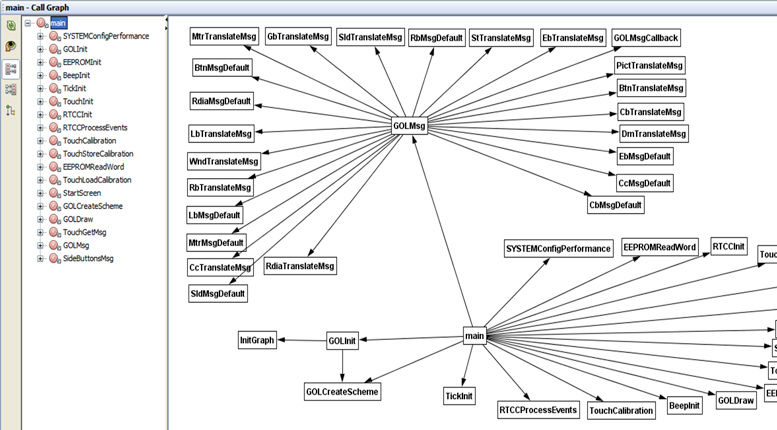
The Call Graph provides a static call tree of all functions called from other functions. It can also be exported to a Portable Network Graphics (PNG) image. This makes it easier to navigate your code or understand a colleague's code.
A single project can build the same set of source files in many different ways. Each configuration has its own compiler options, compiler, hardware tool and target device.
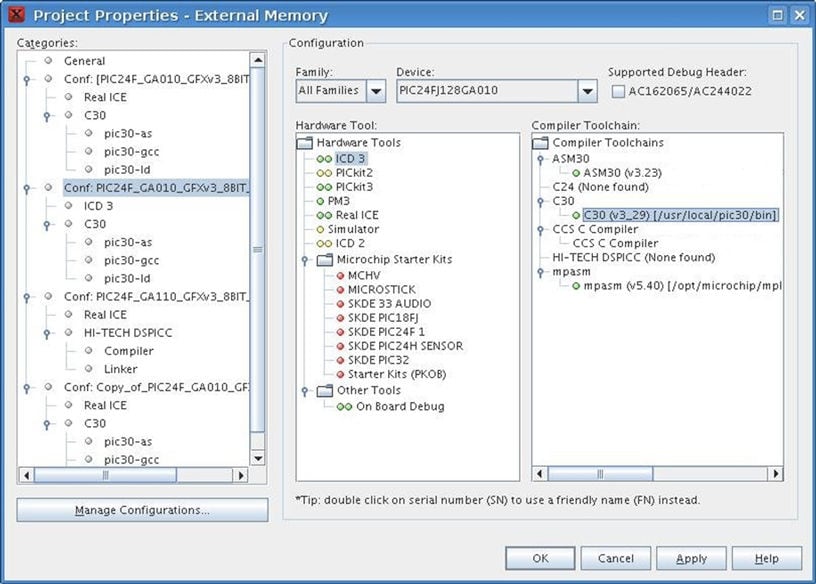
You can have as many versions of a compiler installed as you wish. Each is identified by its own version. For any project, you can select the specific version of your choice. This enables you to use more than one instance of a compiler within the IDE at the same time. Project configurations can be set to use an older version while trying a new release of a compiler.
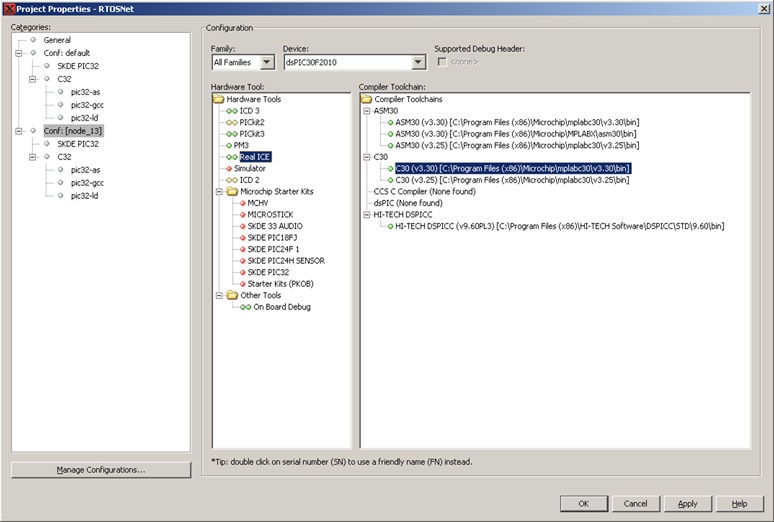
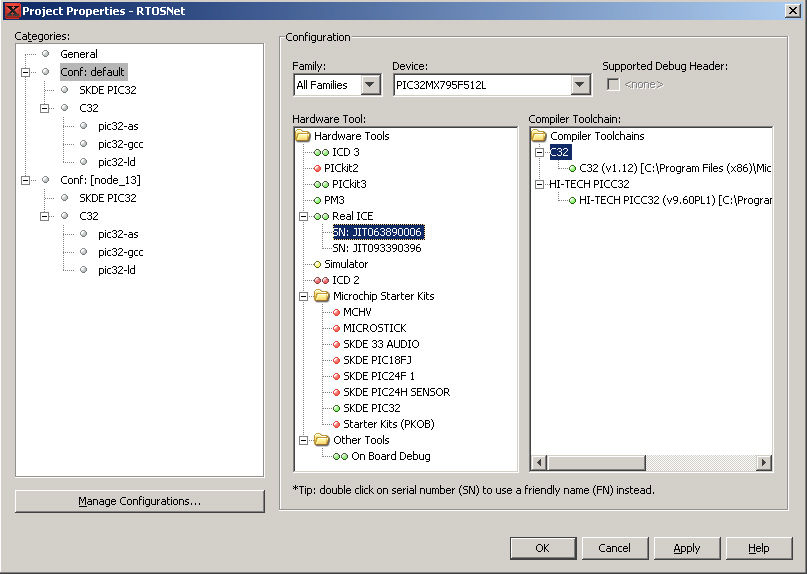
You can have multiple debug tools connected to the computer at the same time. You can select any tool you desire for a specific project or configuration within a project (example: Programmer and Simulator in their own configurations). You can also debug more than one target at the same time using just one installation of MPLAB X IDE.
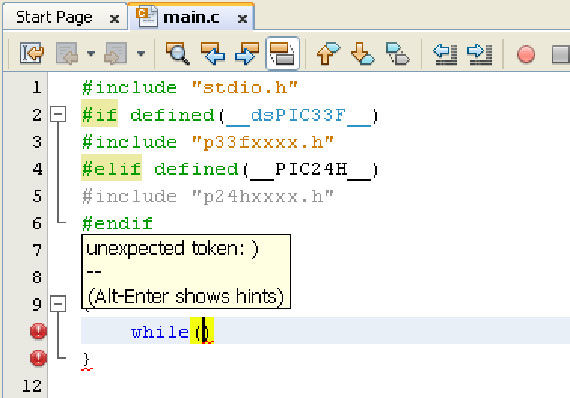
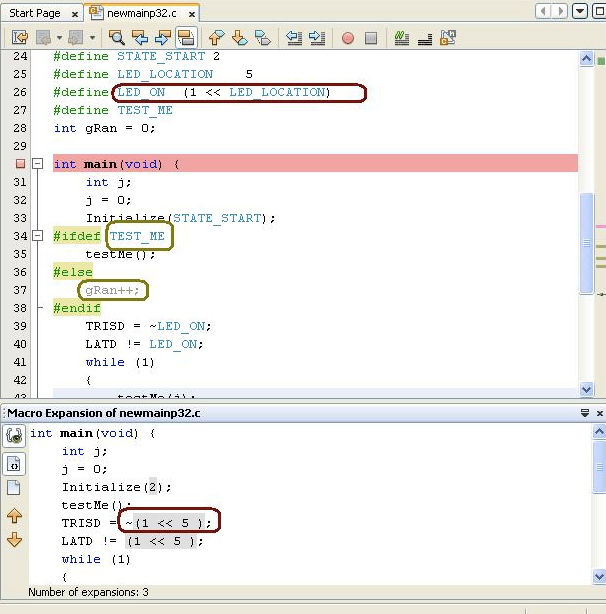
Live parsing will flag something that the C parser doesn't recogize while you are typing in your code, which frequently allows you to fix your code even before you compile it.
You can import an existing MPLAB 8 project and develop the code from within either IDE. The same compiler and same debug tools are used, so the code is still as production worthy as always. This flexibility allows you to use MPLAB X IDE without affecting your MPLAB 8 project.
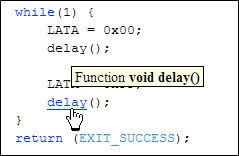
View the declaration for a function, variable, macro, or include statement by using the CTRL key and mouse over. Clicking on the hyperlink will take you right to the source of declaration. Alternatively, you can right click on it and choose Navigate → Go to Declaration from the context menu to jump to its declaration.
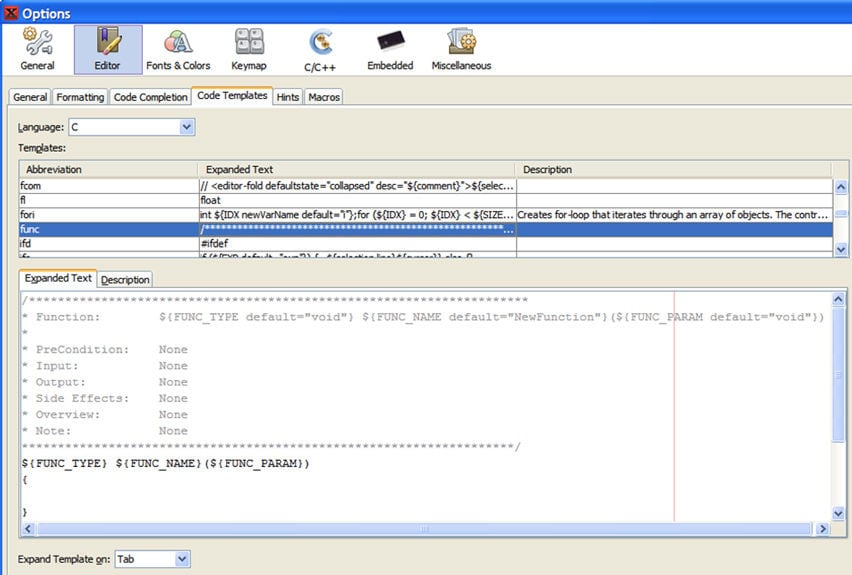
Within the IDE there are many code templates that can be accessed using a couple of letters then tab (or specified key). You can create your own templates, even live templates, so that when you enter values into the template area, other areas of code are also populated. For example the 'func' active code template is shown below. As you enter parameters in the comments to document the function, the real function is also populated.
If you are unsure of what changes you made to the software since the last version control update, you can use the Local History utility to visualize the changes that were made. This feature is very useful for backtracking.
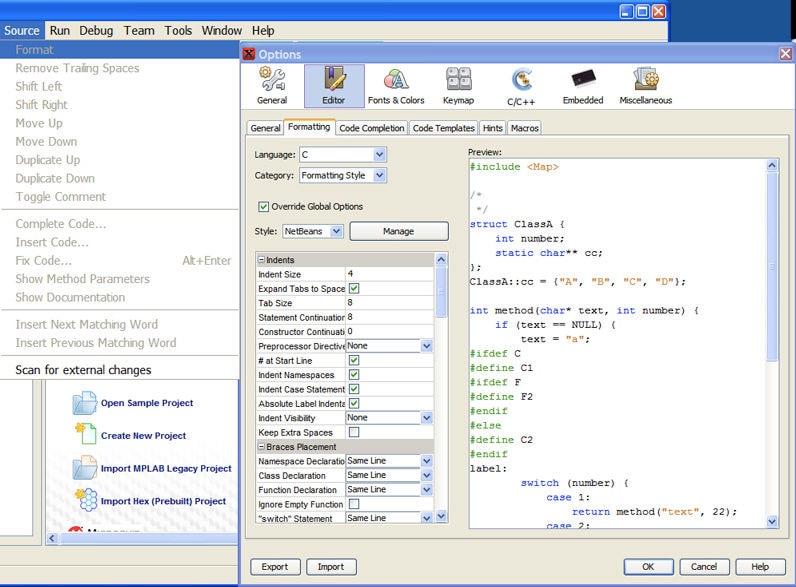
You or your company can set up a code format standard to be used within the editor. Just select the file to format the code in and menu Source >/Format to reapply the template to your source code.
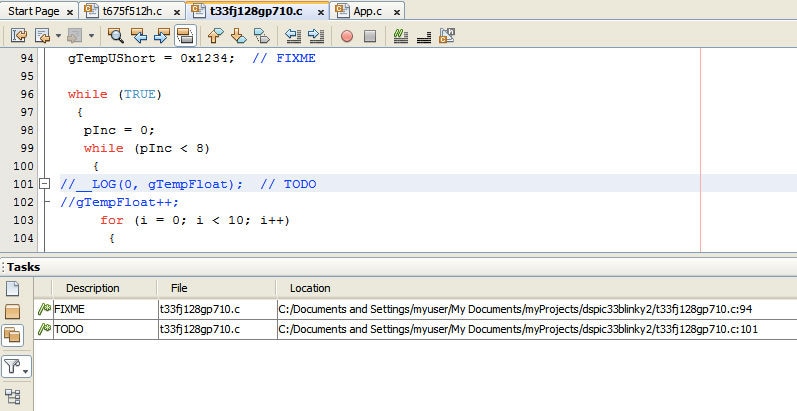
The Tasks operation automatically scans your code and lists commented lines containing words such as "TODO" or "FIXME" (these words can be customized under Options). Tasks provide a convenient way to keep track of important items you feel need addressing.
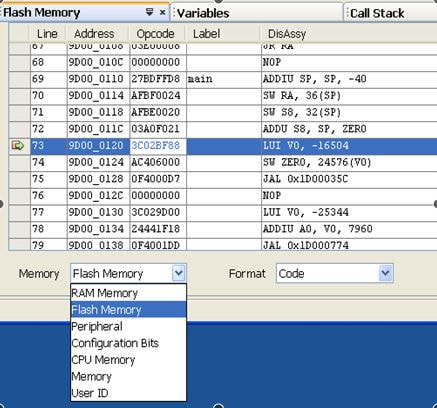
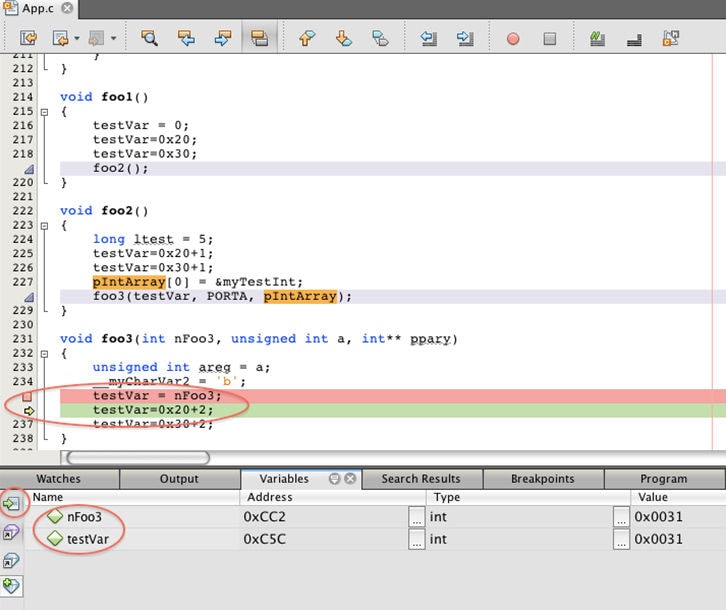
You can change any memory view to look at any type of memory. Formats for those views are also selectable from the dropdowns. This provides a quick view of a change without going through the menus.
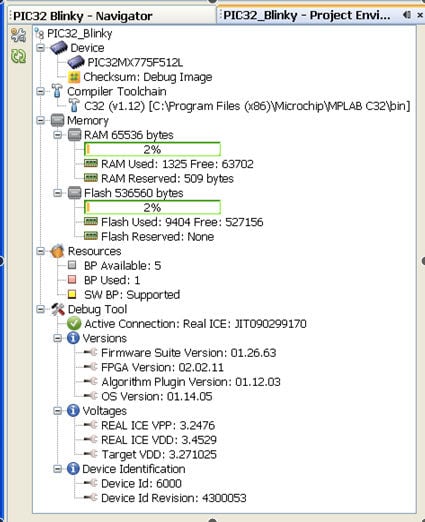
Do you need one place to summarize your project? For convenience there is a single window that gathers all the relevant project information and its environment. It shows Device name, Debug Tool, Language Build Tool, and Connection state. The Memory section shows Total, Used and Reserved by Debug Tool for RAM and Flash memory. Checksum and Breakpoint (silicon resource) status is also shown. The Debug tool provides additional status for Device ID, firmware versions and voltages.
With this feature, you’ll never have to worry about which firmware version you were using. MPLAB X IDE will remember it and automatically restore it to the correct version when you connect to the debugger. Just set it and forget it.

Available only during a debug session and accessed through the Window >/ Debugging menu, this Disassembly window shows the disassembled memory of the high-level language function in the scope of the current execution point of the debugger. It is extremely useful for debugging program execution at the assembly level.
The Disassembly listing window is similar to the one provided in MPLAB IDE v8.x. It is available under the Window >/ Output menu. This window shows the disassembled code generated by the compiler for the current project. It interleaves the disassembled code with the original high-level language source code so it is possible to see what the compiler generates for each line of source code in the project. A project must be built with debugging information, since the display depends upon the debugging line table within the built project to display data.
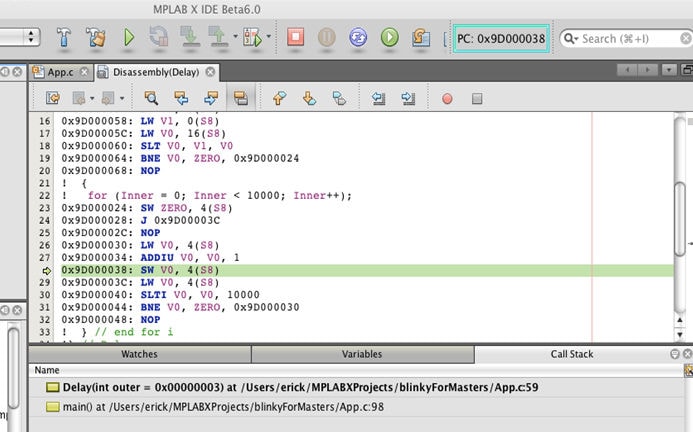
The Variables window is configured to show only variables used near the program counter location (cursor position). In this mode, note that global variables used in the scope of the function can be displayed as well as local variables.
Save time entering programs and ensure correctness using the editor’s auto-completion features.
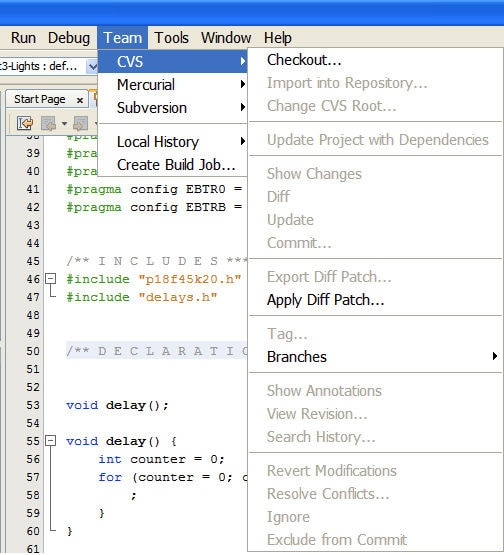
There are three flavors of configuration management source control already built into the IDE. Others are provided through the NetBeans community.
Save time navigating to particular locations in large code bases using the Navigation window. Use the context menu to filter out undesired types.
You can customize the actions in the toolbars, minimize the windows to have them on side bars which will pop out. Undock any editor tab by dragging and dropping it outside the IDE. This will turn into an independent window that will allow you to move onto a second screen.
Статья задумана как описание процесса установки инструментов разработчика (IDE) для программирования микроконтроллеров фирмы Microchip под Linux, в помощь людям, которых такой процесс "настораживает".
Основной инструмент для разработчика здесь - среда MPLAB X, распространяется бесплатно, но под своей лицензией. Почитать про MPLAB X можно здесь. Скачиваем архив для ОС Linux - на этой же странице закладка Downloads.
Далее, все действия необходимо выполнять в командной строке (терминале) Linux. Установка проходила в Linux Mint 17.3.
Заходим в каталог со скачанным архивом (у меня, например, Downloads)
$ cd ~/Downloads
распаковываем архив
$ tar xvf MPLABX-v3.25-linux-installer.tar
появляется файл MPLABX-v3.25-linux-installer.sh, делаем его исполняемым
$ chmod a+x MPLABX-v3.25-linux-installer.sh
запускаем установку в графическом режиме
$ sudo ./MPLABX-v3.25-linux-installer.sh

жмем Next (далее)
читаем лицензию, принимаем лицензионное соглашение.
выбираем путь для установки (по-умолчанию это /opt/microchip/mplabx/vX.XX)

далее, установим и MPLAB IPE для исследований (MPLAB IPE устанавливается вместе со средой программирования MPLAB X IDE и предназначена для программирования микроконтроллеров и микросхем памяти без запуска среды разработки MPLAB X)

отдыхаем

В последнем окне можно убрать галочки, можно и оставить, чтобы познакомиться с указанными компонентами Microchip.

читаем лицензию, принимаем лицензионное соглашение. проверяем (или пишем) путь установки
Проверил все для других машин (дистрибутив Linux Mint 17.1, Linux Mint 18.3) с более свежей версией MPLAB X (3.26, 4.15) и тем же компилятором - работает!
MPLAB Code Configurator (MCC) Archives
Установка XC8

Далее… Соглашаемся с лицензией.


Смотрим на галочки и далее…

Далее… Рекомендую устанавливать в подпапку с MPLAB X IDE, каждую версию — в свою подпапку. Компиляторов для каждого из семейств микроконтроллеров PIC может быть несколько, они выбираются в свойствах проекта.

Ставим нужные галочки и далее…

Apply setting to all users of this machine — Установить для всех пользователей ПК.
Add xc8 to the PATH environment variable — Внести XC8 в переменную окружения.
Посмотреть переменную окружения можно кликнув правой кнопкой мыши по ярлыку Компьютер -> Дополнительные параметры системы -> на вкладке Дополнительно Переменные среды. Смотри переменную «path».

После установки у нас будет тяжкий выбор: использовать бесплатную версию, версию с ограничением на 60 дней или платную версию. Для установки бесплатной версии просто жмем кнопку Next >.

Как я уже писал выше, бесплатная версия отличается от платной только отсутствием оптимизации. Хотя, на интернет-форумах неоднократно встречал претензии к бесплатным версиям компиляторов семейства XC — вроде как бесплатные искусственно тормозят программу. Впрочем, на крупном русскоязычном ресурсе всякого такого лежат все необходимые лекарства =) .

Вот и все — можно устанавливать XC16 и XC32, а XC8 уже установлена.
MPLAB X IDE Archives
HI-TECH C Compilers
For compilers which are higher performance and largely source code compatible, see our MPLAB XC C compiler products.
| HI-TECH C for PIC PRO | HI-TECH C for PIC Standard | HI-TECH C for PIC18 PRO |
| HI-TECH C for PIC10-12-16 PRO v9.60PL5 | HI-TECH C for PIC STD v9.60PL3 | HI-TECH C for PIC18 PRO v9.65 |
| HI-TECH C for PIC10-12-16 PRO v9.70 | HI-TECH C for PIC18 PRO v9.80 | |
| HI-TECH C for PIC PRO 9.71a | ||
| HI-TECH C for PIC10-12-16 PRO v9.80a | ||
| HI-TECH C for PIC PRO v9.81a | ||
| HI-TECH C for PIC PRO v9.83 | ||
| HI-TECH C for PIC18 Standard | HI-TECH C for PIC32 | |
| HI-TECH C for PIC18 STD v9.51PL2 | HI-TECH C for PIC32 | |
| HI-TECH C for PIC18 STD v9.52 |
MPLAB C Compiler for PIC24 MCUs and dsPIC® DSCs
This compiler and its license is supported only by equipment using 32-bit operating systems. For compilers and licenses that are compatible with equipment using 64-bit operating systems, see our MPLAB XC C compiler products.
Functional Safety Compilers
NOTE: These compilers only unlock with the purchase of an MPLAB Functional Safety License.
| MPLAB™ XC8 Compiler | MPLAB XC16 Compiler | MPLAB XC32 Compiler |
|---|---|---|
| v2.19 (WIN) | v1.49 (WIN) | v2.39 (WIN) |
| v2.19 (Linux) | v1.49 (Linux) | v2.39 (Linux) |
| v2.19 (OSX) | v1.49 (OSX) | v2.39 (OSX) |
Please do not contact Microchip for support on these archived versions of MPLAB development ecosystem software. Support is provided only for the current versions posted on the main MPLAB X Integrated Development Environment page.
Stay on the leading edge with our blog
Analytics
Social Networking
Цикл статей – PIC начинающим или основы основ
После установки среды MPLAB X и компиляторов, пришло время бегло ознакомиться с установленной IDE.
Находим вот такую иконку
и кликаем по ней. MPLAB X запустится, а вид стартового окна будет зависеть от настроек программы и предыдущих сессий. Впрочем, при первом запуске предыдущих сессий быть не может =)

Вид MPLAB X после открытия
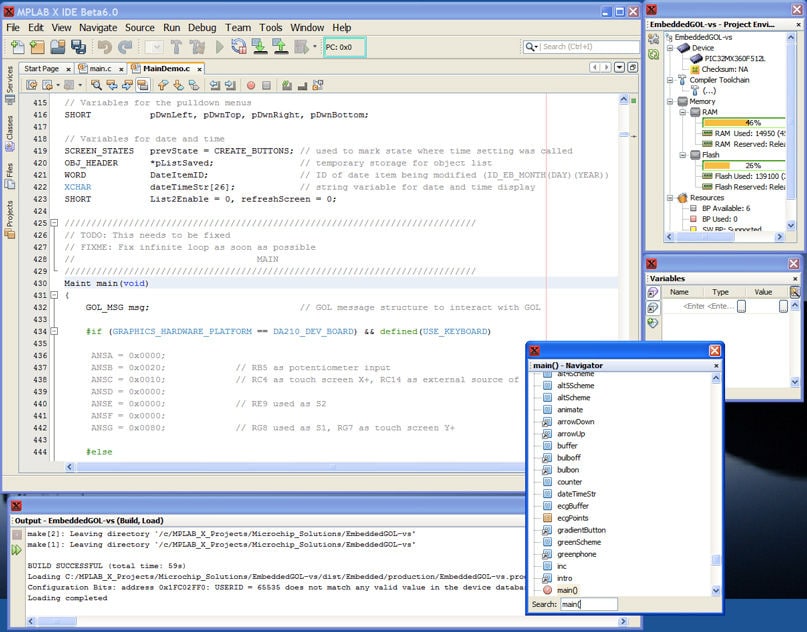
Ниже пример окна MPLAB X с кодом:

Окно MPLAB X с кодом
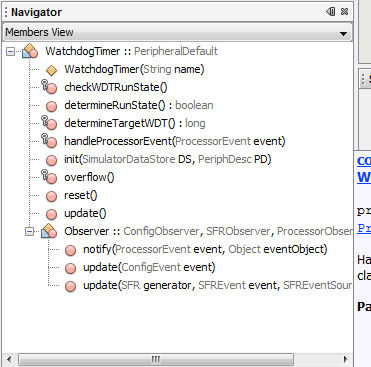
Собственно в области 1 показана вкладка с кодами, в области 2 уже упоминавшийся навигатор.
Все эти области, а на самом деле окна, можно хватать мышкой на названия и перетаскивать. Удобно при многомониторной конфигурации. Ниже пример — окно во время перетаскивания:

MPLAB X — перетаскиваем внутренние окна
Обычно приходиться вести несколько проектов, как видно, MPLAB X позволяет это делать. Но что делать, если открыто несколько файлов из разных проектов, как MPLAB X определит какой из проектов нужно скомпилировать? Очень просто. MPLAB X работает только с активным проектом, как поменять активный (текущий) проект показано на рисунке:

MPLAB X — поменять активный проект
т.е., для этого нужно выбрать проект, который хотим сделать активным, кликнуть по нему правой кнопкой мыши и выбрать пункт «Set as Main Project». Если кликнуть по проекту правой кнопкой мыши и выбрать пункт «Properties», появится окно настроек проекта:

Настройки проекта в MPLAB X
Крайне рекомендую полазить по менюшке «Window». На рисунке ниже показано, как настроить конфигурацию МК. Кроме прочего можно вызвать окно для просмотра переменных, состояния портов и т.д.

MPLAB X — настройка конфигурации микроконтроллера
Поскольку целью статьи не является полноценное обучение работе в MPLAB X, на этом заканчиваю. Возможно, что-то дополню, но несколько позже.
Цикл статей – PIC начинающим или основы основ
Читайте также: