
Микротик импорт настроек из файла rsc
RouterOS backup feature allows you to save your current device's configuration, which then can be re-applied on the same or a different device (with the same model name/number). This is very useful since it allows you to effortlessly restore device's configurations or to re-apply the same configuration on a backup device. System's backup file also contain the device's MAC addresses, which are also restored when the backup file is loaded.
Warning: If The Dude and user-manager is installed on the router, then the system backup will not contain configuration from these services, therefore additional care should be taken to save configuration from these services. Use provided tool mechanisms to save/export configuration if you want to save it.
Note: System's backups contain sensitive information about your device and its configuration, always consider encrypting the backup file and keeping the backup file in a safe place.
Sub-menu: /system backup save
| Property | Description |
|---|---|
| dont-encrypt (yes | no; Default: no) | Disable backup file encryption. Note that since RouterOS v6.43 without a provided password the backup file is unencrypted. |
| encryption (aes-sha256 | rc4; Default: aes-sha256) | Encryption algorithm to use for encrypting the backup file. Note that RC4 is not considered as secure encryption method and is only available for compatibility reasons with older RouterOS versions. |
| name (string; Default: [identity]-[date]-[time].backup) | File name for the backup file. |
| password (string; Default: ) | Password for the encrypted backup file. Note that since RouterOS v6.43 without a provided password the backup file is unencrypted. |
Warning: If password is not provided in RouterOS versions older than v6.43, then the backup file will be encrypted with the current user's password, except if the dont-encrypted property is used or the current user's password is empty.
The backup file will be available under /file menu, which can be downloaded using FTP or using Winbox.
Sub-menu: /system backup load
| Property | Description |
|---|---|
| name (string; Default: ) | File name for the backup file. |
| password (string; Default: ) | Password for the encrypted backup file. |
- To save the router's configuration to file test and a password:
- To see the files stored on the router:
To load the saved backup file test:
Since RouterOS v6.44 it is possible to securely store your device's backup file on MikroTik's Cloud servers, read more about this feature in the IP/Cloud page.
Операционная система RouterOS позволяет сохранить настройки MikroTik, и быстро восстановить резервную копию, чтобы возобновить работу устройства. Это очень удобно, если вы напортачили с настройками, или вам нужно выполнить одинаковую настройку нескольких устройств MikroTik. В этой статье мы расскажем, как создать резервную копию настроек MikroTik, восстановить ее или перенести на другое устройство.
Configuration Import
Root menu command import allows running configuration script from the specified file. Script file (with extension ".rsc") can contain any console command including complex scripts.
For example, load saved configuration file
Import command allows to specify following parameters:
| Property | Description |
|---|---|
| from-line | Start executing the script from the specified line number |
| file-name | Name of the script (.rsc) file to be executed. |
| verbose | Reads each line from the file and executes individually, allowing to debug syntax or other errors more easily. |
Startup delay
If your configuration relies on interfaces that might not yet have started up upon command execution, it is suggested to introduce delays, or to monitor until all needed interfaces are available. This example script allows you to set how many interfaces you are expecting, and how long to wait until they become available:
The above script will wait until there are 10 interfaces visible, or 30 seconds. If there are no 10 interfaces in this time, it will put a message in the log. Modify the variables according to your needs.
Есть старая шутка: «системные администраторы делятся на тех, кто еще не делает резервное копирование и на тех, кто уже делает резервное копирование». Иногда к этой шутке добавляют третью часть: «и на тех, кто уже делает резервное копирование и проверяет резервные копии».
Формат .backup
Экспорт

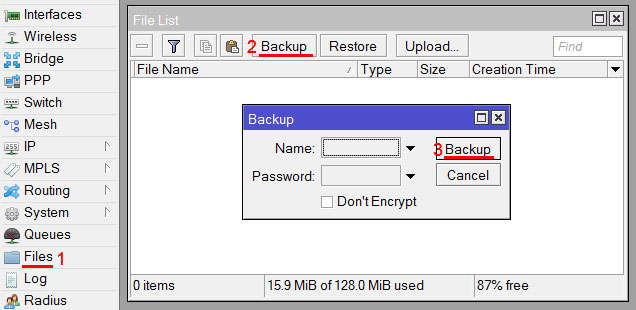
- В раделе Files нажать кнопку Backup
- Ввести желаемое имя
- Задать пароль и шифрование при необходимости
- Нажать кнопку Backup
- В списке файлов должен появится файл с названием которое вы ввели и расширением .backup
Импорт

- В раделе Files выбрать нужный файл бэкапа и нажать кнопку Retore
- Ввести пароль, если он был задан
- Нажать кнопку Restore
- Нажать Yes - после этого последует перезагрузка и восстановление конфигурации
Exporting Configuration
Command name: /export
The export command prints a script that can be used to restore configuration. The command can be invoked at any menu level, and it acts for that menu level and all menu levels below it. The output can be saved into a file, available for download using FTP.
Command Description
- file=[filename] - saves the export to a file
Example
To make an export file:
To see the files stored on the router:
Compact Export
Starting from v5.12 compact export was added. It allows to export only part of configuration that is not default RouterOS config.
Note: Starting from v6rc1 "export compact" is default behavior. To do old style export use export verbose
For example compact OSPF export:
Compact export introduces another feature that indicates which part of config is default on RouterOS and cannot be deleted. As in example below '*' indicates that this OSPF instance is part of default configuration.
List of default config by menus that cannot be removed:
| Menu | Entries |
|---|---|
| /interface wireless security-profiles | default |
| /ppp profile | "default", "default-encryption" |
| /ip hotspot profile | "default" |
| /ip hotspot user profile | "default" |
| /ip ipsec proposal | "default" |
| /ip smb shares | "pub" |
| /ip smb users | "guest" |
| /ipv6 nd | "all" |
| /mpls interface | "all" |
| /routing bfd interface | "all" |
| /routing bgp instance | "default" |
| /routing ospf instance | "default" |
| /routing ospf area | "backbone" |
| /routing ospf-v3 instance | "default" |
| /routing ospf-v3 area | "backbone" |
| /snmp community | "public" |
| /tool mac-server mac-winbox | "all" |
| /tool mac-server | "all" |
| /system logging | "info", "error", "warning", "critical" |
| /system logging action | "memory", "disk", "echo", "remote" |
| /queue type | "default", "ethernet-default", "wireless-default", "synchronous-default", "hotspot-default", "only-hardware-queue", "multi-queue-ethernet-default", "default-small" |
Сохранение и восстановление настроек MikroTik
Чтобы сохранить настройки MikroTik, выполните следующее:
После этого в списке появится файл с именем MikroTik-xxxxxxxx-xxxx.backup , где ххххххxx-хххх - это дата и время создания файла.
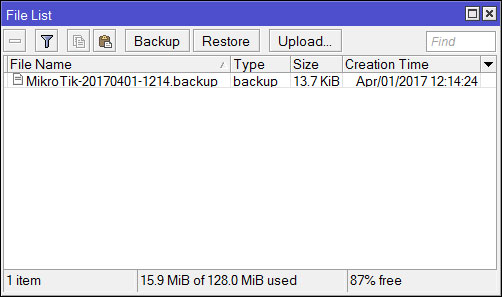
Внимание! Файл MikroTik-xxxxxxxx-xxxx.backup предназначен для восстановления настроек только на устройстве, на котором он создан. Его нельзя использовать для переноса настроек на другое устройство. Иначе у вас перенесутся MAC-адреса интерфейсов, в сети будут два одинаковых устройства и возникнет конфликт.
Для переноса настроек используются специальные файлы в текстовом формате, описанные ниже в разделе Перенос настроек MikroTik на другое устройство.
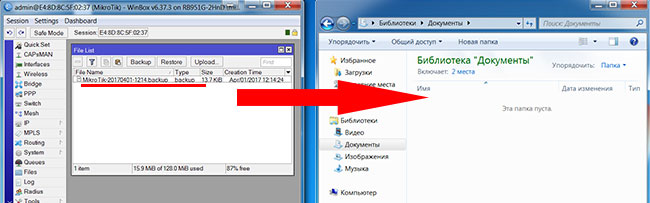
Далее резервную копию конфигурации MikroTik можно сохранить на компьютер, перетащив файл на рабочий стол или в проводник Windows.
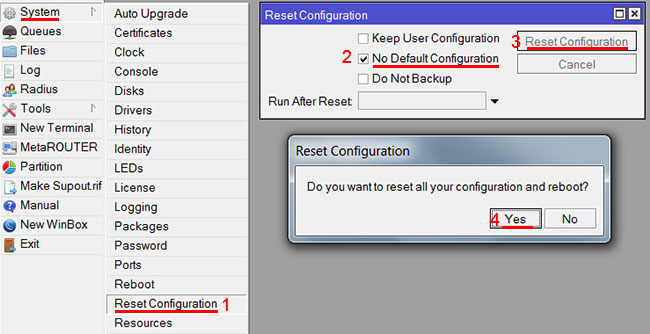
Перед восстановлением настроек, нужно сбросить все настройки устройства, чтобы в нем не остались какие-то настройки из текущей конфигурации.
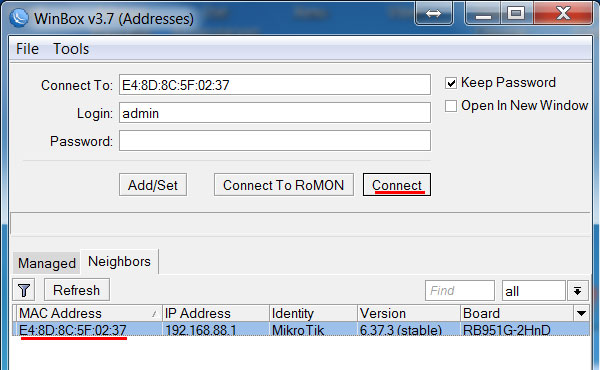
После перезагрузки подключайтесь к устройству по MAC адресу, поскольку IP адрес будет отсутствовать. В программе Winbox нужно нажать мышкой на MAC-адрес устройства и нажать кнопку Connect.
Чтобы восстановить конфигурацию MikroTik, выполните следующее:

Формат .rsc
Экспорт
При экспорте файл с именем которое вы задали в команде и расширением .rsc появляется в корне раздела Files.
Экспорт всей конфигурации:
Экспорт отдельного раздела (на примере раздела ip adress):
Импорт
Исправление проблем при импорте или экспорте
- Попробуйте полностью сбросить устройство и применить конфигурацию
- Попробуйте использовать ключ
Он покажет в каком месте файла остановился импорт, этим же ключем можно пользоваться и при проблемах с экспортом (принцип тот же, покажет место на котором экспорт остановился)
Configuration parts to watch out for in exported .rsc files
Things that should be removed from export files that were created with: "/export", before attempting import on new device.
- Interface renaming that is in conflict with default ethernet naming scheme.
- In older version exports default entries might show with "add" instead of "set" command. That should be edited before import to avoid errors.
- Check if interface/module: ether/wlan/modem/com/etc count match on new and old device. If there will some missing that will end up in error during .rsc import.
In case of problematic import, attempt the following:
- Reset the configuration on that device.
- Run import command again with "verbose=yes" argument. It will stop also stop import process on problem which you already encountered, but will also show place where export failed. That way showing you place where things need to be edited in .rsc import file
Автоматическое создание резервных настроек MikroTik и отправка на email
Чтобы не забывать делать резервные копии конфигурации MikroTik, вы можете автоматизировать этот процесс и отправлять бэкапы себе на email.
Введение
В RouterOS существует 2 типа резервных копий: .backup (бинарный файл с конфигурацией) и .rsc (файл в котором вся конфигурация представлена в текстовом виде команд консоли). Тип .rsc нельзя экспортировать или импортировать в графическом режиме, а импортировать можно только через диалог сброса конфигурации.
Import troubleshooting
Importing Configuration
Command name: /import
The root level command /import [file_name] executes a script stored in the specified file. It will add the configuration from the specified file to an existing configuration. This file may contain any console commands, including scripts. Can be used to restore configuration or parts of it after configuration loss.
Command Description
- file=[filename] - loads the exported configuration from a file to router
Automatic Import
In RouterOS it is possible to automatically execute scripts - your script file has to be named anything.auto.rsc - once this file is uploaded using FTP to the router, it will automatically be executed, just like with the '/import' command. This method only works with FTP.
Once the file is uploaded, it is automatically executed. Information about the success of the commands that were executed is written to anything.auto.log
Example
To load the saved export file use the following command:
Через графический интерфейс
Формат .backup
Экспорт
Импорт
У вас может быть запрошен пароль, если вы не устанавливали пароль, то он пуcт и вам просто нужно нажать клавишу enter.
После диалога запроса пароля, будет диалог о перезагрузке, в котором нужно ввести y, после чего будет перезагрузка и восстановление конфигурации из выбранного файла.
Перенос настроек MikroTik на другое устройство
Для переноса настроек на другое устройство MikroTik, нужно сохранить настройки в файл в текстовом виде. Этот файл можно будет редактировать, если возникнут проблемы при переносе настроек.
Переносить настройки можно только на устройства MikroTik со схожей аппаратной конфигурацией. Вы не сможете перенести настройки с роутера на 10 LAN портов, на роутер с 5-ю LAN портами. При этом будут выдаваться ошибки. Можно конечно вручную отредактировать файл с настройками, но это довольно сложный и долгий процесс.
Чтобы сохранить настройки MikroTik в текстовом формате, откройте меню New Terminal и выполните следующую команду:
Название файла может быть любым. В названии файла желательно указывать дату, чтобы потом не запутаться. В данном случае в названии файла указана дата 20170403 - 3 апреля 2017 года. Файлы с датой, указанной таким образом, будет очень удобно сортировать по имени в проводнике или в файловом менеджере Total Commander, FAR Manager или MC (Linux).
Далее нужно скопировать созданный файл в другое устройство. Для этого сначала перетащите файл на рабочий стол Windows. После этого перетащите его в новое устройство в меню Files.
Перед импортированием настроек, нужно сбросить конфигурацию устройства, иначе будет конфликт с текущими настройками и при импорте будут выдаваться ошибки.
Чтобы импортировать настройки MikroTik, откройте меню New Terminal и выполните следующую команду:
При переносе настроек между похожими роутерами MikroTik с одинаковым количеством портов, но с разными процессорами или памятью, во время импорта могут возникать ошибки. Я как-то пытался перенести настройки между двумя очень схожими роутерами. При этом выдавало ошибку, что указанная частота памяти не поддерживается устройством. В этом случае откройте файл с настройками на компьютере, отредактируйте необходимую настройку или удалите ее.
Формат .rsc
Экспорт
Экспорт через графический интерфейс не возможен.
Импорт

- Выбрать раздел System
- Выбрать раздел Restore
- Свериться со списком файлов раздела Files и выбрать глазами нужный
- Выбрать этот файл в выпадающем списке Run After Reset
- Выбрать Reset Configuration, затем Yes - после этого роутер будет перезагружен и применен выбранный конфигурационный файл
Частичный перенос настроек
Бывают ситуации, когда нужно сохранить часть настроек, например, правила фаервола, скрипты, NAT, правила маркировки пакетов и т.п. Для этого помогут следующие команды:
ip address export file=ip.rsc
ip firewall mangle export file=mangle.rsc
ip firewall nat export file=nat.rsc
ip firewall filter export file=filter.rsc
queue simple export file=simple.rsc
ip dns export file=dns.rsc
system script export file=script.rsc
system scheduler export file=scheduler.rsc
tool e-mail export file=email.rsc
ip firewall address-list export file=address-list.rsc
ip route export file=route.rsc
ip dhcp-server network export file=network.rsc
queue type export file=type.rsc
queue tree export file=tree.rsc
queue simple export file=simple.rsc
interface ethernet export file=ethernet.rsc
ip pool export file=pool.rsc
ppp profile export file=profile.rsc
system logging export file=log.rsc
Configuration Reset
Command name: /system reset-configuration
Description
The command clears all configuration of the router and sets it to the default including the login name and password ('admin' and no password), IP addresses and other configuration is erased, interfaces will become disabled. After the reset command router will reboot. The default is either the factory default, that you can see in the article Default configurations, or it can be a custom default, that can be loaded by including an RSC file when doing Netinstall or if specified with a branding package.
Command Description
- keep-users: keeps router users, passwords and ssh host keys(since v6.45.1)
- no-defaults: doesn't load any default cofigurations, just clears everything
- skip-backup: automatic backup is not created before reset, when yes is specified
- run-after-reset: specify export file name to run after reset
Note: If run-after-reset is set then no-defaults parameter will be ignored and only the specified script will be loaded!
Warning: Warning: If the device has a folder named "flash", then the confscript.rsc file must be stored in that folder to work with "run-after-reset" command. Everything outside this folder is stored on the RAM drive which contents are deleted on reboot or power cycle.
Warning: If the router has been installed using netinstall and had a script specified as the initial configuration, the reset command executes this script after purging the configuration. To stop it doing so, you will have to reinstall the router.
Example
Настройка планировщика
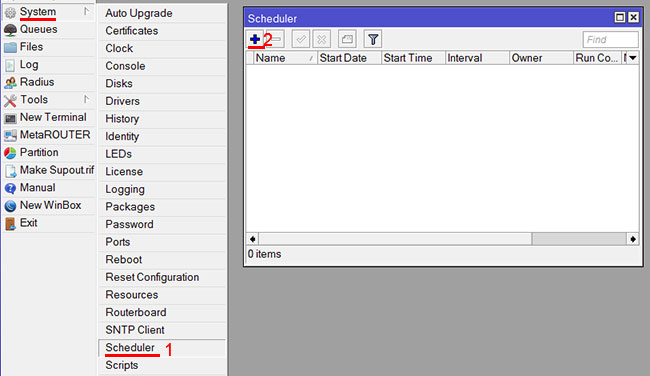
Теперь нужно настроить с какой периодичностью будут создаваться резервные копии, и отправляться на email. Для этого настроим планировщик (Sheduler).
Откройте меню System - Sheduler и нажмите кнопку "плюсик", чтобы добавить новую задачу.
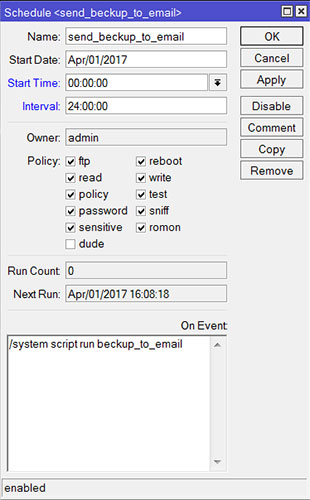
В открывшемся окне настраиваем параметры задачи:
- в поле Name указываем имя задачи, например send_backup_to_email;
- в поле Interval указываем с какой периодичностью будет выполняться скрипт. Мы указали интервал 24 часа. Для отладки работы планировщика укажите интервал 5 минут и текущее время Start Time. И не забудьте настроить время на MikroTik в меню System - Clock;
- в поле On Event указываем, какую команду необходимо выполнить при запуске задачи. Мы указали команду /system script run backup_to_email, которая запускает скрипт backup_to_email;
- нажимаем кнопку OK для сохранения задачи.
Теперь каждый день в 00:00:00 будет создаваться резервная конфигурация MikroTik и отправляться вам на email.
This article describes a set of commands used for configuration management.
Any action done in GUI or any command executed from the CLI is recorded in /system history . You can undo or redo any action by running undo or redo commands from the CLI or by clicking on Undo, Redo buttons from the GUI.
A simple example to demonstrate the addition of firewall rule and how to undo and redo the action:
We have added firewall rule and in /system history we can see all what is being done.
Let's undo everything:
As you can see firewall rule disappeared.
Now redo the last change:
System history is capable of showing exact CLI commands that will be executed during Undo or Redo actions even if we perform the action from GUI, for example, detailed history output after adding TCP accept rule from WinBox:
Sometimes it happens that the router's configuration is changed in a way that will make the router inaccessible (except local console). Usually, this is done by accident, but there is no way to undo the last change when the connection to the router is already cut. Safe mode can be used to minimize such risk.
Safe mode is entered by pressing Ctrl-X. To save changes and quit safe mode, press Ctrl-X again. To exit without saving the made changes, hit Ctrl-D

Message Safe Mode taken is displayed and prompt changes to reflect that session is now in safe mode. In WinBox safe mode is enabled by toggling the Safe Mode toggle button on the left side of the toolbar.
All configuration changes that are made (also from other login sessions), while the router is in safe mode, are automatically undone if the safe mode session terminates abnormally. You can see all such changes that will be automatically undone tagged with an F flag in system history:
Now, if telnet connection, WinBox terminal (if the safe mode was enabled on WinBox terminal window), or WinBox connection is cut, then after a while (TCP timeout is 9 minutes) all changes that were made while in safe mode will be undone. Exiting session by Ctrl-D also undoes all safe mode changes, while /quit does not.
If another user tries to enter safe mode, he's given the following message:
- [u] - undoes all safe mode changes, and puts the current session in safe mode.
- [r] - keeps all current safe mode changes, and puts the current session in a safe mode. The previous owner of safe mode is notified about this:
- [d] - leaves everything as-is.
If too many changes are made while in safe mode, and there's no room in history to hold them all (currently history keeps up to 100 most recent actions), then the session is automatically put out of the safe mode, no changes are automatically undone. Thus, it is best to change the configuration in small steps, while in safe mode. Pressing Ctrl-X twice is an easy way to empty the safe mode action list.
System backup is the way to completely clone routers configuration in binary format. The backup file contains not just configuration, but also statistics data, logs, etc. The backup file is best used to save and restore configuration on the same device, for moving configuration to other devices, use export files instead.
Backup files contain sensitive information (passwords, keys, certificates). The file can be encrypted, but even then backups should be stored only in a secure location.
Restoring backup files should be done only on the same router or on a similar router when the previous router fails. A backup must not be used to clone configuration on multiple network routers.
Example to save and load backup file:
RouterOS allows to export and import of parts of the configuration in plain text format. This method can be used to copy bits of configuration between different devices, for example, clone the whole firewall from one router to another.
An export command can be executed from each individual menu (resulting in configuration export only from this specific menu and all its sub-menus) or from the root menu for complete config export.
Following command parameters are accepted:
| Property | Description |
|---|---|
| compact | Output only modified configuration, the default behavior |
| file | Export configuration to a specified file. When the file is not specified export output will be printed to the terminal |
| hide-sensitive | Hide sensitive information, like passwords, keys, etc. |
| verbose | With this parameter, the export command will output whole configuration parameters and items including defaults. |
For example export configuration from /ip address menu and save it to file:
By default export command writes only user-edited configuration, RouterOS defaults are omitted.
For example, IPSec default policy will not be exported, and if we change one property then only our change will be exported:
Notice the * flag, it indicates that entry is system default and cannot be removed manually.
Here is the list of all menus containing default system entries
| Menu | Default Entry |
|---|---|
| /interface wireless security-profiles | default |
| /ppp profile | "default", "default-encryption" |
| /ip hotspot profile | default |
| /ip hotspot user profile | default |
| /ip ipsec policy | default |
| /ip ipsec policy group | default |
| /ip ipsec proposal | default |
| /ip ipsec mode-conf | read-only |
| /ip smb shares | pub |
| /ip smb users | guest |
| /ipv6 nd | any |
| /mpls interface | all |
| /routing bfd interface | all |
| /routing bgp instance | default |
| /routing ospf instance | default |
| /routing ospf area | backbone |
| /routing ospf-v3 instance | defailt |
| /routing ospf-v3 area | backbone |
| /snmp community | public |
| /tool mac-server mac-winbox | all |
| /tool mac-server | all |
| /system logging | "info", "error", "warning", "critical" |
| /system logging action | "memory", "disk", "echo", "remote" |
| /queue type | "default", "ethernet-default", "wireless-default", "synchronous-default", "hotspot-default", "only-hardware-queue", "multi-queue-ethernet-default", "default-small" |
Auto Import
It is also possible to automatically execute scripts after uploading to the router with FTP or SFTP. The script file must be named with extension *.auto.rsc. Once the commands in the file are executed, a new *.auto.log file is created which contains import success or failure information.
".auto.rsc" in the filename is mandatory for a file to be automatically executed.
RouterOS allows resetting configuration with /system reset-configuration command
This command clears all configuration of the router and sets it to the factory defaults including the login name and password ('admin' with an empty password). For more details on the default configuration see the list.
After the configuration reset command is executed router will reboot and load the default configuration.
The backup file of the existing configuration is stored before reset. That way you can easily restore any previous configuration if reset is done by mistake.
If the router has been installed using Netinstall and had a script specified as the initial configuration, the reset command executes this script after purging the configuration. To stop it from doing so, you will have to reinstall the router.
It is possible to override default reset behavior with the parameters below:
| Property | Description |
|---|---|
| keep-users | Do not remove existing users from the configuration |
| no-defaults | Do not load default configuration, just clear configuration |
| skip-backup | Skip automatic backup file generation before reset |
| run-after-reset | Run specified .rsc file after reset. That way you can load your custom configuration. |
For example hard reset configuration without loading default config and skipping backup file:
This manual introduces you with commands which are used to perform the following functions:
- system backup;
- system restore from a backup;
- configuration export;
- configuration import;
- system configuration reset.
Description
The configuration backup can be used for backing up MikroTik RouterOS configuration to a binary file, which can be stored on the router or downloaded from it using FTP for future use. The configuration restore can be used for restoring the router's configuration, exactly as it was at the backup creation moment, from a backup file. The restoration procedure assumes the configuration is restored on the same router, where the backup file was originally created, so it will create partially broken configuration if the hardware has been changed.
The configuration export can be used for dumping out complete or partial MikroTik RouterOS configuration to the console screen or to a text (script) file, which can be downloaded from the router using FTP protocol. The configuration dumped is actually a batch of commands that add (without removing the existing configuration) the selected configuration to a router. The configuration import facility executes a batch of console commands from a script file.
System reset command is used to erase all configuration on the router. Before doing that, it might be useful to backup the router's configuration.
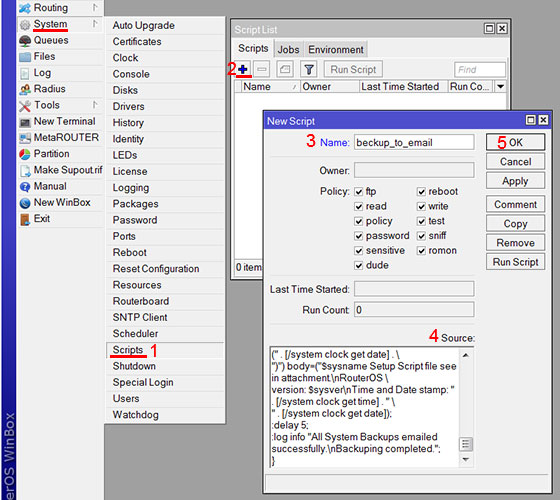
Создание скрипта
Откройте меню System - Scripts и нажмите "красный плюсик", чтобы добавить новый скрипт. В поле Name укажите название скрипта, в поле Source вставьте скрипт и нажмите кнопку OK.
Чтобы протестировать работу скрипта, нажмите кнопку Run Script, и на ваш почтовый ящик будут высланы резервные копии. Процесс выполнения скрипта можно отслеживать в меню Log.
Скрипт для отправки резервной копии настроек MikroTik на email:
Для RouterOS v6.x
<
:log info "Starting Backup Script. ";
:local sysname [/system identity get name];
:local sysver [/system package get system version];
:log info "Flushing DNS cache. ";
/ip dns cache flush;
:delay 2;
:log info "Deleting last Backups. ";
:foreach i in=[/file find] do="$sysname-backup-"]]!="nil") do=>;
:delay 2;
:local smtpserv [:resolve "smtp.gmail.com"];
:local Eaccount "[email protected]";
:local pass "your_gmail_password";
:local backupfile ("$sysname-backup-" . \
[:pick [/system clock get date] 7 11] . [:pick [/system \
clock get date] 0 3] . [:pick [/system clock get date] 4 6] . ".backup");
:log info "Creating new Full Backup file. ";
/system backup save name=$backupfile;
:delay 2;
:log info "Sending Full Backup file via E-mail. ";
/tool e-mail send from="" to=$Eaccount server=$smtpserv \
port=587 user=$Eaccount password=$pass start-tls=yes file=$backupfile \
subject=("$sysname Full Backup (" . [/system clock get date] . ")") \
body=("$sysname full Backup file see in attachment.\nRouterOS version: \
$sysver\nTime and Date stamp: " . [/system clock get time] . " " . \
[/system clock get date]);
:delay 5;
:local exportfile ("$sysname-backup-" . \
[:pick [/system clock get date] 7 11] . [:pick [/system \
clock get date] 0 3] . [:pick [/system clock get date] 4 6] . ".rsc");
:log info "Creating new Setup Script file. ";
/export verbose file=$exportfile;
:delay 2;
:log info "Sending Setup Script file via E-mail. ";
/tool e-mail send from="" to=$Eaccount server=$smtpserv \
port=587 user=$Eaccount password=$pass start-tls=yes file=$exportfile \
subject=("$sysname Setup Script Backup (" . [/system clock get date] . \
")") body=("$sysname Setup Script file see in attachment.\nRouterOS \
version: $sysver\nTime and Date stamp: " . [/system clock get time] . " \
" . [/system clock get date]);
:delay 5;
:log info "All System Backups emailed successfully.\nBackuping completed.";
>
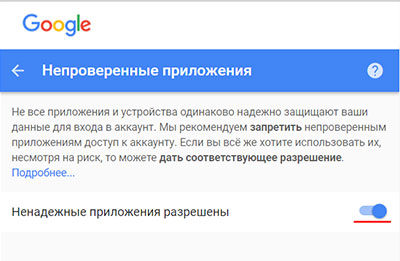
В примере указан скрипт для сервиса Gmail. При отправке через Gmail нужно предварительно разрешить ненадежным приложениям доступ к аккаунту. Для этого залогиньтесь, на странице "Мой аккаунт" перейдите в раздел "Ненадежные приложения" и выберите "Включить". Подробнее читайте Как разрешить ненадежным приложениям доступ к аккаунту.
System Backup
The system backup feature allows you to effortlessly save and load device's configuration. Read more about the backup feature in the System/Backup section.
Через консоль
Читайте также: