
Jvc kd g612 подключение usb выхода

To CD changer/DAB tuner or another external component (see
diagram )
An CD-Wechsler/DAB-Tuner oder andere externe Komponente (siehe
Schaltplan )
К устройству автоматической смены компакт-дисков/тюнеру
DAB или к другому внешнему устройству (см. схему )
Typical Connections / Typische Anschlüsse / Типичные подключения
Before connecting: Check the wiring in the vehicle
carefully. Incorrect connection may cause serious damage to
this receiver.
The leads of the power cord and those of the connector from
the car body may be different in color.
Connect the colored leads of the power cord in the order
specified in the illustration below.
Connect the aerial cord.
Finally connect the wiring harness to the receiver.
Note: If your vehicle does not have any accessory terminal,
move the fuse from the fuse position 1 (initial position) to fuse
position 2, and connect the red lead (A7) to the positive (+)
battery terminal.
• The yellow lead (A4) is not used in this case.
Перед началом подключений: Тщательно проверьте
проводку в автомобиле. Неправильное подключение
может привести к серьезному повреждению устройства.
Жилы силового кабеля и жилы соединителя от кузова
автомобиля могут быть разного цвета.
Подсоедините цветные провода шнура питания в
указанном ниже порядке.
Подключите кабель антенны.
В последнюю очередь подключите электропроводку к
Примечание: Если в Вашем автомобиле никакого
вспомогательного разъема не имеется, переставьте
предохранитель из положения 1 предохранителя
(первоначальное положение) в положение 2
предохранителя и подключите красный провод (А7) к
положительному (+) полюсу аккумулятора.
•
Желтый провод (А4) в этом случае не используется.
Before checking the operation of this receiver prior to
installation, this lead must be connected, otherwise
power cannot be turned on.
Vor der Überprüfung der Funktionsfähigkeit
des Geräts vor dem Einbau, muß diese Leitung
angeschlossen werden, da sonst die Stromversorgung
nicht eingeschaltet werden kann.
Перед проверкой работы устройства подключите
этот провод, иначе питание не включится.
Line out (see diagram )
Schutz kappen Signalausgang (siehe Schaltplan )
К выходу (см. схему )
Rear ground terminal
Hintere Erdungsc-
anschlußklemme
Задний разъем
заземления
To steering wheel remote controller (see diagram )
An Lenkradfernbedienung (siehe Schaltplan )
К рулевому пульту дистанционного управления (см. схему )
15 A fuse
15 A Sicherung
Предохранитель 15 A
Aerial terminal
Antennen-
anschlußklemme
Разъем антенны
Blue with white stripe
Blau mit weißem Streifen
Синий с белой полосой
Not included for this receiver
Wird nicht mit Gerät mitgeliefert
Не входит в комплект
To metallic body or chassis of the car
Zur metallenen Karosserie oder zum Fahrwerk des Autos
К металлическому корпусу или шасси автомобиля
To a live terminal in the fuse block connecting to the car battery
(bypassing the ignition switch) (constant 12 V)
Zur einer stromführenden Anschlußklemme im Sicherungsblock
zum Anschließen an die Autobatterie (Umgehen des Zündschalters)
(konstant 12 V)
К разъему фазы в блоке предохранителя (минуя блок
зажигания) (постоянный 12 В)
Ignition switch
Zündschalter
Переключатель зажигания
Fuse block
Sicherungsblock
Блок предохранителя
To an accessory terminal in the fuse block
Zur einer Zubehöranschlußklemme im Sicherungsblock
К вспомогательному разъему в блоке предохранителя
To the remote lead of other equipment or power aerial if any
(200 mA max.)
Zum Zusatzkabel des anderen Geräts oder der Motorantenne, sofern
vorhanden (max. 200 mA)
К удаленному проводу другого оборудования или антенны
(макс. 200 мА)
To cellular phone system
Zur Mobiltelefon
К системе сотового телефона
Left speaker (front)
Linker Lautsprecher (vorne)
Левый громкоговоритель (передний)
Right speaker (front)
Rechter Lautsprecher (vorne)
Правый громкоговоритель
(передний)
Left speaker (rear)
Linker Lautsprecher (hinten)
Левый громкоговоритель
(задний)
Right speaker (rear)
Rechter Lautsprecher (hinten)
Правый громкоговоритель
(задний)
Purple with black stripe
Lila mit schwarzem
Streifen
Пурпурный с черной
полосой
Green with black stripe
Grün mit schwarzem
Streifen
Зеленый с черной
полосой
Gray with black stripe
Grau mit schwarzem
Streifen
Серый с черной
полосой
White with black stripe
Weiß mit schwarzem
Streifen
Белый с черной
полосой
Fuse position 2 / 2. Sicherungsposition / Положение 2
предохранителя
Vor dem Anschließen: Die Verdrahtung im Fahrzeug sorgfältig
überprüfen. Falsche Anschlüsse können ernsthafte Schäden am Gerät
hervorrufen.
Die Leiter des Stromkabels und die Leiter des Anschlusses im
Fahrzeug können sich farblich unterscheiden.
Die farbigen Adern des Stromkabels in der Reihenfolge
anschließen, wie in der Abbildung unten gezeigt.
Das Antennenkabel anschließen.
Die Kabelbäume am Gerät anschließen.
Hinweis: Verfügt Ihr Fahrzeug nicht über eine
Zubehöranschlußklemme, die Sicherung von der 1.
Sicherungsposition (Erstposition) in die 2. Sicherungsposition
versetzen, die rote Leitung (A7) an der (+) Batterieanschlußklemme
anschließen.
• Die gelbe Leitung (A4) wird in diesem Fall nicht verwendet.
Fuse position 1 / 1. Sicherungsposition / Положение 1
предохранителя
SUBWOOFER—Only for KD-G612/KD-G611 (see diagram )
SUBWOOFER—Nur bei KD-G612/KD-G611 (siehe Schaltplan )
SUBWOOFER—Tолько для KD-G612/KD-G611 (см. схему )
Orange with white stripe
Orange mit weißem Streifen
Оранжевый с белой полосой
To car light control switch
Zum Autobeleuchtungssteuerung-Schalter
К контрольному переключателю освещения автомобиля

и/или тюнера DAB убедитесь в том, что приемник отключен.
Connecting the external amplifier / Anschließen der externen Verstärker / Подключение внешних усилителей
You can connect an amplifier to upgrade your car stereo
system.
• Connect the remote lead (blue with white stripe) to the
remote lead of the other equipment so that it can be
controlled through this receiver.
• Disconnect the speakers from this receiver, connect
them to the amplifier. Leave the speaker leads of this
receiver unused.
Можно подключить усилители для обновления
автомобильной стереосистемы.
•
Подсоедините провод внешнего устройства (синий с
белой полосой) к проводу внешнего устройства другого
оборудования так, чтобы им можно было управлять с
этого устройства.
Отсоедините громкоговорители от данного
устройства, подключите их к усилителю. Оставьте
провода громкоговорителей данного устройства
неиспользованными.
Connecting to the steering wheel remote controller / Anschluß an die Lenkradfernbedienung / Подключение к рулевому пульту
дистанционного управления
If your car is equipped with the steering wheel remote controller, you can operate this receiver
using the controller. To do it, a JVC’s OE remote adapter (not supplied) which matches with your
car is required. Consult your JVC IN-CAR ENTERTAINMENT dealer for details.
Wenn Ihr Fahrzeug mit einer Lenkradferndienung ausgestattet ist, können Sie damit diesen Receiver
steuern. Hierfür ist ein für Ihr Fahrzeug passender Radio-Lenkrad-Fernbedienungsadaption von JVC
(nicht im Lieferumfang enthalten) erforderlich. Für weitere Einzelheiten wenden Sie sich an Ihren JVC
Autoradiohändler.
Если автомобиль оборудован рулевым пультом дистанционного управления, его можно
использовать для управления данным устройством. Для этого необходим адаптер
рулевого пульта дистанционного управления JVC OE (не поставляется), подходящий
для Вашего автомобиля. За более подробной информацией обратитесь к поставщику
автомобильных аудиосистем компании JVC.
JVC Amplifier
JVC Verstärker
JVC-усилитель
Remote lead
Fernbedienungsleitung
Провод внешнего устройства
Remote lead (Blue with white stripe)
Fernbedienungsleitung (Blau mit weißem Streifen)
Провод внешнего устройства (Синий с белой полосой)
To the remote lead of other equipment or power
aerial if any
Zum Zusatzkabel des anderen Geräts oder der
Motorantenne, sofern vorhanden
К удаленному проводу другого оборудования
или антенны
OE remote adapter (not supplied)
Radio-Lenkrad-Fernbedienungsadaption (nicht im
Lieferumfang enthalten)
Aдаптер рулевого пульта дистанционного
управления OE (не поставляется)
Steering wheel remote controller (equipped in the car)
Lenkradfernbedienung (im Fahrzeug installiert)
Рулевой пульт дистанционного управления (устанавливаемый в
автомобиле)
Sie können Verstärker anschließen, um Ihre Autostereoanlage zu
erweitern.
• Schließen Sie das Fernbedienungskabel (blau mit weißem Streifen)
an das Fernbedienungskabel des anderen Geräts an, so daß es über
dieses Gerät gesteuert werden kann.
• Die Lautsprecher von diesem Gerät abtrennen und am
Verstärker anschließen. Die Lautsprecherleitungen
dieses Geräts unbenutzt lassen.
JVC Amplifier
JVC Verstärker
JVC-усилитель
Front speakers
Vordere Lautsprecher
Передние громкоговорители
Signal cord (not supplied for this receiver)
Einzelleitung (für diesen Receiver nicht
mitgeliefert)
Кабель сигнала (не входит в комплект
поставки)
Firmly attach the ground wire to the metallic body or to the chassis of the car—to the place not
coated with paint (if coated with paint, remove the paint before attaching the wire). Failure to do so
may cause damage to the receiver.
Verbinden Sie den Erdungsleiter mit der Karosserie oder dem Rahmen des Fahrzeugs. Die Kontaktstelle darf
nicht lackiert sein (sollte die Kontaktstelle lackiert sein, entfernen Sie den Lack der Kontaktstelle, bevor Sie
den Leiter befestigen). Wenn der Erdungsleiter nicht ordnungsgemäß angeschlossen wird, kann dieses Gerät
beschädigt werden.
Плотно прикрепите заземляющий провод к металлическому кузову или шасси автомобиля—
в месте, не покрытом краской (если оно покрыто краской, удалите краску перед тем, как
прикреплять провод). Невыполнение этого требования может привести к повреждению
данного устройства.
Connecting the external components / Anschließen der externen Komponenten / Подключение внешних устройств
JVC CD changer
CD-Wechsler von JVC
Проигрыватель нескольких
компакт-дисков JVC
JVC DAB tuner
DAB-Tuner von JVC
Тюнер DAB JVC
CD changer and DAB tuner / CD-Wechsler und DAB-Tuner / Проигрыватель нескольких компакт-дисков и тюнер DAB
• Refer also to pages 15 and 28 of the INSTRUCTIONS.
• Siehe auch Seite 15 und 28 in der BEDIENUNGSANLEITUNG.
•
Также см. ИНСТРУКЦИИ ПО ЭКСПЛУАТАЦИИ на стр. 15 и 28.
Y-connector (not supplied for this receiver)
Y-Anschluß (für diesen Receiver nicht mitgeliefert)
Разъем Y (не входит в комплект поставки)
External component
Externe Komponente
Внешнее устройство
• You can connect both components in series as illustrated below.
• Sie können beide Komponenten in Reihe anschließen, wie in der Abbildung unten gezeigt.
•
Внешние устройства можно подключать параллельно, как показано на рисунке.
External Component / Externe Komponente / Внешнее устройство
JVC Amplifier
JVC Verstärker
JVC-усилитель
JVC CD changer
CD-Wechsler von JVC
Проигрыватель нескольких
компакт-дисков JVC
JVC DAB tuner
DAB-Tuner von JVC
Тюнер DAB JVC
• Set “EXT IN” for the external input setting (see page 24 of the INSTRUCTIONS.) /
Stellen Sie “EXT IN” für externe Eingangseinstellung ein
(siehe seite 24 der BEDIENUNGSANLEITUNG.) /
Установите для внешнего входа значение “EXT IN” (см. ИНСТРУКЦИИ ПО ЭКСПЛУАТАЦИИ на стр. 24).
Перед Вами Инструкция автомагнитолы JVC KD-G511_KD-G611_KD-G612. Вы можете ознакомиться и скачать данное руководство по эксплуатации бесплатно. Инструкция по применению на русском языке, предложенная производителем, позволяет правильно использовать Вашу бытовую технику и электронику.

Инструкция автомагнитолы JVC KD-G511_KD-G611_KD-G612

Информация отображена на картинке

Информация отображена на картинке
Информация отображена на картинке
Информация отображена на картинке
Для Вашего удобства
Если листать руководство пользователя автомагнитолы JVC KD-G511_KD-G611_KD-G612 прямо на сайте, не очень удобно для Вас, есть два возможных решения:
• Просмотр в полноэкранном режиме - легко просмотреть руководство пользователя (без загрузки его на свой компьютер), Вы можете использовать режим полноэкранного просмотра. Для просмотра инструкции пользователя автомагнитолы JVC KD-G511_KD-G611_KD-G612 на полном экране, используйте кнопку «Открыть в Pdf-viewer».
• Загрузка на компьютер - Вы можете также скачать Инструкция автомагнитолы JVC KD-G511_KD-G611_KD-G612 на свой компьютер и сохранить его в файлах.
Многие люди предпочитают читать документы не на экране, а в печатной версии. Возможность печати руководства пользователя также была предусмотрена на нашем сайте, и вы можете использовать ее, нажав на иконку «печать» в Pdf-viewer. Нет необходимости печатать все руководство автомагнитолы JVC KD-G511_KD-G611_KD-G612, можно выбрать только нужные страницы инструкции.
Zum Abbrechen der Displaydemonstration siehe Seite 8.
Информацию об отмене демонстрации функций дисплея см. на стр. 8.
For installation and connections, refer to the separate manual.
Für den Einbau und die Anschlüsse siehe das eigenständige Handbuch.
Указания по установке и выполнению соединений приводятся в отдельной инструкции.
ИНСТРУКЦИИ ПО ЭКСПЛУАТАЦИИ
C o v e r _ K D - G 6 1 2 [ E Y ] 0 0 6 A _ f . i n d d 2 Cover_KD-G612[EY]006A_f.indd 2 1 1 / 1 2 / 0 4 8 : 5 9 : 1 7 P M 11/12/04 8:59:17 PM

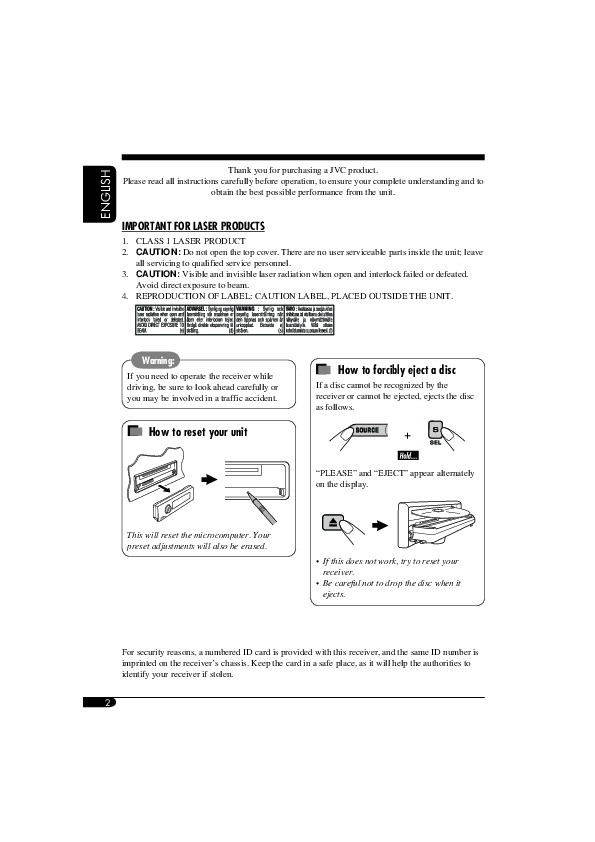
Thank you for purchasing a JVC product.
Please read all instructions carefully before operation, to ensure your complete understanding and to
obtain the best possible performance from the unit.
IMPORTANT FOR LASER PRODUCTS
1. CLASS 1 LASER PRODUCT
2. CAUT I ON : Do not open the top cover. There are no user serviceable parts inside the unit; leave
all servicing to qualified service personnel.
3. CAUTION: Visible and invisible laser radiation when open and interlock failed or defeated.
Avoid direct exposure to beam.
4. REPRODUCTION OF LABEL: CAUTION LABEL, PLACED OUTSIDE THE UNIT.
How to forcibly eject a disc
If you need to operate the receiver while
driving, be sure to look ahead carefully or
If a disc cannot be recognized by the
you may be involved in a traffic accident.
receiver or cannot be ejected, ejects the disc
How to reset your unit
“PLEASE” and “EJECT” appear alternately
This will reset the microcomputer. Your
preset adjustments will also be erased.
• If this does not work, try to reset your
• Be careful not to drop the disc when it
For security reasons, a numbered ID card is provided with this receiver, and the same ID number is
imprinted on the receiver’s chassis. Keep the card in a safe place, as it will help the authorities to
identify your receiver if stolen.
E N 0 2 - 0 5 _ G 6 1 2 [ E X _ E U ] f . i n d d 2 EN02-05_G612[EX_EU]f.indd 2 1 1 / 2 6 / 0 4 9 : 1 9 : 3 5 A M 11/26/04 9:19:35 AM

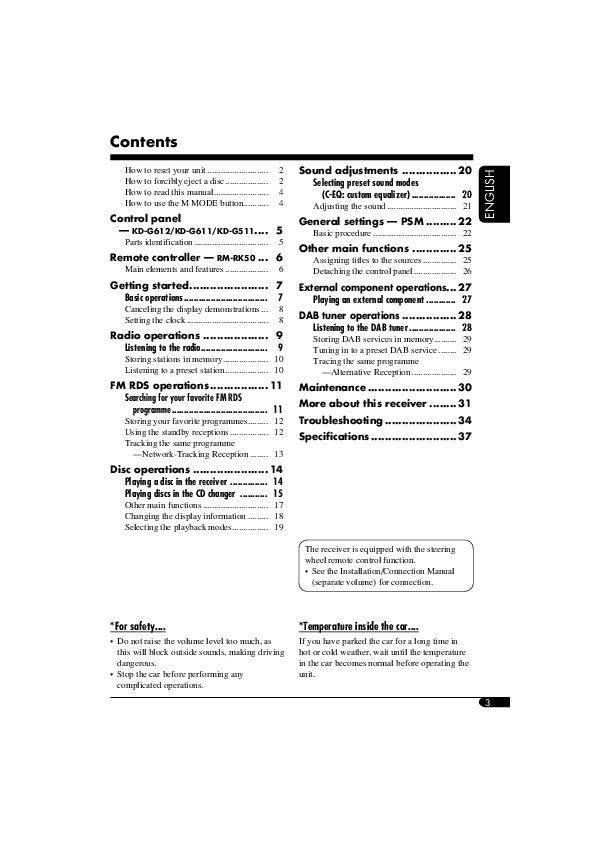
How to reset your unit . 2
Sound adjustments . 20
How to forcibly eject a disc . 2
Selecting preset sound modes
How to read this manual . 4
(C-EQ: custom equalizer) . 20
How to use the M MODE button . 4
Adjusting the sound . 21
General settings — PSM . 22
Basic procedure . 22
Parts identification . 5
Other main functions . 25
Assigning titles to the sources . 25
Main elements and features . 6
Detaching the control panel . 26
Getting started . 7
External component operations
Basic operations . 7
Playing an external component . 27
Canceling the display demonstrations . 8
DAB tuner operations
Setting the clock . 8
Listening to the DAB tuner . 28
Radio operations . 9
Storing DAB services in memory . 29
Listening to the radio . 9
Tuning in to a preset DAB service . 29
Storing stations in memory . 10
Tracing the same programme
Listening to a preset station . 10
—Alternative Reception . 29
FM RDS operations . 11
Searching for your favorite FM RDS
More about this receiver . 31
Storing your favorite programmes . 12
Using the standby receptions . 12
Tracking the same programme
—Network-Tracking Reception . 13
Disc operations . 14
Playing a disc in the receiver . 14
Playing discs in the CD changer . 15
Other main functions . 17
Changing the display information . 18
Selecting the playback modes . 19
The receiver is equipped with the steering
wheel remote control function.
• See the Installation/Connection Manual
(separate volume) for connection.
*Temperature inside the car.
• Do not raise the volume level too much, as
If you have parked the car for a long time in
this will block outside sounds, making driving
hot or cold weather, wait until the temperature
in the car becomes normal before operating the
• Stop the car before performing any
E N 0 2 - 0 5 _ G 6 1 2 [ E X _ E U ] 2 . i n d d 3 EN02-05_G612[EX_EU]2.indd 3 1 1 / 1 / 0 4 6 : 2 4 : 3 7 P M 11/1/04 6:24:37 PM

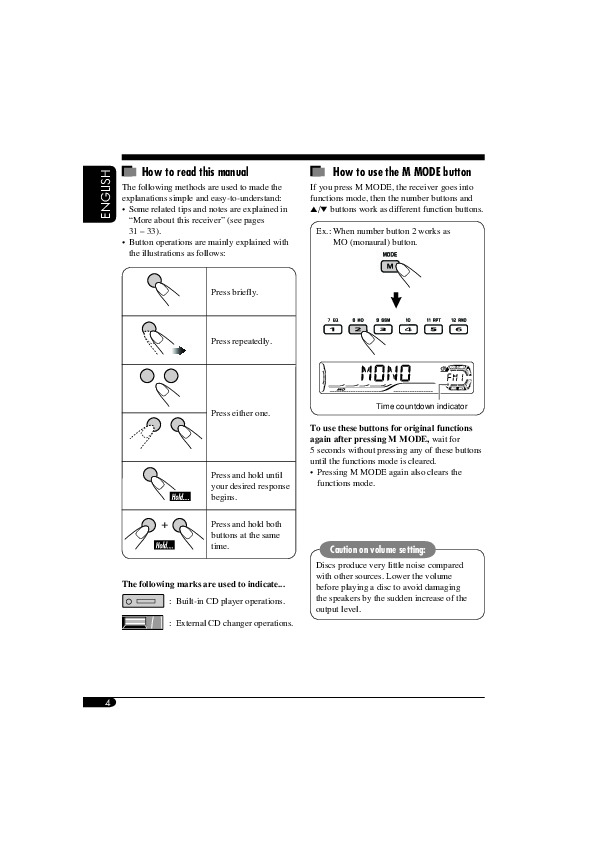
How to read this manual
How to use the M MODE button
The following methods are used to made the
If you press M MODE, the receiver goes into
explanations simple and easy-to-understand:
functions mode, then the number buttons and
• Some related tips and notes are explained in
5 / ∞ buttons work as different function buttons.
“More about this receiver” (see pages
Ex.: When number button 2 works as
• Button operations are mainly explained with
MO (monaural) button.
the illustrations as follows:
Time countdown indicator
Press either one.
To use these buttons for original functions
again after pressing M MODE, wait for
5 seconds without pressing any of these buttons
until the functions mode is cleared.
• Pressing M MODE again also clears the
Press and hold until
your desired response
Press and hold both
buttons at the same
Caution on volume setting:
Discs produce very little noise compared
with other sources. Lower the volume
The following marks are used to indicate.
before playing a disc to avoid damaging
the speakers by the sudden increase of the
: Built-in CD player operations.
: External CD changer operations.
E N 0 2 - 0 5 _ G 6 1 2 [ E X _ E U ] 1 . i n d d 4 EN02-05_G612[EX_EU]1.indd 4 1 0 / 2 6 / 0 4 8 : 5 6 : 1 6 P M 10/26/04 8:56:16 PM

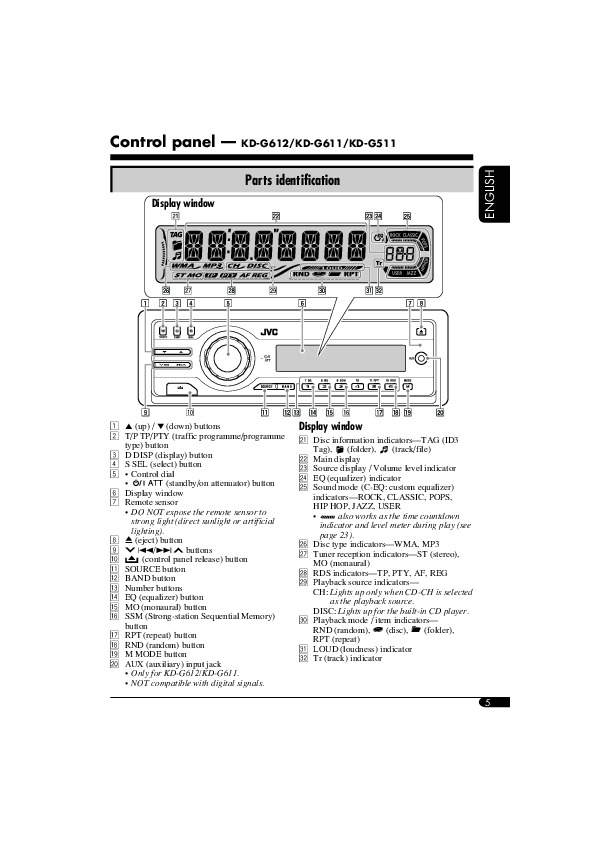
Control panel — KD-G612/KD-G611/KD-G511
1 5 (up) / ∞ (down) buttons
2 T/P TP/PTY (traffic programme/programme
a Disc information indicators—TAG (ID3
3 D DISP (display) button
4 S SEL (select) button
d Source display / Volume level indicator
5 • Control dial
f EQ (equalizer) indicator
(standby/on attenuator) button
g Sound mode (C-EQ: custom equalizer)
6 Display window
indicators—ROCK, CLASSIC, POPS,
7 Remote sensor
HIP HOP, JAZZ, USER
• DO NOT expose the remote sensor to
also works as the time countdown
strong light (direct sunlight or artificial
indicator and level meter during play (see
8 0 (eject) button
h Disc type indicators—WMA, MP3
j Tuner reception indicators—ST (stereo),
(control panel release) button
q SOURCE button
k RDS indicators—TP, PTY, AF, REG
l Playback source indicators—
e Number buttons
CH: Lights up only when CD-CH is selected
r EQ (equalizer) button
as the playback source.
t MO (monaural) button
DISC: Lights up for the built-in CD player.
y SSM (Strong-station Sequential Memory)
/ Playback mode / item indicators—
u RPT (repeat) button
i RND (random) button
z LOUD (loudness) indicator
o M MODE button
x Tr (track) indicator
AUX (auxiliary) input jack
• Only for KD-G612/KD-G611.
• NOT compatible with digital signals.
E N 0 2 - 0 5 _ G 6 1 2 [ E X _ E U ] f . i n d d 5 EN02-05_G612[EX_EU]f.indd 5 1 1 / 2 4 / 0 4 1 0 : 0 0 : 3 9 P M 11/24/04 10:00:39 PM

Remote controller — RM-RK50
RM-RK50 is supplied for KD-G612/KD-G611.
• KD-G511 can be remotely controlled as
Main elements and features
instructed here (with an optionally purchased
remote controller—recommended to use
Installing the lithium coin battery
1 (standby/on/attenuator) button
• When operating, aim the remote controller
• Turns on and off the power and also
directly at the remote sensor on the
attenuates the sound.
receiver. Make sure there is no obstacle in
2 5 U (up) / D (down) ∞ buttons
• 5 U: Changes the FM/AM/DAB bands.
• D ∞ : Changes the preset stations (or
• Store the battery in a place where children
• Changes the folder of the MP3/WMA
cannot reach to avoid risk of accident.
• To prevent the battery from over-heating,
• While playing an MP3 disc on an
MP3-compatible CD changer:
– Do not recharge, short, disassemble, or
– Changes the disc if pressed briefly.
heat the battery or dispose of it in a fire.
– Changes the folder if pressed and held.
– Do not leave the battery with other
3 VOL – / VOL + buttons
• Adjusts the volume level.
– Do not poke the battery with tweezers or
• Selects the sound mode (C-EQ: custom
– Wrap the battery with tape and insulate
when throwing away or saving it.
5 SOURCE button
• Selects the source.
6 2 R (reverse) / F (forward) 3 buttons
• Searches for stations (or services) if
• Searches for ensembles if pressed and
• Fast-forwards or reverses the track if
pressed and held.
• Changes the tracks of the disc.
E N 0 6 - 1 1 _ G 6 1 2 [ E X _ E U ] 2 . i n d d 6 EN06-11_G612[EX_EU]2.indd 6 1 1 / 1 / 0 4 5 : 5 4 : 1 3 P M 11/1/04 5:54:13 PM
Перед Вами Инструкция автомагнитолы JVC KD-G612. Вы можете ознакомиться и скачать данное руководство по эксплуатации бесплатно. Инструкция по применению на русском языке, предложенная производителем, позволяет правильно использовать Вашу бытовую технику и электронику.
Инструкция автомагнитолы JVC KD-G612
Информация отображена на картинке
Информация отображена на картинке

Информация отображена на картинке

Информация отображена на картинке
Для Вашего удобства
Если листать руководство пользователя автомагнитолы JVC KD-G612 прямо на сайте, не очень удобно для Вас, есть два возможных решения:
• Просмотр в полноэкранном режиме - легко просмотреть руководство пользователя (без загрузки его на свой компьютер), Вы можете использовать режим полноэкранного просмотра. Для просмотра инструкции пользователя автомагнитолы JVC KD-G612 на полном экране, используйте кнопку «Открыть в Pdf-viewer».
• Загрузка на компьютер - Вы можете также скачать Инструкция автомагнитолы JVC KD-G612 на свой компьютер и сохранить его в файлах.
Многие люди предпочитают читать документы не на экране, а в печатной версии. Возможность печати руководства пользователя также была предусмотрена на нашем сайте, и вы можете использовать ее, нажав на иконку «печать» в Pdf-viewer. Нет необходимости печатать все руководство автомагнитолы JVC KD-G612, можно выбрать только нужные страницы инструкции.
Читайте также: