
J4j discord что это
Making your first bot is very simple. This tutorial will walk you through how to make a basic bot that responds to a ping command and listens to some other events.
This tutorial assumes a basic familiarity with reactive programming and Reactor. Refer to Reactive (Reactor) Tutorial for information on that topic.
But first, it will be helpful to understand roughly how Discord bots work.
Using just those two mechanisms (receiving events from Discord via a websocket, and interacting with Discord via HTTP), you can create complex programs that do all sorts of things in Discord. In this tutorial, you will learn how to create a very simple, but extensible, bot which will send the message "Pong!" any time someone sends "!ping".
You first need to set up a project with Discord4J as a dependency. Refer to the Quickstart page for details on how to do that with Maven or Gradle. If you're unfamiliar with those tools, refer to the documentation for your specific IDE.
As mentioned previously, Discord4J provides higher-level APIs for interacting with Discord. The "entry point" for any kind of interaction with Discord is the DiscordClient . So, the first thing we need to do in our program is construct one. The easiest way to do that is simply using the create method.
More advanced configuration of the client can be done with DiscordClientBuilder . The default configuration is fine for the purposes of this tutorial.
Replace TOKEN with your bot's authentication token. This is like a username and password that a normal user would use to authenticate with Discord. It can be found in the "Bot" settings page of the developer portal.
A DiscordClient has an important caveat: it presents all of the operations a bot can do while not logged in. Remember, when a bot is "logged in," it has an active connection to Discord that allows it to receive real-time information. While there are many legitimate use cases for just having a non-connected DiscordClient , most bots will instead require a GatewayDiscordClient .
To obtain a GatewayDiscordClient , we will use the withGateway method of DiscordClient . This method allows us to say the bot should do when it logs in. We can use the method like so:
We can see that withGateway returns a Mono which we have named login . Upon subscribing to this Mono, Discord4J will establish a connection with Discord and perform the action specified by the argument to withGateway (i.e., it will invoke the function we passed to withGateway ). In this case, we immediately return Mono.empty() , so that action is essentially "do nothing." You can confirm this by running the following updated program and observing that the bot comes online in Discord, and the program runs indefinitely.
Because most bots require a GatewayDiscordClient over a DiscordClient , you will often see the former referred to as just "client."
A bot doing nothing but being online is pretty boring, so let's change that. Recall that Discord sends real-time information to connected clients via events. To listen to these events, we can use the on method of GatewayDiscordClient .
This method has several overloads, but the most useful (and safest, refer to the javadocs for more info) is the one which takes a Function> for the second parameter. That function is invoked every time the specified event is received from Discord. The Publisher that it returns determines how the event is handled.
Let's look at some concrete examples.
First, let's listen to ReadyEvent . Quoting from the javadoc, this event is "dispatched when an initial connection to the Discord gateway has been established." We can rewrite our withGateway invocation to instead listen to this event and print some information from it.
With this code, every occurrence of ReadyEvent is handled by printing the username and discriminator of the "self user" which is the user associated with the bot account.
fromRunnable is used because the handler isn't reactive. As we'll see later, this usually isn't the case.
When you run the program now, you should see the printed "Logged in as . " line once the bot logs in. In English, this new code essentially says "when logged in, listen to the ready event, and when it gets dispatched, print 'logged in as . '"
Next we'll see how to create our !ping command. Remember, we want the bot to respond to "!ping" with "pong!".
The setup for listening to the event is exactly the same as with ReadyEvent . The only difference is the event we want to listen to. In this case that's MessageCreateEvent . Again quoting from the javadoc, this event is "dispatched when a message is sent in a message channel."
We need to fill in the "todo" with code that checks if the message we received is "!ping" and then responds with "pong!" if it is. This is fairly straightforward. The main thing here is just knowing which methods will give you access to the information you want. Like any library, this familiarity comes with experience.
A pretty good strategy for exploring a new library is to just type someVariable. and seeing what suggestions your IDE has. For example, without any prior knowledge, you could find that you can get the received message in the event with event.getMessage() and the content of that message with event.getMessage().getContent() .
The final code with "todo" filled in looks like this.
We check if the message content equals (ignoring case) "!ping", and if it does, we handle the event by creating a message in the same channel with the content "pong!". Otherwise, we handle the event by doing nothing (returning Mono.empty() ).
At this point, you can probably see how this could be extended to support many more commands. Try adding another one!
And that's it! If you run the program and send "!ping" in a channel the bot can see, it will dutifully respond "pong!".
You might have noticed that the MessageCreateEvent example overwrote the ReadyEvent one. But what if we want to do both? Our bot should both print "Logged in as. " on start up and respond to "!ping" with "pong!". We can easily do this with a couple of small modifications and the and method.
The first change you might notice is the addition of then() to both handlers. We didn't discuss is previously, but gateway.on() returns a Flux where T is the return type of the event handler function. This allows you to continue operating on the results of the handler. In this case, we don't need to do that, so we can simply ignore any results with then() .
Now that both of the handlers are Mono , we can simply combine them with and . The code can be fluently read as "when logged in, print on login and handle the ping command."

Advertising 24
Advertising Advert J4j Advetisement Promo
Simple Advertising is a server that wishes to make Advertising simple and easy for everybody, no complex rules or directives, just simply advertise. We have multiple sets of channels for advertising just the server you need to promote.
Gaming 692
Social Gaming Chill Community J4j
Free Games Sunucumuzda Nitro Çekilişleri Robux Çekilişleri Steam Key Çekilişleri Netflix Hesap Çekilişleri Ve Bütün Oyunları Ücretsiz Bir Şekilde Bulma İmaknı :)
Community 6545
J4j Join4join Joinforjoin Jfj J4jfast
🇹🇷 Profesyonelce tasarlanmış kaliteli Join For Join sunucusu, yeni hesap ve eski hesaplara ayrılmış J4J kanalları bulunmaktadır. 🇬🇧 Professionally designed quality Join For Join server has J4J channels dedicated to new account and old accounts.

Community 62690
J4j Joinforjoin Join4join Nitro Giveaways
Best & New J4J is HERE! Fastest Way To Get Invites!
Advertising 6493
Join-to-join J4j J2j Join-to-join Joinforjoin
Most Advanced Join For Join Server. En Gelişmiş Join For Join Sunucusu.
Discord Home
DiscordHome is a discord listing website, find discord servers and communities here! You can advertise, hire, post resumes and find partners for your discord server. DH deems itself as the home of discord where you can explore amazing and useful resources for all your discord and server needs. We are not affiliated with Discord!
Дискорд4J — это библиотека Java с открытым исходным кодом, которая может быть использована в первую очередь для быстрого доступа к Дискорд Бот API . Он сильно интегрируется с Проект Реактор обеспечить полностью не блокирующий реактивный API.
Мы будем использовать Discord4J в этом учебнике, чтобы создать простого бота Discord, способного реагировать на предопределенную команду. Мы построим бота поверх Spring Boot, чтобы продемонстрировать, как легко было бы масштабировать нашего бота во многих других функциях, включенных Spring Boot.
Когда мы закончите, этот бот сможет прослушать команду под названием “!todo” и распечатать статически определенный список дел.
6. Обзор
В этом учебнике описаны все необходимые шаги для создания бота Discord с использованием библиотеки Discord4J и Spring Boot. Наконец, в нем описано, как настроить базовую масштабируемую структуру командования и реагирования для бота.
Для полного и работающего бота просмотрите исходный код более на GitHub . Для его запуска требуется действительный токен бота.
?? Profesyonelce tasarlanmış kaliteli Join For Join sunucusu, herkesin hızlı bir şekilde üye alabileceği bir platformdur. ?? Professionally designed quality Join For Join server is a platform wher.
Join for join server: Active j4j channel Active s4s channel Overall active community Weekly nitro giveaways Gain thousands of members
?? Profesyonelce tasarlanmış kaliteli Join For Join sunucusu, herkesin hızlı bir şekilde üye alabileceği bir platformdur. ?? Professionally designed quality Join For Join server is a platform wher.
?? Profesyonelce tasarlanmış kaliteli Join For Join sunucusu, herkesin hızlı bir şekilde üye alabileceği bir platformdur. ?? Professionally designed quality Join For Join server is a platform wher.
Hey! Welcome to our server . This server its for: - Join for join . - Nitro classic/nitro boost giveaways - Server promotions
Need people in your server. THEN JOIN J4J you join a server and they join yours. Here you can grow your server fast.
:ENGLİSH:This server is J4J server. If you want to enter, we are waiting for you. have a nice day :TÜRKİSH:Bu sunucu J4J sun.
¯¯¯¯¯¯¯¯¯¯¯¯¯¯¯¯¯¯¯¯¯¯¯¯¯¯¯¯
- J4j
- Joinforjoin
- Join-For-Join
?? Profesyonelce tasarlanmış kaliteli Join For Join sunucusu, herkesin hızlı bir şekilde üye alabileceği bir platformdur. ?? Professionally designed quality Join For Join server is a platform wher.
?? Profesyonelce tasarlanmış kaliteli Join For Join sunucusu, herkesin hızlı bir şekilde üye alabileceği bir platformdur. ?? Professionally designed quality Join For Join server is a platform wher.
New & Safe J4J | Join4Join server ! ---> I am advertising and growing this discord server daily, you will see new members every hour, every day! - Advertise your server/website - New members ever.
?? Profesyonelce tasarlanmış kaliteli Join For Join sunucusu, yeni hesap ve eski hesaplara ayrılmış J4J kanalları bulunmaktadır. ?? Professionally designed quality Join For Join server has J4J cha.
JOIN FOR JOIN (Over 1500+ Daily Joins) BIGGEST ONLINE JOIN FOR JOIN SERVER IS HERE! • Fastest Way To Get Invites • 3 invite = Vip Role • Daily Giveaways • Invite-Rewards • Nitro Drops JOIN NOW! .
© 2015 - 2022 DiscordServers. All rights reserved. Not affiliated with Discord
Discord4J - это библиотека написанная на Java 8, выполняющая роль интерфейса к Discod API. С помощью нее как раз можно сделать чат-бот для вашего Discord-сервера.
Для реализации эхо-бота в рамках данной статьи, нам понадобится:
- Java 8 (JDK 8)
- Eclipse IDE с поддержкой Maven проектов (с 2016 года интеграция Maven в Eclipse идет "в коробе", начиная с Eclipse Neon)
- Discord4J (на момент написания статьи, использовалась версия v2.7.0)
1. Создание проекта в Eclipse с использованием Maven
Для начала создаем Maven проект в Eclipse. File -> New -> Project . или Alt + Shif + N -> Project . . В списке находим категорию Maven и в ней выбираем Maven Project. Жмем далее.

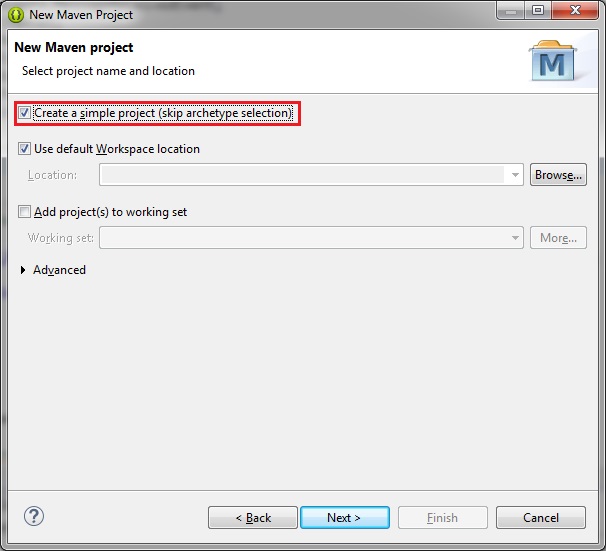
В следующем окне обязательно ставим галочку "Create a simple project". Жмем далее.
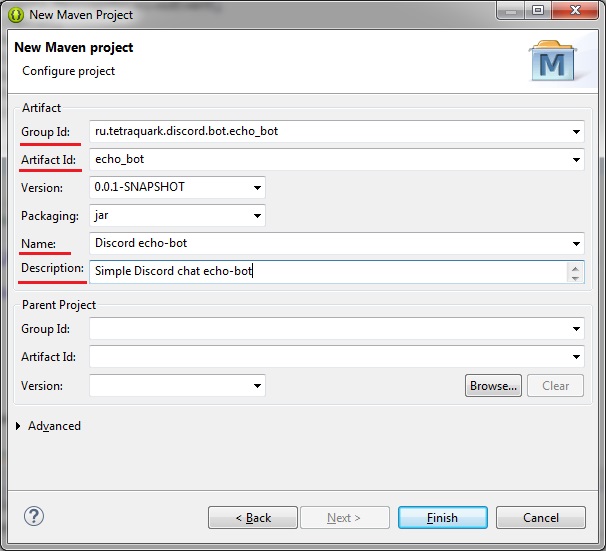
В следующем окне заполняем поля Group ID, Artifact ID, Name, Description на свой вкус. Жмем финиш.
Таким образом мы создали пустой Maven проект для нашего будущего бота, содержание которого примерно следующее:

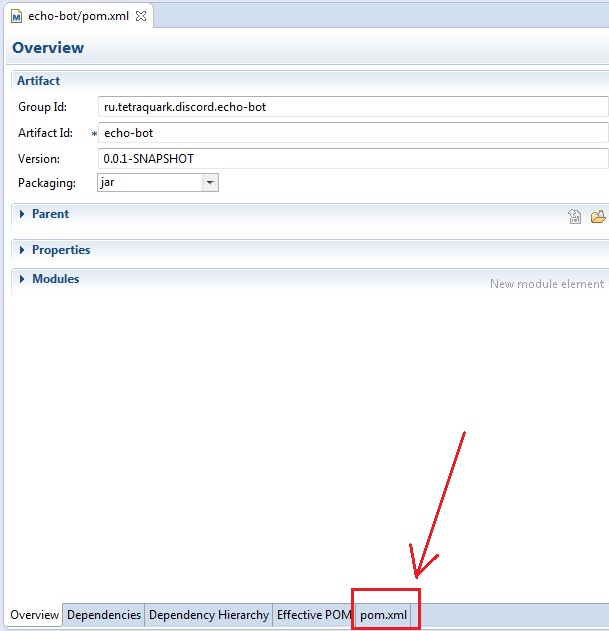
Открываем в текстовом редакторе файл проекта: pom.xml.
В блок (где-то между
Сохраняем файл и обновляем проект следующим образом: правой кнопкой мыши по проекту в Package Explorer, в всплывающем меню выбираем: Maven -> Update Project.
После проделанной процедуры Maven автоматически загрузит с указанных репозиториев в pom.xml зависимые библиотеки, в нашем случае это Discord4j, и встроит их в проект.
Если ничего плохого не произошло, то проект готов и переходим к написанию кода.
2. Пишем код
Создаем новый package в src/main/java, в нем создаем новый класс для своего бота.
Я приведу пример того, что получилось у меня. Подробно описывать этот код я не буду, потому что эти 100 строк крайне просты. Я добавил комментарии к коду, чего для понимая должно хватить.
Ниже привожу полный код эхо чат-бота (ниже есть ссылка на Github проекта):
3. Создайте приложение для весенней загрузки
После создания нового приложения Spring Boot, мы должны быть уверены, чтобы включить Основной Discord4J зависимость:
Discord4J работает путем инициализации GatewayDiscordClient с маркером бота, который мы создали ранее. Этот клиентский объект позволяет нам регистрировать слушателей событий и настраивать многие вещи, но как минимум, мы должны по крайней мере позвонить войти в систему () метод. Это будет отображать наш бот как онлайн.
Во-первых, давайте добавим наш токен бота в наш application.yml файл:
Далее, давайте ввести его в @Configuration класс, где мы можем мгновенно наши GatewayDiscordClient :
На данный момент, наш бот будет рассматриваться как онлайн, но он ничего не делает еще. Давайте добавим некоторые функциональные возможности.
4.3. EventListener
2. Создать приложение раздора
Для того, чтобы наш бот получал обновления от Discord и писал ответы на каналах, нам нужно создать приложение Discord в портале разработчиков Discord и настроить его как бота. Это простой процесс. Так как Discord позволяет создавать несколько приложений или ботов под одной учетной записью разработчика, не стесняйтесь попробовать это несколько раз с различными настройками.
Вот шаги для создания нового приложения:
- Войдите в Портал разработчиков Discord
- Во вкладке Приложения нажмите кнопку “Новое приложение”
- Введите имя для нашего бота и нажмите кнопку “Создать”
- Загрузите значок приложения и описание и нажмите кнопку “Сохранить изменения”
Теперь, когда приложение существует, мы просто должны добавить бот функциональность к нему. Это позволит создать токен бота, который требует Discord4J.
Вот шаги по преобразованию приложения в бота:
- Во вкладке Приложения выберите наше приложение (если оно еще не выбрано).
- Во вкладке Bot нажмите кнопку “Добавить бота” и подтвердите, что мы хотим это сделать.
Теперь, когда наше приложение стало настоящим ботом, скопировать токен, чтобы мы могли добавить его в наши свойства приложения. Будьте осторожны, чтобы не поделиться этим маркером публично, так как кто-то другой сможет выполнить вредоносный код, выдавая себя за нашего бота.
Теперь мы готовы написать код!
4. Добавить событие Слушатели
Есть много типов событий, для которых мы можем слушать. Тем не менее, регистрация слушателя одинакова для всех из них, так что давайте сначала создадим интерфейс для всех наших слушателей событий:
Теперь мы можем реализовать этот интерфейс для как можно большего discord4j.core.event.domain.Event расширения, как мы хотим.
Прежде чем реализовать наш первый слушатель событий, давайте изменим наш клиент @Bean конфигурации, чтобы ожидать список EventListener так что он может зарегистрировать каждый найденный в Весеннее приложениеКонтекст :
Мы могли бы зарегистрировать каждое событие отдельно и открыто. Тем не менее, как правило, лучше использовать более модульный подход для улучшения масштабируемости кода.
Наша настройка слушателя события теперь завершена, но бот все еще ничего не делает, так что давайте добавим некоторые события, чтобы слушать.
4.1. Обработка команд
Многое здесь происходит, но это самая основная форма командования и ответа. Этот подход использует реактивный функциональный дизайн , но это можно написать более традиционным императивом, используя блок () .
Масштабирование нескольких команд ботов, вызов различных служб или репозиториев данных или даже использование ролей Discord в качестве авторизации для определенных команд являются общими частями хорошей архитектуры команды бота. Так как наши слушатели – это весенние @Service s, мы могли бы легко ввести другие весенние управляемые бобы, чтобы заботиться об этих задачах. Тем не менее, мы не будем решать все, что в этой статье.
5. Тест Бот в discord
Теперь, когда у нас есть функционирующий бот Discord, мы можем пригласить его на сервер Discord и протестировать его.
Чтобы создать ссылку приглашения, мы должны указать, какие разрешения бот требует, чтобы функционировать должным образом. Популярный сторонний Калькулятор разрешений раздора часто используется для создания ссылки приглашения с необходимыми разрешениями. Хотя это не рекомендуется для производства, мы можем просто выбрать “Администратор” для целей тестирования и не беспокоиться о других разрешениях. Просто поставь идентификатор клиента для нашего бота (на портале разработчиков Discord) и используйте генерируемую ссылку, чтобы пригласить нашего бота серверная .
Если мы не будем предоставлять администратору разрешения на бота, нам может потребоваться настроить разрешения канала, чтобы бот мог читать и писать в канале.
4.2. EventListener
На этом этапе наш бот получит команду “!todo”. Однако, если пользователь исправляет свою неправильно введенную команду, бот не отвечает. Давайте подготовим этот пример использования с другим слушателем события.
Читайте также: