
Где находится modify 3ds max
Автор:
Using Modifiers
Once you’ve applied modifiers to an object, you can use the Modifier Stack to find a particular modifier, change its parameters, edit its sequence in the modifier stack, copy its settings to another object, or delete it entirely.
You can find alphabetical lists of modifiers in Object-Space Modifiers and World-Space Modifiers.
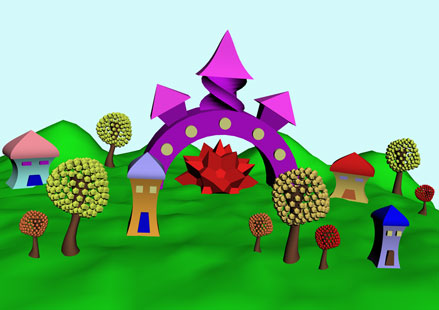
Пример использования модификаторов
Для начала попробуйте выполнить простое упражнение: из примитивов с использованием модификаторов создайте сказочное дерево.
1. На виде Тор создайте GeoSphere c радиусом 75. Примените к ней модификатор Noise (Шум) и установите параметры зашумления Strength X=Y=Z=50. Меняя число Seed, подберите подходящую форму.
2. Примените к этому объекту модификатор Lattice (Решетка).
В свитке Parameters установите переключатель в позицию Joints Only from Vertices (Только узлы на вертексах). В разделе Joints выберите форму узлов Icosa cо значением Radius=10. Получилась крона дерева.

3. На виде Тор создайте Cylinder с параметрами (R=35, H=120, HS=10). Это будет ствол дерева. Расположите его по центру кроны. Примените к цилиндру модификатор Stretch (Растягивание) с настройками Stretch=1,0 и Amplify=1,0.
4. Если вы хотите сделать ствол неравномерно изогнутым, то можно применить к нему модификатор Noise.
Дерево готово. Сгруппируйте его через команду главного меню Group - Group.
5. Попробуйте создать целый сказочный городок, используя примитивы и параметрические модификаторы. Помните, что нужно добавлять сегментов таким примитивам, как Box, Pyramid или Plane, иначе они не будут изменятся из-за нехватки опорных точек.
Когда вы будете клонировать и расставлять по сказочному городу деревья, то меняйте у модификатора Noise число Seed, тогда деревья будут разными. Клоны должны быть независимыми.
тел. (812) 931-01-80
пр. Непокоренных, 49, офис 508
(деловой центр H-49)
У операции Loft существует возможность дополнительной деформации уже созданного объекта.
Установите в новом файле единицы измерения миллиметры.
Эта команда находится в Главном меню Customize-Units Setup.
Подробная информация находится в уроке Установка единиц измерения 3ds Max.

Создайте линию.
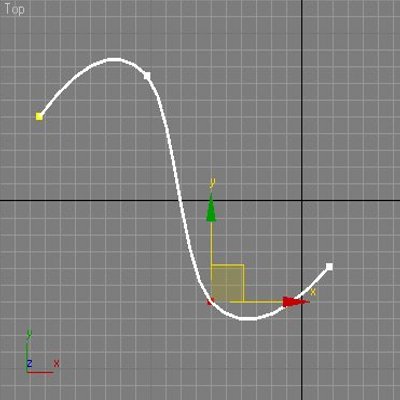
Измените тип точек на Smooth, всем, кроме крайних.

Создайте сечение из Circle.
Выделите путь Line.
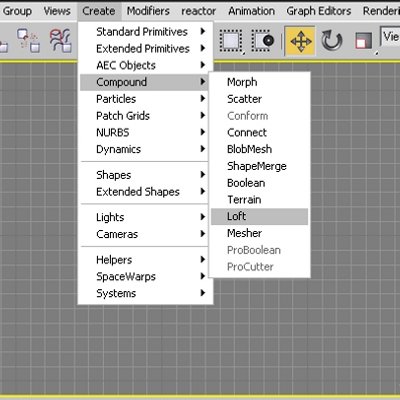
В меню Create в разделе Compound выберите команду Loft.

Вдоль пути построится тело Loft.
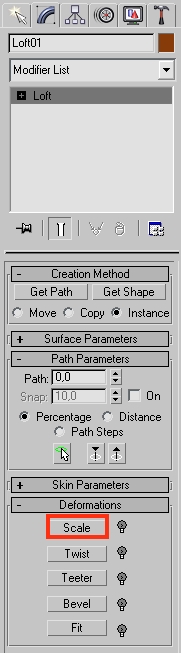
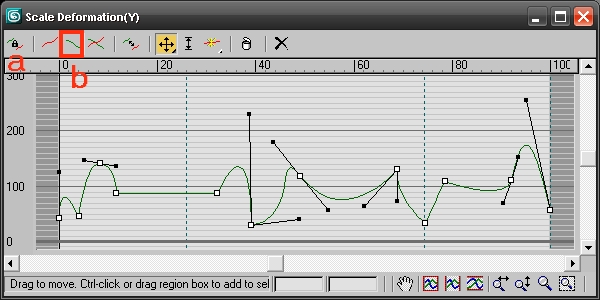
После построения тела Loft перейдите на вкладку Modify и нажмите на кнопке Scale в свитке Deformations.
Откроется диалоговое окно Scale Deformation.
Элементы диалогового окна:
1.Цветная линия - это масштаб всего пути.
2.Reset Curve - сброс всех настроек. Масштаб возвращается в исходное положение.
3.Insert Corner Point - создание новой точки
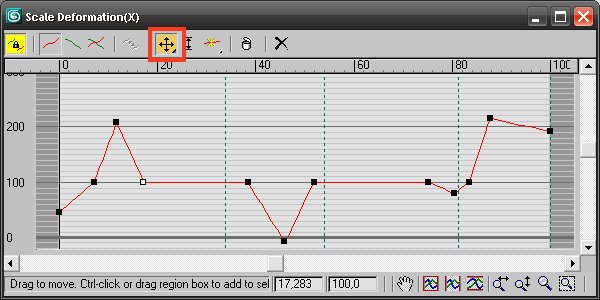
4.Move Control Point - перемещение выбранной точки (точек).
Остальные инструменты рассмотрим по мере работы над объектом.
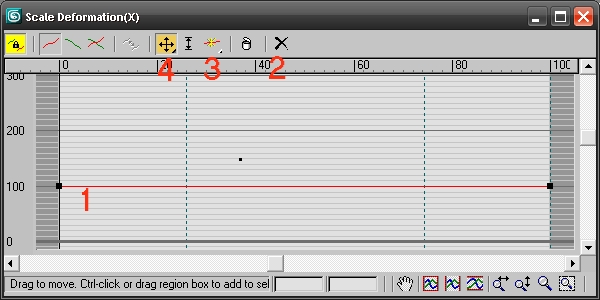
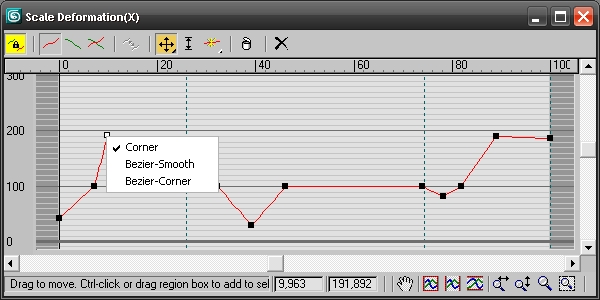
Нажмите на кнопке Insert Corner Point и поставьте на линии 10 точек в разных местах.
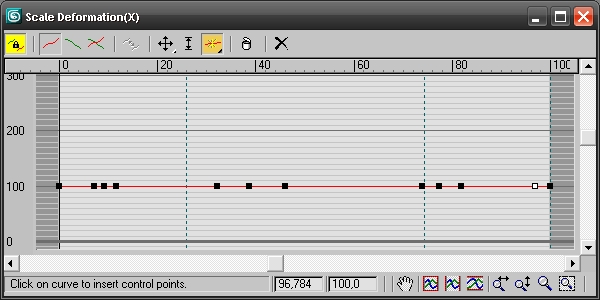
Выберите инструмент перемещения Move Control Point и передвиньте точки в разных направлениях.
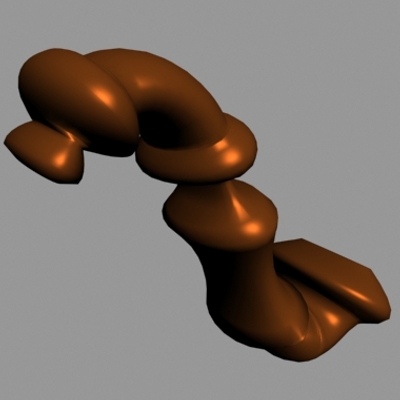
Результат при визуализации.
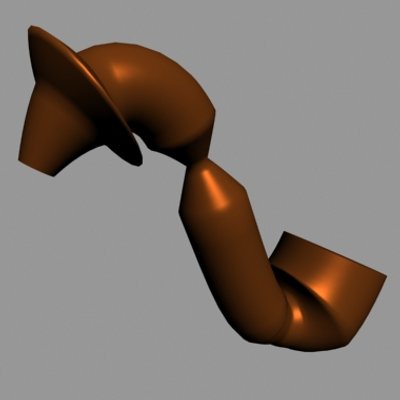
Тип точки (точек) можно менять.
Выделите точку (несколько точек), щелкните правой кнопкой мыши и в контекстном меню выберите тип точки.
Corner - угловая точка.
Bezier-Corner - угловая с векторами, которые настраиваются независимо друг от друга.
Bezier-Smooth - гладкая с векторами, угол между которыми всегда 180 градусов.
Изменяя тип точек вы можете получить модель очень сложной формы.
В процессе работы точки можно как добавлять - Insert Corner Point,
так и удалять Delete

ПРЕДОСТЕРЕЖЕНИЕ!
Во время работы не пересекайте толстую темно-серую линию в окне Scale Deformation.
Пока процесс деформации происходит симметрично по двум осям.
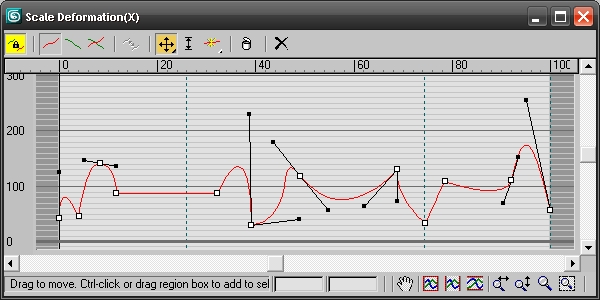
5.Make Symmetrical - блокировка осей, пока она включена деформация симметрична.
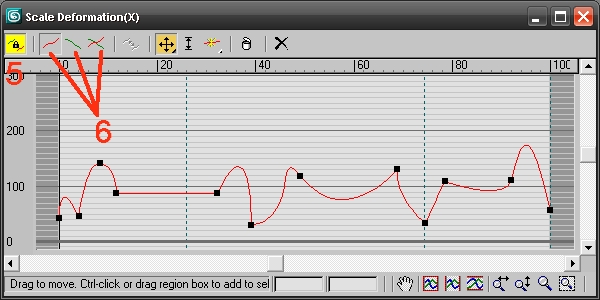
6.Display (..) Axes - выбор оси деформации.
a)Снимите блокировку. Щелкните по кнопке Make Symmetrical.
b)Выберите кнопку Display Y Axes (цвет линии станет зеленым - выбрана другая ось деформации).
"Рамкой" выделите все точки в окне Scale Deformation.
Поднимите их вверх
Форма модели "расплющится" .

Выберите кнопку Display XY Axes и вам станут доступны обе линии.
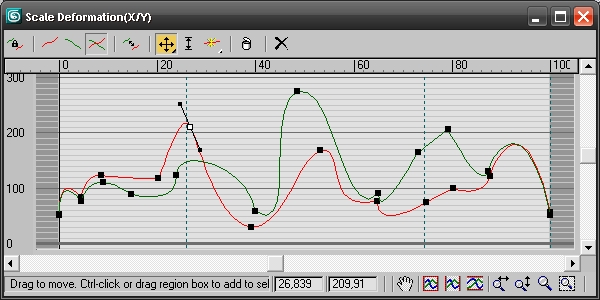
Теперь вы можете их настраивать независимо друг от друга.
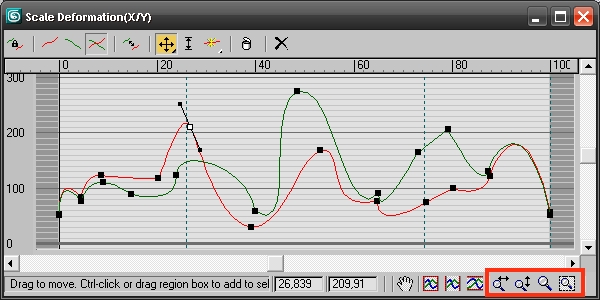
Используя дополнительно инструменты Zoom, вы можете настраивать окно Scale Deformation.
Увеличивать или уменьшать рабочее поле.
Щелкаете по значку и с нажатой левой кнопкой мыши изменяете размер окна.
Значки слева-направо:
1. Zoom Horizontally - увеличение поля по горизонтали
2. Zoom Vertical - увеличение поля по вертикали
3. Zoom - равномерное увеличение
4. Zoom Region - масштабирование выделенного участка.
тел. (812) 931-01-80
пр. Непокоренных, 49, офис 508
(деловой центр H-49)
Modifier Sub-Object Levels
In addition to its own set of parameters, a modifier typically has one or more sub-object levels that you access through the modifier stack. The most common of these are a gizmo and a center.
Displays in viewports as a wireframe that initially surrounds the selected object. A gizmo acts like a mechanical apparatus that transfers its modification to the object it’s attached to. To alter the effect of the modifier on the object, you can move, scale, and rotate the gizmo as you would any object.
The center is the modifier's pivot point. You can move a modifier’s center, which alters the effect of the modifier on the object.
Создание пользовательского списка модификаторов
Хотя в 3ds Max имеется очень большое количество модификаторов объекта, можно использовать лишь небольшое количество операций (например, при выполнении повторяющихся функций моделирования). Чтобы облегчить доступ к ним, можно добавить наиболее часто используемые кнопки-модификаторы на панель Command Panel > вкладка Modify. Для этого:
Procedures
To use the Modify panel:
The name of the selected object appears at the top of the Modify panel, and fields change to match this object.
The object’s creation parameters appear in rollouts on the Modify panel, below the modifier stack display. You can use these rollouts to change the creation parameters for an object. As you change them, the object updates in the viewports.
After you apply a modifier, it becomes active, and rollouts below the modifier stack display settings specific to the active modifier.
To apply a modifier to an object:

Tip: You can use the mouse or keyboard to choose a modifier from the Modifier List. To use the keyboard, first open the list with the mouse, and then type the first letter in the modifier's name. From there you can use the arrow keys or the method described in the following paragraph to highlight the desired modifier, and then press to assign the modifier.
In many cases, several modifier names start with the same letter. You can go directly to a particular modifier if you type the first few letters (enough for a unique combination) in the desired modifier's name quickly. For example, say you want to assign the Mirror modifier to an object. Typing M goes to Mesh Select, which isn't anywhere near Mirror in the Modifier list, but typing MI goes directly to Mirror.
Not all modifiers appear on the Modifiers menu.
Rollouts are now displayed below the modifier stack display, showing settings for the modifier. As you change these settings, the object updates in viewports.
To drag a modifier to an object:
- Select an object that already has a modifier you would like to use on another object.
- To copy the modifier without instancing it, drag the modifier's name from the stack display to the object in a viewport that you want to use the same modifier. To move the modifier, use +drag; this removes it from the original object and applying it to the new one. To instance the modifier, use +drag; this creates an instanced modifier applied to both the original object and the new one.
Note: Instancing a modifier causes its name to be displayed in italics in the modifier stack. This indicates that the modifier is instanced, meaning that a change to the modifier parameters of one object will affect the other.

By:
After adding objects to your scene from the Create panel, you often move to the Modify panel to change an object’s original creation parameters and to apply modifiers. Modifiers are the basic tools for reshaping and adjusting primitive geometry.
Note: You can float or dismiss the command panel using the Customize Display right-click menu. The default setting is to display the command panel docked at the right of your screen. If it is not displayed or you want to change its location and docking or floating status, right-click in a blank area on any toolbar, and choose from the shortcut menu.
The Modify panel stays in view until you click another command panel tab. The panel updates to show the options and controls that are available for the currently selected object or modifier.
Элементы стека модификаторов:
1. Вкладка Modify командной панели (Command Panel).
2. Список всех модификаторов. Для назначения модификатора на выделенный объект нужно открыть выпадающий список и выбрать нужный модификатор одним щелчком. Чтобы поиск был быстрее, можно на клавиатуре нажимать первую букву названия модификатора.
3. Перечень уже назначенных на объект модификаторов (стек). Читается стек снизу вверх. По стеку на рисунке можно сказать, что был создан примитив Box и к нему применен модификатор Bend.
4. Уровень подобъектов Sub-objects. Чтобы развернуть уровень подобъектов, необходимо один раз щелкнуть по плюсу, находящемуся слева от названия модификаторов. Большинство модификаторов имеют несколько уровней подобъектов, например: Gizmo (Гизмо) - габаритный контейнер, в рамках которого действует модификатор. Изображается в видовых окнах как каркас (обычно оранжевого цвета), который первоначально окружает объект. Можно перемещать, вращать и масштабировать гизмо, тем самым изменяя воздействие модификатора на объект. Center (Центр) - точка или ось, относительно которой действует модификатор. Можно перемещать ось, тем самым изменяя воздействие модификатора на объект.
5. Кнопка Закрепить стек позволяет зафиксировать меню стека на экране таким образом, что оно не исчезнет, если снять выделение с объекта или даже выделить другой объект.
6. Кнопка Показывать конечный результат - показывает конечный результат всех модификаций объекта, даже если выбран не последний в стеке модификатор.
7. Кнопка Сделать независимым - делает выбранный модификатор или сам объект независимой копией, которая активна только в том случае, если объект или модификатор является Instance.
8. Кнопка Удалить модификатор - удаляет выделенный модификатор из стека.
9. Кнопка вызова расширенного меню настройки модификаторов.
К одному объекту можно применить несколько модификаторов (рис. 2). Напомню, что читается стек снизу вверх.

Рис.2. На объект назначено два модификатора
Причем конечная форма объекта зависит от последовательности применения модификаторов. Сравните: на рис.3 изображена фигура, к которой сначала применили модификатор Bend (Сгиб), а потом Twist (Скручивание). А на рис.4 изображена фигура, которую сначала скрутили, а потом согнули. Разница очевидна.


рис.3. Bend (Сгиб), Twist (Скручивание) рис.4.Twist (Скручивание), Bend (Сгиб)
Чтобы поменять местами модификаторы, в стеке необходимо выделить один из модификаторов и, удерживая нажатой левую кнопку мыши, перетащить его (рис.5). Легче всего перетаскивать верхний под нижний, причем появляющаяся синяя полоса будет указывать, куда переместится модификатор, когда вы отпустите кнопку мыши.
рис.5. Чтобы поменять модификаторы местами, необходимо выделить один и перетащить ниже другого
Чтобы отключить воздействие модификатора на объект, нужно сделать один щелчок по лампочке, которая располагается слева от названия модификатора, и она станет серого цвета. Тогда модификатор останется в стеке, и все его настройки сохранятся, но модифицировать объект он не будет. Чтобы включить модификатор, сделайте еще один щелчок по лампочке, и она опять станет белой.
Чтобы удалить модификатор из стека, нужно его выделить и щелкнуть по кнопке с изображением корзины (см. рис.1).
General Guidelines
You can generally do the following with the Modify panel:
- Modify anything you can select. This includes any object or set of objects, or any part of an object down to the sub-object level. For example, you can use the Mesh Select modifier to select a single face, then apply a Taper modifier to it.
- Apply an unlimited number of modifiers to an object or part of an object.
The order or sequence in which you make modifications is important. Each modification affects those that come after it. See Using the Modifier Stack.
Проблема
Проблема
Procedures
To use the Modify panel:
The name of the selected object appears at the top of the Modify panel, and fields change to match this object.
The object’s creation parameters appear in rollouts on the Modify panel, below the modifier stack display. You can use these rollouts to change the creation parameters for an object. As you change them, the object updates in the viewports.
After you apply a modifier, it becomes active, and rollouts below the modifier stack display settings specific to the active modifier.
To apply a modifier to an object:
Tip: You can use the mouse or keyboard to choose a modifier from the Modifier List. To use the keyboard, first open the list with the mouse, and then type the first letter in the modifier's name. From there you can use the arrow keys or the method described in the following paragraph to highlight the desired modifier, and then press Enter to assign the modifier.
In many cases, several modifier names start with the same letter. You can go directly to a particular modifier if you type the first few letters (enough for a unique combination) in the desired modifier's name quickly. For example, say you want to assign the Mirror modifier to an object. Typing M goes to Mesh Select, which isn't anywhere near Mirror in the Modifier list, but typing MI goes directly to Mirror.
Not all modifiers appear on the Modifiers menu.
Rollouts are now displayed below the modifier stack display, showing settings for the modifier. As you change these settings, the object updates in viewports.
To drag a modifier to an object:

- Select an object that already has a modifier you would like to use on another object.
- To copy the modifier without instancing it, drag the modifier's name from the stack display to the object in a viewport that you want to use the same modifier. To move the modifier, use Shift +drag; this removes it from the original object and applying it to the new one. To instance the modifier, use Ctrl +drag; this creates an instanced modifier applied to both the original object and the new one.
Note: Instancing a modifier causes its name to be displayed in italics in the modifier stack. This indicates that the modifier is instanced, meaning that a change to the modifier parameters of one object will affect the other.
Одним из простейших методов моделирования является применение параметрических модификаторов к объектам.
Модификатором называется специальная операция 3ds max, которую можно применить к объекту. Каждый модификатор имеет определённое название и наделяет объект дополнительными свойствами. Удобство работы с модификаторами состоит в том, что к одному объекту можно применить несколько модификаторов, менять последовательность их воздействия на объект, а также перенастраивать и удалять модификаторы.
Для работы с модификаторами существует стек модификаторов, который находится на вкладке Modify командной панели (рис.1).

рис.1. Стек модификаторов
Добавление модификаторов в контекстное меню в квадранте
Кроме вкладки "Редактирование" панели команд, которая содержит наиболее часто используемые модификаторы, также можно добавить в меню квадрантов.
- Воспользуйтесь функцией "Адаптация" > "Адаптация интерфейса пользователя" > "Квадратные меню" и перетащите наиболее часто используемые модификаторы в требуемые разделы в меню квадрантов.
- Для сохранения этих настроек нажмите кнопку "Сохранить".
: модификаторы объектов можно добавить в контекстное меню в виде квадрантов, чтобы получить быстрый доступ.
Примечание. Если текст изображения в браузере слишком мал, щелкните изображение правой кнопкой мыши и выберите «Изображение вида» (Firefox) или «Открыть в новой вкладке» (Chrome) для просмотра более крупной версии.
By:
After adding objects to your scene from the Create panel, you often move to the Modify panel to change an object’s original creation parameters and to apply modifiers. Modifiers are the basic tools for reshaping and adjusting primitive geometry.
Note: You can float or dismiss the command panel using the Customize Display right-click menu. The default setting is to display the command panel docked at the right of your screen. If it is not displayed or you want to change its location and docking or floating status, right-click in a blank area on any toolbar, and choose from the shortcut menu.
The Modify panel stays in view until you click another command panel tab. The panel updates to show the options and controls that are available for the currently selected object or modifier.
Modifier Sub-Object Levels
In addition to its own set of parameters, a modifier typically has one or more sub-object levels that you access through the modifier stack. The most common of these are a gizmo and a center.
Displays in viewports as a wireframe that initially surrounds the selected object. A gizmo acts like a mechanical apparatus that transfers its modification to the object it’s attached to. To alter the effect of the modifier on the object, you can move, scale, and rotate the gizmo as you would any object.
The center is the modifier's pivot point. You can move a modifier’s center, which alters the effect of the modifier on the object.
Using Modifiers
Once you’ve applied modifiers to an object, you can use the Modifier Stack to find a particular modifier, change its parameters, edit its sequence in the modifier stack, copy its settings to another object, or delete it entirely.
You can find alphabetical lists of modifiers in Object-Space Modifiers and World-Space Modifiers.
Parametric Deformations and Other Modifier Types
One set of object-space modifiers is known as parametric deformations (“Parametric Deformers” on the Modifiers menu). Twist and Bend are examples of parametric deformers, which alter the selection passed to them without explicitly depending on topology.
Many other types of modifiers, however, perform operations on the explicit topology of sub-object selections. The Edit modifiers and Select modifiers are examples. When a topology-dependent modifier is present on the stack, you can affect its results adversely if you visit previous stack operations and change the number or order of sub-objects (such as faces or vertices) in the selection. If you attempt this, a warning alerts you to the situation:

You can safely edit the stack beneath the topology-dependent modifier, as long as you do not add or remove sub-objects from the selection on which it operates.
Note: If you turn on "Do not show this message again" and then click either Hold/Yes or Yes, the subsequent default behavior is to continue without performing a Hold operation; that is, the same as clicking Yes. If you turn on "Do not show this message again" and then click No, the process is halted and the message remains in effect; that is, it displays again in subsequent such situations.
Прокрутите список или используйте ключевые слова
- При использовании мыши с колесом мыши можно быстро прокрутить список вниз.
- Если список модификаторов открыт, для перехода к первому элементу с этими буквами можно ввести первые буквы имени модификатора. Например:
- При вводе буквы "В" выполняется переход к списку модификаторов редактирования, например "Редактировать сеть", "Редактировать полигон", "Редактировать сплайн" и т. д.
- При вводе символа F выполняется переход к выдавливанию грани с применением следующих модификаторов FFD (произвольная форма).
При вводе первой буквы требуемого имени модификатора (например, " E") выполняется переход к первому элементу, начинающемуся с этой буквы.
Некоторые модификаторы группы Parametric Modifiers:
Bend - сгиб;
Taper - стесывание (заострение);
Twist - скручивание;
Noise - зашумление (случайное искажение);
Lattice - превращение объекта в решетку;
Slice - разрезание объекта / отрезание его части;
Relax - разглаживание поверхности объекта;
Stretch - растягивание / сплющивание объекта;
Wave - волны по поверхности объекта;
Ripple - круги по поверхности объекта;
Push - надувание объекта;
FFD Box - cвободная деформация объекта.
General Guidelines
You can generally do the following with the Modify panel:
- Modify anything you can select. This includes any object or set of objects, or any part of an object down to the sub-object level. For example, you can use the Mesh Select modifier to select a single face, then apply a Taper modifier to it.
- Apply an unlimited number of modifiers to an object or part of an object.
The order or sequence in which you make modifications is important. Each modification affects those that come after it. See Using the Modifier Stack.
Parametric Deformations and Other Modifier Types
One set of object-space modifiers is known as parametric deformations (“Parametric Deformers” on the Modifiers menu). Twist and Bend are examples of parametric deformers, which alter the selection passed to them without explicitly depending on topology.
Many other types of modifiers, however, perform operations on the explicit topology of sub-object selections. The Edit modifiers and Select modifiers are examples. When a topology-dependent modifier is present on the stack, you can affect its results adversely if you visit previous stack operations and change the number or order of sub-objects (such as faces or vertices) in the selection. If you attempt this, a warning alerts you to the situation:

You can safely edit the stack beneath the topology-dependent modifier, as long as you do not add or remove sub-objects from the selection on which it operates.
Note: If you turn on "Do not show this message again" and then click either Hold/Yes or Yes, the subsequent default behavior is to continue without performing a Hold operation; that is, the same as clicking Yes. If you turn on "Do not show this message again" and then click No, the process is halted and the message remains in effect; that is, it displays again in subsequent such situations.
Решение
Список модификаторов 3ds Max содержит большое количество элементов, и если его открыть, он может выходить за пределы нижней части видового экрана 3ds Max. Ниже приведены некоторые способы более эффективной навигации по списку модификаторов.
- Выберите объект в сцене, а затем перейдите на панель команд и выберите "Список модификаторов".
- Щелкните раскрывающийся список "Список модификаторов", чтобы открыть его.
Читайте также: