
Extrude tool в coreldraw где найти
CorelDRAW’s Extrude tool is used to make objects appear three-dimensional, by projecting points from an object and joining them to create the illusion of three dimensions. In this tutorial, we’ll explore the different types of extrusions and show you how to add extrusions to objects and text, how to edit extrusions and change vanishing points, how to copy an extrusion from one object to another, and how to add bevel edges, fills and lighting to an extrusion.
Thanks for watching! We hope you found this tutorial helpful and we would love to hear your feedback in the Comments section at the bottom of the page. You will find a written version of this tutorial below, and a printable PDF copy to download on the Download Resources tab above.
Download your FREE 15-day trial for Windows or Mac and fuel your creative fire with the new perspective tools, flexible design space, progressive photo editing tools, and much more.
Download these free resources:
What’s New in CorelDRAW Graphics Suite
CorelDRAW Tools
Creativity meets productivity in CorelDRAW Graphics Suite: the professional design toolkit for vector illustration, layout, photo editing and typography.
New for 2022! Spring has sprung and we’ve put together this collection of over 300 clipart elements in a variety of design styles.
Dream it then design it with CorelDRAW Standard 2021, the go-to graphic design suite for hobbyists and home businesses.
This 17″ super-slim tablet offers the perfect drawing space and natural creative control for illustration, editing or digital design.
In this tutorial, we’ll explore the different types of extrusions and show you how to add extrusions to objects and text, how to edit extrusions and change vanishing points, how to copy an extrusion from one object to another, and how to add bevel edges, fills and lighting to an extrusion.
Click on any of the images below to view full-size.
2. Rendering the Extruded Shape
Step 3
Once satisfied with your object's new shape, with the Extrude Tool still in use, select the Extrusion Color option in the Property Bar. From here you can determine what color each extruded plane will be.


Step 2
For greater rendering control, right-click the extruded object and hit Break Extrude Group Apart (Control-K). This will allow you to apply various properties to each component of the extruded object. In the case of this triangle, it was broken apart into two objects.


Extrude Tool Basics
The Extrude tool is part of the Effects tool group.
There is also an Extrude docker, or Extrude inspector for Mac users, which can be opened by going to Window > Dockers > Effects > Extrude. The options in the Extrude docker are the same ones that appear on the property bar when the Extrude tool is activated.
Activate the Extrude tool and click the object to extrude. To create the extrusion, click anywhere on the object again, and drag in the direction of the extrusion.

You can also pre-select the object in advance with the Pick tool, activate the Extrude tool, and click and drag to create the extrusion.
You can adjust the location of the vanishing point by dragging the perspective handle, which is the black X, or by entering values in the Vanishing point coordinate fields on the property bar. The extrusion depth can be changed by dragging the slider, or by entering a value in the Depth field on the property bar.
To start over, or remove the extrusion, click the Clear Extrude button on the property bar.
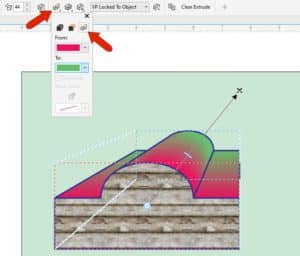
By default, the extrusion fill and outline colors, as well as the outline width, match those of the object being extruded. The Extrusion color icon on the property bar has options to Use Object Fill or Use Solid Color for the extrusion, or Use Color Shading in which you can set a start and end color.
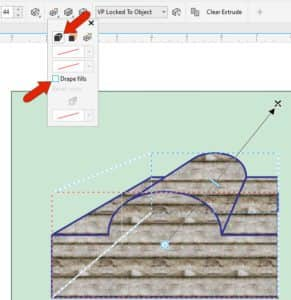
When you select the Use Object Fill option, you can also un-drape the fill, which aligns the fill in different spots in each section.
Changing the original object will also change the extrusion. For example, you can use the Shape tool to adjust or add nodes, and the extrusion updates as you make drag the nodes to reshape the object.
Another way to create a 3D effect is to click the Extrusion Bevels icon on the property bar and check Use bevel. Adjusting the bevel height and angle changes the 3D effect to the front of the object.

You can also turn off the extrusion and leave just the bevel. For any of the extrusion color options, you can set the color of just the bevel.
Step 1
Let's start with simple, flat shapes. I used the Text Tool (F8) with the font Lot to write out "A", "B", and "C". Make sure you've hit Convert to Curves (Control-Q) in the Property Bar so your letters become objects you can easily manipulate.
If you wrote out your letters in one line, you can right-click on them after converting to curves and hit Break Curve Apart.
Change each object's colors in the Object Properties docker. I chose magenta, yellow, and cyan for my fill colors.


Step 2
When satisfied with the drop shadow applied to the "A" group, hit the plus sign in the Properties Bar next to the Presets drop-down menu. This will allow you to save and reuse the drop shadow on other objects.
Once your shadow preset has been saved, select the other objects in turn and select your shadow from the Presets drop-down menu. The same angle, strength, and properties of the first drop shadow will be automatically applied to your other objects.


Step 1
I briefly introduced the Drop Shadow Tool in the tutorial How to Create and Use Perfect Shapes in CorelDRAW. Let's take another look at this tool's versatility.
Select the "A" group and use the Drop Shadow Tool to drag out and place a drop shadow behind the object. Adjust the Shadow Feathering, Drop Shadow Opacity, and other options in the Property Bar.


Adding Lighting to Extrusions
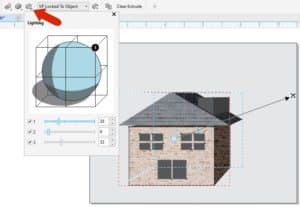
Lighting effects can enhance the 3D look of your extrusions. You can turn on lights in one, two, or all directions, and experiment with their values to get the look you want.
Step 2
Finally, we've got our Pac-Man-esque letter "C".
Rotating an Extrusion
Finally, there are several ways to rotate an extrusion, as long as the vanishing point is locked to the object, and not to the page.
Clicking the Extrude Rotation icon shows a preview for a non-rotated object.

Clicking and dragging this preview object rotates the extrusion.
Clicking the Reset icon in the bottom left corner of the Extrude Rotation window brings back the original orientation.
Clicking the Axes icon in the bottom right corner of the Extrude Rotation window opens another window where you can enter rotations angles. Z axis angles spin the object around in 2D, without affecting the vanishing point. Angles in the other two directions do move the vanishing point.
You can also double-click an active extrusion to bring up the green rotation circle. Clicking and dragging outside the circle, while the cursor is a curved arrow, changes the Z axis rotation. Clicking and dragging while the cursor is inside the circle, and is a 3D arrow, moves the vanishing point as well.

Download your FREE 15-day trial for Windows or Mac and fuel your creative fire with the new perspective tools, flexible design space, progressive photo editing tools, and much more.
After you create an extrusion, you can copy or clone its attributes to a selected object. Cloning and copying transfer the extrusion attributes of an extruded object to another. However, the cloned extrusion settings cannot be edited independently from the master .

You can create a vector extrusion in which the lines of the extrusion converge at a vanishing point . The vanishing point of a vector extrusion can be copied to another object so that both objects appear to recede toward the same point.

| To create an extrusion |
| 1 . | Select an object using the Pick tool . |
| 2 . | In the toolbox, click the Extrude tool . |
| 3 . | Choose a preset from the Presets list box on the property bar. |
| 4 . | Choose an extrusion type from the Extrusion type list box on the property bar. |
| If you want to reset the extrusion, press Esc before releasing the mouse button. |

You can also create an extrusion by using the Extrude docker (Effects Extrude).
| To copy or clone an extrusion |
| 1 . | Select the object you want to extrude. |
| 2 . | Click Effects and click one of the following: |
| • | Copy effect Extrude from |
| • | Clone effect Extrude from |
| 3 . | Click an object whose extrusion properties you want to copy. |
You can also use the Attributes eyedropper tool to copy an extrusion. For more information, see To copy effects from one object to another.
Select an extruded object. Click the Extrude rotation button on the property bar. Drag the extrusion in the direction you want.
Using the Extrude tool , click an extrusion. Click the vanishing point, and drag in the direction you want.
In the toolbox, click the Shape tool . Drag a corner node along the outline of the rectangle or square.
| To apply a fill to an extrusion |
| 1 . | Select an extruded object with the Extrude tool . |
| 2 . | Click the Extrusion color button on the property bar. |
| 3 . | Click one of the following buttons: |
| • | Use object fill — applies the object’s fill to the extrusion |
| • | Use solid color — applies a solid color to the extrusion |
| • | Use color shading — applies a gradient fill to the extrusion |
You can apply an unbroken pattern or texture fill to an object by enabling the Drape fills check box before you click the Use object fill button.
| To apply beveled edges to an extrusion |
| 1 . | In the toolbox, click the Extrude tool . |
| 2 . | Select an extruded object. |
| 3 . | Click the Extrusion bevels button on the property bar. |
| 4 . | Enable the Use bevel check box. |
| 5 . | Type a value in the Bevel depth box. |
| 6 . | Type a value in the Bevel angle box. |

You can also set the bevel depth and angle by using the Bevel interactive display box below the Use bevel check box.
Эффект Extrude (Выдавливание) предназначен для имитации объема плоских фигур. Объекты, к которым применено выдавливание, называют телами экструзии.

Художественный текст с примененным эффектом выдавливания

Применить этот эффект можно, воспользовавшись командой менюEffects/Extrude (Эффекты/Выдавливание) или инструментом Interactive Extrude Tool (Интерактивное выдавливание). Панель свойств этого инструмента содержит следующие элементы:
Presets (Заготовки) - список заготовок настроенного эффекта выдавливания;
Add Preset (Добавить заготовку), Delete Preset (Удалить заготовку) - кнопки для добавления своей заготовки в список Presets (Заготовки) и удаления заготовок из списка;
Object Position (Позиция объекта) - координаты тела экструзии;
Extrusion Type (Тип выдавливания) - список типов выдавливания: Small Back (Уменьшение назад), Small Front (Уменьшение вперед), Big Back (Увеличение назад), Big Front (Увеличение вперед), Back Parallel (Параллельно назад), Front Parallel (Параллельно вперед);
Depth (Глубина) - степень приближения к точке схода (vanishing point), обозначенной крестиком; глубина задается в процентах и может регулироваться с помощью ползунка на управляющем векторе;
Vanishing Point Coordinate (Координата точки схода) - смещения по горизонтали и вертикали: 1) относительно центра объекта, если в списке Vanishing Point Properties (Свойства точки схода) выбран вариант VP Locked To Object (ТС привязана к объекту); 2) относительно центра страницы, если выбран вариант VP Locked To Page (ТС привязана к странице); кнопка справа от этого списка также переключает варианты привязки точки схода;
Extrude Rotation (Вращение тела экструзии) - вызывает вспомогательную панель, с помощью которой можно имитировать поворот тела экструзии в пространстве; кнопка сбрасывает параметры поворота к принятым по умолчанию, а кнопка переключает визуальный режим вращения объекта на режим ввода углов поворота относительно координатных осей задающих трехмерное пространство;
Color (Цвет) - позволяет настроить цвета тела экструзии с помощью специальной панели; по умолчанию тело экструзии имеет такой же цвет, как основной объект (Use Object Fill), однако, для заливки можно выбрать произвольный цвет (Use Solid Color) или плавный переход от цвета к цвету (Use Color Shading), имитирующий затенение на теле экструзии;
Bevels (Скосы) - позволяет создавать фаски на теле экструзии;
Lighting (Освещение) - позволяет создать имитацию освещения тела экструзии: установить от 1 до 3 источников освещения с регулируемой интенсивностью.
What You'll Be Creating
In this tutorial, we'll get to know the Extrude Tool and manipulate shapes in a 3-D format. We'll learn how to apply gradients to each section, use the tool's features, and use the Interactive Fill Tool and the Drop Shadow Tool in conjunction with the Extrude Tool in order to create rendered designs with a sense of depth.
Great Job, You're Done!
See the image below for how far our simple little flat shapes have come in this quick tutorial. Share your results in the comment section below. Apply such extrusion effects and rendering techniques to an entire alphabet of letters, or create a whole poster design filled with three-dimensional text.
Extrusion Types
There are six types of extrusions, which can be seen in the Extrusion Type dropdown window on the property bar. The default type has the original object in front and the extrusion going toward the back and growing smaller toward the vanishing point. The other two types with the object in front have the extrusion growing larger, or staying the same size.
There are also three types with the object in the back, so that only the extrusion itself is visible. With these types, you can choose to have the extrusion grow smaller, grow larger, or stay the same.
Step 3
Select each component of your 3D shape and in the Object Properties docker you can apply more complex gradients and other properties. For additional fun with gradients in CorelDRAW, check out How to Create and Use Gradients in CorelDRAW.
Make sure your object components are Grouped (Control-G) together before you continue on to the next letter.


Step 1
I briefly introduced the Drop Shadow Tool in the tutorial How to Create and Use Perfect Shapes in CorelDRAW. Let's take another look at this tool's versatility.
Select the "A" group and use the Drop Shadow Tool to drag out and place a drop shadow behind the object. Adjust the Shadow Feathering, Drop Shadow Opacity, and other options in the Property Bar.
Adding Extrusions to Multiple Objects
Only one object can be extruded at a time, but an entire group can also be extruded. In this example, if we want to extrude this entire house, first we need to select all its shapes with the Pick tool and then click the Group Objects icon on the property bar.
Now we can extrude the whole house.
3. Rendering the Other Letters
Step 2
We're going to focus most of this quick tutorial on the triangle, or the letter "A". Select your shape and use the Extrude Tool, found in the Toolbox under the Blend Tool, to drag your shape out to the left to create a 3D object. You can adjust your shape with the tool itself, or adjust its settings individually in the Property Bar.


Editing an Extrusion and Changing Vanishing Points
To edit an existing extrusion, you can activate the Extrude tool and click the extrusion. By default, an extrusion’s vanishing point is locked to its object.
This means that if you move the object with the Pick tool, the extrusion remains the same depth and direction from the object.
TIP: press the Spacebar to switch to the Pick tool, then press the Spacebar again to switch back to the Extrude tool (or whatever previous tool you were using).
There are other options available from the Vanishing Point Properties dropdown list on the property bar. If you select VP Locked to Page, the extrusion will always go toward the location of the X, even when you move the object.
TIP: the Page or Object Vanishing Point icon on the property bar can be used as a quick toggle between locking the vanishing point to the page or object.
To match a new extrusion to an existing extrusion, first click on the object you want to copy the extrusion to. Click the Copy Extrusion Properties icon on the property bar, then click the object you want to copy the extrusion from.

This new extrusion will share the same locking properties as those of the copied object but doesn’t use the same vanishing point. To match vanishing points, choose the Shared Vanishing Point option from the Vanishing Point Properties dropdown list on the property bar and click the first extrusion again.

Now if you move the shared vanishing point, both extrusions update.

Step 2
Finally, we've got our Pac-Man-esque letter "C".
Step 1
Let's move on to the letter "B"! I've decided to start with the Extrude Tool, using the same method as for the triangle, and then alter the shape for an additional twist.
3. Rendering the Other Letters
Step 2
For greater rendering control, right-click the extruded object and hit Break Extrude Group Apart (Control-K). This will allow you to apply various properties to each component of the extruded object. In the case of this triangle, it was broken apart into two objects.
Step 2
We're going to focus most of this quick tutorial on the triangle, or the letter "A". Select your shape and use the Extrude Tool, found in the Toolbox under the Blend Tool, to drag your shape out to the left to create a 3D object. You can adjust your shape with the tool itself, or adjust its settings individually in the Property Bar.
Great Job, You're Done!
See the image below for how far our simple little flat shapes have come in this quick tutorial. Share your results in the comment section below. Apply such extrusion effects and rendering techniques to an entire alphabet of letters, or create a whole poster design filled with three-dimensional text.
What You'll Be Creating
In this tutorial, we'll get to know the Extrude Tool and manipulate shapes in a 3-D format. We'll learn how to apply gradients to each section, use the tool's features, and use the Interactive Fill Tool and the Drop Shadow Tool in conjunction with the Extrude Tool in order to create rendered designs with a sense of depth.
Step 1
Let's start with simple, flat shapes. I used the Text Tool (F8) with the font Lot to write out "A", "B", and "C". Make sure you've hit Convert to Curves (Control-Q) in the Property Bar so your letters become objects you can easily manipulate.
If you wrote out your letters in one line, you can right-click on them after converting to curves and hit Break Curve Apart.
Change each object's colors in the Object Properties docker. I chose magenta, yellow, and cyan for my fill colors.
Step 3
Select each component of your 3D shape and in the Object Properties docker you can apply more complex gradients and other properties. For additional fun with gradients in CorelDRAW, check out How to Create and Use Gradients in CorelDRAW.
Make sure your object components are Grouped (Control-G) together before you continue on to the next letter.
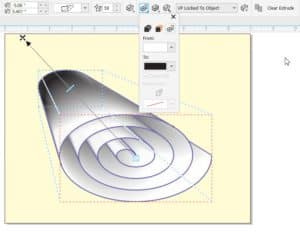
Adding Extrusions to Open Curves
In addition to closed shapes, open curves can be extruded as well. For example, applying an extrusion to an open spiral extrudes just the outlines.

You can get a nice 3D effect by adding a solid or shaded extrusion color in the Extrusion color dropdown on the property bar.
1. Using the Extrude Tool
4. Applying Quick Drop Shadows to Objects
Step 1
The third option of Extrusion Color is a gradient option, allowing you to choose which two colors will appear in your Linear Gradient on the extruded plane. I chose magenta and dark magenta.


1. Using the Extrude Tool
Step 3
Once satisfied with your object's new shape, with the Extrude Tool still in use, select the Extrusion Color option in the Property Bar. From here you can determine what color each extruded plane will be.
2. Rendering the Extruded Shape
4. Applying Quick Drop Shadows to Objects
Step 2
When satisfied with the drop shadow applied to the "A" group, hit the plus sign in the Properties Bar next to the Presets drop-down menu. This will allow you to save and reuse the drop shadow on other objects.
Once your shadow preset has been saved, select the other objects in turn and select your shadow from the Presets drop-down menu. The same angle, strength, and properties of the first drop shadow will be automatically applied to your other objects.
Step 1
Let's move on to the letter "B"! I've decided to start with the Extrude Tool, using the same method as for the triangle, and then alter the shape for an additional twist.
Step 1
The third option of Extrusion Color is a gradient option, allowing you to choose which two colors will appear in your Linear Gradient on the extruded plane. I chose magenta and dark magenta.
Читайте также: