
Exposure control 3ds max настройки
Те, кто увлекается фотографией, знают, что при неправильном выборе условий экспозиции, которые определяются длительностью времени открытия затвора (выдержкой) и диаметром отверстия на входе объектива (диафрагмой), снимок уличнсй сцены в яркий солнечный день может получиться передержанным, то есть почти сплошь залитым белым светом, с малым числом полутонов. Снимок, сделанный в пасмурную погоду или внутри помещения при недостаточной освещенности, может, напротив, оказаться в среднем серым, малоконтрастным, без светлых бликов и темных теней. Правильный выбор времени экспозиции обеспечивает получение насыщенных полутонами, контрастных снимков практически в любых условиях.
В программе max 6 реализована возможность имитации средств управления экспозицией воображаемой съемочной камеры. С этой целью весь диапазон рассчитанных значений яркости исходного визуализированного изображения, от самого темного до самого светлого, разбивается на интервалы, равномерные или неравномерные, которые затем отображаются на равномерные интервалы диапазона значений, демонстрируемых на экране дисплея. При этом диапазон рассчитанных значений яркостей может простираться от нуля (черные участки) до, к примеру, нескольких тысяч (самые яркие блики), а отображаемые значения на черно-белом экране могут изменяться, скажем, от нуля (черный цвет) до 255 (белый цвет).
В max 6 средства управления экспозицией тесно связаны с реализацией методов расчета глобальной освещенности, особенно в случае применения фотометрических осветителей. Например, при использовании мощного фотометрического имитатора солнца (IES Sun) велика опасность получить при визуализации передержанное изображение, а применяя в качестве имитатора электрической лампочки фотометрический точечный осветитель, свет которого затухает обратно пропорционально квадрату расстояния, - слишком темное, малоконтрастное изображение.
Для выбора нужного варианта управления экспозицией и настройки его параметров выполните следующие действия:

By:
Exposure controls are plug-in components that adjust the output levels and color range of a rendering, as if you were adjusting film exposure.
- Standard menu: Rendering menu > Environment > Environment and Effects dialog > Environment panel > Exposure Control rollout
- Enhanced menu: Rendering menu > Environment and Effects > Environment and Exposure Settings > Environment and Effects dialog > Environment panel > Exposure Control rollout
The exposure control process is known as tone mapping. These controls are especially useful for renderings that use radiosity or that render high-dynamic-range (HDR) imagery.
Exposure control compensates for the limited dynamic range of computer displays, which is typically about two orders of magnitude: The brightest color that appears on a display is about 100 times brighter than the dimmest. The eye, by comparison, can perceive a dynamic range of about 16 orders of magnitude. In other words, the brightest color we can perceive is about 10 million-billion times brighter than the dimmest. Exposure control adjusts colors so they better simulate the eye's great dynamic range, while still fitting within the color range that can be rendered.
Attention: The mental ray renderer supports only the Logarithmic, mr Photographic, and Pseudo Color exposure controls.

Left: Linear exposure control maps intensity evenly.
Right: Logarithmic exposure control maps most intensities to low and mid tones.
- If the primary lighting from your scene comes from standard lights (rather than photometric lights), use the Logarithmic exposure control and turn on Affect Indirect Only.
- Use Automatic exposure control for rendering still images. This method is also useful for first-draft renderings.
- Use Logarithmic or one of the advanced exposure control for animations with a moving camera. Automatic and Linear exposure control with a moving camera can cause excessive flickering.
- For rendering high-dynamic-range images with mental ray, use the mr Photographic exposure control.
- For outdoor scenes that use the Daylight system, turn on the Exterior toggle to prevent overexposure.
4. Lens Distortion
Позволяет внести эффект искажения в финальную картинку. Для этого необходимо выбрать Cubic и изменить значением Amount. Также можно создавать искажения по текстуре.
2. Bokeh (Depth of Field)
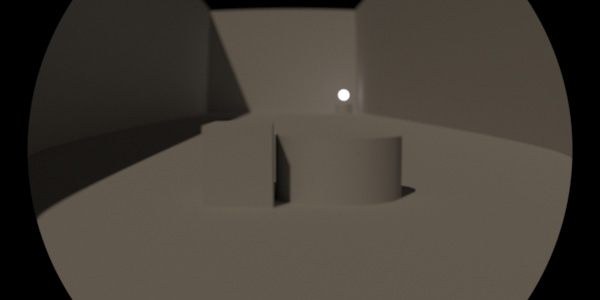
Когда к изображению применяется Depth of Field, объекты не в фокусе размываются. Это называется эффектом боке. Этот эффект наиболее заметен, когда области не в фокусе сцены имеют небольшие точки высокой контрастности. Например, от источников света или других ярких объектов.
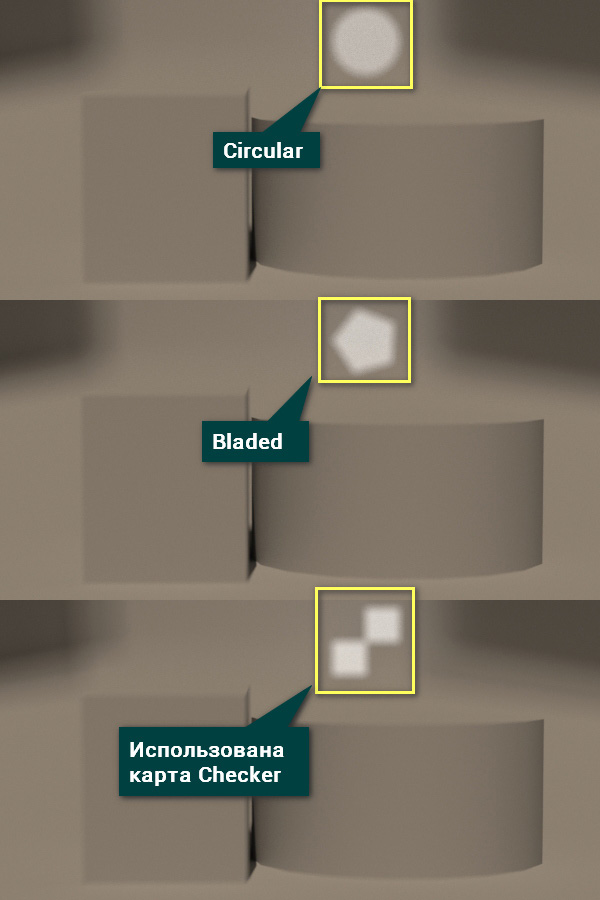
Aperture Shape
Circular обеспечивает эффект боке, основанный на круговой апертуре.
Bladed использует апертуру с краями. Меняя значение Blades, можно установить количество ребер для каждого круга путаницы. Rotation устанавливает угол поворота граней свечения.
Custom Texture использует карту, чтобы заменить свечение узором. Текстура сопоставляется с прямоугольником, который соответствует соотношению сторон объектива: исходное соотношение сторон текстуры игнорируется.
Affect Exposure позволяет пользовательской текстуре влиять на экспозицию сцены. В зависимости от прозрачности текстуры, может быть больше или меньше света, чем при стандартной круговой апертуре. Когда выключено, текстура всегда пропускает столько света, сколько через круговую апертуру.
Center Bias (Ring Effect) смещает прозрачность. Положительные значения увеличивают степень размытия, формируя кольцо. Отрицательные значения уменьшают размытие.
Optical Vignetting (Cat Eye) позволяет виньетировать кадр, имитируя эффект «кошачьего глаза».
Anysotropy (Anamorphic Lens) растягивает диафрагму по вертикали (отрицательные значения) или по горизонтали (положительные значения).
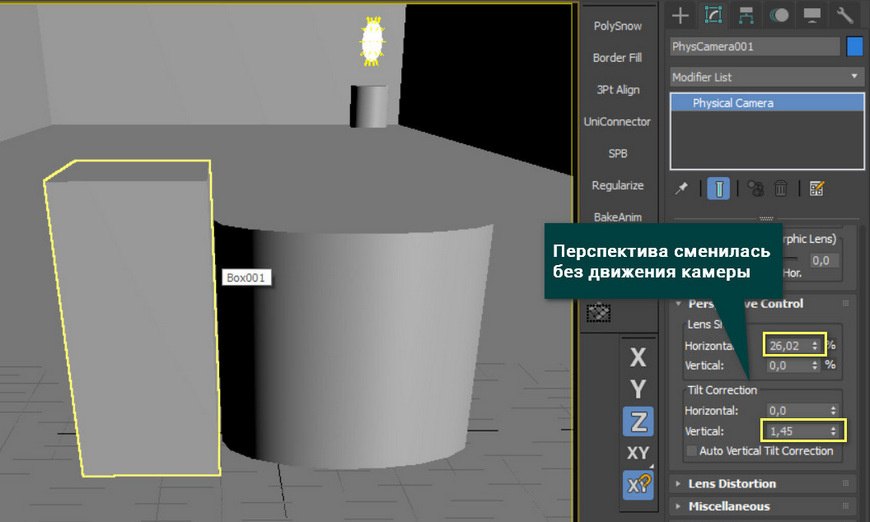
3. Perspective Control
Lens Shift сдвигают вид камеры по горизонтали или вертикали. На обеих осях X и Y они выражены в процентах от ширины пленки/рамки.
Tilt Correction наклоняет камеру по горизонтали или вертикали. Вы можете использовать их для коррекции перспективы. Особенно в сценах, где камера уже наклонена вверх или вниз.
Auto Vertical Tilt Correction задает значение вертикальной коррекции наклона, чтобы выровнять перспективу вдоль оси Z.
Exposure and Attenuation for Standard Lights
When you use standard lights that are not attenuated, renderings tend to have a low dynamic range, because light intensities don't vary greatly across the scene. In this situation, adjusting light values might be all you need to do to get a good rendering.
On the other hand, when lights are attenuated the illumination might be too bright on near surfaces or too dim on distant surfaces. In this situation, the Automatic exposure control can help, because it adjusts the larger dynamic range of the (simulated) physical scene, into the smaller dynamic range of the display.
1. Exposure
Install Exposure Control – эту кнопку необходимо нажать, чтобы открыть внутри камеры возможность управлять экспозицией. Если управление экспозицией камеры уже активно, эта кнопка отключена, и написано «Exposure Control Installed». Настройки данного раздела имеют приоритет над глобальными настройками экспозиции.
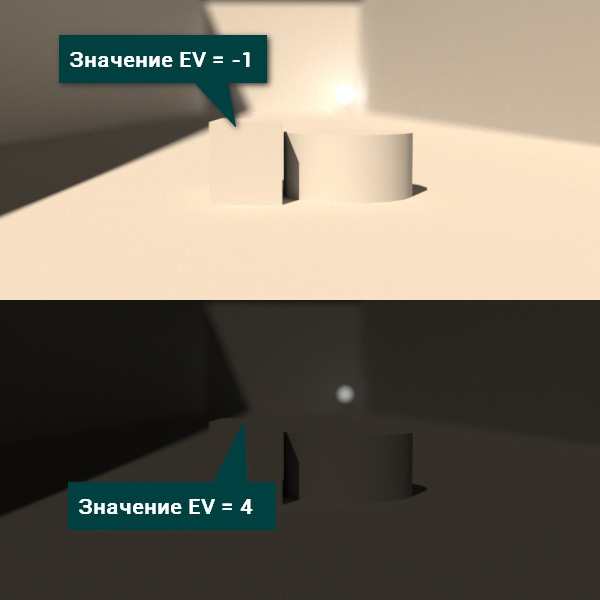
Manual - ручная установка усиления экспозиции через значение ISO. Когда эта опция активна, экспозиция рассчитывается по значению ISO, скорости затвора и настройке диафрагмы. Чем выше это значение, тем больше Exposure.
Target установлен по умолчанию. Реально она соответствует комбинации трех значений фотографической экспозиции. Увеличение или уменьшение значения EV изменять ISO в обратную сторону. Говоря иначе, более высокие значения дают более темные изображения (низкое ISO), а более низкие значения дают более яркие изображения (высокое ISO).
Эти два значения связаны: при изменении значения ISO вручную, значение экспозиции Target изменяется. Также изменяются они и от других параметров. Например, сочетание Duration 1/125 секунды, Aperture f / 16 и ISO 100 приводит к EV, равному 15. Такой же EV получается в результате вдвое уменьшения скорости затвора до 1/250 секунды и изменения Aperture до f / 11.
White Balance отвечает за регулировку цветового баланса. С его помощью можно сделать изображение теплее или холоднее.
Illuminant установлена по умолчанию. Этот параметр позволяет определять цветовой баланс с помощью большого набора источников света. Большинство источников указано в виде «терминов».
Иначе говоря, набор словесных сравнений с заранее настроенной температурой.
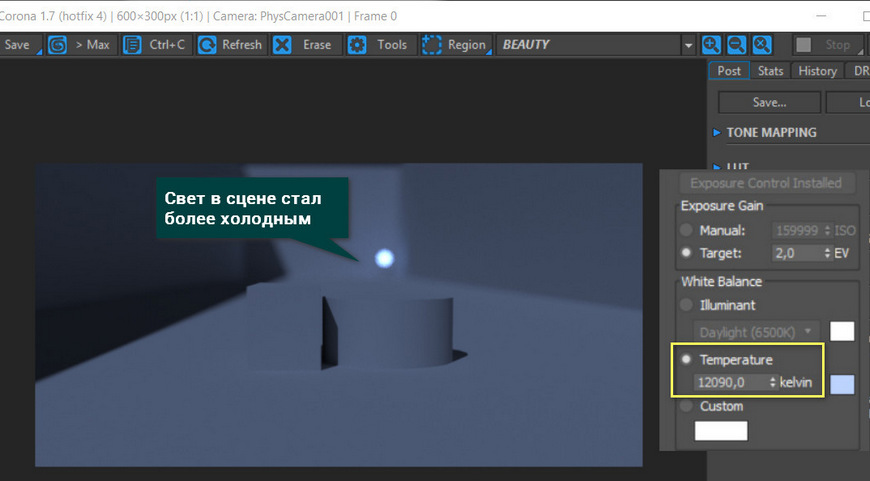
Temperature - меняет цветовой баланс с точки зрения цветовой температуры. Измеряется она в градусах Кельвина и меняется от 100 до 1000000000. Смысл настройки такой же, как и в предыдущем случае, но здесь выбор менее ограничен. Как и в предыдущем варианте, справа находится цветовое окно. Оно показывает, какой цветовой баланс будет в сцене.
Custom устанавливает произвольный цветовой баланс. Нажатие на цветовое окно откроет палитру, в которой можно выбрать любой цвет для сцены.
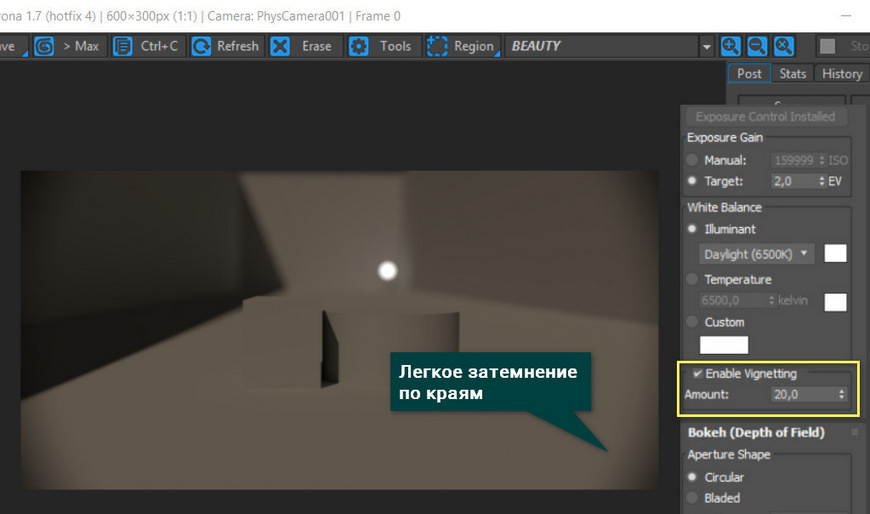
Enable Vignetting во время расчета рендера создает затемнение по краям изображения в зависимости от величины Amount. Чем выше значение, тем большая часть изображения будет темной. Для более точной физической симуляции виньетирования используйте элемент управления Optical Vignetting (Cats Eye) в свитке Bokeh (Depth of Field).
Описанные эффекты и множество других можно настраивать не в камере, а на финальном изображении. Как это сделать вы можете прочитать в статье «Постобработка в Corona Renderer. 3ds Max.» (ссылка на статью Постобработка в Corona Renderer. 3ds Max.)
Exposure and Attenuation for Standard Lights
When you use standard lights that are not attenuated, renderings tend to have a low dynamic range, because light intensities don't vary greatly across the scene. In this situation, adjusting light values might be all you need to do to get a good rendering.
On the other hand, when lights are attenuated the illumination might be too bright on near surfaces or too dim on distant surfaces. In this situation, the Automatic exposure control can help, because it adjusts the larger dynamic range of the (simulated) physical scene, into the smaller dynamic range of the display.
By:
Exposure controls are plug-in components that adjust the output levels and color range of a rendering, as if you were adjusting film exposure. This process is known as tone mapping. These controls are especially useful for renderings that use radiosity, and when dealing with high-dynamic-range (HDR) imagery.
- Standard menu: Rendering menu > Environment > Environment and Effects dialog > Environment panel > Exposure Control rollout
- Enhanced menu: Rendering menu > Environment and Effects > Environment and Exposure Settings > Environment and Effects dialog > Environment panel > Exposure Control rollout
Exposure control compensates for the limited dynamic range of computer displays, which is typically about two orders of magnitude: The brightest color that appears on a display is about 100 times brighter than the dimmest. The eye, by comparison, can perceive a dynamic range of about 16 orders of magnitude. In other words, the brightest color we can perceive is about 10 million-billion times brighter than the dimmest. Exposure control adjusts colors so they better simulate the eye's great dynamic range, while still fitting within the color range that can be rendered.
Attention: The mental ray renderer supports only the Logarithmic, mr Photographic, and Pseudo Color exposure controls.

Left: Linear exposure control maps intensity evenly.
Right: Logarithmic exposure control maps most intensities to low and mid tones.
- If the primary lighting from your scene comes from standard lights (rather than photometric lights), use the Logarithmic exposure control and turn on Affect Indirect Only.
- Use Automatic exposure control for rendering still images. This method is also useful for first-draft renderings.
- Use Logarithmic exposure control for animations with a moving camera. (Automatic and Linear exposure control with a moving camera can cause excessive flickering.)
- For rendering high-dynamic-range images with mental ray, use the mr Photographic exposure control.
- For outdoor scenes that use the Daylight system, turn on the Exterior toggle to prevent overexposure.
Interface

Choose the exposure control to use.
When on, the exposure control is used in rendering. When off, the exposure control is not applied.
Process Background and Environment Maps
When on, the scene background and environment maps are subjected to exposure control. When off, they are not.
The thumbnail displays a preview of the rendered scene with the active exposure control applied. Once a preview has been rendered, it updates interactively when you changed exposure control settings.
If gamma correction or look-up table (LUT) correction is active, 3ds Max applies the correction to this preview thumbnail.
By:
Exposure controls are plug-in components that adjust the output levels and color range of a rendering, as if you were adjusting film exposure.
- Default menu: Rendering menu > Environment > Environment and Effects dialog > Environment panel > Exposure Control rollout
- Alt menu: Rendering menu > Environment and Effects > Environment and Exposure Settings > Environment and Effects dialog > Environment panel > Exposure Control rollout
The exposure control process is known as tone mapping. These controls are especially useful for renderings that use radiosity or that render high-dynamic-range (HDR) imagery.
Exposure control compensates for the limited dynamic range of computer displays, which is typically about two orders of magnitude: The brightest color that appears on a display is about 100 times brighter than the dimmest. The eye, by comparison, can perceive a dynamic range of about 16 orders of magnitude. In other words, the brightest color we can perceive is about 10 million-billion times brighter than the dimmest. Exposure control adjusts colors so they better simulate the eye's great dynamic range, while still fitting within the color range that can be rendered.

Left: Linear exposure control maps intensity evenly.
Right: Logarithmic exposure control maps most intensities to low and mid tones.
- If the primary lighting from your scene comes from standard lights (rather than photometric lights), use the Logarithmic exposure control and turn on Affect Indirect Only.
- Use Automatic exposure control for rendering still images. This method is also useful for first-draft renderings.
- Use Logarithmic or one of the advanced exposure control for animations with a moving camera. Automatic and Linear exposure control with a moving camera can cause excessive flickering.
- For outdoor scenes that use the Daylight system, turn on the Exterior toggle to prevent overexposure.
5. Miscellaneous
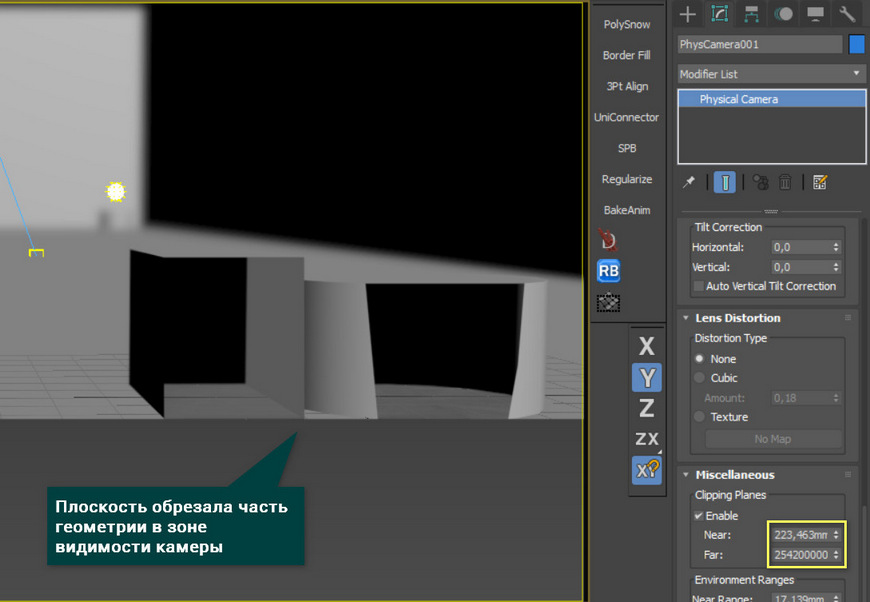
Для включения функции Clipping Planes нажимаем галочку Enable. В рабочей области плоскости отсечения отображаются в виде красных сеток внутри конуса камеры. Их задача – отрезать все, что не будет попадать в дистанцию, находящуюся за пределами значений Near и Far. Схожая функция и у Environment Ranges, но работает она с окружением.
На этом разбор физической камеры окончен. Этот инструмент очень объемный по своим возможностям. Он требует много времени на разбор, и еще больше - на полноценную настройку. Но результат того стоит.
Exposure and Attenuation for Standard Lights
When you use standard lights that are not attenuated, renderings tend to have a low dynamic range, because light intensities don't vary greatly across the scene. In this situation, adjusting light values might be all you need to do to get a good rendering.
On the other hand, when lights are attenuated the illumination might be too bright on near surfaces or too dim on distant surfaces. In this situation, the Automatic exposure control can help, because it adjusts the larger dynamic range of the (simulated) physical scene, into the smaller dynamic range of the display.
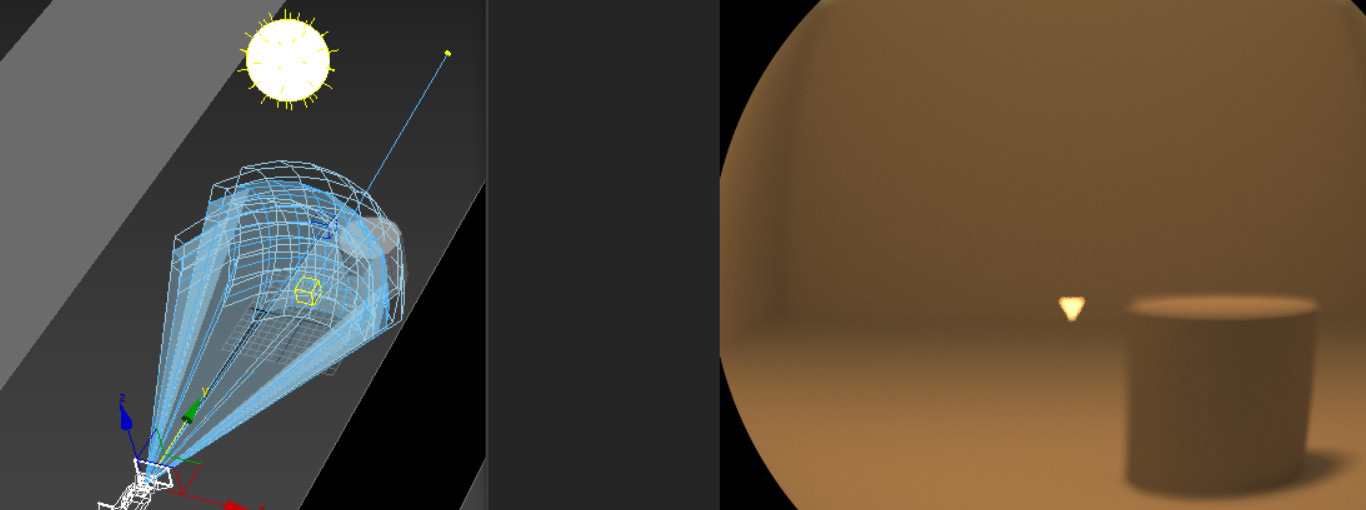
В этой статье мы продолжим знакомство с Physical Camera. Ранее, в первой части, вы узнали общие функции, настройки и их взаимодействие. Теперь же мы затронем очень важные, физические свойства этой камеры и много дополнительных настроек.
Читайте также: