
Чем открыть cpk файл pes 2019
Вступление
Функция «LiveCPK» позволяет заменять игровой контент во время выполнения с содержимым из файлов, хранящихся на диске, вместо того, чтобы все упаковывать в CPK-архивы. (Эта особенность похож на Kitserver's AFS2FS и FileLoader для более ранних версии PES).
Авторское отступление
Внимание: Некоторые функции еще не реализованы в Sider 6.1.0, который предназначен для eFootball PES 2020, но они есть в предыдущих версиях. Так что эта инструкция будет актуальна как для PES 2020, так и для PES 2019. Все что пока не работает в PES 2020 выделено серым цветом . По мере добавление новых функций данная инструкция будет обновляться.
Как использовать Sider в PES 2020?
- Запустите sider.exe от имени администратора, откроется небольшое окно, которое вы можете свернуть, если хотите, но не закрывайте его!
- Запустите игру. Sider должен автоматически присоединиться к игровому процессу.
With the use of batch files
Like faces, general .cpk files can also be made with the use of batch files. An archive can be downloaded below in Tools that contains all the necessary files and a(n example) batch file. Don't mind the fact that it says PES15, the format hasn't changed since then and the batch file still works perfectly fine. All you have to do is put all the files into the correct locations in the 4cc_test folder. To have this batch file work it has to be in the same folder as cpkmakec.exe and CpkMaker.dll. Now before you can run the batch file you will have to edit the location of the PES19 download folder. Just right-click the batch file and select edit. Now change the location in the second line (the one that starts with 'copy') to the location of the download folder of your PES19 installation. After that save it and you can run your .bat file. If done correctly the .cpk file should now be in your PES19's download folder. Compared to CRI GUI, batch files can be up to 100 times faster with 0% chance at corrupting your .cpk files. If you want to change the source folder or CPK name change the 1st and 3rd lines of the .bat to the source folder and CPK name you want. By default 4cc_test is the source folder and 4cc_test.cpk is the CPK file.
To install DLC you need to make sure the .cpk file you want in PES19 is in the download folder, for PES19 this is in the main PES19 folder. For this section we will use the 4cc_test.cpk of the previous section.
To have PES19 recognize the DLC you will have to edit your DpFileList.bin. This can be done in two ways: with a hex editor or via an external tool.
With a hex editor
Open DpFileList.bin with any hex editor you like. For more information on hex editing, please read Working with a hex editor. When opened it will look something like this:

This DpFileList has the default 4cc DLC plus two test CPKs at the very bottom. Each new DLC you want to add will need a new entry in this file, in this example 4cc_80_test.cpk and 4cc_81_test2.cpk. Just looking at the image above should you give an idea on how each new DLC is added to this file/game. However there are some important values/hexes in this file that will be explained.
- The fifth byte, 16 in the image above, denotes how many .cpk files PES19 should load, so in this case 22. This means that PES19 will load all DLC from 4cc_01_base.cpk till 4cc_81_test2.cpk in this case. If this value was made 15 for example, 4cc_81_test2.cpk will not be loaded next time. This value should not be higher than the amount of DLC in the DpFileList.
Don't forget to save your changes and you can check in game to see if your new stuff/DLC works.
Keep in mind that the lower the DLC is in the list, the higher the priority. So if for example the file test.dds is in both 4cc_40_faces.cpk and 4cc_60_midcup0.cpk, the game will load the test.dds in 4cc_60_midcup0.cpk.
Also, if PES fails to find a file, it will skip loading any further DLC packages. So if the file 4cc_30_stadiums.cpk wasn't placed in the download folder in the example above, PES would not load 4cc_33_stadiums2.cpk or any DLC that comes after.
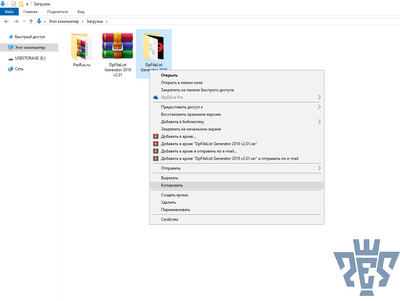
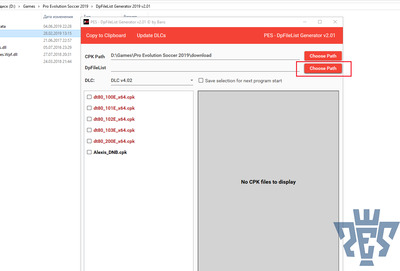
With Baris' DpFileList Generator
Download the tool and unpack it anywhere
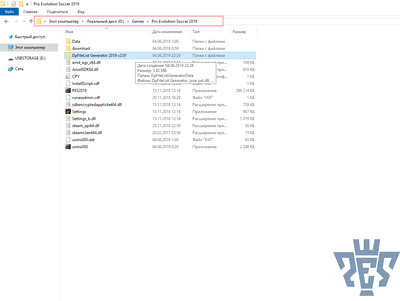
The first thing you'll want to do before running the .exe is to go into 'DpFileListGeneratorData' and edit the .xml, now change the location between the to your own PES17 download folder. Don't forget to save.
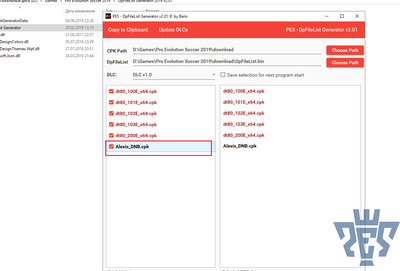
You can now run DpFileList Generator.exe. If you changed the CpkDirectory correctly all the basic DLC should already be correctly listed on the left. Something like in the image below.

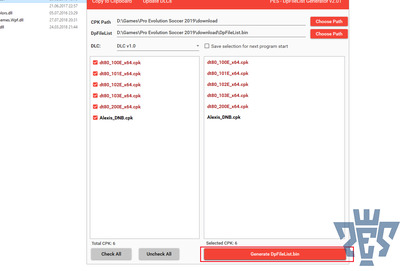
The list to the left has all the .cpk files found in the download folder. The list to the right has all the .cpk files that are checked in the left list and thus will be registered in the to-be generated DpFileList.bin. The lower the file in the list to the right, the higher the priority. Now add your own DLCs to the bottom of the list, make sure the DLC at the top drop-down is set to 4cc, and then just hit Generate DpFileList.bin. You can now go ingame and test your new DLC.
Keep in mind that if you want to replace or update a file that is already in the game, always check the latest DLC on the PES19 page first for the newest version of it. This is very important when editing certain files, for example stadium and team names .bin files.
JFE sometimes doesn't like .cpk files made by CPFM and will crash on loading the .cpk file or give a corrupted view.
There are various causes for your DLC not to work properly. Some of the most common causes (and solutions) are listed below.
Smoke Patch v4 (for PES 2021 PC) Patch v21.4.0 (All In One) - 03.november.2021 Update v21.4.5 - 24.february.2022 Mega Facepack R2 (All In One) - 21.april.2021 Mega Facepack R2 (Update) - 07.july.2021

Contents
Before you can install DLC to PES19 you will need to create a DLC file. There are two methods of doing this although both rely on the same files. The first method is with the use of CRI Packed File Maker and the other method is with the use of batch (.bat) files, although this uses the files of the CRI Packed File Maker.
PES 2021 Smoke Patch (v3) 21.3.6 + Mega Facepack R2
Smoke Patch v3 (for PES 2021 PC) Patch Version 21.3.6 (All In One) - 11.july.2021 Mega Facepack R2 (All In One) - 21.april.2021 Mega Facepack R2 (Update) - 07.july.2021 Release Notes version 21.3.6 * This is the final full version for SP21 v3 (season 20/21) * A small optional update will be available after the transfer market closes to include major transfers * No changes in the league structure to preserve ML/BL modes, season (21/22) will be included in the new season patch v4. * The installer will upgrade any pre-existing smokepatch version. * Football life modes (ML-BL) started with 21.3.0 or newer can continue. * Most addons are updated for best compatibility with the new game and patch versions, check any addon used for available updated versions. * New in full patch version 21.3.6 - Compatible with the latest game version - Includes all needed DLC files - Updated player's stats - Updated database (added missing players) - Updated national teams callups (EURO and Copa America
PES Editor 0.11.6 by ejogc327 | PES 2021
Notes: - If you import new teams in Teams.bin, the game can't create EDIT file. You'll need create EDIT file with the new teams manually or importing in EDIT file too. - The CSV files can be separated by semicolon or tabulation, but must be *.csv. - The CSV files must be UNICODE or UTF-8 to get special characters. - In EDIT mode, can't create players with any Id. It must be higher than 2147483648 (0x80000000). - The Overall values for the players are different. I use my own formula to calculate them. - To import the order don't matter, but the headers do. You can't change them. DOWNLOAD HERE PES Editor 0.11.6 by ejogc327 If you have a false positive better use Avast Antivirus ============= PES Editor 2021 ============= This tool works to edit data base for: - PES Mobile - PES 2021 PC & PS4 - PES 2020 PC & PS4 - PES 2019 PC & PS4 - PES 2018 PC & PS4 - PES 2017 PC & PS4 This version works for: Bin files: From Dt10.cpk and Dt0.cpk (PlayerAppearanc

Настройки в SIDER.INI
-
match.minutes = 15
Вы можете установить любое количество времени матча от 1 до 255. Установив 0, вы отключите данную функцию, будет использоваться время что вы задаете в игре.
- Например, игра хочет загрузить файл, который хранится в некотором CPK, с относительным путем "common/render/thumbnail/ball/ball_001.dds". Sider перехватит это действие и проверит, есть ли в одной из корневых папок файл. Если да, то Sider заставит игру читать содержимое этого файла. Если в sider.ini указано несколько корней, то все они будут проверяться. Как только там есть совпадение имени файла, поиск останавливается. (Таким образом, победит более высокий root, если оба они имеют один и тот же файл). Вы можете использовать либо абсолютные пути, либо относительные пути. Относительные пути будут рассчитаны относительно папки, в которой находится sider.exe.
- "above_normal" - выше нормального
- "below_normal" - ниже нормального
- "high" - высокий
- "idle" - устанавливает базовый приоритет потока для Real time класса в 16, для остальных классов в 1.
- "normal" - нормальный
- "realtime" - в режиме реального времени.
- 0x20 [Пробел] - для переключения
- 0x31 [1] - для следующего модуля
- 0.0: полностью прозрачный
- 1.0: оригинальный альфа-канал изображения остается неизменным.

Это новая версия программа, которая позволит фанатам игры Pro Evolution Soccer 2019 редактировать все что захочется. Названия команд, название игроков, названия стадионов, название команд, возможность редактирование трансферов, редакторование игровых тактик, тренеров, соревнований и многое многое другое. У вас появятся огромные возможности редактирования игры с этой программой. Этот инструмент работает для редактирования статистики для PES 2019 ПК. Эта версия работает для файлов данных: DT10.cpk (DT36.cpk PlayerAppearances.bin), распакован (не нужно распаковывать каждый файл .bin) и файл EDIT.
Используйте режим редактирования:
1. Загрузите Player.bin и PlayerAppearance.bin (рекомендуется).
2. Если вы хотите добавить игрока для редактирования файла, вы должны поставить галочку «In Edit».
Давайте посмотрим несколько скринов с данной программы, чтобы не много понять в чем ее смысл.
1. Игроков
2. Трансферы
3. Команды
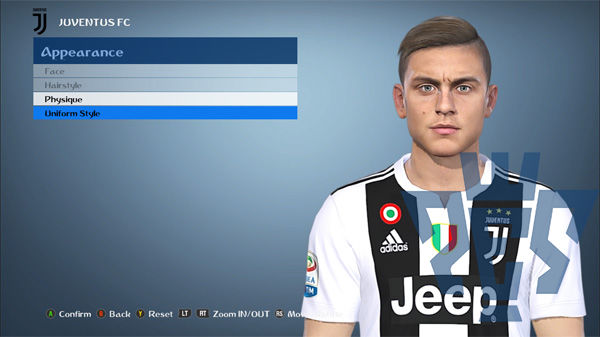
4. Униформы (только файлы Edit)
5. Соревнования
6. Тренеров
7. Стадионы
8. Мячи, бутсы и перчатки
9. Глобальные функции
10. Корректирует фейковые названия и имена (стадионы, игроки и т.д)
11. Заменят повторных игроков
12. Импорт / Экспорт в файлах CSV.
Заметки:
1. Этот инструмент на английском, испанском, итальянском и португальском языках. Если вы хотите добавить другой язык в другой версии, пожалуйста, переведите файл ENG.txt и поделитесь им.
2. Если вы импортируете новые команды в Teams.bin, то игра не cможет создать файл EDIT. Вам нужно будет вручную создать файл EDIT с новыми командами или импортировать его в файл EDIT.
3. Файлы CSV могут быть разделены запятой, точкой с запятой или табуляцией, но должны быть * .csv.
4. Файлы CSV должны быть в UNICODE или UTF-8, чтобы получить специальные символы.
5. В режиме EDIT нельзя создавать игроков с любым идентификатором. Он должен быть выше, чем 2147483648 (0x80000000).
6. Заголовки имеют значение. Вы не можете их изменить.
7. Перед использованием этого инструмента сделайте резервную копию.
Благодарности: Zlac, encrypter19.
Автор: ejogc327
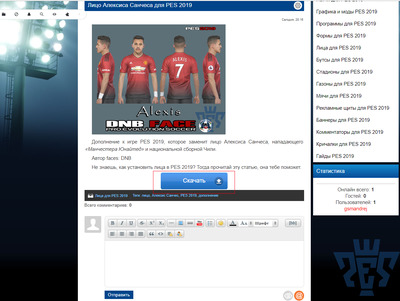
Хочешь, чтобы твой любимый игрок выглядел правдоподобно, но не знаешь, как установить лицо в PES 2019, тебе тогда следует прочитать статью о том, как установить лицо в PES 19.
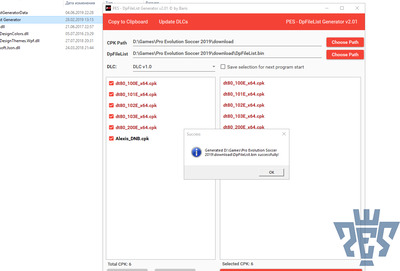
В основном сейчас все лица делают в формате CPK. Потому, что установка такого формата не занимает много времени. Вам только потребуется скачать лицо и распаковать его из архива, после чего скачать программу под названием «DpFileGenerator», его вы можете скачать на сайте, в категории «Программы для PES 2019» и сделать следующие действия:
1. Распаковать программу;
2. В корневую папку (куда устанавливали игру) с PES 2019, копируем распакованную программу DpFileGenerator;
3. Скачиваем понравившееся лицо к PES 2019, в формате CPK;
4. Распаковываем дополнение;
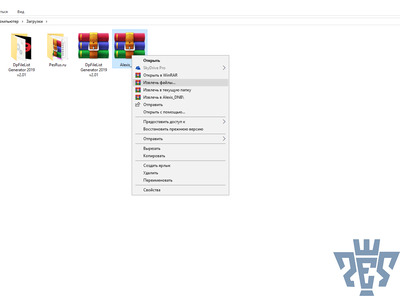
5. После чего копируем или вырезаем распакованное лицо и кидаем его в папку под названием «download», которая находится в корневой папке игры PES 19;
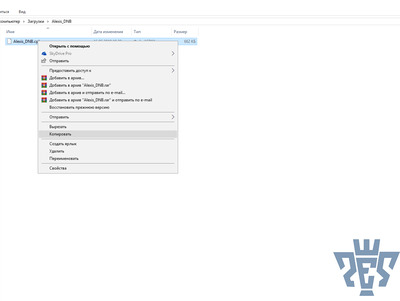
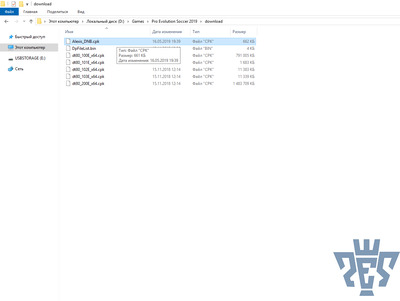
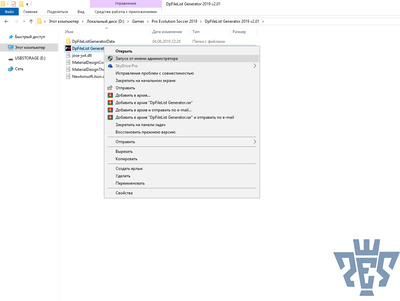
6. После этого заходим в папку с установленной программой DpFileGenerator и открываем ее от имени администратора;
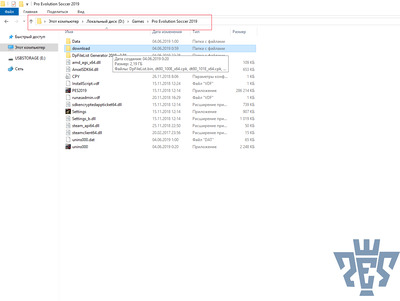
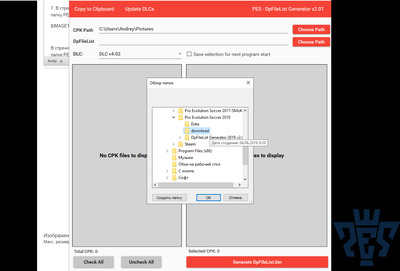
7. В строчке под названием «CPKs Path:» выбираем справа «Choose Path» и выбираем корневую папку PES 2019, а в ней выбираем папку «download»;
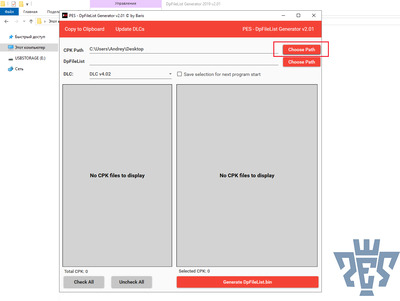
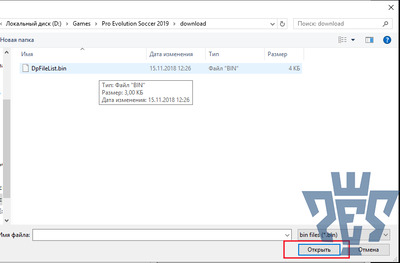
8. В строчке под названием «DpFileList:» выбираем справа «Choose Path» и выбираем в корневой папке PES 2019, папку под названием «download», в ней будет файл под названием «DpFile.List», выбираем его;
9. Слева появится название вашего лица, нажимаем галочку на него.
10. Внизу справа будет красная кнопка «Generate DpFileList.bin», нажимаем на нее;
11. После этого выйдет надпись, что лицо для PES 2019 успешно установлено. Жмем ОК.
12. Закрываем программу и наслаждаемся установленным лицом!
Выражаем всем искреннюю благодарность за поддержку проекта в том или ином виде, также спасибо всем тем, кто просто делится ссылками в социальных сетях, форумах и на других сайтах, что несомненно увеличивает популярность и значимость этого проекта.
Как установить лица в PES 2019? - это абсолютно бесплатное дополнение, которое вы можете скачать по ссылке ниже.
This page will explain how to make and install custom .cpk files in PES19.
CRI Packed File Maker
You will have to download CRI Packed File Maker (CPFM) which is used to make the .cpk files PES19 uses to store its data. After downloading it (see Tools) you can unpack it anywhere, there is no need to install anything, and then start CriPackedFileMaker.exe. If done correctly you'll get something like the following window:

If for some reason the folder you want to turn into DLC is filled with random files you do not want in it, for example thumbs.db, you can edit the excluded files with the button Edit Excluded Files at the bottom left. Show CPK file info is not relevant for this page, but you can check some details of .cpk files you have loaded with CPFM.
To load and check the contents of a .cpk file, use the middle button of the three smaller buttons at the top or just drag the .cpk file into the window. When it is properly loaded you can extract the contents from it with the right button of the three smaller ones at the top. However, when you have everything extracted, keep in mind that some files might still be zlibbed (compression method used by Konami). For more information on zlib please read Pro Evolution Soccer 2016/zlib.
When you want to make a DLC file, press the left button of the three smaller ones at the top to select a folder to load into CPFM. Keep in mind that for a DLC file to work properly the folder structure needs to be correct. This is where Jenkey's File Explorer (JFE) comes in handy (see Tools). For example if you want to install a custom adboard for your stadium, you can open dt30.cpk with JFE (keep in mind some .cpk files can take a long time to load) and navigate to the stadium adboard you want to replace. When you find the correct adboard, recreate the entire tree of folders somewhere in a new folder and put (in this case) ad_007.dds at the end. So:

\New DLC\common\bg\model\bg\ad\texture\ad_007.dds somewhere on your computer. (The name New DLC is just a placeholder, it can be anything you want)
Now select the folder New DLC with CPFM and make sure common becomes the root folder in the new DLC. If done correctly CPFM will look something like this:

In this case we have just a single file, but obviously you can add as many more as you like to a single DLC.

After this you can build the .cpk file by pressing Start to Build and press Complete when it's done. Now you only have to edit the DLC file list to make it work in PES19. (See next section)
Читайте также: