
Atem streaming bridge не сохраняет xml файл
With ATEM Mini, it's never been easier to get started with live streaming and multi camera video production! This section will show you how to connect and set up an ATEM Mini switcher so you can create your first live stream! ATEM Mini is a compact broadcast switcher that lets you switch 4 or 8 HDMI video sources depending on the model, plus 2 dedicated audio sources and the output looks like a regular USB webcam that you can use with video software. ATEM Mini’s built in control panel has all the controls you need to make switching programs easy. Then if you want more power, just run ATEM Software Control to get access to the full feature set of ATEM Mini to create incredible effects and titles.
Setting up your ATEM Mini
Step 4
Switching Between Cuts and Effects Transitions


Now that you have your cameras connected, you can start switching your program! It’s as easy as just pressing the input buttons to switch between sources. You'll see the cuts are smooth and professional looking. To transition with a video effect, simply press auto so selecting input buttons will use a nice transition. Because cut is the most popular transition, there are dedicated buttons for cut and auto transitions. You can change the type of auto transition that’s used by pressing the buttons above the AUTO button. You can choose between mix, dip, DVE push, DVE squeeze, and vertical and horizontal wipes. Of course there are a lot more transitions available when using ATEM Software Control!
Connect up to 8 Independent Cameras
With 4 or 8 HDMI inputs depending on the model, you can connect multiple cameras for different views. Video cameras with HDMI outputs are better quality than simple webcams as they use higher quality lenses and have better low light sensitivity. All video sources will re-sync to the switcher if they operate at different video standards so you don't have to worry about connecting video devices as they all just work! Cameras with HDMI often support interchangeable lenses so you can change to wide angle lenses for wide shots and zoom lenses for close ups. Imagine taking advantage of the low light capability of better cameras for theater production, weddings, school concerts and music videos!

Step 5
Selecting the Best Transitions


Before creating your first program, it’s worth thinking about the type of transitions available. From a creative point of view, a mix transition can feel very elegant as it gradually fades from one source into the next, while slower mix transitions can feel dreamy and gentle. A wipe transition will move a line across the original source revealing the next source and it has a different feel depending on the amount of soft edge you set in the wipe parameters. You can even set a wipe with a border that uses a color or even live video! DVE transitions are a lot of fun and they move the whole image during the transition, so they can feel crazy and exciting, making them perfect for kids shows!
Assign HDMI Out for Monitoring!

The HDMI output of ATEM Mini can be changed, on professional switchers this is called an aux output. You can also loop a computer slide show and a projector through ATEM Mini, allowing access to the slide show as one of your sources. You can select preview out and set the switcher to program/preview switching to allow you to preview shots before going on air. On the ATEM Mini Pro models, you can even select a multiview out for full multi camera monitoring. Being able to see shots before using them on air means you eliminate mistakes. If you are broadcasting gameplay, input 1 can be set to zero latency allowing ATEM Mini to be looped between the console and the gamer's monitor.
Voiceover or Narrate your Broadcast

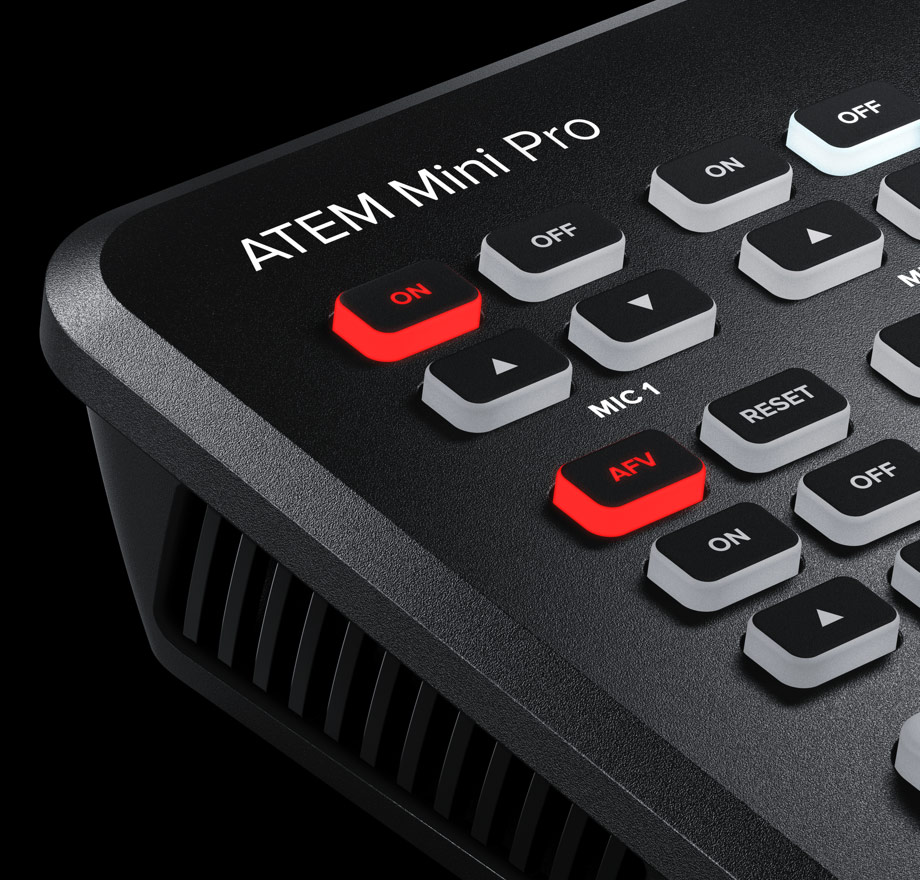
If you need to narrate or add commentary to your production, plug a microphone into one of the 3.5mm mic inputs. Or use two microphones for broadcasting interviews so you can individually control how loud or quiet they are. Above each video input button is the smaller audio control buttons where you can turn on and off each audio source. There are many types of microphones available, such as tiny, wireless collar microphones so the presenter can move freely without cables or larger desktop ones for presenters. Using dedicated microphones as well as using the audio page in the ATEM Software Control to add EQ and some compression can dramatically improve the clarity of presenters.
Create Broadcast Quality Mastered Audio


You can create professional mastered audio using the Fairlight audio mixer in ATEM Mini and controlled through ATEM Software Control. By clicking and dragging the mixer faders you can adjust the sound levels for each camera so they are louder or quieter, or adjust the microphone levels so voices are clearer and stand out. If a music player is plugged into the second mic input, you can even fade music in and out of your broadcast because each mic input has its own audio mixer inputs and effects! If you want to go even further, you can add Fairlight EQ, audio compression and limiting to tailor the sound of presenters to get them sounding clear and to keep the audio levels under control.
Self Contained Broadcast Quality Switcher
ATEM Mini’s compact all in one design includes both a control panel as well as connections. The front panel includes easy to use buttons for selecting sources, video effects and transitions. The source buttons are large so it’s possible to use it by feel, letting the presenter do the switching! You even get buttons for audio mixing! On the ATEM Mini Pro and Extreme models you also get buttons for record and streaming control, as well as output selection buttons that let you change the video output between cameras, program and multiview. On the rear panel there are HDMI connections for cameras or computers, extra microphone inputs, USB for webcam out plus an HDMI "aux" output for program video.

Record your Live Broadcast

You can record using the HDMI output and recorders such as the Blackmagic Video Assist, allowing you to upload your television shows later, or to archive your production history. There are also loads of software tools for recording webcam video so you can use this software to record from the USB on a computer. However on ATEM Mini Pro and Extreme models, you get recording features built into the switcher itself! All you need to do is connect a USB flash disk and then press record on the front panel! ATEM Mini Pro and Extreme also support recording to more than one USB disk, such as a Blackmagic MultiDock, so you can keep recording to a second disk when the first disk becomes full.
Step 1
Managing Live to Air Graphics

You can use any graphics software to create titles for ATEM Mini. If the graphic has an alpha channel, ATEM Mini will output the alpha as a key channel to allow graphics layering. Graphics with alpha channels can be created in software such as Photoshop. To use a still graphic, simply drag and drop it into one of the positions in the media pool in ATEM Software Control. Now go to the keyer settings in the switcher page, where you will need to set the media player source to be the still you just loaded. Then in the keyer settings, select the video and key sources to be the media player. Now turn on the keyer and you'll get professional titles overlaid in real time on your live video.
Connect 5G or 4G Phones for Mobile Data
If you’re doing live production on location then the ATEM Mini Pro and Extreme models support connecting an Apple or Android phone to the USB port to use mobile data! It's also a great backup for the main Ethernet connection. Phone tethering works with the latest high speed 5G phones plus the more common 4G phones! The ATEM switcher will automatically detect when a phone is connected and switch its internet connection to use it, eliminating the need for changing settings. When connected, the phone will power from the USB port so it remains charged from the switcher. By using phone tethering and mobile data, ATEM Mini Pro and ATEM Mini Extreme become the perfect mobile production solutions!


Stream Live Interviews
ATEM Mini is perfect for interviews as you can connect multiple cameras for close ups of the host, or interviewee, as well as wide shots plus ATEM Mini is so small the host can even switch in small studios. Plus ATEM Mini Pro and Extreme models support live streaming to YouTube, Facebook and more!

Business Presentations via Skype
Get dramatically better business presentations on Skype because ATEM Mini makes Skype see it as a webcam, so you can select it in the Skype settings! One camera can be a close up, another for a wide shot and a computer for PowerPoint presentations. The presenter can even use picture in picture!

Live Stream eSport Competitions
Live stream eSport competitions to Twitch by simply connecting multiple gaming consoles and a camera for a presenter. ATEM Mini operates up to 60 frames per second for fast gameplay and you can use picture in picture for commentary! You can even download titles direct from Photoshop!
Kickstarter and Investor Updates
Raise the professionalism of Kickstarter or investor presentations to fund your new product idea! Connect a camera for the presenter, a camera for a product close up and a compute r for business plan slides. Then present live via Skype or Zoom and even post recordings for investors to view later!

Education and Training
ATEM Mini is perfect for educational videos! Setup is fast and easy, so you can travel to locations and record live multi camera video productions on a wide range of educational topics! Connect computers and cameras and use the ATEM Software Panel to load titles and perform video effects.
Connect Monitoring
If you have an ATEM Mini Pro or Extreme, these models have a multiview so you can see it if you connect a monitor to the HDMI out. Make sure you press the M/V button on the video output selection. Now you can see all your sources as you plug in cameras!

2 Powerful ISO Models Record All Inputs for Editing!

ATEM Mini Pro ISO
This model adds all the features of ATEM Mini Pro plus it records 5 H.264 video streams in real time! That's a clean feed of all inputs plus the live program! A DaVinci Resolve project is also saved so you can open your live production to adjust edits, remix audio and add color correction!
ATEM Mini Extreme ISO
This model includes all the features of ATEM Mini Extreme, plus also records 9 separate H.264 video streams in real time, allowing capture of all 8 clean feed inputs as well as the program video. A DaVinci Resolve project file is also saved allowing the project to be recreated and edited later!
Я читаю содержимое файла XML и анализирую его в объектной модели.
Когда я изменяю значения в объектной модели, используйте следующий код, чтобы сохранить его обратно в xml:
Это работает, насколько я вижу, потому что когда я закрываю приложение и перезапускаю его, сохраненные мной значения отражаются в объектной модели при следующем просмотре.
Однако, когда я загружаю фактический файл XML, значения остаются такими же, какими они были изначально.
Почему это? Что мне нужно сделать, чтобы сохранить фактический файл XML с новыми значениями?
Скорее всего, вы испытываете виртуализацию файловой системы, которая была внедрена в Windows Vista.
В основном это означает, что вы сохраняете свой файл, просто не там, где думаете, что вы его сохраняете. Например, вы можете подумать, что вы сохраняете C:\Program Files\Your App\yourFile.xml , но то, что происходит под капотом, заключается в том, что ОС молча перенаправляет это на %APPDATA%\Your App\yourFile.xml , Когда вы переходите на перезагрузку, система снова перенаправляется из этого места.
Это мера безопасности, предназначенная для лучшего инкапсулирования приложений и их данных и предотвращения несанкционированной записи в места, где может произойти повреждение. Вы по-прежнему можете сэкономить %PROGRAMFILES%\Your App , но для этого вам нужно либо %PROGRAMFILES%\Your App ACL, применяемые к этой папке, либо вам нужно повысить уровень привилегий, на котором работает ваше приложение.
Я не был уверен, ставить ли это как комментарий или как ответ, но я думаю, что это может быть потенциальным ответом. Похоже, что файл XML сохраняется, поскольку данные сохраняются в разных экземплярах приложения. Это может быть виртуализация файловой системы, как упомянуто slugster, но это может быть просто, поскольку факт, что вы смотрите на неправильную копию XML файла. Если вы используете относительный путь, файл, возможно, был скопирован в новое место. Я бы предложил вам выполнить быстрый поиск файлов по имени этого файла и посмотреть, что вы вернетесь.
Оказывается, файл копируется и считывается из выходного каталога. Я вижу, что он обновляется, как ожидается оттуда.

на сумму 0.00 руб.
- Atomos представляет новые решения "Camera to Cloud.
- Saramonic Vlink2 — новая микрофонная радиосистема
- Беспроводные микрофонные системы Synco P
- Roland представили три новых устройства для стриме.
- Canon EOS R5c сможет писать 8К RAW
- Светильники SWIT с байонетом Bowens
- Shure MV7 – динамический микрофон, основанный на S.
- Новая линейка кинокамер Sony начинается с FX6
- Компактная Live Stream студия YoloBox из семейства.
- Panasonic представил три новых камкордера
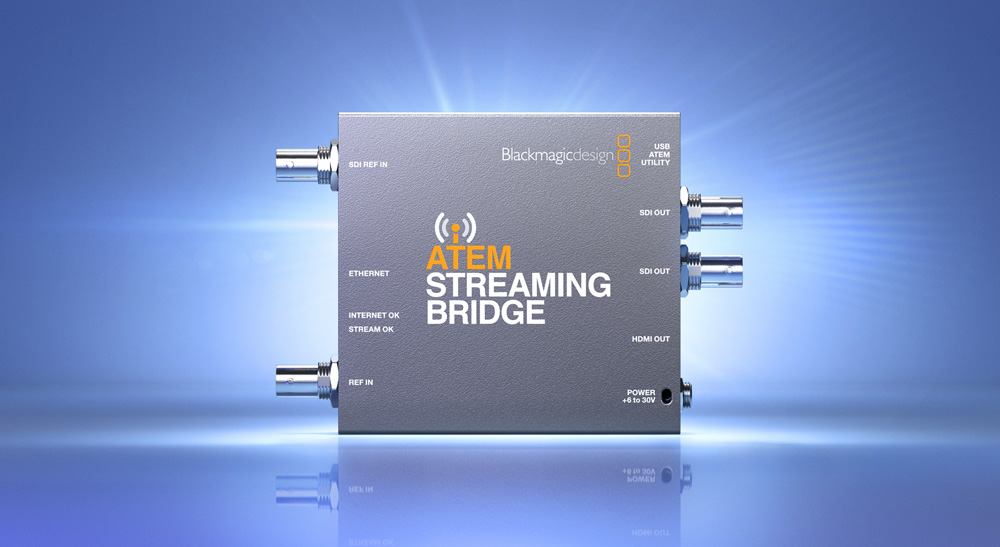
Микшеры ATEM Mini позволяют без труда готовить материал профессионального качества для онлайн-трансляций на платформе YouTube и бизнес-презентаций через Skype или Zoom. Они обеспечивают подключение к четырем источникам изображения, среди которых могут быть камеры, компьютер со слайдами PowerPoint или игровая консоль. Для создания картинки в картинке и целого ряда других эффектов имеется встроенный процессор DVE. Все модели ATEM Mini Pro поддерживают функцию стриминга. Она используется для передачи сигнала напрямую на конвертер ATEM Streaming Bridge. Для вывода изображения на экран с помощью проектора есть HDMI-выход. Кроме того, предусмотрены входы для настольных и петличных микрофонов, чтобы получать качественный звук в репортажах и на публичных выступлениях.
Данное решение дает возможность вещательным студиям принимать сигнал с микшера ATEM Mini Pro и работать со специалистами и блогерами по всему миру. Передаваемый контент имеет исключительное качество и не содержит логотипов производителей. ATEM Streaming Bridge легко подключить к локальной сети и использовать как IP-конвертер, что позволяет выводить видео на большие телевизоры и проекторы в общественных местах, — говорит Грант Петти, генеральный директор Blackmagic Design. — Эта новинка имеет уникальный функционал. Она значительно упрощает подготовку материала профессионального уровня в удаленном режиме и обмен данными по Интернету через ATEM Mini Pro.

Заметил закономерность:
Если картинка multiview целиком помещается в дисплей (края не отрезаются) - тогда мультивью не отваливается. И дело далеко не в перегреве. А вот если линии по краям мультивью не видны на мониторе (находятся, как бы, «за пределами видимости») тогда картинка начинает отваливаться через некоторое время. Если бы причина крылась в перегреве - то блок мультивью, по достижении некоторой критической температуры, просто перестал бы показывать. И возможно, сгорел бы. Но он отваливается не на совсем. Пропадает на 1 сек, на 2. может и не пропадать. Нет никакой системы. Подводя итог: дело в мониторе. Теперь надо понять что именно не так.


Помогите советом. Имеется Atem BlackMagic 4k, на 4 входных hdmi подаются сигналы с 4 ноутбуков. Некоторые ноуты прибор видит, некоторые не видит, вынимаешь hdmi вставляешь в обычный монитор все ок, вставляешь в Atem Blackmagic 4k ничего. Берешь другие источники показывает, т.е дело не в портах, а в голове прибора. Порты рабочие, определенный ноут показывает во всех 4 портах без проблем, некотрые просто нет и все. Хотя в обычный монитор подключаешь все работает. Купил отсекатель hdcp ничего не меняется. Все сигналы подаются в 1080p. Что делать, помогите

Моя проблема: не видит ноутбук. Хотя прошлый раз всё было нормально. Выход на ТВ с ноутбука работает. А на пульт нет.
Георгий, отваливается, значит пропадает на 1-2 сек. Иногда дольше. Иногда вообще не пропадает. Никакой закономерности. У вас похожая тема?
Роман, проблема в том что ноутбук не видит. Советуют частоту изменить, а там стоит 60 гц и выбора нет. И ещё: при показе ролика со звуком с ноутбука звук как выводишь? В моём случае, при подключении к ноутбуку HDMI, звук переходит на этот выход и с ноутбука уже его не взять. А с пульта Atem BlackMagic можно?
Если с ноутбука можно взять только 60 к/с, нужен конвертер в тот режим, в котором запущен пульт. И разумеется, разрешение на ноутбуке должно соответствовать разрешению кадра в пульте. Звук, в зависимости от модели пульта можно взять с выходных разъёмов XLR. Чтобы звук был, надо в аудиомикшере пульта включить (ON) аудиодорожку на том входе, куда подключён ноутбук. Если разъёмов XLR на пульте нет, звук идёт только эмбедированный (встроенный в видео) в программе и на SDI и на HDMI разъёмах. А вообще-то, можно указать текущее аудиоустройство в windows на которое будет идти звук. При подключении hdmi-кабеля система автоматически делает его основным аудиоустройством. Но это можно поменять вручную


Добрый день! у меня вопрос: как подключить к пульту Blackmagic ATEM Television Studio HD видео источник с приставки или компа чтобы в эфире шла картинка с компа ?

Помогите советом видеомикшер ATEM Television Studio HD выпендрился так что слов нет. Вечером отработал как положено выключился. а утром при включении только кнопка SET загорелась и кулера охлаждения закрутились . в остальном труп .. больше ни на что не реагирует и кнопки не светятся. Может у него прошивка слетела? (и вообще есть ли у него прошивка)
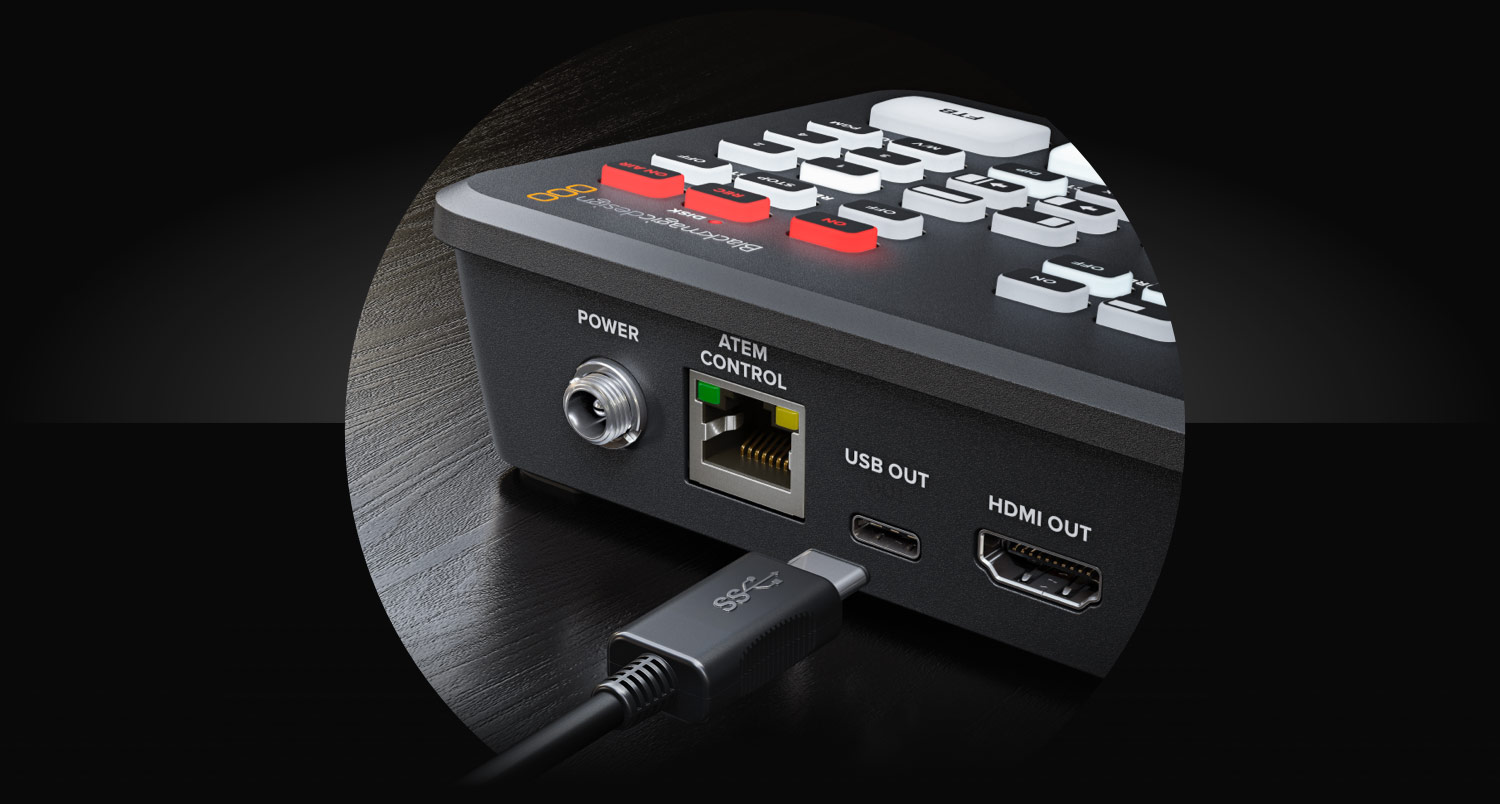
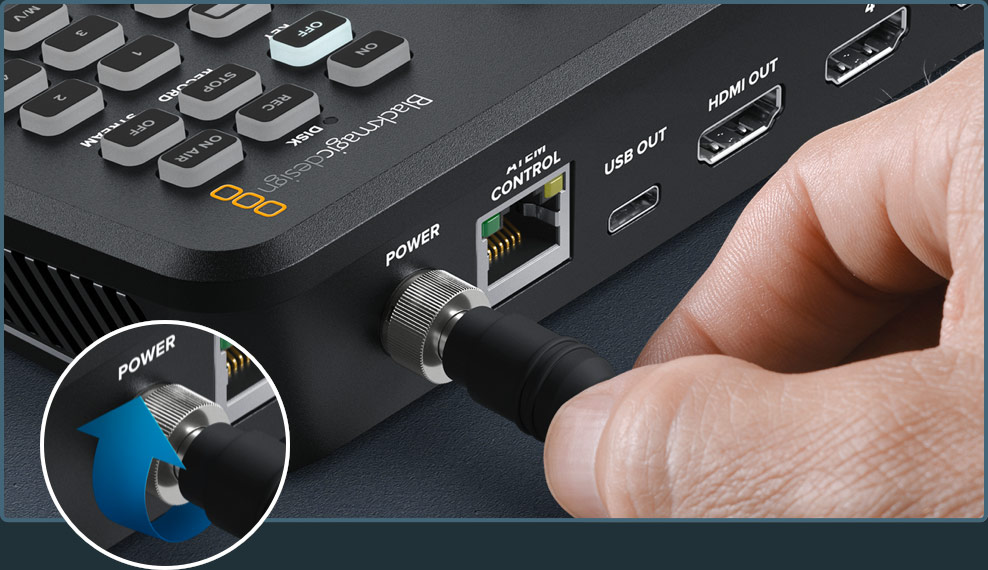
Connect Power
The first step is to plug in the power supply using the supplied power adapter. However most 12V power supplies will work fine, or even a 12V DC battery source will work fine. If you have a locking DC connector, then make sure to tighten it firmly.
Superimpose a Picture in Picture Overlay

Picture in picture superimposes a video in a small box that you can position and customize over your main source. To do this you use the digital video effects processor, or DVE. The DVE uses input 1 for its default source, so if you’re broadcasting gameplay and want to superimpose your reactions, plug your camera into input 1. Make sure your game console uses one of the other inputs. To enable picture in picture just select it on the control panel. As the DVE uses the upstream keyer, you also need to turn off the key. There are buttons on the front panel to set the position of the DVE. You can also fully customize the position, borders and light source by using ATEM Software Control.
Outputs to HDMI Video and USB Webcam!
To ensure maximum compatibility, all ATEM Mini models feature USB that operates as a simple webcam source. That means you can plug into a computer and get working with any video software! The software is tricked into thinking the ATEM Mini is a common webcam, but it's really a live production switcher. That guarantees full compatibility with any video software and in full resolution 1080HD quality. Choose any software you like, such as Zoom, Microsoft Teams or Skype for a new way to do presentations with a professional multi camera broadcast quality style! The ATEM Mini webcam output also works with streaming software such as Open Broadcaster, XSplit Broadcaster and more!

Easy to Use and Fast to Learn!
There's never been a switcher that’s easier to use, as you simply press any of the input buttons labelled by number on the front panel to cut between video sources. You can choose between cut or effects transitions by selecting the cut or auto buttons. Unlike cut, the auto button tells ATEM Mini to use a video effect when switching inputs. You can select from exciting transitions such as dissolve, or more dramatic effects such as dip to color, DVE squeeze and DVE push. Add a DVE effect for picture in picture effects with customized picture positions and background. There are even "media players" which are a still store for titles and graphics that you can load via external software control.

Record Direct to USB Flash Disks with ATEM Mini Pro
The ATEM Mini Pro and Extreme models also support direct recording of your streaming data to USB flash disks! That means you get very long recordings in the same H.264 video files with AAC audio that you streamed, so you can direct upload to any online video site, such as YouTube or Vimeo. Recording to multiple disks is also supported via a USB hub or Blackmagic MultiDock, so when a disk fills recording can continue to a second disk for non-stop recording. Record settings and disk selection are set up in ATEM Software Control and there's a record status view in the built-in multiview. You can even trigger recording on connected Blackmagic Pocket Cinema Cameras!
Connect a Computer
If you're streaming, then all models use USB as a webcam. First connect the USB to a computer. Your computer will recognize ATEM Mini as a webcam and you can then select it as the webcam source in your streaming software, such as Skype.


Faster Video Production plus Live Streaming
Live production is the fastest way to complete a finished program, plus you can stream it to a live global audience via YouTube at the same time. The USB webcam output works with any streaming software while the Pro and Extreme models will directly stream via the internet to popular social media platforms! With up to 8 HDMI inputs, depending on the model, you can set up multiple camera angles such as wide shots and close ups of each person in the performance. Then connect to a computer with a PowerPoint slide show or websites and gaming consoles. All switching is in real time so you can live stream your show to platforms such as YouTube, Facebook, Twitch and many more!
![]()


Five Great ATEM Mini Models!

ATEM Mini
ATEM Mini is fast to set up and easy to use. It includes 4 standards converted HDMI inputs, USB webcam out, HDMI out, Fairlight audio mixer with EQ and dynamics, DVE for picture in picture, transition effects, green screen chroma key, 20 stills media pool for titles and free ATEM Software Control.
ATEM Mini Pro
This model includes all the features found in ATEM Mini, plus more! You get recording direct to USB flash disks in H.264 plus direct streaming via the Ethernet to YouTube Live and more. There's also a multiview with 4 cameras, media, preview and program plus status of recording, streaming and audio.
ATEM Mini Extreme
This model is an advanced switcher for true professionals! You get all the ATEM Mini Pro features plus 8 HDMI inputs, 2 separate HDMI outputs, 2 USB ports and a headphone connection. There are also 4 chroma keyers, 6 picture in picture DVEs, 2 media players, and a multiview with up to 16 views!

Your browser does not support HTML5 video.
![]()
![]()
Step 2
Extreme Power with ATEM Software Control
If you really want to access all the power of your ATEM Mini, then you can run ATEM Software Control and get access to many more features than are available on the front panel. There are pages that let you run the switcher and pallets that have settings for every feature in the switcher. There are also pages in the software for changing settings, uploading and managing graphics, mixing audio and controlling cameras. Just connect the USB to a Mac or PC and run the software, as it uses the same USB connection that the ATEM Mini's webcam output uses. You can also use ATEM Software Control via ethernet if you have more than one operator working on the same job at the same time.

Switcher
Adjust switcher settings, make live cuts, adjust keys, apply transitions, overlay graphics and more.

Media
Upload and manage up to 20 RGBA graphic files. Graphics can be used for transitions, as bugs, lower thirds and more.

Audio
Professional multi channel Fairlight audio mixer with faders and meters for every input and the master level control.

Camera Control
Control and color correct cameras via the HDMI connection to Blackmagic Pocket Cinema Camera 4K and 6K.
Live Stream via Ethernet on ATEM Mini Pro
ATEM Mini Pro and ATEM Mini Extreme models have a built in hardware streaming engine for live streaming via their ethernet connections. That means you can live stream to YouTube, Facebook and Twitch in better quality, without dropped frames and with simpler settings. Just select the streaming service and enter the streaming key! There are palettes in ATEM Software Control for streaming setup, plus streaming status is also displayed in the multiview. Streaming status is easy to understand as the data rate indicator shows internet speed required for the video format you're using. If you're technically minded, you can update the streaming profiles in an XML settings file to load new services.


Start Streaming Video via Ethernet

If you want to live stream and you have the Pro or Extreme models, you can stream direct using the ethernet connection. Once you have connected ethernet to the internet, first request a streaming key from the streaming service. In the ATEM Software Control switcher page output palette select the streaming service you want to use, and the server you want to use choosing the server closest to your location, and enter the streaming key. Generally select the highest quality, unless you have speed limited internet access. Now press the on‑air button on the panel and you should see your program video live on your streaming service. On this model you can see your streaming status in the multiview!
ATEM Mini switchers make it easy to create professional multi camera productions for live streaming to YouTube and innovative business presentations using Skype or Zoom! Simply connect ATEM Mini and you can switch live up to 8 high quality video camera inputs for dramatically better quality images. Or connect a computer for PowerPoint slides or gaming consoles. The built in DVE allows exciting picture in picture effects, perfect for commentary! There are loads of video effects too! All ATEM Mini models have USB that works like a webcam so you can use any streaming software while the ATEM Mini Pro and ATEM Mini Extreme models add live streaming and recording to USB disks. ATEM Mini even has secret broadcast features for high end work!


Your browser does not support HTML5 video.
Plug in Video Sources
Next, plug your HDMI cameras and computers into ATEM Mini's HDMI inputs. This gives you 4 or 8 different video sources depending on your model, to switch between when creating your program. All the HDMI inputs are standards converted so don't worry about video settings!

Step 3
Stream Video
Skype is a good app for testing, so let's configure it for ATEM Mini. In Skype audio and video settings select Blackmagic Design as the video and audio sources. You will see the ATEM Mini video in the preview window and you can make calls!


Читайте также: