
Alienware x51 r2 установка ssd
Бренд Alienware, принадлежащий Dell, хорошо известен игровыми компьютерами, особенно ноутбуками. Однако в модельном ряду есть такие необычные вещи как Alienware X51 – игровой настольный мини-компьютер. Он занимает очень мало места, однако смог уместить внутри «настольные» процессор и видеокарту.
В России брендированные настольные компьютеры прижились не очень хорошо. Долгое время в ходу были решения, собранные из самостоятельно выбранных комплектующих. Сегодня отечественные компании предлагают собственные ПК под своей торговой маркой, но в любом случае традиция самостоятельно сборки продолжает жить. Ее нет только там, где подобная сборка сложна, либо практически невозможна.
Невозможна она в случае ноутбуков и неттопов. Необходимых комплектующих для них в свободной продаже просто не купишь. Хотя, надо признать, было бы интересно. Со сложной сборкой ситуация обстоит проще – если корпус устройства совсем маленький, то приходится выполнять некоторые акробатические этюды, чтобы все аккуратно воссоединить. В этом случае кое-кто также может предпочесть покупку готового решения. Как раз с таким мы сегодня и знакомимся – Dell Alienware X51.
Dell Alienware X51
X51 действительно компактный компьютер. Компания постаралась сделать то, что в свое время было проделано с ноутбуком Alienware M11x – в 11,6-дюймовый лэптоп вместили дискретную видеокарту и неплохой процессор. Тем не менее, X51 – это вовсе не неттоп, а потому ограничений по части производительности и функциональности у него немного.
Комплект поставки
Комплектация Dell Alienware X51 практически не отличается от той, что можно встретить у неттопа. С компьютером поставляется фирменная клавиатура, мышь и блок питания.

It's actually very easy to open up the case. Just unscrew the back of the x51 and slide the left panel out. After that, unscrew 2 screws to lift up the gtx555. Unscrew 1 more to slide out the dvd drive.
Take off the current 4 pin molex power and connect it to the cable you bought. After that, connect the cable to the motherboard. Connect the sata power to ssd.

Before you put everything back, unplug the HDD to make sure the OS installation on the SSD will have no problems. Keep in mind that this is using the SSD as a boot drive and to hold a couple of other programs. Keep ALL bulky files and storage on the HDD.
After the OS installation, plug back in the HDD and install drivers.
Here's how to enable trim for your SSD (Credits go to whoever wrote it.)
Here's where to mount(tape) your SSD.


More options
jpierson86
Member
Thanks for the post, I plan on doing this same thing when I get mine.
Couple of questions:
After installing Win7 to the SSD, is all the needed Alienware software/drivers on the included disks? So my install should be no different from the OEM install on the HDD?
Second, does the X51 come with a Windows disk? I have my own already, just curious.
And last, TRIM is not activated by default? When I installed an SSD in my laptop last year it was, I didn't need to do anything.
I would like to retain full functionality of all the included software, including Alienware ReSpawn.
More options
Member
Yes thank you, just received mine a few days ago and im going to be putting a ssd in very soon.
More options
daxmagex
Member
Thanks for the post, I plan on doing this same thing when I get mine.
Couple of questions:
After installing Win7 to the SSD, is all the needed Alienware software/drivers on the included disks? So my install should be no different from the OEM install on the HDD?
Second, does the X51 come with a Windows disk? I have my own already, just curious.
And last, TRIM is not activated by default? When I installed an SSD in my laptop last year it was, I didn't need to do anything.
I would like to retain full functionality of all the included software, including Alienware ReSpawn.
The OS disk came with the device. All drivers are given to you in the disk. Keep in mind that the eject button of the X51 will not work until you install the driver so before you do, you have to manually eject from "My Computer".
To make sure your SSD maintains in top condition, make sure TRIM is enabled. It only takes a minute or so.
More options
jpierson86
Member
Thanks for the info. I was wondering if I would have to clone the primary hard drive, now it looks like I won't have to. Yay!
Thanks for the info. Like I was saying with my last machine when I installed an SSD, TRIM was activated automatically. I will make sure after I install it in the X51 that TRIM is in fact working.
More options
Derek202
Member
More options
jpierson86
Member
More options
JDThird
Member
Just did this on my new X51 I just received - I have the right one selected in the BIOS for boot, and eventually it DOES boot and I have the SSD as my system drive now (C but it sits for 3 to 5 minutes at the POST screen before actually even activating the function keys to do setup or boot menu or anything. once it boots it works fine, but I can't get it to go past the POST as fast as it did before the SSD. I've done a lot of SSD's and never had anything quite like this on any of my other systems. going to look to see if there's a more recent BIOS for the X51 as well as downgrade the firmware on my SSD (Crucial M4 that had problems due to the new firmware so their support said to put it back to the previous) and see if either of those help, but otherwise even the boot is taking forever, I get the splash screen for windows and it looks like it's booting at SSD speeds (My boot camped mini booted in about 15 seconds from power button to desktop using this very SSD) until the splash screen goes black right before the logon screen comes up - and there's another 60 second or so delay.
If the BIOS and firmware changes don't make a difference I'll just yank it out as it's not that critical for me, as it's a media center PC that runs 24/7 so I only have to deal with boots once in a while when I need to either change something or just refresh it.
![]()
Hey guys, so I'm planning on putting an ssd into my x51 using the spare sata connector (I've also removed my optical drive/cage for the time being). I was wondering if any of you could point me to a few amazon prime member links to the cables that I need to purchase?
I found a youtube tutorial but audio is too quiet for me to hear and I don't want to order items I don't need.
I would very much appreciate the help!
![]()
If you removed your optical drive you can use that cable.
No additional cables?
Hmm sounds tempting. Would you still have any chance in knowing which cords would be needed? I might decide to put the drive back in with a HDD to Optical SATA in place of the drive instead. but if you don't its okay.
This is not possible (at least in R1, R2 may be different) because the cable used is one that incorporates both power and data into the same cable. Dell then took one of the connectors and flipped it around backwards so that the data/power cable that is in the R1 (at least in mine) cannot be used with any other SATA device.
I ran into this problem when adding an SSD to my X51. Thanks Dell for adhering to industry standards and making it a PITA to do even the simplest of upgrades.
Here is a SATA cable which you'd connect from the SSD to the motherboard for data.
Then you'll need one of these, you'll have to unplug a cable on the power board and plug the female end of this into the power board, and plug the female you unplugged into the male side (see here, this is just the 2 cables hes using put together) and then plug the black one into the SSD for power.
Or you could just use the one that comes off the CD drive, your mounting spot will be limited to pretty much right on top of the CD drive because, if I remember correctly, that cable is super short. However with the cables I linked everything will still be functional in your case & you won't lose your CD drive.
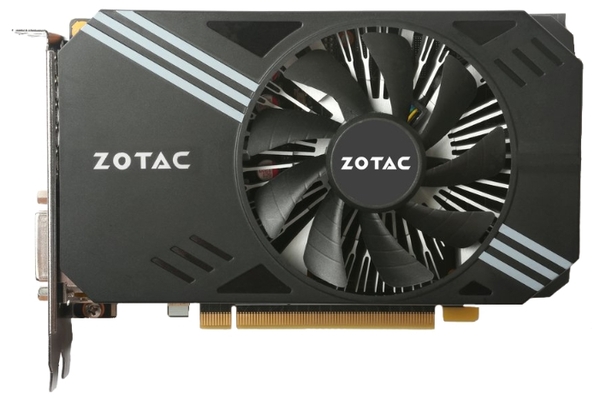
У 1060 меньше энергопотребление, но отсутствует аналоговый выход на монитор.
Купи хороший и тихий ватт на 500-550 и забудь про эту проблему. На 650 смысла ноль, если у тебя нет огромных систем охлаждения и дополнительного разъемов питания, например на эту новую видюху и еще чего-нибудь. Но даже в этом случае тебе на 550 хватит. На 330 под офисный пк подойдет еще, но под твой конфиг явно уже маловато.
Автор, стоит описать чего вы ждете от ПК и для чего будет использоваться. Если игры, то 1060 точно не 3гб, а 6.
Блок питания эта такая эротическая штука в вашем ПК на которой экономить нельзя.
Сегодня сэкономил 3000р на БП, а завтра купил пк заного.
На данный момент оптимальный вариант БП 600-650W и производитель корсар или термалтейк. Да - дорого, да - оно того стоит.
К примеру по яндексу Thermaltake TR2 600W (W0388RU) такой бп имеет вменяемый ценик в 4тр
В новой видяхи нужно отдельно подключать питание. На старой так же? Скорее всего, ничего хорошего не получится. Блок питания в защиту уходить будет, как только запустите какую-нибудь игру.
Бери - потянет, доп питание 6-пин, а на твоей видяхе два 6-пинов. По габаритам должна влезть. Есть только небольшая опасность, что комп старый, и БП выдает мощность ниже номинала, но, т.к. у тебя видеокарта старая более прожорливая, все должно быть норм.
по питанию вытянет. если она так уж лучше 760, то ставь
А тебя не смущает что на Nvidia gtx 760 минимальные системные требования по питанию
по размерам видеокарта новая влезет ? с виду корпус нестандартных размеров.
тс пиздабол какой-то, на таком БП комп бы даже не стартанул
БП слабый. В каком разрешении собираетесь играть?
Странно, потребление 70ой пишут 150
Однако требует 400 Вт БП. да и доп питания всего 6 пин.
и почему именно 3гб 1060 ?
Также обратите внимание что у 760 были аналогвые выходы (вга например), в 1060 - нет. Если ваш монитор может в ДВИ или ХДМИ , проблем не возникнет.
Сам на этом лоханулся на этой неделе - купил рх 480, а про то , что мой моник держит только вга - не подумал.
Спецификация
На сегодняшний день игровые мини-ПК Dell Alienware представлены только одной моделью – X51. Есть еще Alienware Aurora и Aurora ALX, но это полноразмерные настольные системы и их главная отличительная черта – выдающиеся быстродействие и дизайн. В свое распоряжение мы получили систему более слабой конфигурации, по сравнению с той, которая упоминается на официальном сайте Dell.
| Dell Alienware X51 | |
| Процессор | Intel Core i5-2310 (четыре ядра, четыре потока, 2,9/3,2 ГГц, 6144 Кбайт L3) |
| Память | 6144 Мбайт DDR3-1333 |
| Чипсет | Intel H61 |
| Видеокарта | NVIDIA GeForce GT 545 |
| Жесткий диск | 1000 Гбайт (7200 об/мин) |
| Оптический привод | DVD±RW |
| Коммуникационные возможности | 10/100/1000 Мбит/с Ethernet, Wi-Fi 802.11b/g/n |
| Порты | фронтальная панель: 2хUSB 2.0, вход для микрофона, выход для наушников тыльная панель: 6xUSB (4xUSB 2.0, 2xUSB 3.0), HDMI, 2xSP/DIF (TOSLINK и коаксиальный), шесть аудио разъемов, RJ-45 видеокарта: 2x Dual-Link DVI-I, HDMI |
| Блок питания | 330 Вт |
| Размеры | 343х318х95 мм |
| Вес | 5,49 кг |
| Операционная система | Windows 7 Home Premium 64-bit |
| Цена | 48000 рублей |
Перед нами вполне заурядный настольный компьютер, если судить по техническим характеристикам. Приятно, что Dell решила установить в него не какой-нибудь энергоэффективный процессор вроде Core i5-2400S, а полноценный Core i5-2310 с TDP 95 Вт. Система охлаждения корпуса вполне справляется с ним, а владелец получил полноценный четырехъядерный чип с номинальной частотой 2,9 ГГц – очень неплохо надо сказать. Более того, на его месте может оказаться и флагманский Core i7-2600.
Оперативной памяти внутри X51 оказалось тоже достаточно. 6 гигабайт по современным меркам – как раз самый оптимальный вариант. Для работы и игр. Хотя сегодня память недорогая и добавить еще 2 ГБ сильно систему не удорожит, а «запаса прочности» прибавит.
Видеокарта Dell Alienware X51
С чипсетом все в целом ясно – использован младший в семействе Intel H61. Его вполне достаточно для мини-ПК. А вот видеокарта используется такая, которую отдельно не купишь. Прежде всего она полноразмерная. Причем двухслотовой системой охлаждения. Пожалуй, это главное достоинство корпуса Alienware X51 – возможность установки подобного ускорителя. Впрочем, для этого пришлось пойти на некоторые ухищрения в конструкции. Так видеокарта подключена через специальный пассивный переходник, благодаря чему ее удалось установить параллельно системной плате – это серьезно экономит место.
Видеокарта легко изымается и может быть заменена. Кроме того, по размеру шасси видно, что без проблем можно установить и более массивный ускоритель. Впрочем, тут могут возникнуть ограничения со стороны блока питания – его мощности 330 Вт хватит не каждому GPU.
В нашем случае используется GeForce GT 545. Отдельно такая видеокарта не продается – только OEM-производителям. Формально это ускоритель среднего уровня. Точнее чуть ниже среднего. Примерно как Radeon HD 6670. Он имеет 144 потоковых процессора, частота его чипа составляет 870 МГц, а памяти GDDR5 – 4 ГГц. Для игр такой ускоритель подходит не лучшим образом, особенно в разрешении 1920х1080.
Кроме полноразмерной видеокарты очевидным достоинством Alienware X51 является установка 3,5-дюймового жесткого диска. В нашем случае – WD Caviar Blue емкостью 1 терабайт. Куда важнее, что скорость вращения его шпинделя составляет 7200 об/мин. А при желании его можно заменить на что-нибудь более емкое.
Нашлось в корпусе X51 место и для оптического привода, и для Wi-Fi контроллера. Присутствие последнего тоже можно записать в достоинства – все же это не неттоп, а потому на Wi-Fi производитель вполне мог сэкономить. А тут еще и поддержка быстрого стандарта 802.11n. Но Bluetooth остался не у дел. Так что если вы вдруг собираетесь пользоваться «синезубой» мышкой или клавиатурой – придется покупать соответствующий USB-адаптер.
Все это умещается в корпусе размером 34x32x9,5 см, что действительно немного. Его будет просто спрятать под стол или еще куда-нибудь с глаз долой. Да и на столе он замет немного места.
Мы точно не беремся сказать, сколько стоит описанная конфигурация, но за 48 тысяч рублей доступен чуть более мощный вариант: Core i5-2320 (3,0/3,3 ГГц), GeForce GT 555 и 8 гигабайт оперативной памяти. А за 57 тысяч рублей продают модификацию с Core i7-2600 и BD-приводом. Это довольно дорого, особенно с учетом слабой видеокарты. Остается оправдывать эту стоимость компактным корпусом, привлекательной внешностью, качественной сборкой, предустановленной Windows 7 Home Premium и известным брендом.
Моргает экран windows 10
С такими словами обратились ко мне в прошлое воскресенье старые клиенты.
Комп вин 10 домашняя, используется для работы с Эдо и сдачи отчётов. Бух на удалёнке. Лицензия Касперского, лицензия 1с бух, сносить и восстанавливать дело хлопотное. Особенно в воскресенье. Симптомы - сразу при входе на рабочий стол компьютер зависает и начинает интенсивно моргать белым. Ничего не нажать, инет не пашет.
Запуск в безопасном режиме - все работает идеально. Проверка на целостность - без ошибок. С помощью Кавремув из безопасного режима сносим Касперского, сохранив лицензию. Копируем базу 1с. Проверяем др.веб утилитой - все кул. Запускаем комп - все работает. 5 минут, проблема возращается, пропадает интернет. Хм. Уже целенаправленно выдерживаем провод сети, моргание прекращается. Круг проблем сужается. Запускаем диспетчер задач, подключаем интернет и смотрим что начинает генерировать трафик. Попался зловред. Программа называетс я vipnet csp 4.4.2 бесплатный аналог более известной крипто про csp. Решается установкой предыдущих билдов данной программы или бэта 4.4.4.
Ошибку спровоцировало обновление антивируса Касперского. Можно не благодарить, я просто экономлю ваше время, которое можно потратить на игры)
You are using an out of date browser. It may not display this or other websites correctly.
You should upgrade or use an alternative browser.
Endzo
PC Build: Alienware X51 R2
OS: Windows 10 Pro
CPU: Intel Core i5-4460 @3.20GHz
GPU: NVIDIA GeForce GTX 960 2047MB
Monitor Resolution: 1920x1080
PSU: Dell 330w power brick
RAM: 16GB
I've been running through troubleshooting for weeks and weeks due to the system rebooting only while playing Final Fantasy XIV. All of the tests say my system should be fine and even Final Fantasy XIV's newest benchmark says my system should be fine to play it at high or maximum settings, but the game is still rebooting the PC. I'm now to the stage of needing to buy new parts bit by bit and see if swapping things around will fix this. Beyond playing FFXIV, I play other multiplayer titles like the Borderlands franchise and Overwatch, and use this PC for streaming gameplay, watching videos, and using various graphic editing suites like Photoshop and Blender.
I'm considering an Nvidia 1060 or 1660ti, but it seems that the recommended blower style cooling is either sold out, no longer made any more, or just not made at all. Is a single fan model safe for running in this compact case? If so, I'm open to purchase suggestions. My money can go slightly farther on Amazon due to gift cards (up to $300 or so), but I'm okay with ordering from other reputable stores as well (up to $230 or so). With Final Fantasy XIV's next expansion coming out at the end of this month, I'd like to get the new card here as soon as possible so I have time to test things out before launch.
Aeacus
Champion
This video here shows the innards of your PC very well. Watch from 38:40 to 41:30 to know the details about hooking up the regular ATX/SFX PSU,
youtube:
Warranty wise:
Focus: 7 years
Focus+: 10 years
PRIME: 12 years (includes all PRIME models: regular, Fanless, AirTouch, SnowSilent, Ultra)
All my 3 PCs: Skylake, Haswell and AMD are also powered by Seasonic. Full specs with pics in my sig.
Aeacus
Champion
Well, to fix your reboot issue during gaming, you're looking towards new, higher wattage and good quality PSU.
X51-R2 initially came with GTX 745 which is 55W GPU + rest of the system at about 200W, making total power consumption about 255W. 255W is more than enough for it's 330W PSU to handle.
However, GTX 960 is 120W and with rest of the system, you're looking at 320W which is too much for that stock PSU to handle. Hence why system reboots when you start gaming (games put higher load on GPU and in turn, GPU draws more power).
Going for GTX 1060 or GTX 1660 Ti doesn't fix anything since both of these GPUs are also 120W. I'd be comfortable using 500W range PSU to run either of these GPUs. At bare minimum, good quality (Seasonic made) 450W unit would do too.
But there is an issue. Since your PC is prebuilt, it has proprietary parts inside, including it's PSU. Due to that, you can't upgrade the PSU without replacing the PC case.
Here, you have 3x choices:
1) Downgrade your GPU to e.g GTX 1050 Ti (75W) so you can use the GPU at it's fullest without random reboots.
With this, you'd loose gaming performance, e.g @ 1080p, games graphical settings would drop from high settings down to medium settings.
2) Keep your GTX 960 or upgrade your GPU to GTX 1606/1660 Ti and buy 500W range PSU as well (any Seasonic made unit will do fine).
New PSU would be sitting outside of the case since you can't put it inside the PC case. It may not look good, but it works.
3) Besides getting new GPU and PSU, buy a new PC case as well.
While this costs the most and also has the most work in it (swapping the system), end result would be nice and complete looking PC.
So, here you have it. Going with the small footprint prebuilt PC comes with a big sacrifice. You're sacrificing upgradeability; it's more difficult and expensive to repair it; you need to use proprietary parts and the availability of those proprietary parts is also an issue.
Читайте также: