
Adb подключение не установлено т к конечный компьютер отверг запрос на подключение 10061
Кажется, что у беспроводного ADB все больше и больше проблем при каждом обновлении Android Studio. Используя 2.1.1, я теперь не могу подключиться к моему планшету с помощью команды:
Это приводит к ошибке:
Это происходит сразу после утверждения соединения в диалоговом окне на планшете. До сегодняшнего дня я был вынужден сделать adb kill-server до попытки подключения к планшету, но теперь это даже не помогает.
Я недавно столкнулся с той же проблемой. Это происходит потому, что ваше устройство и компьютер подключены к разным сетям.
Это странно. У меня никогда не было этой проблемы до сегодняшнего дня. Я вытащил сетевой кабель и подключился к сети без проводов, и он установил соединение с планшетом.
Нет, оба находятся в одной сети. Он просто перестает работать изо дня в день по неизвестным причинам.
У меня есть эта проблема. Я определенно нахожусь в той же сети, потому что я могу зайти на веб-страницу на моем компьютере. Я предполагаю, что это проблема брандмауэра.
@ Разработчик в Мельбурне Не думаю, что это проблема с брандмауэром. если вы все еще сталкиваетесь с той же проблемой, то обратитесь: codetheory.in/…
Неправильно, оба устройства прибывают в одну подсеть и все еще говорят, что удаленные устройства не найдены
Обычно вы можете сказать, что эта ошибка связана с сетью, сначала проверьте эти пункты:
убедитесь, что ваш компьютер и ваше устройство могут видеть друг друга в сети, в основном это означает, что они подключены к одному маршрутизатору, но в более сложных сценариях ваше устройство может быть подключено к беспроводному маршрутизатору, и ваш компьютер может быть подключен к вашей локальной сети. важно то, что они могут видеть друг друга. вы можете проверить это, проверив IP-адрес устройства с вашего компьютера.
убедитесь, что нет конфликтов с IP-адресами, это может быть очень просто. но если вы не используете DHCP-сервер и вводите IP-адреса в устройствах, вы можете ошибочно ввести один и тот же IP-адрес в разных устройствах.
когда вы уверены в сетевых проблемах, повторите известные шаги
поэтому, когда вы подключаетесь USB, следуйте этим командам:
1-контактное подключение через USB
2-подключение к вашей сети WIFI (компьютер и мобильное устройство)
3-ping DeviceIP (должен иметь пинг на вашем устройстве)
4- adb kill-server
6- adb tcpip 5555
6-1- отсоедините USB-кабель (согласно комментарию @captain_majid)
7- adb connect yourDeviceIP
9-отсоедините кабель USB
Вы можете и должны отключить USB-кабель после adb tcpip 5555 , или вы можете столкнуться с проблемами в Android 6.0, как здесь .
Я использую WCF4.0 шаблон -остальное. Я пытаюсь создать метод, который загружает файл с помощью потока.
проблема всегда возникает при
класс для потоковой передачи:
проект Windows Form: для тестирования
Я отключил брандмауэр и подключение к Интернету, но ошибка все еще существует. Есть ли лучший способ тестирования загрузки метод?
в системе.Сеть.Розетки.Розетка.DoConnect (конечная точка endPointSnapshot, socketAddress socketAddress) в системе.Сеть.ServicePoint.ConnectSocketInternal (Boolean connectFailure, Socket s4, Socket s6, Socket& socket, IPAddress& address, состояние ConnectSocketState, iasyncresult asyncResult, время ожидания Int32, исключение и исключение)
"активно отказался" означает, что хост отправил сброс вместо ack при попытке подключения. Поэтому это не проблема в коде. Либо брандмауэр блокирует соединение, либо процесс, в котором размещается служба, не прослушивает этот порт. Это может быть потому, что он не работает вообще или потому, что он слушает на другом порту.
Как только вы начнете процесс размещения вашего сервиса, попробовать netstat -anb (требуются права администратора), чтобы убедиться, что он работает и прослушивает ожидаемый порт.
update: в Linux вам может потребоваться сделать netstat -anp вместо.
вам не нужно перезагружать компьютер. Вместо этого перезапустите IIS.
Run - > 'cmd'(как admin) и введите "iisreset"
вы можете проверить свой код двумя способами.
- вставить код, чтобы получить время, что служба запущена и время Б, что клиент отправляет запрос на сервер. Если B раньше, чем A, это может вызвать эту проблему.
- измените порт сервера на другой порт, который также доступен в системе. Вы найдете тот же код ошибки сообщается.
Проверьте, использует ли этот порт какая-либо другая программа.
Если экземпляр той же программы все еще активен, убейте этот процесс.
У меня была аналогичная проблема. В моем случае служба будет работать нормально на машине разработчика, но потерпит неудачу, когда на машине QA. Оказалось, что на машине QA приложение не запускалось от имени администратора и не имело разрешения на регистрацию конечной точки:
Если вы используете WCF storm, можете ли вы даже войти в конечную точку службы WCF? Если нет, и вы размещаете его в службе Windows, вы, вероятно, забыли зарегистрировать это пространство имен. Это не очень хорошо рекламируется, что этот шаг требуется, и это на самом деле раздражает.
Я использую этот инструмент для этого; он автоматизирует все эти громоздкие шаги.
у меня была похожая проблема отвергая localhost и 127.0.0.1. cmd (admin) netstat -anb нашел порт, работающий на 169.254.80.80 (не знаю, что ip пришел, потому что мой сетевой ip был 10.0.0.5. после ввода этого IP он работал. Это дает правильный IP:
проверьте номер порта в файле Web.конфигурация вашей веб-страницы такая же, как та, которая размещена на IIS.
с этой ошибкой я смог отследить его, благодаря @Yaur, вам нужно в основном проверить службу (WCF), если она запущена, а также проверить исходящие и входящие свойства TCP в настройках брандмауэра advance.
У меня была такая же проблема на моем веб-сервер "не удалось установить соединение, т. к. конечный компьютер отверг 161.х.х.235:5672". Я попросил администратора открыть порт 5672 на веб-сервере, тогда он работал нормально.
с аналогичным шаблоном мой клиент rest вызывает API службы, служба успешно вызывается при отладке, но не работает над опубликованным кодом. Ошибка: не удалось подключиться к удаленному серверу.
Внутреннее Исключение: Система.Сеть.Розетки.SocketException (0x80004005): не удалось установить соединение, поскольку целевая машина активно отказалась от него serviceIP:443 at System.Сеть.Розетки.Розетка.DoConnect (EndPoint endPointSnapshot, SocketAddress socketAddress) в Системы.Чистая.Менеджмент.ConnectSocketInternal(логическое connectFailure, гнездо С4, С6, гнездо, разъем и гнездо, IP-адрес и адрес, государственный ConnectSocketState, объекта iasyncresult asyncresult, к, исключение& исключение)
разрешение: установите прокси в web config.
необходимо настроить системный прокси Ты должен пройти этот путь. панель управления>>интернет>>подключения>>настройка сети>> полномочие нет tik: использовать прокси-сервер
Кажется, что у беспроводного ADB появляется все больше и больше проблем каждый раз, когда я обновляю Android Studio. Используя 2.1.1, я теперь не могу подключиться к своему планшету с помощью команды:
Это приводит к ошибке:
Это происходит сразу после подтверждения подключения в диалоговом окне на планшете. Раньше я был вынужден выполнить adb kill-server перед попыткой подключиться к планшету, но теперь это даже не помогает.
Недавно я столкнулся с той же проблемой. Это происходит из-за того, что ваше устройство и компьютер подключены к разным сетям .
Обычно вы можете сказать, что эта ошибка связана с сетью, сначала проверьте следующие элементы:
убедитесь, что ваш компьютер и ваше устройство могут видеть друг друга в сети, в основном это означает, что они подключены к одному и тому же маршрутизатору, но в более сложных сценариях ваше устройство может быть подключено к беспроводному маршрутизатору, а ваш компьютер может быть подключен к вашей локальной сети. важно то, что они могут видеть друг друга. Вы можете проверить это, послав эхо-запрос по IP-адресу устройства с вашего компьютера.
убедитесь, что нет конфликта с IP-адресами, это может быть очень просто. но если вы не используете DHCP-сервер и вводите IP-адреса на своих устройствах, вы можете ошибочно ввести один и тот же IP-адрес на разных устройствах.
Когда вы уверены в проблемах с сетью, повторите известные шаги
Итак, при подключении через USB выполните следующие команды:
оставайся подключенным через USB
подключитесь к вашей сети Wi-Fi (компьютер и мобильное устройство)
ping DeviceIP (должен быть ping к вашему устройству)
- отключите USB-кабель (согласно комментарию @captain_majid)
adb connect yourDeviceIP
adb devices (должны быть видны два имени устройства, одно из них по IP-адресу устройства)
При перезапуске устройства ваш порт также изменится, поэтому нажмите команду ниже
1- adb kill-server
2- подключите телефон к компьютеру с помощью USB-кабеля
3- adb tcpip 5555
4- adb connect (ip вашего устройства): 5555
Я была такая же проблема. Эти шаги сработали для меня:
- подключите ваше устройство к usb
- когда ваш cmd уже находится в AppData \ Local \ Android \ Sdk \ platform-tools & gt;, введите adb tcpip 5555
- команда покажет restarting in TCP mode port: 5555
- тип adb connect 192.168.43.1:5555
Надеюсь, это поможет решить вашу проблему.
при перезапуске устройства ваш порт также изменится, поэтому нажмите команду ниже
Update the Android Device Driver or Use an OEM-Provided Driver
If the driver of the Android device is outdated or improper in the system’s Device Manager, then you may encounter the ADB error 10061 in the Android Studio as it can cause incompatibility between the system and target machine. In this context, updating the Android device drive to the latest build or using an OEM-provided driver may solve the problem.

- Right-click on Windows and select Device Manager.
- Now, try to find the Android device in the options shown. You may find it under any of the different categories like Android devices, Android phones, portable devices, other devices, or USB controllers.
- Once found, right-click on the Android device and select Update Driver. Update the Android Device Driver in the Windows Device Manager
- Then click on Search Automatically for Drivers and if no update is available, then click on Search for Updated Drivers on Windows Update.
- If an updated driver is available, download and install the update.
- Once installed, restart your system, and upon restart, check if the ADB issue is resolved.
- If not, steer to the OEM website (like Huawei) and download the latest drivers as per the phone’s model.
- Now, right-click on the downloaded driver and select Run as Administrator.
- Then follow the prompts on the screen to install the driver and afterward, restart your system.
- Upon restart, check if the ADB error 10061 is cleared.
- If this doesn’t work, right-click on the Android device in the Device Manager and select Update Driver.
- Now, select Browse My Computer for Drivers and click on Let Me Pick from a List of Available Drivers on My Computer.
- Then select another driver and apply the changes made.
- Now restart your system and upon restart, check if the ADB issue is cleared.
- If this didn’t do the trick, then you may try all the other Android device drivers in the Device Manager one by one and check if any of the drivers solve the problem.
Check the IP of the Target Device
- Open the Android phone settings and tap on Wi-Fi.
- Now, click on the hamburger icon and select Advanced Settings. Open Advanced Wi-Fi Settings of Phone
- Then check the IP address of the Android device and make sure you are executing the following in the elevated Command Prompt on the system with the correct IP: Check the Phone’s IP Address
- Afterward, check if the connection actively refused issue is resolved.
Execute the Different ADB Commands with Different Parameters
The ADB connection may get refused by the target machine if a wrong parameter is used in the ADB command e.g., if the device’s IP was changed after a restart and the previous IP was used in the ADB command, then a user may encounter the error 10061. In this context, executing the ADB command with different parameters may solve the connection refused error. But before going to that route, check if restarting everything involved in the process like Android Studio, computer, router, phone, etc. solves the problem.
Use a Continual Ping on the System with Other ADB Commands
If that did not work, you may set up a continual Ping on the system to check if the system can connect to the device IP and then execute the ADB commands afterward.

- Launch the elevated Command Prompt on the system and execute the following (whenever you have to stop the Ping command, use the Ctrl+C shortcut): Run Ping Command in the Command Prompt
- If the connection is successfully made, connect the device and system through a USB cable.
- Now try the following ADB commands to check if the issue is resolved.
- Then unplug the USB cable from the system and execute the following command in the system’s elevated Command Prompt:
- After a successful connection, you may expand Studio>>Run and then select Device to check if the ADB error is cleared.
If the ping command failed at step 2, then try to find out the networking issue causing the ADB error.
Update the Android Studio and SDK Platform Tools
‘No connection could be made ADB error 10061’ can be a result of an outdated Android Studio or SDK Platform-tools as it may lead to incompatibility with the OS/host device. Here, updating the Android Studio and SDK Platform Tools may solve the problem.
- Launch the Android Studio and expand its File menu.
- Now select Settings and in the left half of the resulting menu, expand Appearance and Behavior. Open Android Studio’s Settings
- Then expand System Settings and head to the Updates tab.
- Now, in the right half of the window, click on Check Now and if an update is available, download and install the update. Check for Updates of Android Studio
- Then relaunch the Android Studio and check if the ADB error 10061 is cleared.
- If not, again head to the System Settings tab of the Android Studio Settings and in the left pane, select Android SDK.
- Now, in the right pane, check if an update of the relevant packages is available. If so, download and install the update. Update SDK Platform and SDK Tools in the Android Studio
- Afterward, relaunch the Android Studio and check if the no connection could be made issue is resolved.
Enable Wireless, Network, or Bluetooth Debugging
- Launch Settings of Android 11 (or above) and open its Developer Options.
- Now enable Wireless Debugging and then click on Allow in the Allow Wireless Debuggingon This Network. If you trust and want to regularly use the wireless debugging feature on the current network, then checkmark Always Allow on This Network. Enable Wireless Debugging
- Now, on the system’s elevated Command Prompt, execute the following: Use the ADB Pair Command
- Once successful, execute the following and check if the ADB error 10061 is cleared:
Keep in mind that some Android TV devices may show a Network ADB option. Also, if you are trying to connect to a smart Android device (like a watch), then you may enable Bluetooth Debugging in the device settings.
Update the PC’s OS to the Latest Build
The ADB error 10061 could be a result of the incompatibility between the outdated PC’s OS and other system modules (especially, related to ADB). In such a case, updating the PC’s OS to the latest build may solve the problem. For elucidation, we will discuss the process of updating a Windows PC.
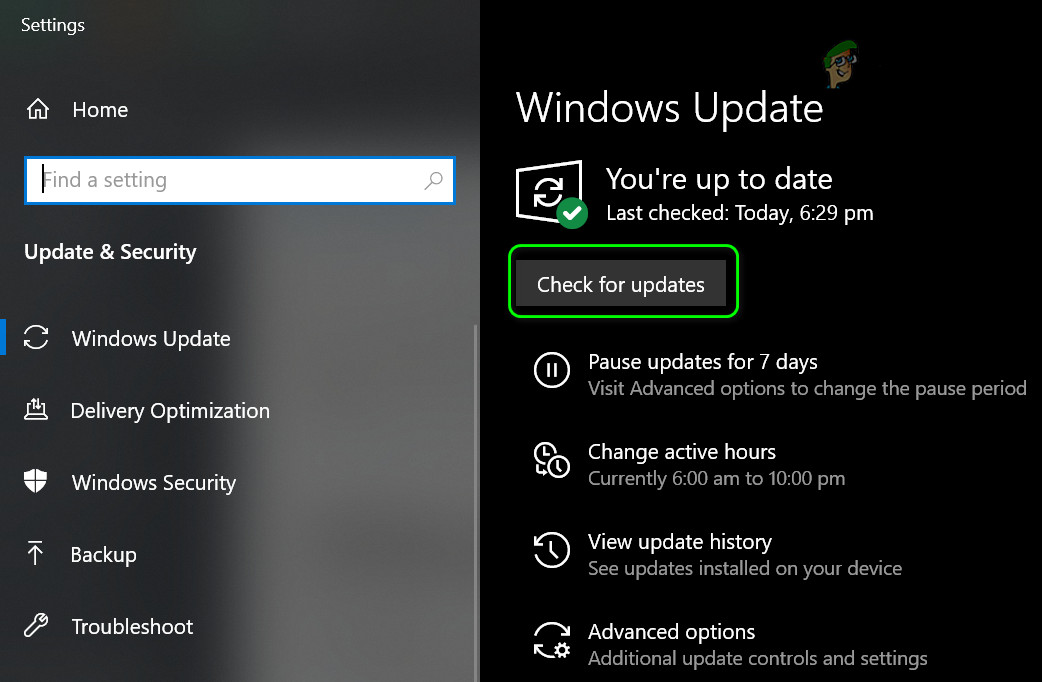
- Click Windows, search and open Check for Updates.
- Now, in the right pane of the resulting window, click on Check for Updates, and if some updates are available, download and install the updates (optional updates as well). Check for Windows Updates
- Once the PC’s OS is updated, restart the system and check if the ADB error 10061 is cleared.
Edit the USB Debugging Settings of the Android Device
The USB debugging is an essential component of the ADB mechanism and if its settings are misconfigured, then ADB may show the warning of no connection could be made because the target machine actively refused it (10061). In this scenario, properly configuring the USB debugging of the Android device may solve the problem.
Use the IP Address of the Local Host in the Command if Using an Android Emulator
If the issue is occurring with an Android emulator, then it could be a result of the ADB attempts to connect to the localhost over IPv6 (that will be “::1”, not, 127.0.0.1). In this context, using the IPv4 address of the local host may solve the problem.
- Execute the following in the elevated Command Prompt on the system:
- Then check if the ADB connection issue is resolved.
- If that did not work, then check if using the ADB connect command without specifying a port number solves the problem.
If none of the above did the trick for you, then you may try an ADB plugin (like Wi-Fi ADB Ultimate or scrcpy) to solve the issue. If that did not work, then you may reset the system or phone to the factory defaults. For some advanced techies, adding the device’s IP to the ARP table of the system may solve the problem.
OS: StarOS на базе Android TV9
CPU: Amlogic S905Y2
RAM: 2 Гб DDR4
Flash: 16 Гб eMMC
Wi-Fi: BCM 802.11 b/g/n/ac 2.4G/5G MIMO 2T2R Wi-Fi
Bluetooth: 5.0
HDMI 2.1, HDCP2.2
Разрешение видео: до 4Kx2K
Поддержки AFR нет!
Аудио: Dolby Digital, Dolby Digital Plu, DTS
DC вход (через MicroUSB)
Аксессуары:
1) Bluetooth пульт с микрофоном
2) Руководство пользователя: Русский
3) Джойстики: 2 наэкранных джойстика для смартфона (опционально)
4) Адаптер питания: DC 5В / 1.0A адаптер
5) Кабель питания: длина 1,5 м
Размеры приставки, ДхШхВ: 77х53х16 мм
Голосовые помощники: Сбер, Афина и Джой.
Интеграция с сервисами Сбербанка.

maliay, конечно нет, как и на бокс от ОККО, можете найти тему, там народ набрал их по дешёвке и прошивает кастомами.
Я так понимаю, что okko smart box сбер забросил и выкатил по сути её немного улучшенную версию, с новым ПО как новый продукт. Через пол года ждём sberbox 2, по этой логике. Точнее логики тут нет, так как принциалльно ничего не мешает обновить По на приставке okko. Кидалово какое то.
Через пол года они допилят свои сервисы, запилят совершенно новый продукт (условный okko smart box 2) в той же коробочке, а sberbox забросят и скажут что это совершенно разные устройства - покупайте новое. А то заспамили все отзывы на маркет, что приставку okko развивать, ждите обновлений и новых функций - ага, щас, покупайте sberbox в итоге. То то я смотрю что в сетевых магазинах уже за 2300 okko smart box отдают.
Жду приставку от яндекса. Там хоть тоже скорей всего на подписке сидеть придётся, но уж явно такого кидалова не будет.
А нужно обязательно перешивать? Вам мало китайских коробок на любой вкус и кошелек, где можно шить - хоть зашиться?
Этот девайс заточен под сервисы Сбера, никто насильно не заставляет его покупать.
Просто умиляет, когда возьмут за копейки Окко, сэкономив на пару бокалов пива (по сравнению с китайским аналогом, где можно шить что угодно) и начинается дрочево по перепрошивке. Экономия на спичках.
Сделал предзаказ, с бесплатным курьером, номер заказа 3499, интересно, эт столько человек предзаказало?
Как интересно у нее с cast'технологией?, airplay нам будет недоступен?Только кастить с ютуба?)
Сделал предзаказ, с бесплатным курьером, номер заказа 3499, интересно, эт столько человек предзаказало?
3641 заказ) Заказал в ночь по МСК! Судя по-всему это и есть люди, сделавшие заказ
Неплохой девайс получился за эти деньги. Поставить бы на него smartyoutube и hdvideobox и вообще идеально было бы. Хот я и так пользоваться можно, даже захотелось спрыгнуть с яндекс плюса на сберовский прайм
maxmayster, старая ,добрая обкатанная со времён спутникового ТВ стратегия.Продают за пол цены устройство которое без платных сервисов ничего не может .Ааааа,ну кроме как рассказать анекдот.Типа ж виртуальные помощники .По идее они эти коробки не продавать должны ,а на халяву раздавать .Купил премиум подписку годовую на окко ,на тебе сбербокс!
У них есть такое предложение, но только подписку на два года купить надо. Данная приставка из официально представленных в России наверно единственная которая имеет нормальное железо и хороший пульт за эти деньги. Софт тоже наверняка будет неплохим. Железо лучше чем во всеми любимом мибоксе. Я вот сижу и думаю взять или нет. Хотя сейчас в эксплуатации две приставки на 905x2 и две на 905x3 и они меня полностью устраивают, но попробовать сбер девайс хочется. Подписку сберпрайм годовую буду точно покупать, т.к. пользуюсь некоторыми сервисами сбера.
На странице заказа сбербокса есть поле промокод, где бы взять этот самый промокод чтобы сбить цену хотя бы до 2500!?
Change the USB Connection Mode to the File Transfer
![]()
- Launch the Android device settings and open Developer Options.
- Now tap on Revoke USB Debugging Authorizations and connect the device with the PC via a USB cable.
- Once connected, swipe up (or down) to open Notifications Tray and tap on USB Usage Mode.
- Then select File Transfer and execute the following in the elevated Command Prompt to check if the error 10061 is cleared: Use the Transfer Files Mode of USB
- If that did not work, check if changing the USB Connection Mode to Camera solves the problem.
- If the issue persists, check if disabling Stay Awake in the Developers Options solves the problem.
Disconnect the VPN on the System and Android Device
The Android Studio requires that both devices should be on the same network and if any of these devices have a VPN enabled on them, then the Android Studio may fail to find the other device on the same network, resulting in the ADB error 10061. In this context, disconnecting the VPN on both devices may solve the problem.

- Expand the hidden icon of the system tray and double-click on the VPN icon (e.g., AnyConnect). Disconnect VPN
- Then select Disconnect and then, on the Android device, swipe up (or down) to show the Notifications tray of the device.
- Now, tap on VPN (if shown) and then tap on Disconnect.
- Once both devices are disconnected from the VPN, re-launch Android Studio, and while keeping the Troubleshoot device connection issues tab opened on the Studio, check if the target machine actively refused connection error 10061 is resolved.
- If that did not work, then check if disabling/enabling the Wi-Fi of the Android device solves the ADB problem.
Disable Other Network Adapters on the System
For proper functioning of the ADB, Android Studio requires both devices to be on the same network but the ADB debug bridge is not good at handling multiple networks. So, the usage of multiple networks (Ethernet or Wi-Fi) on a system may trigger the ADB behavior under discussion. In this scenario, disabling other network adapters on the system may solve the problem.
- Right-click on Windows and select Network Connections.
- Now, select Change Adapter Options and right-click on any of the network adapters. Open Change Adapter Options
- Then select Disable and repeat the same on all the network adapters except the Wi-Fi adapter. Disable Ethernet Adapter in Network Connections
- Now restart the Android Studio and check if the ADB error 10061 is cleared.
- If that did not work, expand the hidden icon of the system tray and click on the Wi-Fi icon.
- Now select Airplane Mode and on the Android Device, swipe up (or down) to expand the Notifications tray of the device. Enable Airplane Mode of the System
- Then tap on the Airplane icon and afterward, enable the Wi-Fi on both devices (without disabling the Airplane mode). Enable the Airplane Mode
- Now re-launch the Android Studio and check if the ADB error 10061 is cleared.
- If the issue persists, check if disabling Wi-Fi in the router (not restarting the router) and then enabling it back solves the problem.
If that did not work, check if using Microsoft’s Your Phone app to connect the system/device and then executing the ADB commands solve the problem.
Enable USB Debugging in the Android Device Settings
- Firstly, enable the Developer Options of the Android device and then open the Android Settings. Open Developer Options
- Now open Developer Options and enable USB Debugging (if disabled), otherwise disable/enable the USB Debugging. Keep in mind that for some Android models (like MXQ Pro), you may find the USB Debugging option in Apps > Settings (not in Android Settings). Enable USB Debugging
- Then execute the following in the elevated Command Prompt on the system: Use the ADB Connect Command
- Then confirm the connection on the Android phone’s screen and check if the ADB error 10061 is cleared.
- If not, Revoke USB Debugging Authorizations and enable the Allow ADB Debugging in Charge Only Mode (some Android models might show the Allow ADB Debugging in Load Only Mode option) to check if that solves the problem. Revoke USB Debugging Authorizations
- If that did not work, check if disabling the Aggressive Wi-Fi to Cellular Handover in the Developer’s Options solves the problem. Disable Aggressive Wi-Fi to Cellular Handover
Disconnect ADB from the Other Devices
If multiple devices are being used with the Android Studio or the same Android device is connected after some time, then a connection with the other device or previous connection to the current device might cause the target machine to actively refuse the connection. In such a case, disconnecting ADB from the other device may solve the problem.

- Right-click on Windows and search for Command Prompt.
- Now right-click on Command Prompt and in the mini-menu, choose, Run as Administrator.
- Then, execute the following: Use the ADB Disconnect Command
- Now relaunch the Android Studio and execute the following to check if the ADB connection is successful:
- If that did not work, then execute the following command in the elevated Command Prompt:
- If there are multiple devices shown like the following:
- Then you may execute the TCPIP and connect commands as the device ID but add -s to them like the following:
- Now check if the ADB error 10061 is cleared.
Fix: No connection could be made because the target machine actively refused it. (10061)
Android Studio’s ADB (Android Debug Bridge) is a command-line tool to communicate with an Android device (either through a USB or by using TCP protocol). Many users, when issuing an ADB command e.g., adb connect, they encounter the ADB error 10061 with the following type of message:

How to Fix ADB Error 10061
The ADB error 10061 means that the remote device is refusing the client’s TCP connection request (either the IP or port). This error can occur due to many reasons but the following can be categorized as the main:
- Outdated System’s OS, Android Studio, or Device Drivers: The incompatibility between the system’s OS, Android Studio, or device driver (if any one of these is outdated) may lead to the error 10061.
- Improper Configuration of the USB Debugging: USB Debugging on the Android device is essential for the first authorization of the Android device to connect to ADB and if it is disabled or the proper connection method (like File Transfer, etc.) are not used, then ADB may fail to make a connection with error 10061.
- ABD’s Usage of Other Network Adapters: ADB is not good in handling multi-networks on a system and if your system is using multiple networks (like Ethernet and Wi-Fi connection at the same time), then it may lead to the current ADB error.
- Improper ADB Commands Used: If the proper ADB commands are not used (like not disconnecting from a previous session), then ADB may show the error at hand.
Use a Different Port in the ADB Commands
If the above ADB commands did not work, then the issue could be due to the wrong port number used in the commands. Here, trying different port numbers might solve the problem.
- Repeat the steps mentioned above but at the TCPIP command execute the following:
- And then execute the following:
Keep in mind some devices have port 5555 closed by default (like a Mi Box) and to open the required port, you may have to connect the device with a USB to the system and execute the following:
Also, do note that the port will be closed if the device restarts and you may have to repeat the above step to open the required port.
Читайте также: