
Acdsee отключить распознавание лиц
A question seen frequently on photography groups is “What software do I get to process my images in?”. There is the usual flurry of recommendations for the familiar choices and a few random ones thrown in. One option that doesn’t get mentioned as often as it should is ACDSee. In particular the Photo Studio Ultimate 2019 bundle is worthy of consideration for both beginners and more experienced users.
The 2019 version with the newly included Face Detection and Facial Recognition features is a step up from the previous 2018 program, indicating an intention towards AI-based digital asset management.
For anyone wanting a one-stop shop to manage, view, process RAW files, and edit with layers, etc, PLUS only having to pay once for a perpetual licence, ACDSee offers a compelling option in the marketplace.
My background is in Lightroom and Photoshop which is the basis for comparison in this review.
Let us assess this software from the point of view of what it offers a beginner.
Доклад 4. Smart Indexer – только актуальные данные
Умные папки, умное индексирование… Одна из самых неприятных вещей при работе на компьютере – это когда какая-либо программа делает что-то непонятное в фоновом режиме, не спрашивая пользователя и даже не говоря ему об этом. Какие-то данные добавляются в какую-то базу данных для какого-то более быстрого индексирования… С другой стороны, если такое индексирование нужно для корректной работы программы, то пусть эта функция будет частью программы, какой смысл говорить об этом как о революционной новинке?
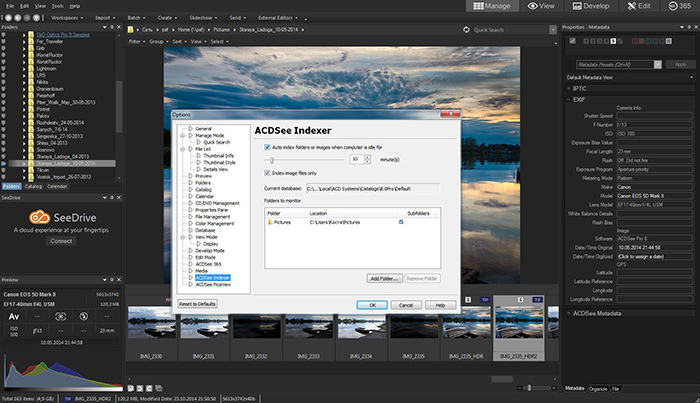
Полезно профессионалам? Нет. Мало кто оценит тот факт, что пока ты занимаешься другими вещами, программа втихаря то-то индексирует за твоей спиной и отнимает ресурсы компьютера. Хорошо, что в настройках есть галочка отключения подобной функции.
Полезно любителям? Нет. Они вряд ли оценят эту функцию и не будут ей рады, скорее всего, не заметят её вообще: есть и ладно.
Searching for multiple people
1. Search for two or more people by holding down CTRL while selecting a second name in the People section of the Catalog panel. The software finds the images for those people. You can also utilize the ‘Easy Select’ arrows next to the names to select multiple people.
2. Find an image with two specific people in it together by typing both of their names in the ‘Quick Search’ bar as Person 1 + Person 2 to run a Boolean AND search. It is during this process that it’s essential to understand the naming convention you used originally.
In ‘Manage’ mode, select the folder you want to search in and click F3 to search (or right mouse click and select Search). Make sure you put ‘People’ in the ‘Categories’ section or it will search the entire database and potentially pull up other images.
3. You can also run a search from the ‘Catalog’ pane. In the ‘People’ section, select all the people you want to search for by using the ‘Easy-Select’ arrows or CTRL/SHIFT clicking. Click the gear icon on the People section header, and change the search type to ‘Match All.’
Системные требования ACDSee Photo Studio Ultimate 2019
Компьютер
- Intel® или AMD с поддержкой 64-бит
- Рекомендуется Intel i3 или мощнее
- 2 GB RAM (рекомендуется 6 GB RAM или более)
- 512 MB Video RAM (VRAM)
- Видеокарта с поддержкой DirectX 10
- Разрешение экрана 1024 x 768 (рекомендуется 1920 x 1080)
- 2GB свободно на диске
Операционная система
- Microsoft® Windows® 7 (SP1), Windows® 8, Windows® 8.1, & Windows® 10 (только 64 бит)
- Microsoft® Internet Explorer® 9+
- Microsoft® DirectX® 10 или современнее
- Windows Media® Player 9.0
Составление обзора, Константин Биржаков, 23 октября 2018 г.
По материалам официального сайта ACD Systems
Автор обзора не может нести ответственность за достоверность сведений, взятых из открытых источников.
Алексей (гость сайта) :: 01 сентября 2020
Добрый день!
Подскажите пожалуйста, можно ли отключить функцию распознавания лиц?
Заранее благодарен!

Раньше и трава была выше, и солнышко грело теплее, и новые версии программы ACDSee Pro радовали новыми функциями, обновлениями и улучшениями. Теперь дело обстоит примерно таким образом: собираются раз в год маркетологи компании ACDSee Software на общем собрании и решают, что бы такого придумать, дабы как-то оправдать появление новой циферки в названии программы. И если раньше, когда трава была выше и солнышко грело, у них в запасе были такие козыри, как привязка к карте, как ретушь, как градиент обработок, как экспорт на Facebook и некоторые другие, то сегодня – бац! – козыри закончились. А восьмёрочку в название поставить хочется, и денег получить с пользователей за переход на новую версию тоже ой как хочется. Что делать?
Вот что говорит о новых продуктах и вообще о положении дел в отрасли Дуг Вэндеркерхоув (Doug Vanderkerkhove), основатель компании ACD Systems и её генеральный директор:
«Благодаря появлению продвинутых линз в современных сматфонах и доступности фотокамер топ-уровня сегодня существенно изменился способ, которым люди фотографируют и делятся своими эмоциями друг с другом. Мы в ACD Systems обратили внимание, что стремительно стирается различие между высококачественным профессиональным программным обеспечением и приложениями для домашних пользователей, и нам необходимо идти в ногу со временем. Наши новые программы предлагают многофункциональное решение с неизменно высоким качеством всех продуктов ACDSee, которому наши пользователи всегда доверяют».
Данное высказывание вполне можно трактовать так: все вокруг постоянно что-то снимают, и любители, и профессионалы, и хорошо у них выходит, а на рынке не хватает универсальной программы одной для всех. Насчёт новичков и любителей всё понятно, а вот неужели профессиональные фотографы и правда используют в своей работе Windows и ACDSee Pro?
Оказывается, да. Вот как отзывается о программах ACDSee профессионал – Серж Тимачеф (Serge Timacheff), официальный фотограф и журналист Международной Федерации Фехтования (International Fencing Federation, FIE):
«Я работал на 5 Олимпийских играх, 25 чемпионатах мира и десятках гран-при по фехтованию, и при этом всегда использовал ACDSee для обработки, редактирования, управления, и архивирования фотографий, которые я снял на каждом из этих мероприятий. Стандартные программы по работе с фото не достаточно надёжны и функциональны, чтобы доверять им репортажи с важных событий, а топовые профессиональные продукты тяжёлые, неповоротливые и притом дорогие. В программе ACDSee я обработал более чем два миллиона изображений с соревнований по фехтованию, и я полностью доверяю этой программе весь мой технологический процесс на самых ответственных мероприятиях. ACDSee – превосходный инструмент, и я рекомендую его людям во всем мире».
Говоря о «стандартных программах» Серж, видимо, имеет в виду встроенные в операционную систему Windows утилиты по управлению файлами. В этом вопросе с ним сложно не согласиться! А вот насчёт чрезмерно высокой стоимости и неповоротливости программ топ-уровня Серж лукавит: стоят они примерно столько же или чуть дороже, а работают как правило быстрее и стабильнее, нежели ACDSee Pro.
И решают маркетологи – давайте все функции программы оставим как есть, а в программу добавим всяких новых рюшечек и фенечек, и пусть восьмерка в названии будет. Хорошо, говорит председатель, давайте заслушаем доклады, кто из маркетологов какое улучшение приготовил, да на примерах эти улучшения посмотрим. Садитесь поудобнее, и на экран смотрите. Сейчас кино будет.
Доклад 6. SeeDrive – онлайн доступ к изображениям
ACDSee SeeDrive – облачное хранилище фотографий с оплатой определённой суммы раз в год. Предлагается несколько тарифных планов, расценки см. на официальном сайте. Можно купить только программу ACDSee Pro 8, а тариф для облачного хранилища при желании докупить отдельно.
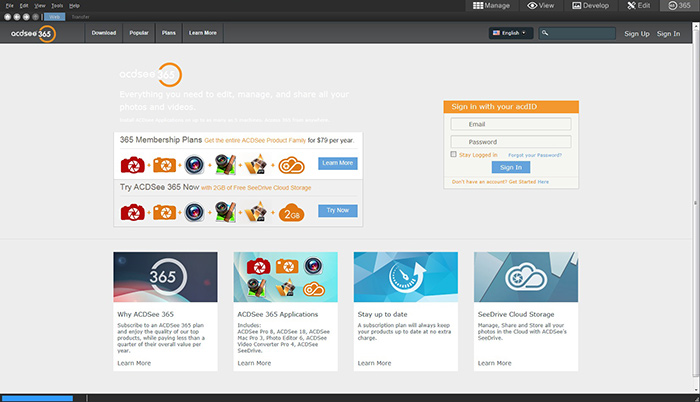
Полезно профессионалам? Нет. Если попытаться как-то организовать работу на основе этого облака, то возможно.
Полезно любителям? Нет. Начинающие скорее оценят интеграцию с Facebook (имеется), Flickr (имеется), Instagram, Вконтакте и прочими одноклассниками, где их друзья и коллеги и ждут появления новых фотографий. К тому же данная услуга стоит довольно дорого, платить надо раз в год.
Contents
- Getting Started – installing and setting up
- Layout and Features
- Importing and Viewing Images
- Editing your RAW Image
- Advanced editing with layers
- New Features in 2019 version
- General Comments
Подсказки
Добавление подсказок в метаданных ACDSee для автоматического перехода к следующему изображению, что позволяет организовать целые папки, не отрывая рук от клавиатуры.
Контраст определённых цветов
Можно отрегулировать контрастность в определенных тонах и задать точные диапазоны яркости, чтобы выявить контрастные детали в бликах или тенях.
Things to note:
1. The naming convention you use is important, so plan that out in advance.
2. If the face is not automatically detected, and you have to create it manually, the software will not further recognize it in Face Recognition. Also, note that if you use the Remove Faces or Redetect Faces command on an image, manual faces aren’t retained. The Rerun Face Detection option remembers them if you edit images.
3. Currently, there is no facility to import face recognition tags from other software (Picasa as an example). However, a search through the support forums has this listed on the ‘Potential Ideas for Future Updates’ list. It also appears to apply to the exporting of images from ACDSee as well, with the intention of retaining the face recognition tags.
4. There is no easy way to establish if there are currently any unnamed faces.
5. If the software has assigned the wrong name to someone, you can remove it with the Remove Faces function. This removes all face data from the selected image, not just the one wrong one.
6. To ensure a better success rate, you may need to manually select several images of one person so that the software can ‘learn’ that face with accuracy. You achieve better accuracy by naming as many faces in the (first) image as possible.
7. You can manually remove the names from incorrect selections and can rescan in ‘Manage’ mode via Tools | Redetect Faces. You need to correct the wrong name, rather than remove it, otherwise rescanning continues to return the wrong name over and over.
Расширенная панель настроек
Просмотрите настройки, сделанные для ваших изображений в режиме разработки, скопируйте эти настройки и вставьте их на другие изображения или восстановите изображение из режима управления или просмотра.
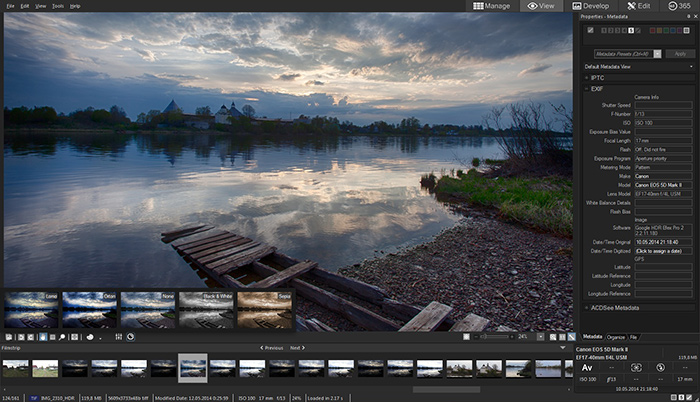
Доклад 2. PicaView – предварительный просмотр в проводнике
Стандартные средства MacOS давно и успешно позволяют именно так просматривать свойства всевозможных медиа-файлов: щелчок правой кнопкой мыши и далее Get Info. Работая на Mac, к этому мгновенно привыкаешь, и кажется, что любая операционка должна так делать, это по сути и есть её функция. А вот не совсем – штатный проводник Windows 7 в принципе может показать какую-то информацию об изображении, но не так красиво. ACDSee PicaView добавляет этот функционал и показывает EXIF красиво и компактно, в виде таблички. Спаведливости ради стоит отметить, что в MacOS не показывается информация EXIF вообще.
 | 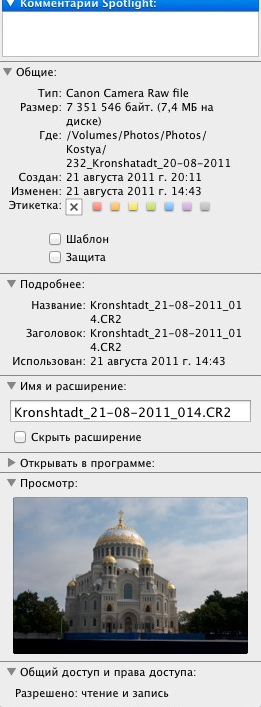 |
| Windows 7 | MacOS |
|---|
Полезно профессионалам? Да. Для быстрого поиска нужного изображения или видео, а также мгновенного просмотра фотосессии безусловно полезно.
Полезно любителям? Да. Разумеется, эта функция сделана для пользователей любого уровня, не понятно, почему никто этого не сделал раньше.
Расширенный режим Black & White
Улучшено редактирование в черно-белом режиме – можно увеличивать или уменьшать контрастность каждого отдельного цвета, а также указать диапазон яркости, на который будет направлена настройка контрастности. Можно использовать редактирующую кисть, чтобы нарисовать эти настройки на определенных частях изображения.
Кисть обработок
Кисть, которая способна повышать яркость, насыщенность, оттенок, яркость и контрастность, регулировать цветовые наложения или цветовую температуру, оттенки и тон в некоторых частях изображения, не затрагивая другие части. Можно применять обработки с использованием линейных и радиальных градиентов.
Импорт / экспорт действий
Поделитесь своими действиями (Actions) с другими пользователями, экспортируя их в удобные сжатые пакеты или получая действия, сделанные друзьями.
Что нового?
Предлагаю всем фотографам в комментариях ниже написать две строчки:
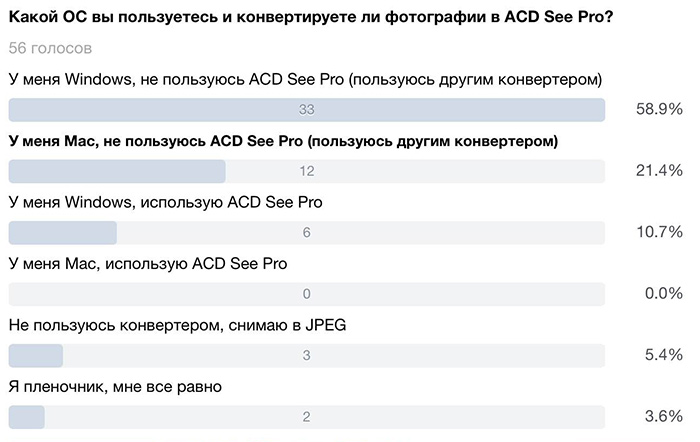
- Ваша операционная система (Win/Mac), кто работает под Linux, не пишите: обзор программ обработки фото для Linux не за горами, там и обсудим
- Работаете ли в ACDSee Pro (Да/Нет), имеется в виду серьёзная работа над реальными проектами
Доклад 7. История внесённых изменений
История изменений, которые внесены во вкладке Edit. Любая профессиональная программа должна отображать историю внесённых изменений, однако данный инструмент действует только во вкладке Edit, то есть работает с изменениями, которые будут применены деструктивно. Для профессиональной работы нужно такое же, только во вкладке Develop, чтобы можно было хоть через год вернуться к обработке того или иного RAW и увидеть полную историю внесённых год назад изменений и выборочно удалить или отключить одно из них.

В нашем случае дело обстоит так: сделал несколько обработок, посмотрел в палитре Hastory на их перечень, пощёлкал туда-сюда. Работает. Сохранил изображение. Тут же снова открыл его для редактирования во вкладке Edit – нет никакой истории. Стёрта вся история, канула в лету, изображение уже обработано и сохранено, и чтобы вернуться к первоначальному изображению, нужен оригинал.
Полезно профессионалам? Нет.
Полезно любителям? Да. Обрабатывая фотографию, можно смотреть как та или иная обработка воздействует на изображение. Вряд ли кто-то будет этим пользоваться, но как дополнительная фишка, функция в целом полезная.
Выделение на основе яркости
Создавайте выделение на основе яркости изображений. Чем ярче пиксель, тем сильнее будет выбор на этом пикселе.
New Features in 2019
Several new features have been included in the 2019 edition, but one key one is Face Recognition. A short video explains how to use it HERE.
Generally, I don’t shoot people/portraits but had a few tucked away to test. The Face Recognition functioned, however, it didn’t automatically find all the other images and assign them correctly. This may be because I have all my images on a NAS and not in the usual directory. If I clicked on each image individually, it did recognize the face and the person.
Доклад 11. Auto EQ – автоматическая обработка изображений
Этот инструмент расположен слева от пиктограммки Auto Lens View и при нажатии на его пиктограммку каким-то чудным образом обрабатывает фотографию. Далее инструмент ведёт себя еще более чудно, нежели Auto Lens View – примененная обработка не запоминается вообще никак. Как и где повторить такую обработку? Перешли к другому фото и вернулись обратно – всё слетает. Зачем такая функция, как ей пользоваться, не понятно. Почему это позиционируется как новая оригинальная фишка программы?

Полезно профессионалам? Нет.
Полезно любителям? Нет.
Update:
В группе Виртуальной фотовыставки PhotoWebExpo в социальной сети ВКонтакте был проведен опрос по теме данного обзора. На данный момент проголосовало 56 человек, что можно считать неплохой выборкой. Ниже приведу скриншот с результатами.
© Константин Биржаков, 23 октября 2014 г. Google+
По материалам официального сайта ACD Systems
Текст обзора защищен с помощью сервиса Яндекс. Оригинальные тексты: Текст от 23.10.2014, 23:27
В статье использованы фотографии автора
Любая перепечатка в любых СМИ только с письменного разрешения автора обзора.
Managing name data
You can edit/change/remove the name data you have stored, which comes in handy if you have to update the spelling on one. Maybe you forgot you already had a ‘Sebastian’ in there, and you need to change one of them.
1. In ‘Manage’ mode, select ‘Tools’ from the top menu option.
2. From the drop-down menu, select ‘Manage People.’
3. A ‘People Manager’ box opens up with all the names you have saved. You can edit each one as needed by selecting them and using the bottom buttons.
Импорт / экспорт пресетов
Теперь можно делиться с коллегами своими пресетами, а также импортировать пресеты коллег в свой рабочий процесс. Также пресеты легко редактировать.
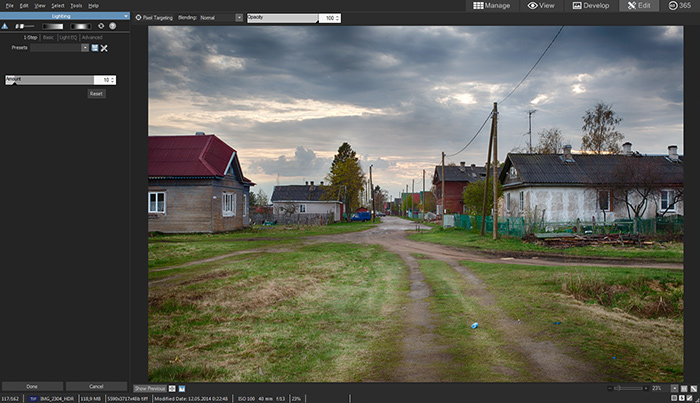
Доклад 3. 1-Step EQ – обработка в 1 клик
1-Step EQ – запатентованная технология LCE ACDSEE (освещение и контрастное улучшение) – обработка в 1 клик. Нужно открыть изображение во вкладке Edit, после чего найти инструмент Light, сверху будет новая функция 1-Step.
Полезно профессионалам? Нет. Деструктивная обработка.
Полезно любителям? Да. Обработка в один клик – мечта любого фотолюбителя.
5. Advanced Editing With Layers
Edit mode gives most of the expected features you would find in Photoshop and other programs that offer layer/mask functionality. The Filmstrip is visible (similar to Bridge), although you can turn it off to gain the screen real estate back.
Edit Mode open with all the default settings and panels visible
Edit mode offers quite a few extra or useful features. Adjustment layers for Color LUTs (a recent new feature brought into LR) is included in the 2019 version.
A new feature in the 2018 version was an Actions Menu—a range of preset creative edits you can apply with one click. The 2019 update to this allows you export and import actions as well.
Some of the actions have a really harsh effect like overdone HDR or similar, which was quite noticeable in the 2018 version. In the 2019 version they have toned down the effect in some of the actions, but not all of them. So it pays to pick and choose as it does depend on which action you choose as to what outcome you get. Also, it applies it directly to the image so you can’t do it as a layer and then blend in, unless you duplicate the base layer and blend back which has its own issues.
One of the features that did impress me in both the 2018 and 2019 versions was how good a job the Heal tool did in tidying up spots and other issues. On the above image, I have removed several spots and imperfections. On the right-hand side, the long black mark on the petal (near the small curved one), in the center of the flower, has been seamlessly removed.
An oddity also visible in the above image – in View mode I applied a LOMO preset and liked what it did, and further edited the image to mute the tones and lower the saturation. However, when you use the Navigator tool, as per above, it shows the original RAW file in its unedited state.
Finally, I drag some texture layers, (can be dragged from a second monitor into the Layer Palette), apply some blend modes, adjust the opacity, and soften areas with a mask to reach the final image.
2. Layout and Features
ACDSee has five main modes in separate tabs for each function—Manage, Photos, View, Develop, and Edit. There are some extra features but these are key ones used in general.
Summary of the features:
Manage mode has access to your computer, direction to find images where they are stored on the computer, and the default option is to view your images in thumbnail view (similar to Grid in LR). It shows EXIF data, histogram, and shot information for a particular image. You can colour code or rate images in Manage Mode.
Photos mode is similar to Manage. It allows a more comprehensive way of viewing image files on your hard drive, and you can drill down to specific day/month/year views.
View mode allows you to view a single image in full-screen mode (similar to a single image view in LR) and has some basic editing functions included.
Develop mode is where you edit your RAW image files (similar layout and functions to LR or ACR).
Edit mode is where you can do advanced editing with layers (similar to PS).
There is also the 365 tab, the ‘Dashboard’ tab, and the ‘Messages’ tab. 365 is where you have access to your subscription information if you opt for it. The Dashboard shows graphical data on image/camera information—if you want to know your most commonly used ISO setting, type, and the number of files, it is visible here.
Резюме по докладам
В прослушанных докладах за каждое «ДА» ставим 1 балл, за каждое «НЕТ» ставим 0. Всего докладов 11, таким образом максимум можно набрать 11 баллов. Итак:
- Профессионалы – 1 балл.
- Любители – 7 баллов.
Получаем нонсенс – треть улучшений в профессиональной программе ACDSee Pro 8 не нужны в принципе, а большинство из тех, которые полезны, ориентированы не на профессионалов, на любителей и домашних пользователей. Другими словами, профессионалам предлагается заплатить 60$ за обновление с версии 7 и получить взамен предпросмотр в проводнике… Да, друзья. Грустно всё это.
Доклад 10. Auto Lens View – еще одни фильтры
Auto Lens View – новая фишка вкладки View, причём довольно странная. При нажатии на кнопочку с пиктограммой линзы нам показывают на экране 4 обработки из галереи эффектов: Lomo, Orton, Black&White, Sepia. Однако эти фильтры служат только для просмотра, для примера, как будет выглядеть изображение, будучи обработанным данным фильтром во вкладке Edit.
Ведёт себя эта функция так – обработка отображается только во вкладке View, применить эту обработку к изображению никак невозможно, то есть если нажать Edit, изображение загрузится в первоначальном виде, вернувшись во View мы снова увидим обработку Auto Lens View. Как её теперь убрать? Снова нажать пактограммку Auto Lens View и выбрать обработку None.
Кто это придумал? Зачем? Почему это позиционируется как новая оригинальная фишка программы? Хорошо, допустим. А как мне поменять фильтры, которые я хочу видеть в Auto Lens View, например, я хочу видеть там не Black&White, а Wind? Никак.
Полезно профессионалам? Нет.
Полезно любителям? Нет. При более богатом функционале, когда можно было бы назначить инструменту свои любимые фильтры – функция потенциально интересная.
Доклад 8. Поддержка тачскринов
Программа позволяет листать фотографии как с помощью мышки, так и с помощью жестов, это работает на устройствах, которые совместимы с Windows Touch Gestures™.
Полезно профессионалам? Нет. Разве что быстро пролистать на ходу и что-то показать заказчику – удобнее ткнуть пальцем в экран ноутбука, чем целиться мышкой.
Полезно любителям? Да. Сидеть на диване и показывать друзьям фотографии, листая их пальцем, вполне современно и удобно, в духе планшетов и смартфонов.
Распознавание лиц на фото
Функция ACDSee Photo Studio Ultimate 2019 «Обнаружение лица и распознавание лица» найдет людей на ваших фотографиях, чтобы вы могли назвать людей для быстрого поиска. ACDSee сразу узнает, какие имена нужно нанести на лица.
Цветовые LUT
Можно окрашивать изображения, импортируя и применяя LUT как красочные фильтры режима редактирования.
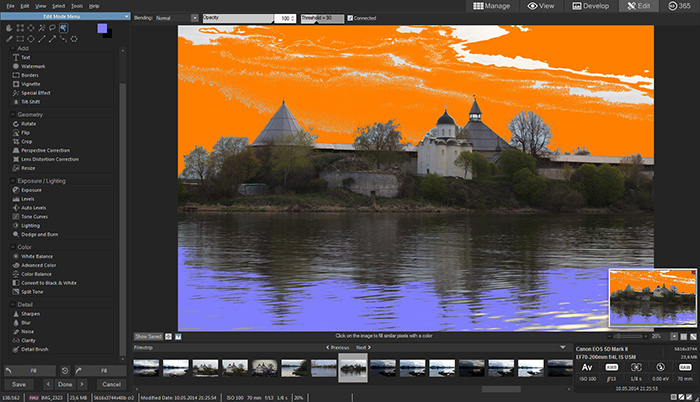
Доклад 5. Заливка цветом
Новая функция во вкладке Edit – заливка цветом. Суть данного инструмента такова: выбираем в палитре какой-либо цвет, после чего щелкаем в определенный участок изображения. Все участки изображения, окрашенные в подобный цвет, будет залиты выбранным цветом. Можно регулировать разброс по цветам, прозрачность и способ смещения с фотографией, наподобие смешения слоёв в Photoshop. В результате получаем нечто в духе авангардного искусства, только там искусство, а у нас больше мазня.
Полезно профессионалам? Нет. Во-первых, вряд ли можно представить себе ситуацию, когда подобный функционал применим для обработки профессиональных фотографий. Во-вторых, данная обработка деструктивна.
Полезно любителям? Да. Вероятно, кто-то в ходе экспериментов найдет применение данной функции.
Other Image Viewing Options
ACDSee has two other image viewing options included. Photos mode and View mode
Photos mode opens with a splash screen explaining what it does.
It offers another way to sort and view your image files and has some granular control. You can get it down to a specific day quite easily and just see the images shot on that day. Probably very helpful for wedding or event photographers.
Below is an example where it shows all the shooting days, with a blue bar that gives an idea of how many photos are stored under that day.
View mode is where you can see just a single image using the full screen size. You can zoom in to check the image quality using various zoom features. There is a floating Navigator panel you can activate and use that to ensure you are viewing the correct part of the image. Similar to the Navigator in LR/PS.
There are some very basic editing tools available here, but better functionality is had in Develop mode.
4. Editing RAW Files
RAW image editing is done in Develop mode and it is laid out very similarly to LR. By default, the Editing tool panel is on the left but it can be moved.
Image with Edit Tool Panel on the left
While not immediately obvious, the active slider is shown by the white section of the grey bar ending with the triangle cut out at the bottom. You move the light bar to the desired settings. Or type in a number or use the Up and Down arrows on the end.
There are 4 main tabs in the Tool Panel:
- Tune – The usual tools for editing a RAW file, exposure, etc. Very similar to LR
- Detail – Sharpening, Noise Reduction, and Skin Tuning
- Geometry – Lens Correction, Cropping, Perspective adjustments
- Repair – Heal/Clone and Red Eye adjustments
In Develop Mode with the Tune Panel open
In general, I found the sliders a bit fiddly to operate; it wasn’t smooth, but apparently, it is easier to incrementally adjust sliders with a mouse wheel. My perception of the program is that its application of the settings is quite harsh, so careful use of the sliders is necessary.
While you can activate a second screen in Develop mode, the only purpose is to maintain a view of the unedited image for comparison.
The Tune tab also has some spot editing features—Develop Brush, Linear Gradient Tool and Radial Gradient Tool—the equivalent of Adjustment Brush, ND Grad, and Radial Tool in LR.
Доклад 1. Выборочное редактирование – Pixel Targeting
Данная функция работает только вкладке Edit, то есть оказывает деструктивное действие на изображение. Чтобы воспользоваться этой функцией, нужно выбрать изображение, перейти во вкладку Edit, далее выбрать один из инструментов, с которым работает Pixel Targeting, например Advanced Color. Далее работаем так – двигая регуляторы, выбираем участки изображения, которые будут обработаны, мониторим маску в специальном окне Tagret Mask. После чего уже самим инструментом Color редактируем цвета на свой вкус. Все изменения тут же показываются на изображении. Возможно использовать кисточку, чтобы «рисовать обработками», закрашивая какие-либо участки изображения, а также градиент.
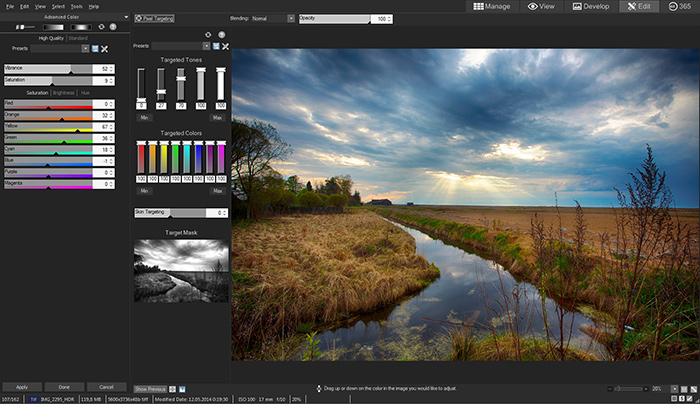
Полезно профессионалам? Нет. Этот инструмент работает только деструктивно. Для профессиональной обработки нужен такой же, но во вкладке Develop, то есть недеструктивный. Сама по себе идея выборочного редактирования, например оттенков цвета, очень и очень полезна.
Улучшения в версии 2019
- Улучшенное управление инструментов Кривые
- Добавлено раскрывающееся меню Process в режиме Manage
- Увеличено количество ячеек в таблице быстрых категорий и ключевых слов
- Удвоен диапазон экспозиции в режиме обработки
- Удвоен диапазон улучшения подсветки
- Улучшенный рабочий процесс кисти в режиме обработки
- Добавлен инструмент Smart Erase to Repair в режиме редактирования
- Добавлена дополнительная кисть в режиме обработки
- Вкладка «Параметры» в диалоговом окне «Печать»
- Добавлены параметры автосохранения в режиме редактирования
- Добавлена возможность изменения размера в процентах в пакетном экспорте
- Добавлена поддержка подчеркивания в качестве разделителя в диалоговом окне «Импорт»
- Добавлена возможность отмены / повтора отдельных слайдеров в режиме обработки
Доклад 9. Обновлённый набор фильтров обработки
Дополнительные фильтры во вкладке Edit, опять же деструктивная обработка. Раньше было много фильтров, теперь стало очень много.
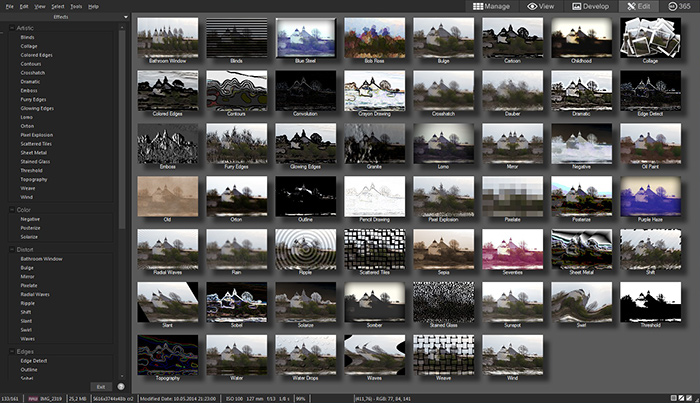
Полезно профессионалам? Нет.
Полезно любителям? Да. Многие любят всевозможные фильтры в духе инстаграма, и активно пользуются ими. Зачастую только ими, традиционные инструменты обработки наподобие кривых, уровней и прочих движков используются гораздо реже.
Conclusion
Face detection and recognition is a tool that can make life easier for a photographer with many images of people in their portfolio. The ability to assign a name to a person and have the computer run an algorithm to find all the other images is significantly faster than doing it manually.
To be able to search for images with a specific person (or range of people) becomes faster and more efficient as well.
Is it perfect? If I am honest, not 100% all of the time. However, it is easy to use, easy to manage and does a pretty good job for most requirements. It could be useful for many other things that they may implement into the next version.
Right now, it is an effective time saver for the home photographer with photos of family and friends, through to commercial photographers with wedding/event shoots filling up the portfolio.
The previous 2018 generation of ACDSee was the first version that bought a range of features all together in one space. Thus, giving you the capability to manage and view files, edit Raw files, do creative editing with layers, all in one piece of software.
Leading with this Face Detection and Recognition, the 2019 iteration builds on that initial foundation by bringing specific functionality to boost capabilities even further. Thus, making for a compelling consideration for anyone looking to purchase editing software, especially when it is available via one-off perpetual license purchase.
ACDSee automatically adds file information and thumbnails to the database as you browse. This process is called cataloging. Once the folder you are browsing has been cataloged, ACDSee begins the process of detecting faces in your images. As you open other folders, ACDSee will continue scanning for faces in the first folder, and will queue subsequent folders as you open them. ACDSee will continue scanning until Face Detection is complete on the folders you browsed.
You can also detect faces on an image by image basis in View mode. Face Detection will scan each image for faces as you open it.
After Face Detection has run on the folders you have browsed, you can open the images in View mode, where the faces will be outlined. You can assign names to the detected faces in View mode.
To Enable or Disable Face Detection:
Choose Tools | Options | Face Detection and toggle the Automatically detect faces in images checkbox.
Once you have assigned names to detected faces in View mode, you can use the People group of the Catalog pane to find photos based on the individuals in them. You can also search by name in the Quick Search bar and the Search pane. You can manage the names assigned to faces through Face Detection using the People Manager.
To Remove Face Detection and Recognition on Selected Images:
You can remove face detection and recognition data on images selected in Manage mode.
- In Manage mode, select one or more images.
- Choose Tools | Face Detection | Remove Faces.
These images will remain marked as having been scanned for faces, and Face Detection will not re-scan them, unless triggered by the Redetect Faces command, or enabling Rerun Face Detection and editing or developing the images and browsing them.
To Rerun Face Detection on Selected Images:
You can force Face Detection to re-scan selected images in Manage mode.
- In Manage mode, select one or more images.
- Choose Tools | Face Detection | Redetect Faces.
To Rerun Facial Recognition on Selected Images:
In order to correct names mistakenly assigned to faces by ACDSee, you can rerun facial recognition on faces you have not manually named within the selected image(s). This clears all names assigned by ACDSee's facial recognition, but leaves manually entered names. ACDSee will then attempt to recognize unnamed faces based on names you have entered manually.

ACDSee Photo Studio Ultimate 2019 – менеджер цифровых изображений и RAW-конвертер с поддержкой слоёв, отвечающий всем современным требованиям для занятия творческой графикой и фотографией. Это мощная программа всё-в-одном, имеющая графическое ускорение, позволяет быстрее и проще организовать свою коллекцию графичеких изображений, фото и видео. Теперь, благодаря распознаванию лиц, программа предлагает еще больше возможностей для недеструктивной обработки отдельных областей изображения, гибкого управления цветом и многое другое. Photo Studio Ultimate 2019 упрощает раскрытие творческого потенциала фотографа.
How it becomes useful
Once the software has recognized the face and you have assigned a name to it, it detects that face amongst all your other photos. While it works across any images currently stored on your computer, the data is saved and applied to any new images you import onto your computer.
Therefore, you should only have to tag the person once. ACDSee remembers their name and applies it to any future image with their face in it.
Now you might want to search for all the images with Heather.
1. In ‘Manage’ mode, select ‘Catalog’ on the left-hand panel. The panel is broken up into different sections. At the top is ‘Categories.’
2. The second panel down is ‘People.’ All the names you have applied to your images are listed. Click on any name, and it goes through the database to pull out all the images with that face present in them.
3. In ‘Manage’ mode, you can ‘Quick Search’ by typing the name in the Quick Search box.
Выводы
- Изменения в ACDSee Pro 8 мало полезны любителям и вообще не интересны профессионалам. Для какой цели обновляться с версии ACDSee Pro 7 – не понятно.
- Есть две программы – ACDSee Pro 8 и ACDSee 18. Почему бы наконец не сделать одну для профессиональных пользователей, другую для домашних? Эта политика – и вашим, и нашим – к восьмой версии ACDSee Pro уже не лезет ни в какие рамки.
- Для чего профессиональным пользователям такое количество автоматических обработок? Зачем им все эти креативные фильтры, автолинзы, облако, обработка в 1 клик, поддержка тачскринов? Интерфейс весь пестрый от ненужных кнопочек и фенечек, в то время как основные рабочие инструменты, подчеркиваю, РАБОЧИЕ, которые нужны для РАБОТЫ над фотографиями не обновляются с 6-й или 7-й версии?
- Снова, в который раз уже повторю, что профессиональная программа должна работать только недуструктивно, то есть наличие вкладки Edit, все инструменты в которой оказывают деструктивное, необратимое действие на фото, – недопустимо. Вкладку Edit – всю со всеми потрохами – нужно перенести в программу для домашних пользователей ACDSee 18.
- Чрезвычайно неудобно иметь две совершенно различные программы для Mac и для Windows, особенно тем, кто по каким-либо причинам работает и в той и другой операционке. Программа для Mac (ACDSee Mac Pro 3) имеет свою историю изменений, свой интерфейс, свои баги и глюки, и живет своей жизнью, а стоит при этом немалых денег. Программа для Windows, кстати, тоже стоит отнюдь не три копейки, а ровненько 200$.
- Чтобы окончательно пояснить свою мысль, снова, как и в завершении обзора ACDSee Pro 7, приведу примерные цены на программы конкурентов:
- Abobe Lightroom 5.6 – около 160$
- DxO Optics Pro 9 – 150$ за стандарт и 300$ за расширенную версию
- Capture One Pro 8 – 290$

Несколько ссылок на мои статьи по теме
Копирование/вставка масок
Скопируйте цветные изображения и вставьте их как маски яркости на другие слои, включая корректирующие слои.
3. Importing and Viewing Images
Importing is not required with ACDSee. The software will read folders directly off your computer, displaying and respecting its existing folder structure, just like Explorer. However, users can import off of external sources if they wish to achieve other organizational goals at the same time, such as culling, tagging, renaming, etc.
Once imported, you will then want to view them, cull, tag, and select the best ones for editing.
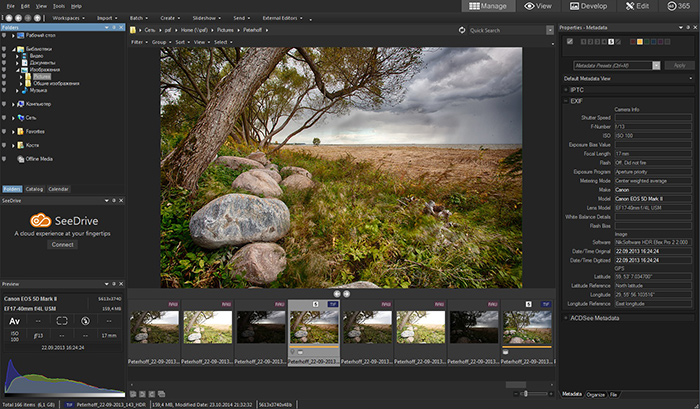
I have all my images stored on a NAS and it found those with no issues. Above is the Manage page showing the hard drive directory structure and images in thumbnail grid view.
You can rate your images either using numbers or color tags. In the above image, it has picked up the color rating I gave one image in LR. If you select the Catalog tab on the left-hand menu, you can further refine your search parameters with selecting a specific rating or color tag. In the below example it has used the Red color tag to select images to view.
Also visible in the above image is the histogram (color graph below left) with camera settings above it for the selected image. The fine print at the bottom of the window has the name, file format, date/time taken, and file size information.
The full Manage mode window above, with directory tree/histogram/camera data on the left-hand menu, and EXIF data for the selected image on the right-hand pane, and all the images on display.
1. Install and Setup
Setup and installation are fairly standard as per most software. ACDSee does require you to set up an account as part of the install process (it’s mandatory and cancels the install if you try to opt out), which then requires an extra registration step with an email confirmation. However, once sorted, no further registration is required. If you have registered before, you can use the previous login details.
It does allow you to choose which drive/directory/folder you want to install it into, as well as if you want to use a non-standard install path. As per the splash page below that opens on Startup—you can auto select the folder to open when the software starts.
Also new is the next screen, which helpfully shows you what the key functions and features are, and where to find them. Both of these can be turned off if desired. You can click on any of the words on the left panel and it will take you to the appropriate screen. Or click through on the NEXT button. Or close it.
Once you have navigated the splash pages, you will be taken to the Manage mode screen.
Поддержка файлов HEIF
Декодируйте файлы формата HEIF и файлы последовательностей изображений в ACDSee Photo Studio.
General Comments
There are some things I find odd about how the program functions; three different ways to view the image can be a bit confusing. The second monitor view in Develop mode that only holds a copy of the unedited file for a comparison seems like a major waste of screen real estate.
While many new features were included in the 2018 version, the ones assessed in this review of the latest version have been further enhanced and improved – I am guessing in response to user feedback.
This 2019 version adds a lot of nice new mature touches, and helpful splash screens to introduce you to different features. More accessible help options is a vast improvement: there are links in the Help menu to a Support Community, a Facebook page, and a Twitter account.
Any new software program takes a bit of getting used to, but once you understand it, ADCSee Photo Studio Ultimate 2019 offers any beginner (and more experienced users) a compelling package. It has all the features you need for image management, RAW editing, and more advanced editing in one place, with the advantage of a ‘pay once and it’s yours’ option instead of a subscription. Although a subscription option is available if desired.
At $149 USD for the single purchase perpetual license, you get a LOT of capability all wrapped up in one software program.
Are you a person who takes lots of photos of people? Perhaps you shoot weddings or events? Family portraits? Maybe you like to capture images of family and friends? Eventually, you end up with many images. Some are easy to sort through when they have only one person in them.
However, what about group photos? How do you tag/catalog/sort through those? Do you have to list out everyone’s name in the meta tags manually?
What if you don’t know all the names immediately? What if you find out later that Heather is actually Helen and you have to go back and change it?
Finally, how can you find all the images with a specific person quickly and easily?
Luckily, ACDSee Photo Studio Ultimate 2019 makes this task easy with the new Face Detection and Recognition capabilities.
How to set up Face Detection and Recognition
1. Open the program and in ‘Manage’ mode, navigate to the desired folder where you have stored your images.
2. Click on an image of the person you want to name and click on ‘View’ to open in View mode.
3. Face Detection identifies the person by outlining their face.
4. If this outline box is not present, click on the ‘Show Face Outlines’ button (or Shift + B).
5. Once the face is selected, we need to apply the name. Click on the ‘Face’ Tool (or Shift + F) and a dark grey text bar pops up under the outline.
6. Click in the text bar and type the name of the person and press ‘Enter.’
7. If you select any other image with that person and open it in ‘View mode,’ it should automatically select their face and apply the name.
A key point regarding the naming structure you use is to put some thought into what naming convention you use and then keep it consistent. For example, something along the lines of: first name (space) last name or first name_last name. Doing so makes a difference later if you are using search parameters to find people.
What happens if you have more than one Joe Smith? What if you start off using only first names and then you have 3 x David, 4 x Michael, 2 x Louise all in the same wedding party? Being as specific as possible when naming addresses this issue.
Настраиваемые сочетания клавиш
Можно настроить горячие клавиши, доступные для каждого этапа рабочего процесса.
Читайте также: