
3ds max tiles map настройки

By:
Using the Tiles procedural map, you can create brick or stacked tiling of colors or maps. A number of commonly defined architectural brick patterns are available, or you can design custom patterns.

Tiles used for the walls of a house
With the Tiles map, you can:
- Assign many of the maps available through the Material Editor.
- Load textures and use colors in the pattern.
- Control the number of tiles in columns and rows.
- Control the size of the grout gap and its roughness.
- Apply random variance in the pattern.
- Control the stacking layout by shifting how the tiles line up.
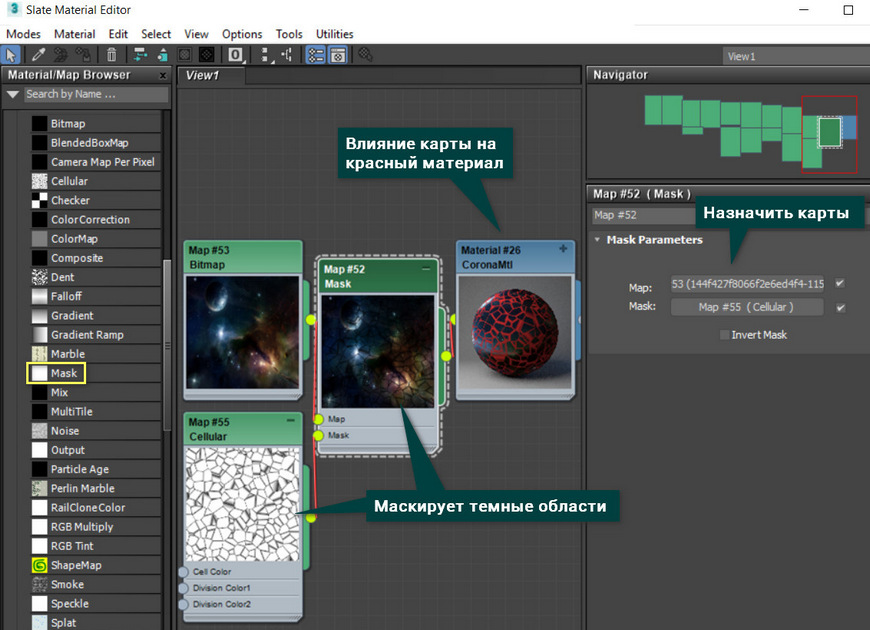
6. Mask
Блокирует наложение цвета по текстуре. Белый цвет маскирующей карты Mask пропускает цвет, а черный обрезает. При наложении на материал маскированная область будет пропускать Diffuse Color материала. С помощью Mask легко создается текстура разбитой поверхности или витража. Также можно смешать маскированную карту с какой-либо другой, используя Mix.
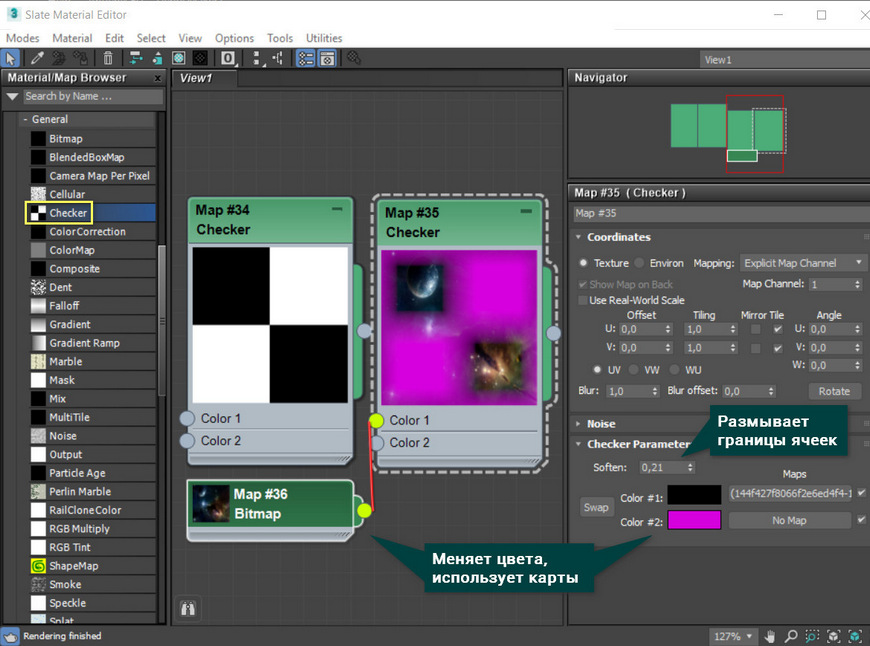
3. Checker
Клетчатая карта Checker постоянно используется при создании развертки. Она помогает контролировать ее правильность, положение, разделение и прочее. Также эта карта хорошо подходит для создания текстуры плитки с двумя разными изображениями.
Procedures
Example: To create a brick wall:

- Create a wall using a Box primitive, or use an existing surface in one of your scenes.
- On the Material Editor toolbar, click (Assign Material To Selection) to apply a Standard material to the wall.
- Open the Maps rollout. Click the Map button for Diffuse to display the Material/Map Browser.
- In the map list, select Tiles, then click OK.
Alternatively, use the Slate Material Editor to wire a Tiles map to the Diffuse Color component.
Now the Tiles map is assigned to the material.
Example: To match the tiles on the top and side of a wall:
- Select a wall object whose material uses a Tiles map.
- On the Modify panel, apply an Edit Mesh modifier to the object.
- Go to the Face sub-object level.
- Select the top face of the wall.
- Open the Material Editor. If you are using the Compact Material Editor, drag the wall’s tile material to an unused sample slot to duplicate it. If you are using the Slate Material Editor, select the material node, choose Select Select Children (+ C ), then +drag the material node to make a copy of the material and its maps.
- View the parameters for the copied Tiles map. In the Advanced Controls rollout Tiles Setup group, adjust the horizontal and vertical count of the new material to match the side of the wall.
- Apply the new tile material to the selected faces on the top of the wall.
- In the Stacking Layout group, align the tiles by using the Line Shift option.
Procedures
Example: To create a brick wall:

- Create a wall using a Box primitive, or use an existing surface in one of your scenes.
- On the Material Editor toolbar, click (Assign Material To Selection) to apply a Standard material to the wall.
- Open the Maps rollout. Click the Map button for Diffuse to display the Material/Map Browser.
- In the map list, select Tiles, then click OK.
Alternatively, use the Slate Material Editor to wire a Tiles map to the Diffuse Color component.
Now the Tiles map is assigned to the material.
Example: To match the tiles on the top and side of a wall:
- Select a wall object whose material uses a Tiles map.
- On the Modify panel, apply an Edit Mesh modifier to the object.
- Go to the Face sub-object level.
- Select the top face of the wall.
- Open the Material Editor. If you are using the Compact Material Editor, drag the wall’s tile material to an unused sample slot to duplicate it. If you are using the Slate Material Editor, select the material node, choose Select Select Children ( Ctrl+C ), then Shift +drag the material node to make a copy of the material and its maps.
- View the parameters for the copied Tiles map. In the Advanced Controls rollout Tiles Setup group, adjust the horizontal and vertical count of the new material to match the side of the wall.
- Apply the new tile material to the selected faces on the top of the wall.
- In the Stacking Layout group, align the tiles by using the Line Shift option.
Interface
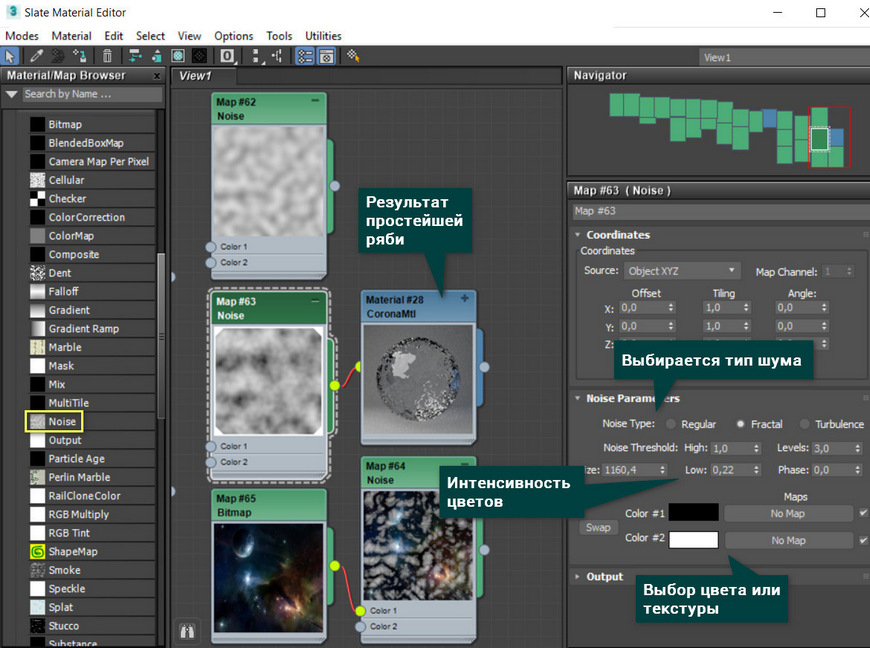
8. Noise
Noise создает шум или подобие загрязнения. С ее помощью легко создать на материале потертости, наложив в раздел Reflection Glossiness. Создает эффект грязного стекла, если наложить на Refraction Glossiness. Если наложить на Bump прозрачного материала, то получится рябь на воде.
Advanced Controls rollout

Show Texture Swatches When on, the Texture swatch for Tiles or Grout updates to show the map you assign. Default=on.
Tiles Setup group
Texture Controls the display of the current texture map for the tiles. When on, the texture is used as the tile pattern instead of the color swatch. When turned off, the color of the tiles is displayed; clicking the color swatch displays the Color Selector. [Texture button] Acts as a target where you drag and drop maps for the tiles. When you click this button with a map assigned, 3ds Max displays the rollout for the map. Before a map is assigned, the label reads "None."
The checkbox controls whether the map is used or not.
Horiz. Count Controls the number of tiles in a row. Vert. Count Controls the number of tiles in a column. Color Variance The greater this value, the greater the color varies among individual tiles. Range: 0.0 to 100.0. Default = 0.0.

Left: Color Variance = 0.0
Right: Color Variance = 1.0
Fade Variance The greater this value, the greater the color of individual tiles is "faded" or desaturated. Range: 0.0 to 100.0. Default = 0.05.

Left: Fade Variance = 0.05
Right: Fade Variance = 1.0
Grout Setup group
Texture Controls the display of the current texture map for the grout. When on, the texture is used as the grout pattern instead of the color swatch. When off, the color of the grout is displayed, and clicking the color swatch displays the Color Selector. [Texture button] Acts as a target where you drag and drop maps for the grout. When you click this button with a map assigned, 3ds Max displays the rollout for the map. Before a map is assigned, the label reads "None."
The checkbox controls whether the map is used or not.
Horizontal Gap Controls the horizontal size of the grout between the tiles. This value is locked by default to the vertical gap, so that both values change as you edit one or the other. To unlock them, click the lock icon.


Vertical Gap Controls the vertical size of the grout between the tiles. This value is locked by default to the horizontal gap, so that both values change as you edit one or the other. To unlock them, click the lock icon. % Holes Sets the percentage of holes in the tiled surface caused by missing tiles. The grout shows through the holes. Rough Controls the roughness of the edges of the grout.
Miscellaneous group
Random Seed Randomly applies patterns of color variation to the tiles. Does not require any other setting to generate completely different patterns. Swap Texture Entries Swaps the texture maps or colors between the tiles and the grout.
Stacking Layout group
Note: This group of controls is active only when Custom Tiles is selected in Standard Controls rollout Pattern Setup Preset Type.
Line Shift Shifts every second row of tiles a distance of one unit. Random Shift Randomly shifts all rows of tiles a distance of one unit.
Row and Column Editing group
Note: This group of controls is enabled only when Custom Tiles is selected in Standard Controls rollout Pattern Setup Preset Type.
- Per Row Specifies which rows to change. When Per Row equals 0, no rows change. When Per Row equals 1, every row changes. When Per Row is a value greater than 1, the change appears every N rows: A value of 2 changes every second row, a value of three changes every third row, and so on. Default=2.
- Change Changes the width of tiles in the affected rows. A value of 1.0 is the default tile width. Values greater than 1.0 increase the width of tiles, and values less than 1.0 decrease it. Range=0.0 to 5.0. Default=1.0.
A value of 0.0 is a special case: When the Change value is 0.0, no tiles appears in that row, and the underlying material shows through.
A value of 0.0 is a special case: When the Change value is 0.0, no tile appears in that column, and the underlying material shows through.
By:
Applies colors or maps as tiles on a material.
Using the Tiles procedural map, you can create brick or stacked tiling of colors or maps. A number of commonly defined architectural brick patterns are available, or you can design custom patterns.

Tiles used for the walls of a house
With the Tiles map, you can:
- Assign many of the maps available through the Material Editor.
- Load textures and use colors in the pattern.
- Control the number of tiles in columns and rows.
- Control the size of the grout gap and its roughness.
- Apply random variance in the pattern.
- Control the stacking layout by shifting how the tiles line up.
Interface
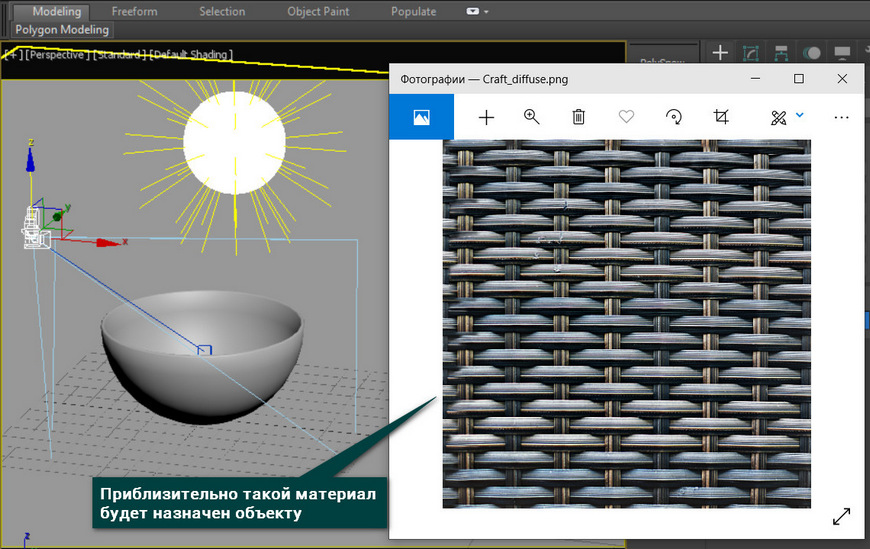
1. Создание материала
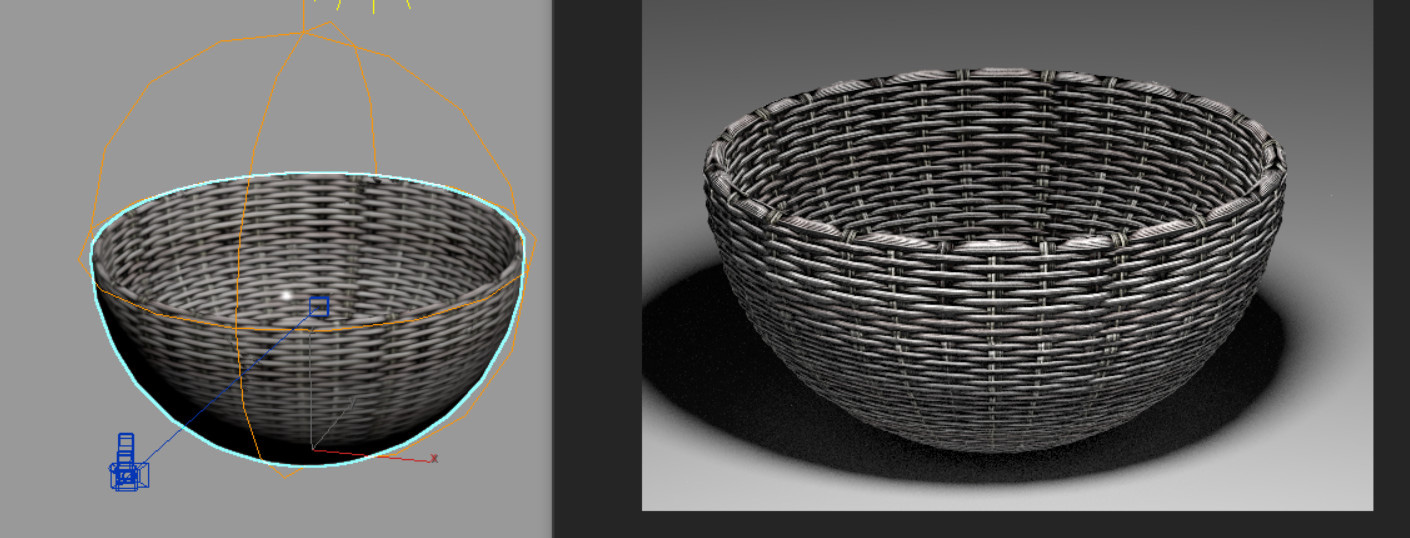
Прежде всего необходимо создать объект, на который будет применен материал с текстурами. Также сразу стоит создать пол и источник света для рендеринга. Для тестовой сцены в качестве пола используется Plane, а в качестве света CoronaLight. Объектом будет полусфера, на которую будет накладываться материал плетенной корзины. Для удобства можно также поставить Standard Camera.
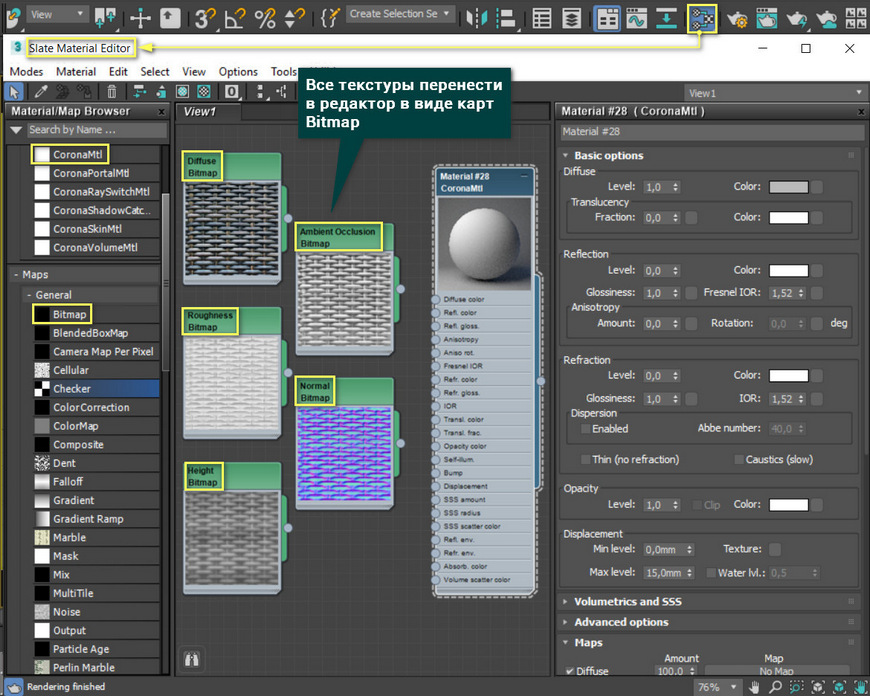
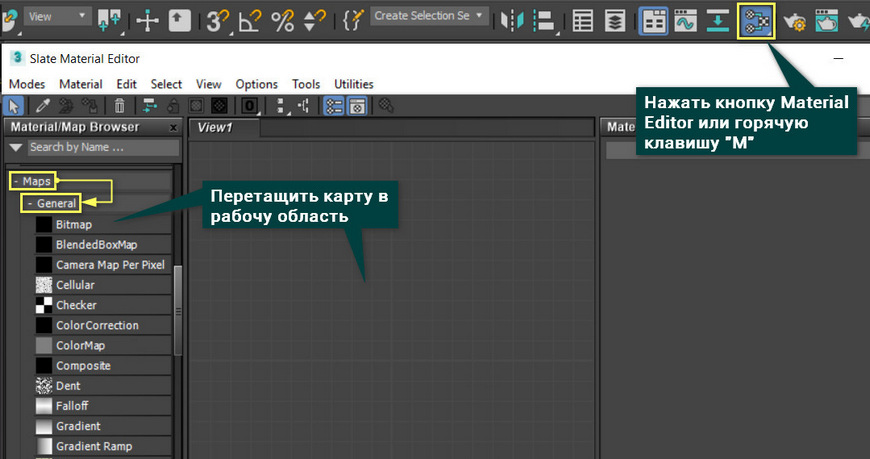
Перейдите в Material Editor, нажав клавишу «M» или кнопку на панели Main Toolbar, и создайте материал CoronaMtl. Добавьте все карты в рабочую область перетаскиванием картинок или создавая карту Maps – General – Bitmap.
Скачивая карты из Сети, они часто именуются по свойствам, за которые отвечают. В данной статье применялись карты: Diffuse, Ambient Occlusion (AO), Roughness, Normal и Height. В других материалах можно встретиться с названиями: Base color, Metallic, Glossiness, Specular.
Diffuse = Base color, Roughness = Glossiness, Metallic = Specular.
Названия это только ориентиры. Помните, что автор мог ошибиться и неправильно назвать карту.
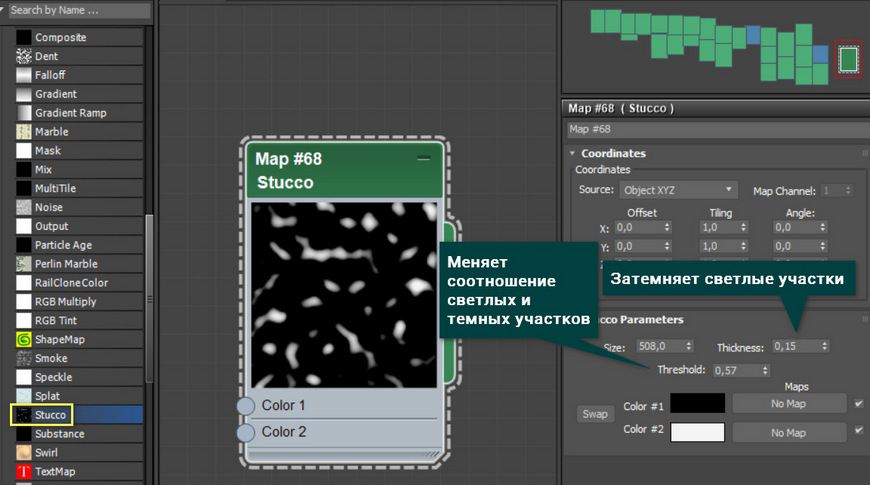
9. Stucco
Карта Stucco очень похожа на Noise, но более контрастная. Применив на Bump, легко получается рельеф штукатурки. Как и Cellular, эта карта дает интересные эффекты с модификатором Displace. Также карту удобно использовать для имитации загрязнения, как и Noise.
Standard Controls rollout
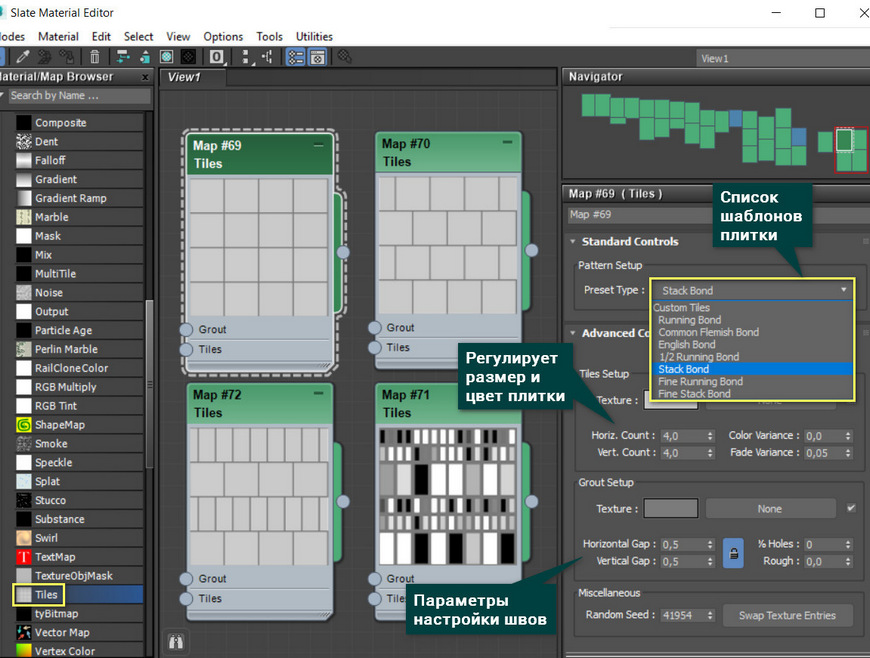
Lists the commonly defined architectural tile bonds, or patterns, plus a custom pattern, which you design by selecting options under the Advanced Controls and Stacking Layout rollouts. The following illustrations show some of the different bonds:


Interface
Advanced Controls rollout

Show Texture Swatches When on, the Texture swatch for Tiles or Grout updates to show the map you assign. Default=on.
Tiles Setup group
Texture Controls the display of the current texture map for the tiles. When on, the texture is used as the tile pattern instead of the color swatch. When turned off, the color of the tiles is displayed; clicking the color swatch displays the Color Selector. [Texture button] Acts as a target where you drag and drop maps for the tiles. When you click this button with a map assigned, 3ds Max displays the rollout for the map. Before a map is assigned, the label reads "None."
The checkbox controls whether the map is used or not.
Horiz. Count Controls the number of tiles in a row. Vert. Count Controls the number of tiles in a column. Color Variance The greater this value, the greater the color varies among individual tiles. Range: 0.0 to 100.0. Default = 0.0.

Left: Color Variance = 0.0
Right: Color Variance = 1.0
Fade Variance The greater this value, the greater the color of individual tiles is "faded" or desaturated. Range: 0.0 to 100.0. Default = 0.05.

Left: Fade Variance = 0.05
Right: Fade Variance = 1.0
Grout Setup group
Texture Controls the display of the current texture map for the grout. When on, the texture is used as the grout pattern instead of the color swatch. When off, the color of the grout is displayed, and clicking the color swatch displays the Color Selector. [Texture button] Acts as a target where you drag and drop maps for the grout. When you click this button with a map assigned, 3ds Max displays the rollout for the map. Before a map is assigned, the label reads "None."
The checkbox controls whether the map is used or not.
Horizontal Gap Controls the horizontal size of the grout between the tiles. This value is locked by default to the vertical gap, so that both values change as you edit one or the other. To unlock them, click the lock icon.


Vertical Gap Controls the vertical size of the grout between the tiles. This value is locked by default to the horizontal gap, so that both values change as you edit one or the other. To unlock them, click the lock icon. % Holes Sets the percentage of holes in the tiled surface caused by missing tiles. The grout shows through the holes. Rough Controls the roughness of the edges of the grout.
Miscellaneous group
Random Seed Randomly applies patterns of color variation to the tiles. Does not require any other setting to generate completely different patterns. Swap Texture Entries Swaps the texture maps or colors between the tiles and the grout.
Stacking Layout group
Note: This group of controls is active only when Custom Tiles is selected in Standard Controls rollout Pattern Setup Preset Type.
Line Shift Shifts every second row of tiles a distance of one unit. Random Shift Randomly shifts all rows of tiles a distance of one unit.
Row and Column Editing group
Note: This group of controls is enabled only when Custom Tiles is selected in Standard Controls rollout Pattern Setup Preset Type.
- Per Row Specifies which rows to change. When Per Row equals 0, no rows change. When Per Row equals 1, every row changes. When Per Row is a value greater than 1, the change appears every N rows: A value of 2 changes every second row, a value of three changes every third row, and so on. Default=2.
- Change Changes the width of tiles in the affected rows. A value of 1.0 is the default tile width. Values greater than 1.0 increase the width of tiles, and values less than 1.0 decrease it. Range=0.0 to 5.0. Default=1.0.
A value of 0.0 is a special case: When the Change value is 0.0, no tiles appears in that row, and the underlying material shows through.
A value of 0.0 is a special case: When the Change value is 0.0, no tile appears in that column, and the underlying material shows through.

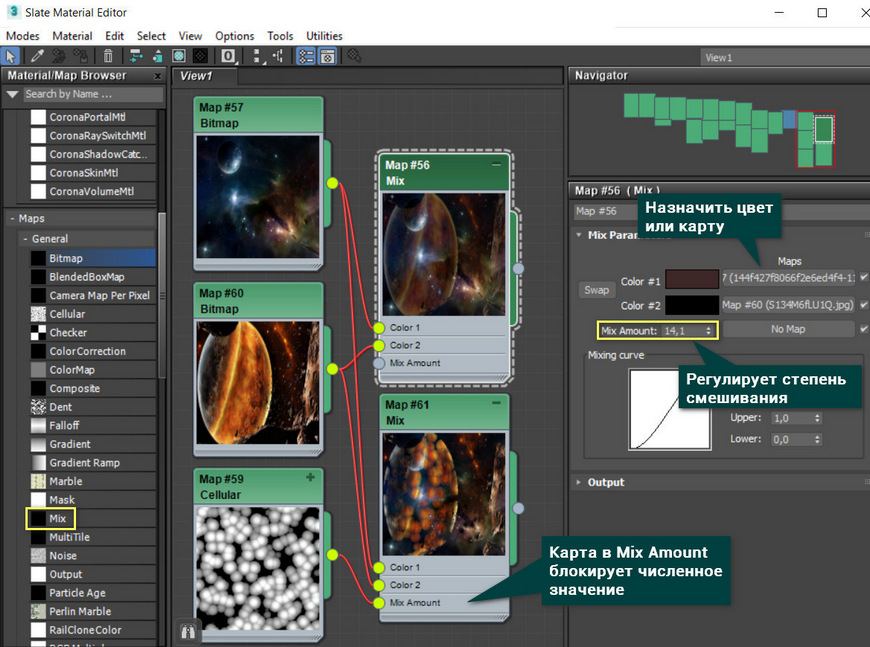
7. Mix
Карта Mix смешивает два изображения за счет регулировки прозрачности. Так же можно задать текстуру, по которой будет происходить смешивание. Прозрачность по текстуре зависит от цвета: чем ближе к белому, тем прозрачнее.
Advanced Controls rollout

Show Texture Swatches When on, the Texture swatch for Tiles or Grout updates to show the map you assign. Default=on.
Tiles Setup group
Texture Controls the display of the current texture map for the tiles. When on, the texture is used as the tile pattern instead of the color swatch. When turned off, the color of the tiles is displayed; clicking the color swatch displays the Color Selector. [Texture button] Acts as a target where you drag and drop maps for the tiles. When you click this button with a map assigned, 3ds Max displays the rollout for the map. Before a map is assigned, the label reads "None."
The checkbox controls whether the map is used or not.
Horiz. Count Controls the number of tiles in a row. Vert. Count Controls the number of tiles in a column. Color Variance The greater this value, the greater the color varies among individual tiles. Range: 0.0 to 100.0. Default = 0.0.

Left: Color Variance = 0.0
Right: Color Variance = 1.0
Fade Variance The greater this value, the greater the color of individual tiles is "faded" or desaturated. Range: 0.0 to 100.0. Default = 0.05.

Left: Fade Variance = 0.05
Right: Fade Variance = 1.0
Grout Setup group
Texture Controls the display of the current texture map for the grout. When on, the texture is used as the grout pattern instead of the color swatch. When off, the color of the grout is displayed, and clicking the color swatch displays the Color Selector. [Texture button] Acts as a target where you drag and drop maps for the grout. When you click this button with a map assigned, 3ds Max displays the rollout for the map. Before a map is assigned, the label reads "None."
The checkbox controls whether the map is used or not.
Horizontal Gap Controls the horizontal size of the grout between the tiles. This value is locked by default to the vertical gap, so that both values change as you edit one or the other. To unlock them, click the lock icon.


Vertical Gap Controls the vertical size of the grout between the tiles. This value is locked by default to the horizontal gap, so that both values change as you edit one or the other. To unlock them, click the lock icon. % Holes Sets the percentage of holes in the tiled surface caused by missing tiles. The grout shows through the holes. Rough Controls the roughness of the edges of the grout.
Miscellaneous group
Random Seed Randomly applies patterns of color variation to the tiles. Does not require any other setting to generate completely different patterns. Swap Texture Entries Swaps the texture maps or colors between the tiles and the grout.
Stacking Layout group
Note: This group of controls is active only when Custom Tiles is selected in Standard Controls rollout Pattern Setup Preset Type.
Line Shift Shifts every second row of tiles a distance of one unit. Random Shift Randomly shifts all rows of tiles a distance of one unit.
Row and Column Editing group
Note: This group of controls is enabled only when Custom Tiles is selected in Standard Controls rollout Pattern Setup Preset Type.
- Per Row Specifies which rows to change. When Per Row equals 0, no rows change. When Per Row equals 1, every row changes. When Per Row is a value greater than 1, the change appears every N rows: A value of 2 changes every second row, a value of three changes every third row, and so on. Default=2.
- Change Changes the width of tiles in the affected rows. A value of 1.0 is the default tile width. Values greater than 1.0 increase the width of tiles, and values less than 1.0 decrease it. Range=0.0 to 5.0. Default=1.0.
A value of 0.0 is a special case: When the Change value is 0.0, no tiles appears in that row, and the underlying material shows through.
A value of 0.0 is a special case: When the Change value is 0.0, no tile appears in that column, and the underlying material shows through.
By:
Using the Tiles procedural map, you can create brick or stacked tiling of colors or maps. A number of commonly defined architectural brick patterns are available, or you can design custom patterns.

Tiles used for the walls of a house
With the Tiles map, you can:
- Assign many of the maps available through the Material Editor.
- Load textures and use colors in the pattern.
- Control the number of tiles in columns and rows.
- Control the size of the grout gap and its roughness.
- Apply random variance in the pattern.
- Control the stacking layout by shifting how the tiles line up.
10. Tiles
Карта имитации плитки. Ее особенность в наличии списка интересных, необычных шаблонов плитки. Карта имеет продвинутые настройки, регулирующие цвет, цветовое смещение, швы и прочее. Tiles можно успешно использовать практически для всех свойств материала.
Пользуясь этими процедурными картами, можно быстро создать простейшие материалы. Но перечень их использования скорее ограничен вашим воображением и уровнем знаний инструментов. Не бойтесь экспериментировать и искать новые способы применения процедурных карты в 3ds Max.
С помощью наложения текстур можно легко и быстро создавать высококачественные материалы. Для этого можно использовать практически любые 2D изображения. Их можно создавать самому в графических редакторах или искать в Сети. Ниже мы разберем, как задавать свойства материала CoronaMtl с помощью текстур и различные способы настройки.
3. Настройка размера и UVW Map
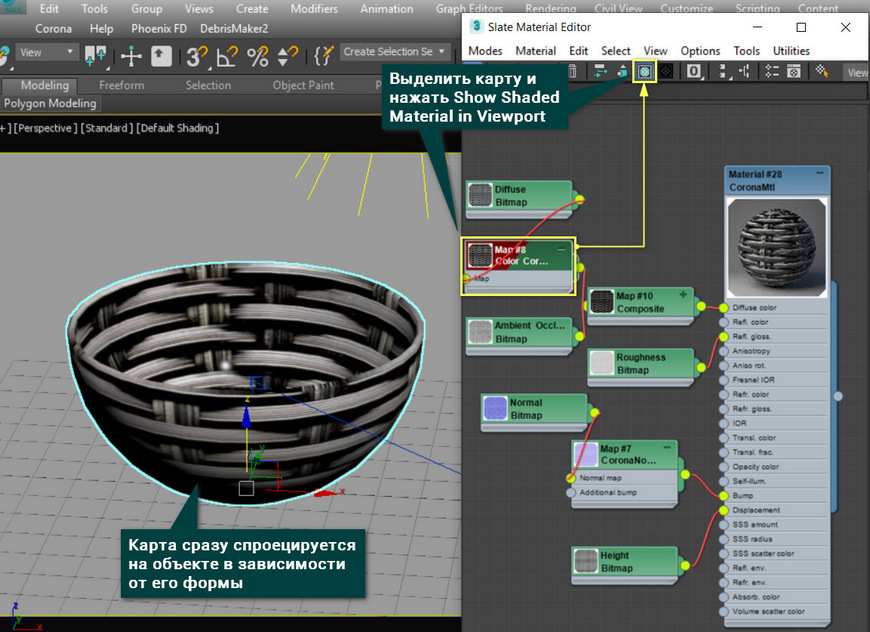
Создав материал, можно переходить к его настройке. Для начала стоит отобразить материал на объекте, чтобы видеть его наличие и положение. Отображается только цвет материала, а точнее любая из назначенных карт. Поэтому в данном случае мы выделяем карту Color Correction и отображаем ее кнопкой Show Shaded Material in Viewport.
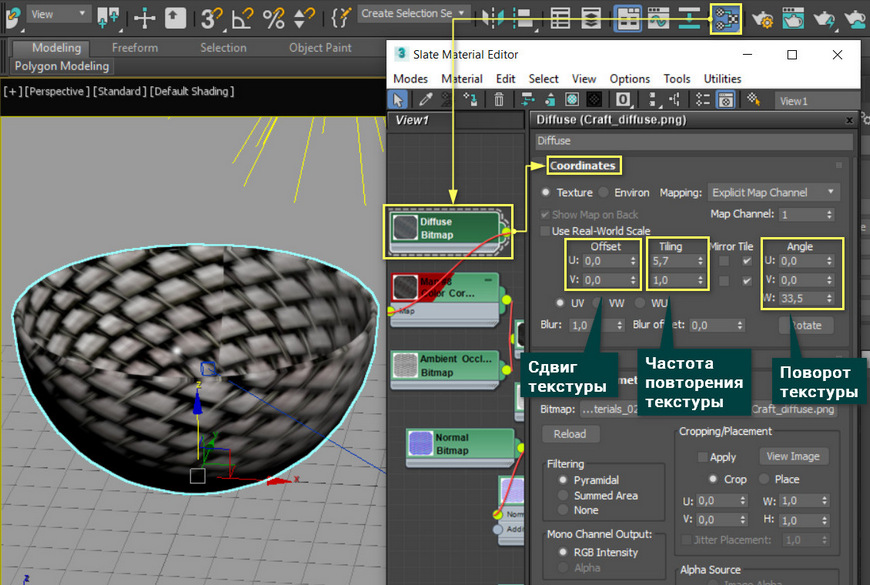
Теперь можно видеть, что текстура слишком крупная и ее следует уменьшить. Сделать это можно в настройках карт Bitmap, которые были загружены из памяти компьютера. Перейдя в Material Editor – Bitmap (Diffuse) – Coordinates, вы сможете настраивать положение текстуры и повторение. Offset смещает положение текстуры по оси U (вправо/влево) и V (вверх/вниз). Tiling увеличивает количество повторений текстуры по тем же осям. Angle поворачивает текстуру по осям U, V и W (по диагонали).
У такого метода настройки есть большой недостаток – каждую карту Bitmap придется настраивать отдельно. Если какую-то пропустить, то финальный вид материала может испортиться. Для того, чтобы изменять все используемые карты одновременно, воспользуйтесь модификатором UVW Map.
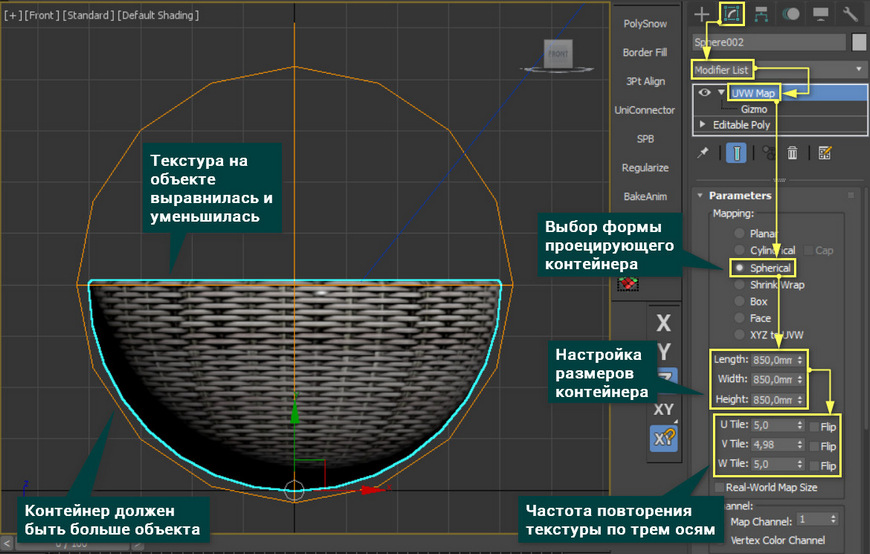
Примените модификатор к объекту, перейдя в Modify – Modifier List – UVW Map. В разделе Parameters – Mapping выберете наиболее подходящую форму для вашего объекта. В данном случае – Spherical.
Значениями Length, Width и Height настраивается размер проецирующего контейнера. Рекомендуется, чтобы все его края находились снаружи объекта.
С помощью параметров U/V/W Tile можно настроить повторения всех карта. Благодаря увеличению этих значений, текстура уменьшится.
На этом настройка материала и объекта закончена. Можно запускать рендер и использовать объект в сцене. Все настройки уникальны для каждого отдельного материала и текстуры. Поэтому, чтобы хорошо настроить материал, нужно потратить много времени на подбор параметров. Описанный метод подойдет для большинства материалов. Однако, для очень сложных моделей есть более продвинутые инструменты текстурирования. К таким относятся «запекание» и создание развертки Unwrap UVW.
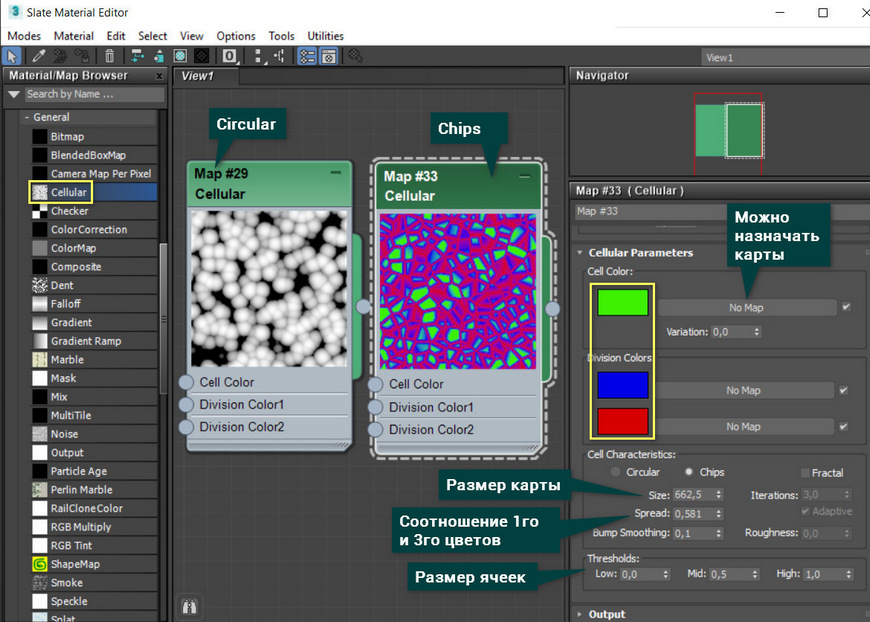
2. Cellular
Карта Cellular имитирует текстуру чего-то ячеистого: кожа, пенопласт. Эта карта чаще всего используется в разделах Bump и Displacement материала. С этой картой можно создавать интересные природные рельефы и ландшафты, применяя модификатор Displace. Состоит из 3х цветов, которые можно менять с помощью палитры или других карт.
Standard Controls rollout
Lists the commonly defined architectural tile bonds, or patterns, plus a custom pattern, which you design by selecting options under the Advanced Controls and Stacking Layout rollouts. The following illustrations show some of the different bonds:


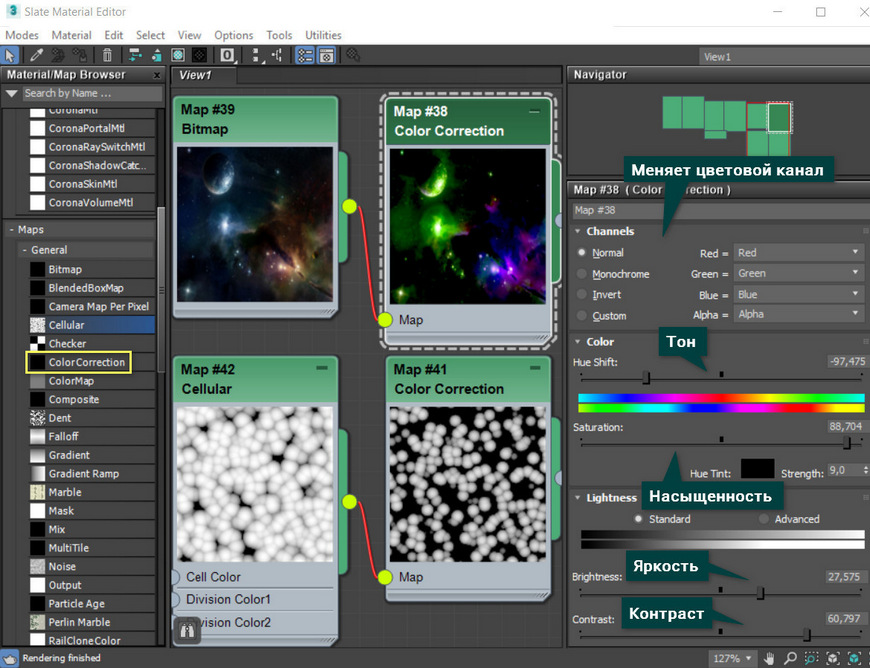
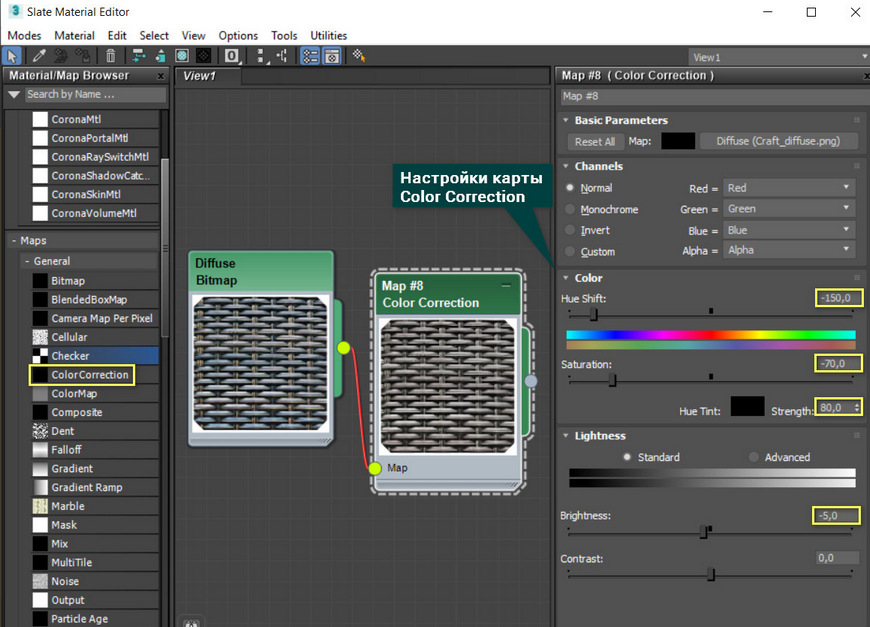
4. ColorCorrection
Карта корректировки цвета ColorCorrection используется как промежуточная между текстурной картой и материалом. Она меняет различные цветовые параметры имеющейся карты. Это значительно расширяет гибкость настройки карты цвета для будущего материала.
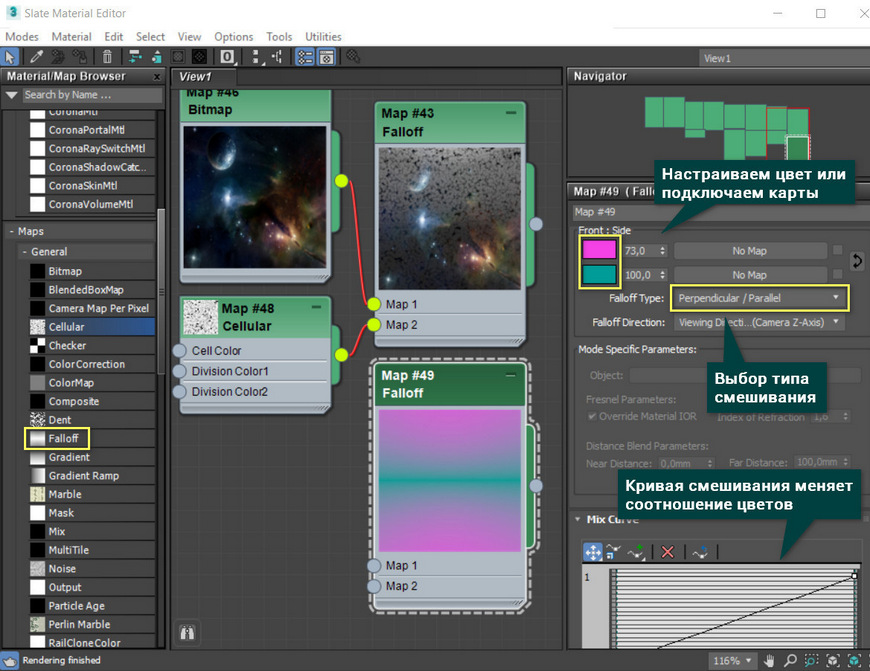
5. Falloff
Это карта различных типов градиента. Используется для плавного перехода между двумя цветами или текстурными картами. Falloff удобно использовать для отражений (Reflection) материала или для создания переливающихся цветов (перламутр).
Standard Controls rollout
Lists the commonly defined architectural tile bonds, or patterns, plus a custom pattern, which you design by selecting options under the Advanced Controls and Stacking Layout rollouts. The following illustrations show some of the different bonds:


2. Подключение текстурных карт
Теперь карты можно подключать к материалу. Но для верного подключения и хорошего результата понадобятся дополнительные карты.
1. Color Correction – к ней подключается карта Diffuse. Эта карта нужна для изменения картинки с базовым цветом.
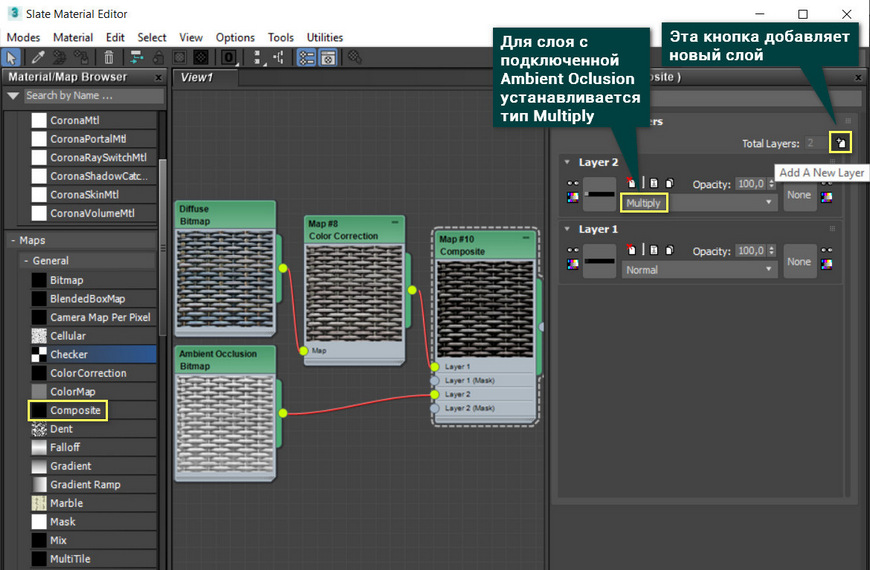
2. Composite объединяет между собой две карты Diffuse (через Color Correction) и Ambient Occlusion. Чтобы их объединить, в карте Composite нужно добавить новый слой (Layer 2) кнопкой Add A New Layer. Карта Ambient Occlusion подключается к Layer 2 и ему назначается тип Multiply. Diffuse подключается к Layer 1.
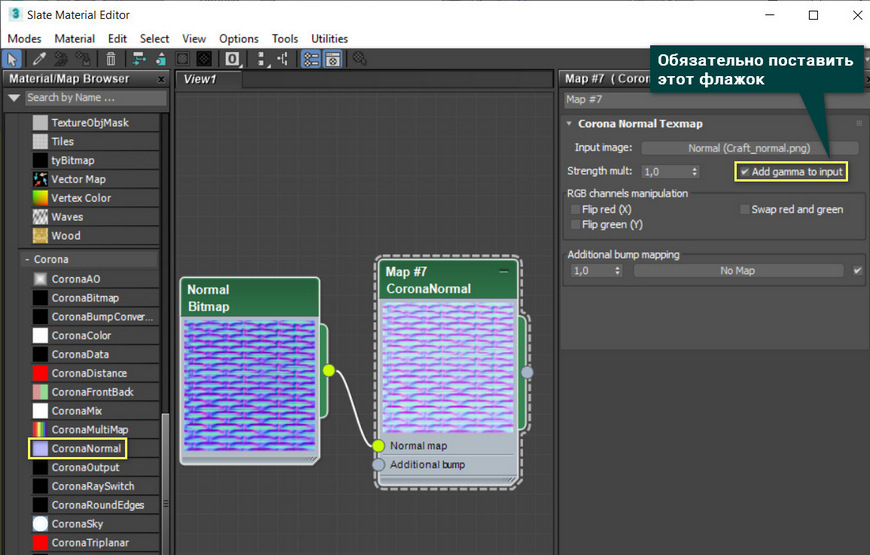
3. CoronaNormal – карта для активации работы и настройки карт нормалей. Для включения карты нужно зайти в ее настройки и установить флажок Add gamma to input. В случае неудовлетворительного результата можно изменить множитель выдавливания Strength mult, изменить красный (Red) и зеленый (Green) цветовые каналы. Эту карту нужно подключать только к картам нормалей. Если в слот Bump будет назначена другая карта, то ее не нужно подключать таким же образом.
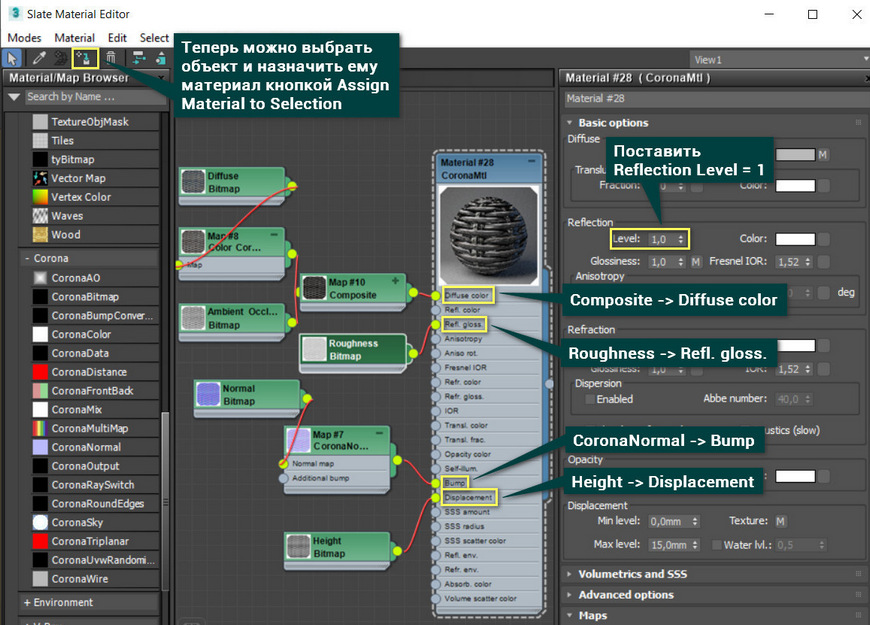
Теперь сформированные текстуры можно устанавливать в слоты материала.
Composite подключается к Diffuse color.
Roughness подключается к Refl. gloss. При этом нужно установить Reflection Level = 1.
CoronaNormal подключается к Bump. Значение Bump в CoronaMtl – Maps можно увеличить или уменьшить, в зависимости от результата.
Height подключается к Displacement.
Большинство карт свойств представлены в черно-белом виде. Если вам недостает как-либо карт, то можно назначить одну и ту же разным свойствам. Можно изменить их с помощью карт Color Correction и Output. Причем, назначить в любое из свойств можно и карту цвета Diffuse color, и она будет работать. А другие полезные карты можно узнать в статье «10 самых нужных карт 3Ds Max».
Теперь можно выбрать объект и назначить ему материал кнопкой Assign Material to Selection.
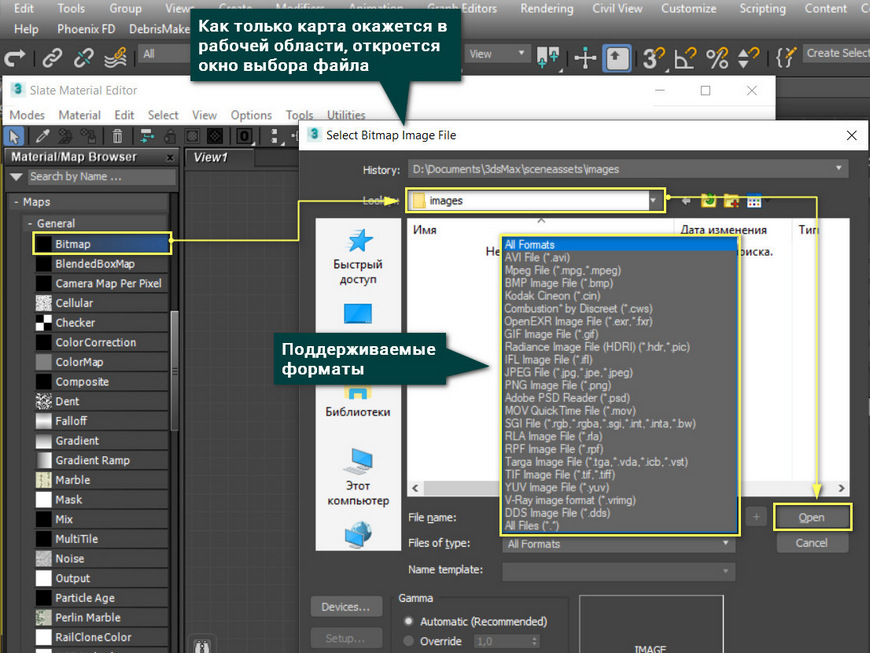
1. Bitmap
Карту Bitmap можно считать самой важной. Именно она позволяет загружать картинки, не входящие в 3ds Max. Ее можно использовать для создания объектов с уникальными изображениями: фотообои, картины, плитка с рисунком. Так же она позволяет загружать готовые текстуры различных материалов. Для этого переносим карту в рабочую область и выбираем файл на компьютере.
Сами по себе процедурные карты не используются. Их можно применять к материалам, к определенным модификаторам, к некоторым объектам.
Читайте также: