
3ds max axis constraints где находится
Как вы знаете, точку трехмерного пространства можно определить значениями вдоль трех осей: X, Y и Z. Попытайтесь представить, что вы встаете на каждую ось и смотрите на сцену; в этом случае вы сможете увидеть три отдельных плоскости: XY, YZ и ZX. Каждая из них имеет две размерности, поэтому и возможности трансформации ограничиваются только двумя координатными осями.
По умолчанию окна проекции Top, Side и Front отображают только одну плоскость, соответственно и трансформировать объекты в них можно только в одной плоскости. Окно проекции Тор ограничивает движение плоскостью XY, окна Left и Right - плоскостью YZ, a Front - плоскостью ZX. Такое распределение полностью отвечает целям моделирования, однако иногда возникает необходимость ограничить трансформации только одной плоскостью во всех без исключения окнах проекций. В 3ds max для этого имеются специальные кнопки Restrict, расположенные на панели инструментов Axis Constraints (Ограничения по осям). Чтобы отобразить эту панель, показанную на рис. 9.6, щелкните на основной панели инструментов правой кнопкой мыши (вне кнопок) и из появившегося контекстного меню выберите команду Axis Constraints.
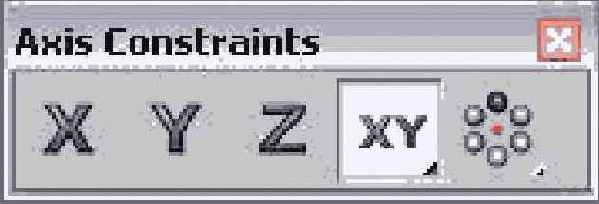
Эти четыре кнопки называются Restrict to X (), Restrict to Y (), Restrict to Z () и кнопка со всплывающим меню Restrict to XY, YZ или ZX Plane (). Эффект активизации одной из кнопок ограничения напрямую зависит от выбранной системы координат. Например, если активизирована кнопка Restrict to X и выбрана система координат View, объект будет трансформироваться вправо, поскольку именно в эту сторону направлена ось X во всех окнах в системе координат просмотра. Если же кнопка Restrict to X активизирована в локальной системе координат, то, поскольку оси связаны с самими объектами, трансформация вдоль оси X во всех окнах проекции будет одинакова (при такой установке в окне проекции Left объект двигаться не будет, так как в этом окне отображается плоскость YZ).
Кроме того, используя четвертую кнопку, можно ограничить движения какой-либо одной плоскостью: XY, YZ или ZX. (Для быстрого переключения между плоскостями используется клавиша .) Если включено отображение объекта Transform Gizmo (Контейнер трансформации) доступная ось или оси окажутся выделенными желтым цветом.

Если ограничение по осям не назначается, проверьте, чтобы в разделе Ref. Coord. System (Установленная система координат) вкладки General диалогового окна Preference Settings был установлен флажок Constant (Постоянная).
Ребятки, такая ситуация. Раньше было все норм, переустановил макс и не знаю дальше как сделать. Например, я хочу переместить 2 точки в обьекте по оси х. Раньше я брал, закреплял обьект пробелом, выделял ось х и выбирал привязку. обьект перемещался только по оси х. Сейчас только если левой кнопкой зажать эту ось. что надобно включить, подскажите, пожалуйста.

Вот на этой панельке работа с осями
Выключайте привязку ХУ. Чтоб при включенной привязке двигать по одной оси. Ну вообщем думаю разберетесь
вот в этом то и проблема. на сколько я понимаю, это axis constraint, но у меня нет таких кнопок, и когда на панеле правой кнопкой тиснешь, тоже нет пункта Axis constraint.
В нопках нет особой необходимости, можно горячими клавишами установленными по дефолту:
F5 - ось X, F6 - ось Y, F7 - ось Z, F8 - переключает свободное перемещение по двум осям
хорошо, тогда так. я выбираю ось и тяну, все норм. как только включаю привязку, сразу становится активными все оси, и клавиши F5 и т.д. не откликаются.
хорошо, тогда так. я выбираю ось и тяну, все норм. как только включаю привязку, сразу становится активными все оси, и клавиши F5 и т.д. не откликаются.
Я же обьясняю выключите ХУ на привязках

Не знаю как у вас не находит но есть второй способ в настройках привязки
хорошо, тогда так. я выбираю ось и тяну, все норм. как только включаю привязку, сразу становится активными все оси, и клавиши F5 и т.д. не откликаются.
Я же обьясняю выключите ХУ на привязках
Не знаю как у вас не находит но есть второй способ в настройках привязки
Всех слов мира не хватит чтобы выразить мою благодарность!
Всех слов мира не хватит чтобы выразить мою благодарность!
хорошо, тогда так. я выбираю ось и тяну, все норм. как только включаю привязку, сразу становится активными все оси, и клавиши F5 и т.д. не откликаются.
Я же обьясняю выключите ХУ на привязках
Не знаю как у вас не находит но есть второй способ в настройках привязки
Спасибо большое)) Тоже столкнулась с этой проблемой, хотя не первый день в максе работаю..
Мне это помогло.

Нашел! Если кому интересно то поставить галочку
Grid and Snap Settings - Options - Enable Axis Constraints
Очень хорошая штука ;)
Мне это помогло.
Да! Нашел! Благодарю!
хорошо, тогда так. я выбираю ось и тяну, все норм. как только включаю привязку, сразу становится активными все оси, и клавиши F5 и т.д. не откликаются.
Я же обьясняю выключите ХУ на привязках
Не знаю как у вас не находит но есть второй способ в настройках привязки
Дай Вам Бог здоровья! Спасли:)
Не могу понять, зачем эти все манипуляции, когда мышей же наводишь на нужную ось, она (и только она) становится активной (в жёлтый окрашивается), зажимаешь - и тянешь в нужном направлении по нужной оси.
Можно ещё квадратик между осями мышей зажать и тянуть - объект будет двигаться в нужной плоскости.
Я чего-то не понимаю.
feles - не всегда оси видны во вьюпорте. Бывает объект большой, оси где-то там, за кадром, включаешь привязки (S), клацаешь нужную ось, например F6 (перемещение по оси y) и подтягиваешь объект куда нужно. Экономит кучу времени )
feles - не всегда оси видны во вьюпорте. Бывает объект большой, оси где-то там, за кадром, включаешь привязки (S), клацаешь нужную ось, например F6 (перемещение по оси y) и подтягиваешь объект куда нужно. Экономит кучу времени )
А, ну тогда понятно ) Видимо, просто не сталкивалась с такими моментами.
Спасибо за объяснение!
Когда сама не вижу осей - просто счётчиками внизу окна пользуюсь и тяну их ползунки, куда надо.
Вот на этой панельке работа с осями
Выключайте привязку ХУ. Чтоб при включенной привязке двигать по одной оси. Ну вообщем думаю разберетесь
Мне это помогло.

Ребятки, такая ситуация. Раньше было все норм, переустановил макс и не знаю дальше как сделать. Например, я хочу переместить 2 точки в обьекте по оси х. Раньше я брал, закреплял обьект пробелом, выделял ось х и выбирал привязку. обьект перемещался только по оси х. Сейчас только если левой кнопкой зажать эту ось. что надобно включить, подскажите, пожалуйста.
А ещё можно щёлкнуть мышкой по стрелочки нужной оси Pivotа, например по Х, то она подсветится жёлтым. И после этого объект можно двигать за любую деталь и движение будет только по Х.

By:
The Restrict To . buttons, also called the Axis Constraint buttons, are located on the Axis Constraints toolbar.
By default, this toolbar is not displayed. You can display it by right-clicking an empty spot on the main toolbar and choosing Axis Constraints from the pop-up menu. These buttons let you specify one or two axes about or along which the transform takes place. They help you avoid transforming an object in a direction you didn't intend.
While the Axis Constraints toolbar is displayed, its controls update interactively to correspond to the portion of the transform gizmo that you are using currently.
Note: It's generally easier to use the Transform gizmos than these buttons; see Using Transform Gizmos. However, it is helpful to understand the concepts explained below.

Axis Constraint buttons
Only one axis constraint can be active at a time. When a button is turned on, transforms are constrained to the specified axis (or plane). For example, if you turn on the Restrict To X button, you can rotate an object only about the X axis of the current transform coordinate system.
The axis or axes to which you’re constrained are highlighted in red on the axis tripod icon in viewports, or in yellow on the Transform gizmo.
Note: By default, axis constraints don't apply when using Snap. You can override this by turning on Snaps Use Axis Constraint Toggle on the Axis Constraints toolbar, or by turning on Use Axis Constraints in Snap Options.
Note: Constraints are set on a transform-by-transform basis, so select the transform before you select the axis constraint. If you do not want the constraints to change, turn on Customize menu Preferences General tab Reference Coordinate System group Constant.
The axis constraints are stored separately at object and sub-object levels. If you set these three controls one way while in sub-object mode and another way while in object selection level, when you return to sub-object mode, they're restored to the way they were previously set. For example, if you're using XY constraints at object level, then switch to sub-object level and use Z constraint, when you return to object level, XY will be restored.
Restrict to Plane Flyout

The Restrict To Plane flyout, available from the Axis Constraints toolbar, lets you limit all transformations (move, rotate, scale) to the XY, YZ, or ZX planes (by default, parallel with the Top view).
You can also select planar constraint by using the Move Transform Gizmo. Instead of dragging one of the axis indicators, drag one of the plane indicators near the center of the gizmo.
When you move an object along a plane that is head-on to your view, the object moves along the single available axis shown in the view.
By:
The Restrict To . buttons, also called the Axis Constraint buttons, are located on the Axis Constraints toolbar.
By default, this toolbar is not displayed. You can display it by right-clicking an empty spot on the main toolbar and choosing Axis Constraints from the pop-up menu. These buttons let you specify one or two axes about or along which the transform takes place. They help you avoid transforming an object in a direction you didn't intend.
While the Axis Constraints toolbar is displayed, its controls update interactively to correspond to the portion of the transform gizmo that you are using currently.
Note: It's generally easier to use the Transform gizmos than these buttons; see Using Transform Gizmos. However, it is helpful to understand the concepts explained below.

Axis Constraint buttons
Only one axis constraint can be active at a time. When a button is turned on, transforms are constrained to the specified axis (or plane). For example, if you turn on the Restrict To X button, you can rotate an object only about the X axis of the current transform coordinate system.
The axis or axes to which you’re constrained are highlighted in red on the axis tripod icon in viewports, or in yellow on the Transform gizmo.
Note: By default, axis constraints don't apply when using Snap. You can override this by turning on Snaps Use Axis Constraint Toggle on the Axis Constraints toolbar, or by turning on Use Axis Constraints in Snap Options.
Note: Constraints are set on a transform-by-transform basis, so select the transform before you select the axis constraint. If you do not want the constraints to change, turn on Customize menu Preferences General tab Reference Coordinate System group Constant.
The axis constraints are stored separately at object and sub-object levels. If you set these three controls one way while in sub-object mode and another way while in object selection level, when you return to sub-object mode, they're restored to the way they were previously set. For example, if you're using XY constraints at object level, then switch to sub-object level and use Z constraint, when you return to object level, XY will be restored.
Читайте также: