
You have started fl studio with administrative privileges что это
This article discusses why we should run Visual Studio as an administrator, and examines the easiest way to do that under Windows Vista.
Visual Studio and Administrator Rights
Visual Studio 2005 actually warns you at start up if you are not running it as an administrator under Vista, and Microsoft recommends that you always run it with administrator privileges. In fact MSDN gives a list of scenarios where Visual Studio 2005 will have ‘issues’ if it is not running with these privileges:
For other versions of Visual Studio and operating systems there are fewer issues about not running Visual Studio as an administrator. However there are a number of scenarios where you need administrative privileges. These include needing to install or reinstall anything, or to do any kind of Office add-in work, or to use ActiveX controls, or even just to register a library for COM Interop.
Running Visual Studio as an Administrator
Under earlier versions of Windows developers usually just made themselves local administrators on their development computers to ensure Visual Studio had sufficient privileges. Under Vista however, this is not enough (it is still necessary to be an administrator, but not sufficient).
This is because if you run an application under Vista by default it does not have administrative privileges unless specifically given them. This is true even if the user running the application has administrative privileges.
Granting Visual Studio Administrative Privileges
There are (at least) three ways of starting Visual Studio with administrative privileges in Vista.
Note that for all three you need access to an administrator account. It’s easiest if you are logged in as an administrator, in which case you will simply get a User Account Control warning saying ‘A program needs your permission to continue’ (and you can just click ‘OK’). If you are not logged in as an administrator the User Account Control will ask you for an administrator’s ID and password before it will launch the program.
- Right-click on the shortcut to Visual Studio and select ‘Run as administrator’ from the context menu.
- Type ‘devenv’ into the Start Search box (at the bottom of the Vista Start menu: just hit the Windows key and you are in it). Then hit Control-Shift-Enter, rather than just Enter. Control-Shift-Enter tells Windows to start the program with administrative privileges. This one is for those of you who don’t like reaching for a mouse.
- Right-click a shortcut to Visual Studio, select the Compatibility tab, and check the ‘Run this program as an administrator’ checkbox at the bottom.
Always Running Visual Studio as an Administrator
The last of the items above (item 3) is the one to use if you always want to run Visual Studio as an administrator. Once the checkbox is checked in future you will be able to click on any shortcut to Visual Studio and it will run with elevated privileges.
Note that setting the ‘Run this program as an administrator’ property on a shortcut actually sets it on the underlying executable itself (in this case devenv.exe). It isn’t possible as far as I can see to have one shortcut that will run the program as an administrator, and another one that will run it with normal privileges.
User Account Control
If you always run Visual Studio as an administrator you are going to get the User Access Control warning every time you start it, even if you are logged in as an administrator to Windows. Obviously you can just click ‘OK’ to dismiss this warning, but it may tempt you to turn User Access Control off.
Note that this is true only if Vista’s User Account Control (UAC) is turned on. Many developers turn UAC off, and in this case Vista behaves in the same way as earlier versions of Windows with regard to starting Visual Studio: if you are logged in as an administrator then Visual Studio will by default run with administrative privileges.
The Administrator Account
Vista also has an account called ‘Administrator’ which behaves differently from other administrator accounts. In fact it behaves like administrator accounts in earlier versions of Windows, in that all programs launched when using it run with administrator privileges by default. There’s no need to specifically set up the program as described above.
As a developer your really shouldn’t need to use this account: you can develop with administrator privileges using the techniques described in this article.
However you may have occasions when you aren’t sure whether a program is failing because of some coding error or simply because a process is being launched with insufficient privileges. In these cases it may be useful to use the Administrator account temporarily to simply rule out a problem with privileges. Note that if you work for a large organization they are almost certainly not going to let you near this account, however: this is really only useful for those developing at home.
Using the Administrator Account
To enable the Administrator account start a command prompt with administrator privileges as described above (type ‘cmd’ in the Start Search box and hit Control-Shift-Enter). Then enter:
net user Administrator /active:yes
This has a blank password by default. To set a password use:
net user Administrator
You can now log off and log on as the Administrator. Once you are done with any testing you should disable this account again as below
net user Administrator /active:no
Note that disabling the account does not clear the password. However if you forget it you can always set it again as above when you come to use the account again (provided you have access to at least one account with administrator privileges).
Aside: Administrator Account on Windows XP
The Administrator account discussed above is the main default administrator account for a computer. Previous versions of Windows had this account as well, although other accounts with administrator rights behaved in the same way.
In particular it existed under XP. Not only that it was enabled by default, and had a blank password. If you’ve got an XP computer at home try hitting Ctrl-Alt-Del twice on the screen that shows your accounts, and then enter ‘Administrator’ and a blank password. If that logs you on with admin rights you may want to consider disabling the account as described above.
Forum rules
POSTS HERE ARE PRIVATE. INSTRUCTIONS BELOW:
ALL posts made in this forum are 'Private' so that only you and staff can see them. This allows sharing of personal data, projects and other information. Posts are generally made public after they are marked 'Solved' AND there was no personal data contained in them. If you don't want your post made public let the team know.
We know it's frustrating when things don't work. However, please help us to help you by following these suggestions:
- Update - Before trying anything else. Download and install the latest version of FL Studio from here. Your bug may be fixed already!
- Update plugins - If you are using 3rd party plugins. Look at crash logs for their names. Install the latest version for any you spot. See also Plugins Behaving Badly
- Simple clear explanation - Explain what you are doing, or trying to do, and exactly what is happening.
- Specific information - a) FL Studio version & build number, b) what you are doing and what happens exactly, c) step-by-step instructions how reproduce the problem.
- Screenshots - Another great way to demonstrate issues. Get a free screenshot app here. Include images using the 'Attachments' tab, at the bottom of the post edit window.
- A video - The best way of demonstrating many issues. Windows 10 includes an integrated screen recorder, see here OR get a free free recorder here. Include mp4 videos to your post from the 'Attachments' tab, at the bottom of the post edit window.
- Use English - Google Translate your post. Short simple sentences in your original language translate best. We are happy to work this way, no need to worry.
FL 20.5 - always starts with admin privileges
Ever since installing FL 20.5, it shows a popup on opening: "You have started FL Studio with administrative privileges. This may cause drag and drop of files to stop working [. ]". When I follow the steps as listed (opening up compatibility settings), "Run as Administrator" is always unchecked.
I've tried checking it, applying/saving settings, then unchecking it, and re-applying/saving but the warning persists every time I open the software.
I am trying to make bootable flash drive of windows XP by using ultraiso software but i got message of "you need admin privileges to run this program" what do i do.
Ultraiso is installed but when i am trying to burn disk image then i got this message you need admin privileges to run this program.
Please help me..
This thread is locked. You can follow the question or vote as helpful, but you cannot reply to this thread.
Report abuse
Harassment is any behavior intended to disturb or upset a person or group of people. Threats include any threat of suicide, violence, or harm to another. Any content of an adult theme or inappropriate to a community web site. Any image, link, or discussion of nudity. Any behavior that is insulting, rude, vulgar, desecrating, or showing disrespect. Any behavior that appears to violate End user license agreements, including providing product keys or links to pirated software. Unsolicited bulk mail or bulk advertising. Any link to or advocacy of virus, spyware, malware, or phishing sites. Any other inappropriate content or behavior as defined by the Terms of Use or Code of Conduct. Any image, link, or discussion related to child pornography, child nudity, or other child abuse or exploitation.
Replies (2)
Report abuse
Harassment is any behavior intended to disturb or upset a person or group of people. Threats include any threat of suicide, violence, or harm to another. Any content of an adult theme or inappropriate to a community web site. Any image, link, or discussion of nudity. Any behavior that is insulting, rude, vulgar, desecrating, or showing disrespect. Any behavior that appears to violate End user license agreements, including providing product keys or links to pirated software. Unsolicited bulk mail or bulk advertising. Any link to or advocacy of virus, spyware, malware, or phishing sites. Any other inappropriate content or behavior as defined by the Terms of Use or Code of Conduct. Any image, link, or discussion related to child pornography, child nudity, or other child abuse or exploitation.
Was this reply helpful?
Sorry this didn't help.
Great! Thanks for your feedback.
How satisfied are you with this reply?
Thanks for your feedback, it helps us improve the site.
How satisfied are you with this reply?
Thanks for your feedback.
I agree, this questions should be directed to the XP Forum.
Keep this in mind though. Most applications that "require" admin authority to run, implies that the privileges are NOT available.
As an owner of the device, the Admin profile password and other components would be available to the owner.
If that information is unknown to the user attempting to create a bootable disk, from a product that requires Admin authority, then the next question would be:
1) Are you a user of the device only, and have access to the system as granted by the owner?
2) Is the device a part of a domain managed by a business and admin rights are handled through the domain administrator?
Performing a build for a bootable drive does not require an ISO image. It does require that MS Windows be used to build a recovery drive or other off-line protection device. Normally ISO images are reserved for disk drives (or images), operating system deployments, DVD/BD images, or other areas that specifically need an ISO image.
Once you move your inquiry to the XP Forum, please provide the additional information implied above. They shall be able to more rapidly assist with a more focused response.
Report abuse
Harassment is any behavior intended to disturb or upset a person or group of people. Threats include any threat of suicide, violence, or harm to another. Any content of an adult theme or inappropriate to a community web site. Any image, link, or discussion of nudity. Any behavior that is insulting, rude, vulgar, desecrating, or showing disrespect. Any behavior that appears to violate End user license agreements, including providing product keys or links to pirated software. Unsolicited bulk mail or bulk advertising. Any link to or advocacy of virus, spyware, malware, or phishing sites. Any other inappropriate content or behavior as defined by the Terms of Use or Code of Conduct. Any image, link, or discussion related to child pornography, child nudity, or other child abuse or exploitation.
![]()
I have a problem with output arcade, I keep trying to download kits and samples but they won't download and I have good connection so I don't think it's that if anyone have a solution plz share it with me
![]()
I'm having a similar issue. In windows10 i can open it and it's online. But when i open it in DAW (FL Studio 20) it opens, but keep says "no internet connection" i tried to click on reconnect at least 100 times, but still can't connect. I can't find any support e-mail address for Output company, but i couldn't found.
Same problem here
i just reinstalled it and opened it first as standalone
I have managed to come up with a solution to this issue. Launch the standalone Arcade app, then sign out and sign in. Go to settings -> audio/MIDI -> Change the driver to ASIO. Mine was set originally to Windows Audio. Now when I use Arcade within FL Studio it works. Hope I help someone else with this issue.
I had the same problem but with Studio One, your solution worked for me, thank you very much.
Just log out of your account / user profile and log in after that. It should resolve the issue with downloading new kitts
Yeah thanks it did work for me why is that though ? Output arcade really needs to get these bugs fixed right ASAP or At least acknowledge us what’s going on
Hey guys, anyone know if it works for logic too? having the same problem
maybe try going into manage plugins and click check plugins or whatever the button is. or even delete and reinstall
I'm having this same issue. It refuses to let me download anything and previous sessions can't find samples that I already had downloaded, causing beats to be stripped of those particular sounds. Pretty much ruining the entire project. I contacted Output and they told me to reinstall software. Did that and also preformed a "soft reset". Still nothing. I contacted them several times since then and no response. Customer support isn't the most helpful. Didn't think it was going to be a difficult issue for them to resolve, but by them ignoring me for close to a week now, I'm starting to lose hope. Hopefully they'll be more responsive after the holidays. They recently came out with a update on the 20th of December. I downloaded that version and now when I go to download, it just crashes software altogether..
Обычно этот процесс не вызывает ни у кого, даже из начинающих особой сложности, но все же, почему-то, вопросы по данной теме продолжают поступать от новичков FL Studio.
И для вопроса «Как засунуть трек в fl studio» по сути, самый простой ответ – просто ПЕРЕТАЩИТЬ из папки Windows, в любое место в FL Studio. Это может быть плейлист:
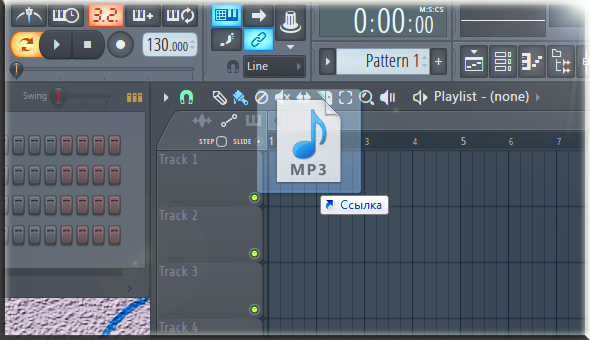
перетаскивание на который, создаст автоматический аудио клип на плейлисте и занесет этот клип, конечно же, в панель каналов FL Studio. Теперь этот трек на плейлисте, как на «операционном столе»: можно растягивать, резать и делать с ним все, что только заблагорассудиться.
Это может быть так же панель каналов, и впоследствии с нее можно направлять трек куда угодно:
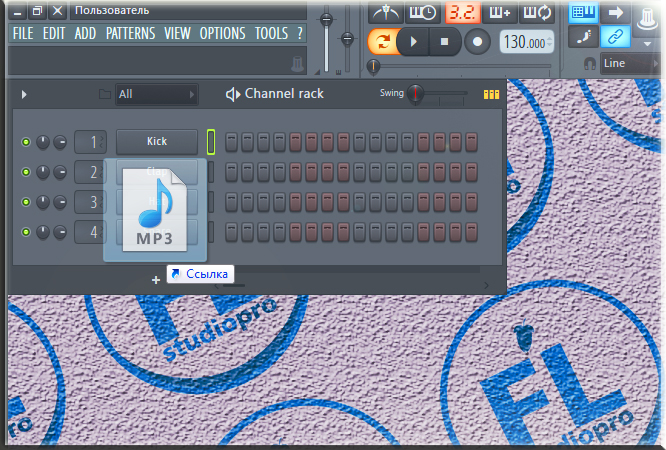
Это может быть браузер FL Studio (то темное поле, что находиться слева в FL):

добавление трека в браузер занесет это в коренной каталог FL StudioData, что находиться по умолчанию по адресу: С:Program FilesImage-LineFL Studio 12 (11,10)Data. И это полезно, если ты будешь обращаться к этому треку еще ни один раз, так как теперь он будет в твоей постоянной досягаемости, для перетаскивания его в любую локацию внутри FL Studio.
И впоследствии измененный, подразумевается улучшенный или требуемый вариант, «сохранить» или, по правильному, «экспортировать» в любой аудио формат – Wav, mp3, ogg. Для того, что бы узнать, КАК сохранять и экспортировать аудио форматы из FL studio, добро пожаловать в самую подробную инструкцию!
Так же можно открыть прекраснейший редактор аудио Edison, встроенные VST плагин в FL Studio, открыть его можно на любом канале микшера в одном из слотов, нажав на стрелку в слоте. И туда свой аудио трек ты помещаешь так же простым перетаскиванием. Как научиться профессионально, работать и редактировать аудио в нем, ты можешь научиться в ЭТОЙ СЕРИИ ВИДЕО. Сохраняем из Edison, измененный аудио файл, через команду File– Save sample as.
Похожие вопросы:
Чтобы связаться с нами по любому вопросу (реклама, сотрудничество, отзыв о сервисе), пишите на почту admin@rpi.su. Ответ будет дан в течении 24-х часов.
Add your answer
Report Abuse
I think this question violates the Community Guidelines
Chat or rant, adult content, spam, insulting other members,show more
I think this question violates the Terms of Service
Harm to minors, violence or threats, harassment or privacy invasion, impersonation or misrepresentation, fraud or phishing, show more
Additional Details
Report Abuse
I think this answer violates the Community Guidelines
Chat or rant, adult content, spam, insulting other members,show more
I think this answer violates the Terms of Service
Задайте свой вопрос.
Возник вопрос по фрутику? Не можете найти ответ? Задайте мне вопрос, я постараюсь сразу ответить на него.
почему когда я делаю инструментал все звуки звучат ровно по громкости, а когда сохраняю проект и воспроизвожу в проигрывателе, то бас перегружает, то ещё какой-нибудь синт?
3 серега сказал в 19:23 Июнь 22nd, :
как импортировать лупы закаченые из нета!так чтобы они были не в нарезку а целиком!
4 Илья сказал в 21:42 Июнь 5th, :
Привет. такая проблема. Когда я начинаю выризать в эдисоне, то после резки звук идет по возрастающей, как бы увеличивая громкость. как от этого избавиться. у меня десятые фрукты.
5 Новичок сказал в 10:43 Июнь 4th, :
3. Окно Mixer (микшер)
Описание команд меню слота для подключения плагинов (меню открывается с помощью кнопки ):
- Select – меню для выбора подключаемого плагина
- Browse presets – открыть в браузере Browser папку с пресетами для данного плагина
- Save preset as – сохранить настройки плагина в файл пресета
- Last tweaked parameter – набор команд, относящихся к тому параметру плагина, значение которого было изменено в последнюю очередь (см. описание команд контекстного меню регуляторов в разд. 2.8.4 книги ).
- Browse parameters – открыть в браузере Browser папку с параметрами данного плагина
- View editor – открыть окно плагина
- Set name – переименовать название подключенного экземпляра плагина
- Smart disable – режим экономии ресурсов процессора при отсутствии звукового сигнала на входе плагина
- Move up – переместить плагин в слот, расположенный выше
- Move down – переместить плагин в слот, расположенный ниже
- Help – вызов справки по данному плагину.
Несколько слов о режиме Smart disable. Если данный режим включен, то программа анализирует – поступает ли на вход плагина звуковой сигнал. Если на вход плагина в течение четырех секунд кроме тишины ничего не поступает, то незаметно для пользователя он отключается. Это позволяет экономить ресурсы процессора. Как только на вход плагина вновь начинает поступать звуковой сигнал, плагин мгновенно включается. При включении/выключении плагина не возникает никаких побочных звуков (например, щелчков). Однако данный режим можно использовать не для всех типов эффектов. Например, его не рекомендуется применять для длительной реверберации: по истечении четырех секунд после затухания сигнала на входе плагина он отключится, однако в момент отключения сигнал на выходе плагина может еще присутствовать.
Описание команд меню микшера, открываемого с помощью кнопки (Effects options ):
- File Open mixer track state – загрузить настройки текущего модуля микшера из файла
- File Save mixer track state as – сохранить настройки текущего модуля микшера в файле
- View Controls. + – отобразить/скрыть фейдеры громкости и регуляторы панорамы для всех модулей микшера
- View Names. + – отобразить/скрыть названия модулей микшера
- Disk recording Render to wave file(s)…. + – экспорт звуковых данных с модулей микшера, подготовленных к записи в один или несколько звуковых файлов
- Disk recording Auto-unarm – автоматически выключать режим готовности к записи после ее завершения
- Disk recording Auto-create audio clip – автоматически создавать аудиоклипы в окне Playlist используя вновь записанные звуковые файлы
- Disk recording Latency compensation – компенсация задержки записываемого сигнала
- Disk recording 32Bit float recording – запись звуковых файлов в 32-битном формате с плавающей точкой (если опция выключена, то запись будет производиться в 16-битном формате)
- Link selected channels To this track. + – выделенные в окне пошагового секвенсора каналы будут связаны с текущим модулем микшера
- Link selected channels Starting from this track – выделенные в окне пошагового секвенсора каналы будут связаны с текущим и последующими модулями микшера (каждый канал с отдельным модулем микшера)
- Selected linked channels. + – выделить в окне пошагового секвенсора все каналы, связанные с текущим модулем микшера
- Rename – переименовать текущий модуль микшера
- Switch smart disable for all – включение/выключение режима Smart disable (экономия вычислительных ресурсов при простое плагина) сразу для всех задействованных плагинов.
Несколько слов о функции компенсации задержки. Задержка возникает при прохождении потока звуковых данных сквозь драйвер звуковой карты. При использовании ASIO-драйверов, в зависимости от настроек аудиоинтерфейса эта задержка может быть очень маленькой. Тем не менее, ее следует компенсировать. Компенсация заключается в том, что создаваемые в окне Playlist аудиоклипы будут размещаться с учетом этой задержки. В некоторых случаях по вине драйверов звуковой карты функция компенсации задержки может работать не вполне корректно. Вам придется самостоятельно передвигать аудиоклипы так, чтобы записанный в них аудиоматериал соответствовал остальному материалу проекта.
Если вы используете драйверы ASIO, то после выбора входного порта в поле IN автоматически включится режим готовности записи файла с именем, принятым по умолчанию. Об этом будет свидетельствовать тот факт, что символ , расположенный в правом нижнем углу микшера, будет выделен ярким цветом.
Щелчком правой кнопки мыши на поле OUT открывается контекстное меню, содержащее следующие команды:
- Reset mapping – установить принятые по умолчанию настройки выходных портов всех модулей микшера
- Auto map outputs – автоматически распределить модули микшера по доступным выходным портам.
При записи звуковых сигналов от внешних источников средствами FL Studio необходимо задавать имена соответствующих звуковых файлов. Щелчком на надписи REC. расположенной в правом нижнем углу окна Mixer. вызывается стандартное диалоговое окно для присвоения имени звуковому файлу. FL Studio 5 может присваивать имена записываемым звуковым файлам автоматически. Для этого нужно щелкнуть на надписи REC правой кнопкой мыши. Чтобы узнать имя файла, куда будет осуществляться запись, подведите указатель мыши к полю REC и прочитайте имя в информационной строке главной панели.
Если во время записи звукового файла что-то пошло не так, то в FL Studio 5 сессию записи можно отменить командой главного меню EDIT Undo .
Следует иметь в виду, что все записанные с помощью FL Studio звуковые файлы доступны в папке RECORDED браузера Browser. Оттуда их можно перетаскивать в секцию аудиотреков окна Playlist или же в окно пошагового секвенсора.
Если щелкнуть на нужном звуковом файле в браузере правой кнопкой мыши, откроется контекстное меню, содержащее несколько полезных команд:
- Send to selected channel – загрузить сэмпл в генератор, подключенный к текущему каналы (команда будет выполнена в том случае, если генератор поддерживает загрузку сэмплов)
- Open in new channel – создать новый канал, задействовав в качестве генератора встроенный сэмплер, и загрузить в него выбранный файл
- Open in new slicer channel – создать новый канал, задействовав в качестве генератора плеер барабанных лупов Fruity Slicer, и загрузить в него выбранный файл
- Open in new granulizer channel – создать новый канал, задействовав в качестве генератора гранулярный синтезатор Fruity Granulizer, и загрузить в него выбранный файл.
В FL Studio имеется возможность экспортировать звуковые данные с выходов отдельных модулей микшера. Перед командой экспорта программе необходимо указать те модули микшера, данные с которых следует экспортировать. Для этого для нужных модулей микшера следует включить режим готовности к записи. Затем нажатием кнопки (Effects options ), расположенной в левом верхнем углу окна Mixer. следует открыть меню и выбрать в нем команду Disk recording Render to wave file(s)… или нажать комбинацию клавиш +. Откроется диалоговое окно Rendering N mixer tracks (рис. 6). Здесь N – количество модулей микшера, звуковые данные которых будут экспортироваться.

Рис. 6. Диалоговое окно Rendering
Как видите, данное окно является урезанным вариантом уже знакомого вам окна, показанного на рис. 9.3 книги. экспорт можно осуществлять только в файлы формата WAV. После нажатия кнопки Start экспорт звуковых данных будет выполнен в заданные файлы.
How to run Sylenth1 in FL Studio
For FL Studio it is recommended to install only the 32-bit version of Sylenth1, unless you are using the native 64-bit version of FL Studio.
In order to properly load and register Sylenth1, open FL Studio in Administrator Mode . To do so, right-click FL Studio and choose Run as Administrator and click Yes .

In FL Studio, click Options from the menu bar and select File Settings .

Under VST plugins extra search folder click the folder icon to select your VST folder.

Select the VST folder where you installed Sylenth1.

Now click Channels from the menu bar and select Add one , then More .

A list of plugins will appear. Click the Refresh at the bottom of the list and choose Fast scan .

After scanning you should see Sylenth1 in the list. Now you can double click it to open Sylenth1 and if you want, check the favorites box to add Sylenth1 to your list of favorites.

That’s it! The full version of Sylenth1 will start up in demo mode with sound disabled for the first time. Click here to find out how to unlock Sylenth1 from demo mode

Как Побороть Страх Перед Публикой
как побороть страх перед публикойг. Краснодар, Елена ПриходькоТакие заявления часто приходится слышать. Для многих людей страх публичного выступления .
Укоротить ссылку, загрузить файл, проверить IP-адрес
Google PageRank: 1 из 10
Помощник по работе с документами позволяет преобразовать отсканированные изображения в PDF формат, снабдить файл паролем и меткой. Вы можете загрузить файлы JPEG, PNG, BMP и получить файл PDF.
Google PageRank: 0 из 10 Яндекс ТИЦ: 0
Найденная страница содержит файл Индикаторная отвертка как пользоваться, номер файла на странице 795292445. Файл можно загрузить перейдя по ссылке внизу. Так же мы Вам предлагаем ознакомится с похожим файлом Как лечить бородавки на руках
Файлообменник для бесплатного хранения и передачи файлов до 100 Гб! Высокая скорость скачивания и загрузки. Загрузка на файлообменник по ftp, через браузер или с удаленного сервера. Партнерская программа, позволяющая заработать на файлах. Free file sharing.
файлообменник,загрузить файл,бесплатный хостинг файлов,закачать файл,заработать на файлах,файловый обменник,бесплатный файлообменни,скачать быстро,файловый сервер,хостинг файлов,передача файлов,файлообменник без регистрации,залить файл,хранение файлов,обмен.
Руководство пользователя для Nokia Lumia 610 на русском языке (RU) можно загрузить здесь. Файл инструкции в формате «.pdf», для его просмотра – Где скачать инструкцию для Nokia Lumia 610 на русском языке
нокиа , 610 , инструкция
Бесплатный файлообменник zalil.su
бесплатное хранение файлов, обмен и публикация файлов, регистрация не обязательна, количество файлов не ограничено
загрузить файл, файлы , закчать , скачать , файл
Google PageRank: 0 из 10
Файлообменник без ограничения скорости скачивания, и без ограничения объёма загружаемых файлов.
Быстрый файлообменник и бесплатный хостинг файлов. Место под хранение файлов не ограничено. Скорость передачи файлов до 1 Гб/сек. Скачивание файлов в несколько потоков. Загрузка через браузер, по FTP и нескольких файлов сразу.
Google Тренды это диаграмма для отслеживания сезонности ключевых слов. Этот график позволяет лучше понять сезонное изменение полулярности запросов по определенной тематике.
Значения приведены относительно максимума, который принят за 100. Чтобы увидеть более подробную информацию о количестве запросов в определенный момент времени, наведите указатель на график.
Читайте также: