
Xsd схема visual studio
После определения файла XSD можно воспользоваться инструментом в исполняющей среде, который преобразует схему в соответствующие классы доступа к данным, такие как показанный ранее безопасный к типам класс DataTable. Давайте начнем с простого файла XSD (Products.xsd), описывающего ту же информацию, что и пример AutoLot, который был рассмотрен ранее, а затем расширим его, добавив некоторую дополнительную функциональность:
В этом файле, по сути, определяется схема с атрибутом id, установленным в AutoLot. Определен сложный тип по имени Product, содержащий ряд элементов — по одному для каждого из полей таблицы Products.
Элементы отображаются на классы данных следующим образом. Схема AutoLot отображается на класс, производный от DataSet. Сложный тип Product отображается на класс, унаследованный от DataTable. Каждый подэлемент отображается на класс, унаследованный от DataColumn. Коллекция всех столбцов отображается на класс, унаследованный от DataRow.
Предполагая, что предыдущий файл сохранен как AutoLotXsd.xsd, его можно преобразовать в код, запустив следующую команду из командной строки:
В результате получится файл AutoLotXsd.cs. С утилитой xsd.exe могут применяться различные переключатели, с помощью которых изменяется сгенерированный вывод. Некоторые из наиболее часто используемых переключателей описаны ниже:
/database (/d)
Позволяет генерировать классы, унаследованные от DataSet, DataTable и DataRow.
Позволяет определить пространство имен, в которое должен быть помещен сгенерированный код. По умолчанию пространства имен нет.
Ниже приведена сокращенная версия вывода утилиты XSD для схемы AutoLot:
Все приватные и защищенные члены удалены, чтобы сосредоточить внимание на общедоступном интерфейсе. Определения ProductDataTable и ProductRow показывают позицию двух вложенных классов, которые будут реализованы далее. Конструктор AutoLot() вызывает приватный метод InitClass(), который конструирует экземпляр производного от DataTable класса ProductDataTable и добавляет таблицу в коллекцию Tables класса DataSet.
Добавлением строк в таблицу занимается один из двух перегруженных (и существенно отличающихся) методов AddProductRow(). Первая перегрузка принимает уже сконструированный DataRow и возвращает void. Вторая берет набор значений, по одному для каждого столбца DataTable, конструирует новую строку, устанавливает в ней значения, добавляет строку к объекту DataTable и возвращает эту строку вызывающему коду. И настолько разные функции названы одинаково!
Подобно члену InitClass() производного от DataSet класса, который добавляет таблицу в класс DataSet, член InitMember() из ProductDataTable добавляет столбцы в класс DataTable. Свойства каждого столбца соответствующим образом устанавливаются, после чего столбец добавляется в коллекцию столбцов.
Последний класс, который мы обсудим — это ProductRow, унаследованный от DataRow. Этот класс используется для обеспечения безопасного к типам доступа ко всем полям таблицы данных. Он служит оболочкой для определенной строки и предоставляет члены для чтения (и записи) каждого поля таблицы.
В дополнение, для каждого допускающего значение null поля предусмотрены функции для установки поля в null и проверки значения поля на предмет равенства null. В следующем примере показаны функции для столбца CarID:
Типизированный объект DataSet. Чтение и запись XML-документов
XML-схемы данных (XSD)
Схемы данных 1 Точный перевод XML Schema Document - схема документа XML >, однако мы будем в дальнейшем использовать термин "схема данных XML". XSD ( XML Schema Document, XSD) представляют собой альтернативный способ правил построения XML-документов. По сравнению с DTD, схемы обладают более мощными средствами для определения сложных структур данных, обеспечивают более понятный способ описания грамматики языка, способны легко модернизироваться и расширяться. Схема XSD может содержать следующую информацию:
- представление связей между элементами данных, аналогичное связям внешних ключей между таблицами в реляционной базе данных;
- представление уникальных идентификаторов, подобных первичному ключу;
- спецификацию типов данных каждого индивидуального элемента и атрибута в XML-документе.
Для создания схемы данных в Visual Studio .NET в главном меню переходим File \ New \ File и выбираем из списка шаблонов (см. рис. 11.3) XML Schema . Появляется окно с надписью "Чтобы начать, перетащите объекты из окна Server Explorer или Toolbox на рабочую область (область дизайна) или щелкните правой кнопкой" (рис. 11.1):
Дело в том, что мы находимся в режиме дизайна. Переключаемся в режим кода, для чего нажимаем на кнопку(XML):
Первая строка - это уже знакомое указание на то, что схема представляет собой XML-документ с корневым элементом xs:schema . Префикс xs : предваряет все элементы схемы, указывая на свое пространство имен. Во второй строке располагается длинное, подробное и зачастую совершенно ненужное описание схемы (сравните с аналогичным кодом для HTML-страниц). Для корректной работы вполне достаточно ограничиться следующим представлением:
Переключаемся на вкладку(Data) и видим всего одну запись (рис. 11.2).
Создать схему, описывающую этот документ, можно несколькими способами: в главном меню выбрать пункт "XML \ Create Schema" (рис. 11.3, А), в режиме XML в контекстном меню выбрать этот же пункт (рис. 11.3, Б), в режиме Data в контекстном меню выбрать этот пункт (рис. 11.3, В), и, наконец, в режиме Data нажать на кнопку панели инструментов XML (рис. 11.3, Г).

В любом случае появляется схема документа в виде таблицы (рис. 11.4). Оставим пока режим Schema и переключимся в режим(XML).
Среда сгенерировала XML-код, описывающий структуру документа:
Документ XMLEasy.xsd был автоматически создан в той же самой директории, где находится XMLEasy.xml.
В программном обеспечении к курсу вы найдете все файлы этой таблицы в папке XSD (Code\Glava5\ XSD).
Задание типа данных в XML-документе (последний пример - табл. 11.1) - один из способов ограничения содержимого. Для ограничения значения заданного типа применяются дополнительные атрибуты. В следующем фрагменте схемы значение элемента PRICE должно быть в пределах от 50 до 100:
Для ограничения XML-документа некоторыми фиксированными значениями используется следующая конструкция:
Здесь элемент NAME может принимать только одно фиксированное значение из пяти названий стран.
Выше мы получили XSD-схему документа XMLTourFull.xml. Итак, методика следующая: создаем XML-документ, затем выбираем "Create Schema" - среда сама генерирует готовую схему. Но как быть, если нам совсем не нужен XML-документ, а нужна XSD-схема сама по себе? Создадим точно такую же схему, как и XMLTourFull.xsd, только на этот раз без всякой привязки к документу. Запускаем студию, нажимаем Ctrl+N и в появившемся окне выбираем XML \ Schema (см. рис. 11.3). Сохраним сразу документ, задав ему название "CreateXSDSchema.xsd". Для добавления элемента можно воспользоваться одним из следующих способов: перетащить из окна Toolbox элемент управления, который так и называется - element (рис. 11.7, А); в главном меню перейти "Schema \ Add \ New element" (рис. 11.7, Б); выбрать пункт контекстного меню "Add \ New element" (рис. 11.7, В ).

Далее нам предстоит заполнить элементы полями, как это показано в таблице 11.6. В результате получится четыре элемента (рис. 11.8):

Для создания вложенной структуры берем элемент SEASON и перетаскиваем его на элемент TOUR . В элементе TOUR появляется дополнительное поле SEASON ( SEASON ), отражающее связь, и значок с линией - щелкнув на него, можно собрать структуру (рис. 11.9).
Аналогичным образом добавляем элементы PASS и PAYMENT . Переходим в режим XML и убеждаемся в том, что созданный код практически одинаков с кодом документа XMLTourFull.xsd - в последнем имеются только дополнительные атрибуты, например minOccurs="0". При необходимости их можно добавить вручную.
Мы рассмотрели создание простейшей XSD-схемы. Графическое конструирование более сложных XSD-схем не будет отличаться принципиально - вместо написания тегов, приведенных в таблицах 11.2-11.4, на рабочую область просто переносится и настраивается соответствующий элемент.
В программном обеспечении к курсу вы найдете файл CreateXSD Schema.xsd в папке XSD (Code\Glava5\XSD).
This page discusses various ways of integrating the XSD compiler with the Microsoft Visual Studio IDE as well as other Visual Studio-specific topics. For information on how to setup the XSD compiler and runtime library paths in Visual Studio IDE refer to the installer instructions (.msi package) or the accompanying README file (.zip package).
Contents
Note: Visual Studio 7.1 is only supported up to XSD 3.3.0. However, the mechanism described below applies to newer Visual Studio and XSD versions.
A common way of integrating the XSD compilation step into Visual Studio (VS) 7.1 is with the custom build steps. With this method you add the schema file to your project and specify the command line to compile it as well as the output files. When the project is built, VS IDE checks if the output files do not exist or out-of-date compared to the schema file and executes the specified command line in order to regenerate them. The following step-by-step instructions describe how to accomplish this:
- Add the schema file (for example, hello.xsd) to your project ("Project"->"Add Existing Item" menu action). At this point VS assumes that you are going to use the Microsoft xsd.exe tool and will try to compile the schema which may fail. This is ok. You may also find that additional files (for example, hello.h) were added under the schema item. You can safely remove them from the project.
- Open the Properties dialog for the schema file (select the schema file in the Solution Explorer and choose "Project"->"Properties" menu action).
- In the Properties dialog select the General tab and choose "Custom Build Tool" for the Tool field. Then press the Apply button.
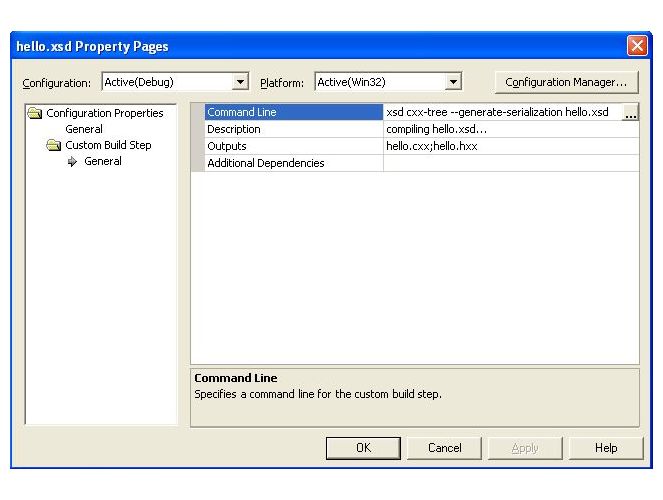
- In the same Properties dialog select the "Custom Build Step" tab. There you will have the "Command Line", "Description", "Outputs", and "Additional Dependencies" fields. Fill them depending on how you want to compile your schema, for example:
- Press the Ok button to close the Properties dialog.
- Compile the schema by selecting the schema file in the Solution Explorer and choosing "Build"->"Compile" menu action. This will result in the output files (for example, hello.hxx and hello.cxx) being created.
- Add the output files (for example, hello.hxx and hello.cxx) to the project ("Project"->"Add Existing Item" menu action).
- If your project is not linking to Xerces-C++ (or Expat, if you are using the C++/Parser mapping and have selected Expat as the underlying XML parser), you should add xerces-c_3.lib (release) or xerces-c_3D.lib (debug) (libexpat.lib for Expat) as Additional Dependencies in the Linker's Input tab. To accomplish this, select your project in Solution Explorer and choose "Project"->"Properties" menu action. Select the Linker tab, then Input sub-tab, and enter the library name into the Additional Dependencies field.
Visual Studio 2005 (8.0) and 2008 (9.0)
- The .rules files are located in the etc\vc-8.0 and etc\vc-9.0 directories (for VS 2005 and 2008, respectively) in the XSD distribution. The first step is to add one of these directories to the list of paths where Visual Studio looks for .rules files. To accomplish this, open the Options dialog by choosing the "Tools"->"Options" menu action. Then in the "Projects and Solutions" tab select the "VC++ Project Settings" sub-tab. Add the path to either etc\vc-8.0 (for VS 2005) or etc\vc-9.0 (for VS 2008) to the "Rule File Search Paths" field. Then press the Ok button to close this dialog. Alternatively, you can copy the .rules file into your solution directory and then include it into your project using the "Find Existing" button in the "Custom Build Rules" dialog described on the next step. This way your solution will be self-sufficient and can be built without modifications on another machine where XSD was installed in a different location.
- Select the project where you want to add your schema and open the "Custom Build Rules" dialog by choosing "Project"->"Custom Build Rules" menu action. There your should see two rules for CodeSynthesis XSD: one is for C++/Tree and the other is for C++/Parser. Select the rule corresponding to the mapping you are planning to use in your project. Press the Ok button to close the dialog. For example:
- Add the schema file (for example, hello.xsd) to your project ("Project"->"Add Existing Item" menu action). At this point VS may add additional files (for example, hello.h) under the schema item. You can safely remove them from the project.
- Open the Properties dialog for the schema file (select the schema file in the Solution Explorer and choose "Project"->"Properties" menu action). There you will notice that the Tool field in the General tab contains the name of the C++ mapping that you have chosen.
- In the same Properties dialog select the "C++/Tree Mapping Rule" or "C++/Parser Mapping Rule" tab. There you will see a number of sub-tabs where you can select various XSD compiler options, for example:
- Press the Ok button to close the Properties dialog.
- Compile the schema by selecting the schema file in the Solution Explorer and choosing "Build"->"Compile" menu action. This will result in the output files (for example, hello.hxx and hello.cxx) being created.
- Add the output files (for example, hello.hxx and hello.cxx) to the project ("Project"->"Add Existing Item" menu action).
- If your project is not linking to Xerces-C++ (or Expat, if you are using the C++/Parser mapping and have selected Expat as the underlying XML parser), you should add xerces-c_3.lib (release) or xerces-c_3D.lib (debug) (libexpat.lib for Expat) as Additional Dependencies in the Linker's Input tab. To accomplish this, select your project in Solution Explorer and choose "Project"->"Properties" menu action. Select the Linker tab, then Input sub-tab, and enter the library name into the Additional Dependencies field.
Visual Studio 201X (1X.0)
Note: the below information applies to Visual Studio version 2010 (10.0) and later (e.g, 2012 (11.0), 2013 (12.0), etc).
For Visual Studio 201X there are two ways to setup the XSD compilation step. You can use the same custom build step approach as in Visual Studio 2003. Additionally, you can use the rules-based approach of setting up the XSD compilation. This method relies on a set of build customization files (.targets, .props, and .xml) that are provided with the XSD distribution. These files specify the command line, output files, and options for the XSD compiler. They also provide the GUI-based presentation which allows you to configure the schema compilation process in a way similar to the built-in tools such as the C++ compiler and linker. The following step-by-step instructions show how to accomplish this:
- The build customization files are located in the etc\vc-1x.0 directory in the XSD distribution. The first step is to add this directory to the list of paths where Visual Studio looks for such files. To accomplish this, open the Options dialog by choosing the "Tools"->"Options" menu action. Then in the "Projects and Solutions" tab select the "VC++ Project Settings" sub-tab. Add the path to etc\vc-1x.0 to the "Build Customizations Search Path" field. Then press the Ok button to close this dialog. Alternatively, you can copy the build customization files into your solution directory and then include them into your project using the "Find Existing" button in the "Build Customization Files" dialog described on the next step. This way your solution will be self-sufficient and can be built without modifications on another machine where XSD was installed in a different location.
- Select the project where you want to add your schema and open the "Build Customization Files" dialog by choosing "Project"->"Build Customizations" menu action. There your should see two rules for CodeSynthesis XSD: xsd-cxx-tree for C++/Tree and xsd-cxx-parser for C++/Parser. Select the rule corresponding to the mapping you are planning to use in your project. Press the Ok button to close the dialog. For example:
- Add the schema file (for example, hello.xsd) to your project ("Project"->"Add Existing Item" menu action) and open its Properties dialog (select the schema file in the Solution Explorer and choose "Project"->"Properties" menu action). There you will notice that the Item Type field in the General tab contains the name of the XML Schema to C++ mapping that you have chosen.
- In the same Properties dialog select the "C++/Tree Mapping" or "C++/Parser Mapping" tab. There you will see a number of sub-tabs where you can select various XSD compiler options, for example:
- Press the Ok button to close the Properties dialog.
- Compile the schema by selecting the schema file in the Solution Explorer and choosing "Build"->"Compile" menu action. This will result in the output files (for example, hello.hxx and hello.cxx) being created.
- Add the output files (for example, hello.hxx and hello.cxx) to the project ("Project"->"Add Existing Item" menu action).
- If your project is not linking to Xerces-C++ (or Expat, if you are using the C++/Parser mapping and have selected Expat as the underlying XML parser), you should add xerces-c_3.lib (release) or xerces-c_3D.lib (debug) (libexpat.lib for Expat) as Additional Dependencies in the Linker's Input tab. To accomplish this, select your project in Solution Explorer and choose "Project"->"Properties" menu action. Select the Linker tab, then Input sub-tab, and enter the library name into the Additional Dependencies field.
Conflict with Microsoft xsd.exe
Microsoft SDK contains an executable with the name xsd.exe which may take precedence over CodeSynthesis xsd.exe . If this happens you will get an error message like this:
If you get this error message then you need to make sure that the bin directory inside the CodeSynthesis XSD distribution is in the Visual Studio IDE's "Executable files" list and is at the top of this list. To check this:
- for Visual Studio .NET 2003/7.1 go to "Tools"->"Options"->"Projects"->"VC++ Directories"
- for Visual Studio 2005/8.0 go to "Tools"->"Options"->"Projects and Solutions"->"VC++ Directories"
- for Visual Studio 2008/9.0 go to "Tools"->"Options"->"Projects and Solutions"->"VC++ Directories"
- for Visual Studio 2010/10.0 and later:
Note (curtesy of Kent Bair): adding the value directly in front of the list of "Executable Directories" field will break compiling C++ code in all other versions of Visual Studio that you may have installed due to Visual Studio writing the value in the text box directly to %AppData%\..\Local\Microsoft\MSBuild\v4.0\Microsoft.Cpp.Win32.user.props which is shared by all versions starting from 10.0. However, if you select "Edit" and add the XSD path to the top of the list, Visual Studio will correctly change the value to [path-to-xsd]\bin;$(ExecutablePath).
Creating a DLL
1. Create a DLL project, let's call it foo, and add the schema to it as explained in the previous section.
2. Create a header file, let's call it export.hxx, which contains the export symbol definitions:
4. Rebuild the project.
If your schemas use XML Schema polymorphism in the form of substitution groups or xsi:type (and are therefore compiled with the --generate-polymorphic option) and you would like to place the generated code into several DLLs then your will need to use the --import-maps and --export-maps options as discussed in the XSD Compiler Command Line Manual.
Итак, что же мы будем делать, для того, что бы научиться штамповать XML на основе вашего эталона? Опишу всё по порядку.
Имеется:
Какой то XML (xmlfile.xml), сохраненный в текстовом формате в файл. Ниже приведу текст:
Шаг 1. Создание XSD из XML.
- Утилита xsd.exe - создатель Microsoft.
- Утилита xsd2code.exe - стороннее приложение, которое умеет все тоже самое, что и xsd.exe, но доступно для скачивания напрямую (на данный момент стала платной с Trial периодом).
- Использование любых онлайн сервисов.
- Далее перейдя в папку:
C:\Program Files (x86)\Microsoft SDKs\Windows>
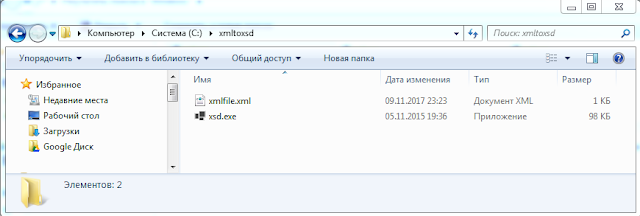
- Воспользуемся поиском, и найдем файл xsd.exe, после чего (что бы упростить себе работу), скопируем его в созданную в корне диска папку C:\xmltoxsd. Далее в эту же папку мы копируем наш xmlfile.xml и все готово к началу.
Отрываем "Командную строку" (Пуск -> "Выполнить" -> "cmd"), переходим в наш каталог и вызываем с параметрами по умолчанию xsd.exe, передавая наш xmlfile.xml параметром:
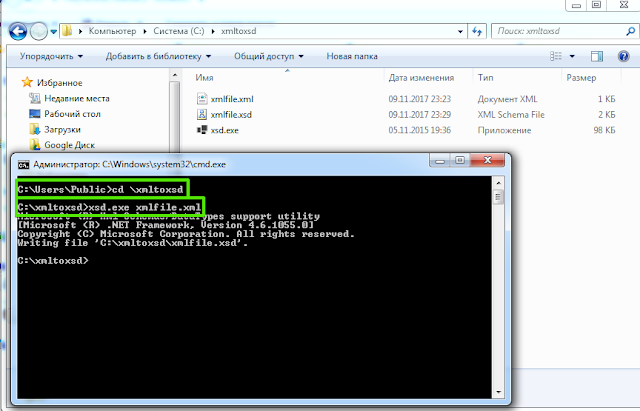
И видим, что рядом появился файл xmlfile.xsd с содержимым.

Вот и все! Этих действий достаточно, для создания примитивного XSD файла, с которым можно работать. Но стоит понимать, что сам xsd.exe, как и любая другая утилита, ничего не знает про типы ваших полей (поэтому почти всегда тип полей будет string), а так же о всех вариациях атрибутов и параметров. То есть, если у какого-то тега нет атрибута в вашей XML, тогда его и не будет в описании. Поэтому XML должен быть наиболее полным и в случае, если элемент может содержать несколько дочерних полей, лучше добавить как минимум два, что бы xsd.exe понял, что это коллекция.
Синтаксис XSD не очень сложный, поэтому, если пишется достаточно серьезное описание, возможно придется поработать и напильником.
Шаг 2. Создание Class из XSD.

После выполнения появится файл xmlfile.cs, содержимое которого приведено ниже в сжатом виде:

Как видите, для внутреннего элемента catalog был создан класс catalogBook, у которого поля соответствуют полям в XML, а поле Id помечено как атрибут. Xsd.exe корректно понял, что внутри catalog хранится коллекция книг, поэтому появилось свойство Items, для наполнения дочерней коллекции.
Замечание: xsd.exe не умеет добавлять комментарии к получившимся классам и полям. В описании XSD существует элемент под названием < xs:annotation >, который чаще всего содержит < xs:documentation >, внутри которого размещено описание поля. По идее, оно должно быть размещено в /// описании, но на текущий момент xsd.exe отказывается добавлять текст в описание, поэтому приходится прибегать к альтернативам, таким как xsd2code или онлайн сервисам.
Шаг 3. Сериализация объектов в XML.
Получившиеся классы у нас лежат в файле xmlfile.cs. Далее его содержимое или сам файл добавляем в проект Visual Studio, после чего можно с ним работать. Я создам демонстративный объекты книг, после чего сохраню в файл в формате XML.
После запуска и открытия Output.xml можно увидеть, что мы сохранили так, как мы хотели (Нижний файл - "Созданный кодом").

Как мы видим, форматирование было соблюдено, а данные были наполнены нами.
Читайте также: