
Weight paint blender это

Blender provides a set of helper tools for Weight Painting. The tools are accessible from the Tool Shelf in Weight Paint Mode. And they are located in the weight tools panel.
The Subset Option
Some of the tools also provide a Subset filter to restrict their functionality to only specific vertex groups (in the Operator panel, displayed after the tool is called) with following options:
- Active Group
- Selected Pose Bones
- Deform pose Bones
- All Groups
All tools also work with Vertex Selection Masking and Face Selection masking. In these modes the tools operate only on selected vertices or faces.
About the Blend tool
The Blend tool only works when “Vertex selection masking for painting” is enabled. Otherwise the tool button is grayed out.
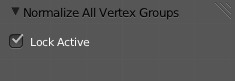
Normalize All
For each vertex, this tool makes sure that the sum of the weights across all Vertex Groups is equal to 1. This tool normalizes all of the vertex groups, except for locked groups, which keep their weight values untouched.
Options
Normalize All Options.
Normalize
Normalize All Options.
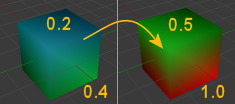
This tool only works on the active Vertex Group. All vertices keep their relative weights, but the entire set of weights is scaled up such that the highest weight value is 1.0.
Mirror
Normalize All Options.
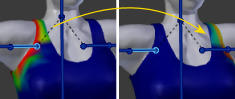
This tool mirrors the weights from one side of the mesh to the opposite side (only mirroring along x-axis is supported). But note, the weights are not transferred to the corresponding opposite bone weight group. The mirror only takes place within the selected Vertex Group.
Options
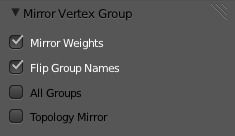
Mirror Weights Mirrors the weights of the active group to the other side. Note, this only affects the active weight group. Flip Group Names Exchange the names of left and right side. This option only renames the groups. All Groups Operate on all selected bones. Topology Mirror
Mirror for meshes which are not 100% symmetric (approximate mirror).
Mirror to opposite bone
If you want to create a mirrored weight group for the opposite bone (of a symmetric character), then you can do this:
- Delete the target Vertex Group (where the mirrored weights will be placed).
- Create a copy of the source bone Vertex Group (the group containing the weights which you want to copy).
- Rename the new Vertex Group to the name of the target Vertex Group (the group you deleted above).
- Select the Target Vertex Group and call the Mirror tool (use only the Mirror weights option and optionally Topology Mirror if your mesh is not symmetric).
Invert

Replaces each Weight of the selected weight group by × -1.0 weight.
- Original 1.0 converts to 0.0
- Original 0.5 remains 0.5
- Original 0.0 converts to 1.0
Options
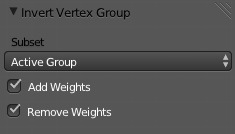
Subset Restrict the tool to a subset. See above The Subset Option about how subsets are defined. Add Weights Add vertices that have no weight before inverting (these weights will all be set to 1.0) Remove Weights Remove vertices from the Vertex Group if they are 0.0 after inverting.
Locked vertex Groups are not affected.
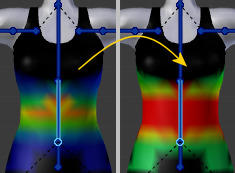
Clean
Removes weights below a given threshold. This tool is useful for clearing your weight groups of very low (or zero-) weights.
In the example shown, a cutoff value of 0.139 is used (see operator options below) so all blue parts (left side) are cleaned out (right side).
Note, the images use the Show Zero weights Active option so that unreferenced Weights are shown in Black.
Options
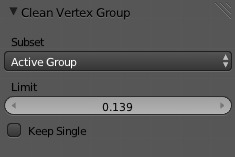
Subset Restrict the tool to a subset. See above The Subset Option for how subsets are defined. Limit This is the minimum weight value that will be kept in the Group. Weights below this value will be removed from the group. Keep Single Ensure that the Clean tool will not create completely unreferenced vertices (vertices which are not assigned to any Vertex Group), so each vertex will keep at least one weight, even if it is below the limit value!
Quantize
Clamps each weight to a number of steps between (0 - 1).
Levels
Adds an offset and a scale to all weights of the selected Weight Groups. with this tool you can raise or lower the overall “heat” of the weight group.
No weight will ever be set to values above 1.0 or below 0.0 regardless of the settings.
Options
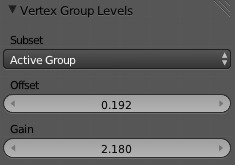
Subset Restrict the tool to a subset. See above The Subset Option for how subsets are defined. Offset A value from the range (-1.0 - 1.0) to be added to all weights in the Vertex Group. Gain All weights in the Subset are multiplied with the gain.
Whichever Gain and Offset you choose, in all cases the final value of each weight will be clamped to the range (0.0 - 1.0). So you will never get negative weights or overheated areas (weight > 1.0) with this tool.
Smooth
Blends the weights of selected vertices with adjacent unselected vertices. This tool only works in vertex select mode.

To understand what the tool really does, let us take a look at a simple example. The selected vertex is connected to four adjacent vertices (marked with a gray circle in the image). All adjacent vertices are unselected. Now the tool calculates the average weight of all connected and unselected vertices. In the example this is:
\((1 + 0 + 0 + 0) / 4 = 0.25\)
This value is multiplied by the factor given in the Operator options (see below).
- If the factor is 0.0 then actually nothing happens at all and the vertex just keeps its value.
- If the factor is 1.0 then the calculated average weight is taken (0.25 here).
- Dragging the factor from 0 to 1 gradually changes from the old value to the calculated average.

Now let us see what happens when we select all but one of the neighbors of the selected vertex as well. Again all connected and unselected vertices are marked with a gray circle. When we call the Smooth tool now and set the Factor to 1.0, then we see different results for each of the selected vertices:
The topmost and bottommost selected vertices:
are surrounded by three unselected vertices, with an average weight of \((1 + 0 + 0) / 3 = 0.333\) So their color has changed to light green.
The middle vertex:
is connected to one unselected vertex with weight = 1 . So the average weight is 1.0 in this case, thus the selected vertex color has changed to red.
The right vertex:
is surrounded by three unselected vertices with average weight = \((0 + 0 + 0) / 3 = 0.0\) So the average weight is 0, thus the selected vertex color has not changed at all (it was already blue before Smooth was applied).

Finally let us look at a practical example. The middle edge loop has been selected and it will be used for blending the left side to the right side of the area.
- All selected vertices have two unselected adjacent vertices.
- The average weight of the unselected vertices is \((1 + 0) / 2 = 0.5\)
- Thus when the Factor is set to 1.0 then the edge loop turns to green and finally does blend the cold side (right) to the hot side (left).
Options

Factor The effective amount of blending. When Factor is set to 0.0 then the Blend tool does not do anything. For Factor > 0 the weights of the affected vertices gradually shift from their original value towards the average weight of all connected and unselected vertices (see examples above). Iterations ToDo. Expand/Contract ToDo. Source ToDo.
Fix Deforms
Transfer Weights
Copy weights from other objects to the vertex groups of the active Object. By default this tool copies all vertex groups contained in the selected objects to the target object. However, you can change the tool’s behavior in the Operator panel (see below).
Prepare the Copy

You first select all source objects, and finally the target object (the target object must be the active object).
It is important that the source objects and the target object are at the same location. If they are placed side by side, then the weight transfer will not work. You can place the objects on different layers, but you have to ensure that all objects are visible when you call the tool.
Now ensure that the Target Object is in Weight Paint Mode.
Call the Tool
Open the Tool Shelf and locate the Weight Tools panel. From there call the “Transfer weights” tool. The tool will initially copy all vertex groups from the source objects. However, the tool also has an Operator panel (which appears at the bottom of the tool shelf). From the Operator panel you can change the parameters to meet your needs. (The available Operator parameters are documented below.)
Operator Panel Confusion
You may notice that the Operator panel (see below) stays available after the weight transfer is done. The panel only disappears when you call another Operator that has its own Operator panel. This can lead to confusion when you use Transfer weights repeatedly after you changed your vertex groups. If you then use the still-visible Operator panel, then Blender will reset your work to its state right before you initially called the Transfer Weights tool.
Workaround
When you want to call the Transfer Weights tool again after you made some changes to your vertex groups, then always use the “Transfer Weights” Button, even if the operator panel is still available. Unless you really want to reset your changes to the initial call of the tool.
Options
This tool now uses the generic ‘data transfer’ one. Please refer to the Data Transfer docs for options details and explanations.
Limit Total
Reduce the number of weight groups per vertex to the specified Limit. The tool removes lowest weights first until the limit is reached.
The tool can only work reasonably when more than one weight group is selected.
Options
Subset Restrict the tool to a subset. See above The Subset Option for how subsets are defined. Limit Maximum number of weights allowed on each vertex.
Weight Gradient

Example of the gradient tool being used with selected vertices.
This is an interactive tool for applying a linear/radial weight gradient; this is useful at times when painting gradual changes in weight becomes difficult.
The gradient tool can be accessed from the Tool Shelf or as a key shortcut:
- Linear: Alt-LMB and drag.
- Radial: Alt-Ctrl-LMB and drag.
The following weight paint options are used to control the gradient:
Weight The gradient starts at the current selected weight value, blending out to nothing. Strength Lower values can be used so the gradient mixes in with the existing weights (just like with the brush). Curve The brush falloff curve applies to the gradient too, so you can use this to adjust the blending.
Blends the weights of selected vertices with unselected vertices.
This tool only works in vertex select mode.
Options
Assign
Assign from Bone Envelopes Applies the envelope weight of the select the bone(s) to the selected vertex group. Assign Automatic from Bone Apply from the selected bone(s) to the vertex group the same “auto-weighting” methods as available in the Parent armature menu.

Before we start, please take a quick look at the following resources:
Blender Fundamentals - Introduction to Rigging
Blender Fundamentals - Character Rigging Blender 2.80 Fundamentals - Armature
Blender 2.80 Fundamentals - Character Rigging
Blender 2.80 Fundamentals - Vertex Groups [More info later in the guide]
Blender 2.80 Fundamentals - Bone Layers
Blender 2.80 Fundamentals - Copy Limit Constraint [OPTIONAL]
Blender 2.80 Fundamentals - Inverse Kinematics (IK) [OPTIONAL]
If the Gfycat demos are too fast, you can right click them to change speed.
IMPORTANT:
There is a known bug in Blender that occurs when attempting to Undo (CTRL+Z) in Weight Paint mode or Sculpt mode.
- Demo: Undo Bug
- Bug Reported
Workaround: After adjusting the brush values (Weight, Radius, or Strength), switch to a different paint brush (Add, Subtract, Mix, etc.), and then switch back to your previous paint brush.
- Undo should now work as expected.
If you have MMD Tools add-on active, it will conflict with Rigify's Generate Rig functionality.
- MMD Tools Reported Bug
- If you plan to use Rigify's Generate Rig function, make sure to disable the MMD Tools add-on before using the Rigify armature.
For beginners, I recommend starting with rigging character models that don't have face bones, like a masked character:
After you've mastered the basic body rigging, you can then move on to Face Rigging.
[Explained later in SECTION 8]
Here are different types of Objects you may encounter in Blender:
We will focus on only 2 Object Types:
- Armature Object
- Mesh Object
A rigged 3D character model contains 2 essential things:
- Skeleton (Armature Object)
- 3D Model (Mesh Object)

The 3D model is the Child.
The Skeleton is the Parent.
Wherever the Skeleton moves, the 3D model follows.
In Blender, you parent the Mesh Object to the Armature Object, then you can continue with the Weighting or Weight Painting process (explained later).
Select children first, then select the parent last.
Hotkey: CTRL + P [Opens the Parent Menu]
[ Object ]
[ Armature Deform ]
[ Armature Deform with Empty Groups ]
[ Armature Deform with Automatic Weights ]
[Armature Deform with Envelope Weights]
[ Bone ]
Great for simply attaching something to a bone:
-- Glasses --> Head Bone
-- Gun --> Thigh Bone
-- Knife --> Calf Bone
No weights or vertex groups needed.


A 3D model can be a single Mesh Object
- this is common with low-poly character models.
A 3D model can be composed of multiple Mesh Objects
- this is common with high-poly models with optional clothing, weapons, etc.
You can parent multiple Mesh Objects (Head, Arms, Legs, Clothing, etc.) to a single Armature Object.

What is the purpose of Vertex Groups?
- Vertex Groups can be used for organizing and making it easier to Select/Deselect vertices/faces on a Mesh.
[Example: If your character is a singleMesh Object, you can assign different parts of the character (Hat, Weapon, Jewelry, Clothing, etc.) into their own Vertex Groups, which will make it easier to separate them later as their own Mesh Objects.] - Vertex Groups can be used for physics simulation/collisions.
[Example: Assign vertices from clothing, hair, or breasts to react to physics] - Vertex Groups can be used as Bone Vertex Groups for rigging/weight painting.
- streamable.com/n73te
[Example: Assign vertices from the character's left upperarm to the Vertex Group "upperarm_L" (bone name) with a weight value from 1 to 0 or 100% to 0%]
Weight influence 100%(Red) - 0%(Blue)
This will be explained later in the guide.

How to Prepare/Clean the 3D model before rigging?
Example 1: [Symmetry]
If you have a symmetricalMesh Object that has a few non-symmetrical vertices, use Snap to Symmetry.
- The Snap to Symmetry tool lets you snap a mesh vertices to their mirrored neighbors.
- Useful when dealing with meshes which are mostly symmetrical, but have vertices which have been moved enough that Blender does not detect them as mirrored (when X Mirror option is enabled for example).
- This can be caused by accident when editing without X Mirror enabled. Sometimes models imported from other applications are asymmetrical enough that mirror fails too.
- This is also a good option to use after removing overlapping/double vertices with Remove Doubles or Merge by Distance.
WARNING: The Symmetrize tool is not as safe as Snap to Symmetry, and it may destroy mesh or UV data.
Related Question

You can also tell if an Object's transform hasn't been applied by looking at the location of the Object Origin (Origin Point).
According to some reports, Mesh Objects with dimensions smaller than 1m (1 Meter = 1 Blender Unit) may fail with Automatic Weights.

Make sure the bones are inside the mesh, otherwise you will get the following error with Automatic Weights:
- Bone Heat Weighting: failed to find solution for one or more bones

- Don't forget to adjust your bone rolls.
- In Example 3, you will want to join all the Mesh Objects together before rigging, to avoid the seams.
- Select all the Mesh Objects and join them together CTRL+J.
- Afterwards, in [Edit Mode], select the seams (overlapping vertices) and Remove Doubles or Merge by Distance.
- Later in the guide, you will learn how to separate the Mesh Objects.
-
or Merge By Distance [Show Normal Direction] [Set Normals from Faces]
- Check for Loose Geometry or Non-manifolds (loose vertices/edges/faces) [CTRL+SHIFT+ALT+M]
- [Demo1] [Demo2] [Demo3]
-
Check if your character Mesh Object has:
- Overlapping mesh parts:
- armor, clothing, hair, tactical gear, ammo pockets, holstered sword - Internal mesh parts:
- eye balls and teeth
How to properly switch to Weight Paint mode?
- Blender 2.7
- Demo: [Blender 2.7]
- While the Armature is in Pose Mode, select a Bone.
- Then select your Mesh Object and switch it to Weight Paint Mode.
- Weight Paint Mode will now allow you to pose your selected Bone while weight painting the Mesh Object to it.
- While in Weight Paint Mode, you can select bones with RIGHTCLICK. - Blender 2.8
- Demo: [Blender 2.8]
- While in Object Mode, select the Armature Object first, and the Mesh Object last.
- Then switch to Weight Paint Mode.
- While in Weight Paint Mode, you can select individual bones with CTRL+LEFTCLICK, or select multiple bones with SHIFT+LEFTCLICK
- You won't be able to select bones properly while Face or Vertex Selection Masking is enabled. More details in [SECTION 7].

Method: [Weight Painting]
- Weight Painting is recommended for high quality rigging.
- Make weight painting in Blender 2.8 similar to Blender 2.7 by disabling Lock Object Modes (Optional).
- Right click video to change speed.
Weight Paint - Vertex Selection Masking
Weight Paint - Face Selection Masking (Bug Fixed in Blender 2.81)
- Select a Face or Vertex: CTRL+LEFTCLICK
- Select multiple Faces or Vertices: SHIFT+LEFTCLICK
Method: [Vertex Weights Panel]
The Vertex Weights panel is only available while Vertex Selection Masking is enabled.
You can open the Vertex Weights panel with the N key.
You will only be able to view/edit the weights of individual vertices, one vertex at a time.
This is a great way to troubleshoot weighting issues:
- [Example 1] [Example 2]
You can also copy the weight values from one vertex to another:
- [Demo]
Method: [Automatic Weights]
It's a quick way to weight the mesh object(s) to the bones in the Armature.
It's not always perfect.
If you take a look at the Vertex Groups, weight values will have already been generated for each bone (Bone Vertex Group).
Fixing Automatic Weights Demo:
- Right click video to change speed.
- Vertex Weights Panel [INFO]
View Clipping Region:
- Use View Clipping Region to easily work in difficult areas in a 3D model.
- Demo: View Clipping Region and Weight Paint [Starts at 04:10]
- Blender 2.8 Shortcut: Alt + B
Method: [Assign Automatic from Bones]
[Blender 2.7 Demo]
Similar to Automatic Weights, except it is for individual bones.
Method: [Transfer Weights]
Great for clothes or other loose parts.
Method: [Parent to Bone]
- First select the Mesh Object
- and then the Armature Object.
- Switch to Pose Mode and select a Bone.
- Press CTRL+P.
- Set Parent to Bone
Great for simply attaching something to a bone:
-- Glasses --> Head Bone
-- Gun --> Thigh Bone
-- Knife --> Calf Bone
No weights or vertex groups needed.


Rigging and Weight Painting Videos:
- [Blender 2.80] Blender 2.8 3D Female Bone Positioning (Hips, Breasts, Shoulders, Hands, Feet, Spine)
- [Blender 2.80] Blender 2.8 Weight Painting mini-tutorial (and how to undo a "neck fix")
- Mostly Weight Painting - [Blender 2.78] Blender Human Meta-Rig. Clear HD tutorial
- Excellent tips for preparing the mesh and setting up bones and rolls - [Blender 2.77] Blender: Weight Painting (Part 1 of 2)
- Vertex Group tips, Weight Painting tips - [Blender 2.76] How To Rig A Simple Female Character In Blender 2 .76
- Rigging with metarig, fixing bone rolls, custom IK controls, custom foot roll controls, Automatic Weights, breast physics - [Blender 2.69] Simple rigging of a character in Blender
- Setting up a custom rig from scratch with IK controls, custom bone shapes, and Automatic Weights Work In Progress.
Extra Resources:
- Fundamentals of bones, deformation, vertex groups, weight painting

Want to rig some free models?
Try these.
Submit 3D Models and Resources:


Common Mistakes Made in Blender

Rip Your Favorite 3D Game Character Models FREE

Dec 4 2019
Swapped [Section 6] and [Section 7]
- Added how to properly select bones in Weight Paint Mode.
- Added how to select faces or vertices in Weight Paint Mode.
Oct 25 2019
Updated: How to Prepare/Clean the 3D model before Rigging?
- added info about Snap to Symmetry
Important: If you plan to use Rigify, check this page for the Bone Positioning Guide:
- wiki.blender.jp/Extensions:2.6…
According to some reports, Automatic Weights may not work properly for Mesh Objects with dimensions smaller than 1m (1 Meter = 1 Blender Unit)
May 19 2019
Update:
Added Transfer Weights demo for Blender 2.7.
Mar 28 2019
Update:
Added an easier alternative to rigging: Shape Keys
- Shape Keys are also known as Flexes or Morph Targets.
Feb 21 2019
Update:
Added Demonstration for Armature Deform with Empty Groups
Feb 14 2019
Update:
Added details of the different Parenting options and Rigging options
- Armature Deform, Empty Groups, Automatic Weights, etc.
Added explanation and Demo for Vertex Groups
Added explanation and Demo for Assign Automatic from Bones
Blender - Common Mistakes and Tips
Blender - Common Mistakes & Tips Click HERE to see updated tips! [Updated: December 19th 2019] Change Log at the bottom. 1. How do I use Old and New versions of Blender? I recommend downloading the portable versions of Blender 2.79b and Blender 2.81. You can switch between versions anytime, or run them both simultaneously. .zip = Windows Portable .tar.bz2 = Linux Portable Unzip and run Blender, no installation required. a, b, c, d releases include the latest official fixes for Blender. 2. Help! I installed a Blender Add-on, but nothing happened or it doesn't appear to work. Important, make sure there are no extra periods in th
Rip Your Favorite 3D Game Character Models [FREE]
Play with XPS/XNALara models in Blender
Blender - Play with XPS Models (For new Blender users) **Update** Dec 27th 2019 (See Changelog at the bottom) Click HERE for the latest guide! This guide is mostly targeted at users who may have anxiety learning Blender. I made this short, sweet, and easy. If you are interested in Blender 2.8, click HERE. If you are looking for a guide to help you start Posing/Animating/Editing/Rendering XPS characters in Blender, continue reading. The User Interface shown in the gifs below has been changed slightly to help new users identify the different Editors/Windows within Blender. For eye comfort, feel free to change the appearance of Blender'
In this tutorial you’ll learn about weight painting in IMVU. While this tutorial specifically references Blender, many of these steps will apply in other 3D software applications. [Download Blender FREE here.]
Limit skin weighting to 4 bones per vertex!
Products created with skin weighting of more than 4 bones per vertex may appear distorted in Next platforms (Desktop, Web, Mobile and Studio).
Weight Painting (Vertex Groups)
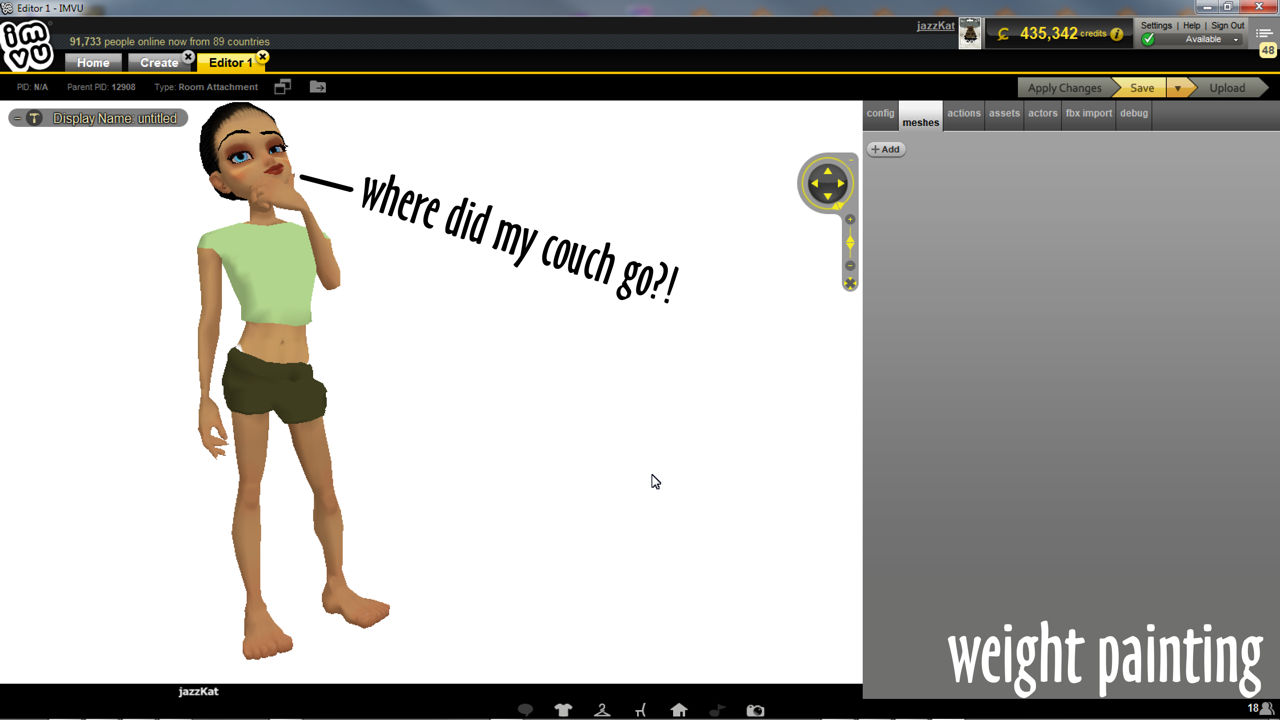
To export meshes to IMVU they need to be associated with the appropriate skeleton for the product being made, a couch for example has to be linked to a furniture item skeleton otherwise nothing appears in IMVU and/or the item won’t work, articulate or move the way it should. In Blender this is a two part process; 1) Parent mesh to skeleton or Armature, and 2) link nodes or bones with mesh vertices using Weight Painting.
Without linking the underlying structure of a mesh to a skeleton, if export/import succeeds, nothing will appear in IMVU when loaded
/imported.
What is weight Painting?
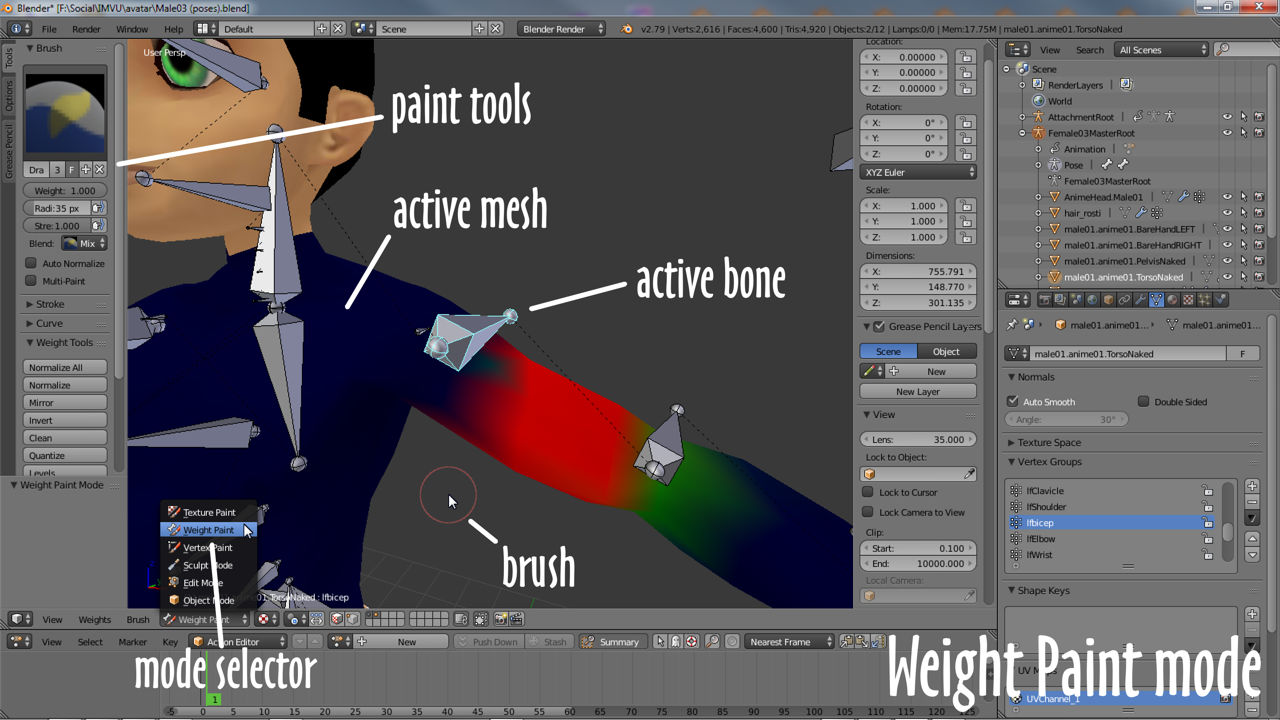
Weight Painting is two things; assigning an ‘influence’ value to something (weighting), and the act of doing this (painting). In Blender this is done in a dedicated Weight Paint mode; with a mesh selected choose Weight Paint from the interaction mode selector menu (or switch using Ctrl+Tab shortcut). When enabled the current active mesh turns blue, the Tool Shelf updates showing a new set of options, and the mouse cursor displays a pinkish tinted circular outline representing a brush.
If the mesh has yet to be painted it will appear blue, if it has already been painted, or values already assigned though other means ( vertex groups, see section below ), it will be coloured, typically red, green. orange, yellow or pale-blue.
When enabled the active mesh turns blue, a set of new options appear in the Tool Shelf, and the cursor displays an circular outline.
Weight Painting
The next step once Weight Paint mode is active is to select a bone or node and then paint the mesh with the cursor/brush to link painted areas with the skeletal element highlighted. As this is done a corresponding Vertex Group is created, named or labeled to reflect the bone or node chosen prior to painting. Depending on the product this painting process then needs to be repeated for each bone or node that’s to influence the mesh, for example 86/7 bones for an avatar replacement, or just one for a simple furniture item.
Similar to Smoothing, the actual element painted are vertices, these store weight information because they are the most basic structural component of a surface.

The active mesh changes colour as its painted, blue represents 0 influence (the bone or node won’t do anything), red 100% influence (the bone/node has complete control).
Weight Painting vs. Vertex Groups
Weight Painting is a more intuitive way to create, assign and manage Vertex Groups, the colours are immediately readable as representing values of influence, the degree to which a bone or node can move, articulate or manipulate a given vertex or mesh section – red is 100% effective, blue is 0% or ineffective. Painting can be tricky for symmetry, when something has a left and right that need to articulate equally, so some manual editing of vertex group values may be necessary in Edit Mode rather than trying to balance values using colour – in Object Data Properties select an entry in the Vertex Groups list and use the buttons below to Assign or Remove selections, or (Shift+) right-click individual vertexes and Assign or Remove, changing the Weight value below where needled, altering the degree of influence the group has over the selection.
When using node based skeletons vertex groups may need to be created first before painting assignments as their selection doesn’t highlight correspond mesh sections as occurs using Armatures and Bones.

Vertex Groups can potentially have a very large number of associated vertices and thus a large number of weights (one weight per assigned vertex). Weight Painting is a method to maintain large amounts of weight information in a very intuitive way. It is primarily used for rigging meshes, where the vertex groups are used to define the relative bone influences on the mesh. But we use it also for controlling particle emission, hair density, many modifiers, shape keys, etc.
The basic principle of the method is: the weight information is literally painted on top of the Mesh body by using a set of Weight brushes. And since painting is always associated with color, we also need to define .
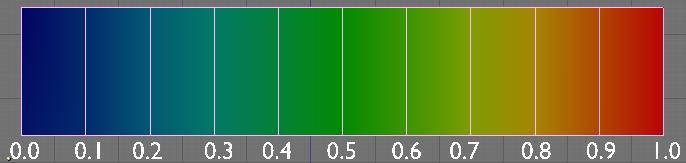
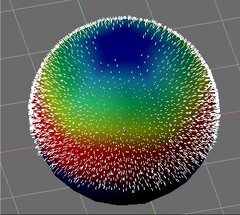
The weighting Color Code
Weights are visualized by using a cold/hot color system, such that areas of low influence (with weights close to 0.0) are drawn in blue (cold) and areas of high influence (with weights close to 1.0) are drawn in red (hot). And all in-between influences are drawn in rainbow colors, depending on their value (blue, green, yellow, orange, red)
In addition to the above described color code, Blender has added (as an option) a special visual notation for unreferenced vertices: They are drawn in black. Thus you can see the referenced areas (drawn in cold/hot colors) and the unreferenced areas (in black) at the same time. This is most practical when you look for weighting errors (we will get back to this later).

Painting needs paint brushes and Blender provides a Brush Panel within the Tool Shelf when it operates in Weight Paint Mode . You find predefined Brush Presets when you click on the large Brush Icon at the top of the brush Panel. And you can make your own presets as needed. See below for the available brush presets and to create custom presets.
The main brush properties
- Mix: In this Blend mode the Weight value defines the target weight that will eventually be reached when you paint long enough on the same location of the mesh. And the strength determines how many strokes you need to arrive at the target weight. Note that for strength = 1.0 the target weight is painted immediately, and for Weight = 0.0 the brush just does nothing.
- Add: In this blend mode the specified weight value is added to the vertex weights. The strength determines which fraction of the weight gets added per stroke. However, the brush will not paint weight values above 1.0.
- Subtract: In this blend mode the specified weight is subtracted from the vertex weights. The strength determines which fraction of the weight gets removed per stroke. However the brush will not paint weight values below 0.0.
- Lighten: In this blend mode the specified weight value is interpreted as the target weight very similar to the Mix Blend mode. But only weights below the target weight are affected. Weights above the target weight remain unchanged.
- Darken: This Blend mode is very similar to the Lighten Blend mode. But only weights above the target weight are affected. Weights below the target weight remain unchanged.
- Multiply: Multiplies the vertex weights with the specified weight value. This is somewhat like subtract, but the amount of removed weight is now dependent on the Weight value itself.
- Blur: tries to smooth out the weighting of adjacent vertices. In this mode the Weight Value is ignored. The strength defines how effectively the blur is applied.
Normalize Options
Blender also provides Options regarding the automatic normalizing of all affected Vertex groups:
Auto Normalize Ensures that all deforming vertex groups add up to 1 while painting. When this option is turned off, then all weights of a vertex can have any value between 0.0 and 1.0. However, when Vertex Groups are used as Deform Groups for character animation then Blender always interprets the weight values relative to each other. That is, Blender always does a normalization over all deform bones. Hence in practice it is not necessary to maintain a strict normalization and further normalizing weights should not affect animation at all. Multi-Paint Paint on all selected Vertex Groups simultaneously. This option is only useful in the context of Armatures, where you can select multiple Vertex Groups by selecting multiple Pose bones.
The Brush stroke definition

- Airbrush: Keep applying paint effect while holding mouse down (spray)
- Space: Limit brush application to the distance specified by spacing (see below)
- Dots: Apply paint on each mouse move step
The brush Falloff curve

The brush falloff editor allows you to speciy the characteristics of your brushes to a large extent. The usage should be obvious and intuitive.
The brush appearance

Show Brush makes the brush visible as a circle (on by default) Color setter To define the color of the brush circle Custom icon Allows definition of a custom brush icon
Brush presets
Blender provides several Brush presets:
- Mix, Draw, Brush: uses the Mix Blending mode to draw the brush weight with varying strength and brush falloff
- Add: uses the Add Blending mode
- Subtract: uses the Subtract Blending mode
- Lighten: uses the Lighten Blending mode
- Darken: uses the Darken Blending mode
- Multiply:uses the Multiply Blending mode
- Blur: uses the Blur Blending mode
Customizing brush color space

Blender allows customization of the color range used for the Weight Paint colors. You can define the color band as you like; for example, you can make it purely black/white (similar to maya Weight painting), and you can even use Alpha values here.
You find the customizer in the User Properties section, in the System Tab.
If you have a complex mesh, it is sometimes not easy to paint on all vertices in Weight Paint mode. Suppose you only want to paint on a small area of the Mesh and keep the rest untouched. This is where selection masking comes into play. When this mode is enabled, a brush will only paint on the selected verts or faces. The option is available from the footer menu bar of the 3D viewport (see icons surrounded by the yellow frame):
![]()
You can choose between Face Selection masking (left icon) and Vertex selection masking (right icon).
Select mode has some advantages over the default Weight Paint mode:
- The original mesh edges are drawn, even when modifiers are active.
- You can select faces to restrict painting to the vertices of the selected faces.
- Selecting tools include:
Details about selecting
The following standard selection operations are supported:
Vertex Selection Masking

In this mode you can select one or more vertices and then paint only on the selection. All unselected vertices are protected from unintentional changes.
Note: This option can also be toggled with the V key:
Face Selection Masking


The Face Selection masking allows you to select faces and limit the weight paint tool to those faces, very similar to Vertex selection masking.
Hide/Unhide Faces
You also can hide selected faces as in Edit Mode with the keyboard Shortcut H , then paint on the remaining visible faces and finally unhide the hidden faces again by using Alt H
Hide/Unhide Vertices
You cannot directly hide selected faces in vertex mask selection mode. However you can use a trick:
- First go to Face selection mask mode
- Select the areas you want to hide and then hide the faces (as explained above)
- Switch back to Vertex Selection mask mode
Now the verts belonging to the hidden Faces will remain hidden.
The Clipping Border
To constrain the paint area further you can use the Clipping Border. Press Alt B and LMB -drag a rectangular area. The selected area will be "cut out" as the area of interest. The rest of the 3D window gets hidden.

You make the entire mesh visible again by pressing Alt B a second time.
All weight paint tools that use the view respect this clipping, including border select, weight gradient and of course brush strokes.

The Weight Paint Options modify the overall brush behavior:
Unified Settings: The Size , Strength and Weight of the brush can be set to be shared across different brushes, as opposed to per-brush.
- Spray: to constantly draw (opposed to drawing one stroke per mouse click).
- Restrict: to only paint on vertices which already are weighted in the active weight group. (No new weights are created; only existing weights are modified.)
- x-mirror: to draw symmetrically. Note the this only works when the character symmetry plane is z-y (character looks into y direction).
- Show Zero weights: To display unreferenced and zero weighted areas in black (by default).

Blender provides a set of helper tools for Weight Painting. The tools are located in the weight tools panel.
The weight paint tools are full described in the Weight Paint Tools page
This is probably the most often used application of weight painting. When a bone moves, vertices around the joint should move as well, but just a little, to mimic the stretching of the skin around the joint. Use a “light” weight (10-40%) paint on the vertices around the joint so that they move a little when the bone rotates. While there are ways to automatically assign weights to an armature (see the Armature section), you can do this manually. To do this from scratch, refer to the process below. To modify automatically assigned weights, jump into the middle of the process where noted:
- Create an armature.
- Create a mesh that will be deformed when the armature’s bone(s) move.
- With the mesh selected, create an Armature modifier for your mesh (located in the Editing context, Modifiers panel). Enter the name of the armature.
Pick up here for modifying automatically assigned weights.
- Select the armature in 3D View, and bring the armature to Pose mode ( Ctrl ⇆ Tab , or the 3D View window header mode selector).
- Select a desired bone in the armature.
- Select your mesh (using RMB ) and change immediately to Weight Paint mode. The mesh will be colored according to the weight (degree) that the selected bone movement affects the mesh. Initially, it will be all blue (no effect).
- Weight paint to your heart’s content. The mesh around the bone itself should be red (generally) and fade out through the rainbow to blue for vertices farther away from the bone.
You may select a different bone with RMB while weight painting, provided the armature was left in Pose mode as described above. This will activate the vertex group sharing the name with the selected bone, and display related weights. If the mesh skins the bones, you will not be able to see the bones because the mesh is painted. If so, turn on X-Ray view ( Buttons window, Editing context, Armature panel). While there on that panel, you can also change how the bones are displayed ( Octahedron , Stick , B-Bone , or Envelope ) and enable Draw Names to ensure the name of the selected bone matches up to the vertex group.
If you paint on the mesh, a vertex group is created for the bone. If you paint on vertices outside the group, the painted vertices are automatically added to the vertex group.
If you have a symmetrical mesh and a symmetrical armature you can use the option X-Mirror . Then the mirrored groups with the mirrored weights are automatically created.
Faces or vertices with zero weight generate no particles. A weight of 0.1 will result in 10% of the amounts of particles. This option “conserves” the total indicated number of particles, adjusting the distributions so that the proper weights are achieved while using the actual number of particles called for. Use this to make portions of your mesh hairier than others by weight painting a vertex group, and then calling out the name of the vertex group in the VGroup: field ( Particles panel, Object context).
I am trying to remove some weight. I left click to add it, but I cannot figure out how to remove it.
4 Answers 4
From the Manual on blend mode:
Subtract: In this blend mode the specified weight is subtracted from the vertex weights. The strength determines which fraction of the weight gets removed per stroke. However the brush will not paint weight values below 0.0.
Lighten: In this blend mode the specified weight value is interpreted as the target weight very similar to the Mix Blend mode. But only weights below the target weight are affected. Weights above the target weight remain unchanged.
Blur: tries to smooth out the weighting of adjacent vertices. In this mode the Weight Value is ignored. The strength defines how effectively the blur is applied.

You can enter edit mode, select the part(s) of the mesh where you need the weight changed (you can press C and also paint select) and in the Data panel (the button with the triangle) in the Properties context under Vertex Groups, set the weight slider to 0 and press Assign.
Paint zero weight to effectively remove it (zero weight has no effect) If you want to remove the vertex from the group you can run the "Clean" tool, or manually select and remove the vertices from the group.
See: Weight Paint Mode -> 3D View Header -> Weights -> Clean
You can erase with draw brush. Change the weight parameter.
- 0.0: Deep eraser
- 0.3: Shallow eraser
- 0.7: Shallow brush
- 1.0: Deep brush
*Precautions: Weight paint does not wet only vertex. Clicking on the vertex makes it dark. Mirror side is not wet. Weight values is recorded on the vertex data of the target mesh. Vertex data is made only of the number of bones. When is it? Setting armature to parent. (with Automatic weight or with Empty group)
Please select together the target mesh and the bones in the order goes to the weight painting mode. Operation: Shift + Click Selection of the bones. can be released by Shift + Double Click . This operation looks confusing. When you paint the weight value is easy to understand and see while switching the object mode and weight painting mode in the Ctrl + Tab .
Читайте также: