
Visual studio как установить pip
Valid python install(s) must exist on the system before this extension will work.
Configuration in vscode must be set to point at the valid python install(s), and must specify specific packages (see extension settings section).
Extension Settings
pip-updater.AutoUpdate
Description
Boolean value that toggles auto-update behavior. Setting 'true' will cause the extension to update packages automatically when vscode is launched.
Note: The behavior is still available by the command regardless of the value of this setting.
Sample
Default Value
The default value is to not run the auto-update when vscode launches. However, configuration will still be loaded as part of the startup logic.
pip-updater.PackagesAndVersions
Description
A list of packages to install and (optionally) specific versions. Ommitting the version or specifying "latest" will pull down the latest version of the package.
Sample
Default value
The default value is an empty array. At least one package must be specified.
pip-updater.VirtualEnv
Description
List of virtual environments in which packages should be installed. Ommitting this setting will cause the packages to be installed in the system python installed in the $PATH .
Virtual environment settings may also specify a path to python that should be used for the virtual environment. If this value is omitted, system python (in $PATH ) will be used to install the virtual environments.
If the path to python that is specified does not contain a valid pip executable, the environment will be ignored.
Virtual environment settings may also specify a path on the system to store virtual environments. If this value is not configuration, the default of %USERPROFILE%\envs or ~/.virtualenvs is used.
Note: virtualenvwrapper will be installed into each python installation automatically in order to support virtual environments.
Note: The value of $WORKON_HOME will be overwritten if a path to the virtual environments is specified in these settings
Sample
Entries are as follows:
- Virtual environment 'TestEnv' using system python in $PATH
- Virtual environment 'TestEnvPy36' using python in /usr/bin/python36 (MacOS/Linux example)
- No virtual environment, installed using python in C:\\python27 (Windows example)
- Virtual environment 'InDifferentEnvs' will be created/stored in specified directory
Note: Sample includes mac/windows paths together, which is not a supported production use-case.
Default value
The default value is an empty array. This will install packages into default environment (no environment) using the system python.
pip-updater.Timeout
Description
Timeout (in milliseconds) when invoking external processes. If the process does not complete in the specified time limit, failure is assumed and the process is aborted.
Packages with many dependencies may take a few minutes when installing on a clean system. This value may need to be increased in order for a successful invocation.
Sample
Default value
The default value is 60000 (1 minute).
Known Issues
Release Notes
Fix regression where changing a configuration would cause it to reload incorrectly
Output will be displayed to the console in real-time instead of all at the end.
Use more appropriate event for catching configuration changes
Add auto-reload when configuration is changed. Add command for manually reloading configuration.
Сообщество разработчиков на Python создало тысячи полезных пакетов, которые вы можете включать в свои проекты. В Visual Studio имеется пользовательский интерфейс для управления пакетами в средах Python.
Просмотр окружений
Выберите команду меню Просмотр > Другие окна > Окружения Python. Откроется окно Окружения Python (как узел обозревателя решений), в котором представлены разные среды, доступные вам. Список содержит как окружения, установленные с помощью установщика Visual Studio, так и окружения, которые вы установили отдельно. В их число входят глобальные, виртуальные среды и среды Conda. Среда, выделенная полужирным шрифтом, — это среда, используемая по умолчанию для новых проектов. Дополнительные сведения о работе со окружениями см. в разделе Создание окружений Python и управление ими в средах Visual Studio.


Используйте сочетания клавиш CTRL +K, CTRL +` , чтобы открыть окно Окружения Python из окна Обозревателя решений. Если сочетание клавиш не работает и окно "Окружения Python" отсутствует в меню, возможно, не установлена рабочая нагрузка Python. Инструкции по установке Python см. в статье Установка поддержки Python в Visual Studio в Windows.
Если открыт проект Python, вы можете открыть окно Окружения Python из Обозревателя решений. Щелкните правой кнопкой мыши Окружения Python и выберите пункт Просмотреть все окружения Python.


Теперь создайте проект, выбрав пункт меню Файл > Создать > Проект, а затем выбрав шаблон Приложение Python.
В появившийся файл кода вставьте приведенный ниже код, который строит косинусоиду, как в предыдущих шагах учебника, но теперь в виде графика. Можно также использовать ранее созданный проект и заменить код.
В окне редактора наведите указатель мыши на инструкции импорта numpy и matplotlib . Вы заметите, что они не разрешены. Чтобы разрешить инструкции импорта, установите пакеты в глобальное окружение по умолчанию.


Если в окне редактора навести указатель мыши на операторы импорта numpy и matplotlib , вы заметите, что они не разрешены. Это связано с тем, что пакеты не были установлены в глобальном окружении по умолчанию.
Например, щелкните ссылку Открыть интерактивное окно, и в Visual Studio откроется интерактивное окно для этого окружения.
На вкладке Пакеты в окне "Окружения Python" указаны все пакеты, установленные в настоящий момент в окружении.
Установка пакетов с помощью окна "Окружения Python"
В окне "Окружения Python" выберите окружение по умолчанию для новых проектов Python и перейдите на вкладку Пакеты. Вы увидите список пакетов, которые в настоящее время установлены в окружении.
Установите пакет matplotlib , введя его имя в поле поиска, а затем выбрав параметр Выполнить команду "pip install matplotlib" . При выполнении этой команды будут установлены пакет matplotlib , а также все пакеты, от которых он зависит (в данном случае — numpy ).
Выберите вкладку Пакеты.
Согласитесь на повышение прав, если появится соответствующий запрос.
Установленный пакет появится в окне Окружения Python. Если щелкнуть знак X справа от пакета, он будет удален.
Введите matplotlib в поле поиска для установки matplotlib .
Выберите вариант Выполнить команду: pip install matplotlib. Будет установлен пакет matplotlib , а также все пакеты, от которых он зависит (в данном случае — numpy ).


Согласитесь на повышение прав, если появится соответствующий запрос.
Установленный пакет появится в окне Окружения Python. Если щелкнуть знак X справа от пакета, он будет удален.


Под названием среды может появиться небольшой индикатор выполнения, который указывает на то, что Visual Studio создает базу данных IntelliSense для нового пакета. На вкладке IntelliSense также приводятся более подробные сведения. Имейте в виду, что, пока база данных не будет готова, функции IntelliSense, такие как автозавершение и проверка синтаксиса, будут неактивны для этого пакета в редакторе.
Запуск программы
После установки matplotlib запустите программу с отладчиком (F5) или без него (CTRL+F5), чтобы увидеть результат.
The Python developer community has produced thousands of useful packages that you can incorporate into your own projects. Visual Studio provides a UI to manage packages in your Python environments.
View environments
Select the View > Other Windows > Python Environments menu command. The Python Environments window opens as a peer to Solution Explorer and shows the different environments available to you. The list shows both environments that you installed using the Visual Studio installer and environments you installed separately. That includes global, virtual, and conda environments. The environment in bold is the default environment that's used for new projects. For more information about working with environments, see How to create and manage Python environments in Visual Studio environments.


You can also use the Ctrl+K, Ctrl+` keyboard shortcut to open the Python Environments window from the Solution Explorer window. If the shortcut doesn't work and you can't find the Python Environments window in the menu, it's possible that you haven't installed the Python workload. See How to install Python support in Visual Studio on Windows for guidance about how to install Python.
With a Python project open, you can open the Python Environments window from Solution Explorer. Right-click Python Environments and select View All Python Environments.


Now, create a new project with File > New > Project, selecting the Python Application template.
In the code file that appears, paste the following code, which creates a cosine wave like the previous tutorial steps, only this time plotted graphically. You can also use the project you previously created and replace the code.
In the editor window, hover over the numpy and matplotlib import statements. You'll notice that they aren't resolved. To resolve the import statements, install the packages to the default global environment.


When you look at the editor window, notice that when you hover over the numpy and matplotlib import statements that they aren't resolved. The reason is the packages haven't been installed to the default global environment.
For example, select Open interactive window and an Interactive window for that specific environment appears in Visual Studio.
The Packages tab in the Python Environments window lists all packages that are currently installed in the environment.
Install packages using the Python Environments window
From the Python Environments window, select the default environment for new Python projects and choose the Packages tab. You'll then see a list of packages that are currently installed in the environment.
Install matplotlib by entering its name into the search field and then selecting the Run command: pip install matplotlib option. Running the command will install matplotlib , and any packages it depends on (in this case that includes numpy ).
Choose the Packages tab.
Consent to elevation if prompted to do so.
After the package is installed, it appears in the Python Environments window. The X to the right of the package uninstalls it.
Enter matplotlib into the search field to install matplotlib .
Select the Run command: pip install matplotlib option. This option installs matplotlib , and any packages it depends on (in this case, that includes numpy ).


Consent to elevation if prompted to do so.
After the package installs, it appears in the Python Environments window. The X to the right of the package uninstalls it.


A small progress bar might appear underneath the environment to indicate that Visual Studio is building its IntelliSense database for the newly-installed package. The IntelliSense tab also shows more detailed information. Be aware that until that database is complete, IntelliSense features like auto-completion and syntax checking won't be active in the editor for that package.
Visual Studio 2017 version 15.6 and later uses a different and faster method for working with IntelliSense, and displays a message to that effect on the IntelliSense tab.
Run the program
Now that matplotlib is installed, run the program with (F5) or without the debugger (Ctrl+F5) to see the output:
Это пошаговое руководство для пользователей, начинающих работу с Python в Windows.
Настройка среды разработки
Для начинающих, которые не знакомы с Python, рекомендуется установить Python из Microsoft Store. При установке из Microsoft Store используется базовый интерпретатор Python3, но в дополнение к автоматическому обновлению также настраиваются параметры пути для текущего пользователя (без необходимости доступа администратора). Это особенно полезно, если вы работаете из среды образовательного учреждения или являетесь частью организации, которая ограничивает разрешения или административный доступ на компьютере.
Установка Python
Чтобы установить Python с помощью Microsoft Store, сделайте следующее:
Перейдите в меню Пуск (значок Windows в нижнем левом углу), введите "Microsoft Store" и щелкните ссылку, чтобы открыть магазин.
Когда магазин откроется, выберите Поиск в верхнем правом меню и введите "Python". Выберите, какую версию Python вы хотите использовать, из результатов в разделе «Приложения». Мы рекомендуем использовать самую последнюю версию, если только у вас нет причин для обратного (например, по причине согласования с версией, использованной в уже существующем проекте, над которым вы планируете работать). Определив, какую версию вы хотите установить, выберите Получить.
После того как Python завершит процесс загрузки и установки, откройте Windows PowerShell, используя меню Пуск (значок Windows в нижнем левом углу). После открытия PowerShell введите Python --version , чтобы убедиться, что Python 3 установлен на компьютере.
Установка Python из Microsoft Store содержит стандартный диспетчер пакетов pip. Pip позволяет устанавливать дополнительные пакеты, которые не входят в стандартную библиотеку Python, и управлять ими. Чтобы убедиться, что у вас есть pip, который можно использовать для установки пакетов и управления ими, введите pip --version .
Установка Visual Studio Code
При использовании VS Code в качестве текстового редактора или интегрированной среды разработки (IDE) вам доступны IntelliSense (помощь в завершении кода), анализ кода (помогает избежать ошибок в коде), поддержка отладки (помогает находить ошибки в коде после запуска), фрагменты кода (шаблоны для небольших повторно используемых блоков кода) и модульное тестирование (тестирование интерфейса кода с различными типами входных данных).
VS Code также содержит встроенный терминал, который позволяет открывать командную строку Python с помощью командной строки Windows, PowerShell или любой другой, создавая простой рабочий процесс между редактором кода и командной строкой.
Установив VS Code, необходимо также установить расширение Python. Для установки расширения Python можно выбрать ссылку на VS Code в Marketplace или открыть VS Code и выполнить поиск по фразе Python в меню расширений (Ctrl+Shift+X).
Python — интерпретируемый язык, и для выполнения кода Python необходимо указать VS Code, какой интерпретатор нужно использовать. Мы рекомендуем использовать самую последнюю версию Python, если у вас нет особой причины для обратного. После установки расширения Python выберите интерпретатор Python 3, открыв палитру команд (CTRL+SHIFT+P), и начните вводить команду Python: Select Interpreter (Python: выбор интерпретатора) для поиска, а затем выберите появившуюся команду. Вы также можете использовать параметр Select Python Environment (Выбрать среду Python) в нижней строке состояния, если она доступна (возможно, уже отображается выбранный интерпретатор). Команда предоставляет список доступных интерпретаторов, которые VS Code может найти автоматически, включая виртуальные среды. Если нужный интерпретатор не отображается, перейдите к статье о настройке сред Python.
Чтобы открыть терминал в VS Code, выберите Просмотр>Терминал или используйте клавиши CTRL+` (символ обратного апострофа). Терминалом по умолчанию является PowerShell.
В окне терминала VS Code откройте Python, просто введя команду: python
Попробуйте использовать интерпретатор Python, введя: print("Hello World") . Python вернет фразу "Hello World".

Установка Git (необязательно)
Если вы планируете совместно работать над кодом Python с другими пользователями или размещать проект на сайте с открытым исходным кодом (например, GitHub), примите во внимание, что VS Code поддерживает управление версиями с помощью Git. Вкладка системы управления версиями в VS Code отслеживает все изменения и содержит общие команды Git (добавление, фиксация, принудительная отправка, извлечение) прямо в пользовательском интерфейсе. Сначала необходимо установить Git для включения панели управления версиями.
Скачайте и установите Git для Windows с веб-сайта git-scm.
В комплект входит мастер установки, который задает вам ряд вопросов о параметрах установки Git. Рекомендуется использовать все параметры по умолчанию, если у вас нет конкретной причины изменить какой-либо из них.
Если вы никогда не использовали Git, обратитесь к руководствам по GitHub. Они помогут вам приступить к работе.
Учебник по некоторым основам работы с Python (на примере Hello World)
Python, согласно его создателю Гвидо ван Россуму, — это "язык программирования высокого уровня, и его основная философия проектирования — это удобочитаемость кода и синтаксис, позволяющий программистам выразить концепции в нескольких строках кода".
Python — интерпретируемый язык. В отличие от скомпилированных языков, в которых написанный код необходимо перевести в машинный код для выполнения процессором компьютера, код Python передается непосредственно интерпретатору и запускается напрямую. Просто введите код и запустите его. Попробуем сделать это!
Откройте командную строку PowerShell и введите python , чтобы запустить интерпретатор Python 3. (В некоторых инструкциях указано использовать команду py или python3 , которые также подойдут.) Если вы делаете все правильно,появится командная строка с тремя символами "больше, чем" >>>.
Существует несколько встроенных методов, позволяющих вносить изменения в строки в Python. Создайте переменную с помощью команды variable = 'Hello World!' . Нажмите клавишу ВВОД для создания новой строки.
Выведите переменную с помощью команды print(variable) . Отобразится текст "Hello World!".
Выясните, сколько символов используется для переменной строки, с помощью команды len(variable) . Будет показано, что используется 12 символов. (Обратите внимание, что пробел учитывается как символ в общей длине.)
Преобразуйте строковую переменную в буквы верхнего регистра: variable.upper() . Теперь преобразуйте строковую переменную в буквы нижнего регистра: variable.lower() .
Подсчитайте, сколько раз буква "l" используется в строковой переменной: variable.count("l") .
Найдите определенный символ в вашей строковой переменной. Давайте найдем восклицательный знак с помощью команды variable.find("!") . Будет показано, что восклицательный знак находится в позиции 11 строки.
Замените восклицательный знак на вопросительный знак: variable.replace("!", "?") .
Чтобы выйти из Python, введите exit() , quit() или нажмите клавиши CTRL+Z.

Надеемся, вам понравилось использовать некоторые из встроенных в Python методов модификации строк. Теперь попробуйте создать файл программы Python и запустить его с помощью VS Code.
Учебник по использованию Python с VS Code (на примере Hello World)
Команда VS Code составила отличный учебник по началу работы с Python с пошаговым руководством по созданию программы Hello World с помощью Python, запуску программного файла, настройке и запуску отладчика, а также установке пакетов, таких как matplotlib и numpy, для создания графического изображения в виртуальной среде.
Откройте PowerShell и создайте пустую папку с именем hello, перейдите в эту папку и откройте ее в VS Code:
После открытия среды VS Code, где показана новая папка hello в левом окне обозревателя, откройте окно командной строки в нижней панели VS Code, нажав CTRL+` (символ обратного апострофа) или выбрав Просмотр>Терминал. После запуска VS Code в папке эта папка станет вашей рабочей областью. VS Code хранит параметры, относящиеся к этой рабочей области, в файле .vscode/settings.json. Они отделены от параметров пользователя, которые хранятся глобально.
Продолжайте работу с учебником в документации для VS Code: Сведения о создании файла исходного кода для Hello World на Python.
Создание простой игры с помощью Pygame
Pygame — это популярный пакет Python для создания игр, который позволяет учащимся изучать программирование увлекательным способом. Pygame отображает графические изображения в новом окне, поэтому метод "только командной строки" WSL не подойдет. Но если вы установили Python с помощью Microsoft Store, как описано в этом учебнике, все получится.
После установки Python установите Pygame из командной строки (или терминала в VS Code), введя python -m pip install -U pygame --user .
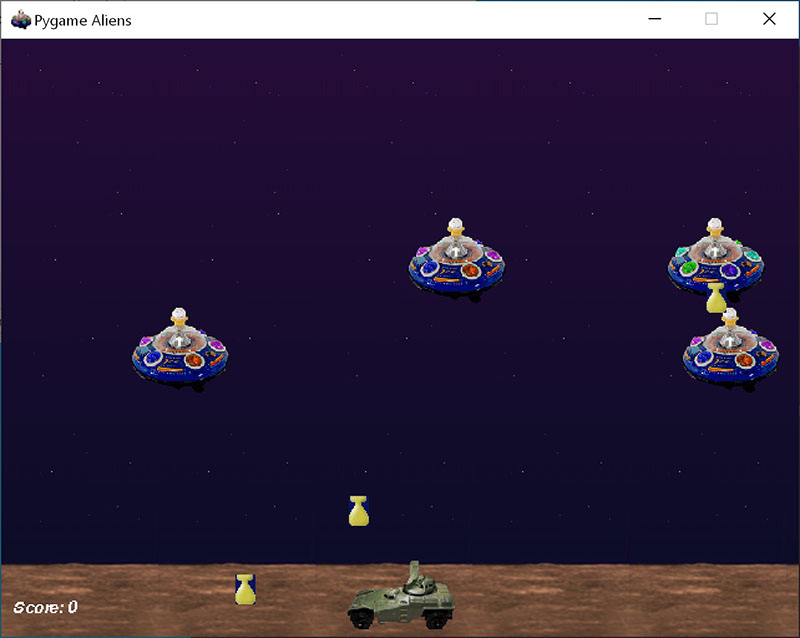
Протестируйте установку, запустив пример игры: python -m pygame.examples.aliens
Если все в порядке, откроется окно игры. По завершении игры закройте окно.
Вот как начать написание кода собственной игры:
Откройте PowerShell (или командную строку Windows) и создайте пустую папку с именем bounce. Перейдите к этой папке и создайте файл с именем bounce.py. Откройте папку в VS Code:
С помощью VS Code введите следующий код Python (или скопируйте и вставьте его):
Сохраните его как: bounce.py .
Запустите его в терминале PowerShell, введя: python bounce.py .
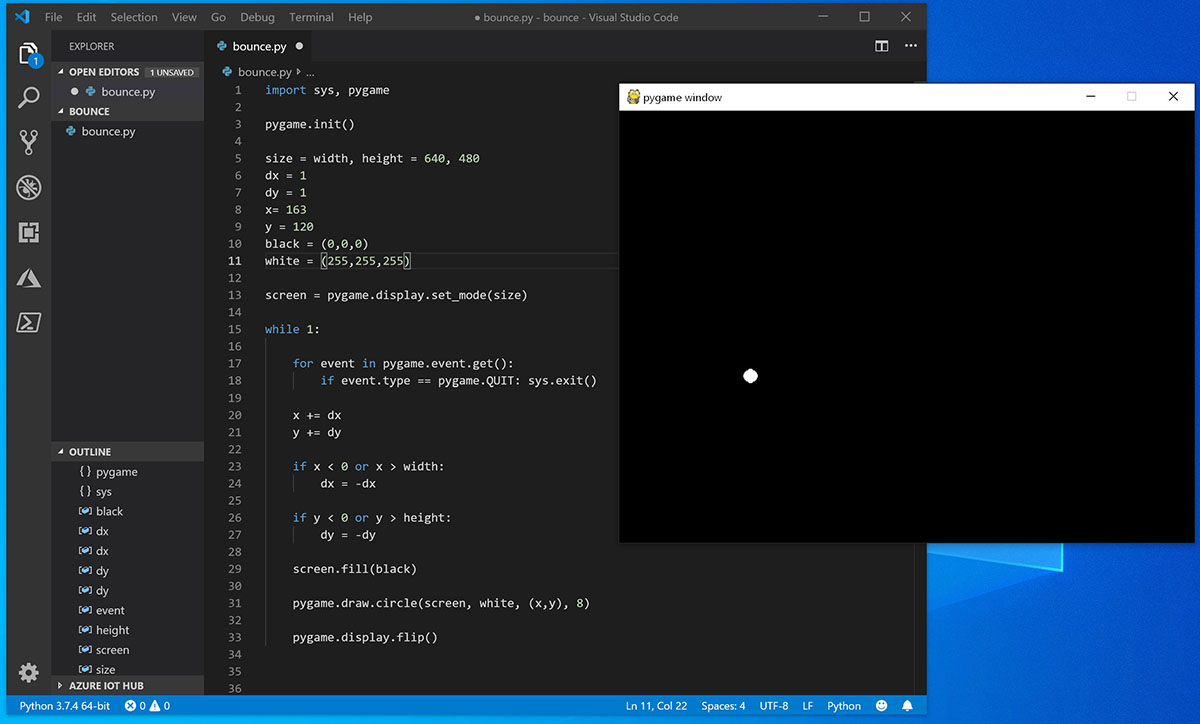
Попробуйте изменить некоторые из чисел, чтобы увидеть, как они влияют на прыгающий шарик.
Материалы для непрерывного обучения
Мы рекомендуем использовать следующие ресурсы, чтобы продолжить изучение разработки на Python в Windows.
Онлайн-курсы для изучения Python
Введение в Python на Microsoft Learn. Попробуйте интерактивную платформу Microsoft Learn и получите навыки выполнения этого модуля, охватывающего основы написания базового кода Python, объявления переменных и работы с входными и выходными данными консоли. Интерактивная среда песочницы предоставляет эту отличную возможность начать пользователям, у которых еще не настроена среда разработки Python.
Python на Pluralsight: 8 курсов, 29 часов. Схема обучения Python на Pluralsight предлагает онлайн-курсы, охватывающие различные темы, связанные с Python, включая средство для измерения навыков и поиска пробелов в знаниях.
Работа с Python в VS Code
Редактирование Python в VS Code. Узнайте больше о том, как воспользоваться преимуществами автозаполнения VS Code и поддержкой IntelliSense для Python, включая их настройку или отключение.
Анализ кода Python. Анализ кода — это процесс запуска программы, которая будет анализировать код на наличие возможных ошибок. Узнайте о различных формах поддержки анализа кода VS Code для Python и о том, как выполнить его настройку.
Отладка Python. Отладка — это процесс обнаружения и удаления ошибок из компьютерной программы. В статье по этой ссылке описывается инициализация и настройка отладки для Python с помощью VS Code, установка и проверка точек останова, присоединение локального скрипта, выполнение отладки для различных типов приложений или на удаленном компьютере, а также некоторые основные способы устранения неполадок.
Модульное тестирование Python. В статье по этой ссылке содержатся некоторые основные сведения о модульном тестировании, включении платформы тестирования, создании и выполнении тестов, отладке тестов и параметрах конфигурации теста, а также приведено пошаговое руководство с примером.
In this tutorial, you use Python 3 to create the simplest Python "Hello World" application in Visual Studio Code. By using the Python extension, you make VS Code into a great lightweight Python IDE (which you may find a productive alternative to PyCharm).
This tutorial introduces you to VS Code as a Python environment, primarily how to edit, run, and debug code through the following tasks:
- Write, run, and debug a Python "Hello World" Application
- Learn how to install packages by creating Python virtual environments
- Write a simple Python script to plot figures within VS Code
If you have any problems, feel free to file an issue for this tutorial in the VS Code documentation repository.
Prerequisites
To successfully complete this tutorial, you need to first setup your Python development environment. Specifically, this tutorial requires:
- VS Code
- VS Code Python extension
- Python 3
Install Visual Studio Code and the Python Extension
If you have not already done so, install VS Code.
Next, install the Python extension for VS Code from the Visual Studio Marketplace. For additional details on installing extensions, see Extension Marketplace. The Python extension is named Python and it's published by Microsoft.

Install a Python interpreter
Along with the Python extension, you need to install a Python interpreter. Which interpreter you use is dependent on your specific needs, but some guidance is provided below.
Windows
Note: If you don't have admin access, an additional option for installing Python on Windows is to use the Microsoft Store. The Microsoft Store provides installs of Python 3.7, Python 3.8, Python 3.9, and Python 3.10. Be aware that you might have compatibility issues with some packages using this method.
macOS
The system install of Python on macOS is not supported. Instead, an installation through Homebrew is recommended. To install Python using Homebrew on macOS use brew install python3 at the Terminal prompt.
Note On macOS, make sure the location of your VS Code installation is included in your PATH environment variable. See these setup instructions for more information.
Linux
The built-in Python 3 installation on Linux works well, but to install other Python packages you must install pip with get-pip.py.
Other options
Data Science: If your primary purpose for using Python is Data Science, then you might consider a download from Anaconda. Anaconda provides not just a Python interpreter, but many useful libraries and tools for data science.
Windows Subsystem for Linux: If you are working on Windows and want a Linux environment for working with Python, the Windows Subsystem for Linux (WSL) is an option for you. If you choose this option, you'll also want to install the Remote - WSL extension. For more information about using WSL with VS Code, see VS Code Remote Development or try the Working in WSL tutorial, which will walk you through setting up WSL, installing Python, and creating a Hello World application running in WSL.
Verify the Python installation
To verify that you've installed Python successfully on your machine, run one of the following commands (depending on your operating system):
Linux/macOS: open a Terminal Window and type the following command:
Windows: open a command prompt and run the following command:
If the installation was successful, the output window should show the version of Python that you installed.
Note You can use the py -0 command in the VS Code integrated terminal to view the versions of python installed on your machine. The default interpreter is identified by an asterisk (*).
Start VS Code in a project (workspace) folder
Using a command prompt or terminal, create an empty folder called "hello", navigate into it, and open VS Code ( code ) in that folder ( . ) by entering the following commands:
Note: If you're using an Anaconda distribution, be sure to use an Anaconda command prompt.
By starting VS Code in a folder, that folder becomes your "workspace". VS Code stores settings that are specific to that workspace in .vscode/settings.json , which are separate from user settings that are stored globally.
Alternately, you can run VS Code through the operating system UI, then use File > Open Folder to open the project folder.
Select a Python interpreter
Python is an interpreted language, and in order to run Python code and get Python IntelliSense, you must tell VS Code which interpreter to use.
From within VS Code, select a Python 3 interpreter by opening the Command Palette ( ⇧⌘P (Windows, Linux Ctrl+Shift+P ) ), start typing the Python: Select Interpreter command to search, then select the command. You can also use the Select Python Environment option on the Status Bar if available (it may already show a selected interpreter, too):

The command presents a list of available interpreters that VS Code can find automatically, including virtual environments. If you don't see the desired interpreter, see Configuring Python environments.
Note: When using an Anaconda distribution, the correct interpreter should have the suffix ('base':conda) , for example Python 3.7.3 64-bit ('base':conda) .
Selecting an interpreter sets which interpreter will be used by the Python extension for that workspace.
Note: If you select an interpreter without a workspace folder open, VS Code sets python.defaultInterpreterPath in User scope instead, which sets the default interpreter for VS Code in general. The user setting makes sure you always have a default interpreter for Python projects. The workspace settings lets you override the user setting.
Create a Python Hello World source code file
From the File Explorer toolbar, select the New File button on the hello folder:

Name the file hello.py , and it automatically opens in the editor:

By using the .py file extension, you tell VS Code to interpret this file as a Python program, so that it evaluates the contents with the Python extension and the selected interpreter.
Note: The File Explorer toolbar also allows you to create folders within your workspace to better organize your code. You can use the New folder button to quickly create a folder.
Now that you have a code file in your Workspace, enter the following source code in hello.py :
When you start typing print , notice how IntelliSense presents auto-completion options.

IntelliSense and auto-completions work for standard Python modules as well as other packages you've installed into the environment of the selected Python interpreter. It also provides completions for methods available on object types. For example, because the msg variable contains a string, IntelliSense provides string methods when you type msg. :

Feel free to experiment with IntelliSense some more, but then revert your changes so you have only the msg variable and the print call, and save the file ( ⌘S (Windows, Linux Ctrl+S ) ).
For full details on editing, formatting, and refactoring, see Editing code. The Python extension also has full support for Linting.
Run Hello World
It's simple to run hello.py with Python. Just click the Run Python File in Terminal play button in the top-right side of the editor.
The button opens a terminal panel in which your Python interpreter is automatically activated, then runs python3 hello.py (macOS/Linux) or python hello.py (Windows):

There are three other ways you can run Python code within VS Code:
Right-click anywhere in the editor window and select Run Python File in Terminal (which saves the file automatically):

Select one or more lines, then press Shift+Enter or right-click and select Run Selection/Line in Python Terminal. This command is convenient for testing just a part of a file.
From the Command Palette ( ⇧⌘P (Windows, Linux Ctrl+Shift+P ) ), select the Python: Start REPL command to open a REPL terminal for the currently selected Python interpreter. In the REPL, you can then enter and run lines of code one at a time.
Configure and run the debugger
Let's now try debugging our simple Hello World program.
First, set a breakpoint on line 2 of hello.py by placing the cursor on the print call and pressing F9 . Alternately, just click in the editor's left gutter, next to the line numbers. When you set a breakpoint, a red circle appears in the gutter.

Next, to initialize the debugger, press F5 . Since this is your first time debugging this file, a configuration menu will open from the Command Palette allowing you to select the type of debug configuration you would like for the opened file.

Note: VS Code uses JSON files for all of its various configurations; launch.json is the standard name for a file containing debugging configurations.
These different configurations are fully explained in Debugging configurations; for now, just select Python File, which is the configuration that runs the current file shown in the editor using the currently selected Python interpreter.
You can also start the debugger by clicking on the down-arrow next to the run button on the editor, and selecting Debug Python File in Terminal.
The debugger will stop at the first line of the file breakpoint. The current line is indicated with a yellow arrow in the left margin. If you examine the Local variables window at this point, you will see now defined msg variable appears in the Local pane.

A debug toolbar appears along the top with the following commands from left to right: continue ( F5 ), step over ( F10 ), step into ( F11 ), step out ( ⇧F11 (Windows, Linux Shift+F11 ) ), restart ( ⇧⌘F5 (Windows, Linux Ctrl+Shift+F5 ) ), and stop ( ⇧F5 (Windows, Linux Shift+F5 ) ).

The Status Bar also changes color (orange in many themes) to indicate that you're in debug mode. The Python Debug Console also appears automatically in the lower right panel to show the commands being run, along with the program output.
To continue running the program, select the continue command on the debug toolbar ( F5 ). The debugger runs the program to the end.
Tip Debugging information can also be seen by hovering over code, such as variables. In the case of msg , hovering over the variable will display the string Hello world in a box above the variable.
You can also work with variables in the Debug Console (If you don't see it, select Debug Console in the lower right area of VS Code, or select it from the . menu.) Then try entering the following lines, one by one, at the > prompt at the bottom of the console:

Select the blue Continue button on the toolbar again (or press F5) to run the program to completion. "Hello World" appears in the Python Debug Console if you switch back to it, and VS Code exits debugging mode once the program is complete.
If you restart the debugger, the debugger again stops on the first breakpoint.
To stop running a program before it's complete, use the red square stop button on the debug toolbar ( ⇧F5 (Windows, Linux Shift+F5 ) ), or use the Run > Stop debugging menu command.
For full details, see Debugging configurations, which includes notes on how to use a specific Python interpreter for debugging.
Tip: Use Logpoints instead of print statements: Developers often litter source code with print statements to quickly inspect variables without necessarily stepping through each line of code in a debugger. In VS Code, you can instead use Logpoints. A Logpoint is like a breakpoint except that it logs a message to the console and doesn't stop the program. For more information, see Logpoints in the main VS Code debugging article.
Install and use packages
Let's now run an example that's a little more interesting. In Python, packages are how you obtain any number of useful code libraries, typically from PyPI. For this example, you use the matplotlib and numpy packages to create a graphical plot as is commonly done with data science. (Note that matplotlib cannot show graphs when running in the Windows Subsystem for Linux as it lacks the necessary UI support.)
Return to the Explorer view (the top-most icon on the left side, which shows files), create a new file called standardplot.py , and paste in the following source code:
Tip: If you enter the above code by hand, you may find that auto-completions change the names after the as keywords when you press Enter at the end of a line. To avoid this, type a space, then Enter .
Next, try running the file in the debugger using the "Python: Current file" configuration as described in the last section.
Unless you're using an Anaconda distribution or have previously installed the matplotlib package, you should see the message, "ModuleNotFoundError: No module named 'matplotlib'". Such a message indicates that the required package isn't available in your system.
To install the matplotlib package (which also installs numpy as a dependency), stop the debugger and use the Command Palette to run Terminal: Create New Terminal ( ⌃⇧` (Windows, Linux Ctrl+Shift+` ) ). This command opens a command prompt for your selected interpreter.
A best practice among Python developers is to avoid installing packages into a global interpreter environment. You instead use a project-specific virtual environment that contains a copy of a global interpreter. Once you activate that environment, any packages you then install are isolated from other environments. Such isolation reduces many complications that can arise from conflicting package versions. To create a virtual environment and install the required packages, enter the following commands as appropriate for your operating system:
Note: For additional information about virtual environments, see Environments.
Create and activate the virtual environment
Note: When you create a new virtual environment, you should be prompted by VS Code to set it as the default for your workspace folder. If selected, the environment will automatically be activated when you open a new terminal.

For Windows
If the activate command generates the message "Activate.ps1 is not digitally signed. You cannot run this script on the current system.", then you need to temporarily change the PowerShell execution policy to allow scripts to run (see About Execution Policies in the PowerShell documentation):
For macOS/Linux
Select your new environment by using the Python: Select Interpreter command from the Command Palette.
Install the packages
Rerun the program now (with or without the debugger) and after a few moments a plot window appears with the output:

Once you are finished, type deactivate in the terminal window to deactivate the virtual environment.
For additional examples of creating and activating a virtual environment and installing packages, see the Django tutorial and the Flask tutorial.
Next steps
You can configure VS Code to use any Python environment you have installed, including virtual and conda environments. You can also use a separate environment for debugging. For full details, see Environments.
To learn to build web apps with the Django and Flask frameworks, see the following tutorials:
Читайте также: