Установка virtio драйверов kvm
In order to improve disk performance, special paravirtualized block drivers can be installed in Windows guests. You have to download and install those drivers in the VM, as Windows does not provides them by default.
VirtIO block may get deprecated in the future.
Download
Upload the ISO through the Proxmox VE WebUI: Select a Storage which allows ISO images in the PVE WebUI and switch to Content tab where you can use the "upload" button on the menu bar.
You may also copy the ISO manually onto a PVE configured storage.
The goal to use VirtIO SCSI or Block (SCSI is recommended) to improve the performance and available features of (Windows) VMs. The way we do this depends if we want to change an already installed and running Windows VM or if we want to set this up during a Windows installation.
Setup On Running Windows
Here we add a temporary disk with the new wanted disk controller to the VM and install the respective drivers. The Windows OS in your VM knows nothing about VirtIO drivers, so you can't simply stop the VM, change the disk to Vrtio-SCSI or VirtIO and reboot. You have to force Windows to install VirtIO drivers during it runs. To do this we add a small temporary SCSI-VirtIO or VirtIO disk to the VM and install its drivers explicitly. Without adding the Disk the installation of the driver is flawed under Windows, as driver installation of an not plugged in Hardware does not works.
Tested guest OS
- Windows 2003 r2 32 bit guest
- Windows 2000 server sp4
- Windows 7 and newer should work
- Windows Server 2008 and newer should work
Setup Steps
- Prerequisite: An installed running Windows OS and the VirtIO driver ISO
- insert the VirtIO ISO into the VMs CDROM Drive.
- add a small (1GB) SCSI (with Options -> SCSI Controller Typ: VirtIO) or VirtIO Block disk to the VM, you can use the PVE WebUI.
- The disk should get hot plugged. If not, you need to reboot the VM.
- Window should detect the new disk has a new unknown device and ask you for its drivers. If it doesn't, open the Device Manager, there should be an unknown device
- Right-click this entry and select "Update Driver Software"
- Select No when the wizard asks you to search for the driver software (online)
- Select "Install from a list of specific location"
- Use the Browse button and navigate to the driver CDROM
- Normally selecting the CDROMs top directory (e.g. D:) is enough on newer Windows versions.
- If that doesn't work select the appropriate folder for your guest version/architecture manually (use vioscsi for SCSI and vioblk for VirtIO)
You should now be able to enter Windows "Disk Management" and format the temporary SCSI/VirtIO disk (this is not necessary, it just proves that the driver is installed and working).
Windows has now the VirtIO SCSI/Block driver installed, and we need to re attach the VM disks as SCSI or virtio.
- Shut down the VM and remove the temporary Disk (Remove it once to mark it unused and remove the unused to delete it entirely)
- Detach all the disks you want to use as Virtio SCSI/Block, do this by "Removing" the disk. This will not delete the disk but mark them as "unused disks"
- reattach them by double-clicking the unused disk entries (or use the Edit button) here select SCSI for VirtIO SCSI or VirtIO (SCSI virtio disks (do this by clicking the "Edit" button for each of the "unused" disks that were previously "IDE" disks)
- Important: Fix up the Boot Order under the VMs Option tab. Make sure that the primary boot device is still the old boot disk.
- Now you can start the VM again, it should use the new better disk controllers now.
- If the VM does not boots you can detach and re attach the Disks as IDE, ensure that you do not missed a step here and eventually ask the Proxmox VE community for help.
After finishing, through PVE web interface, you can:
- remove the temporary VirtIO disk if you haven't already done this and don't need it anymore
- remove the ISO mounted as CD device
Setup During Windows Installation
Download the VirtIO drivers as described above.
Set the drive type to SCSI (preferred) or VirtIO and the Network also to VirtIO for improved performance. Add a second IDE CDROM drive, in the first mount the Windows installer ISO and in the second the VirtIO driver ISO.
Startup the VM and the Installation process. When you arrive at the Disk/Partition selection you won't see a Disk because the driver aren't loaded. Click on the Load Driver button and then Browse. In the file browser select the second CDROM drive with the VirtIO drivers and navigate to the vioscsi/WINVERSION/amd64 (or x86 if you have a 32 bit system) and click OK. RedHat driver should show up in the Driver Installer click next to install them. Repeat the process for other VirtIO driver (e.g. network, qxl, . ).
The Disks should now show up and you can continue with the installation process as usual.
Old VFD Method
Note: This is kept for legacy reasons, newer Windows versions (XP and newer) should use the above menthod.
You can add the block drivers during install by manually adding a virtual floppy drive (vfd) and a second IDE CDROM Drive (for network VirtIO) to the VM for the initial install (thanks to meto & user100 in the forum).
Download the VirtIO drivers as described above, upload VFD (for disks) and the ISO (for network) to PVE.
to add the VFD as virtual floppy to the VM.
Now start the VM and open the console. The standard boot sequence for a new KVM seems to be HDD - Floppy - CD, you can change this but it's just as easy to reboot using the Ctrl-Alt-Del button in the console, use F12 to bring up a boot selection window & boot from CD.
Once windows starts to load, press F6 to get it to look for extra drivers to load. It will automatically load the floppy & away you go.
Note that older VirtIO drivers aren't signed by Windows, so you need to tell the system to continue to load the drivers on a warning.
После установки гостевой операционной системы Windows на гипервизор KVM мы можем столкнуться с проблемой отсутствия драйверов. Как правило, больше всего неудобств вызывает отсутствие сетевых драйверов. Мы рассмотрим универсальный способ установки драйверов на Windows, который установлен на виртуальную машину KVM.
Предполагается, что наш KVM установлен на операционную систему семейства Linux, например, CentOS или Ubuntu. Все команды в данной инструкции будут выполняться из командной строки.
Загрузка драйверов и их монтирование
Первым делом загрузим ISO образ с набором драйверов и примонтируем его к операционной системе. Для этого заходим на хост виртуализации по SSH и вводим команду:
Дожидаемся загрузки файла на сервер, после чего создаем конфигурационный файл для монтирования образа в операционную систему:
Добавляем в него следующее:
* /data/kvm/iso/virtio-win.iso — путь до файла, который мы загрузили на сервер. В данном файле мы создали описание для монтирования устройства cdrom.
С помощью созданного файла XML мы монтируем ISO образ в CDROM на виртуальной машине:
virsh update-device WIN /etc/libvirt/qemu/guest-virtio-drivers.xml
* где WIN — имя виртуальной машины.
Установка драйверов
Подключаемся к виртуальной машине с помощью VNC. Мы должны увидеть примонтированный CD-ROM с драйверами virtio:
![Примонтированный диск с драйверами]()
Кликаем правой кнопкой мыши по пуск и выбираем Диспетчер устройств:
![Переходим в диспетчер устройств]()
* в ранних версиях Windows необходимо кликнуть правой кнопкой мыши по Мой компьютер - Управление - Диспетчер устройств.
В разделе «Другие устройства» кликаем правой кнопкой мыши по устройству, для которого необходим драйвер и выбираем Обновить драйверы:
![Обновляем драйвер для устройства]()
В открывшемся окне выбираем Выполнить поиск драйверов на этом компьютере:
![Выполняем поиск драйверов на этом компьютере]()
. и выбираем наш CD-ROM с драйверами:
![Ищем драйверы на виртуальном приводе]()
Если система выдаст предупреждение безопасности, кликаем по Установить:
![Устанавливаем драйверы от издателя Red Hat]()
Драйвер установлен. Повторяем процедуру для каждого устройства, для которого система не смогла установить драйвер.
At the moment these kind of devices are supported:
- block (disks drives), see Paravirtualized Block Drivers for Windows
- network (ethernet cards), see Paravirtualized Network Drivers for Windows
- balloon (dynamic memory management), see Dynamic Memory Management
You can maximize performances by using VirtIO drivers. The availability and status of the VirtIO drivers depends on the guest OS and platform.
Windows OS Support
Windows does not have native support for VirtIO devices included. But, there is excellent external support through opensource drivers, which are available compiled and signed for Windows:
Note that this repository provides not only the most recent, but also many older versions. Those older versions can still be useful when a Windows VM shows instability or incompatibility with a newer driver version.
The binary drivers are digitally signed by Red Hat, and will work on 32-bit and 64-bit versions of Windows
Installation
Using the ISO
You can download the latest stable or you can download the most recent build of the ISO. Normally the drivers are pretty stable, so one should try out the most recent release first.
You can access the ISO can in a VM by mounting the ISO with a virtual CD-ROM/DVD drive on that VM.
Wizard Installation
![]()
You can use an easy wizard to install all, or a selection, of VirtIO drivers.
- Open the Windows Explorer and navigate to the CD-ROM drive.
- Simply execute (double-click on) virtio-win-gt-x64
- Follow its instructions.
- (Optional) use the virtio-win-guest-tools wizard to install the QEMU Guest Agent and the SPICE agent for an improved remote-viewer experience.
- Reboot VM
Manual Installation
- Open the Windows Explorer and navigate to the CD-ROM drive. There you can see that the ISO consists of several directories, each having sub-directories for supported OS version (for example, 2k19, 2k12R2, w7, w8.1, w10, . ).
- Balloon
- guest-agent
- NetKVM
- qxl
- vioscsi
- .
![]()
Downloading the Wizard in the VM
You can also just download the most recent virtio-win-gt-x64.msi or virtio-win-gt-x86.msi from inside the VM, if you have already network access.
Резервное копирование виртуальных машин KVM без остановки
![]()
Есть хост CentOS 7, KVM, гость vm1 (Windows 7 x64, но что Windows, что Linux, отличаться по сути будет только установка драйвера внутри гостевой vm). Пока виртуальная машина работает, копировать ее диск - идея неправильная. Непонятно, что будет скопировано и непонятно, восстановится ли потом. Идея live backup (т.е. backup без остановки) состоит в следующем - делаем снапшот виртуальной машины, при этом чтение/запись начинает выполняться в этот снапшот. Сразу после создания снапшота исходный диск виртуальной машины уже ничем не занят - все новое копируется в файл снапшота. Можно спокойно скопировать этот диск. Это займет какое-то время, в течении которого vm работает, что-то записывается, удаляется. После того, как мы спокойно скопируем диск, нужно будет дать команду все из снапшота залить в основной диск vm. Снапшот нам нужен был только как временная мера.
Снепшот -> бекап диска -> объединение снепшота с бекапом диска:
Бекап диска vm1:
где vda - это устройство (сокет системного диска) vm1, на котором установлена гостевая OS:
Т.е. в работающей vm1 файл диска - /vms/vm1.iso, устройство - vda.
Но прямо с первой команды мы получим ошибку:
error: argument unsupported: QEMU guest agent is not configuredДля того, чтобы гостевую виртуальную машину можно было бекапить без ее остановки, нужно сделать несколько шагов:
- указать в конфиге vm агента QEMU
- в гостевой vm установить службу агента QEMU
- убедиться, что хост и агент взаимодействуют.
- делать бекапы.
Готовим виртуальную машину к установке агента QEMU
Способ первый (с выключением гостевой виртуальной машины).
В конфигурацию гостевой vm нужно добавить специальное устройство - агент QEMU.
В параметре source указывается имя сокета, которое должно быть уникальным в рамках хоста. Также надо отметить, что при включенном SELinux могут быть проблемы с соединением к этому сокету, из-за чего может возникать ошибка "QEMU guest agent is not connected".
Внимание! Выключить и включить гостевую виртуальную машину (перезагрузка может не помочь).
Второй способ (без выключения виртуальной машины):
Этот способ я нашел позднее и не проверял лично, но, тем не менее, он указан в руководстве Red Hat.
Готовим файл agent-win7.xml:
Применительно к CentOS/RedHat указывать уникальный путь bind не требуется, поэтому шаблон может быть одинаковым для разных vm. Итак, готовим файл agent.xml:
Установка драйверов агента QEMU
. в гостевой виртуальной машине CentOS
. в гостевой виртуальной машине Debian/Ubuntu
. в гостевой виртуальной машине Windows (VirtIO Serial driver)
Установить virtio-win драйверы в гостевую vm:
Внутри гостевой виртуальной машины:
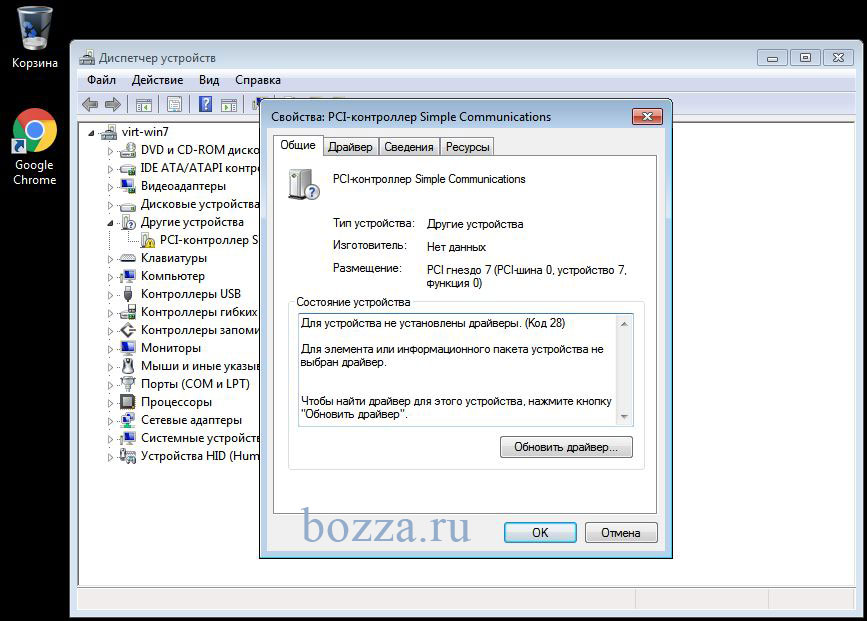
1) Установите CD-Drive:\guest-agent\qemu-ga-x64 (или x86).
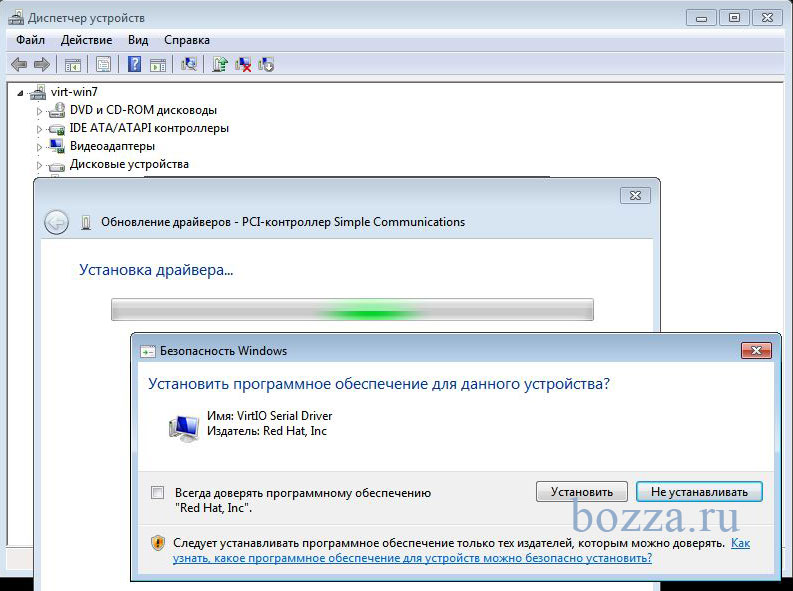
2) В диспетчере устройств обновите драйвер внутри vm и перезагрузите ее (перезагрузка может и не потребоваться, но надо будет запустить службы QEMU Guest Agent и QEMU Guest Agent VSS Provider):
![PCI controller Simple Communications]()
![VirtIO Serial Driver install]()
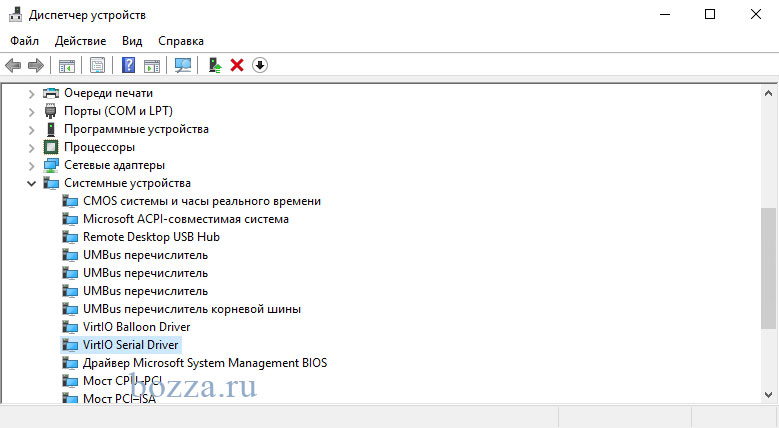
![VirtIO Serial Driver installed]()
QEMU guest agent is not connected
error: Guest agent is not responding: QEMU guest agent is not connected
Если сделать дамп состояния vm1, то видно, что агент не подключен (disconnected):
Это может быть из-за:
- ошибки запуска агента в гостевой vm1 (например, виртуальная машина не была перезагружена или не были запущены службы QEMU Guest Agent и QEMU Guest Agent VSS Provider);
- из-за включенного SELinux на хосте (попробуйте отключить "setenforce 0 " и посмотреть, будет connected или нет)
- или еще из-за чего-нибудь.
Исправляем и пробуем наконец-то сделать бекап виртуальной машины без ее остановки:
Слияние снапшота с копией
Теперь данные будут записываться в основной диск vm1, а в backup будет копия диска и конфиг, восстановиться из которых можно с помощью virsh create.
![]()
Почтовый сервер Шифрование Squid 3proxy VPN Mikrotik Настройка сервера Виртуальные машины kvm Защита почты Резервное копирование Групповые политики SELinux WDS IPFW OpenVPN firewalld systemd Mobile libvirt Samba WiFi Iptables NAT Lightsquid Remote desktop Postfix Dovecot Удаление данных Софт Безопасность Настройка прокси Winbox User agent Хостинг Передача данных Онлайн сервисы Privacy LetsEncrypt VPN сервер RRDTool sendmail Rsync Linux SSH Система Windows Синхронизация Облако fail2ban FreeBSD
Драйверы VirtIO для виртуальной машины Windows. KVM, CentOS
![]()
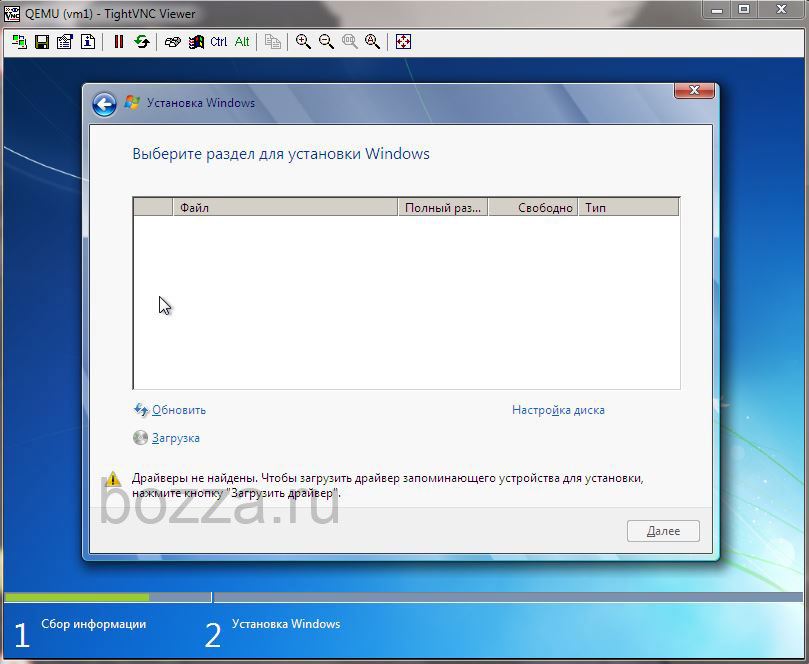
Что делать, если Windows не видит диск KVM VirtIO? Драйверы VirtIO для KVM дадут возможность создавать более быстрые виртуальные сетевые адаптеры, подключать диски типа virtio к VM. Можно и без них, но зачем делать хуже, если можно лучше? На примере виртуальной машины Windows 7, устанавливаемой на хост KVM (CentOS 7), посмотрим, как подключить такие драйверы при установке гостевой операционной системы.
Была создана виртуальная машина Windows 7:
![Windows не видит диск virtio]()
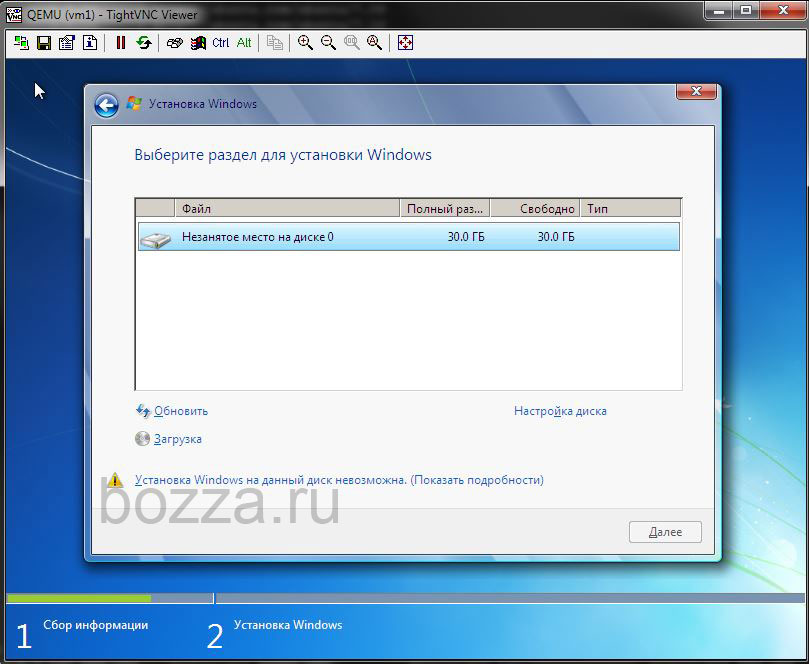
Подключаюсь к консоли TightVNC, начинаю установку - установщик не видит диск.
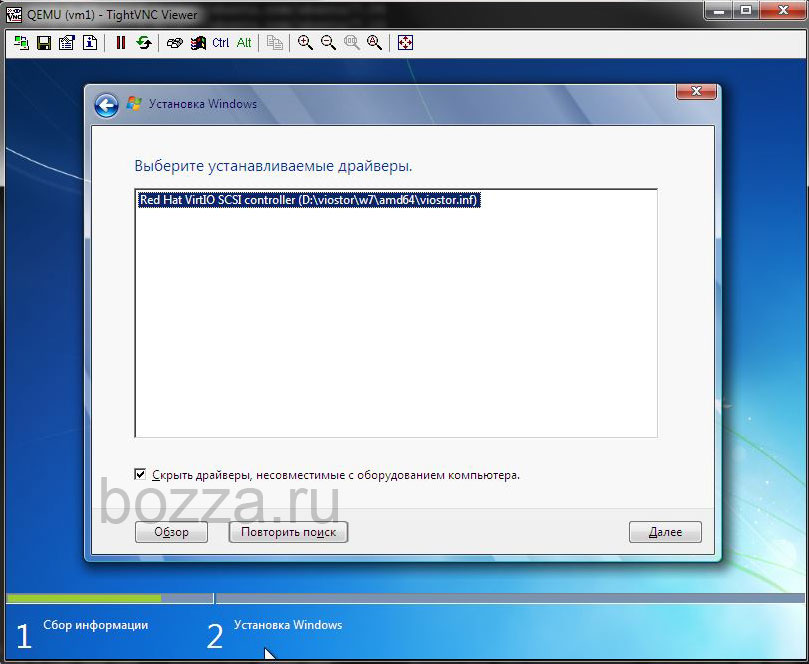
Тип диска был указан virtio. Нужно подсунуть этот драйвер установщику.Подключаю к VM диск с драйверами:
![Выбираем драйвер VirtIO для диска]()
Теперь выбираем драйвер:
![VM KVM видит диск VirtIO]()
Подключаем снова установочный диск:
и продолжаем установку Windows 7.
Аналогичным способом диск с драйверами подключается после установки, для устройств типа сетевых карт и др.
![]()
Почтовый сервер Шифрование Squid 3proxy VPN Mikrotik Настройка сервера Виртуальные машины kvm Защита почты Резервное копирование Групповые политики SELinux WDS IPFW OpenVPN firewalld systemd Mobile libvirt Samba WiFi Iptables NAT Lightsquid Remote desktop Postfix Dovecot Удаление данных Софт Безопасность Настройка прокси Winbox User agent Хостинг Передача данных Онлайн сервисы Privacy LetsEncrypt VPN сервер RRDTool sendmail Rsync Linux SSH Система Windows Синхронизация Облако fail2ban FreeBSD
Читайте также: