
Создание кисти в adobe illustrator
Did you know you can use your iPad or iPhone to design beautiful, high-quality brushes from photos of anything that inspires you? Save the brushes to your Creative Cloud Library and access them anywhere across Photoshop and Illustrator!
Learn more about the Adobe Brush CC iPad app in this video.
Download the awesome Adobe Brush CC app from the iTunes app store.
Brushes let you stylize the appearance of paths. You can apply brush strokes to existing paths, or you can use the Paintbrush tool to draw a path and apply a brush stroke simultaneously.
There are different types of brushes in Illustrator: calligraphic, scatter, art, pattern, and bristle. You can achieve the following effects using these brushes:
Create strokes that resemble those drawn with the angled point of a calligraphic pen and are drawn along the center of the path. When you use the Blob Brush tool, you can paint with a calligraphic brush and automatically expand the brush stroke into a fill shape that merges with other filled objects of the same color that intersect or are adjacent in stacking order.
Disperse copies of an object (such as a ladybug or a leaf) along the path.
Stretch a brush shape (such as Rough Charcoal) or object shape evenly along the length of the path.
Create brush strokes with the appearance of a natural brush with bristles.
Paint a pattern—made of individual tiles—that repeats along the path. Pattern brushes can include up to five tiles, for the sides, inner corner, outer corner, beginning, and end of the pattern.

A. Calligraphic Brush B. Scatter Brush C. Art Brush D. Pattern Brush E. Bristle Brush
Scatter brushes and Pattern brushes can often achieve the same effect. However, one way in which they differ is that Pattern brushes follow the path exactly, while Scatter brushes do not.

Arrows in a Pattern brush bend to follow the path (left), but arrows remain straight in a Scatter brush (right).
The Brushes panel (Window > Brushes) displays brushes for the current file. Whenever you select a brush in a brush library, it is automatically added to the Brushes panel. Brushes that you create and store in the Brushes panel are associated only with the current file, which means that each Illustrator file can have a different set of brushes in its Brushes panel.
Show or hide a type of brush
Choose any of the following from the panel menu: Show Calligraphic Brushes, Show Scatter Brushes, Show Art Brushes, Show Bristle Brushes, Show Pattern Brushes.
Change the view of brushes
Change the order of brushes in the Brushes panel
Drag a brush to a new location. You can move brushes only within their type. For example, you cannot move a Calligraphic brush to the Scatter brush area.
Duplicate a brush in the Brushes panel
Drag the brush onto the New Brush button or choose Duplicate Brush from the Brushes panel menu.
Delete the brushes from the Brushes panel
Select the brushes and click the Delete Brush button . You can select brushes that aren’t used in a document by choosing Select All Unused from the Brushes panel menu.
Brush libraries (Window > Brush Libraries > [library]) are collections of preset brushes that come with Illustrator. You can open multiple brush libraries to browse through their contents and select brushes. You can also open brush libraries using the Brushes panel menu.
To automatically open a brush library when you start Illustrator, choose Persistent from the brush library’s panel menu.
Copy brushes from a brush library to the Brushes panel
Import brushes into the Brushes panel from another file
In the Brush Library panel, click on the individual brush definition or all the brush definitions that you need to import and select Add To Brushes from the Brush Library panel menu (flyout menu).
Create new brush libraries
Choose Save Brush Library from the Brushes panel menu, and place the new library file in one of the following folders so that it will appear in the Brush Libraries menu when you restart Illustrator:
- (Windows) User/AppData/Roaming/Adobe/Adobe Illustrator < version number >Settings/Brushes
- (Mac OS) Library/Application Support/Adobe/Adobe Illustrator < version number >Settings/Brushes
- Replace with the following values, depending on the version of Illustrator that you have installed on your system. For more information, see Replace Illustrator version number .
If you place the file in a different folder, you can open the library by choosing Window > Brush Libraries > Other Library and selecting the library file.
You can apply brush strokes to a path created with any drawing tool, including the Pen tool, Pencil tool, or basic shape tools.
Select the path, and then select a brush in a brush library, the Brushes panel, or the Control panel.
Drag a brush onto the path. If the path already has brush strokes applied to it, then the new brush replaces the old brush.
If you want to apply a different brush to the path and want to use the brush stroke settings used with the original brush, hold down Alt (Win) or Option (Mac OS) when clicking the new brush you want to apply.
Select the Paintbrush tool .
Position the pointer where you want the brush stroke to begin, and drag to draw a path. A dotted line follows the pointer as you drag.
To draw an open path, release the mouse button when the path is the desired shape.
To draw a closed shape, hold down Alt (Windows) or Option (Mac OS) as you drag. The Paintbrush tool displays a small loop . Release the mouse button (but not the Alt or Option key) when you are ready to close the shape.
Illustrator sets down anchor points as you draw. The number of anchor points is determined by the length and complexity of the path and by the Paintbrush tolerance settings.
Tip: To adjust the shape of a brushed path after you finish drawing it, first select the path. Then position the Paintbrush tool on the path, and drag until the path is the desired shape. You can use the technique to extend a brushed path as well as change the shape of the path between the existing end points.
Double-click the Paintbrush tool to set the following options:
Controls how far you have to move your mouse or stylus before Illustrator adds a new anchor point to the path. For example, a Fidelity value of 2.5 means that tool movements of less than 2.5 pixels aren’t registered. Fidelity can range from 0.5 to 20 pixels; the higher the value, the smoother and less complex the path.
Controls the amount of smoothing that Illustrator applies when you use the tool. Smoothness can range from 0% to 100%; the higher the percentage, the smoother the path.
Fill New Brush Strokes
Applies a fill to the path. This option is most useful when drawing closed paths.
Determines whether Illustrator keeps the path selected after you draw it.
Edit Selected Paths
Determines whether you can change an existing path with the Paintbrush tool.
Within: _ pixels
Determines how close your mouse or stylus must be to an existing path to edit the path with the Paintbrush tool. This option is only available when the Edit Selected Paths option is selected.
In the Brushes panel, choose Remove Brush Stroke from the panel menu or click the Remove Brush Stroke button .
You can also remove a brush stroke by selecting the Basic brush from the Brushes panel or Control panel.
You can convert brush strokes into outlined paths to edit the individual components of a brushed path.
Illustrator places the components of the expanded path in a group. Within the group are a path and a subgroup containing the brush stoke outlines.
You can create and customize calligraphic, scatter, art, pattern, and bristle brushes depending on your requirement. For scatter, art, and pattern brushes, you must first create the artwork.
Follow these guidelines when creating artwork for brushes:
The artwork cannot contain gradients, blends, other brush strokes, mesh objects, bitmap images, graphs, placed files, or masks.
For art and pattern brushes, the artwork cannot contain type. To achieve a brush-stroke effect with type, create an outline of the type and then create a brush with the outline.
For pattern brushes, create up to five pattern tiles (depending on the brush configuration), and add the tiles to the Swatches panel.
You can make the brushes you create available for every new document by adding the brush definition to the New Document Profile. For more information on new document profiles, see About new document profiles.
Create a brush
For scatter and art brushes, select the artwork you want to use. For pattern brushes, you can select the artwork for the side tile, but it isn’t necessary. For detailed guidelines to create pattern brushes, see Guidelines for constructing pattern tiles. To know more about pattern brush options, see Pattern brush options.
If you do not want to see a seam between the artwork pieces used to create the pattern brush, turn off the Anti-Aliasing option from Edit > Preferences > General (Windows) or Illustrator > General > Preferences (Mac OS).
Click the New Brush button in the Brushes panel. Alternatively, drag the selected artwork to the Brushes panel.
Modify a brush
- To change the options for a brush, double-click the brush in the Brushes panel. Set the brush options and click OK. If the current document contains brushed paths that use the modified brush, a message appears. Click Apply To Strokes to change pre-existing strokes. Click Leave Strokes to leave pre-existing strokes unchanged, and apply the modified brush to new strokes only.
- To change the artwork used by a scatter, art, or pattern brush, drag the brush into your artwork and make the changes you want. Then Alt‑drag (Windows) or Option-drag (Mac OS) the modified brush onto the original brush in the Brushes panel.
- To modify a brushed path without updating the corresponding brush, select the path and click the Options Of Selected Object button in the Brushes panel or select options of selected object from the Brushes panel menu (flyout menu).
You can specify different options for the different types of brushes. To change the options for a brush, double-click the brush in the Brushes panel.
Scatter, Art, and Pattern brushes all have identical options for colorization.
To customize a stroke instance for Art Brushes or Pattern Brushes, click the Options of Selected Objects icon in the Brushes Panel and set the stroke options. For art brush you can set the stroke width along with flipping, colorization, and overlapping options. For pattern brush, you can set the scaling options along with flipping, fitting, and colorization options.
Did you know you can use your iPad or iPhone to design beautiful, high-quality brushes from photos of anything that inspires you? Save the brushes to your Creative Cloud Library and access them anywhere across Photoshop and Illustrator!
Learn more about the Adobe Brush CC iPad app in this video.
Download the awesome Adobe Brush CC app from the iTunes app store.
Brushes let you stylize the appearance of paths. You can apply brush strokes to existing paths, or you can use the Paintbrush tool to draw a path and apply a brush stroke simultaneously.
There are different types of brushes in Illustrator: calligraphic, scatter, art, pattern, and bristle. You can achieve the following effects using these brushes:
Create strokes that resemble those drawn with the angled point of a calligraphic pen and are drawn along the center of the path. When you use the Blob Brush tool, you can paint with a calligraphic brush and automatically expand the brush stroke into a fill shape that merges with other filled objects of the same color that intersect or are adjacent in stacking order.
Disperse copies of an object (such as a ladybug or a leaf) along the path.
Stretch a brush shape (such as Rough Charcoal) or object shape evenly along the length of the path.
Create brush strokes with the appearance of a natural brush with bristles.
Paint a pattern—made of individual tiles—that repeats along the path. Pattern brushes can include up to five tiles, for the sides, inner corner, outer corner, beginning, and end of the pattern.
A. Calligraphic Brush B. Scatter Brush C. Art Brush D. Pattern Brush E. Bristle Brush
Scatter brushes and Pattern brushes can often achieve the same effect. However, one way in which they differ is that Pattern brushes follow the path exactly, while Scatter brushes do not.
Arrows in a Pattern brush bend to follow the path (left), but arrows remain straight in a Scatter brush (right).
The Brushes panel (Window > Brushes) displays brushes for the current file. Whenever you select a brush in a brush library, it is automatically added to the Brushes panel. Brushes that you create and store in the Brushes panel are associated only with the current file, which means that each Illustrator file can have a different set of brushes in its Brushes panel.
Show or hide a type of brush
Choose any of the following from the panel menu: Show Calligraphic Brushes, Show Scatter Brushes, Show Art Brushes, Show Bristle Brushes, Show Pattern Brushes.
Change the view of brushes
Change the order of brushes in the Brushes panel
Drag a brush to a new location. You can move brushes only within their type. For example, you cannot move a Calligraphic brush to the Scatter brush area.
Duplicate a brush in the Brushes panel
Drag the brush onto the New Brush button or choose Duplicate Brush from the Brushes panel menu.
Delete the brushes from the Brushes panel
Select the brushes and click the Delete Brush button . You can select brushes that aren’t used in a document by choosing Select All Unused from the Brushes panel menu.
Brush libraries (Window > Brush Libraries > [library]) are collections of preset brushes that come with Illustrator. You can open multiple brush libraries to browse through their contents and select brushes. You can also open brush libraries using the Brushes panel menu.
To automatically open a brush library when you start Illustrator, choose Persistent from the brush library’s panel menu.
Copy brushes from a brush library to the Brushes panel
Import brushes into the Brushes panel from another file
In the Brush Library panel, click on the individual brush definition or all the brush definitions that you need to import and select Add To Brushes from the Brush Library panel menu (flyout menu).
Create new brush libraries
Choose Save Brush Library from the Brushes panel menu, and place the new library file in one of the following folders so that it will appear in the Brush Libraries menu when you restart Illustrator:
- (Windows) User/AppData/Roaming/Adobe/Adobe Illustrator < version number >Settings/Brushes
- (Mac OS) Library/Application Support/Adobe/Adobe Illustrator < version number >Settings/Brushes
- Replace with the following values, depending on the version of Illustrator that you have installed on your system. For more information, see Replace Illustrator version number .
If you place the file in a different folder, you can open the library by choosing Window > Brush Libraries > Other Library and selecting the library file.
You can apply brush strokes to a path created with any drawing tool, including the Pen tool, Pencil tool, or basic shape tools.
Select the path, and then select a brush in a brush library, the Brushes panel, or the Control panel.
Drag a brush onto the path. If the path already has brush strokes applied to it, then the new brush replaces the old brush.
If you want to apply a different brush to the path and want to use the brush stroke settings used with the original brush, hold down Alt (Win) or Option (Mac OS) when clicking the new brush you want to apply.
Select the Paintbrush tool .
Position the pointer where you want the brush stroke to begin, and drag to draw a path. A dotted line follows the pointer as you drag.
To draw an open path, release the mouse button when the path is the desired shape.
To draw a closed shape, hold down Alt (Windows) or Option (Mac OS) as you drag. The Paintbrush tool displays a small loop . Release the mouse button (but not the Alt or Option key) when you are ready to close the shape.
Illustrator sets down anchor points as you draw. The number of anchor points is determined by the length and complexity of the path and by the Paintbrush tolerance settings.
Tip: To adjust the shape of a brushed path after you finish drawing it, first select the path. Then position the Paintbrush tool on the path, and drag until the path is the desired shape. You can use the technique to extend a brushed path as well as change the shape of the path between the existing end points.
Double-click the Paintbrush tool to set the following options:
Controls how far you have to move your mouse or stylus before Illustrator adds a new anchor point to the path. For example, a Fidelity value of 2.5 means that tool movements of less than 2.5 pixels aren’t registered. Fidelity can range from 0.5 to 20 pixels; the higher the value, the smoother and less complex the path.
Controls the amount of smoothing that Illustrator applies when you use the tool. Smoothness can range from 0% to 100%; the higher the percentage, the smoother the path.
Fill New Brush Strokes
Applies a fill to the path. This option is most useful when drawing closed paths.
Determines whether Illustrator keeps the path selected after you draw it.
Edit Selected Paths
Determines whether you can change an existing path with the Paintbrush tool.
Within: _ pixels
Determines how close your mouse or stylus must be to an existing path to edit the path with the Paintbrush tool. This option is only available when the Edit Selected Paths option is selected.
In the Brushes panel, choose Remove Brush Stroke from the panel menu or click the Remove Brush Stroke button .
You can also remove a brush stroke by selecting the Basic brush from the Brushes panel or Control panel.
You can convert brush strokes into outlined paths to edit the individual components of a brushed path.
Illustrator places the components of the expanded path in a group. Within the group are a path and a subgroup containing the brush stoke outlines.
You can create and customize calligraphic, scatter, art, pattern, and bristle brushes depending on your requirement. For scatter, art, and pattern brushes, you must first create the artwork.
Follow these guidelines when creating artwork for brushes:
The artwork cannot contain gradients, blends, other brush strokes, mesh objects, bitmap images, graphs, placed files, or masks.
For art and pattern brushes, the artwork cannot contain type. To achieve a brush-stroke effect with type, create an outline of the type and then create a brush with the outline.
For pattern brushes, create up to five pattern tiles (depending on the brush configuration), and add the tiles to the Swatches panel.
You can make the brushes you create available for every new document by adding the brush definition to the New Document Profile. For more information on new document profiles, see About new document profiles.
Create a brush
For scatter and art brushes, select the artwork you want to use. For pattern brushes, you can select the artwork for the side tile, but it isn’t necessary. For detailed guidelines to create pattern brushes, see Guidelines for constructing pattern tiles. To know more about pattern brush options, see Pattern brush options.
Click the New Brush button in the Brushes panel. Alternatively, drag the selected artwork to the Brushes panel.
If you do not want to see a seam between the artwork pieces used to create the pattern brush, turn off the Anti-Aliasing option from Edit > Preferences > General (Windows) or Illustrator > General > Preferences (Mac OS).
Modify a brush
- To change the options for a brush, double-click the brush in the Brushes panel. Set the brush options and click OK. If the current document contains brushed paths that use the modified brush, a message appears. Click Apply To Strokes to change pre-existing strokes. Click Leave Strokes to leave pre-existing strokes unchanged, and apply the modified brush to new strokes only.
- To change the artwork used by a scatter, art, or pattern brush, drag the brush into your artwork and make the changes you want. Then Alt‑drag (Windows) or Option-drag (Mac OS) the modified brush onto the original brush in the Brushes panel.
- To modify a brushed path without updating the corresponding brush, select the path and click the Options Of Selected Object button in the Brushes panel or select options of selected object from the Brushes panel menu (flyout menu).
You can specify different options for the different types of brushes. To change the options for a brush, double-click the brush in the Brushes panel.
Scatter, Art, and Pattern brushes all have identical options for colorization.
To customize a stroke instance for Art Brushes or Pattern Brushes, click the Options of Selected Objects icon in the Brushes Panel and set the stroke options. For art brush you can set the stroke width along with flipping, colorization, and overlapping options. For pattern brush, you can set the scaling options along with flipping, fitting, and colorization options.
А вы знаете, что прямо на iPad или iPhone можно создавать яркие высококачественные кисти на основе фотографий и любых других объектов, которые вас вдохновили? Сохраните кисти в библиотеку Creative Cloud и используйте их в Photoshop и Illustrator, где бы вы ни работали.
Подробнее о приложении Adobe Brush CC для iPad см. в этом видео.
Загрузите приложение Adobe Brush CC из магазина приложений iTunes.
С помощью кистей можно применять различные стили для изменения внешнего вида контуров. Можно применять мазки кистью к существующим контурам или использовать инструмент «Кисть», чтобы одновременно нарисовать контур и применить к нему мазок кистью.
В Illustrator существуют различные типы кистей: каллиграфические, дискретные, объектные, узорчатые и кисти из щетины. Используя эти кисти, можно создать следующие эффекты.
Создают линии, подобные нарисованным с помощью каллиграфического пера и нарисованные вдоль центральной оси контура. При использовании инструмента «Кисть-клякса» можно рисовать каллиграфической кистью и автоматически разобрать мазок кисти в фигуру с заливкой, которая объединяется с другими объектами с заливкой того же цвета, пересекающимися или соседствующими в порядке размещения.
Копии объекта (например, божьей коровки или листа) распределяются вдоль контура.
Форма кисти (например, «Грубый уголь») или форма объекта отображается равномерно вдоль контура по всей длине.
Кисть из щетины
Создаются мазки, имитирующие мазки кистью из щетины.
Узор создается из отдельных элементов и повторяется вдоль контура. Узорчатые кисти могут сочетать до пяти элементов: для сторон, внутреннего угла, внешнего угла, начала и конца узора.
A. Каллиграфическая кисть B. Дискретная кисть C. Объектная кисть D. Узорчатая кисть E. Кисть из щетины
Часто с помощью дискретных и узорчатых кистей можно создать один и тот же эффект. Тем не менее между ними есть одно существенное отличие: узорчатая кисть в точности следует контуру, в отличие от дискретных кистей.
Стрелки, изображенные узорчатой кистью, изгибаются по контуру (слева), в то время как стрелки, изображенные дискретной кистью, остаются прямыми (справа).
На палитре «Кисти» («Окно» > «Кисти») отображаются кисти для текущего файла. При выборе какой-либо кисти в библиотеке она автоматически добавляется на палитру «Кисти». Кисти, созданные пользователем и сохраненные на палитре «Кисти», связаны только с текущим файлом. Таким образом, для каждого файла Illustrator может использоваться собственный набор кистей на палитре «Кисти».
Отображение и скрытие типа кисти
В меню палитры выберите один из следующих вариантов: «Показать каллиграфические кисти», «Показать дискретные кисти», «Показать объектные кисти», «Показать кисти из щетины», «Показать узорчатые кисти».
Изменение режима отображения кистей
Изменение порядка расположения кистей на палитре «Кисти»
Перетащите кисть на новое место. Перемещать кисти можно только в пределах одного типа. Например, нельзя переместить каллиграфическую кисть в область, где расположены дискретные кисти.
Создание дубликата кисти на палитре «Кисти»
Перетащите кисть на кнопку «Новая кисть» или выберите в меню палитры «Кисти» команду «Создать дубликат кисти».
Удаление кистей из палитры «Кисти»
Выделите кисти и нажмите кнопку «Удалить кисть» . Можно выделить кисти, не используемые в документе, выбрав в меню палитры «Кисти» команду «Выделить все неиспользуемые».
Библиотеки кистей («Окно» > «Библиотеки кистей» > [название_библиотеки]) — это коллекции образцов кистей, поставляемых вместе с Illustrator. Можно открыть несколько библиотек кистей, чтобы просмотреть их и выбрать кисти. Можно также открывать библиотеки кистей с помощью меню палитры «Кисти».
Чтобы библиотека кистей открывалась автоматически при запуске программы Illustrator, выберите в меню палитры библиотеки кистей пункт «Постоянно».
Копирование кистей из библиотеки кистей на палитру «Кисти»
Перетащите кисти на палитру «Кисти» или выберите в меню палитры библиотеки кистей команду «Добавить к кистям».
Импорт кистей на палитру «Кисти» из другого файла
На палитре «Библиотека кистей» нажмите отдельное определение кисти или все определения кистей, которые необходимо импортировать, и выберите во всплывающем меню команду «Добавить к кистям».
Создание новых библиотек кистей
Выберите в меню палитры «Кисти» команду «Сохранить библиотеку кистей» и поместите новый файл библиотеки в одну из следующих папок, чтобы обеспечить его отображение в меню «Библиотеки кистей» при следующем запуске программы Illustrator:
- (Windows) User/AppData/Roaming/Adobe/Adobe Illustrator < номер версии >Settings/Brushes
- (Mac OS) Library/Application Support/Adobe/Adobe Illustrator < номер версии >Settings/Brushes
- Замените на одно из следующих значений в зависимости от того, какая версия Illustrator установлена в вашей системе. Дополнительные сведения представлены в разделе Замена номера версии Illustrator .
Если файл библиотеки помещен в другую папку, библиотеку можно открыть, выбрав команду «Окно» > «Библиотеки кистей» > «Другая библиотека» и указав нужный файл.
Можно применить мазки кисти к контуру, созданному с помощью любого инструмента рисования, включая инструмент «Перо», инструмент «Карандаш» или инструменты рисования основных фигур.
Выделите контур, затем выберите кисть в библиотеке кистей, на палитре «Кисти» или панели «Управление».
Перетащите кисть на контур. Если к контуру уже применены мазки кисти, прежняя кисть заменяется новой.
Чтобы применить к контуру другую кисть, но использовать параметры мазка исходной кисти, удерживайте клавишу «Alt» (Win) или «Option» (Mac OS) при щелчке на новой кисти.
Выберите инструмент «Кисть» .
Расположите курсор в точке, где должна начинаться линия, и перетащите его, чтобы нарисовать контур. При перетаскивании путь курсора отмечается точечной линией.
Чтобы нарисовать незамкнутый контур, отпустите кнопку мыши, когда контур примет желаемую форму.
Чтобы нарисовать замкнутую фигуру, удерживайте нажатой клавишу Alt (Windows) или Option (Mac OS) в процессе перемещения. Рядом с курсором инструмента «Кисть» отображается небольшая петля . Отпустите кнопку мыши (но не клавишу «Alt» или «Option»), когда фигура примет желаемую форму и ее необходимо будет замкнуть.
Illustrator отмечает опорные точки в процессе рисования линии. Число опорных точек определяется длиной и сложностью контура, а также настройками допуска инструмента «Кисть».
Совет. Для корректировки формы контура, созданного с помощью кисти, выберите этот контур. Затем расположите инструмент «Кисть» на контуре и перетащите, придавая контуру требуемую форму. Можно использовать этот метод для удлинения контура, нарисованного кистью, а также для изменения формы контура между существующими конечными точками.
Дважды щелкните инструмент «Кисть», чтобы задать параметры, описанные ниже.
Определяет, на какое расстояние можно переместить курсор или перо прежде, чем Illustrator добавит к контуру следующую опорную точку. Например, значение 2,5 для параметра «Отклонение» означает, что перемещения инструмента на расстояние менее 2,5 пикселя не регистрируются. Параметр «Отклонение» может принимать значения от 0,5 до 20 пикселей. Чем выше значение, тем более гладким и менее сложным будет контур.
Определяет степень сглаживания, применяемую программой Illustrator при использовании этого инструмента. Параметр «Сглаживание» может принимать значения от 0 до 100 %. Чем выше процентное значение, тем более сглаженный контур создается при рисовании.
Выполнять заливку новых мазков кистью
Применяет заливку к контуру. Этот параметр особенно полезен при рисовании замкнутых контуров.
Определяет, должен ли контур оставаться выделенным по окончании его рисования.
Редактировать выделенные контуры
Определяет, допускается ли изменение существующего контура с помощью инструмента «Кисть».
В пределах: _ пикс.
Определяет, насколько близко должен находиться курсор или перо к существующему контуру, чтобы можно было изменять контур с помощью инструмента «Кисть». Этот параметр доступен только в случае, если выбран параметр «Зона редактирования выделенных контуров».
В палитре «Кисти» выберите команду «Удалить мазок кисти» или нажмите кнопку «Удалить мазок кисти» .
Также можно удалить мазок кисти, выбрав базовую кисть на палитре «Кисти» или на панели «Управление».
Можно преобразовать мазки кисти в рамки контура, чтобы редактировать отдельные компоненты контура кисти.
Illustrator помещает компоненты разобранного контура в группу. В группу входят контур и подгруппа, содержащая кривые мазков кисти.
Вы можете создать каллиграфическую, дискретную, объектную, узорчатую кисть или кисть из щетины, а затем настроить ее параметры нужным образом. Чтобы создать дискретную, объектную или узорчатую кисть, необходимо сначала создать для нее рисунок.
При создании рисунка для кисти следуйте приведенным ниже рекомендациям.
Рисунок не должен содержать градиенты, наложение, другие мазки кисти, объекты сетки, растровые изображения, диаграммы, маски и файлы, добавленные командой «Поместить».
Рисунки для объектных и узорчатых кистей не должны содержать текст. Чтобы создать эффект мазка кисти с текстом, преобразуйте текст в кривые и затем создайте кисть с использованием этих кривых.
Для узорчатых кистей создайте до пяти элементов узора (в зависимости от конфигурации кисти) и добавьте эти элементы на палитру «Образцы».
Вы можете затем использовать созданные кисти для новых документов, добавив определения кистей в профиль нового документа. Дополнительные сведения о профилях новых документов см. в разделе О профилях новых документов..
Создание кисти
Для дискретных и объектных кистей выберите нужный рисунок. Для узорчатых кистей можно выбрать рисунок для бокового элемента, но это делать необязательно. Подробные указания по созданию узорчатых кистей представлены в разделе Рекомендации по созданию элементов узора. Дополнительные сведения о параметрах узорчатых кистей представлены в разделе Параметры узорчатой кисти.
В диалоговом окне «Параметры кисти» введите имя для кисти, задайте параметры кисти и нажмите кнопку «ОК».
Если требуется, чтобы граница между частями рисунка, которые используются для создания узорчатой кисти, отсутствовала, отключите параметр «Сглаживание» в меню «Редактирование > Установки > Основные» (в Windows) или «Illustrator > Установки > Основные» (в Mac OS).
Изменение кисти
Можно задать разные параметры для разных типов кистей. Чтобы изменить параметры кисти, дважды нажмите на нее на палитре «Кисти».
К дискретным, объектным и узорчатым кистям применяются одинаковые параметры окраски.
Чтобы изменить настройки экземпляра обводки для объектной или узорчатой кисти, нажмите на значок «Параметры выделенного объекта» на палитре «Кисти» и установите нужные значения. Для объектной кисти помимо ширины обводки, можно задать такие параметры, как зеркальное отражение, настройку размера и цвет. Для узорчатой кисти помимо настроек масштабирования, можно задать такие параметры, как зеркальное отражение, настройку размера и цвет.
Владея своими собственными кистями в иллюстраторе, творческие возможности значительно расширяются. Создание собственных кистей позволит автоматически делать интересные иллюстрации, экономя время и силы на однообразную прорисовку деталей. В этом видео уроке, показано, как создавая свои кисти делать с их помощью красивые рисунки, орнаменты, текстуры, фоны и все, на что хватит фантазии.
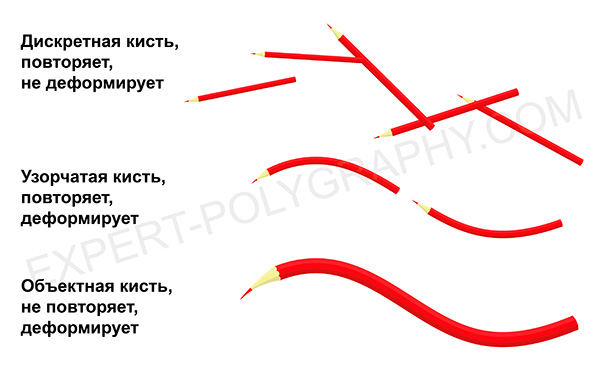
Виды кистей в Adobe Illustrator
В Illustrator есть готовые наборы кистей, подборка на разные темы, но создание своих собственных, даст большое преимущество в рисовании. Всего в Adobe Illustrator пять видов кистей, подробнее обо всех кистях рассказано в этом уроке. Сейчас речь пойдет всего о трех: дискретная, объектная, узорчатая. На следующей картинке показана разница между кистями.
Создание собственной кисти
Для создания собственной кисти, сперва нужно нарисовать элемент. Если вы хотите использовать градиент в кистях, то его нужно преобразовать в сплошную заливку - Объект/Разобрать оформление и выбрать количество переходов цвета. Вот заготовки для будущих кистей:

Перетаскиваем рисунок в панель кистей и выбираем тип желаемой кисти. Второй способ: выделить рисунок и нажать на кнопку создания новой кисти. После этого, открывается окно настроек.

Дискретная кисть (Scatter Brush)
Повторяет рисунок на оси, не деформируя его. Настраивается промежуток между объектами, колебания размера, интервалы между предметами, разброс от линии и поворот. Такой кистью удобно создавать фоны, заполненные повторяющимися элементами, разного размера и угла поворота. Все кисти в Иллюстраторе работают с графическим планшетом и могут реагировать на силу нажатия на перо, а в профессиональных планшетах - наклон, поворот и другие фишки.

Объектная кисть (Art Brush)
Растягивает объект по направляющей один раз, без повторений. Деформирует элемент по линии изгиба. Позволяет получать штрихи определенной формы или текстуры. Идеально подойдет для выполнения штрихового, контурного рисунка, состоящего из линий определенного профиля. Смотрите видео в конце статьи.
Галочка "Масштабировать пропорционально" означает, что толщина линии будет зависеть от ее длинны, чем длиннее линия, тем толще. В некоторых ситуациях, для проработки мелких деталей лучше выбрать именно этот режим.

Узорчатая кисть (Pattern Brush)
Похожа на объектную, но она не растягивает объект, а повторяет много раз на штрихе. С помощью такой кисти создаются орнаменты, узоры, рамки. Наиболее важными параметрами этой кисти, является настройка стыковки элементов:
- Растянуть - будут сжаты или растянуты в зависимости от длинны штриха и длинны элемента.
- Вставить пробелы - элементы будут накладываться один на другой.
- Сместить - стыковка происходит без искажений, но возможно увеличится длинна или форма рисунка.

Изменение настроек кисти влияет на будущие штрихи, а также может повлиять на раннее нарисованные этой кистью, если согласиться применить к ним изменения.


Для работы в программе Adobe Illustrator вам не раз пригодятся различные кисти, особенно если вы рисуете через планшет. Кисти условно можно разделить на 4 типа:
- Стандартные кисти, предустановленные в Adobe Illustrator.
- Платные кисти.
- Бесплатные кисти.
- Кисти, сделанные собственноручно.
Последние 3 вида кистей нужно как-то внедрить в Adobe Illustrator. Об этом мы и расскажем в нашей статье. А еще рассмотрим несколько вариантов создания своих кистей и работу со стандартными кистями.
Типы кистей
В Иллюстраторе существуют следующие типы кистей:
- Каллиграфические кисти — их линии похожи на линии пера, к ним относится «Кисть-клякса», с помощью которой можно рисовать объекты, которые будут сразу преобразованы в фигуры с заливкой.
- Дискретные кисти — это копии объекта, распределенные вдоль контура.
- Узорчатые кисти — узор создается из элементов кисти, их может быть до 5-ти. В данной статье ниже будет рассмотрен процесс создания такой кисти.
- Объектные кисти — форма такой кисти растягивается вдоль всей нарисованной линии, например: меловая линия, лист дерева.
- Кисть из щетины — имитирует мазки кистью из щетины.
Как установить кисти в Иллюстраторе
Если вы скачали бесплатно или купили новые кисти для Adobe Illustrator, то для начала их нужно распаковать из архива. Весь процесс установи и настройки будем разбирать на примере кисти-веревки, которую можно купить тут на 6$.

В архиве данных кистей вы найдете эти папки и файлы, вам нужно выбрать файл с расширением .AI, соответствующий вашей версии иллюстратора:

Откройте файл .AI в Adobe Illustrator. Откройте панель «Кисти», и вы увидите, что ваши новые кисти уже загружены и готовы к использованию.

Сохранение библиотеки кистей
Удалите все лишние кисти из палитры «Кисти». В разделе «Параметры» на панели «Кисти» выберите «Сохранить библиотеку кистей».

Вы можете сохранить кисти в любой папке на компьютере. Но, чтобы легко открывать кисти из меню «Кисти» — «Открыть библиотеку кистей» — «Определяемые пользователем» , нужно сохранить кисти в этих папках:
- (Windows) User/AppData/Roaming/Adobe/Adobe Illustrator номер версии> Settings/Brushes
- (Mac OS) Library/Application Support/Adobe/Adobe Illustrator номер версии> Settings/Brushes
Работа с кистями
Далее рассмотрим что же можно делать с помощью кистей.
Как рисовать кистью
Работать с кистями очень просто. Нарисуйте фигуру и примените к ней нужную кисть, выбрав ее в библиотеке, например так:
Для некоторых кистей можно изменить цвет через цвет обводки:

Для более сложных кистей вы можете использовать функцию «Редактировать» — «Редактировать цвета» — «Перекрасить графтческий объект» (Recolor Artwork), меняя сразу все оттенки:

Еще один интересный способ редактирования — это изменение толщины обводки:

Некоторые кисти нужно разобрать для редактирования цвета. Для этого выделите объект и идите в «Объект» — «Разобрать оформление». Теперь все элементы можно перекрашивать по отдельности.

Как настроить и изменить размер кисти
Дважды кликните по инструменту «Кисть» на панели инструментов и вы увидите возможные настройки кисти.

Так же часть настоек есть в верхней панели инструментов. Например, изменить размер и толщину кисти можно через размер Обводки, увеличив или уменьшив ее толщину.

Как настроить кисти в для планшета
Раздел в разработке, но есть видео на тему;)
Кисть-клякса
Эта кисть относится к каллиграфическим. Ее особенность в том что она создает объекты с заливкой. Этой кистью удобно рисовать на планшетах типа iPad.

Как создать свою кисть в Иллюстраторе
А сейчас рассмотрим процесс создание собственной Узорчатой кисти. Будем создавать кисть вот с таким узором:.

Выделяем все ягодки (предварительно сгруппировав плодоножку и ягодку) и листики и выравниваем расстояние между ними:
Чтобы ровно разрезать фигуру нарисуем прямоугольник без заливки, шириной от начала первой ягодки до конца последней (в данном варианте этого будет достаточно, но если вам нужны зазоры между элементами кисти, то ширину прямоугольника стоит увеличить).
Уберите заливку и контур у прямоугольника. Выделите прямоугольник и основной ствол. Идем в панель «Обработка контуров» — «Разделение»

Удалите лишние пустые фигуры и расгруппируйте основной ствол:

Теперь у нас появилось 3 элемента кисти, для наглядности я их сместила по вертикали:

Сгруппируйте каждую часть как показано на рисунке:

Перетащите начало и конец веточки в палитру «Образцы»:
Далее выделяем основную ветку с листиками и ягодами и создаем из нее новую Узорчатую кисть:

В настройках начала и окончания кисти выбираем наши концевые листочки. Так же можно настроить остальные 3 варианта изгиба кисти, можно даже отдельно прорисовать как они должны выглядеть и добавить как и кончики через палитру «Образцы» .
Читайте также: