
Программа для сканирования sharp ar 6020
If you have had recent power outages, viruses or other computer problems, it is likely that the drivers have become damaged. Browse the list above to find the driver that matches your hardware and operating system. To see more matches, use our custom driver search engine to find the exact driver.
Tech Tip: If you are having trouble deciding which is the right driver, try the Driver Update Utility for Sharp AR 6020. It is a software utility that will find the right driver for you - automatically.
DriverGuide maintains an extensive archive of Windows drivers available for free download. We employ a team from around the world which adds hundreds of new drivers to our site every day.
How to Install Drivers
Once you download your new driver, then you need to install it. To install a driver in Windows, you will need to use a built-in utility called Device Manager. It allows you to see all of the devices recognized by your system, and the drivers associated with them.
Open Device Manager
In strong>Windows 11, Windows 10 & Windows 8.1, right-click the Start menu and select Device Manager
In Windows 8, swipe up from the bottom, or right-click anywhere on the desktop and choose "All Apps" -> swipe or scroll right and choose "Control Panel" (under Windows System section) -> Hardware and Sound -> Device Manager
In Windows 7, click Start -> Control Panel -> Hardware and Sound -> Device Manager
In Windows Vista, click Start -> Control Panel -> System and Maintenance -> Device Manager
In Windows XP, click Start -> Control Panel -> Performance and Maintenance -> System -> Hardware tab -> Device Manager button
Install Drivers With Device Manager
Locate the device and model that is having the issue and double-click on it to open the Properties dialog box.
Select the Driver tab.
Click the Update Driver button and follow the instructions.
In most cases, you will need to reboot your computer in order for the driver update to take effect.
Visit our Driver Support Page for helpful step-by-step videos
Install Drivers Automatically
If you are having trouble finding the right driver, stop searching and fix driver problems faster with the Automatic Driver Update Utility. Automatic updates could save you hours of time.
The Driver Update Utility automatically finds, downloads and installs the right driver for your hardware and operating system. It will Update all of your drivers in just a few clicks, and even backup your drivers before making any changes.
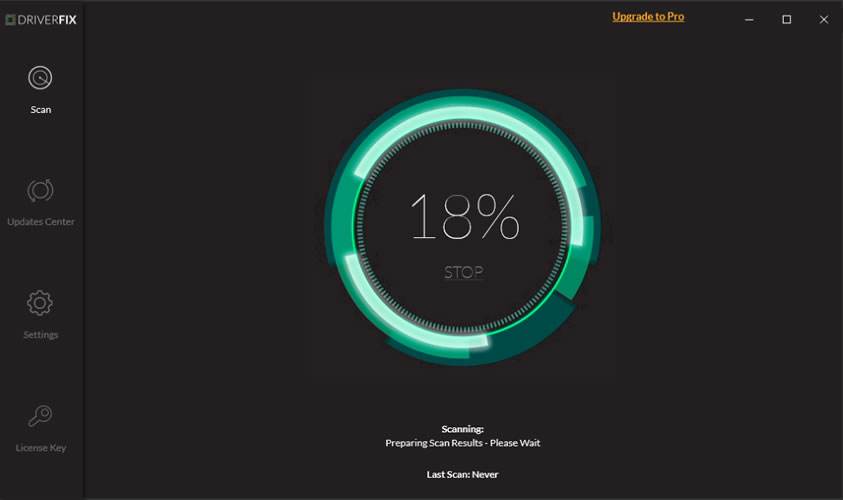
Once you download and run the utility, it will scan for out-of-date or missing drivers:
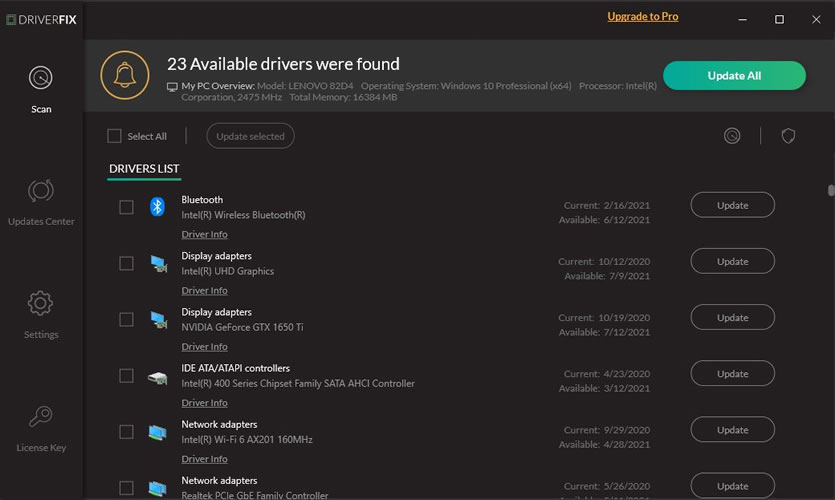
When the scan is complete, the driver update utility will display a results page showing which drivers are missing or out-of-date:
Next, update individual drivers or all of the necessary drivers with one click.
Benefits of Updated Drivers
Many computer problems are caused by missing or outdated device drivers, especially in Windows 11. If your desktop or laptop is running slow, or keeps crashing or hanging, there is a good chance that updating your drivers will fix the problem.
Ensures your hardware runs at peak performance.
Fixes bugs so your system will have fewer crashes.
Unlocks new features and configuration options in your devices, especially with video cards and gaming devices.
"Network Scanner Tool Lite" enables to store document data scanned from MFP to your PC via a network. With Network Scanner Tool Lite, you can store large size data or a large number of originals easily into the specified folder of your PC.

Network Scanner Tool Lite enables to store large size data.
You can select where to store the scanned data.
Register multiple destinations in advance so that you can select where to store the data by simply specify the destinations.
A balloon message is displayed when the PC receives the scanned data.
A balloon message appears on the screen of PC when the scanned data is stored in the folder of the PC. The specified destination folder can be displayed from the balloon message.
The record of the scan can be checked at any time.
You can check the history of the document data scan to your PC. The specified destination folder can be displayed from the scan history.
You can execute scanning from your PC.
When you are on a business trip or in other situations, if you need to use MFP's scanner function, Network Scanner Tool Lite makes it easy to execute scanning from your PC. There is no need to register a destination to store the scanned data.
Two Ways of Scanning
Execute the Scanning from MFP

1. Select FTP/Desktop.

2. Select an address.
![Place the original and tap [Start]](https://global.sharp/products/copier/img/products/nst_lite/index/image_mfp03.jpg)
3. Place the original and tap [Start].

4. Save the scanned data to the specified destination folder.
Execute the Scanning from PC

1. Select MFP to use its scanner.

2. Configure scan settings.

3. Place the original on MFP and start scanning.
4. Select destination to save the file.
* “Scan from Computer” feature will not encrypt the data when communicate with MFP.
How to Install Network Scanner Tool Lite
Please read Network Scanner Tool Lite download page to install the software on your PC.
Ниже вы сможете найти всю доступную на данный момент документацию и технические характеристики по данному продукту.
Загрузки
Спецификации
Общее
Скорость Ч/Б печати стр/мин (А4) 20 Скорость Ч/Б печати стр/мин (А3) 11 Формат бумаги: макс./мин. A6R - A3 Плотность бумаги (г/м2) 55 - 200 Запас бумаги: стандартно (листов) 350 Запас бумаги: макс. (листов) 1850 Время прогрева (сек.) 25 Общая память мин/макс (МБ) 64 - 192 Требования к электропитанию: напряжение (В) и частота (Гц) 220 - 240 В, 50 / 60 Гц Потребляемая мощность (КВт) 1,2 Размеры (мм) 599 x 612 x 511 Вес (кг) 27,9
Копир
Формат оригинала (макс.) A3 Время выхода первой Ч/Б копии (сек.) 6,4 Электронная сортировка стандартно Непрерывное копирование (макс. копий) 999 Разрешение Ч/Б сканирования (т/д) 600 x 600 Разрешение печати (т/д) 600 x 600 Градация (эквивалент) - Ч/Б 256 Диапазон масштабирования (%) 25 - 400 Предустановленное масштабирование копирования 10
Устройство подачи оригиналов
Сетевой сканер
Сетевой сканер (Стандартно/Дополнительно) OPT Метод сканирования с Панели управления и с помощью TWAIN Разрешение сканирования с панели (т/д) 50 - 9600 Разрешение сканирования с панели (т/д) 75, 100, 150, 200, 300, 400, 600 Форматы файла TIFF, PDF,JPG, BMP Адресация сканирования на Рабочий стол Sharpdesk Адресация сканирования FTP, e-mail Адресация сканирования на USB устройство
Сетевой принтер
Разрешение (т/д) 600 x 600 Сетевой принтер (Стандартно/Дополнительно) Дополнительно Интерфейс Станд/Опц Стандартно: USB 2.0 (High Speed), дополнительно: 10Base-T/100Base-TX Поддерживаемые ОС стандартно Windows 8.1, 10. Поддерживаемые ОС дополнительно Windows Server 2016, 2019. Mac OS X 10.6. 10.7, 10.8, 10.9, 10.10, 10.11, 10.12, 10.13, 10.14, 10.15 Сетевые протоколы TCP/IP Протоколы печати LPR, Raw TCP, IPP (дополнительно) PDL стандартно/дополнительно Стандартно: SPLC, дополнительно: эмуляция PCL 6 и эмуляция PostScript® 3 ™ Доступные шрифты 80 шрифтов для PCL, 136 шрифтов для PostScript® 3™
What if you want to install Sharp AR-6020 printer on your computer and its driver CD got misplaced? – which came with the printer. Don’t worry because these days all the printer manufacturer’s companies provide drivers on their website.
Therefore, this page contains driver installation instructions and download links for the latest Sharp AR-6020 printer. The information provided below is thoroughly researched and the drivers available for download are from the official Sharp website. Sharp AR-6020 driver download links are given in the download section below for Windows, Linux and Mac OS. It contains the printer & scanner driver. This driver will work for Sharp AR-6020 / 6020n / 6020v / 6020dv.
How to download Sharp AR-6020 driver
First you should determine the version of the operating system on your computer. Please find the same OS version in the list given below and use its download button to get your Sharp AR-6020 driver setup file.
Sharp AR-6020 Driver Download List
- Full feature printer & scanner driver for Windows XP (32-bit) → Download
- Full feature printer & scanner driver for Windows XP (64-bit) → Download
- Full feature printer & scanner driver for Windows Vista (32-bit) → Download
- Full feature printer & scanner driver for Windows Vista (64-bit) → Download
- Full feature printer & scanner driver for Windows 7 (32-bit) → Download
- Full feature printer & scanner driver for Windows 7 (64-bit) → Download
- Full feature printer & scanner driver for Windows 8, 8.1 (32-bit) → Download
- Full feature printer & scanner driver for Windows 8, 8.1 (64-bit) → Download
- Full feature printer & scanner driver for Windows 10 (32-bit) → Download
- Full feature printer & scanner driver for Windows 10 (64-bit) → Download
- Full feature printer & scanner driver for Windows 11 (32-bit) → Download
- Full feature printer & scanner driver for Windows 11 (64-bit) → Download
- Full feature driver for Server 2003 to 2022 → Not Available
- Full feature driver for macOS 11 Big Sur and 12.x Monterey → Download
- Full feature driver for Mac OS X 10.7 to 10.15 → Download
- Full feature driver for Linux and Ubuntu → Not Available
How to install Sharp AR-6020 printer
The printer driver installation guide that we have shared below explains in simple steps the proper method of installing a printer driver on various operating systems. Installing the printer driver for this all-in-one cannot get easier. Just read our printer driver installation guide given below and follow the instructions properly.
Updating Printer Driver
You must upgrade your Sharp printer driver with its latest version. If you don’t have full feature Sharp AR-6020 driver installed for this Sharp all-in-one, then you must upgrade it immediately. Upgrading your printer driver with its latest version ensures that your printer is running on support software that has the least known bugs in it.
Printer Driver Function
Gone are the days when a printer driver was functioning only as a communication channel between your computer applications and your printer. For this Sharp all-in-one, when you install the full feature Sharp AR-6020 driver you get many additional features as the driver package includes several applications necessary for the efficient functioning of this MFP.
Supported Operating Systems
Windows XP to Windows 10 (32 / 64bit)
Mac OS 10.0 to 10.15
Linux, Ubuntu
Specifications
- Functions: Print, Scan, Copy
- Printer Type: B/W Laser Printer
- Print Speed: up to 20 ppm
- Print Resolution: up to 600 x 600 dpi
- Paper Size: A3, A4, A6
- Paper Capacity: 1850 sheets
- Connectivity Interface: USB
- Input Tray: 250 sheets
Toner Details
This Sharp printer uses toner powder to refill and also use one Black (MX-237BT / GT) toner.
More Information:
You can download the latest Sharp AR-6020 driver package in the below given driver download guide. Read our guide properly, choose the right driver for your operating system and follow the installation instructions given below.
On this page, we are offering Sharp AR-6020 driver download links for Windows, Linux and Mac operating systems. If you have lost your Sharp AR 6020 software CD, then the driver package given below is the right solution.
In this article, we have seen how you can download and then install Sharp AR-6020 machine on your computer, please let us know in the comments section below if you have query regarding the above statements.
Questions & Answers
Would you like to ask a question like these? Ask Question , you'll get answer within 24 hours. It's completely FREE.
Цена сопоставима с покупкой нового недорогого МФУ, но нового! – нормальный сетевой интерфейс, сканирование по сети, нормальный захват бумаги (коллеги вечно жаловались).
После долгих раздумий, расчетов и так, и эдак, было принято решение о покупке Sharp AR-6020NR – сетевое МФУ формата А3 с весьма дешевыми расходниками. (Будем аккуратны в его эксплуатации и надеемся, что прослужит он долго)
Итак, Sharp AR-6020NR:
Вот так он выглядит:


Сразу оговорюсь, крышка, которая на самом верху МФУ, которая прижимает сканируемый лист, покупалась отдельно. Очевидно компания Sharp решила предоставить выбор пользователям купить обычную прижимную крышку или с автоподатчиком (однако замечу, что стоимость крышки с автоподатчиком сопоставима со стоимостью самого принтера, а в сумме это получается не мало, не мало настолько, что за эти деньги появляется достаточно большой выбор устройств, и далеко не факт, что в итоге выбор падет на Sharp)
МФУ – принтер, сканер, копир. Буква «N» в названии говорит, что принтер снабжен сетевым интерфейсом (от английского слова net – сеть)

Помимо сетевого интерфейса есть USB B – для подключения к ПК по USBпроводу, а также есть стандартный вход USB (для флешки) – МФУ может сканировать сразу на флешку.
(кабель USBв комплекте не идет!)
Немного забежали вперед. Вернемся к началу.
Принтер доставили в картонной коробке. Мы его сами распаковывать не стали – на сайте четко написано: «Гарантия на многофункциональные устройства предоставляется только при условии выполнения инсталляции и пуско-наладочных работ персоналом сервисного центра, авторизованного компанией производителем.»
Нашли мы такую фирму, вызвали. Я предполагал, что придут грамотные люди, установят и настроят принтер, и покажут хотя бы мне основные его функции и настройки (а я потом уже всех коллег научу с ним работать) Ну а мы, естественно, заплатим «небольшую денежку».
В итоге пуско-наладка была бесплатной, но… пришли ребята, не особо внушающие доверие, распаковали принтер, подключили питание, открутили пару болтов и всё! Сказали: «остальное не наше дело» и ушли.
Пришлось скачивать инструкцию и настраивать его самостоятельно.
Кабель питания подключается сзади. Стандартный компьютерный кабель питания:

Тут же сзади бирка принтера. Произведен в Тайланде:

МФУ имеет вот такой пульт управления, с экраном:

При работе практически все кнопки с той или иной частотой используются, лишнего ничего нет.
Есть специальный ряд кнопок для сканирования (самый левый ряд – 6 кнопок) – на каждую из них можно задать режим сканирования, и сканировать в заранее заданном режиме.
МФУ может сканировать в форматы: TIFF, JPG, PDF, цветное и ч\б, с различной плотностью точек DPI, сканы может сбрасывать на почту, на флешку, в ftp папку. (вот на комбинации этих режимов и можно настроить целевые кнопки)
У МФУ штатно 2 лотка подачи бумаги: основной и дополнительный (боковой):


В любой из них можно класть любой формат бумаги.
Есть одно особенность которую заметили только опытным путем. Принтер снабжен системой двусторонней печати, так вот эта двусторонняя печать работает только при захвате бумаги из основного лотка. Как мы ни пытались, при захвате из бокового лотка со второй стороны принтер не печатает.
Отсек принтера, где располагаются тонер картридж и фото барабан:

Слева тонер картридж, справа фото барабан.
Ресурс тонер картриджа, который идет в комплекте – 4 000 отпечатков А4 (ресурс стандартного картриджа 20 000 отпечатков).
Ресурс фото балабана – 75 000 отпечатков. (причем сервисники сказали, что скорее всего после 75 000 отпечатков придется их вызывать для замены или добавки девелопера)
При таком ресурсе и стоимости расходников цена одного отпечатка у меня получилась равной – 43 копейки. Это один из самых низких показателей на данный момент на рынке в таком классе устройств.
Правая сторона МФУ, которую надо открывать если произошло замятие бумаги:

При подключении принтера к компьютерной сети, адрес он получает либо через DHCP, либо его необходимо назначить через пульт управления вручную (как это сделать достаточно понятно описано в инструкции). При DHCP рекомендую создать привязку MAC–IP, иначе если принтер получит другой адрес, ПК, настроенные на работу с ним по сети, не найдут его.
Как только адрес у принтера появился, можно устанавливать драйвера и софт. Это очень просто – вставляем диск, устанавливаем сначала на принтер потом на сканер. В процессе установки система ищет принтер в сети, и настраивается именно на текущий адрес (кстати, может быть его и можно где-то поменять в случае изменения адреса)
Т.к. принтер сетевой, у него есть веб интерфейс настройки. Основное, что я там использовал, это настройка кнопок для задания режимов сканирования, назначение ftp папки. Там еще много чего есть, но это уже «тюнинг».
Вот в принципе и все.
Времени на него я потратил немало, особенно на ftp папку, которой у нас раньше не было.
Но на данный момент все работает, всем нравится.
В целом принтер весьма неплох. Все базовые потребности небольшого офиса закрывает с лихвой. Самое главное теперь, чтобы он отпечатал такое количество бумаги, чтобы окупиться.
Читайте также: