
Pixplant как установить в фотошоп
Facebook Если у вас не работает этот способ авторизации, сконвертируйте свой аккаунт по ссылке ВКонтакте Google RAMBLER&Co ID
Авторизуясь в LiveJournal с помощью стороннего сервиса вы принимаете условия Пользовательского соглашения LiveJournal
Плагин PixPlant 2.1.65 for Adobe Photoshop
- PixPlant 2.1.65 for Adobe Photoshop (x32/x64) + видео Tutorial
Это мощный и удобный инструмент для создания высококачественных бесшовных текстур любого размера из любых изображений и фотографий. При создании текстуры можно указывать, должна ли она быть бесшовной по горизонтали и/или по вертикали, исключать из процесса генерации некоторые части исходного изображения, задавать повторяемость и другие параметры. Вы сможете уберечь уйму времени при создании бесшовных текстур, благодаря использованию технологии применяемой в программе, которая за четыре клика создаст нужную вам бесшовную текстуру. Также данный плагин можно использовать в таких программах как XnView и IrfanView.
Преимущества:
• Быстрое создание уникальных бесшовных текстур
• Исходя из реальных фотографий, программа создает реалистичные текстуры без каких-либо искажений
• Позволяет генерировать неповторяющиеся текстуры
• Создание текстур в высоком разрешении и качестве из исходного изображения
• И многое другое.
Особенности:
• Создание текстуры практически из любой фотографии, благодаря продвинутой технологии выпрямления
• Высокая автоматизация задач
• Большинство текстур создается за 1-4 клика
• Тщательно продуманный и простой в использовании интерфейс с интерактивной справкой и полноэкранным предпросмотром
PixPlant 2 includes the following features:
- Create normal, displacement and specular maps ready to be used in 3D modelling applications.
- Fine tune 3D textures with an interactive parallax mapped 3D preview.
- Create textures from almost any photo, thanks to advanced straightening and seed pattern controls.
- Highly automated with most textures created in 1-4 clicks. And high performance with usually a few seconds per texture.
- Generate complete images or refine and expand existing ones. Out-select parts of the seed image for fine grain control.
What's new in 2.1.65
- PixPlant is now available for 64 bits Windows 7, Vista and XP. The Photoshop plug-in version has also been updated to support Photoshop 64 bits versions. The setup installs both the 32 and 64 bits versions in a 64 bits operating system; or the 32 bits version if the operating system is 32 bits.
- Added the Light Intensity control to the 3D Material tab.
- Added mouse wheel zooming to the Texture Canvas as well as to the 3D map display, and also double-click fit zoom and maximum zoom.
- Added double-click fit zoom and maximum zoom to 3D Preview.
- New Reset Settings link in the Common Surface Settings.
- Clicking the label of a setting in the 3D Material maps now resets the respective control to its default value.
- Added the Preview Resolution setting to the Preferences dialog. This setting allows PixPlant to deal with large textures and maps, by establishing a size above which maps are resized. - - This solves slowdowns and problems with large textures not fitting the GPU available memory.
- Removed two settings from the Preferences dialog which were available in previous versions: Normal Map Preview and Preview Mip Maps. These settings were found to be unreliable across different GPUs; and since the 3D Preview is a really a just a preview and not the final render (with all the extra sets of options) we chose to remove these settings on this and future versions. Mip maps are now adaptively managed by PixPlant depending on the text size.
- Starting from this release PixPlant is no longer available for Windows 2000.
- Fixed a few minor issues.
Операционная система: Windows XP/Vista/ 7.
Язык интерфейса: Английский
Размер: 73.53 MB (Лекарство в архиве)

Скачал и установил PixPlant 2.1.67 x86+x64 [2012, ENG] . На компе стоит Фотошоп ЦС5. Вопрос довольно простой, как им пользоваться-то?
Щелкаю по ярлыку PixPlant2, он мне открывает фотошоп и выскакивает ошибка
Разобрался. В фильтрах надо было искать PixPlant. Только не понятно как отдельной программой ее открывать.
Лучше ставить как отдельную прогу а не как плагин для фотошопа. Если отдельно то он и запукаться должен отдельно, если как плагин то икать его надо открыв сам фотошоп в фильтрах, так помоему. Я ставила себе отдельно, работает отлично, присутствует ли текстовый документ с установочным файлом, обычно в хелперах пишут что да как устанавливать.
AuRu
Пока редактировал пост ты уже ответила. )
Да нашел как запускать, но я не понимаю как его запускать отдельной программой. При установке снимал галку фотошоп цс5, но при запуске он все равно открывал фотошоп и выдавал вышеуказанную ошибку.
А про хелп, то так только как крякать. )
То что ты скачал это и есть плагин для фотошоп, а есть отдельно прога, могу тебе скинуть если надо, у меня имеется. У тебя наверно прога с припиской PS, а надо без нее.
Да там без этой приставки, да и при установке есть выбор ставить галку как плагин или как прога отдельная (если правильно понял). Но давай, скинь. )
И чем все-таки лучше его отдельной программой ставить, а не плагином?
Отличие только одно, что работая как плагин затрачивает чуть больше ресурса чем отдельная программа, и удобство при работе прям в фотошопе для тех кто часто им пользуется,не нужно переключаться между двумя программами, вот и все. При установке галочку снимать не нужно, иначе установка плагина будет некорректной, это плагин а не прога, там внизу при установке об этом написано. Находиться он будет в фильтрах. Посмотрела ничем не отличается от той версии что я скинула, так что все нормально, главное чтоб работало.
PixPlant creates and edits 3D maps and quickly transforms common photos into seamlessly tiling materials.
The 5th major version of PixPlant includes many improvements. In fact so many things are new, that the version number has jumped from 3 to 5:
- Support for the Physically Based Rendering (PBR) Workflow, while maintaining support for the previous Traditional (Diffuse-Specular) 3D Workflow.
- Improved 3D Preview rendering with HDRI environment lighting. PBR Metallic-Roughness uses common GGX rendering, while Traditional Diffuse+Specular Workflow uses Blinn-Phong rendering.
- New Map Tools system with an intuitive interface and powerful capabilities. Fast GPU acceleration available in most tools.
- Includes the previous version's automatic tiling features with easy-to-use synchronized tiling of multiple maps.
- All map editing is done at 16-bit precision, with some tools working at floating point. Full sRGB support for the Base Color, Difuse and Specular maps, and linear space support for other maps.
- Includes an help system built inside the app with many contextual information buttons and interactive guides.
2. Interface Areas
The PixPlant interface is divided in three main areas:

The 3D Preview displays a rendering of a 3D model textured with maps being edited. It can be undocked from the main PixPlant into a separate window.
At the right side, the Map Tools area includes the tools available for the current editor. Click on the Tool header to use it.Some tools, mostly related to map extraction, are specific to individual map types, while others are common to many types.
The Map Editor area in the center is where you can view and edit the currently active 3D map. To switch between active maps, click the tabs above the Editor Area:

All editors can edit the map in a 2D view, which usually provides the best possible visualization for editing. But as surface relief is best visualized in 3D, the Displacement map editor also provides a 3D view, that you can enable by clicking the 2D/3D button at the top-left corner of the Editor.
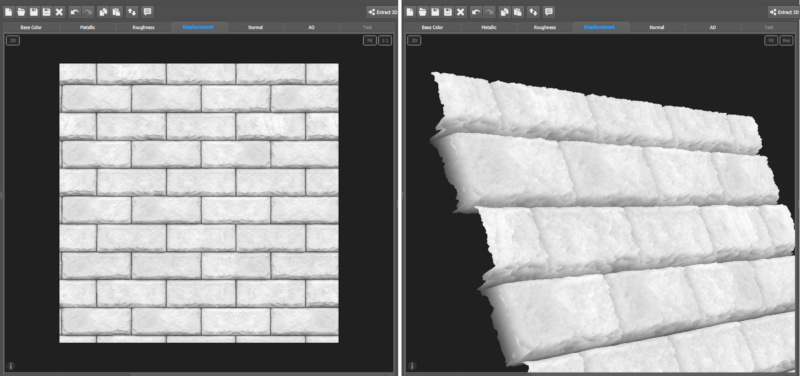
Although the 3D view is quite useful to visualize surface relief, some tools may be better used in the 2D editor, like the Transform tool.
Please see the included Interface Tour Guide for a walk-through of the interface.
3. Real Help Is in the App
PixPlant includes a help system integrated in the app, the place where it is most needed. Anywhere you see an ( i ) button like this:
You can click it for an explanation of that area and its settings. It is available in the 3D Preview, editor areas, tools and windows like the New Maps, Save Maps, Preferences, etc.
Map Tools are special: to get help in an open Map Tool, leave the mouse cursor over its title and the ( i ) button will appear. Click it to get help:

In most interface elements too small for an ( i ) button, you can leave the mouse over the element's label for a tooltip to appear with help.
Besides the ( i ) buttons, PixPlant includes an interactive guide or tutorial system that can be accessed from the Guides button at the top-right corner of the interface:

A Guide list will appear, where you'll find interface guides, map guides, tool guides and more. After selecting the Guide, it will lead you through a sequence of steps with explanations and action suggestions:
4. 3D Workflows
PixPlant supports the PBR Metallic-Roughness Workflow and the Traditional Diffuse-Specular Workflow from previous versions.
To set the current Workflow, click the Global Settings button at the top-right corner:

The following maps types are supported:
- Base Color
- Metallic
- Roughness
- Displacement
- Normal
- Ambient Occlusion (AO)
When the 3D Workflow is changed, the current open maps are closed and editors of the new workflow become available.
5. Extract 3D Maps
Although most map editors have an Extract tool (usually the first tool at the top of Map Tools), you can use the "Extract 3D Maps" functionality to automate the task of extracting multiple maps from a photo. To extract maps, open the source image in the Base Color or Diffuse editors and click the "Extract 3D Maps" button at the top:

In the "2. Extract" section, check which maps you'd like to extract from the photo opened in Base Color or Diffuse map editors.
The choice of tiling the source map before extracting is also offered, and in the PBR Workflow, of delighting the Base Color map afterwards.
Upon clicking Start, the process begins and maps are extracted in sequence. As you may later wish to change some extraction parameters, each extraction tool remains open in its own Editor.
Please note that if extracting Displacement, Normal and AO maps, if you later modify the Displacement map, those changes will not automatically propagate to the Normal and AO maps that were extracted from it. You'll need to extract Normal and AO (by using their Extract tools) after any Displacement changes.
6. External Edit

In all editors, you can transfer edition of the image into an external editor app and import it back as soon as it is saved from the other editor. This is done by clicking the External Edit button:
The external app can be defined in the Preferences or it will be asked the first time you use this feature.
7. Photoshop Plug-in
PixPlant includes a plug-in for 64-bit Adobe Photoshop (CS6, CC and higher) or other compatible 64-bit hosts with support for RGB and grayscale images.
To launch PixPlant from Photoshop, select Filter > PixPlant > PixPlant 5. The PixPlant window will appear and you'll need to select which map type should the incoming image be edited as. After editing, close PixPlant to return the edited map to Photoshop.
When launched as a plug-in, PixPlant will initially ask which map type should the incoming image be edited as. PixPlant can only return to the plug-in host changes made on the image that you invoked it upon. Even if the input image size is changed in PixPlant, it will still be later resized to the original size when returned to Photoshop. This is a limitation of the Photoshop plug-in interface, as it can only receive back into the same (single) image where the plug-in was invoked.
However, you can still save the image (and any other extracted/edited images) to a file or copy to the Clipboard before returning to Photoshop.
The Windows installer already searches for installations of known Photoshop versions and copies the plug-in to the right locations. To install manually, simply go to the PixPlant installation folder and copy PixPlant5.8bf into the Plug-ins/ folder of your Photoshop installation - make sure you're copying into a 64-bits version of Photoshop as the plug-in is 64-bit only.
8. Activation
A PixPlant license needs to be activated or it will run in trial/evaluation mode. To activate your PixPlant license, click the Activate Button in the Welcome window or select Help > Activate License. The activation window appears where you can enter the Serial code to activate your license:

Activation requires an Internet connection and is done only once, not on every app run. To transfer the license to another computer, select Help > Deactivate License and later activate in the new machine.
9. Shortcut Keys
The following shortcut keys are available:
| Action | Shortcut |
|---|---|
| Single Map | |
| New Map | Ctrl + N |
| Open Map | Ctrl + O |
| Save Map | Ctrl + S |
| Save Map As | Ctrl + Alt + S |
| Close Map | Ctrl + W |
| Multiple Maps | |
| New Maps | Ctrl + Shift + N |
| Open Maps | Ctrl + Shift + O |
| Save All | Ctrl + Shift + S |
| Save All As | Ctrl + Alt + Shift + S |
| Close All | Ctrl + Shift + W |
| Undo | Ctrl + Z |
| Redo | Ctrl + Y |
| Copy Map | Ctrl + C |
| Paste as New Map | Ctrl + V |
| External Edit Map | Ctrl + E |
| Preferences | Ctrl + K |
3D Preview shortcut keys:
| Action | Shortcut |
|---|---|
| Toggle Base Color / Diffuse | Alt + 1 |
| Toggle Metallic / Specular | Alt + 2 |
| Toggle Roughness | Alt + 3 |
| Toggle Displacement | Alt + 4 |
| Toggle Normal | Alt + 5 |
| Toggle AO | Alt + 6 |
| Toggle All | Alt + 9 |
| Fit Model in View | Alt + 0 |
| Reset Model | Ctrl + Alt + 0 |
| Reset Model+Camera+Light | Ctrl + Alt + Shift + 0 |
| Save Snapshot | Ctrl + Shift + P |
| Copy Snapshot | Ctrl + Shift + C |
Map Editor shortcuts:
10. File Formats
The following image formats are supported for opening and/or saving maps:
| File Format | Open | Save | Save Precision |
|---|---|---|---|
| BMP | O | O | 8 Bits |
| DDS | O | ||
| EXR | O | O | Float |
| GIF | O | ||
| HDR | O | ||
| JPEG | O | O | 8 Bits (avoid saving in this lossy format) |
| JPEG 2000 | O | ||
| JPEG XR | O | ||
| PNG | O | O | 8 and 16 Bits * |
| Photoshop PSD | O | ||
| TARGA | O | O | 8 Bits |
| TIFF | O | O | 8 and 16 Bits * |
| WEBP | O |
- Displacement and Normal maps: 16 Bits
- All other maps: 8 Bits
Please avoid saving in JPEG format, which is a lossy format, degrading image quality on each save.
The minimum supported image size is 64x64 pixels. The maximum size depends on GPU capabilities and can be selected in Preferences.
The 3D Preview accepts the following formats:
| Type | File Formats |
|---|---|
| HDRI environment maps | HDR and EXR images |
| 3D models | FBX, OBJ, 3DS and other formats supported by the Open Asset Import Library (Assimp) |
11. System Requirements
| OS | Windows 10, 8.1 or 7 SP1, 64-bit only |
| GPU | Any GPU compatible with Direct3D 11, with 2Gb+ VRAM |
| Display | A monitor at least 1366 pixels wide is recommended |
| Input | A two-button mouse with scroll wheel is recommended for full functionality |
| Plug-in | Works as a plug-in on Adobe Photoshop (CS6, CC and higher) and compatible hosts, 64-bit only |
© PixPlant/FaronStudio · All trademarks are the property of their respective owners
PixPlant includes a plug-in for 64-bit Adobe Photoshop or other compatible 64-bit hosts. The Windows installer already searches for Photoshop installations (of known versions) and copies the plug-in to the right locations. To install manually, simply go to the PixPlant installation folder and copy PixPlant5.8bf into the Plug-ins folder of your Photoshop installation - make sure you're copying into a 64-bits version of Photoshop as the plug-in is 64-bit only.
The PixPlant Photoshop plug-in will only return changes made on the image that you invoked it upon. Even if the input image size is changed in PixPlant, still the original size is returned to Photoshop. This is a limitation of the Photoshop plug-in interface, as it can only receive back into the same (single) image where the plug-in was invoked.
However, you can still save the image (and all other extracted images) to a file or copy to the Clipboard before returning to Photoshop.
The most frequent cause for this behavior are outdated GPU drivers. Please make sure you're running updated drivers for your GPU. If this didn't solve the problem, please Contact Support and kindly let us know your Windows version and GPU model.
Please be assured that PixPlant installer is safe and digitally signed with FaronStudio's Sectigo (formerly Comodo) code signing certificate: you can verify this by right-clicking the installer, then selecting Properties and then the "Digital Signatures" tab.
In the rare event that you may receive this Windows SmartScreen message, when running the PixPlant installer:

To continue, simply click More info at the top of the above window and the following appears:

Click the "Run anyway" button at the bottom and PixPlant will install and run as normally.
This message may appear for a few days after a new PixPlant update has been available for download: after a certain number of installs across the world, this window stops appearing. It works this way because Microsoft automatically gathers reputation information via Windows telemetry and after some installs the PixPlant installer is considered recognized and cleared.
This is a Microsoft installer which is run with the PixPlant installation in Windows: it installs Microsoft files required for PixPlant to run. Windows itself usually includes these files and this will only update them if necessary.
Activation and Licensing
The following causes may be preventing activation to work:
- The activation serial was not correctly copied: if possible, please use Copy+Paste to transfer the serial into PixPlant's activation window. If having to copy manually, take special care with capital I, lowercase l and numeral 1 characters which may be visually very similar, depending on the text font used.
- Make sure you have a working Internet connection, which is needed for activation.
- Error "License was already activated in other computers, reaching the maximum activations for this license." To solve this and activate in a new computer, you'll need to first deactivate it from a previous one: this can be done in the Help Menu > Deactivate option of the old computer.
If you can no longer access a computer to deactivate the license, please Contact Support, providing the Serial and, if possible, the Hardware ID, listed in the Help > About window. - For other errors, please Contact Support, providing the Activation Serial and your Hardware ID, which is listed in the Help > About window.
Simply deactivate from the old computer and activate on the new one. To deactivate, select Help menu > Deactivate. To activate on the new computer, either select Activate from the launch window or select Help menu > Activate.
If you can no longer access a computer where PixPlant was activated or if your hardware has changed, and you can no longer deactivate PixPlant, please Contact Support so that we can deactivate it on our side.
Select Help menu > About. The "Activated License Information" section lists how many activations are included.
The Freelancer license can be used for commercial (and non-commercial) work, as long as the licensee is an individual or one-person business running the license on an owned computer.
3D Preview
When you are using a painting tool, the default "3D Preview Performance" setting (in the Preferences window > Rendering tab) controls the preview update interval. Try setting this option to a lower (faster) value.
The F0 (Fresnel reflectance at 0 degrees) value is automatically handled by the 3D Preview shader. In a similar way to other common Metallic-Roughness renderers, this value is set to 4% for dielectrics, and interpolated to 100% as the metalness value increases to 1.0.
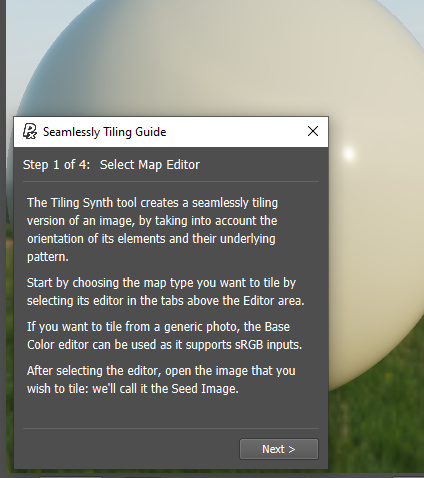
Tiling Synth Tool
The Tiling Synth tools creates seamless tiling versions of an source image called a "seed image". A good seed image should have a reasonable number of repeated elements, either structured (for example bricks along a wall) or unstructured (for example pebbles in the ground). In both cases the more elements in the image the better as it allows PixPlant to extract and generate more visual variety.
A good seed image should also avoid strong luminosity contrasts; however you can correct these contrasts up to a point with the Equalize Seed setting.
It should also have its repeated elements as aligned as possible with the image sides, but this can usually be corrected with the Seed Wizard.
You should usually prefer seed images with lots of repeated elements (see What makes a good seed image? above), so that PixPlant has enough variety to generate the image. The following actions can improve the seamless tiling quality of the generated image:
This means PixPlant is not sure about the detected Seed Pattern. It's a way of PixPlant requesting that you verify if the detected seed pattern grid is correct. Having a correct seed pattern is only important for textures with repeated regular elements (e.g. with structure).
PixPlant includes a setting that automatically snaps the Seed Scale settings to the nearest best value for tiling. This is important so that the pattern elements in the generated texture spatially "meet" at the image boundaries, so as to obtain a good tiling.
If the Scale Lock button at the right of the Seed Scale sliders is set, both width and height will snap - if you prefer, unset Scale Lock and then change the sliders individually.
In the Seed Viewer area, at the right side of the window, select with the mouse an area that you don't want PixPlant to use - this area will turn dark and won't be used. To make that black area available again, just click with the mouse over it.
Yes - simply select "None" in the Tiling Mode of the Global Settings and generate again. The Global Settings are available at the top-right corner of the PixPlant window.
In the Editor area, select, by pressing the left mouse button, an area that you want to generate to and press Generate. This will rely on the neighbor portions of the image to generate the part that you selected. Generating to a part of the image is very useful for expanding existing images with extra pixels at the sides for example.
If you always get the same pixels, this means that PixPlant is "land-locked" by the neighbor portions of the image - you can overcome this by increasing the size of generation area till it gives different results. This is usually only a problem when generating to small areas.

4100117770549562

Pixplant - программа представляет из себя инструмент для создания высококачественных бесшовных текстур из фотографий. Утилита реализована в виде отдельной программы и в виде плагина для Adobe Photoshop. Поможет вам создавать бесшовные текстуры любого размера на основе каких-либо фотографий и изображений. При создании текстуры можно указывать, должна ли она быть бесшовной по горизонтали и/или по вертикали, исключать из процесса генерации некоторые части исходного изображения, задавать повторяемость и прочее. Вы можете сохранить множество времени благодаря использовании технологии применяемой в программе, которая за четыре клика создаст бесшовную текстуру.
Преимущества:
- Быстрое создание уникальных бесшовных текстур
- Исходя из реальных фотографий, программа создает реалистичные текстуры без каких-либо искажений
- Позволяет генерировать неповторяющиеся текстуры
- Создание текстур в высоком разрешении и качестве из исходного изображения
- И многое другое.
Особенности:
- Создание текстуры практически из любой фотографии, благодаря продвинутой технологии выпрямления
- Высокая автоматизация задач
- Большинство текстур создается за 1-4 клика
- Тщательно продуманный и простой в использовании интерфейс с интерактивной справкой и полноэкранным предпросмотром
- Используется в качестве отдельной программы и в качестве плагина для Adobe Photoshop
OC: Windows ALL
Интерфейс: English
File size: 3.63 MB

Pixplant v2.0.43 + Pixplant For Photoshop v2.0.43

Pixplant - is a powerful and handy tool for creating high-quality seamless textures of any size from any of the images and photos. When you create a texture can specify whether it should be seamless, horizontally and / or vertically, to exclude from the generation of some parts of the original image, set the frequency and other parameters. You can save a lot of time to create seamless textures, thanks to the use of technology used in the program, which is four clicks will create the desired seamless texture. Also this plugin can be used in programs such as XnView and IrfanView.
Pixplant v2.0.50 plugin for Adobe Photoshop:
Pixplant 2.1.68 Standalone & PS plugin + Rus
Вышла новая версия PixPlant, удобнейшей программы для создания высококачественных бесшовных текстур из фотографий. При создании текстуры можно указывать, должна ли она быть бесшовной по горизонтали и/или по вертикали, исключать из процесса генерации некоторые части исходного изображения, задавать повторяемость и прочее. PixPlant является умным 3-D инструментом текстурирования, который создает высококачественную нормаль, смещение, зеркальные карты и текстуры без шва из простых фотографий. PixPlant реализован в виде отдельной программы и в виде плагина для Adobe Photoshop.
Технология, используемая в PixPlant, позволяет создавать высококачественные бесшовные текстуры из фотографий.
Преимущества:
- Быстрое создание уникальных бесшовных текстур
- Исходя из реальных фотографий, программа создает реалистичные текстуры без каких-либо искажений
- Позволяет генерировать неповторяющиеся текстуры
- Создание текстур в высоком разрешении и качестве из исходного изображения
- И многое другое.
Особенности:
- Создание текстуры практически из любой фотографии, благодаря продвинутой технологии выпрямления
- Высокая автоматизация задач
- Большинство текстур создается за 1-4 клика
- Тщательно продуманный и простой в использовании интерфейс с интерактивной справкой и полноэкранным предпросмотром
- Используется как в качестве отдельной программы, так и и в качестве плагина для Adobe Photoshop
- Поддерживаются 3D текстуры
PixPlant 2 includes the following features:
- Create normal, displacement and specular maps ready to be used in 3D modelling applications.
- Fine tune 3D textures with an interactive parallax mapped 3D preview.
- Create textures from almost any photo, thanks to advanced straightening and seed pattern controls.
- Highly automated with most textures created in 1-4 clicks. And high performance with usually a few seconds per texture.
- Generate complete images or refine and expand existing ones. Out-select parts of the seed image for fine grain control.
- Carefully designed easy-to-use interface, now also available in 64 bits as a standalone application and as a plug-in for Photoshop and compatible applications.
Новое в версии 2.1.68:
- Решена проблема сохранения 3D-карты после создания текстур без предварительной 3D визуализации материала.
- Исправлена проблема с UI диалогом настроек размера в системах Windows, с увеличенными шрифтами системы.
- Решена проблема с кнопками текстуры холста zoom.
- Добавлена поддержка Photoshop CS6 в версии плагина Photoshop.
Операционная система: Windows® XP/Vista/7(x86,x64)
Год выхода: 2012
Версия: 2.1.68
Язык интерфейса: английский, русский (русификатор для Standalone x86)
Формат файла: rar
Лекарство: Patch
Размер: 52.28 Mb (5% на восстановление)
Читайте также: