
Paint index что это
If you remember from last time; Index painting involves using "dirty" tools (tools which lay multiple colors at once) within a pre-defined indexed palette. Photoshop doesn't inherently allow for this behavior. If you index an image in Photoshop all of the "dirty" tools become locked or reduce their functionality to not be dirty. No more soft brushes, smudges, gradients, etc. The one way around this is to paint with dirty tools first, then index the image to either a generated palette or a pre-defined one (Kiwi has excellent tutorials on this method here). But with that method you never truly know what the end result is going to be until you index the image. A lot of what you thought would look nice when color-reduced ends up looking like a mess or gets lost entirely and requires you to spend lots of time cleaning up the image pixel-by-pixel. It's a great way to get a head-start on a composition, but still cumbersome. But what if I told you there was a way to use soft brushes, smudges, gradients, and all your favorite dirty tools, but remain within an indexed palette? It'd blow your mind right? Well here's how.
HD Index Painting

Why "HD?" The backbone of this method that makes all the magic happen is the concept of manipulating higher resolution data than the end result. Instead of painting directly with an indexed color palette, you're always painting in HD which then procedurally gets mapped to the indexed palette. For every color ramp you define your source data is 8bit allowing for a possible 256 colors, with no limit on the number of ramps you define. Typically when dealing with pixel art you'd map that to 32 colors or less. What's most important though is the indexing is non-destructive. All of the high resolution detail is retained allowing you to do things that no other index painting tool allows, essentially making this the most powerful "pure" pixel art tool in existence.
You can download the PSD used to create the following gifs HERE
So what can it do?:
| Pixel-bush, AA-brush, Soft-brush | Procedural Dithering |
Dither Sampling | Dither Patterns |
Smudge | Gradient |
AA transforms | Alpha-blending |
Blend Modes | Fixed index Adjustments |
Dynamic index Adjustments | Dynamic re-indexing |
Setup

The first thing you'll want to do is make sure your eyedropper tool is set to sample "current and below." This is essential if you plan to paint with colors sampled from the canvas as we'll be adding a whole bunch of layers stacked on top of the paint layer which will alter the colors that you'll want to paint with. Some versions of Photoshop might not support this, in which case you might have to pick by changing the value slider.

Second thing you'll want to do is make sure you have your dither patterns defined. Dither patterns can be anything you want, so get creative. To create a new pattern, simply paint the pattern in black and white within a square (usually no larger than 16x16 pixels. Once you're done painting, select the square with the selection tool and go to EDIT > DEFINE PATTERN. Now the pattern will be available to you in your pattern list for use with the paint bucket tool. The image above shows some examples of various patterns applied to a gradient. you can download the basic dither pattern I made here.
That's pretty much all the settings you'll need to change actually.
Basic Layer Stack

Paint layer
This is the layer you are actually painting on when you pixel. All other layers in the process get clipped to this one. You paint in 24bit B&W on this layer. Any color will be stripped out and replaced with a palette that you later define. In pixel-art terms, the best way to think about this is you're painting with indexes of a color ramp, not with actual colors. Pure black is the first index, Pure white is the last index, and everything in-between gets rounded to the nearest index. It's this ability to paint in-between indexes that is the key to making this process so powerful and allows you to do things no other pixel art program can.
Multiple color ramps / Transparency
One downside to this method is it's a bit cumbersome when working with multiple color ramps. Unlike in other pixel art tools, You can't just start painting with a different ramp on the same layer, instead you have to create an entirely new layer stack and paint there. This means you need to be conscious of which color should be on top of the other. Additionally working with transparency is a bit of concern. When posterizing Photoshop doesn't threshold the alpha channel. This means that if you're using a soft brush on top of a transparent paint layer (necessary if you want to have multiple color ramps), then the result will be a non-indexed blend. To solve this, the best practice is to define the silhouette of what you're painting with the pixel brush first, then lock the alpha channel of the layer using the alpha-lock feature in the layer palette. This will ensure that when using soft-brushes it will only paint on top of the opaque pixels.
Advanced Layer Setup
This isn't the only way of doing things either! Try adding in additional paint layers if you dont want to commit to a new idea. Try adding adjustment layers in various parts of the stack. Depending on where you place it, it will have vastly different effects. If you place one right after your paint layers you'll be making a "dynamic index adjustment", but if you place one in-between two duplicated posterize layers you'll be making a "fixed index adjustment." Play around and have fun!
Examples:
I'll leave you with a few examples of images I created with this method on Chasm. Unfortunately most of the work I've done with this method is still not public.


Take-Aways:
- Non-destructive: By keeping all the steps as separate adjustment layers everything becomes non-committal and non-destructive. Color-count, dithering, and palette can all be changed on the fly without affecting any other component - something no other program can achieve.
- Always viewed as indexed: Unlike using a color reduction method, cleanup is done while you paint, not after. This allows you to always know what you're doing and remain in control of the end result on a per-pixel level.
- Faster and more efficient: Having access to more tools simply allows you to get to your final piece faster. Making changes that would normally take hours takes mere seconds.
- Large scale illustrations: This method tends to shine best when working on fairly monotone pieces (or a piece with a few straight ramps) on larger canvases. Soft brushes and dirty tools are only really useful when you have the canvas space to appreciate them
- non-linear-color ramps: Due to the nature of this method If you intend to have color ramps that intersect and efficiently reuses colors between themselves it would be impossible to achieve. You would likely need to flatten the layer stack and optimize the palette afterwards.
- Multiple color-ramps: Each ramp has to be a completely separate layer stack. You can't color sample between ramps, instead you have to switch to a different layer stack to begin painting with that palette. If you have a lot of ramps, this can get a bit cumbersome.
- Transparency: Have to be careful with how you deal with transparency: Using soft-brushes works perfect so long as you're not painting on transparent pixels.
- Smaller scaled pieces: If you're working small, chances are you're going to be sticking to the pixel brush and paint fairly traditionally. This method tends to get in your way more than aid you at these scales and is probably best done the old fashioned way.
Conclusion:
By far the most important thing I need to stress here is that this ISN'T end-all be-all solution for creating pixel art. It is simply a tool like any other. Sometimes I use it and sometimes I choose not to depending on the task at hand. It will not make you a better pixel artist, it will only make you a more efficient one as the pixel-level decisions that great pixel artists make can't be taught to a computer. With that said, these tools can drastically increase your work efficiency. Tasks that used to take hours now takes only minutes allowing you to express yourself more freely and get to your final composition faster.
I hope this tutorial will be as helpful to you as it has been for me. Let me know your thoughts and feel free to ask me any questions. There's a lot more that I haven't covered on this topic, but the post was getting quite long as it is.
Как запустить мобильные приложения на компьютере с ОС Windows и Mac OS
Вы можете скачать Ibis Paint X бесплатно на ПК или ноутбук с ОС Виндовс 11, 10, 8, 7 и Mac OS от разработчиков, без вирусов с нашего сайта с помощью программы-эмулятора BlueStacks.
Что нужно сделать для установки?
- Ознакомиться с системными требованиями программы и игры, сверить характеристики вашего ПК.
- Приложение Ibis Paint X скачать на ПК бесплатно через эмулятор андроид-среды BlueStacks.
- Установить на ОС Windows по инструкции ниже и запустить на ПК!
- Скачайте и установите BlueStacks на ПК.
- Войдите в аккаунт Google, чтобы получить доступ к Google Play, или сделайте это позже.
- В поле поиска, которое находится в правой части экрана, введите название приложения – Ibis Paint X.
- Среди результатов поиска найдите игру Ibis Paint X и нажмите на кнопку "Установить".
- Завершите авторизацию в Google (если вы пропустили этот шаг в начале) и установите Ibis Paint X.
- Нажмите на ярлык Ibis Paint X на главном экране, чтобы начать пользоваться.
312 кистей, 58 фильтров…
Из обзора вы узнаете:
Ibis Paint X — приложение для поклонников рисования. Оно позволяет в полной мере проявить собственные таланты и способности. Большинство функций в этом приложении похожи на инструменты в дизайнерском программном обеспечении от Photoshop, но важное отличие состоит в том, что в ibis Paint X они собраны под одной оболочкой.
Программа предлагает широкий набор функций, проста в использовании и интуитивно понятна. Многие пользователи, знакомые с нею, рекомендуют скачать ibis Paint X на ПК с помощью эмулятора Android-среды BlueStacks в качестве альтернативы программам этого типа, созданным для Windows.

Функционал: что умеет приложение
Ibis Paint X — приложение, которое отлично подойдет как начинающим художникам, так и профессионалам.
Количество инструментов, доступное вприложении, очень большое. Для рисования здесь доступно свыше 140 типов кистей. Среди них есть распылитель краски, цветной фломастер, инструмент настоящего художника, цифровая ручка, плоские и веерные кисти и т.д. В приложении можно устанавливать толщину штриха, угол наклона, степень прозрачности с помощью слайдера. Предусмотрен предварительный просмотр настроенных инструментов в режиме реального времени.
Для обработки изображения доступно свыше 40 фильтров. Добавлены фоны специально для манги. Скачайте Ibis Paint X на компьютер прямо сейчас, ссылка внизу обзора.
Приложение позволяет создавать рисунок, состоящий из нескольких слоев. Последние можно смешивать, уменьшать, регулировать степень прозрачности. Доступно масштабирование слоя, создание копии, экспорт из галереи, а также вращение слоев по горизонтали и вертикали.
В приложении предусмотрен стабилизатор, позволяющий плавно рисовать линии. С помощью линейки можно строить четкие и резкие линии. По загруженному изображению выполняется плавная отрисовка контура.
Важное значение в приложении имеет социальная часть. Приложение позволят записывать процесс создания изображения на видео, а затем делиться им с другими пользователями или, наоборот, просматривать чужие видеозаписи, чтобы получить опыт и научиться чему-то новому. Кроме того, готовыми проектами можно делиться в социальных сетях с друзьями и близкими.
Многие пользователи отмечают, что несмотря на то, что Ibis Paint X создавался для планшетов или телефонов, гораздо удобнее работать с рисунками на компьютере. Для этого приложение потребуется скачать на ПК через эмулятор BlueStacks. Управлять кистями с помощью мыши и клавиатуры гораздо проще, чем на сенсорном экране, а рассматривать результат или работать на проектом комфортнее на большом дисплее.
Бесплатно в Ibis Paint X доступна только часть инструментов. Начинающим пользователям их будет достаточно, а при необходимости всегда можно расширить функционал и приобрести платную версию приложения.
Достоинства и недостатки
Приложение Ibis Paint X на компьютере и ноутбуке высоко оценено пользователями. Они отмечают простоту использования программы, невероятное количество инструментов, удобство работы с ними. Высоко оценена возможность скачивать чужие видео с поэтапным изложением создания рисунка. Это помогает учиться чему-то новому.
Среди недостатков приложения отмечается необходимость приобретать платную версию для доступа к большинству кистей. Но есть и другая возможность – просмотрев рекламную видеозапись длиной 30 секунд можно получить доступ к инструментам на 18 часов. Таким образом, проблема становится несущественной.
Вас может заинтересовать:
Системные требования
Для установки эмулятора и запуска Ibis Paint X на ПК посмотрите технические требования:
- ОС: Microsoft Windows 7, 8, 10.
- Процессор: Intel или AMD с включенной виртуализацией в BIOS — прочитать настройку.
- ОЗУ: от 2 Гб или больше.
- SSD+HDD: от 5 Гб свободного места для хранения данных программы и игры.
- Актуальные драйверы видеокарты (проверить на официальных сайтах: ATI, Nvidia).
- Широкополосный доступ в Интернет для своевременного обновления программы и игры.
- Права администратора на вашем ПК — запуск установщика сторонних программ.
- Рекомендации: отключить антивирусное программное обеспечение на время и отключить Hyper-V, VirtualBox, они могут препятствовать работе эмулятора.
Как установить Ibis Paint X на ПК или ноутбук
Для установки мобильных приложений, к сожалению, требуется дополнительная программа. Программа-эмулятор Блюстакс может запустить файлы системы Андроид. Программа работает в полноэкранном режиме — вы можете редактировать на большом экране. Ради этого стоит попробовать. Немного истории. Ранее такие программы использовали разработчики для тестирования своих приложений. Сейчас обычные пользователи могут это делать. Поддерживает программа все приложения Плей Маркет.
С помощью аккаунта вы получаете доступ ко всем приложениям и играм Google Play. Также программа-эмулятор работает со сторонними apk файлами. Скачайте на ПК Ibis Paint X из Сети, любого источника (проверенного вами) и перетащите файл для запуска в окно эмулятора или через опцию — «добавать apk файл» в меню программы.
Ниже рассмотрим через аккаунт. В строку поиска вносим название приложения и запускаем поиск. Нам выдается приложение. Если у вас не получилось через поисковую строку, то можно попробовать через нижнее меню — поиск Google Play.
Вы видите, что интерфейс программы очень похож на мобильный. Далее вы нажимаете установку и ожидаете скачивание. Готово! Пользуйтесь Ibis Paint X на своем ПК.


Игровой потенциал и функционал эмулятора
Автопереводчик
Не дожидайтесь локализации игры на ваш язык - есть функция перевода в режиме реального времени.
Режим Эко — снижение FPS
Режим эко оптимизирует использование ресурсов ПК. Режим позволяет настраивать потребление ресурсов, включение и отключение звука, снижение значения FPS (менеджер окон). Чем ниже значение FPS, тем меньше потребляется ресурсов системы. После его активации снизится потребление мощностей процессора и видеокарты.
Сочетайте режим эко с другими функциями: макросами, скриптами, мультиоконностью, синхронизацию окон.
Trim Memory снижает потребление оперативной памяти до минимума, что обеспечивает плавный игровой процесс без задержек.

Игровые контроллеры и поддержка геймпадов
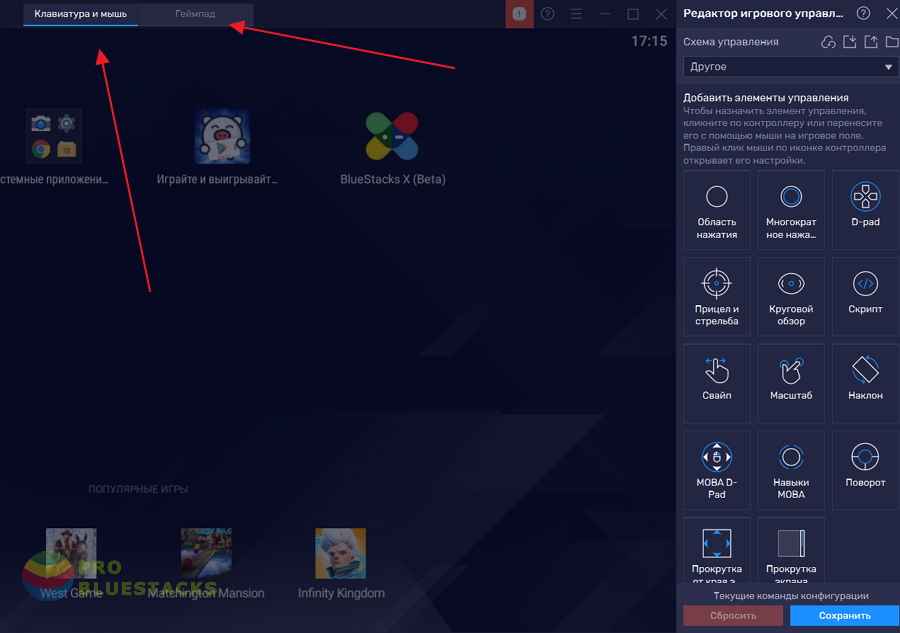
Для игр Android на ПК в BlueStacks, используйте клавиатуру, мышь или геймпад. Готовых наборов контроллеров более чем достаточно для комфортного геймплея. Однако вы можете изменить настройки системы управления под свой стиль игры.
Окно игрового управления открывается автоматически после запуска игры. Можно открыть нажатием комбинации клавиш Ctrl+Shift+H или на боковой панели инструментов.
BlueStacks поддерживает устройства от Logitech, PDP, Redgear, Xbox One и PS4. Вы можете переключаться между схемами управления клавиатурой и мышью или геймпадом.
Макросы и скрипты
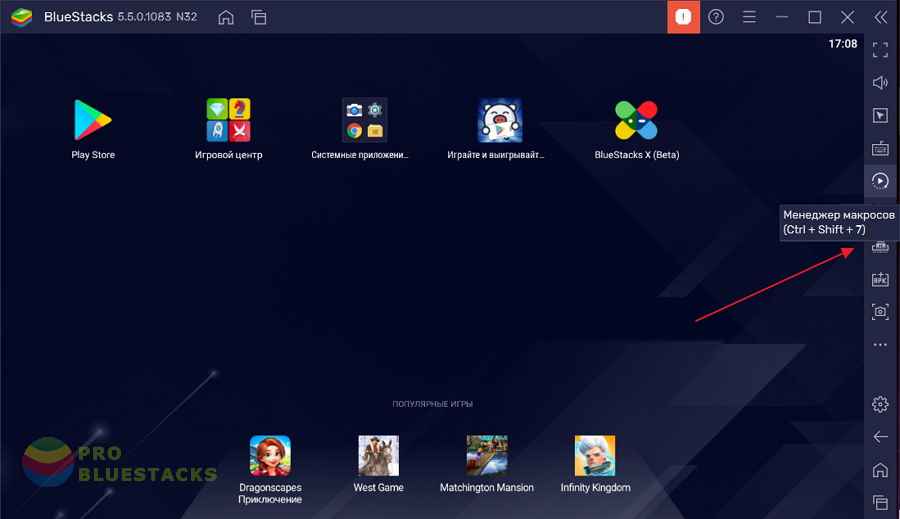
Записывайте серии действий для любых задач в BlueStacks и запускайте их со 100% точностью одним кликом мыши или кнопкой на клавиатуре. Вы можете создавать макросы для любых игр. После запуска игры запишите макрос, выполнив нужную комбинацию. Запишите и сохраните макрос на компьютер в виде файла в формате .json. Вы сможете импортировать, экспортировать файлы макросов, делиться ими со своими друзьями.
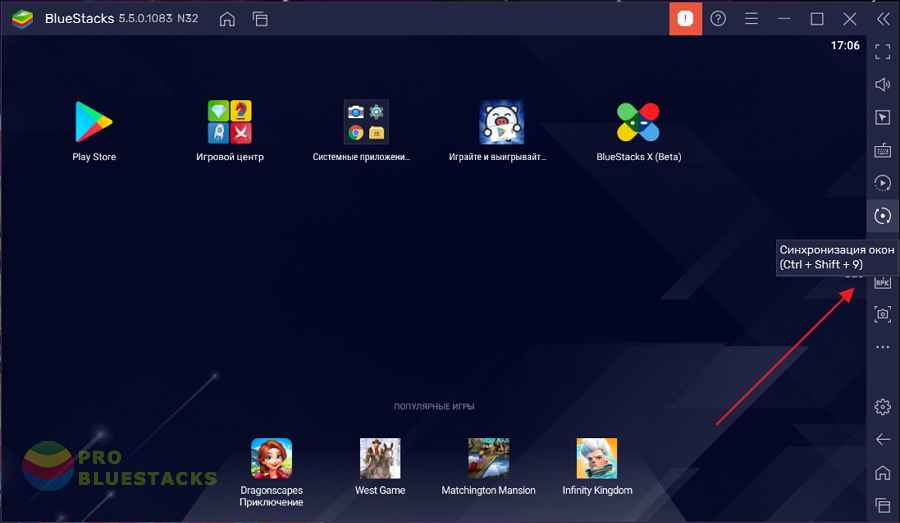
Мультиоконность и синхронизация окон
С BlueStacks можно играть в несколько игр одновременно. С синхронизацией окон вы получаете больше возможностей - все действия на главном экране продублируются в дополнительных в условиях реального времени.
Смарт-управление
Новое и улучшенное смарт-управление позволяет избежать перегруженности кнопками действий на игровом экране, особенно при использовании подложки с подсказками назначенных клавиш.
Интересное видео
Подобные приложения
- MediBang Paint — карманный арт
- PicsArt Color Раскрасить
- Autodesk SketchBook
- Infinite Painter Animator: GIF и видео
- Background Eraser
- Как нарисовать аниме и мангу — DrawShow
- Adobe Photoshop Sketch
Вывод: стоит ли скачивать?
Ibis Paint X — приложение для мобильной техники на базе Андроид, предназначенное для поклонников рисования. Простое управление и широкие функциональные возможности делают программу отличным решением как для начинающих пользователей, так и для профессионалов.
В приложении предлагается множество инструментов для работы — в частности, здесь доступны свыше 140 кистей, более 40 фильтров для изображений, поддерживается создание рисунков по слоям и т.д. Уникальная особенность ibis Paint X состоит в том, что здесь широко развиты социальные функции.
Пользователь может записать процесс создания рисунка по этапам в форме видеоролика и поделиться им с другими пользователями, чтобы получить отзывы о работе. Существует и возможность просмотреть чужие видеозаписи, чтобы научиться новым приемам работы от других людей.
Установите BlueStacks и скачайте Ibis Paint X на свой ПК! BlueStacks позволяет запускать любимые игры Android на Windows и Mac OS. Используйте клавиатуру и мышь для точного управления - покоряйте игровой мир! Снимайте видео в личный блог, запускайте онлайн-трансляции в BlueStacks. Запускайте несколько копий BlueStacks и играйте в несколько игр одновременно! BlueStacks обеспечивает невероятный опыт мультизадачности на Android.

Индикатор 3 Indexes Paint TT представляет собой комплексный алгоритм для оценки текущей рыночной ситуации. Рассматриваемый алгоритм включает в себя три проверенных временем инструмента(ADX, MFI и CCI), благодаря чему удается добиться высокой точности выдаваемых сигналов.
Рассматриваемый алгоритм входит в группу стрелочных инструментов, благодаря чему он отображает на экране довольно простые и понятные сигналы для создания успешных позиций. Благодаря этой особенности успешно применять рассматриваемый алгоритм для заработка могут как спекулянты, обладающие определенным опытом, так и новички.
p, blockquote 1,0,0,0,0 -->
Индикатор 3 Indexes Paint TT по праву считается универсальным алгоритмом, так как он в состоянии обеспечить довольно высокий уровень точности выдаваемых сигналов практически на любой валютной паре и временном интервале. Чтобы скачать индикатор 3 Indexes Paint TT, щелкните по ссылке, которую вы можете увидеть ниже.
p, blockquote 2,0,1,0,0 -->
p, blockquote 3,0,0,0,0 -->
Индикатор 3 Indexes Paint TT. Оптимизация
Установка алгоритма отличается простотой. Этот процесс не должен вызвать каких-либо существенных трудностей даже у новичков, которые не обладают опытом применения схожих инструментов. После запуска индикатора 3 Indexes Paint TT, перед вами появится окошко с его параметрами.

Индикатора 3 Indexes Paint TT обладает следующими параметрами:
- «Calculation».В этом поле вы можете выбрать метод, который рассматриваемый алгоритм будет применять для осуществления всех необходимых вычислений.
- «Index-Period». Этот параметр отвечает за число баров, которые рассматриваемый алгоритм будет применять для осуществления всех необходимых вычислений.
- «Price». Этот параметр отвечает за тип ценового уровня, который будет применяться рассматриваемым алгоритмом для осуществления всех необходимых вычислений.
- «Hot-Level». В этом поле можно настроить уровень, на который будет ориентироваться рассматриваемый алгоритм для выявления оптимальных мест для создания успешных позиций.
Также рассматриваемый алгоритм обладает огромным количеством разнообразных параметров, которые отвечают за визуальное отображение сигналов, отображаемых рассматриваемым алгоритмом на экране. Благодаря тому, что рассматриваемый алгоритм обладает довольно небольшим числом параметров, которые оказывают непосредственное влияние на работу рассматриваемого алгоритма, с процессом его оптимизации легко справится как опытный спекулянт, так и новичок.
p, blockquote 6,0,0,0,0 -->
Применение алгоритма

Индикатор 3 Indexes Paint TT является довольно эффективным и при этом простым в применении алгоритмом, который могут успешно применять для заработка даже новички. Существует два основных варианта применения рассматриваемого алгоритма.
p, blockquote 7,0,0,0,0 -->
Первый вариант заключается в применении рассматриваемого алгоритма для выявления тенденции, присутствующей на графике.
p, blockquote 8,0,0,1,0 -->
Для выявления тенденции, присутствующей на графике, достаточно просто на него взглянуть. Если свечи окрашены в синий цвет, то на графике присутствует восходящая тенденция. При нисходящей тенденции свечи приобретают красный оттенок.
p, blockquote 9,0,0,0,0 -->

Дополнительный метод использования алгоритма 3 Indexes Paint TT заключается в открытии успешных позиций по его сигналам. После того, как на экране появится направленная вниз красная стрелка, вам необходимо создать позицию на продажу. В момент появления направленной вверх зеленой стрелки вам нужно создать позицию на покупку.
p, blockquote 10,0,0,0,0 --> p, blockquote 11,0,0,0,1 -->
Для достижения большего размера прибыли следует использовать 3 Indexes Paint TT в паре с иными алгоритмами, так как это позволяет увеличить размер потенциальной прибыли.
If you remember from last time; Index painting involves using "dirty" tools (tools which lay multiple colors at once) within a pre-defined indexed palette. Photoshop doesn't inherently allow for this behavior. If you index an image in Photoshop all of the "dirty" tools become locked or reduce their functionality to not be dirty. No more soft brushes, smudges, gradients, etc. The one way around this is to paint with dirty tools first, then index the image to either a generated palette or a pre-defined one (Kiwi has excellent tutorials on this method here). But with that method you never truly know what the end result is going to be until you index the image. A lot of what you thought would look nice when color-reduced ends up looking like a mess or gets lost entirely and requires you to spend lots of time cleaning up the image pixel-by-pixel. It's a great way to get a head-start on a composition, but still cumbersome. But what if I told you there was a way to use soft brushes, smudges, gradients, and all your favorite dirty tools, but remain within an indexed palette? It'd blow your mind right? Well here's how.
HD Index Painting
Why "HD?" The backbone of this method that makes all the magic happen is the concept of manipulating higher resolution data than the end result. Instead of painting directly with an indexed color palette, you're always painting in HD which then procedurally gets mapped to the indexed palette. For every color ramp you define your source data is 8bit allowing for a possible 256 colors, with no limit on the number of ramps you define. Typically when dealing with pixel art you'd map that to 32 colors or less. What's most important though is the indexing is non-destructive. All of the high resolution detail is retained allowing you to do things that no other index painting tool allows, essentially making this the most powerful "pure" pixel art tool in existence.
You can download the PSD used to create the following gifs HERE
So what can it do?:
| Pixel-bush, AA-brush, Soft-brush | Procedural Dithering |
Dither Sampling | Dither Patterns |
Smudge | Gradient |
AA transforms | Alpha-blending |
Blend Modes | Fixed index Adjustments |
Dynamic index Adjustments | Dynamic re-indexing |
Setup
The first thing you'll want to do is make sure your eyedropper tool is set to sample "current and below." This is essential if you plan to paint with colors sampled from the canvas as we'll be adding a whole bunch of layers stacked on top of the paint layer which will alter the colors that you'll want to paint with. Some versions of Photoshop might not support this, in which case you might have to pick by changing the value slider.
Second thing you'll want to do is make sure you have your dither patterns defined. Dither patterns can be anything you want, so get creative. To create a new pattern, simply paint the pattern in black and white within a square (usually no larger than 16x16 pixels. Once you're done painting, select the square with the selection tool and go to EDIT > DEFINE PATTERN. Now the pattern will be available to you in your pattern list for use with the paint bucket tool. The image above shows some examples of various patterns applied to a gradient. you can download the basic dither pattern I made here.
That's pretty much all the settings you'll need to change actually.
Basic Layer Stack
Paint layer
This is the layer you are actually painting on when you pixel. All other layers in the process get clipped to this one. You paint in 24bit B&W on this layer. Any color will be stripped out and replaced with a palette that you later define. In pixel-art terms, the best way to think about this is you're painting with indexes of a color ramp, not with actual colors. Pure black is the first index, Pure white is the last index, and everything in-between gets rounded to the nearest index. It's this ability to paint in-between indexes that is the key to making this process so powerful and allows you to do things no other pixel art program can.
Multiple color ramps / Transparency
One downside to this method is it's a bit cumbersome when working with multiple color ramps. Unlike in other pixel art tools, You can't just start painting with a different ramp on the same layer, instead you have to create an entirely new layer stack and paint there. This means you need to be conscious of which color should be on top of the other. Additionally working with transparency is a bit of concern. When posterizing Photoshop doesn't threshold the alpha channel. This means that if you're using a soft brush on top of a transparent paint layer (necessary if you want to have multiple color ramps), then the result will be a non-indexed blend. To solve this, the best practice is to define the silhouette of what you're painting with the pixel brush first, then lock the alpha channel of the layer using the alpha-lock feature in the layer palette. This will ensure that when using soft-brushes it will only paint on top of the opaque pixels.
Advanced Layer Setup
This isn't the only way of doing things either! Try adding in additional paint layers if you dont want to commit to a new idea. Try adding adjustment layers in various parts of the stack. Depending on where you place it, it will have vastly different effects. If you place one right after your paint layers you'll be making a "dynamic index adjustment", but if you place one in-between two duplicated posterize layers you'll be making a "fixed index adjustment." Play around and have fun!
Examples:
I'll leave you with a few examples of images I created with this method on Chasm. Unfortunately most of the work I've done with this method is still not public.
Take-Aways:
- Non-destructive: By keeping all the steps as separate adjustment layers everything becomes non-committal and non-destructive. Color-count, dithering, and palette can all be changed on the fly without affecting any other component - something no other program can achieve.
- Always viewed as indexed: Unlike using a color reduction method, cleanup is done while you paint, not after. This allows you to always know what you're doing and remain in control of the end result on a per-pixel level.
- Faster and more efficient: Having access to more tools simply allows you to get to your final piece faster. Making changes that would normally take hours takes mere seconds.
- Large scale illustrations: This method tends to shine best when working on fairly monotone pieces (or a piece with a few straight ramps) on larger canvases. Soft brushes and dirty tools are only really useful when you have the canvas space to appreciate them
- non-linear-color ramps: Due to the nature of this method If you intend to have color ramps that intersect and efficiently reuses colors between themselves it would be impossible to achieve. You would likely need to flatten the layer stack and optimize the palette afterwards.
- Multiple color-ramps: Each ramp has to be a completely separate layer stack. You can't color sample between ramps, instead you have to switch to a different layer stack to begin painting with that palette. If you have a lot of ramps, this can get a bit cumbersome.
- Transparency: Have to be careful with how you deal with transparency: Using soft-brushes works perfect so long as you're not painting on transparent pixels.
- Smaller scaled pieces: If you're working small, chances are you're going to be sticking to the pixel brush and paint fairly traditionally. This method tends to get in your way more than aid you at these scales and is probably best done the old fashioned way.
Conclusion:
By far the most important thing I need to stress here is that this ISN'T end-all be-all solution for creating pixel art. It is simply a tool like any other. Sometimes I use it and sometimes I choose not to depending on the task at hand. It will not make you a better pixel artist, it will only make you a more efficient one as the pixel-level decisions that great pixel artists make can't be taught to a computer. With that said, these tools can drastically increase your work efficiency. Tasks that used to take hours now takes only minutes allowing you to express yourself more freely and get to your final composition faster.
I hope this tutorial will be as helpful to you as it has been for me. Let me know your thoughts and feel free to ask me any questions. There's a lot more that I haven't covered on this topic, but the post was getting quite long as it is.

Он - жив!
Да! Да! Глаза не обманывают Хабрачеловеков. В новой ОС Windows 11 MS Paint, он же pbrush вернулся в полной красе и с новыми финтифлюшками.
Ранее сообщалось, что нашего любимца, пережившего Сапёра и Пасьянс Косынку вырубят топором из Windows 10 и заменят абсолютно бесполезной претензией на программное обеспечение под названием Paint 3D.
В своём видео-посте в твиттере @panos_panay показал, как старый добрый пейнт возвращается с новыми прибамбасами.
В частности, заявлена поддержка тёмной темы, новый интерфейс ввода текста и куча новых кисточек, так чисто для галочки.

Чепятать мемы стало удобнее, ибо раньше вводить текст в пейнте было страшно.
К сожалению, за исключением вышеприведённых источников (видео и одной картинки) Майкрософт молчит и не распространяется об этом замечательном нововведении.

Airbrush! Первая возможность российской молодёжи почувствовать себя спрей-пейнтерами в 95-м году.
На самом деле, как и с предыдущими версиями пейнта, все обновления были сделаны для того, чтобы перенести программу на новый интерфейс. Тут вам и скруглённые края, и новый стиль кнопок (как в Visual Studio) и всё тому подобное украшательство.
Что самое приятное, судя по видео, изменений не так уж много, со времён Windows 7, что греет душу.
Что же, я надеюсь что @perfect_genius оценит работу Майкрософт и обновит свой список ошибок, которые он нашёл в предыдущей версии пейнта.
Вот некоторые:
-куча графических глюков при частых выделениях, Ctrl+Z и Ctrl+Y. Портит картинку, что приходится его перезагружать.
-сглаживание хуже или вообще не работает при изменении размера картинки, если его перед этим выделить.
-если ширина картинки больше 34122 пикселей или высота больше 33448, то ползунок не довести до конца курсором — он прыгает на начало.
(Я бы рекомендовал добавить этот список в резюме для хорошего тестировщика).
Читайте также: