
Paint deformation 3d max как пользоваться
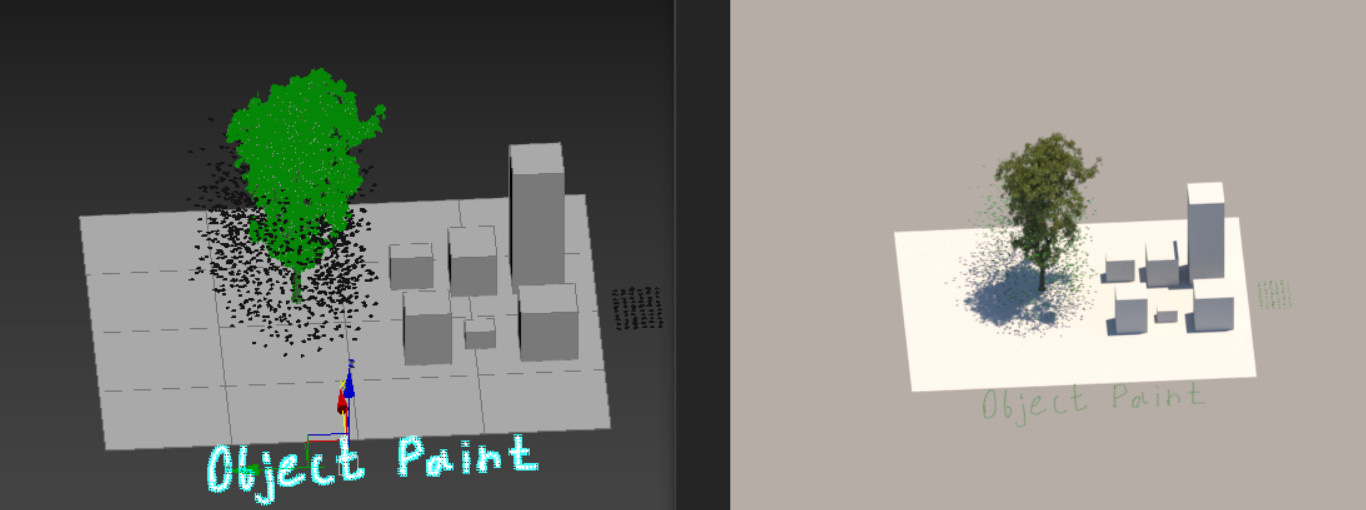
Функция Object Paint очень необычна. В отличие от большинства инструментов 3ds Max она работает не на основе параметров и расчетов. Эта функция работает «от руки». В какой-то мере данная особенность делает функцию проще и гибче. Вам больше не придется строить сплайны для использования Spacing Tool, отделять полигоны для точечного использования Scatter.
1. Paint Object
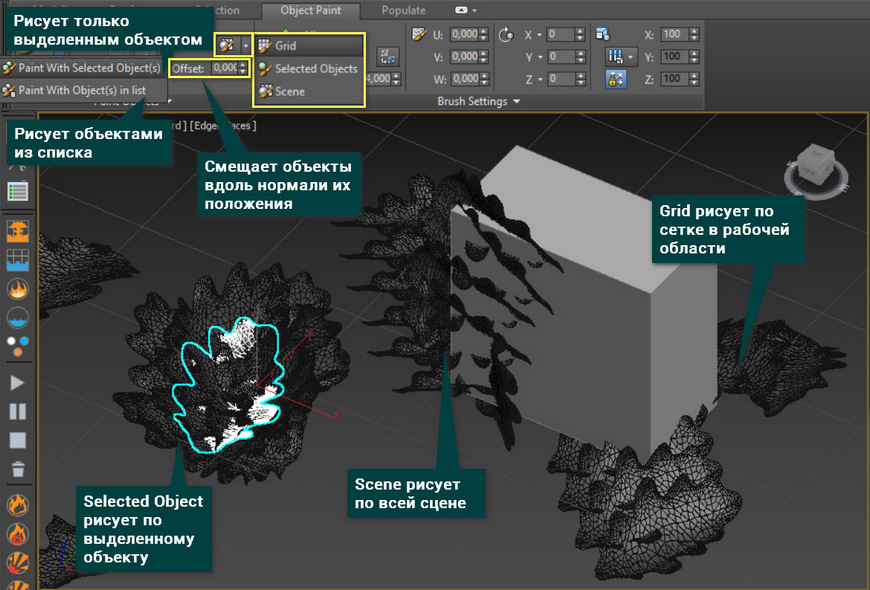
Находится данный инструмент на панели Ribbon – Object Paint. Прежде всего, необходимо создать минимум 2 предмета: которым будете рисовать и на который будете наносить. Чтобы начать рисовать, выберете нужный объект и нажмите кнопку Paint With Selected Object(s). Теперь, зажимая ЛКМ и проводя мышкой по сцене, начнут появляться выбранные объекты.

Рисовать можно тремя способами:
- Grid – по сетке рабочей области. Сетка появляется во всех плоскостях при прямом взгляде из режима Orthographic. Соответственно, рисовать можно во всех плоскостях, но из разного вида.
- Selected Object – только по выделенному объекту. Лучше подходит к режиму рисования объектами из списка (PaintWithObject(s)inlist). Тогда можно будет выбрать любой объект в сцене и рисовать исключительно по нему.
- Scene – рисует по все сцене и по любым объектам. В других плоскостях рисует так же, как Grid.
Offset смещает нарисованные объекты вдоль нормали. Здесь нормаль — это прямая, идущая от плоскости, в которой был нарисован объект.
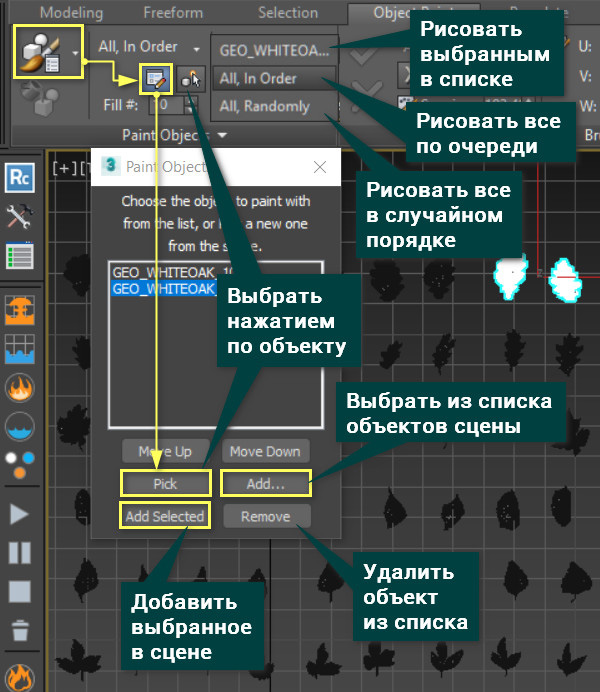
Перейдя в режим Paint With Object(s) in list, открывается доступ к Edit Object List. В нем находятся все выбранные объекты, которыми можно будет рисовать. Добавлять объекты можно тремя кнопками: Pick, Add и Add Selected. Удалять кнопкой Remove. Рисовать из списка можно в трех режимах: только выбранным, всеми по порядку (All, In Order) и всеми в случайном порядке (All, Randomly).
2. Brush Settings
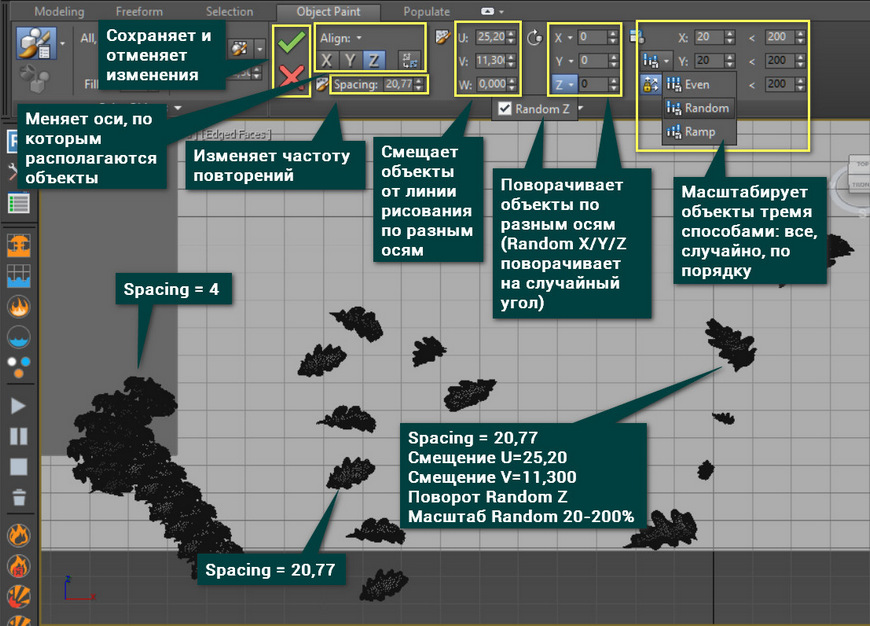
Все объекты строятся вдоль скрытой линии, созданной движением мыши. Панель Brush Settings позволяет настраивать расположение объектов вдоль этой линии. Она делится на несколько секций:
- Align – определяет, по какой оси будут расположены новые объекты (оси X/Y/Z). Галочка и крестик сохраняют и отменяют изменения соответственно. Если вы несколько раз рисовали объектами, то удалятся все. Spacing изменяет частоту повторений объектов. Важно! Не нажимайте Ctrl+Z. Из-за этого может закрыться программа (справедливо для 3dsMax 2017).
- Scutter – эта панель отвечает за смещение объектов в разные стороны от прямой рисования. Смещение происходит на случайное расстояние в пределах установленного значения.
- Rotate – разворачивает объекты на установленный угол. При нажатии на букву оси развернется дополнительная функция RandomX/Y/Z, которая повернет объекты на случайный угол данной оси.
- Scale – масштабирует объекты. Имеет 3 типа масштабирования: все объекты одинаково (Even), все объекты на случайную величину (Random) и все объекты по очереди (Ramp).
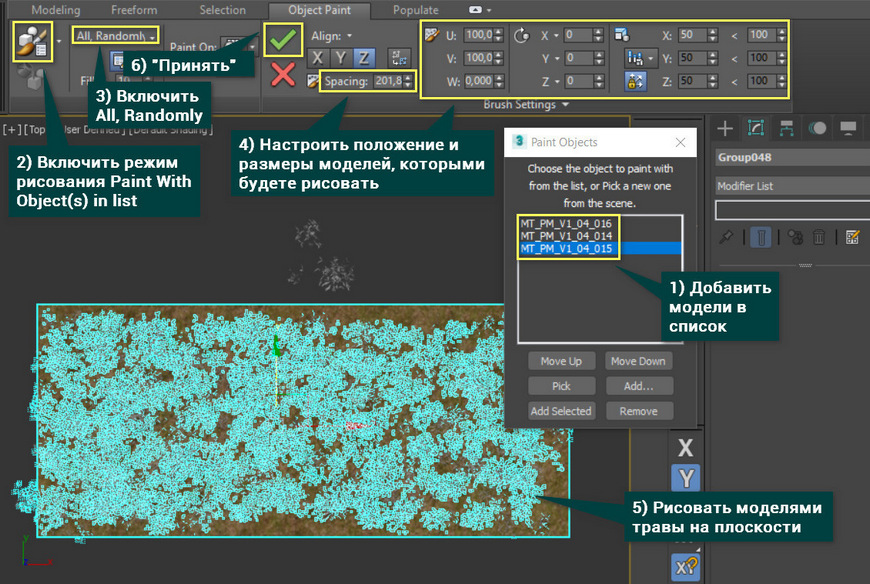
Инструмент Object Paint довольно прост по своим настройкам. Но его параметров достаточно для удобной настройки и быстрого распределения объектов по сцене. Самый простой пример использования – трава.
- Добавить модели травы в список PaintObject.
- Включить режим рисования Paint With Object(s) in list.
- Включить рисование всеми объектами в случайном порядке All,Randomly.
- Настроить параметры Spacing, Scutter, Rotate и Scale.
- Рисовать моделями травы по плоскости.
- В конце не забудьте нажать на галочку
Еще один интересный способ использование – листья. За несколько минут работы с Object Paint вы сможете распределить листья по желаемым участкам сцены, создать эффект опадающей листвы смещением по оси Z. И благодаря такой мелочи финальная визуализация будет выглядеть более живой.
Displacement – отличный инструмент, чтобы визуализировать сложный рельеф на простых формах. Но как быть, если нужно превратить рельеф в геометрию? Для этого можно воспользоваться аналогом инструмента – модификатором Displace. Он выдавливает рисунок прямо на сетке объекта, задавая ему неровности.
1. Создание рельефа
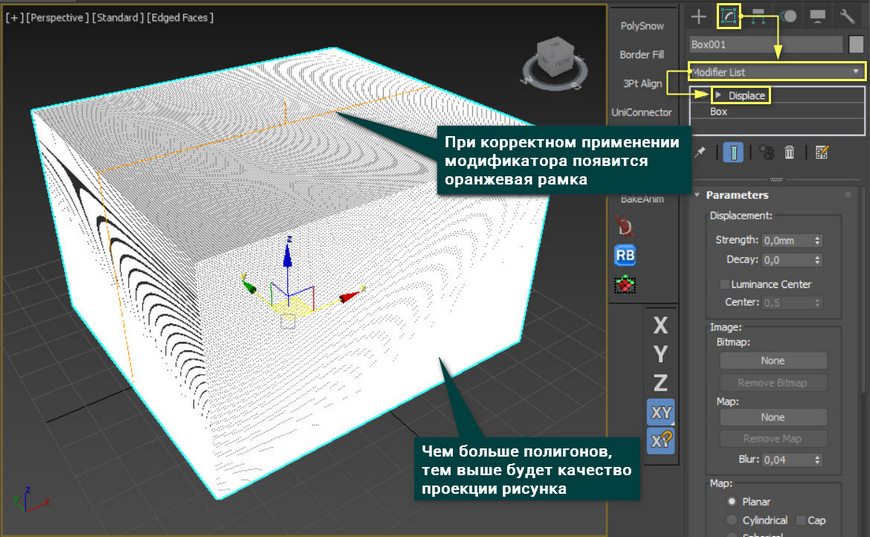
Прежде всего необходимо создать высокополигональный объект. Чем больше будет полигонов, тем выше окажется качество проекции рисунка. Затем нужно перейти в Modify – Modifier List – Displace.
Как только модификатор применится – появится оранжевая рамка. Если рамки нет или она сильно отличается по размеру от объекта, то модификатор применился некорректно.
В разделе Image задается текстура, по которой создастся рельеф. Нажав кнопку None в подразделе Map, можно будет выбрать любую стандартную карту 3ds Max. В подразделе Bitmap устанавливается любое стороннее изображение. Кнопками Remove Map/Bitmap назначенные карты удаляются.
О полезных картах, которые можно использовать в данных разделах, вы найдете в статье «10 самых нужных карт 3ds Max»
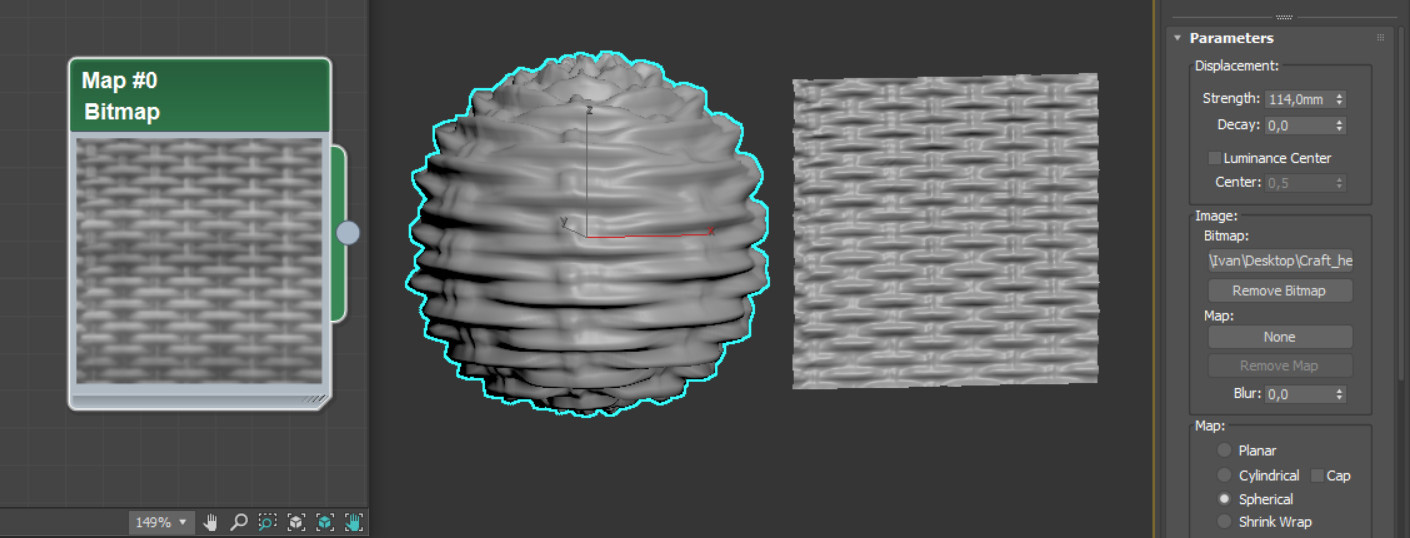
Как только изображение будет назначено, нужно изменить значение Strength. Этот параметр влияет как на силу выдавливания, так и на направление.
Luminance Center изменяет смещение геометрии. По умолчанию полигоны объекта либо смещаются (в светлых областях рисунка), либо остаются на месте (в темных областях). Параметр Center позволяет управлять, какой цвет и с какой силой будет сдвигать полигоны.
Blur размывает границы между светлыми и темными областями рисунка. Чем сильнее Blur, тем более сглажены края. Слишком большие значения этого параметра размывают весь рисунок.

2. Изменение формы рельефа
Для улучшения рельефа можно изменять форму проецирования рисунка. Это можно делать как готовыми формами, так и регулировкой размеров.
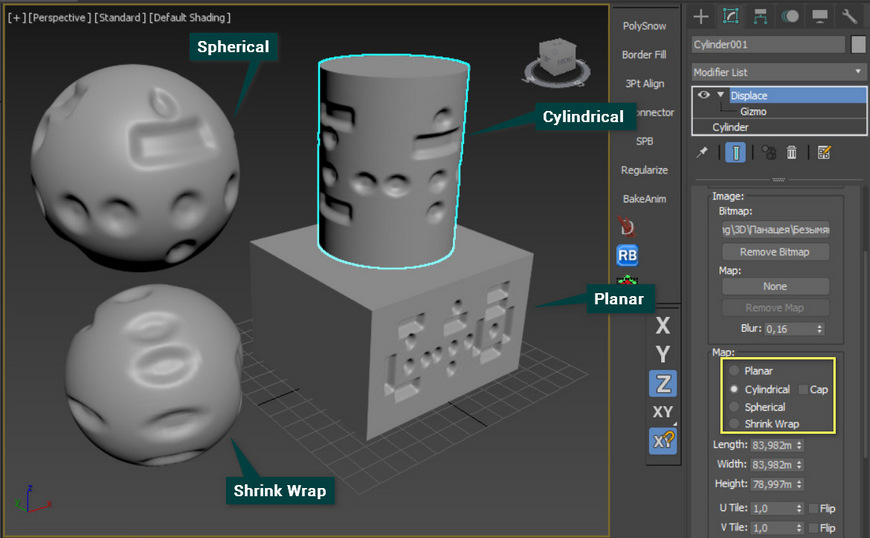
Planar – проекция в виде плоскости. Больше всего подходит для прямоугольных ровных объектов.
Cylindrical – проекция в виде цилиндра. Исходя из названия, больше всего подходит для цилиндрических объектов.
Spherical – сферическая проекция.
Shrink Wrap – второй вариант сферической проекции. Отличается от предыдущего тем, что имеет всего один полюс, в котором сшивается текстура. Spherical имеет 2 таких полюса.
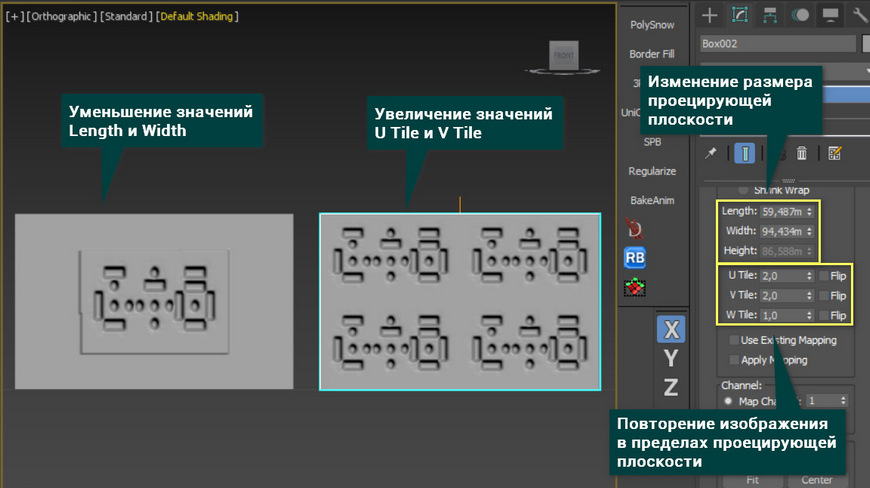
Параметры Length, Width и Height отвечают за размеры проецирующей формы. Изменяя эти значения, можно изменять размер рисунка.
U/V/W Tile изменяет повторение текстуры в пределах проецирующей плоскости. Flip просто отражает текстуру по какой-либо оси.
3. Быстрая настройка проекции
В разделе Alignment находится набор кнопок, благодаря которым можно быстро изменять проецирующую плоскость.
X, Y, Z – выравнивание плоскости по какой-либо из осей.
Fit – масштабирование плоскости в соответствие с габаритным контейнером объекта.
Center – устанавливает плоскость по центру объекта.
Bitmap Fit – задает плоскости размер изображения, которое можно выбрать на компьютере. Причем, картинка не обязательно должна быть такая же, как и в модификаторе.
Normal Align – перемещает и размещает плоскость по нормалям объекта. Для использования нужно включить этот режим и нажать ЛКМ на самом объекте.
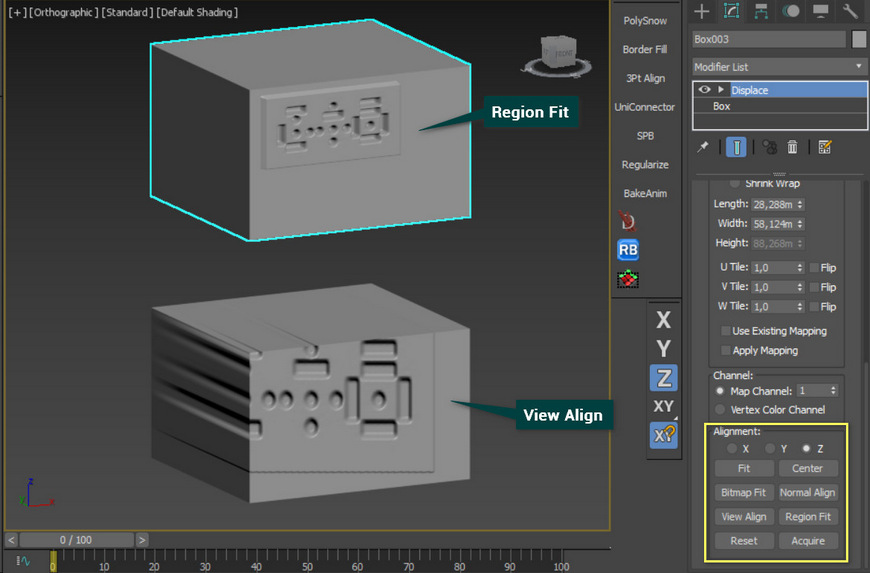
View Align – выравнивает плоскость относительно точки взгляда.
Region Fit – растягивание плоскости по объекту.
Acquire – позволяет выбирать для настройки размера плоскости другой объект.
Reset – возвращает плоскость к изначальной форме.
Этот модификатор имеет довольно узкий список задач. Больше всего он нужен при создании моделей, предназначенных для ЧПУ станков. Для визуализации он полезен при создании барельефов. Но тогда придется задуматься о снижении числа полигонов. Конечно, в этом поможет модификатор Optimize. Либо, если рельеф несложный и его можно повторить сплайнами, воспользуйтесь ShapeMerge.

By:
Paint Deformation lets you push, pull, or otherwise affect vertices by dragging the mouse cursor over the object surface. At the object level, Paint Deformation affects all vertices in the selected object. At sub-object levels, it affects only selected vertices (or vertices that belong to selected sub-objects), and recognizes soft selection.
- Edit/Editable Poly object > Paint Deformation rollout
By default, deformation occurs in the normal direction of each vertex. 3ds Max continues to use a vertex's original normal for the direction of deformation, but you can opt to use the altered normal direction for a more dynamic modeling process, or even deform along a specific axis.
Procedures
To paint deformation onto a mesh object:
- Apply an Edit Poly modifier to an object, or convert the object to Editable Poly format. Paint Deformation uses existing geometry, so the object should have enough mesh resolution for the desired deformation.
- Do either of the following:
- To deform anywhere on the object, remain at the object level, or work at a sub-object level with no sub-objects selected.
- To deform only specific areas of an object, go to a sub-object level and then select the sub-objects in the area to deform.
- On the Paint Deformation rollout, click Push/Pull.
- Set Push/Pull value to a negative value to push into the object surface, or to a positive value to pull the surface outward. The higher the absolute value, the greater the effect.
- Set Brush Size and Brush Strength.
- Position the mouse cursor over the surface to be deformed.
As you move the mouse, the “brush” reorients dynamically to show the normal direction of the portion of the mesh currently under the cursor. You can use the normal direction of deformed surfaces as the push/pull direction by choosing Deformed Normals.
Interface

Paint Deformation has three modes of operation: Push/Pull, Relax, and Revert. Only one of these modes can be active at a time. The remaining settings control the effect of the active deformation mode.
For any mode, choose the mode, change settings as necessary, and then drag the cursor over the object to paint the deformation.
To paint deformation anywhere on the object, remain at the object level, or work at a sub-object level with no sub-objects selected. To deform only specific areas of an object, go to a sub-object level and select the sub-objects in the area to deform.
Push/Pull Moves vertices into the object surface (push) or out of the surface (pull). The direction and extent of pushing or pulling is determined by the Push/Pull Value setting.
Note: Push/Pull supports soft selection in that effective strength falls off with the selection value of soft-selected sub-objects.
Relax Normalizes the distances between vertices by moving each vertex to a position calculated from the average of its neighbors. Relax uses the same method as the Relax modifier.
Use Relax to push apart vertices that are too close together, or to pull together vertices that are too far apart.
Revert Lets you gradually “erase” or reverse the effects of Push/Pull or Relax by painting. Affects only vertices deformed since the most recent Commit operation. If no vertices qualify for reversion, the Revert button is unavailable.
Tip: You can switch to Revert mode temporarily by pressing and holding the Ctrl key while painting deformation in Push/Pull or Relax mode.
Push/Pull Direction group
This setting lets you specify whether pushing or pulling vertices occurs with respect to surface normals, original or deformed, or along a specific axis. Default=Original Normals.
Painting deformations with Original Normals typically moves vertices perpendicular to the original surface; using Deformed Normals tends to move vertices outward after their initial deformation, resulting in a “puffy” effect.
Original Normals When chosen, pushing or pulling a vertex moves it in the direction of its normal before deformation. Repeated applications of Paint Deformation always move each vertex in the same direction it moved originally. Deformed Normals When chosen, pushing or pulling a vertex moves it in the current direction of the normal; that is, after deformation. Transform axis X/Y/Z When chosen, pushing or pulling a vertex moves it along the specified axis, using the current reference coordinate system.
Push/Pull Value Determines the direction and maximum extent of a single application of the push/pull operation. Positive values “pull” vertices out of the object surface, and negative values “push” vertices into the surface. Default =10.0.
A single application is defined as painting (that is, dragging once or more over the same area) without lifting the mouse button.
Tip: You can use Alt to switch between pushing and pulling with the same value while painting. For example, if you're pulling with a value of 8.5, press and hold Alt to start pushing with a value of –8.5.
Brush Size Sets the radius of the circular brush. Only vertices inside the brush circle are deformed. Default=20.0.
Tip: To change the brush radius interactively, release the mouse button, press and hold Shift+Ctrl + the left mouse button, and then drag the mouse. This also works with all other painter-interface features in 3ds Max such as Skin Paint Weights and VertexPaint.
Brush Strength Sets the rate at which the brush applies the Push/Pull value. A low Strength value applies the effect more slowly than a high value. Range=0.0 to 1.0. Default=1.0.
Tip: To change the brush strength interactively, release the mouse button, press and hold Shift+Alt + the left mouse button, and then drag the mouse. This also works with all other painter-interface features in 3ds Max such as Skin Paint Weights and VertexPaint.
Brush Options Click this button to open the Painter Options dialog, where you can set various brush-related parameters. Commit Makes any deformation changes permanent, “baking” them into the object geometry. After using Commit, you can no longer apply Revert to changes up to that point. Cancel Eliminates all changes since the initial application of Paint Deformation or the most recent Commit operation.
By:
Paint Deformation lets you push, pull, or otherwise affect vertices by dragging the mouse cursor over the object surface. At the object level, Paint Deformation affects all vertices in the selected object. At sub-object levels, it affects only selected vertices (or vertices that belong to selected sub-objects), and recognizes soft selection.
- Edit/Editable Poly object > Paint Deformation rollout
By default, deformation occurs in the normal direction of each vertex. 3ds Max continues to use a vertex's original normal for the direction of deformation, but you can opt to use the altered normal direction for a more dynamic modeling process, or even deform along a specific axis.
Procedures
To paint deformation onto a mesh object:
- Apply an Edit Poly modifier to an object, or convert the object to Editable Poly format. Paint Deformation uses existing geometry, so the object should have enough mesh resolution for the desired deformation.
- Do either of the following:
- To deform anywhere on the object, remain at the object level, or work at a sub-object level with no sub-objects selected.
- To deform only specific areas of an object, go to a sub-object level and then select the sub-objects in the area to deform.
- On the Paint Deformation rollout, click Push/Pull.
- Set Push/Pull value to a negative value to push into the object surface, or to a positive value to pull the surface outward. The higher the absolute value, the greater the effect.
- Set Brush Size and Brush Strength.
- Position the mouse cursor over the surface to be deformed.
As you move the mouse, the “brush” reorients dynamically to show the normal direction of the portion of the mesh currently under the cursor. You can use the normal direction of deformed surfaces as the push/pull direction by choosing Deformed Normals.
Interface

Paint Deformation has three modes of operation: Push/Pull, Relax, and Revert. Only one of these modes can be active at a time. The remaining settings control the effect of the active deformation mode.
For any mode, choose the mode, change settings as necessary, and then drag the cursor over the object to paint the deformation.
To paint deformation anywhere on the object, remain at the object level, or work at a sub-object level with no sub-objects selected. To deform only specific areas of an object, go to a sub-object level and select the sub-objects in the area to deform.
Push/Pull Moves vertices into the object surface (push) or out of the surface (pull). The direction and extent of pushing or pulling is determined by the Push/Pull Value setting.

Tip: To reverse the Push/Pull direction while painting, press and hold .
Note: Push/Pull supports soft selection in that effective strength falls off with the selection value of soft-selected sub-objects.
Relax Normalizes the distances between vertices by moving each vertex to a position calculated from the average of its neighbors. Relax uses the same method as the Relax modifier.
Use Relax to push apart vertices that are too close together, or to pull together vertices that are too far apart.
Revert Lets you gradually “erase” or reverse the effects of Push/Pull or Relax by painting. Affects only vertices deformed since the most recent Commit operation. If no vertices qualify for reversion, the Revert button is unavailable.

Tip: You can switch to Revert mode temporarily by pressing and holding the key while painting deformation in Push/Pull or Relax mode.
Push/Pull Direction group
This setting lets you specify whether pushing or pulling vertices occurs with respect to surface normals, original or deformed, or along a specific axis. Default=Original Normals.
Painting deformations with Original Normals typically moves vertices perpendicular to the original surface; using Deformed Normals tends to move vertices outward after their initial deformation, resulting in a “puffy” effect.
Original Normals When chosen, pushing or pulling a vertex moves it in the direction of its normal before deformation. Repeated applications of Paint Deformation always move each vertex in the same direction it moved originally. Deformed Normals When chosen, pushing or pulling a vertex moves it in the current direction of the normal; that is, after deformation. Transform axis X/Y/Z When chosen, pushing or pulling a vertex moves it along the specified axis, using the current reference coordinate system.
Push/Pull Value Determines the direction and maximum extent of a single application of the push/pull operation. Positive values “pull” vertices out of the object surface, and negative values “push” vertices into the surface. Default =10.0.
A single application is defined as painting (that is, dragging once or more over the same area) without lifting the mouse button.
Tip: You can use to switch between pushing and pulling with the same value while painting. For example, if you're pulling with a value of 8.5, press and hold to start pushing with a value of –8.5.
Brush Size Sets the radius of the circular brush. Only vertices inside the brush circle are deformed. Default=20.0.
Tip: To change the brush radius interactively, release the mouse button, press and hold + + (left mouse button), and then drag the mouse. This also works with all other painter-interface features in 3ds Max such as Skin Paint Weights and VertexPaint.
Brush Strength Sets the rate at which the brush applies the Push/Pull value. A low Strength value applies the effect more slowly than a high value. Range=0.0 to 1.0. Default=1.0.
Tip: To change the brush strength interactively, release the mouse button, press and hold + + (left mouse button), and then drag the mouse. This also works with all other painter-interface features in 3ds Max such as Skin Paint Weights and VertexPaint.
Brush Options Click this button to open the Painter Options dialog, where you can set various brush-related parameters. Commit Makes any deformation changes permanent, “baking” them into the object geometry. After using Commit, you can no longer apply Revert to changes up to that point. Cancel Eliminates all changes since the initial application of Paint Deformation or the most recent Commit operation.
Читайте также: