
Media bang paint как рисовать мангу
I will explain the basics of drawing cartoons using MediBang Paint.
Although I will not explain in this tutorial, MediBang Paint has a service called “cloud project” to draw comics in earnest. (To use the cloud project, user registration to MediBang is necessary.)
Let’s use “Comic guide”
“Comic guide” is a guide line when printing manga. When opening a new canvas as “manga manuscript”, “Comic guide” will be displayed automatically.
To open the canvas as “manga manuscript”, open the “New Image” dialog with “File” → “New” in the menu and create a canvas from the “Comic (1)” tab.

Caption. Comic tab
Let’s create a canvas by selecting “Doujinshi (A5 finished): 350 dpi” as a template on the “Comic” tab.

Caption. When opening the canvas with 'Comic'
A canvas of “Comic” was opened. This light blue color guideline is “Comic guide”. (Please see here for the meaning of the lines of the guideline.)
When checking “Spread / Cover page” at the time of new creation, the spread canvas will open.
“Comic guide” can be displayed / hidden at any time by “View” → “Show Comic Guide Lines” of the menu. You can also change the setting by “View” → “Comic Guide Lines Settings”.
Let’s try a Panel Divide
I will explain “Panel Divide” which is indispensable process for drawing cartoons. You can easily “Panel Divide” with MediBang Paint.
Panel Divide
First, add “Panel Material” to the canvas with “Layer” → “Add Panel Material” in the menu.

Caption. Panel properties
The “Comic Panel Property” dialog is displayed and you can set the “Panel Material” to be added. Please press OK as it is here.

Caption. Where 'Panel Material' was added
“Panel Material” is added according to the inner frame of “Comic guide” and the cursor changes to the shape of the cutter (A). (“Divide Tool” is selected.)
With this “Divide Tool” selected, you can “Panel Divide” by cutting “Panel Material”.

Caption. Where you cut the panel
Let’s cut the panel next to it like a red line.
When cutting a piece, please cut it so as to divide the piece. When the panel can not be divided properly like the blue line, the panel will not break. In the (1) toolbar, you can also set the vertical and horizontal spacing when splitting a panel.
If you want to divide panel diagonally, please hold down Shift key and break panel.
Let’s divide the panel appropriately. When I accidentally devide a piece, It’s expected “Undo”.
Transforming Panels
To Transform / Move some Panels, use the “Operation Tool”.

Caption. Select Operation Tool
(a)・(b) This function can not be used with “Panel Divide”. (c) This button changes the overlapping order of “Panel”. If more than one “Panel” is overlapped, rearrange this “Panel” so that it is displayed one above. (d) This button changes the overlapping order of “Panel”. If more than one “Panel” overlaps, rearrange this “Panel” so that it is displayed one below. (e) It is a button to delete “Panel”. (f) It is a button to change the property of “Panel”. When pressed, a dialog for changing the line width and color of “Panel” opens.
Select “Operation Tool (2)”, click “Panel” you want to operate, “Toolbar (3)” will be displayed under “Panel”. Operation of “Panel” is done by grasping “handle (4)” around “Panel”.
If you want to erase part of “Panel” please see here.
If you want to divide “Panel” evenly, let’s use “Layer” -> “Material” -> “Divide” in the menu. Since this function equally divides the currently active “Panel”, execute with the “Panel” you want to split with the operation tool selected.
If you use it successfully, you can also “Panel Divide” for “4-frame cartoon”.

Caption. Panel divide for 4-frame cartoon
Let’s use “material”
In MediBang Paint, you can easily paste materials such as tone on your manga.
Please refer to here for basic usage of the material.
Let’s try it
First, add a new layer for pasting the material. Next, let’s select the appropriate frame with “MagicWand Tool” and open the “Material Dialog” by pressing the “Open Material Dialog” button.

Caption. Where Material Dialog is opened
When “Material Dialog” opens, drag and drop the tiles and tones you want to use onto the canvas.

Caption. Material setting bar
A bar is displayed at the bottom of the main window where you can set the angle and magnification of the material. If you set an appropriate value here and press the “OK” button, pasting of the material is confirmed. If you paste it correctly, if you release the selection, the material is stuck in the “Panel” neatly.

Caption. Where the tiles are pasted
In this way, by pasting the material after creating the selection range, you can paste the material only to the place you want to paste.
When sharpening the tone it is convenient to use transparent color.
Let’s copy with the “Text Tool”
By using “Text Tool”, you can easily enter characters.
For the basic usage of “Text Tool” please refer to here.
Let’s try it
Select “Text Tool” from the toolbar on the left of the main window and click where you want to place the letters on the canvas. The “Edit Text” dialog is displayed.

Caption. When 'Edit Text' dialog is displayed
After entering the characters you want displayed on the canvas and pressing the OK button, the layer of text is added and the characters are displayed on the canvas.
This character can be moved when “Text Tool” or “Move Tool” is selected.

Caption. Where text was entered
If you want to write text vertically using Windows fonts entered in the computer, using fonts with “@” at the beginning of the font name will be written vertically.

Caption. The font at the beginning is @
The following is an explanation of MediBangPaint’s basic manga drawing functions.
Comic Template settings
The Manga Manuscript Guide refers to the lines that act as guides for making manga to be printed.
First, let’s open a new A5 canvas.
Once you have opened the canvas screen, open “Edit Menu” → “Canvas Settings” → “Comic Template Settings”.
Tap “Templates”, select “Doujinshi (A5 Size)” and press OK.

Caption. Canvas Settings
The sizes of the canvas and the guide lines do not match, so tap “Canvas Settings” → “Canvas Size” → “FIT TO MANGA GUIDE SIZE.” and press OK.

Caption. An A5 Comic Template Canvas
This gives us a canvas for a manga manuscript. The light blue lines are the manuscript guide.
Please see this article for more about guide lines.
By adding a check mark to “Spread/Cover Page” in “Comic Template Settings” you can create a guide for a center page spread.
Removing the check mark from “Use Manga Crop Marks” will hide the guide display.
The panel cutting tool
MediBangPaint allows you to easily set the panel layout needed for drawing manga.
Caption. The Panel Cutting Tool (1) ADD COMIC PANEL Tapping this will bring up a dialogue like the one shown above. Here you can select the line width and color of panels, and add them. Adding a check mark to “Title” will generate a square box for you to enter text on the top of the canvas. (2) DEVIDE After adding your panels, you can split your panels with width and height values of your choice. Splitting by 2×2 will give you a layout as seen in the image below.
Caption. Split Panels (3) Kerning This allows you to set the horizontal spaces between panels. You can choose from between 0~100px. (4) Leading This allows you to set the vertical spacing between panels. You can choose from between ~100px.

You can manually add angular divides to your panels. Tap to outer edge of the panel you would like to split, and drag the line in the direction you would like to make a divide in. Be sure to drag the line all the way out, otherwise it will not divide the panel.
Caption. Manual Panel Dividing
Operation tool
The Operation Tool allows you to move and alter the shapes of panels.

Caption. The Operation Tool (1)/(2) These features cannot be used with panel dividing. (3) This alters the stacking order of the panels. It will arrange a panel to the top, when there are several panels stacked on top of one another. (4) This alters the stacking order of the panels. It will arrange a panel to be displayed on level lower when there are several panels stacked on top of one another. (5) This will delete a panel. (6) This allows you to alter the panel’s settings. Tapping it will bring up a dialogue that allows you change the color and line width of the panel.
Tapping a panel you would like to transform/move will select it.
Expanding/shrinking or transforming a panel can be done by moving your pointer on one of its lines.
Moving a panel can be done by tapping and dragging it.
The materials menu
MediBangPaint allows you to select materials for your panels such as tone, etc.
The following are the three types of material available.
- Tiles…Net, etc.
- Tones…Background or screen tone
- Items…Illustrations and figures
The Materials Menu is located on the bottom right of the canvas screen. Tapping tiles, tones, or items on the upper portion will bring you to a new tab.
This tutorial is working with no log in, which limits the number of downloadable materials.
To remove the limit on the number of downloadable materials, please make an account and log in.

Caption. The Materials Menu (1) This is the tiles tab. (2) This is the tones tab. (3) This is the items tab. (4) This will add files from your device as materials. (5) This will download materials from the cloud. (6) This will add materials from photos taken with your camera. (Your camera app will start up.) (7) This will update your tabs to reflect the latest information. (8) This will delete materials.
1 Add/download materials
Adding materials can be done through options (4) through (6) listed above. This explanation will cover downloading materials from the cloud.
Tap the cloud icon from (5) to move to the download page as seen below.

Caption. Downloading Materials
After selecting the materials you would like to download, tap “Download” to add them to your materials tab. When you want to delete a material from your tab, tap the garbage bin icon and then select the materials you would like to delete.

Caption. The Added Materials
2 Using materials
Once you’ve downloaded your materials, let’s give them a try.
First, add the layer you want to add your material to.
Next, select the panel you want to add your material tool with the Select Tool.

Caption. Select the Panel to Add Material to
Here, open the Materials Menu, and tap the material you want to use. This will bring up the following screen.

Caption. Material Angle/Magnification
Here, you can adjust the angle and magnification of the material. After making your adjustments, tap confirm.

Caption. A Panel With Material
Release the selected range and you’re done. Adding materials after making a selected range allows you to add the material only where you specifically want it.
Using translucent colors when sharpening tone makes things more convenient.
See the Tone Sharpening article for details.
Rasterizing Materials…If you do not rasterize your panels or item materials, you will not be able to erase them with the eraser. By setting “Layer Menu” → “Layer Operations” → “Rasterize”, you will be able to draw or erase on them.
The text tool
The Text Tool allows you to type letters on your canvas.
After selecting the Text Tool, tap the area on your canvas where you would like to place your text.
The following “Edit Text” dialogue will be displayed.

Caption. The Text Tool (1) Text Enter the words you would like to add here. (2) Font Enter the words you would like to add here. (3) Text Color This allows you to choose the color of your text. Tapping it will open an edit color dialogue. (4) Position This allows you to select the position of text when you have two or more lines from the following options: Align Beginning/Align Center/Align End. (5) Bold This makes your text bold. (6) Italics This will make your text italic. (7) Left to Right This will take your text read left to right. (8) Anti Aliasing Adding a check mark enable anti-aliasing (smoothing out the edges of your lines). (9) Text Size This allows you to change the size of your text. (10) Text Spacing This allows you to alter the spacing between each letter. (11) Line Spacing This allows you to alter the spacing between each line. (12) Rotation degree This allows you to rotate your text. (13) Edges This allows you to add edges to your text. You can choose the color and width of the edges. Adding a check mark to “Round out the edges” will make the edges smooth.
Once you’re done editing, tap “Confirm” on the bottom right.

Caption. The Text Tool
You can move the text by dragging as long as you have it selected with the Text Tool or the Move Tool.
When you want to make additional edits to your text, tap the pen icon at (14) or go to “Layer Menu” → “Text Layout Gear Icon”, which will bring up the text edit dialogue box.
Tap the icon at (15) to delete text.
Using the text tool will generate a “Text Layer”. You cannot draw on or transform it. While you can draw on it by turning on rasterization from the Layer Menu, you will no longer be able to make edits via the text dialogue box.
I will explain the basics of drawing cartoons using MediBang Paint.
Although I will not explain in this tutorial, MediBang Paint has a service called “cloud project” to draw comics in earnest. (To use the cloud project, user registration to MediBang is necessary.)
Let’s use “Comic guide”
“Comic guide” is a guide line when printing manga. When opening a new canvas as “manga manuscript”, “Comic guide” will be displayed automatically.
To open the canvas as “manga manuscript”, open the “New Image” dialog with “File” → “New” in the menu and create a canvas from the “Comic (1)” tab.

Caption. Comic tab
Let’s create a canvas by selecting “Doujinshi (A5 finished): 350 dpi” as a template on the “Comic” tab.

Caption. When opening the canvas with 'Comic'
A canvas of “Comic” was opened. This light blue color guideline is “Comic guide”. (Please see here for the meaning of the lines of the guideline.)
When checking “Spread / Cover page” at the time of new creation, the spread canvas will open.
“Comic guide” can be displayed / hidden at any time by “View” → “Show Comic Guide Lines” of the menu. You can also change the setting by “View” → “Comic Guide Lines Settings”.
Let’s try a Panel Divide
I will explain “Panel Divide” which is indispensable process for drawing cartoons. You can easily “Panel Divide” with MediBang Paint.
Panel Divide
First, add “Panel Material” to the canvas with “Layer” → “Add Panel Material” in the menu.

Caption. Panel properties
The “Comic Panel Property” dialog is displayed and you can set the “Panel Material” to be added. Please press OK as it is here.

Caption. Where 'Panel Material' was added
“Panel Material” is added according to the inner frame of “Comic guide” and the cursor changes to the shape of the cutter (A). (“Divide Tool” is selected.)
With this “Divide Tool” selected, you can “Panel Divide” by cutting “Panel Material”.

Caption. Where you cut the panel
Let’s cut the panel next to it like a red line.
When cutting a piece, please cut it so as to divide the piece. When the panel can not be divided properly like the blue line, the panel will not break. In the (1) toolbar, you can also set the vertical and horizontal spacing when splitting a panel.
If you want to divide panel diagonally, please hold down Shift key and break panel.
Let’s divide the panel appropriately. When I accidentally devide a piece, It’s expected “Undo”.
Transforming Panels
To Transform / Move some Panels, use the “Operation Tool”.

Caption. Select Operation Tool
(a)・(b) This function can not be used with “Panel Divide”. (c) This button changes the overlapping order of “Panel”. If more than one “Panel” is overlapped, rearrange this “Panel” so that it is displayed one above. (d) This button changes the overlapping order of “Panel”. If more than one “Panel” overlaps, rearrange this “Panel” so that it is displayed one below. (e) It is a button to delete “Panel”. (f) It is a button to change the property of “Panel”. When pressed, a dialog for changing the line width and color of “Panel” opens.
Select “Operation Tool (2)”, click “Panel” you want to operate, “Toolbar (3)” will be displayed under “Panel”. Operation of “Panel” is done by grasping “handle (4)” around “Panel”.
If you want to erase part of “Panel” please see here.
If you want to divide “Panel” evenly, let’s use “Layer” -> “Material” -> “Divide” in the menu. Since this function equally divides the currently active “Panel”, execute with the “Panel” you want to split with the operation tool selected.
If you use it successfully, you can also “Panel Divide” for “4-frame cartoon”.

Caption. Panel divide for 4-frame cartoon
Let’s use “material”
In MediBang Paint, you can easily paste materials such as tone on your manga.
Please refer to here for basic usage of the material.
Let’s try it
First, add a new layer for pasting the material. Next, let’s select the appropriate frame with “MagicWand Tool” and open the “Material Dialog” by pressing the “Open Material Dialog” button.

Caption. Where Material Dialog is opened
When “Material Dialog” opens, drag and drop the tiles and tones you want to use onto the canvas.

Caption. Material setting bar
A bar is displayed at the bottom of the main window where you can set the angle and magnification of the material. If you set an appropriate value here and press the “OK” button, pasting of the material is confirmed. If you paste it correctly, if you release the selection, the material is stuck in the “Panel” neatly.

Caption. Where the tiles are pasted
In this way, by pasting the material after creating the selection range, you can paste the material only to the place you want to paste.
When sharpening the tone it is convenient to use transparent color.
Let’s copy with the “Text Tool”
By using “Text Tool”, you can easily enter characters.
For the basic usage of “Text Tool” please refer to here.
Let’s try it
Select “Text Tool” from the toolbar on the left of the main window and click where you want to place the letters on the canvas. The “Edit Text” dialog is displayed.

Caption. When 'Edit Text' dialog is displayed
After entering the characters you want displayed on the canvas and pressing the OK button, the layer of text is added and the characters are displayed on the canvas.
This character can be moved when “Text Tool” or “Move Tool” is selected.

Caption. Where text was entered
If you want to write text vertically using Windows fonts entered in the computer, using fonts with “@” at the beginning of the font name will be written vertically.

Caption. The font at the beginning is @
Medibang Paint – бесплатный графический редактор, созданный в Японии. Отличительной особенностью данного редактора является его направленность на рисование манга и довольно большой функционал для этого.

Сначала неопытный пользователь может испугаться такого большого количества иконок/рамок/настроек.
Но в реале же, постоянно пользоваться мы будем лишь малой частью.
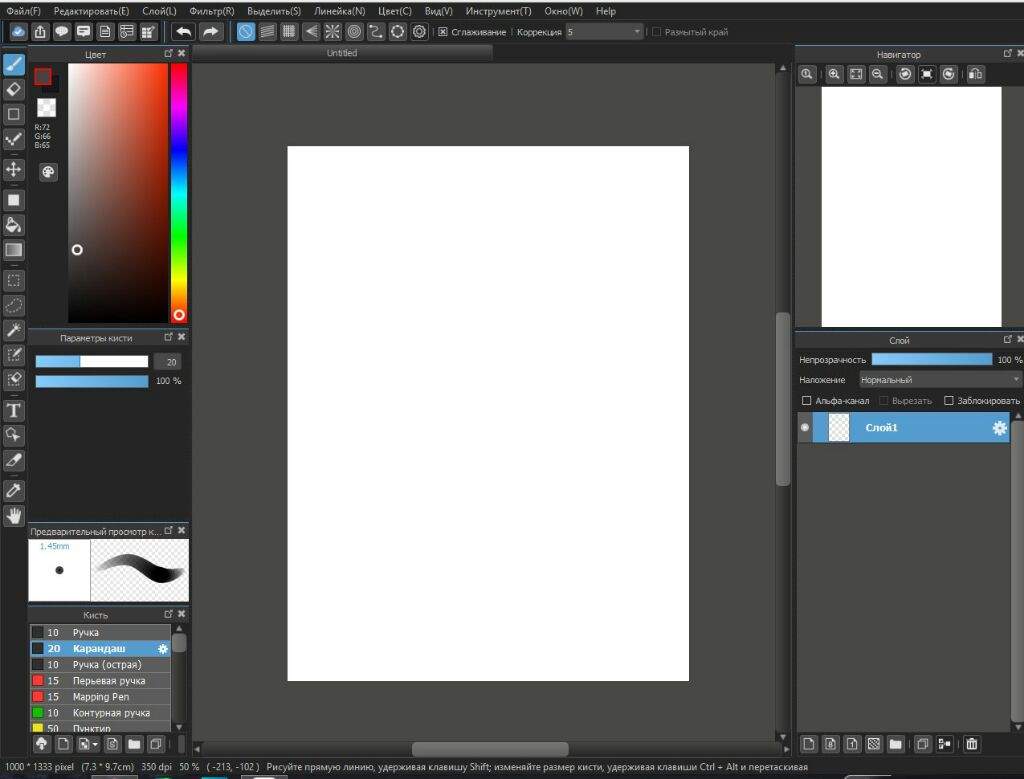
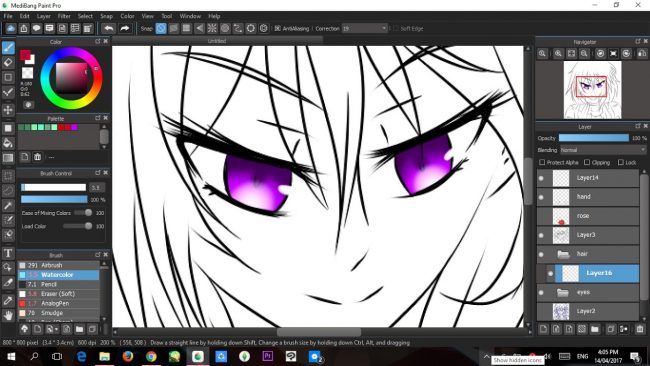
Слева находятся панель инструментов, настройки кисти и выбор цвета.

В целом, всё интуитивно понятно. Волшебная палочка, заливка, выделение. С этим знакомы многие.
Посмотрим, что справа. Справа настройки слоёв и уменьшенный холст.

В правом верхнем углу есть вот такие кнопочки.

И они очень интересные! Ими можно увеличивать/уменьшать изображение, отзеркаливать работу, вертеть её в разные углы и куча другого волшебства! Но только тссссс.
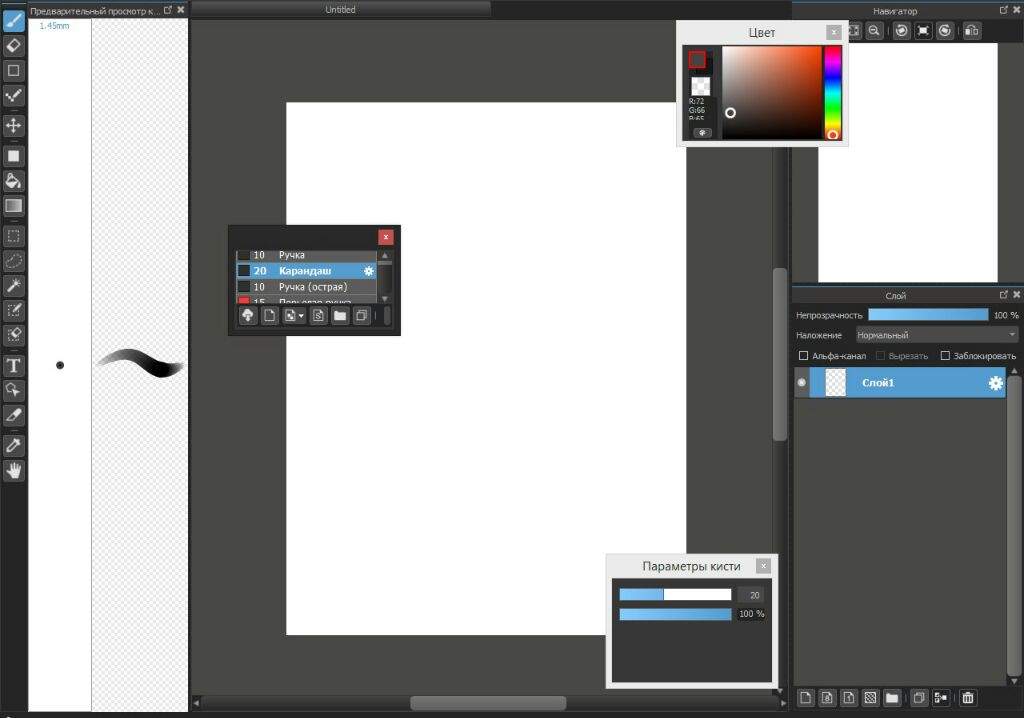
Расположение и размер всех окон можно настаивать.
По дефолту даётся немного кистей. Их вполне хватает для нормальной работы.

При желании вы можете получить больше кистей. Но для этого нужно зарегистрироваться. После регистрации вы можете самостоятельно скачивать нужные вам кисти с официального источника.
(внизу панелей с кистями есть знак облачка со стрелочкой, кликните на него и вам откроется окошко, чтобы скачать кисть нажмите на неё и ждите загрузки)

Кистей там много. Есть очень полезные.

Приступим к самому интересному! К скринтонам!
Немного информации из Интернета.
Что такое скринтоны? Это покрытие, которое наносят на изображение для придачи ему какого-нибудь характерного оттенка. Более популярными скринтоны стали благодаря японской манге, где они применяются вместо закраски цветом.
Наши скринтоны находятся в левом верхнем углу, во второй кнопки.

Как и кисти, скачивать их надо из Интернета.

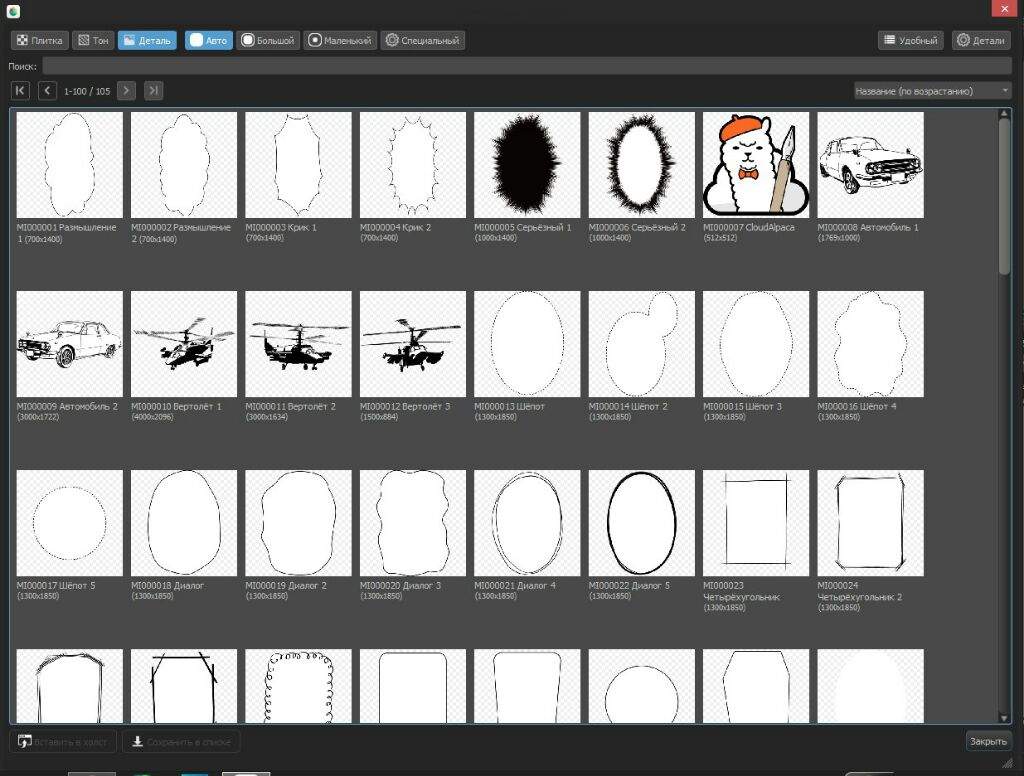
Также, у нас есть фоны и облачки с текстом! Это очень важно!
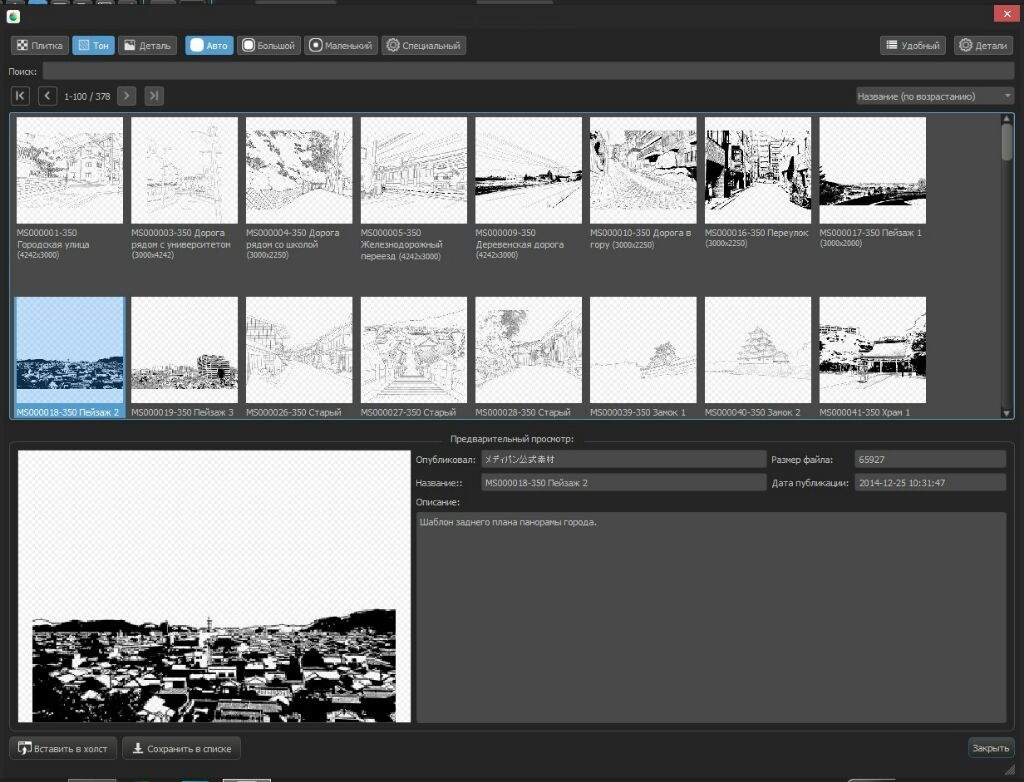
Скринтоны надо накладывать либо с помощью волшебной палочки, либо с помощью выделителя.
После выделения области наложения, скринтон нужно просто перетащить в нужное место.
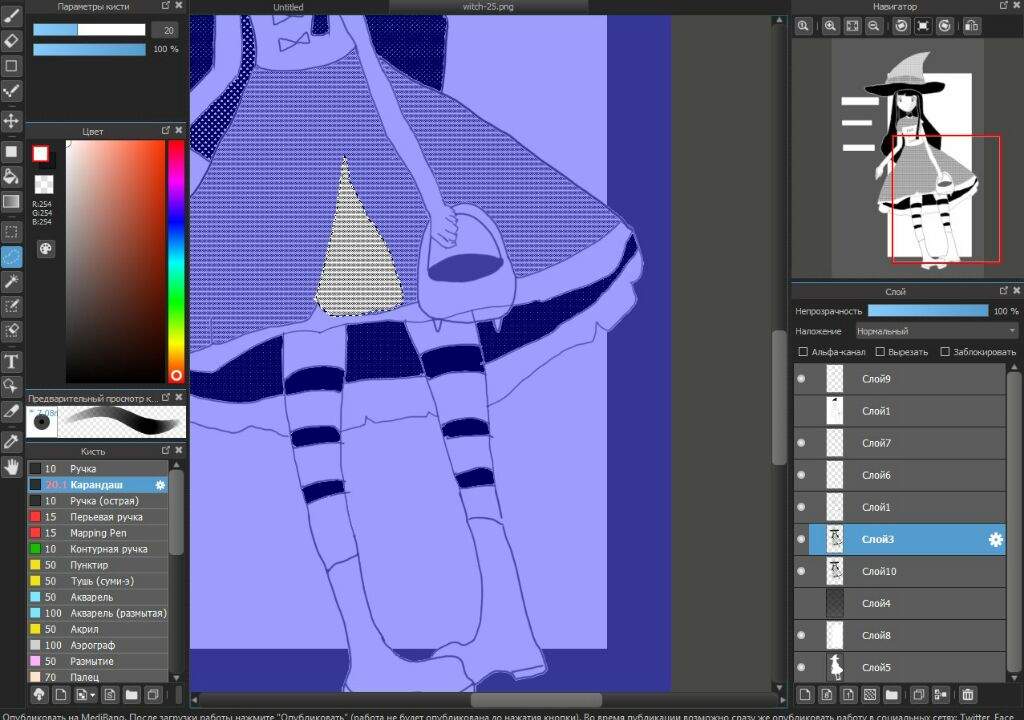
Можно менять положение скринтона и его размер. У слоёв со скринтонами – менять прозрачность.
После 20 минут работы вышла вот такая ведьмочка.

Заключения здесь не будет.
Приложение отлично подходит для новичков и фанатов манги, но мне оно совсем не приглянулось. Ставлю пять звёзд из-за бесплатного распространения и лёгкости использования.
Существует множество программ, предназначенных для рисования и создания различных проектов. Одной из необычных, но популярных утилит выступает MediBang Paint Pro. Благодаря бесплатному графическому редактору можно создавать различные иллюстрации, а также целые комиксы. При этом софт доступен как для скачивания на компьютер, так и на мобильное устройство. Как и где можно скачать, установить приложение и легко ли его освоить?
О программе
Многофункциональное приложение МедиБанг Пейнт было разработано в Японии специально для творческих людей, которые неравнодушны к аниме, комиксам и манги. С помощью бесплатного сервиса можно создавать различные проекты, а также японские комиксы.

Примечательно то, что графический редактор подходит для компьютеров операционной системы Windows. Также утилиту можно установить на планшет или телефон. Установить приложение можно как на андроиды, так и на айфоны.
Редактором могут пользоваться как профессиональные пользователи, так и новички. Интерфейс сервиса вполне понятный и удобный к использованию. Кроме того, при работе с МедиБанг Пейнт можно получить доступ к облачному хранилищу, что позволяет обмениваться данными, а также нескольким пользователям работать совместно над одним проектом.
Где можно применять
Софт MediBang Paint содержит большое количество инструментов и опций, с помощью которых можно создавать различные иллюстрации. Данная программа может пригодиться людям разных профессий. Воспользоваться «рисовалкой» могут профессиональные иллюстраторы, художники, графические дизайнеры, создатели японской манги.
При этом необязательно владеть специальными навыками. Интерфейс удобен и прост в использовании, поэтому освоить программу не составит большого труда. Практиковать свои навыки смогут даже начинающие пользователи, далекие от рисования и создания комиксов.
Надо отметить, что утилита была разработана таким образом, чтобы работать над проектом мог не один пользователь, а сразу несколько. Индивидуальные или совместные готовые проекты можно использовать как в личных, так и в коммерческих целях. Так, любители аниме благодаря редактору смогут создавать настоящие шедевры манги.
Ключевые возможности
Бесплатное приложение по рисованию комиксов имеет множество полезных инструментов и опций, которые можно использовать в процессе работы.
Опции MediBang Paint:
- софт можно скачать и установить на любые платформы с различными операционными системами (Windows, Android, MacOS);
- сервис доступен в открытом доступе, пользоваться утилитой можно бесплатно;
- программа оснащена мощным инструментарием (более 50 кистей, более 800 тонов, фонов и текстур), при этом кисточки можно настраивать в зависимости от типа рисунка;
- разработана удобная панель управления;
- можно создать неограниченный размер холста;
- можно быстро разделить лист-холст на несколько отдельных окошек благодаря специальной опции, которая именуется «комикс-панелью»;
- при работе с софтом открывается доступ к облачному хранилищу, куда можно сохранять готовые иллюстрации;
- большое количество задних планов, тонов и фонов;
- поскольку программа предназначена для создания комиксов, то ни один комикс не обходится без диалогов, поэтому существует большое разнообразие шрифтов;
- возможность работать над одним проектом сообща.
Все функции представлены в свободном доступе. Освоить японскую утилиту смогут и профессиональные, и начинающие художники. Надо отметить, что пользователь сможет менять настройки по своему усмотрению.
Как и где скачать
На официальном сайте представлены различные бесплатные версии для скачивания. Прежде чем нажать на установку софта, следует ознакомиться с системными требованиями утилиты.
- совместима с операционными системами Windows 7, 8, 8.1, 10, MacOS и Android;
- на жестком диске должно быть не менее 100 Мб свободного места;
- подходит как для 32, так и для 64 разрядных систем;
- для того, чтобы сохранять проекты в облаке и использовать «облачные» шрифты, нужно интернет соединение.
Чтобы скачать редактор на телефон с системой Android, необходимо запустить приложение Play Market. Для установки на Айфон или Айпад, необходимо зайти в приложение App Store.
Надо отметить, что мобильное приложение MediBang Paint доступно на разных языках, в том числе и русском. Установив утилиту на компьютер, также можно настроить панель управления на русском языке, но необходимо дополнительно установить русификатор.
Обучение
Чтобы обучиться работать в графическом редакторе, желательно изучить различный контент. Можно обратиться к интернет-ресурсам, найти инструкции по использованию программой. Доя эффективности и закрепления усвоенного материала можно обратиться к роликам на YouTube.
Многие блогеры на своих ютуб-каналах рассказывают об основах работы в редакторе, также представляют онлайн мастер-классы по рисованию в редакторе.
Как правильно пользоваться — инструкция по работе
Этапы создания рисунка:
- Необходимо запустить программу или приложение MediBang Paint. В панели управления следует найти вкладку «файл», а затем нажать на подраздел «создать».
- Далее всплывет дополнительное окно, в котором можно ввести нужные параметры холста. Можно вручную вписать параметры холста или использовать готовый шаблон.
- После создания холста можно приступать непосредственно к самому процессу рисования. Для создания иллюстрации можно пользоваться различными инструментами и фильтрами. Для разделения холста на отдельные окошки, следует воспользоваться функцией «комикс-панель». При создании проекта не нужно забывать про работу с фоном и слоями. Также можно воспользоваться понравившимся шрифтом.
- После того, как проект будет завершен, следует его сохранить. Для этого необходимо кликнуть на раздел «сохранить», выбрать нужный формат файла и место сохранения.
Для упрощения рабочего процесса профессионалы рекомендуют пользоваться горячими клавишами. Также для удобства можно пользоваться готовыми шаблонами, что существенно экономит время.
Аналогичные программы
Не всегда есть возможность запустить именно MediBang Paint. Существуют похожие программы, которыми можно воспользоваться при создании комиксов.
-
– утилита, предназначенная для создания манги и артов. Приложение оснащено большим количеством инструментов, можно настраивать эффекты, слои и даже вставить трехмерные модели в рисунок. – еще одна программа, с помощью которой можно создавать комиксы. Интерфейс программы состоит из рабочего холста, набора инструментов. С помощью IllustStudio можно пользоваться градиентной заливкой, накладывать фильтры на растровые слои, а также просматривать трехмерные объекты. – софт, созданные для рисования манги. Сервис имеет множество полезных функций и возможностей. Дополнительно в магазине можно приобрести большое количество текстур, материалов, заготовок и даже 3D-моделей.
Преимущества и недостатки
Популярный софт MediBang Paint полюбился многим пользователям, поскольку совмещает в себе не только инструменты обычной «рисовалки», но и имеет опции для создания манги. Можно создавать холсты необъятных размеров, делить их на окошки, использовать множество фонов и текстур, накладывать слои и применять многообразные шрифты.
Преимущества:
- доступен на многих платформах, прогу можно установить на компьютер, планшет или телефон;
- готовые иллюстрации можно сохранять в облачном хранилище;
- возможность подстраивать кисти под себя;
- поддерживает множество форматов файлов (png, jpg, bmp, gif, psd, tif, webp);
- можно скачать и установить на устройство абсолютно бесплатно;
- простой и удобный, понятный интерфейс.
Недостатки:
- при установке мобильного приложения, может всплывать реклама, к тому же утилита может немного «подвисать» (особенно после обновлений);
- для того, чтобы полноценно работать в редакторе, требуется регистрация.
В сети интернет можно найти различные отзывы пользователей, которые успели опробовать японскую программу. Большинство отзывов положительные. При этом оставляют отзывы как профессиональные художники, так и новички. Особенное программа полюбилась тем, кто неравнодушен к аниме, манге и комиксам. С помощью популярного сервиса можно создавать собственные комиксы.
В дополнении к статье информация в видео:
Пользователям нравится работа в приложении, поскольку редактор имеет множество возможностей и опций. К тому же, готовые иллюстрации можно без опасения сохранять в облаке в любом удобном формате.
Читайте также: