
Manjaro удалить драйвер nvidia
Manjaro Linux — один из лучших новых дистрибутивов Linux, набирающий популярность в сообществе. Нетрудно понять почему, поскольку обычно сложный дистрибутив Arch Linux помещается в удобный, простой для понимания корпус, эффективно добавляя обучающие колеса к нестабильной базе.
Операционная система Manjaro имеет множество сильных сторон, но, безусловно, лучшая из них — это надежный инструмент для установки драйверов. Благодаря этому даже новые пользователи Linux могут быстро и эффективно получить все, от последних драйверов графического процессора до чего-то столь же запутанного, как WiFi-карта, работающая без особых проблем.
Есть два способа использовать установщик драйвера Manjaro Linux: из командной строки или через приложение настройки графического интерфейса Manjaro. В этом руководстве мы рассмотрим, как использовать оба.
Примечание: установщик драйверов Manjaro обычно обнаруживает проприетарные драйверы. Если ваши устройства уже работают, а установщик этого не показывает, это означает, что вы используете устройства с открытым исходным кодом, уже встроенные в ядро Linux, и устанавливать что-либо еще не нужно.
Установить драйверы через CLI
Диспетчер драйверов Manjaro работает через CLI с помощью mhwd команда. Чтобы использовать его, откройте окно терминала, нажав Ctrl + Alt + T или Ctrl + Shift + T на клавиатуре.
Когда окно терминала открыто, используйте sudo -s команда для переноса терминальной сессии от обычного пользователя к Root.
Отсюда вам нужно запустить mhwd из терминала, чтобы определить, какие аппаратные устройства доступны и подготовить драйверы к установке.
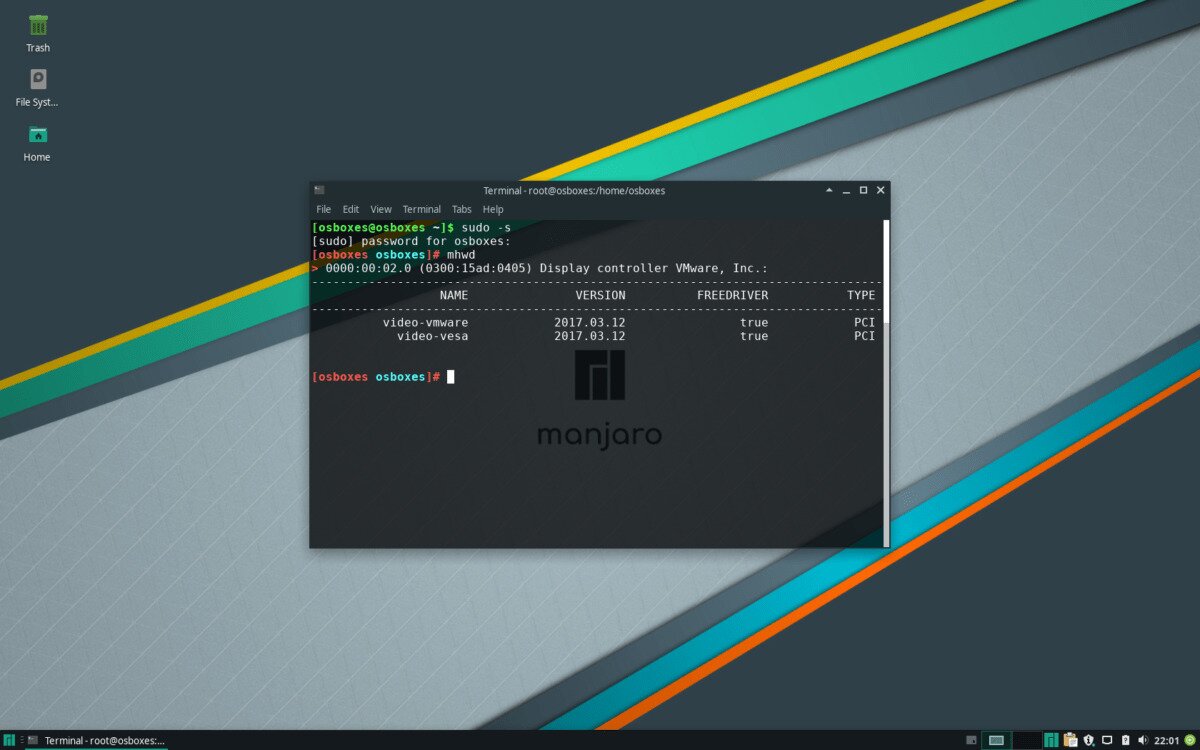
В выходных данных инструмент Manjaro Hardware Detection перечислит все несвободные драйверы устройств, которые он обнаружил и доступен для установки.
Чтобы установить драйвер, посмотрите на вывод драйвера. Например, чтобы установить драйвер Video VMware в Manjaro, вы должны:
Просто следуйте синтаксису ниже.
Примечание: не знаете, как найти «Тип»? Посмотрите столбец «Тип» в окне терминала Mhwd.
Удаление драйверов через CLI
Удаление драйвера с помощью инструмента Mhwd CLI работает так же хорошо, как и процесс установки. Для этого запустите mhwd команда для просмотра всех драйверов.
Затем найдите имя драйвера, который вы хотите удалить, в разделе «Имя». Затем загляните в раздел «Тип» драйвера и выясните, какой это тип драйвера.
Следуйте приведенному ниже синтаксису, чтобы удалить драйверы через интерфейс командной строки Mhwd.
Установить драйверы через графический интерфейс
В Manjaro разработчики предлагают отличную графическую утилиту, которую можно использовать для быстрой загрузки и установки драйверов оборудования. А еще лучше то, что для его использования не требуется никаких специальных знаний!
Чтобы получить установщик драйвера Manjaro, откройте приложение настроек на рабочем столе и выполните поиск по запросу «Manjaro Settings Manager». После открытия приложения прокрутите приложение настроек до «Конфигурации оборудования» и щелкните его, чтобы получить доступ к области драйвера.
Примечание: здесь будет отображаться только оборудование, которое в настоящее время не использует драйверы ядра Linux. Если устройство не появляется, значит для него уже есть драйвер!
Отсюда появится список оборудования. Просмотрите список устройств и найдите устройство, для которого вы хотите установить новый драйвер. Затем установите с помощью мыши флажок рядом с «открытым исходным кодом» (или несвободным / несвободным, если необходимо).
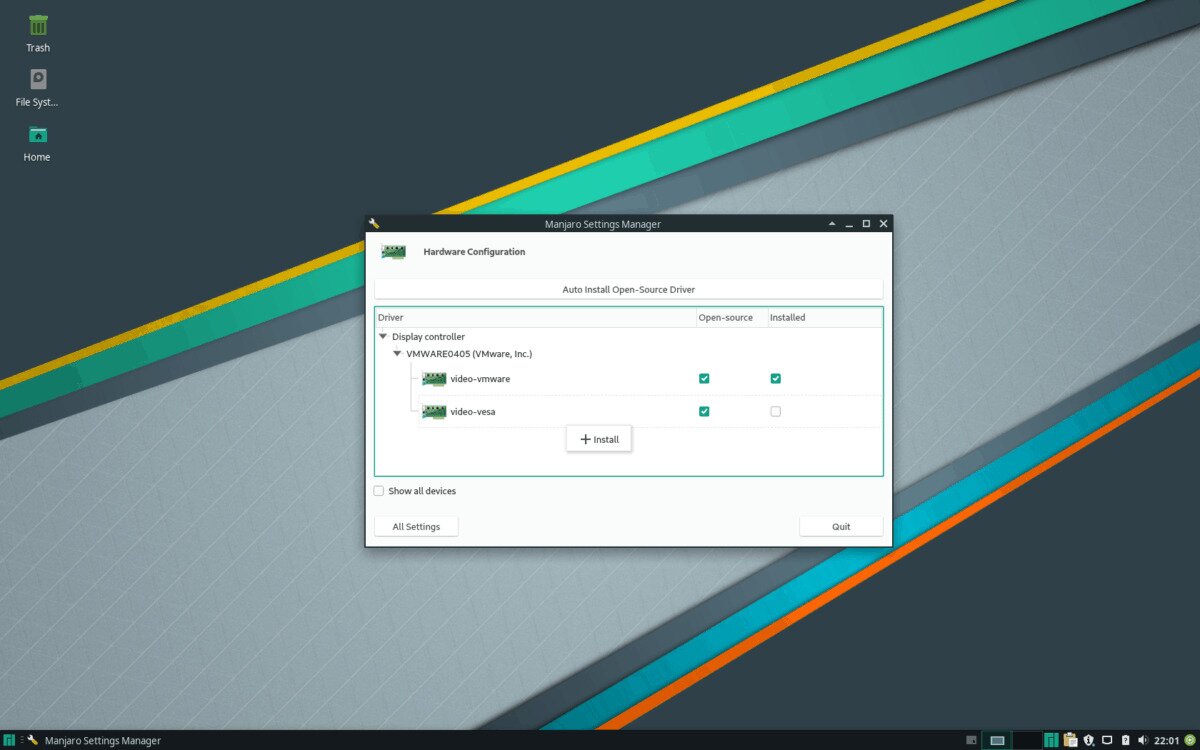
Установив флажок, щелкните устройство правой кнопкой мыши и выберите кнопку «+ Установить», чтобы установить новый драйвер на ПК с Manjaro Linux.
Когда драйвер будет установлен, рекомендуется перезагрузить компьютер, так как недавно установленный драйвер может не загрузиться сразу.
Удаление драйверов через графический интерфейс
Удаление драйвера из графического интерфейса драйвера Manjaro работает следующим образом. Сначала откройте приложение Manjaro Settings Manager, как раньше, когда вы устанавливали драйверы в систему.
В открытом приложении прокрутите вниз до «Конфигурация оборудования» и откройте его, чтобы получить доступ к списку драйверов. Затем найдите аппаратное устройство, с которого вы хотите удалить драйвер, щелкните его правой кнопкой мыши и выберите «- Удалить» для удаления.
Когда драйвер будет удален, перезагрузите компьютер, чтобы завершить процесс!
Другие способы получить драйверы на Manjaro
Программа установки драйверов Manjaro Linux помогает пользователям получать новые драйверы для своих аппаратных устройств. Тем не менее, это не единственный способ установить новые драйверы. Если ваши аппаратные устройства не обнаруживаются в Manjaro, лучше всего обновить до более новой версии ядра Linux.

Manjaro Linux делает невероятно простым обновление до более новых версий ядра Linux. Для получения дополнительной информации о том, как выполнить обновление ядра, ознакомьтесь с руководством здесь!
Использование ArchLinux в домашнем обиходе весьма специфично, ибо не каждый готов тратить время на поиск информации для настройки и оптимизации системы, которая долгое время развивалась лишь в серверном направлении. Благо, всё давно изменилось и исходя из опыта автора, мы поэтапно оптимизируем ArchLinux для максимального быстродействия, а также разберём множество нюансов.
Гайд написан линуксоидом для линуксойдов и является помощником для продвинутых пользователей ArchLinux. Гайд не претендует на инструкцию для новичков или попытку что-то доказать. Возможно, пригодится для Steam Deck.
Убедимся, что конфигурация пакетного менеджера Pacman настроена для получения доступа к 32-битным зависимостям.
Откроем консоль и введём команду:
Убедитесь, что перед выделенными строчками отсутствует решётка и сохраните изменения (CTRL+X) Y.Теперь необходимо удостовериться в актуальности ключей ArchLinux во избежание проблем с установкой ПО.
Операция может занять продолжительное время.
После получения доступа к 32-битным зависимостям и обновления ключей безопасности, необходимо ускорить скорость скачивания пакетов с зеркал ArchLinux, а также принять изменения.
Утилита Reflector отсортирует доступные зеркала по скорости.
Если вы из Европейской части России, то всегда лучше использовать зеркала Германии, так как их больше всего и они имеют оптимальную свежесть/скорость.
Выполним обновление и приминения всех изменений:
Поздравляю, мы успешно завершили предварительный этап для будущей настройки системы. Теперь не должно быть проблем с ограничением скачивания или ошибок с доступностью зависимостей.
В установке драйверов для Linux-систем нет ничего сложного, ибо главное — учитывать, что от свежести ядра и версии драйвера, будет зависеть получите ли вы чёрный экран смерти или нет (Шутка). В гайде мы применим драйвер версии DKMS, который сам пропишет нужные параметры и не позволит убить систему.
Выполним перезагрузку PC после установки драйвера и сгенерируем предварительную конфигурацию Xorg.
В панели настроек выставляем наши значения как на скриншотах.
Повторим все изменения без прав sudo (это важно), но без сохранения в Save to X.
Поздравляю, вы успешно настроили драйвера Nvidia для ArchLinux, но из-за особенностей Nvidia под Linux можно применить и дополнительные твики для повышения производительности.
Дадим понять системе, что у вас Nvidia и файловая система BTRFS (Пропускаем, если ничего этого нет).
Для видеокарт ниже (GeForce 600) рекомендуется использовать свободную альтернативу драйвера NVIDIA — Nouveau.Nouveau это открытый драйвер, который имеет официальную поддержку со стороны сообщества для старых видеокарт и что отлично справляется с 2D ускорением.
sudo pacman -S mesa lib32-mesa vulkan-radeon lib32-vulkan-radeon vulkan-icd-loader lib32-vulkan-icd-loader
sudo pacman -S mesa lib32-mesa vulkan-intel lib32-vulkan-intel vulkan-icd-loader lib32-vulkan-icd-loader
Как вы могли заметить, самое сложное это установка проприетарного драйвера Nvidia, но другие карты таких танцев не требуют.
Переходя к базовой оптимизации системы мне стоит напомнить, что чистый ArchLinux это фундамент, и требуется уйма надстроек для нормальной работы системы. Установить компоненты, которые будут отвечать за электропитание, чистку, оптимизацию и т. п.
Прежде чем приступать к сборке компонентов системы, мы должны изменить флаги компиляции, которые являются указателями для компилятора при сборке программ.
CFLAGS="-march=native -mtune=native -O3 -pipe -fno-plt -fexceptions \ -Wp,-D_FORTIFY_SOURCE=2 -Wformat -Werror=format-security \ -fstack-clash-protection -fcf-protection" CXXFLAGS="$CFLAGS -Wp,-D_GLIBCXX_ASSERTIONS" RUSTFLAGS="-C opt-level=3" MAKEFLAGS="-j$(nproc) -l$(nproc)" OPTIONS=(strip docs !libtool !staticlibs emptydirs zipman purge !debug lto)
Данные флаги компилятора выжимают максимум производительности при компиляции, но могут вызывать ошибки сборки в очень редких приложениях. Если такое случится, то отключите ‘lto’ в строке options, добавив символ восклицательного знака ("!lto").
Ananicy — это демон для распределения приоритета задач, его установка сильно повышает отклик системы.
Haveged — это демон, что следит на энтропией системы. Необходим для ускорения запуска системы при высоких показателях systemd-analyze blame (Больше 1 секунды).
Включаем TRIM — очень полезно для SSD.
Rng-tools — демон, что также следит на энтропией системы, но, в отличие от haveged, через аппаратный таймер. Необходим для ускорения запуска системы при высоких показателях systemd-analyze blame (Больше 1 секунды). (Не использовать вместе с Ananicy).
PulseAudio — это один из старейших аудиосерверов в Linux, который управляет каналами вывода звука в системе. Выполним установка зависимостей на все случаи жизни, а также удобную графическую панель управления pavucontrol.
Внимание!
Пакет realtime-privileges — лучше не устанавливать, так как он может вызвать небольшие задержки из-за усиленного воздействия на CPU.
PipeWire — это новая альтернатива PulseAudio, которая призвана избавить от проблем и уменьшить потребление ресурсов. Пакет alsa-utils также содержит консольный Микшер (настройка громкости), который вызывается командой alsamixer.
Alsa — это тот самый звук, который идёт напрямую с ядра и является самым быстром, так как не вынужден проходить множество программных прослоек.
Разница небольшая и если у вас нет Bluetooth-наушников или потребности слушать музыку и болтать в микрофон, то Alsa+alsamixer это идеальный выбор.
Для настройки интернет-подключения, скорее всего, вы будете использовать NetworkManager, т. к. он является швейцарским ножом и поставляется по умолчанию во многих Linux-дистрибутивах. Однако если вы пропишете команду systemd-analyze blame, то узнаете, что он задерживает загрузку системы примерно на ~4 секунды.
Поздравляю, базовые оптимизации завершены и теперь можно переходить к настоящему веселью.
По умолчанию процессор динамически меняет свою частоту, что в принципе правильно и даёт баланс между энергосбережением и производительностью, но если вы всё-таки хотите выжать все соки, то необходимо закрепить режим максимальной производительности.
Закрепим режим максимальной производительности:
Увеличивает время загрузки, лучше не использовать.
GRUB_CMDLINE_LINUX_DEFAULT="quiet splash noibrs tsx_async_abort=off rootfstype=btrfs selinux=0 lpj=3499912 raid=noautodetect elevator=noop mitigations=off preempt=none"
Подробнее о каждом из параметров написано здесь.
lpj=— это уникальный параметр для каждой системы. Самоопределяется во время загрузки, что довольно трудоёмко, поэтому лучше задать вручную. Определить ваше значение lpj можно через следующую команду: sudo dmesg | grep «lpj=»raid=noautodetect — отключает проверку на RAID во время загрузки. Если вы его используете RAID массив, то не прописывайте параметр.rootfstype=btrfs — Здесь указываем название ФС в которой у вас форматирован корень.elevator=noop — указывает для всех дисков планировщик ввода NONE. Не использовать, если у вас жёсткий диск.
Существует десятки файловых систем, но BTRFS — Т1000 из мира файловых систем, так как является наследником идей EXT2-3 и прекрасно подходит для SSD носителей, ибо автоматически определять SSD, что позволяет не волноваться за сохранность носителя. Скорости чтение сопоставимы, а иногда (Особенно при высоких нагрузках) превышают показатели EXT4. Идеальный выбор для игровой системы на базе Linux.
Изменяем realtime на noatime или lazytime — эти параметра отвечают за запоминание времени доступа к файлу и прочий бред, что только портит отклик.Параметр noatime выключает полностью данную функцию, что может привести к некоторым багам в приложениях зависимых от времени (например, git), но автор никогда не встречал данной проблемы.Параметр lazytime успешно будет выполнять все функции, но выполнять их запись в оперативной памяти, что позволит избежать замедления без потери функциональности, но говорят lazytime чудит. Автор советует noatime.
Оптимальные параметры для SSD носителей. Описание каждого из них вы можете найти здесь.
При использовании Btrfs для корневого раздела установите пакет btrfs-progs.
Существует большое количество кастомных ядер, которые в той или иной мере созданы для разных задач, но для домашнего десктопа подходят только некоторые из них.
Отличный выбор для неискушённого пользователя, который не ставит задачи в покорении максимальной планки FPS. Доступен в официальных репозиториях (не нужно компилировать).
Идеальное ядро для игроманов, так как значительно улучшает качество отклика в повседневных задачах и играх. Ориентирован для процессоров Intel.
Такая установка рекомендуется, если вы не хотите компилировать ядро, но тогда производительность будет хуже, чем у аналогичного скомпилированного ядра.
Альтернатива Liquorix, ибо тоже нацелен на оптимизацию под игрушки и повышение плавности работы системы. Не рекомендуется обладателям процессоров Intel и наоборот же рекомендуется для AMD.
Является альтернативой всем трём ядрам выше, предоставляет возможность собрать ядро с набором множества патчей для улучшения производительности в игрушках (Futex2, Zenify). Предоставляет выбор при сборке ядра с разными планировщиками. Грубо говоря, то это сборная солянка из всех остальных ядер и кучи патчей.
Редактирование и настройка параметров через nano customization.cfg или makemenu, что не должно вызвать проблем у продвинутого пользователя.
Переходя к запуску Windows-игр на Linux-системах, стоит иметь в виду, что никаких эмуляторов Windows на Linux не существует и весь запуск осуществляется с помощью сторонней реализации Windows API — Wine/Proton, а также средств ретрансляции команд DirectX в доступные графические API на Linux (Vulkan, OpenGL) с помощью DXVK или иного ретранслятора кода.
Бинарные версии ПО всегда доступны в репозиториях и очень удобны, но они не могут обеспечить достойный уровень производительности. Советую поставить Wine-staging, а уже поверх собрать Wine-tkg.
sudo pacman -S wine-staging winetricks wine-mono giflib lib32-giflib libpng lib32-libpng libldap lib32-libldap gnutls lib32-gnutls mpg123 lib32-mpg123 openal lib32-openal v4l-utils lib32-v4l-utils libpulse lib32-libpulse libgpg-error lib32-libgpg-error alsa-plugins lib32-alsa-plugins alsa-lib lib32-alsa-lib libjpeg-turbo lib32-libjpeg-turbo sqlite lib32-sqlite libxcomposite lib32-libxcomposite libxinerama lib32-libgcrypt libgcrypt lib32-libxinerama ncurses lib32-ncurses opencl-icd-loader lib32-opencl-icd-loader libxslt lib32-libxslt libva lib32-libva gtk3 lib32-gtk3 gst-plugins-base-libs lib32-gst-plugins-base-libs vulkan-icd-loader lib32-vulkan-icd-loader
Нативная компиляции Wine-tkg позволяет не только получить громадную прибавку производительности, но и задействовать многие фишки: FSR, Esync и т. п
По умолчанию wine-tkg не использует нативные флаги, которые вы указывали ранее в /etc/makepkg.conf. Их нужно указать в вручную в wine-tkg-profiles/advanced-customization.cfg.
Всё, теперь большинство ПО будет запускаться через обычный двойной клик, но такое использование — это куча мороки, используйте Lutris.
уся конфигурация и настройка осуществляется через интерфейс Lutris.
Возможно, могло показаться, что это очень сложно и муторно, но на самом деле это позволяет выжимать намного больше FPS по сравнению с любой версией Windows и не занимает многого времени. К сожалению, не удалось затронуть преимущества сборки компилятором Clang или оптимизацию DE с использованием Stacer и Bleachbit, ибо материал и так разросся, но следуя поэтапно данным рекомендациям, вы уже получите весьма быструю и систему на базе ArchLinux. Используйте Linux, познавайте веселье и оставайтесь гладкими!
Если вам понравился материал, то пожалуйста — посетите блог автора ТЫК.
Как пропатчить KDE2 под FreeBSD?
Это не аниме хаб.
О, наконец-то, моя область специализации. Начнём разбор.
1. Добавление multilib никоим образом не относится к производительности, это нужно только для запуска 32-битного софта. Ты уверен, что оно надо всем и каждому? В steam есть свой рантайм, не обязательно запускать всё на "нативных" библиотеках.
2. > Операция может занять продолжительное время.
Увеличить можно в разы, установив ParallelDownloads в большее значение в /etc/pacman/pacman.conf. Либо по количеству потоков процессора + 1, либо по +1 за каждые 10мбпс полосы интернета вплоть по 100мбпс и +1 за каждые 100 последующие.
3. Про reflector более-менее правильно написано, но в россии как правило самое быстрое зеркало - это яндекса, по большей части за счёт их CDN. И достаточно его просто скопировать в самый верх /etc/pacman.d/mirrorlist, это покроет 98% потребностей в скорости скачки.
4. > pacman -S base-devel git gvfs ccache grub-customizer
Зачем?
5. Зачем в powermizer ебашить 100% частоты ядра гпу? Будет больше расход энергии, быстрее деградация, и больше шума от видеокарты (шумящий компьютер к 30 уже начинает выбешивать). Если очень хочется MAXIMUM YOBA, то подбери команду к nvidia-settings --assign, и запускай скриптом вместе с запуском стимецкого. Сохранение конфигурации в xorg.conf тоже не нужно довольно давно.
6. Cудя по репозиторию https://github.com/keylase/nvidia-patch, он нужен только для обхода запрета на многопоток NvENC и захват картинки через NvFBC. К играм относится по касательной, зачем его ставить?
7. > Дадим понять системе, что у вас Nvidia и файловая система BTRFS
Вот тут огромный разрыв в гайде, аж с этапа установки. BtrFS убрать из гайда, и дать хотя бы номинальное объяснение, что такое initramfs, зачем оно нужно, и как в эту картину мира вписываются mkinitcpio/dracut. Dracut, кстати, офигенный, советую на него перейти.
8. > Модули для включения DRM (Сверхнизкий доступ к устройству)
Как раз наоборот, с DRM ядро предоставляет единый высокоуровневый API для программ для отрисовки. А в этом шаге ты включаешь модули, которые обеспечивают его работу.
9. Зачем использовать grub в 2022? Если система на платформе новее, чем Sandy Bridge, то проще использовать rEFInd, как бонус - красивый кастомизируемый UI. А если хочется СКОРОСТИ - то через efibootmgr загнать в очередь загрузки компа ядро напрямую, что позволит ещё сильнее срезать ожидание.
А если платформа старее, то во что на ней гамать-то такого, что аж целый гайд по твикам нужен? Из коробки всё то немногое, что есть, работать будет.
10. Поаккуратнее с флагами makepkg! С ними можно собрать такие пакеты, которые вообще не будут запускаться в системе. Тут лучше отослать вот сюда: https://wiki.gentoo.org/wiki/GCC_optimization
11. Ananicy выглядит интересно, спасибо. А haveged польза сомнительна на не-хламе - он выкидывает часть пайплайна по генерации энтропии, в теории это ухудшает генерируемый системой рандом, и может внести уязвимости в систему.
12. Про TRIM всё правильно, но надо помнить про два нюанса. Первое - при зашифрованных LUKS системах он не отрабатывает по-умолчанию, на рачвики есть инструкция, как включить обратно, и обоснование. Во-вторых, discard не надо указывать в /etc/fstab или systemd-юнитах, trim по расписанию гораздо менее предрасположен к выводу из строя накопителя.
13. dbus-broker тоже выглядит интересно, но судя по его анонсу https://dvdhrm.github.io/rethinking-the-dbus-message-bus/, он меняет поведение системной шины. Я на своём компе в основном работаю, так что не вижу смысла так радикально тюнить систему.
14. Со звуком достаточно одного варианта, рекомендую pipewire. А если его ставить, то не нужно и остальные пакеты ставить, достаточно pipewire-alsa, pipewire-pulse, pipewire-jack. lib32-pipewire + lib32-pipewire-jack для тех, кому нужен мультилиб.
15. > sudo cpupower frequency-set -g performance
И пошёл дикий рёв кулеров. Не буду повторять пункт 5.
16. > GUI для изменения частоты процессора
Лучше бы нашёл GUI для изменения кривой кулеров. Его реально не хватает, руками в TLP и pwmconfig я не полезу.
17. > GRUB_CMDLINE_LINUX_DEFAULT="quiet splash noibrs tsx_async_abort=off rootfstype=btrfs selinux=0 lpj=3499912 raid=noautodetect elevator=noop mitigations=off preempt=none"
Лишнего хватанул. Для "Отключения Spectre and Meltdown", как указано в заголовке, достаточно добавить mitigations=off в параметры ядра. Остальные параметры не в тему. Зато отсутствует initrd в аргументах, и микрокод, который ты скачивал ранее, у тебя тупо не грузится.
18. А нету пункта 18. Userspace-утилитами и каштомными ядрами не балуюсь, так что комментировать мне нечего.
Резюмируя, я скажу что лучше всё-таки сначала читать английскую оф. вики, прежде чем что-то тюнить, потому что без мозгов можно сделать только хуже, т.к. дистрибутив не водит юзера за ручку.
Без 32 битных бибилиотек вы не установите панель управления нвидиа.
Migrationoff отключает не все запладки, даже в последней версии ядра.
Яндекс зеркала гавно.
Перечитайте гайд - производительность, а не дрочь на ваты и безшумность.
Да сверхнизкий доступ, вперёд на аур вики.
Кому надо сам конвертнёт ext4 в BTRFS.
По грубу больше всего инфы.
Флаги указаны те, что ничего не ломают, а просто задействуют все потоки и инструкции процессора.
Прежде чем копипастить вики генты - убедитесь на практике.
А нахрена нужен игровой комп в режиме, не выдающим свою производительность? Собрать не из кала не вариант, чтобы при нагрузке не взлетал? Какая деградация от 100% частот? Наркоманский пост какой-то. Одно дело, что полная дурь в не нужна в либреофисе, но В ИГРАХ!?
Note The mhwd command is still under development, and at present is only able to install drivers for graphics cards connected internally via pci.
Where installing the full version of Manjaro (i.e. complete with a pre-installed desktop environment, codecs, and software applications), the mhwd command will be automatically run by the GUI and CLI installer to automatically detect your graphics card and install the most appropriate driver for it. Whether free or proprietary drivers are installed will depend on your initial choice of using free or nonfree graphics drivers to boot up. Otherwise, it will be necessary to run the mhwd command manually as part of the post-installation process for the minimalistic NET-Edition of Manjaro.
For Beginners, it is recommended to use "Hardware Detection" in Manjaro Settings Manager to change or install new graphics drivers.
For intermediate and advanced users, it is also possible to use the mhwd command to install, re-install, and remove installed graphics drivers at any time, as illustrated below.
This is the recommended method for the detection and installation of graphics drivers. The syntax for the automated installation method is:
A breakdown of the command used for the automated method is as follows:
- -a: Automatically detect and install the appropriate driver
- [pci or usb]: Install the appropriate driver for devices connected internally via pci, or externally via usb (again, mhwd currently only supports pci connections at this stage in its development)
- [free or nonfree]: Install either free drivers (e.g. provided by the Linux community), or nonfree drivers (e.g. provided by hardware manufacturers)
- 0300: Identify that a driver is to be installed for a graphics card (0300 is the ID for graphics cards. As the mhwd command develops, new ids will be used for other hardware devices).
For example, the following command would result in the automatic detection and installation of the best available proprietary driver for a pci-connected graphics card:
Otherwise, the following command would result in the automatic detection and installation of the best available free driver for a pci-connected graphics card:
Taking a do-it-yourself approach is itself relatively easy and straightforward using the mhwd command. This should be undertaken in two stages:
1. Identify the appropriate driver to be installed, and then
2. Install the driver
Tip Just ensure that you have identified and are indeed about to install the correct driver for your particular graphics card!
Identifying Available Drivers
Prior to manually installing a graphics driver, it will be necessary to identify what drivers are available for your system. To list the appropriate drivers available, the basic syntax is:
Using this command without the additional options will list basic information for all the available drivers for devices connected to your system. All drivers graphics card drivers will have the prefix (video-) in their name. The basic information provided for all listed drivers will be:
- Name
- Version
- Free or proprietary, and
- PCI or USB connection
A more detailed list of installed drivers can be obtained by entering:
A detailed list will provide the following information:
- Name
- Version
- PCI or USB connection
- Description
- Priority
- Free or proprietary
- Dependencies
- Conflicts
- Class ID (e.g. '0300' for graphics card drivers), and
- Vendor ID
In addition, using the --pci filter in the following example will list detailed information for only the drivers available for devices (e.g. graphics cards) using an internal PCI connection:
Installing a Driver
To install a driver for a graphics card, the syntax is:
A breakdown of the command used to manually install a driver is as follows:
- -i: Install a driver
- [pci]: Install a driver for a device connected internally via pci (e.g. graphics cards)
- [name of driver]: The name of the driver to be installed
For example, to install the proprietary nvidia graphics card driver, the following command would be used:
Force Reinstall a Driver
To force the re-installation of an existing driver without removing it first, the syntax is:
For example, to force the re-installation of a previously installed nvidia graphics card driver, the following command would be used:
On occasion it may be necessary to remove an installed graphics card driver. Similarly to manually installing a graphics card driver, two steps should be undertaken for removal:
1. Identify the installed driver
2. Remove the identified driver
After all, it would be somewhat difficult to remove an installed driver if you don't know what it's called!
Identifying Installed Drivers
To identify and list Manjaro's installed drivers - including the graphics driver to be removed, the syntax is:
Using this command without the additional options will list the basic information of all the drivers currently installed on your system. Once again, all drivers for graphics cards will have the prefix (video-) in their name. As with listing drivers available for your system, the -d option used in the following command will list detailed information:
This information may prove useful to determine any otherwise unforeseen consequences or problems upon removing a driver. And again, it is also possible to filter your list of installed drivers by whether they are used on hardware connected via pci or usb. In this instance, a detailed list will be generated only for installed drivers used on hardware with a PCI connection:
One other way of reporting drivers installed andin use is using the inxi tool.
Note The mhwd profile 'video-linux' corresponds to the latest opensource driver availablefor your hardware.
Note The mhwd profile 'video-vesa' is a generic fallback driver which should not be used in the vast majority of cases.
Removing Installed Drivers
To remove an installed driver, the syntax is:
For example, to remove the installed driver for a nvidia graphics card (connected internally via pci), the following command would be used:
You can check configuration with:
And if needed fix issues with:
Make sure the path to xorg config file is valid.
Note about ati, xorg file and login artifacts or kicad: if you get artifacts upon logging in or if kicad rendering and zooming is slow, try adding [Option "EXAPixmaps" "off"] in the "Device" section of xorg config file. See here.
PRIME GPU offloading
If your hardware includes more than one GPU card you can make use of PRIME offloading. PRIME is a technology used to manage hybrid graphics found on recent desktops and laptops (Optimus for NVIDIA, AMD Dynamic Switchable Graphics for Radeon). PRIME detects both cards and automatically selects Intel card by default; using the more powerful discrete graphics card, when called, for more demanding applications.
In Manjaro this will automatically be available for hybrid graphics systems using intel/modesetting for the integrated card and free drivers (AMDGPU or Nouveau) for the dGPU.
You may choose to run a program with a specific GPU, prepending the application's command with DRI_PRIME=x, where x is the card priority number.
For example, to run an application using the second card prepend the application command with DRI_PRIME=1
To use the 1st card (usually when the CPU has an embedded GPU, this is used)
If you want to always run some application with the discrete gpu, you may copy that application's .desktop file to ~/.local/share/applications/ and edit the "Exec" property
Some applications (usually games like steam) may have an embedded option to specify the command line, where it is preferred to use this way.
For example, in Steam, select a game - that you want to run using your discrete Nvidia card - from the Library page of the Steam client, right-click, and select Properties. Click the SET LAUNCH OPTIONS. button and specify for the command line options followed by the default launch hook %command%.
To use the dGPU by default see Reverse Prime
If you have a Nvidia card, you have the option to use the proprietary (closed source = non-free) drivers instead of the open source (free) nouveau driver.
For Legacy/older nvidia cards, Manjaro maintains older drivers for compatibility. In these cases the driver name is different, instead of nvidia it is nvidia-390xx or nvidia340xx, whether in nvidia-only or bumblebee mhwd driver configuration.
When you install the non-free driver, mhwd includes a Nvidia utility "Nvidia Settings Utility" that can help you configure several settings. You can find this utility in your GUI Applications Menu or start it from a terminal
If you are using bumblebee, the nvidia utility needs a special command
Nvidia Optimus
For Optimus laptops or dual GPU hardware with intel and nvidia GPUs, you have three options to utilize the card driver usage at your preference or your hardware capabilities.
PRIME (mhwd default)
When you install Manjaro with the non-free option selected from Grub menu, or when you use automatic driver installation, PRIME or bumblebee is installed by default, depending on support for your GPU, PRIME being preferred. In these cases, the mhwd driver is named "video-hybrid-intel-nvidia-***xx-prime" or "video-hybrid-intel-nvidia-***xx-bumblebee".
Configure The Resolution/Refresh Rate
Warning The method provided does not currently work for the Cinnamon Edition. As soon as a solution is found, then this article will be updated.
1. Start nvidia-settings utility
2. Change resolution and refresh rate in 'X Server Display Configuration' tab.
3. Hit the 'Save to X Configuration File' button and save to /etc/X11/mhwd.d/nvidia.conf
4. Now start your terminal and enter the following command to complete the process:
Configure X Screen settings (OpenGL Settings, Antialiasing, X Server XVideo)
1. Start nvidia-settings utility
2. Change settings in X Server XVideo Settings, OpenGL and Antialiasing, in the 'X Screen' tab.
3. Click on 'nvidia-settings configuration' tab and click on the 'Save Current Configuration' button.
4. Save the .nvidia-settings-rc to the default location specified (/home/[your account name])
5. Edit the .xinitrc file with your preferred text editor. For example, if you use gedit, run this in your terminal:
6. Once opened, add the following line into the configuration file:
7. Save and exit.
Nvidia settings for special cases
In case your monitor is not entering powersave mode (DPMS), try adding `Option "HardDPMS" "true"` in your Xorg monitor section. For example:
nvidia-prime
Manjaro also offers an easy way to use PRIME with proprietary Nvidia drivers.
Simply select and install an 'nvidia-prime' profile through MSM or mhwd (such as video-hybrid-intel-nvidia-440xx-prime) and ensure the package nvidia-prime is installed.
Then to use the discrete Nvidia card it works the same as PRIME offloading above but uses a different command. Prepend the application command with prime-run. For example:
Bumblebee
Bumblebee configuration is mainly developed to help minimize laptop battery consumption, since Nvidia usually consumes significant power, while Intel cards are more power efficient. So, bumblebee detects both cards and automatically selects Intel card by default and can use the Nvidia for more demanding applications. For an application to use the Nvidia card, prepend the application command with optirun or primusrun. For example:
If you want to specifically run some application with the nvidia driver, you may edit that application's .desktop file "Exec" property, or run it in terminal like this
Some applications (usually games like steam) may have an embedded option to specify the command line, where it is preferred to use this way.
For example, in Steam, select a game - that you want to run using your discrete Nvidia card - from the Library page of the Steam client, right-click, and select Properties. Click the SET LAUNCH OPTIONS. button and specify for the command line options followed by the default launch hook %command%.
If you have problems with a bumblebee setup, refer to this Forum Tutorial for advice.
With this tool you can: - install graphic driver - switch graphic driver
Example output command:
Nvidia driver ( proprietary driver )
OpenGL vendor string: NVIDIA Corporation
OpenGL renderer string: GeForce GTX 660/PCIe/SSE2
OpenGL core profile version string: 4.3.0 NVIDIA 331.49
OpenGL core profile shading language version string: 4.30 NVIDIA via Cg compiler
OpenGL core profile context flags: (none)
OpenGL core profile profile mask: core profile
OpenGL core profile extensions:
OpenGL version string: 4.4.0 NVIDIA 331.49
OpenGL shading language version string: 4.40 NVIDIA via Cg compiler
OpenGL context flags: (none)
OpenGL profile mask: (none)
OpenGL extensions:
Nouveau , Gallium from Mesa ( open source driver )
OpenGL vendor string: nouveau
OpenGL renderer string: Gallium 0.4 on NVE6
OpenGL core profile version string: 3.1 (Core Profile) Mesa 9.2.5
OpenGL core profile shading language version string: 1.40
OpenGL core profile context flags: (none)
OpenGL core profile extensions:
OpenGL version string: 3.0 Mesa 9.2.5
OpenGL shading language version string: 1.30
OpenGL context flags: (none)
OpenGL extensions:
Intel driver from Mesa ( open driver )
OpenGL vendor string: Intel Open Source Technology Center
OpenGL renderer string: Mesa DRI Intel(R) Ivybridge Desktop
OpenGL core profile version string: 3.3 (Core Profile) Mesa 11.0.6
OpenGL core profile shading language version string: 3.30
OpenGL core profile context flags: (none)
OpenGL core profile profile mask: core profile
OpenGL core profile extensions:
OpenGL version string: 3.0 Mesa 11.0.6
OpenGL shading language version string: 1.30
OpenGL context flags: (none)
OpenGL extensions:
OpenGL ES profile version string: OpenGL ES 3.0 Mesa 11.0.6
OpenGL ES profile shading language version string: OpenGL ES GLSL ES 3.00
OpenGL ES profile extensions:
Cookie-файлы помогают нам предоставлять наши услуги. Используя наши сервисы, вы соглашаетесь с использованием cookie-файлов.
Читайте также: