
Как установить шрифт в clip studio paint
It is important to know how to install new brushes in Clip Studio Paint. After all, we just got some new and good looking brushes to have some fun with and we need to add them to the software! There aren’t as many Clip Studio Brushes around as we wish, but there’s still some very good material.
Besides, Clip Studio also has an Asset Store where you can buy or get for free new and different material, including brushes. Importing these brushes, both from the store or from a folder on your computer is pretty straightforward.
How can you import brushes in Clip Studio Paint? The easiest way is to simply drag the brushes from their folder into a Brush/Pen tab you have opened in Clip Studio Paint.
There are other ways to do it and depending on if you’re on a computer or an iPad, you’ll have to import them differently. I’ll explain each method right here, accompanied by images to make to whole process easier for you!
Importing Brushes In Clip Studio Paint
Importing Brushes in Clip Studio Paint is fairly easy, as long as they’re specifically made for Clip Studio. These brushes are usually named with the .sut extension! There are actually two ways to import brushes. A more complex one, but not too much, basically it just take quite a few extra steps.
And then the easiest one, which is very useful if you’re importing more than one brush!
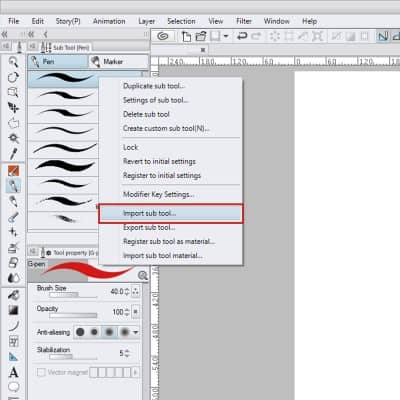
Let’s start with the first method. Go to your pen or brushes tab. It doesn’t really matter which since you can then move your new brush to any tab you want. But if you don’t want to have more work later on, choose the tab you’ll want to have your new brush on.
Right-click any brush in it. Again, it doesn’t really matter which one because it won’t replace it. Now go down and click ‘Import Subtool…’. A new window will open and you just need to find the location of your brush and select it. Click Ok and it’s done!
You’ll notice that the brush you just imported will be at the bottom of the list of brushes in that tab. If you wish to change its place simply click and hold it and move the brush to where you want it.
For example, you can create a new Subtool tab, by dragging it to the side of the tab you’re on. You can put it in another Subtool tab by dragging it to the top of an existing tab and releasing it. Finally, you can also create a new brush tool icon on the toolbar. You just need to grab it and drag it in between icons!
The second method is much more simple. You can actually use this method to add just one brush as well. Open up Clip Studio Paint, choose one of the brush or pen tabs. Whichever you prefer. Now open the folder where you have your new brushes.
Select as many as you wish and drag them to the brushes tab. That’s it! The brushes you just imported will appear right away and are now ready to use.
How To Import Brushes Into Clip Studio Paint For iPad
There are different ways to import your Brushes into Clip Studio Paint for iPad. The main difference is where you have them stored. You can save your brushes in the Dropbox, for example.
First, you should open up Clip Studio Paint, and choose one of the brush or pen tabs. Make sure that’s where you want your new brush to be in. Now go to the Dropbox app and select the brush you want. Select ‘Export -> Open In…’, now choose Clip Studio!
And that’s it! If you go back to Clip Studio, you’ll notice your new brush in the tab you left open. If not, try to close and open Clip Studio again to refresh it.
Other than Dropbox, you can also import your brushes from Google Drive! Just like before, be sure the tab where you want your brush to go is open in Clip Studio Paint. Then select the brush you want in Google Drive, select ‘Open In…’ and then ‘Copy to Clip Studio’.
Your new brush should now be ready to use!
Notice that you should have each individual .sut file available both in Dropbox and Google Drive instead of a .zip folder. Be sure to unzip the brushes you want and then you can import them.
Unfortunately, I don’t know of any way of importing more than one brush at a time. You need to go one by one. Still, it is rather simple to import your brushes and once in Clip Studio Paint you can move them to any tab you want, just like we do on the computer!
How To Download Brushes From Clip Studio Assets
Clip Studio Paint has a very handy tool where you can download new and different material. It can be brushes, models, textures, etc. There’s a lot you can find there and they’re made by other artists and Clip Studio users. There are paid assets, but there’s also a vast array of free assets that you can download and use!
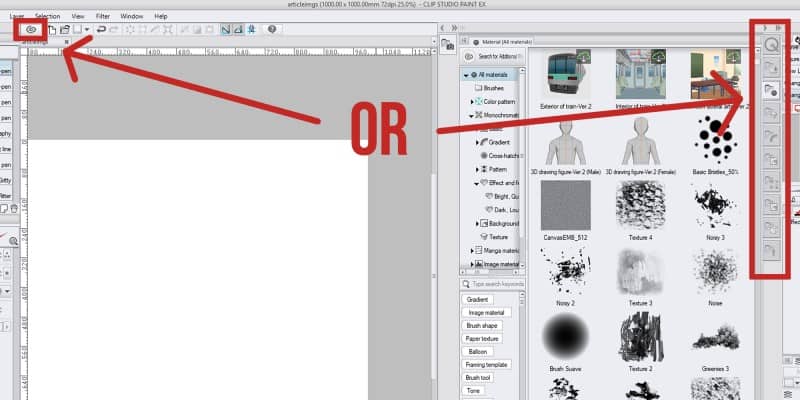
To access this, simply open the Material Tab and then select the ‘Search for Additional Materials’ button. Alternatively, you can also click the third icon on the tab below the menus!
To download a brush, you need to have a Clip Studio account. Be sure to register and login before trying to download anything, because it will ask you for it!
Now that you’re set, feel free to search for brushes or other materials. If there’s something you want to use on Clip Studio, simply open it and then click the ‘Dowload’ button to the right.
When you download a brush, you can then go back to Clip Studio Paint, go to the Material bar on the right side of your screen and go to the ‘Download’ folder. The brush you just downloaded should appear there!
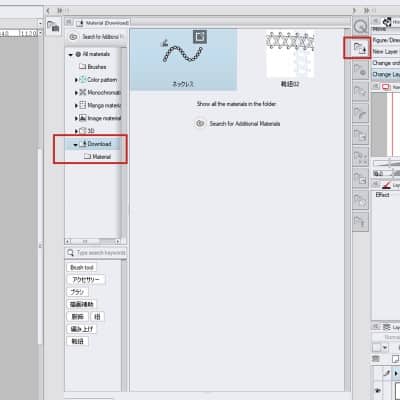
If you had this folder already open, you might need to click another folder and then go back to the downloaded material so it refreshes.
Now you just need to grab your new brush and drag it to the Pen or Brush tab you have selected! The brush you downloaded is now ready to use.
Again, you can move it to another tab if you wish to. Just click on it and drag the brush to where you want it to be!
All material assets that you download can be used both for non-commercial and commercial uses. So feel free to explore the materials available and try them out. You can always credit the people that made the assets so other people can find their work as well and use it!
Additional Questions
How do I export clip studio brushes? To export a brush, simply right-click on it then select ‘Export Subtool…’. Choose a location and save it. You can create your own brushes in Clip Studio and export them to share or sell with other people!
Can I give the downloaded material to another person? No. When downloading something from the Asset store you cannot give it to someone else nor sell it as your own. If you want another friend to use it, simply show it to them, so they can download the material as well!


Allows you to configure the type and size of letters and the like when using the [Text] sub tool, or when the [Text layer] is selected with the [Object] sub tool.

Some settings may not display depending on the selected tool or sub tool.
(1) Font
Displays a font list from where you can select the one to use. For the font list, see " Font List " .
Windows fonts (extension: fon) cannot be selected from the font list.
(2) Mixing font [PRO/EX]
Configures addition and deletion of mixing fonts. Mixing font is a combination of font and size configured for each type of letter.

Creates a new mixing font. Clicking the item displays the [Create mixing font] dialog box.
Changes the settings for the mixing font selected in [Font]. Clicking the item displays the [Create mixing font] dialog box. The item is not displayed if there is a text being edited.
Changes in the mixing font settings are not reflected in texts with mixing fonts input before the changes were made.
Deletes the mixing font selected in [Font]. The item is not displayed if there is a text being edited.
(3) Size
Adjusts the letter size in points or Q.
(4) Horizontal ratio
Scales the size of text up/down in the horizontal direction. Specifies the horizontal direction size as a percentage.
(5) Vertical ratio
Scales the size of text up/down in the vertical direction. Specifies the vertical direction size as a percentage.
(6) Word space
Configures the space between letters in points or Q.
The unit of [Size] and [Word space] can be toggled between points (pt) and Q. It is configured by [Text unit] under [Ruler/Unit] → [Unit] on the [Preferences] dialog box that displays when [File] menu ([CLIP STUDIO PAINT] menu in mac OS version) → [Preferences] is selected.
(7) Character spacing
Sets a blank space at the front and back of text. The larger the value, the closer together text is spaced.
(8) Style
Configure one of the following styles.

Makes the letters thick.
Leans the letters to the right.
Adds an underline to the text. This item does not display for vertical text.
Adds a strikeout to the letters. This item does not display for vertical text.
Horizontal text and vertical text can be switched with [Text direction] in the [Text] category. For details, see " Text " .
(9) Open face
When turned on, converts letters into open face. The thickness of the open face may be selected from [Open face (light)] and [Open face (bold)].
(11) Color *
You can change the color of the selected text. Clicking color shows the [Color Change] dialog box where you can change the color of the text.
For details on the [Color settings] dialog box, see " Color settings Dialog Box " .
(12) TateChuYoko (Horizontal in Vertical)
When using vertical input, only the selected text is set to horizontal. Select half width alphanumeric characters one character at a time to display them in the same orientation as vertical characters.
[TateChuYoko (Horizontal in Vertical)] can be set only for the entered text by setting [Auto TateChuYoko (Horizontal in Vertical)] to [None]. For details on [Auto TateChuYoko (Horizontal in Vertical)], see " Text " .
Font List
This is a screen displayed when selecting a font. It allows you to configure settings such as switching of the [Font list] to display, method of displaying the fonts, and so on.

(1) Font list
Displays a list of available fonts.
To display more fonts in the [Font list], resize the list of [Font list] dialog box by dragging one of the edges.
(2) Display font name
Displays only the font name on the [Font list].

(3) Display font name in specific font
Displays each font name on the [Font list] using the corresponding font.

(4) Display text in specific font
Previews the selected text on the [Font list]. Sample alphanumeric characters and hiragana are displayed if a text is not selected.

(5) Switch font list
Switches the [Font list] to display. You can create and edit the [Font list] with the [Settings of font list] dialog box that displays when you click [Settings of font list]. For details on the [Settings of font list] dialog box, see " Settings of font list Dialog Box " .
(6) Settings of font list
Displays the [Settings of font list] dialog box, which allows you to configure a [Font list]. For details on the [Settings of font list] dialog box, see " Settings of font list Dialog Box " .
(7) Search for fonts not in this list [iPad/iPhone]
If the fonts installed on your device are not listed in the font list, you can add them here.
Tap to display the OS's FontPicker. When you select the font you want to use, it is added to the font list.
[Search for fonts not in this list] shows on iPad iOS 13 or later. This will not display on other devices.
Settings of font list Dialog Box
A dialog box that displays when [Settings of font list] is clicked. Allows you to manage, such as create, edit, and delete [Font list].

(1) Font list
Displays a list of [Font list].
(2) Create new
Creates a new [Font list]. When clicked, adds a [Font list] to the list of [Font list] and at the same time, enables the selection of fonts from [Available font].
(3) Change name
Changes the name of the [Font list] selected on the list of [Font list].
You can also change the name of a [Font list] by double clicking its name on the list of [Font list].
(4) Duplicate
Makes a copy of the [Font list] selected on the list of [Font list].
(5) Delete
Deletes the [Font list] selected on the list of [Font list].
(6) Available fonts
Allows you to select a font to display on the [Font list]. Selecting the font to display from [Available fonts] and turning on its check box adds the font to the [Font list].
· If [Available fonts] is displayed empty, select the [Font list] from the list of [Font list].
· To display more fonts in [Available fonts], resize the [Settings of font list] dialog box by dragging one of the edges.
(7) Display font name
Displays only the font names on [Available fonts].
(8) Display font name in specific font
Displays each font name on [Available fonts] using the corresponding font.
(9) Select all
Selects all fonts displayed on [Available fonts].
(10) Deselect all
Deselects the selection of all of the fonts displayed on [Available fonts].
Create mixing font Dialog Box [PRO/EX]
Use this dialog box to configure a mixing font.

(1) Mixing font
Input a name for the mixing font. This item cannot be input when the dialog is displayed as a result of clicking [Change] for [Mixing font].
(2) Default
Configures the default font. The default font applies when the font and letter size settings are disabled.
By default, the font configured in [Font] on the [Tool Property] palette or [Sub Tool Detail] palette displays.
(3) Font
Configures the font type and size for each letter type.
Enables/disables the font and size settings.
Type of letter to which a mixing font can be configured. The following options are available: [Hiragana/Katakana], [Chinese character], [Signs], [Single-byte numbers], [Singly-byte alphabet], [Punctuation mark] and [External character].
Displays a font list from where you can configure the one to use. For the font list, see " Font List " .
Specifies the letter size in %. The letter size changes based on the value configured for [Size] on the [Tool Property] palette and [Sub tool detail] palette.
Manga and comic fans have Clip Studio Paint at their disposal to turn any graphic story they can think of into reality. Developed by the Japanese company Celsys, this raster graphics editor offers unique tools that facilitate the digital creation of comics, but it also has traditional options to design any type of drawing. Among them is the option to add texts, but its default collection could be very limited for many artists. That is why today we will teach you how to add fonts to Clip Studio Paint.
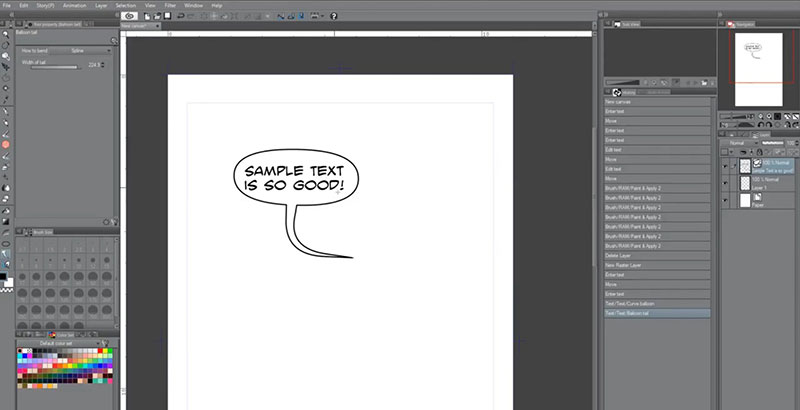
The program started as an illustration application for Mac OS X, but nowadays has versions for Windows and iPad. Among the most notable tools in Clip Studio Paint are the creation of speech bubbles, inking drawings, managing multiple pages, applying textures, 2D animation, and many other options.
Of course, if the software allows the creation of speech bubbles, it means that it must have the option of adding text to them, otherwise, the comics would be incomplete. The problem is that some works don’t get the necessary character using the default Clip Studio Paint fonts.
If you have found yourself in this predicament, you should know that you can update its font gallery, and the process is very easy. It will even work for other programs.
Side note: Do you want to increase your chances of getting a better design job? Get a Graphic Design Specialization from CalArts (California Institute of the Arts).
What is a font?
Fonts on a computer are graphic representations of characters, which help the user to read or print documents. Typically, fonts can be manipulated.
Get 300+ freebies in your inbox!
Subscribe to our newsletter and receive 300+ design resources in your first 5 minutes as a subscriber.
Thank you!
One more step is needed. Please check your inbox for the newsletter confirmation email.
In graphic design, a font can make the difference between striking text and expressionless text. Moreover, when it comes to creating expressive characters, texts are necessary.
What fonts can I install?
Operating systems support a wide variety of font files, so you shouldn’t be concerned about the type of file you download.
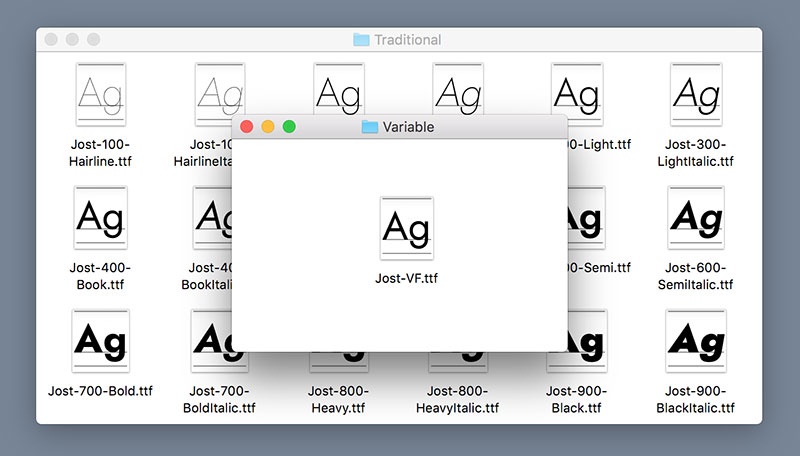
Among the file types you can get are OpenType (OTF), OpenType SVG (SVG), True Type (TTF), Variable Fonts, Multiple Master, Composite, and Adobe Fonts.
The magic of Clip Studio fonts
Animation and comics require a special approach regarding texts. In traditional advertising jobs, the fonts must be eye-catching, while in academic or business presentations, the font must be legible. In comics, this too is important, but you should also use glyphs that show emotion.
Artists generally prefer to use comic fonts that help them express emotions. Irregularly patterned letters that keep the comic looking lively despite being static images.
Although many designers hate such irregular fonts, the most innocent, cartoonish, or expressive projects could not live without them.
How to add fonts to Clip Studio Paint – Windows
Manual method
The installation of your new font will be done directly on the computer and not inside Clip Studio Paint. This means that you can even use them in other programs once they are installed.
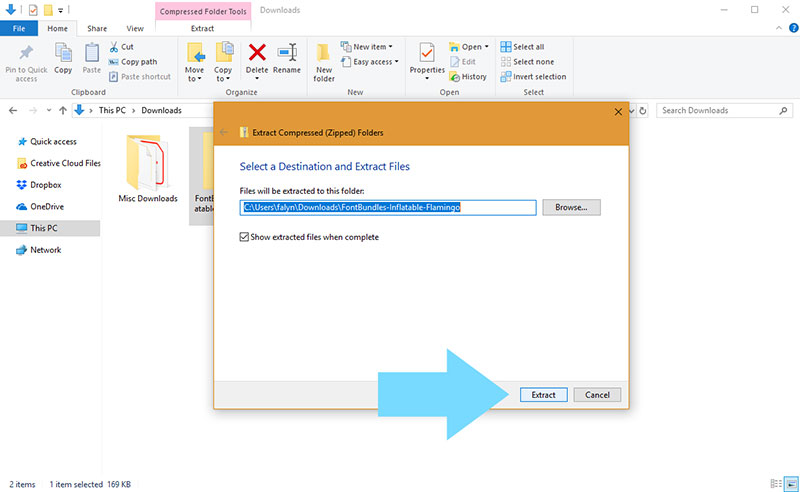
- The first step is to download the font you want to install. You can find many options online with a simple search, or you can even download them from the Adobe library. Please note that these files will probably come compressed into a RAR or ZIP that you will need to unzip.
- The unzipped file should have some OTF, TTF, SVG, TFF, EOT extension.
- Proceed to close all the programs that are running so that the installation is done without errors.
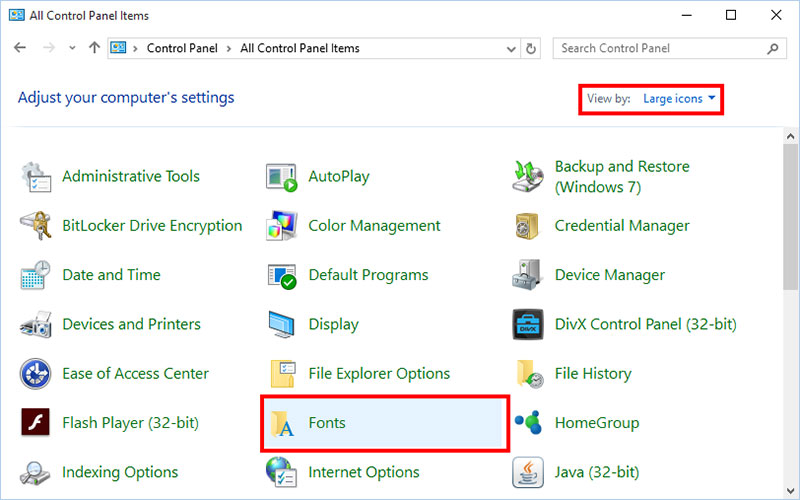
- Keep at hand the file you want to install to find it easily. Now you must open the Control Panel to find the Operating system’s Fonts folder.
- In Windows XP, the Control Panel is located within “MY Computer”, while in Windows Vista and later versions you will find it in the Start menu, in the Windows symbol in the lower-left corner
- Find the “Appearance and Personalization” menu. In it, you should find a sub-menu called “Fonts”. You will recognize that it is the right folder because you will see many font files.
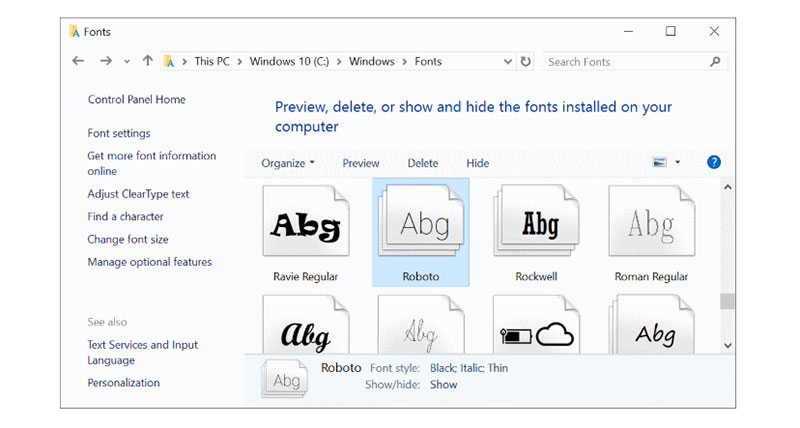
- Drag, or Copy and Paste, your new font into the Fonts folder, and it should install automatically.
Automatic method
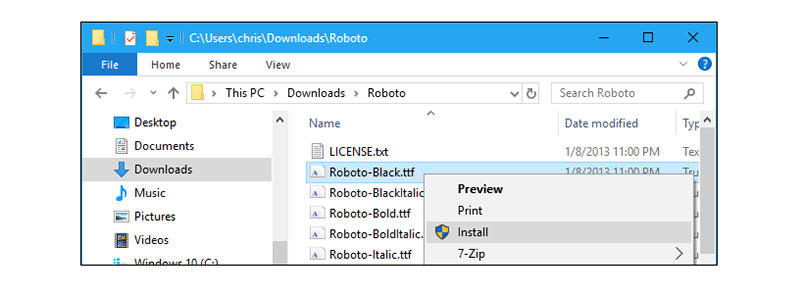
You can add a font to Clip Studio Paint or your PC in an even simpler way. Just right-click the TTF files and you should see an “Install” option in the drop-down menu.
Remember that before doing this process, you must close all the running programs. Once finished, you can restart them to check if your new font has been installed.
With this technique, you can also install multiple fonts at the same time, you just have to select them all and then right-click on one to press the “Install” option.
It is best to do these processes using administrator permissions so that the changes apply to all users. If you see a shield next to the “Install” option, the process will be done with administrator privileges.
After finishing any of the methods, you can open Clip Studio Paint or any other program that allows you to enter texts to check if the font was installed. Once you check it, you can delete the file you downloaded.
How to add fonts to Clip Studio Paint – Mac
Automatic method

- Close all running programs. It is recommended to restart the computer at the end of the process, so you should save any project you are doing
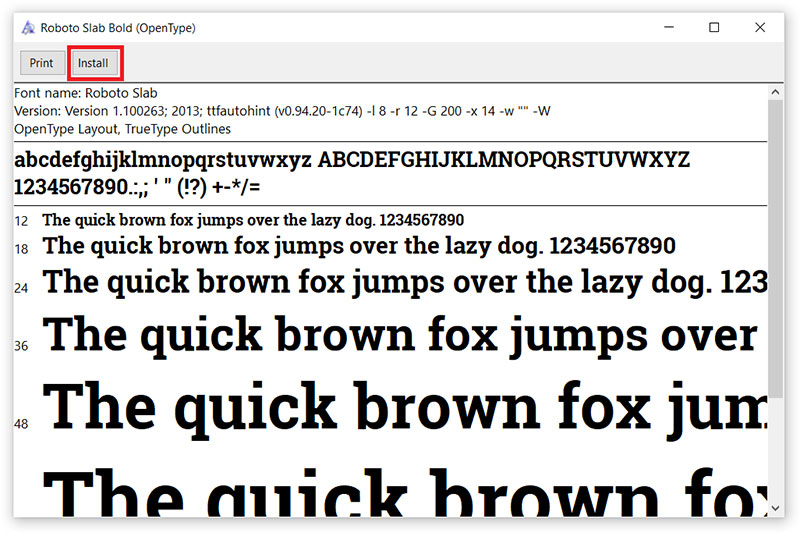
- With the font downloaded and unzipped, double-click it. If the font is compatible with Mac OS X, the Font Book application should open.
- Font Book will show you a preview of the font to be installed. You can change some options, as well as allow other users to use the font. When you are done, press the blue “Install” button.
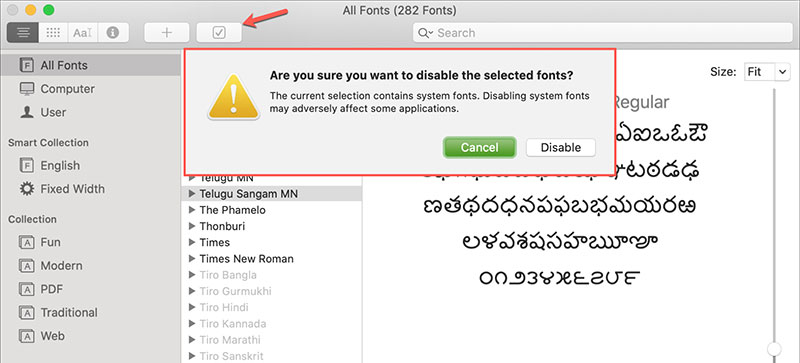
- From Font Book, you can also disable fonts that you don’t want to use. Just select it, click the “Edit” button and then “Disable”. This will hide the glyphs without removing them from your system.
Manual way
Alternatively, you can install the font on Mac manually.
- Select a Volume from your hard drive. You can do this with the Finder browser (the smiley face icon).
- Look for the “Library” folder, and then the “Fonts” directory. Just copy and paste the font file you downloaded in it.
Remember to close the running programs and restart the computer when finished. Now you can check in Clip Studio Paint if the font has been installed.
How to add fonts to Clip Studio Paint – iPad

Adding fonts to Clip Studio Paint is so easy that it can even be done in the iPad app. For this, you only need to synchronize the application with your Clip Studio Cloud account, and the fonts you have stored in the cloud will be installed.
You can also do this manually by synchronizing the iPad from iTunes. When you select Clip Studio Paint in the applications list, you will see a box called “Clip Studio Documents” where you can install the fonts.
Now you know how to add fonts to Clip Studio Paint in any of its versions. We do not recommend that you install many fonts at the same time, as they could end up slowing your work.
How to find the installed fonts in Clip Studio Paint
Clip Studio Paint has three different ways to find a font, adapting to any user.
- The first option is very similar to the one used in Office programs. You can find it on the left side with an A icon with horizontal lines. Clicking it will display a list without a preview of available fonts.
- The second option, located in the center, will display the same list, but in this case, it will do so with a preview of the font.
- The third option, located on the right, serves to preview the text that you highlight with the new font. This last alternative is not so useful on small screens.
You can resize the font panel in Clip Studio Paint, but there is no way to save these changes for future sessions.
If you enjoyed reading this article on how to add fonts to Clip Studio Paint, you should read these as well:
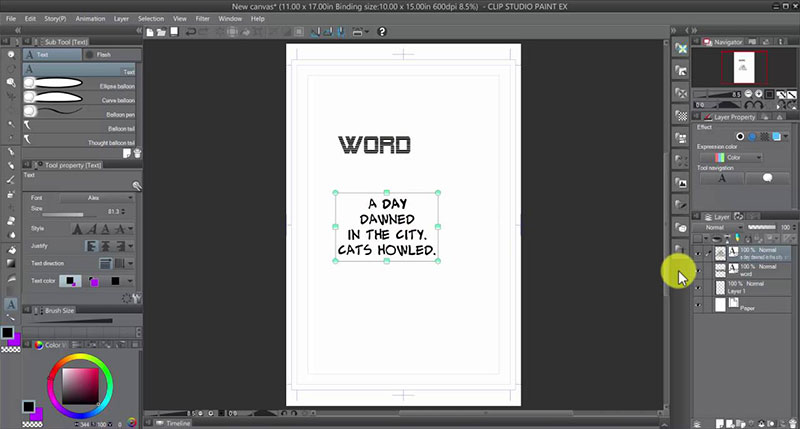
Choosing a font in Clip Studio Paint can be a pain in the neck. But there is some help if you click some tiny buttons. It’s just a little hidden.
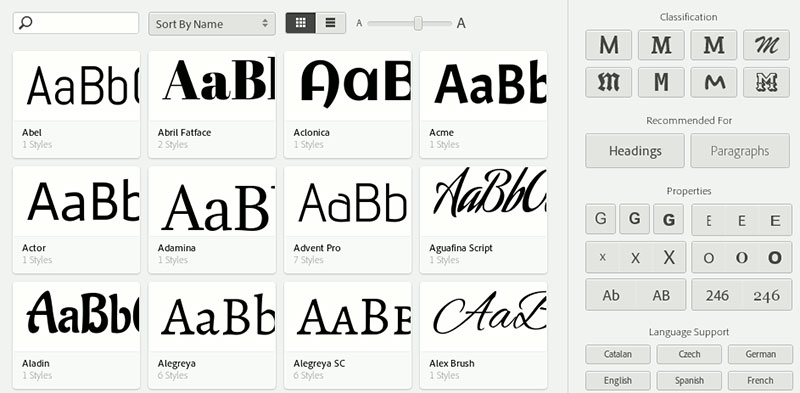
In the Text tool properties, click on the Font drop down too show a list of fonts available for your use.

If you have a lot of fonts installed in your system — and you can see I’m pushing 1000 here — that drop down list is prohibitively long. Remembering what each font looks like by name is a skill that I don’t have. Clip Studio Paint can help you out a little, though, by listing the fonts in three different ways.
At the bottom, you’ll see three tiny buttons. I hope you have a big screen.
Here, let me zoom in on it for you.

I’ll cover them from left to right:
2. The middle button, though, shows the font list in alphabetical order in the style of the font, itself. (I like the looks of AppleGothic as a font…)

3. The button on the right will list the fonts in alphabetical order using the highlighted text instead of the font name, but in the style of the font. It’s a nice idea, but it’s so small on your screen that it’s still hard to judge.
Also, as you use CSP more, you’ll find yourself relying on a core set of fonts. You’ll start remembering their names and choosing them based on that. At some point, all the fonts trying to be Helvetica start to blend together, and this method will suffer.
If you have no text highlighted, Clip Studio Paint will give you a default selection of text with letters and numbers, as seen in the screen shot above.
Bonus Tip: View More Fonts

The pane that shows the list of fonts is re-sizable. Assuming your pane is on the left side of the screen, grab the lower right corner and drag it away to increase the number of fonts on display. Clip Studio Paint will not remember how you had resized it the next time you go back to the list, though.
The Take Away
In a perfect world, the highlighted text in the image would change as you hovered over each font. That kind of early preview would be very helpful.
Choosing between these three settings might help you focus in on just the font you want to select. Personally, I like the middle option the best. It’s not as legible as I’d like it to be, but it’s clear enough. Extending out the size of the window is nice, but gets tedious after doing it too many times in a row.
If you rely on a core set of fonts, you can simplify this process a lot by making a new font list, which we will cover later this week.
Bonus Q&A
How To Add Fonts to Clip Studio Paint?
The fonts you see in Clip Studio Paint come from your operating system’s font library. If there’s a font you want to use in CSP, add it to your computer’s font library and it’ll appear inside CSP. (In the Mac’s case, double click on the font file to open it in FontBook and then click the “Install Font” button.)
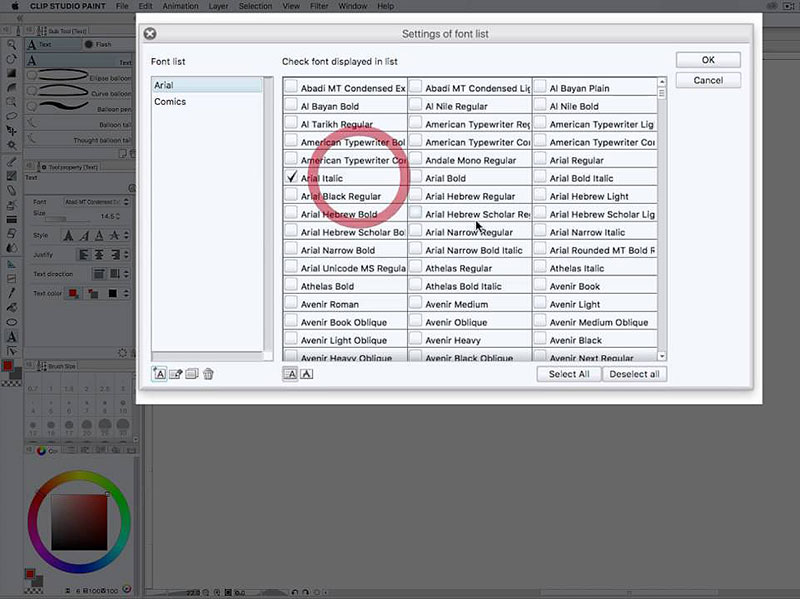
How Can I Better Organize My Fonts Inside of CSP?
Glad you asked, because I have a whole article on that. Go read “Finding Fonts Easier With Font List.” It’ll show you how to create collections of fonts so you can find them easier. It’s a technique that’s specific to CSP.
Clip Studio Paint breaks your art creation tools into three categories: Pens, Pencils, and Brushes. It’s completely arbitrary, but it is suggested that you organize your tools along those lines just for sanity’s sake.
In this tutorial, I’ll show you how to add a brush, move a brush around to a different category, create and delete a new category, and delete the brush. As a bonus, I’ll also show you the trick for how to add multiple pencils or pens or brushes at once.
Grab a New Brush
First, download the brush/pen/tool/what have you to a directory of your choosing. Remember where it is. This will be important.
Here, I have a pack of brushes I picked up from the DAUB Brushes site, all together in their own directory.
OK, go back to Clip Studio Paint.
Preparing to Add a New Brush
The big trick with this process is that you need to pick where you want to install your brush to before you install it.
First, push “B” to go to the brushes.

On my screen here, you can see I have three tabs named “Watercolor”, “Oil Paint,” and “India Ink.”
Keep in mind: These distinctions are completely arbitrary. They’re ultimately meaningless. You could put pens and pencils in here for all Clip Studio Paint cares. But, for consistency’s sake and your own mental health, I suggest running with this categorization of the tools. Keep the brushes together in one spot, pens in another, and pencils in a third.
For this example, I want to add an ink brush to my tool set. So let me click on the India Ink tab first.
Import the New Brush
To add my new brush to this category, I click on the little button in the upper left corner here with the three lines and the arrow. The documentation refers to it as a “menu,” so we’ll call it the Brush Menu here.
That brings up some possibilities. We want to “Import Sub Tool…”

That will pop open a file picker. Sub tools have “.sut” file extensions. If your Finder is set up to show file extensions, you can read it easily enough, but don’t worry: Any files that aren’t tools will be grayed out in any case, so don’t worry about it.
Also, you can only add one brush at a time this way. You can’t shift click to get a bunch at one time, or CTRL-CLICK to pick other individual tools. Don’t bother trying.
Just pick the one you want and click OPEN. Or just double click the file name.
Magically, your File Picker closes and BAM! your new tool is there at the bottom of the list.

Congratulations on importing your first brush.
Move the Brush Around
Now, you can drag and drop it somewhere else in the list if you want to change the order around.
You can even create a new tab by dragging this brush into an empty spot amongst the tabs. This will create a new family of tools, which will be automatically named after this brush, in particular. You can then right click or CTRL-click on that name to change it if you wish.

You can move the tool to any other tab from that new tab by dragging and dropping it to another tab. And, if it was the only tool in that beginning tab, that tab will disappear. It lost its raison d’etre there.
For those of you who prefer a good animated gif, I give you this:
Deleting Brushes

To get rid of the brush, itself, you can right click or CTRL-CLICK on the brush and choose “Delete sub tool.” You will get a confirmation box before the deed is done. You won’t see one in this example because I once clicked the “Do Not Show Me This Window” option, so it never pops up for me anymore..
If you DELETE a tool like that when it’s the sole tool in a tab, the tab will disappear also. It’s not just moving the tool that will collapse the tab, but also deleting it.
Here, I’ll show you:
Import Tool. Move it to create a new tab. Right Click and delete tool. The tab is now gone along with the brush.
Multiple Brushes
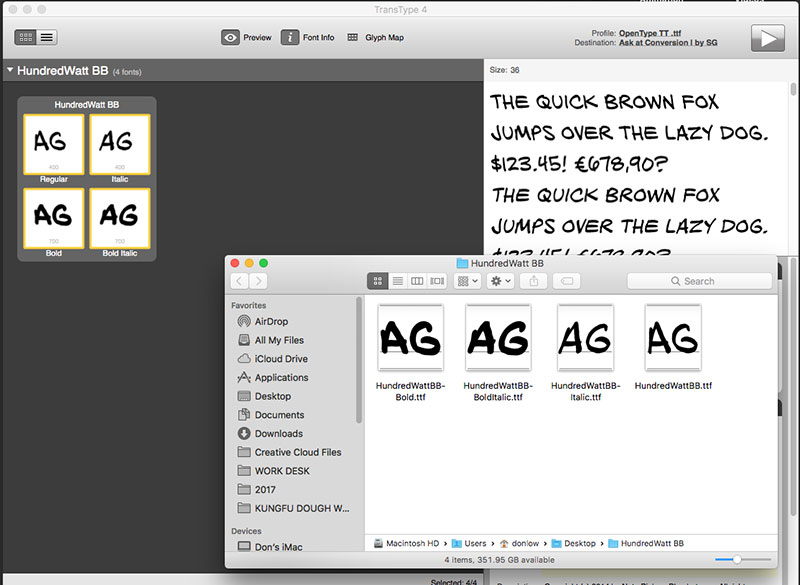
There is a trick to adding multiple brushes at once. You have to open a Finder window on the screen. Here’s where you can CTRL-click individual brushes, or just shift-click to highlight a bunch that are already in a row.
Then, click back to Clip Studio Paint. Now, drag and drop that brush or bunch of brushes to an empty spot in the tab where you want to add them. In the animated GIF below, I have the Finder window inside of Clip Studio Paint’s proscenium of tools, just behind were an image I’d be working on would be. You can also move brushes over to Clip Studio Paint from a window on another monitor, if you have one.
The trick here is that both the Finder window and CSP have to be visible at the same time. If you have that, you can pull this off.
After that, you can move them around to the different tabs if you so choose. Remember: stay organized!
There is no way to delete a group of tools at the same time. At least, none that I know of yet. Leave me a comment if you know that trick.
And that’s how you add, move around, and delete brushes, pens, and pencils.
Читайте также: