
Как установить glut на visual studio 2017
OpenGL + vs2017 + конфигурация 64-разрядной среды разработки Windows10
Когда мы занимаемся программированием OpenGL, нам нужно создать окно для отображения графики, и нам нужно получать события от мыши и клавиатуры. Но OpenGL - это только интерфейс для графики. Он кроссплатформенный. Что касается того, как создавать окна и контролировать ввод-вывод, реализована собственная библиотека платформы. Например, окна могут использовать методы в windows.h для создания окон, но использовать свою собственную библиотеку для создания Windows обычно вызывает особые хлопоты. Так что бог графики Марк Килгард не мог усидеть на месте, а звук пушки нас перегрузил. glut (служебная библиотека OpenGL) предоставляет нам унифицированный интерфейс для облегчения управления окнами, мониторинга ввода-вывода, а также включает некоторые функции рисования трехмерных объектов, которые используются для рисования конкретных и более сложных объектов, таких как сферы, круглые поверхности, Чайник и т. Д. А перенасыщение является закрытым исходным кодом и не обновляется с 2000 года, так что это gg. Freeglut - это версия перенасыщения с открытым исходным кодом, которая поддерживается и обновляется специальным персоналом.
Glew - это кроссплатформенная библиотека расширений C ++. Похоже, что она упрощает платформу управления, а версия opengl не совпадает, а также упрощает поддержку уникального аппаратного интерфейса для различных видеокарт. Window в настоящее время поддерживает только OpenGL 1.1, но OpenGL теперь разработан до версии выше 2.0. Чтобы использовать эти расширенные функции OpenGL, вы должны загрузить последние расширения. Кроме того, различные производители видеокарт также выпустят некоторые, которые имеют только свои собственные видеокарты. Поддерживаются только функции расширения. Если вы хотите использовать эти числа, вам нужно найти последний файл glext.h. С библиотекой расширений GLEW вам больше не нужно беспокоиться о том, что вы больше не найдете интерфейс функции, потому что GLEW может автоматически Определите все расширенные расширения OpenGL, поддерживаемые вашей платформой. Другими словами, пока вы включаете файл заголовка glew.h, вы можете использовать все функции gl, glu, glext, wgl и glx. GLEW поддерживает различные популярные операционные системы (включая Windows, Linux, Mac OS X, FreeBSD, Irix и Solaris).
Чтобы настроить OpenGL для vs2017 под Windows 10, воспользуйтесь следующим методом:
Шаг 2 Нажмите на GLUT for Microsoft Windows 95 & NT users , Найдите заголовок «GLUT для пользователей Microsoft Windows 9X, ME, 2000, NT и XP»
Шаг 3 Нажмите на glutdlls37beta.zip Готов к скачиванию
- Чтобы выбрать собственную платформу, если CMake установлен и версия слишком мала, вы можете удалить старую версию.
- Для платформы Windows я рекомендую выбирать загрузку с расширением .msi, что более удобно для установки.
шаг 1 Разархивируйте glutdlls37beta.zip
распаковать и обнаружить, что он содержит glut.dll glut32.dll glut.lib glut32.lib glut.h 5 файлов
Шаг 2 Будет glut.h Скопируйте в каталог установки vs2017
Найдите каталог, в котором установлен vs2017, путь D:\Program Files\Microsoft Visual Studio\2017\Community\VC\Tools\MSVC\14.16.27023\include , Создайте файл с именем gl Папку и извлеките полученный glut.h Копия файла
Шаг 3 Будет glut.lib , glut32.lib Скопируйте в каталог установки vs2017
Найден путь D:\Program Files\Microsoft Visual Studio\2017\Community\VC\Tools\MSVC\14.16.27023\lib\x86 , Распакованный glut.lib , glut32.lib Скопируйте это
Шаг 4 Будет glut.dll , glut32.dll Скопируйте в каталог установки vs2017
Наконец, распакуйте его glut.dll с glut32.dll скопировать в C:\Windows\System32 В папке (32-битная система) или C:\Windows\SysWOW64 (64-битная система)
3.1 Используйте cmake для компиляции freeglut
Скопируйте папку GL из каталога D: \ OpenGL \ freeglut \ freeglut-code-1792-tags-FG_3_0_0 \ include в каталог include файла VC в каталоге установки VS2015. Например, мой - D: \ visual studio 2015 \ ВК \ включить
Откройте bin \ Release \ freeglut.dll и bin \ Debug \ freeglutd.dll целевой папки, созданной CMake, и переместите их в корневой каталог C: \ Windows \ system32 и C: \ Windows \ SysWOW64.
Откройте CMake для создания целевых папок lib \ Release \ freeglut.lib, freeglut_static.lib и lib \ Debug \ freeglutd.lib, freeglut_staticd.lib и переместите их в каталог D: \ visual.studio2015 \ VC \ lib \ amd64.
4.1 32-битная конфигурация Glew
1. Распакуйте файл glew-1.9.0-win32.zip, чтобы получить три папки: bin, include, lib и doc.
2. Скопируйте три файла заголовков glew.h, glxew.h, wglew.h из папки GL в папку include в D: \ ProgramFiles (x86) \ Microsoft Visual Studio 10.0 \ VC \ include \ GL. (В зависимости от моего места установки VS2010).
3. Поместите четыре файла библиотеки glew32.lib, glew32mx.lib, glew32mxs.lib в папку lib,
Скопируйте четыре библиотеки статических ссылок glew32s.lib в D: \ Program Files (x86) \ Microsoft Visual Studio10.0 \ VC \ lib.
Примечание. В случае возникновения ошибки рекомендуется одновременно скопировать freeglut.dll в C: \ Windows \ SysWOW64.
4.2 Конфигурация Glew64-bit
2. Скопируйте три файла заголовков glew.h, glxew.h, wglew.h из папки GL в папку include в D: \ ProgramFiles (x86) \ Microsoft Visual Studio 10.0 \ VC \ include \ GL. (В зависимости от моего места установки VS2010).
3. Поместите четыре файла библиотеки glew32.lib, glew32mx.lib, glew32mxs.lib в папку lib,
Скопируйте четыре библиотеки статических ссылок glew32s.lib в папку D: \ Program Files (x86) \ Microsoft Visual Studio10.0 \ VC \ lib \ amd64. Обратите внимание, что именно здесь находится 64-разрядная библиотека статических ссылок.
Примечание. В случае возникновения ошибки рекомендуется одновременно скопировать файл freeglut.dll в C: \ Windows \ System32.
Откройте vs2017 и создайте новый пустой проект C ++:
файл->Новый->проект->Мастер рабочего стола Windows->Пустой проект

Вставьте следующий код:

результат операции
Если вы можете успешно запустить приведенный выше код и получить указанные выше результаты, значит, ваша конфигурация успешна.
В противном случае измените конфигурацию.
Тот, что установлен выше, GLUT , Пока в«Конфигурация 64-разрядной среды разработки OpenGL + VS2015 + Win10» В этой статье описывается, как установить в win10 FreeGLUT 。
Open Graphics Library is a cross-language, cross-platform application programming interface for rendering 2D and 3D vector graphics. The API is typically used to interact with a graphics processing unit, to achieve hardware-accelerated rendering.
To execute your graphics applications written using OpenGL libraries, you can use Visual Studio.
Microsoft Visual Studio is an integrated development environment (IDE) from Microsoft. It is used to develop computer programs, as well as websites, web apps, web services and mobile apps.
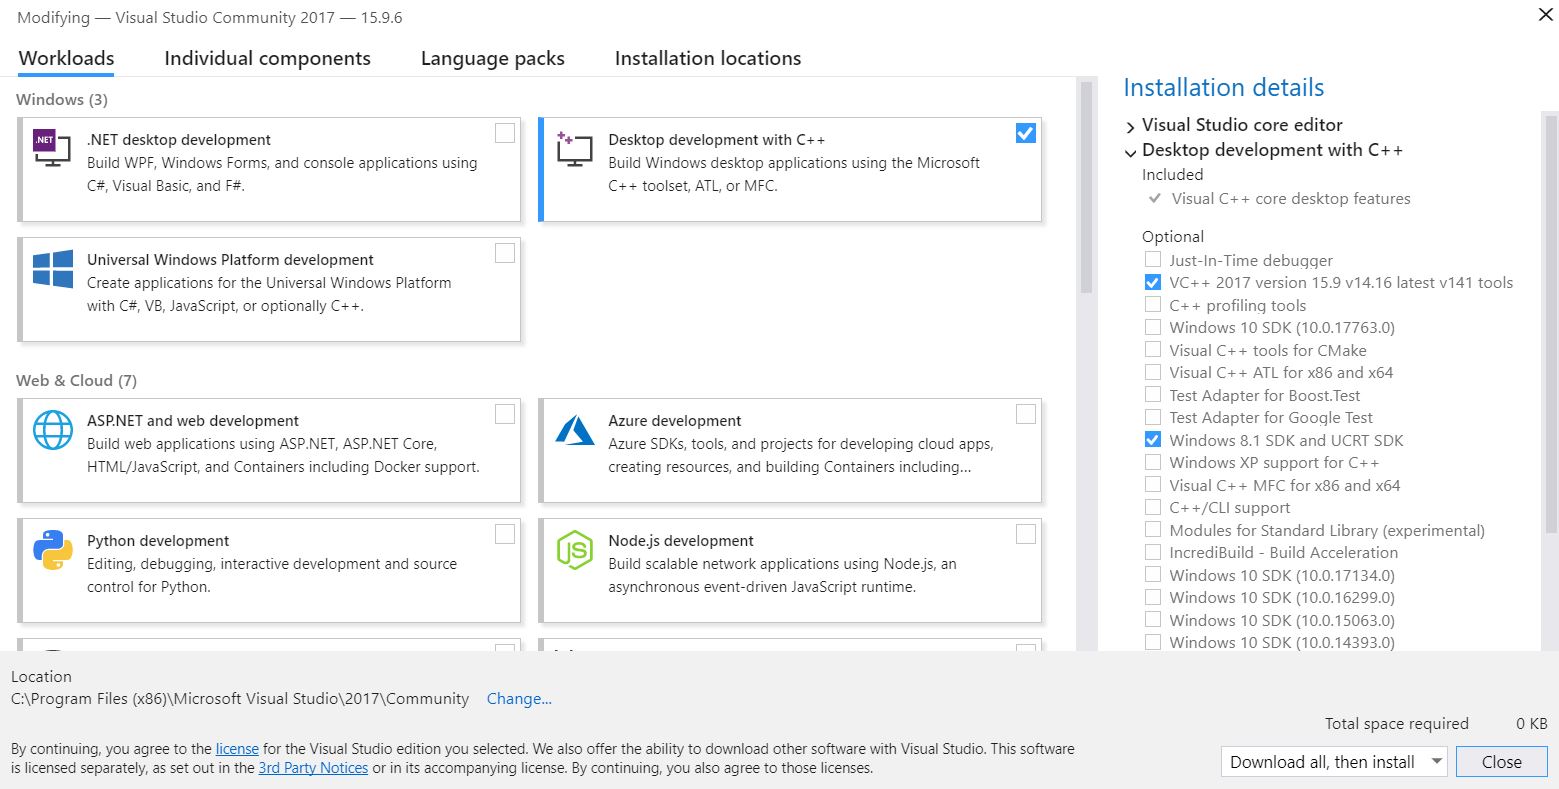
Install Visual Studio Community 2017 using the official installer with the required components as shown in the image below.
Download GLUT header, lib, and dll files from OpenGL. (Mentioned on this page)
Paste glut.h in C:\Program Files (x86)\Microsoft Visual Studio\2017\Community\VC\Tools\MSVC\\include\GL .
Create the GL folder if not present already. The may differ on your system.
Paste glut.lib in C:\Program Files (x86)\Microsoft Visual Studio\2017\Community\VC\Tools\MSVC\\lib\x64 .
Paste glut32.lib in C:\Program Files (x86)\Microsoft Visual Studio\2017\Community\VC\Tools\MSVC\\lib\x86. The may differ on your system.
Paste glut.dll and glut32.dll in C:\Windows\SysWOW64 .
Copy glut32.dll to C:\Windows\System32 also.
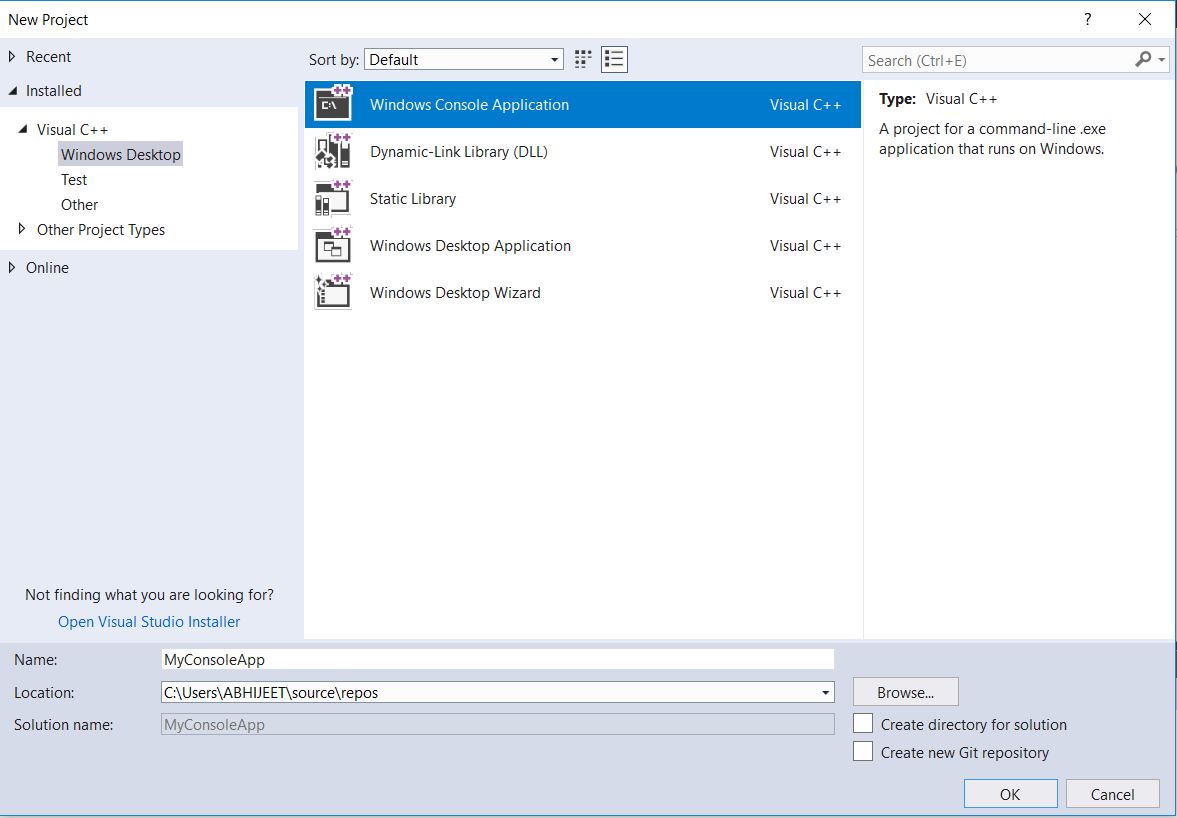
Open your Windows Console Application project in Visual Studio , or create a new one:
File > New > Project
Visual C++ > Windows Desktop > Windows Console Application
Go to Project > Properties .
Select All Configuration from Configuration dropdown menu on top left corner.
Select Configuration Properties > C/C++ > Precompiled headers and change Precompiled Header option’s value to Not Using Precompiled Headers .
Select Configuration Properties > Linker > Input . Now right click on Additional Dependencies found on right panel and click Edit.
(Note: Each .lib in new line)
That’s it. You have successfully installed OpenGL. Go on and run your program.
Same installation instructions apply to freeglut files with the header files in the GL folder, lib in the lib folder, and dll in the System32 folder.
You can check your installation by running a simple C++ OpenGL program to draw points on a 2D canvas.
The Visual Studio version for this tutorial will be the 2017 (seems to work with the 2015 and 2019 as well).
The glew version will be the 2.2.0.
The freeglut version will be the 3.0.0.
The glew library stands for GL Extension Wrangler.
At the end of this OpenGL tutorial you will be able to display a window with a white square displayed on a black background.
First of all
We are going to use the 32-bit or the 64-bit version.
You have the choice, and it will be specified in the tutorial.
Notice that the version is only based on which platform you want to compile for.
If you plan to create a program to be executed on a 32-bit platform, so use the 32-bit version.
Every platform accept 32-version, so the 64-bit version is only for specific purpose only.
And so the 32-bit version will work on every Windows system.
You'll need glew headers that could be find on the sourceforge website of the OpenGL Extension Wrangler Library:
freeglut
You'll also need the freeglut version for Microsoft Visual Studio:
Click the link inside the part freeglut 3.0.0 MSVC Package.
The name of the file you have to download is: freeglut-MSVC-3.0.0-2.mp.zip.
Once you have downloaded it, there is a folder named freeglut inside.
Extract it and rename it to freeglut-3.0.0 in order to have exactly the same name used in this tutorial.
Paths and directories for this setup
The general directory for our setup will be:
Visual Studio
Open it and create an empty project > File > New > Project > Templates > Visual C++ > Empty Project.
- Name: Shapes2D
- Location: C:\dev\visual-studio-c++\
- Solution: Create a new solution
- Solution name: BadprogTutorial
Your Shapes2D project has been created into your BadprogTutorial solution.
Let's add a main.cpp > Right click your project > Add > New Item > Visual C++ > C++ File > write the name main.cpp > Add.
Setting all configurations
Right click your Shapes2D project > Properties > On the top left there is a drop down menu > Configuration > Select All Configurations (instead of Debug)
Including header files (includes)
Right click your Shapes2D project > Properties > Configuration Properties > C/C++ > General > Additional Include Directories > Click it.
On the right there is a drop down menu, click .
A new window has appeared: Additional Include Directories.
Click the New Line icon > Click the browse button > Then select the two following folders:
- C:\dev\lib\glew-2.0.0\include
- C:\dev\lib\freeglut-3.0.0\include
Click OK > Apply
Including libraries
Library folders
Right click your Shapes2D project > Properties > Configuration Properties > Linker > General > Additional Library Directories > Click it.
On the right there is a drop down menu, click .
A new window has appeared: Additional Library Directories.
Click the New Line icon > Click the browse button > Then select the two following folders:
For the 64-bit version
- C:\dev\lib\glew-2.0.0\lib\Release\x64
- C:\dev\lib\freeglut-3.0.0\lib\x64
For the 32-bit version
- C:\dev\lib\glew-2.0.0\lib\Release\Win32
- C:\dev\lib\freeglut-3.0.0\lib
Click OK > Apply
Library files
Right click your Shapes2D project > Properties > Configuration Properties > Linker > Input > Additional Dependencies > Click it.
On the right there is a drop down menu, click .
A new window has appeared: Additional Dependencies.
Click the white area and write:
- freeglut.lib (click enter to go the next line)
- glew32.lib
Click OK > Apply > OK.
Your Visual Studio IDE is now ready to play with OpenGL!
Testing the setup
To test the setup, let's code the most basic code HelloWorld! that you can write with OpenGL.
On the Visual Studio's top menu there is a dropdown menu with x86 selected.
Click the black tiny triangle on the right of the x86 and select Configuration Manager.
A new window has appeared: Configuration Manager.
On the right select x86 in the dropdown menu and click New.
A new window has appeared: New Solution Platform.
On the right click the the Active solution platform dropdown menu and select:
- Type or select the new platform: x64
- Copy settings from: x86 (or Empty)
You could now close the Configuration Manager and as you can see the platform is now specified as x64.
And you could easily click either x86 or x64 (depending of your libraries version).
freeglut.dll and glew32.dll
Before building it, let's copy (not move!) the .dll of these two libraries:
For the 64-bit version
- C:\dev\lib\glew-2.0.0\bin\Release\x64\glew32.dll (yes this is the right one)
- and
- C:\dev\lib\freeglut-3.0.0\bin\x64\freeglut.dll
To the following directory:
- C:\dev\visual-studio-c++\BadprogTutorial\x64\Debug
Or if it doesn't work in: - C:\dev\visual-studio-c++\BadprogTutorial
For the 32-bit version
- C:\dev\lib\glew-2.0.0\bin\Release\Win32\glew32.dll
- and
- C:\dev\lib\freeglut-3.0.0\bin\freeglut.dll
To the following directory:
- C:\dev\visual-studio-c++\BadprogTutorial\Debug
Or if it doesn't work in: - C:\dev\visual-studio-c++\BadprogTutorial
For both versions (x86 and x64) and to avoid having copy/paste .DLL
If you don't want to copy/paste your freeglut.dll and glew32.dll from the library directory to your project directory then you have to set their paths directly in your Environment variables.
If you don't know where to find your Environment variables, open your Windows settings and search for Environment variables.
A system properties window should appear > Advanced tab > Environment variables > In the System variables click New. > Enter, for example for the x64 Freeglut version, the following:
- Variables name: FREEGLUT_LIB
- Variable value: C:\dev\lib\freeglut-3.0.0\bin\x64\
And for the x64 Glew32 version the following:
- Variables name: GLEW32_LIB
- Variable value: C:\dev\lib\glew-2.0.0\bin\Release\x64\
Then click OK > OK.
Do the same for the x86 version except the paths that must, of course, correspond to your x86 versions.
Then close your Visual Studio IDE (yes close it if it still open) in order to get the last Environment variables set.
And you are done, this time you won't have to copy/paste your .DLL because Windows is now able to find them automatically.
Open Visual Studio again to build and compile your first OpenGL application.
Building the project
On the Visual Studio's top menu, select either x86 or x64 and build the project.
If there is no error, right click the Shapes2D project > Debug > Start new instance.
If all is OK, you should see a black window with a white square.
Possible Errors
If you had some errors like these ones, it's because you try to play with a different version from the one specified in the setup configuration.
For example if you have set up the configuration with the 64-bit version, you have to build it with the x64 configuration.
Same thing for the 32-bit version, set up with the 32-bit library version and build it as a x86 configuration.
So double check the paths you've just entered in the setup configuration.
Here the errors:
Conclusion
Now that your Visual Studio has been set up, you could start creating OpenGL applications.

Запустите установочный пакет, нажмите «Далее» и дождитесь загрузки.

Выберите «Разработка с C ++ Desktop». Если вы беспокоитесь о сети, вы можете выбрать «Загрузить и установить все» в правом нижнем углу, чтобы избежать зависания во время установки. Нажмите Установить.

Ожидание загрузки, это занимает много времени.

Шаг 2: Установите GLUT-OpenGL Utility Toolkit
Загрузить предварительно скомпилированные библиотеки Win32 для библиотек Intel GLUT 3.7 для Windows 95 и NT

Получите 5 файлов после распаковки файлов

Найдите папку, в которой сохранены файлы заголовков / библиотек, у меня есть C: \ Program Files (x86) \ Windows Kits \ 10
Если вы не знаете, где, вы можете попробовать включить файл gl.h в Visual Studio. Когда вы набираете gl две буквы, vs предложит вам указать конкретный адрес каталога gl.

- Скопируйте файлы заголовков в каталог C: \ Program Files (x86) \ Windows Kits \ 10 \ Include \ 10.0.17134.0 \ um \ gl и измените папку gl на GL
- Скопируйте файл .lib в каталог C: \ Program Files (x86) \ Windows Kits \ 10 \ Lib \ 10.0.17134.0 \ um \ x86
- Скопируйте файл .dll в каталог C: \ Windows \ SysWOW64. Будьте осторожны, чтобы не поместить его в другую папку.
Совет: вышеупомянутый каталог не уникален, у вас может не быть папки 10.0.017134, это может быть что-то еще. В частности, обратитесь к значку, чтобы найти папку, которую вы хотите положить
Шаг 3: Установите GLEW
Нажмите Binaries Windows 32-bit и 64-bit, чтобы загрузить скомпилированный файл.

После загрузки и распаковки получается много файлов

- Скопируйте всю папку GL в папке include в C: \ Program Files (x86) \ Windows Kits \ 10 \ Include \ 10.0.17134.0 \ um
- Скопируйте файл .lib в lib \ Release \ Win32 в C: \ Program Files (x86) \ Windows Kits \ 10 \ Lib \ 10.0.17134.0 \ um \ x86
- Скопируйте .lib файлы в lib \ Release \ x64 в C: \ Program Files (x86) \ Windows Kits \ 10 \ Lib \ 10.0.17134.0 \ um \ x64
- Скопируйте glew32.dll в bin \ Release \ x64 в C: \ Windows \ SysWOW64
- Скопируйте glew32.dll в bin \ Release \ Win32 в C: \ Windows \ System32
Часть четвертая: Тестирование
Откройте Visual Studio 2017 и создайте новый пустой проект VC ++

В этой статье я расскажу как установить графическую библиотеку glut, и покажу вам самый элементарный пример программы с его использование, пользуясь средой разработки "Microsoft Visual C++ Express 2010"
Glut предназначен для создания/манипуляции окон, вывода графики.Так же glut прекрасно подходит для освоения OpenGL.
1)Начнём с glut32.dll.Его мы должны перекинуть по этому адресу:
C://Windows/System32
2)glut32.lib надо перекинуть по этому адресу:
C://Program files/Microsoft Visual Studio/VC/lib
3)Для glut.h Мы создадим папку по адресу . /VC/include , назовём её GL.И в эту папку перекинем glut.h.
(Таким же образом можно установить библиотеки gl.h и glu.h все файлы можно скачать по отдельности здесь)
4)Открываем Microsoft Visual C++.Создаём проект.(Win32->Консольное приложение(пустой проект))
5)Правой кнопкой жмём на проект ->Cвойства->Открываем вкладку "Компоновщики".В "Дополнительных зависимостях"пишем:
opengl32.lib glut32.lib glu32.lib
Установка завершена!
Перейдём к программе написанной с помощью glut.
Для подключения заголовочного файла нам нужно написать:
void display()
<
glClear(GL_COLOR_BUFFER_BIT); /*Функция очищения экрана*/
glBegin(GL_LINES);//начало рисования линий
glColor3f(1.0, 0.0, 0.0); //цвет красный
//Нарисуем квадрат
glVertex2f(0.4, 0.4);//координаты начальной точки лини
glVertex2f(0.4, 0.8);//координаты конечной точки линии
//
glVertex2f(0.4, 0.8);/*2f - означает что рисуем мы в 2-х мерном пространстве*/
glVertex2f(0.8, 0.8);
//
glVertex2f(0.8, 0.8);
glVertex2f(0.8, 0.4);
//
glVertex2f(0.4, 0.4);
glVertex2f(0.8, 0.4);
glEnd();
glFlush(); /*Отрисовывает всё, что мы описали*/
>
void display()
<
glClear(GL_COLOR_BUFFER_BIT);
glBegin(GL_LINES);
glColor3f(1.0, 0.0, 0.0);
glVertex2f(0.4, 0.4);
glVertex2f(0.4, 0.8);
//
glVertex2f(0.4, 0.8);
glVertex2f(0.8, 0.8);
//
glVertex2f(0.8, 0.8);
glVertex2f(0.8, 0.4);
//
glVertex2f(0.4, 0.4);
glVertex2f(0.8, 0.4);
glEnd();
glFlush();
int main(int argc, char **argv)
<
glutInit(&argc, argv);
glutInitDisplayMode(GLUT_SINGLE | GLUT_RGB);
glutInitWindowSize(240, 240);
glutInitWindowPosition(100, 740);
glutCreateWindow("First window!");
glClearColor(1.0, 1.0, 1.0, 1.0);
glMatrixMode(GL_PROJECTION);
glLoadIdentity();
glOrtho(-1.0, 1.0, -1.0, 1.0, -1.0, 1.0);
glutDisplayFunc(display);
glutMainLoop();
>
Читайте также: