
Как стабилизировать видео в after effects
Learn how to smooth handheld footage, choose which objects in a scene get stabilized, and even reverse a stabilization to track an object in an unstable scene using the Warp Stabilizer VFX.

What you'll need
If you shoot footage using a handheld camera, you will probably end up with shaky shots. Unless this look is intentional, you’ll want to stabilize your shots to eliminate unwanted motion.
Warp Stabilizer VFX in Adobe After Effects automatically removes extraneous jitters. When played back, the motion appears smooth because the layer itself is scaled and moves incrementally to offset the unwanted movement. (The Warp Stabilizer VFX effect replaces the Warp Stabilizer effect available in previous versions of After Effects.)
In this excerpt from Adobe After Effects Classroom in a Book, published by Adobe Press, you will apply Warp Stabilizer VFX to a shaky clip to see how the stabilization effect works.
About bicubic scaling
In this tutorial, you will scale the video sample. When you scale video footage or an image to a larger size, After Effects must sample data to add information where none existed before. You can choose which sampling method After Effects uses when scaling a layer. For details, see the video, Set scaling quality using bicubic sampling.
In previous versions, After Effects has used only bilinear sampling. Bicubic sampling, new in After Effects, uses a more complex algorithm that typically provides better results when color transitions are more gradual, as in nearly all real-world photographic images. Bilinear scaling may be a better option for sharp-edged graphics.
To choose a sampling method for a layer, select the layer, and choose Layer > Quality > Bicubic or Bilinear. Bicubic and bilinear sampling are available only for layers that are set to Best quality. (To change a layer’s quality setting to Best, choose Layer > Quality > Best.)
Setting up the project
As you start After Effects, restore the default application settings for After Effects:
- Start After Effects, and then immediately hold down Ctrl+Alt+Shift (Windows) or Command+Option+Shift (Mac OS) to restore default preferences settings. When prompted, click OK to delete your preferences.
- Click Close to close the Welcome screen.
- After Effects opens to display a new, untitled project.
- Choose File > Save As > Save As.
- Name the project Stabilize.aep, and then click Save.
Importing the footage
You need to import one footage item to start this project. Download the sample tutorial files that accompany this tutorial to follow along.
- Double-click an empty area of the Project panel to open the Import File dialog box.
- Select the flowers.mov file in the sample tutorial files, and then click Import or Open to import the footage into your project (see Figure 1).

Creating the composition
You’ll start by creating the composition.
- Drag the flowers.mov clip in the Project panel onto the Create A New Composition button at the bottom of the panel.
After Effects creates a new composition named Flowers with the same pixel size, aspect ratio, frame rate, and duration of the source clip. - Click the RAM Preview button in the Preview panel to preview the footage. Press the spacebar to stop the preview when you’ve seen the whole clip. This clip was shot with a handheld camera in the late afternoon. A slight breeze rustles the vegetation, and the camera moves unsteadily.
Applying Warp Stabilizer VFX
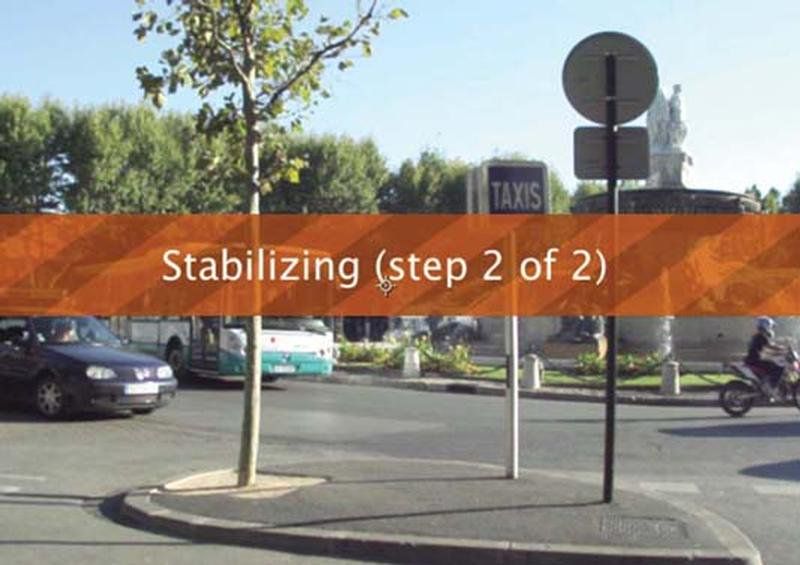
Warp Stabilizer VFX starts analyzing footage as soon as you apply it. Stabilization is a background process, so you can work on other compositions while it finishes. How long it takes depends on your system. After Effects displays a blue banner while it analyzes the footage and an orange banner while it applies stabilization (see Figure 2).

- Select the flowers.mov layer in the Timeline panel, and choose Animation > Warp Stabilizer VFX. The blue banner appears immediately.
- When Warp Stabilizer VFX has finished stabilizing, and the orange banner has disappeared, create another RAM preview to view the changes.
- Press the spacebar to stop the preview.
The clip is still shaky, but it’s smoother than it was initially. Warp Stabilizer VFX moved and repositioned the footage. To see how it applied changes, view the effects in the Effect Controls panel. For example, the clip’s borders were scaled up (to about 103%) to hide black gaps that occur when the image is repositioned in the stabilization process. You’ll adjust the settings that Warp Stabilizer VFX uses.
Adjusting the Warp Stabilizer VFX Settings
You’ll change the settings in the Effect Controls panel to make the shot smoother.
- In the Effect Controls panel, increase the Smoothness amount to 75%.
Warp Stabilizer VFX immediately begins stabilizing again (see Figure 3). It doesn’t need to analyze the footage, because the initial analysis data is stored in memory.

- When Warp Stabilizer VFX has finished, create another RAM preview to view the changes.
- Press the spacebar to stop playback when you’re done.
It’s better, but still a little rough. The Auto-scale setting in the Effect Controls panel now displays 103.7%; the effect moved the frames more dramatically, requiring more scaling to eliminate black gaps around the edges.
Rather than change the amount Warp Stabilizer VFX smooths the footage, now you’ll change its goal. - In the Effect Controls panel, choose No Motion from the Result menu (see Figure 4).

With this setting, Warp Stabilizer VFX attempts to lock the camera in position. This requires even more scaling. When No Motion is selected, the Smoothness option is dimmed.
Now the camera stays in position, so that the movement you notice is the rustling of the flowers in the wind, not the shakiness of the camera. In order to achieve this effect, Warp Stabilizer VFX had to scale the clip to 112.4% of its original size.
Fine-tuning the results
The default analysis works well most of the time, but sometimes you may need to massage the end results even further. In this project, the clip skews subtly in a few places, most noticeably at about the five-second mark. Casual viewers may not notice the problem, but a keen producer will. You’ll change the method that Warp Stabilizer VFX uses to remove the skew.
- In the Effect Controls panel, choose Position, Scale, Rotation from the Method menu.
- Choose Stabilize Only from the Framing menu.
- Increase the Additional Scale to 114% (see Figure 5).
Note: Scaling a video layer up degrades the image. A good rule of thumb is to keep the Additional Scale value below 115% if possible.

- Create another RAM preview.
Now the shot looks rock-steady. The only movement is that caused by the wind rustling the flowers. - Press the spacebar to stop the playback when you’re done.
- Choose File > Save to save your work.
- Choose File > Close Project.
Open Stabilize.mov included in the sample tutorial files to see how the final, stabilized footage should look.
As you have discovered, stabilizing a shot is not without its drawbacks. To compensate for the movement or rotation data applied to the layer, the frames must be scaled, which could ultimately degrade the footage. If you really need to use the shot in your production, this may be the best compromise.
Warp Stabilizer VFX settings
This is just a summary of the Warp Stabilizer VFX settings to help you get started.
- Result controls the intended result. Smooth Motion makes camera movement smoother, but doesn’t eliminate it; use the Smoothness setting to control how smooth the movement becomes. No Motion attempts to remove all of the camera motion.
- Method specifies the most complex operation the Warp Stabilizer VFX performs on the footage to stabilize it: Position, which is based on position data only; Position, Scale, Rotation, which uses these three types of data; Perspective, which effectively corner-pins the entire frame; or Subspace Warp (the default), which attempts to warp various parts of the frame differently to stabilize the entire frame.
- Borders settings adjust how borders (the moving edges) are treated for footage that is stabilized. Framing controls how the edges appear in a stabilizing result, and determines whether the effect crops, scales, or synthesizes edges using material from other frames.
- Auto-scale displays the current auto-scale amount, and allows you to set limits on the amount of auto-scaling.
- Advanced settings give you even greater control over the actions of the Warp Stabilizer VFX effect.
Tip: You can use Warp Stabilizer VFX advanced settings to achieve more complex effects, too. To learn more, see Adobe After Effects Visual Effects and Compositing Studio Techniques, available from Adobe Press.
Learn how to smooth handheld footage, choose which objects in a scene get stabilized, and even reverse a stabilization to track an object in an unstable scene using the Warp Stabilizer VFX.
What you'll need
If you shoot footage using a handheld camera, you will probably end up with shaky shots. Unless this look is intentional, you’ll want to stabilize your shots to eliminate unwanted motion.
Warp Stabilizer VFX in Adobe After Effects automatically removes extraneous jitters. When played back, the motion appears smooth because the layer itself is scaled and moves incrementally to offset the unwanted movement. (The Warp Stabilizer VFX effect replaces the Warp Stabilizer effect available in previous versions of After Effects.)
In this excerpt from Adobe After Effects Classroom in a Book, published by Adobe Press, you will apply Warp Stabilizer VFX to a shaky clip to see how the stabilization effect works.
About bicubic scaling
In this tutorial, you will scale the video sample. When you scale video footage or an image to a larger size, After Effects must sample data to add information where none existed before. You can choose which sampling method After Effects uses when scaling a layer. For details, see the video, Set scaling quality using bicubic sampling.
In previous versions, After Effects has used only bilinear sampling. Bicubic sampling, new in After Effects, uses a more complex algorithm that typically provides better results when color transitions are more gradual, as in nearly all real-world photographic images. Bilinear scaling may be a better option for sharp-edged graphics.
To choose a sampling method for a layer, select the layer, and choose Layer > Quality > Bicubic or Bilinear. Bicubic and bilinear sampling are available only for layers that are set to Best quality. (To change a layer’s quality setting to Best, choose Layer > Quality > Best.)
Setting up the project
As you start After Effects, restore the default application settings for After Effects:
- Start After Effects, and then immediately hold down Ctrl+Alt+Shift (Windows) or Command+Option+Shift (Mac OS) to restore default preferences settings. When prompted, click OK to delete your preferences.
- Click Close to close the Welcome screen.
- After Effects opens to display a new, untitled project.
- Choose File > Save As > Save As.
- Name the project Stabilize.aep, and then click Save.
Importing the footage
You need to import one footage item to start this project. Download the sample tutorial files that accompany this tutorial to follow along.
- Double-click an empty area of the Project panel to open the Import File dialog box.
- Select the flowers.mov file in the sample tutorial files, and then click Import or Open to import the footage into your project (see Figure 1).
Creating the composition
You’ll start by creating the composition.
- Drag the flowers.mov clip in the Project panel onto the Create A New Composition button at the bottom of the panel.
After Effects creates a new composition named Flowers with the same pixel size, aspect ratio, frame rate, and duration of the source clip. - Click the RAM Preview button in the Preview panel to preview the footage. Press the spacebar to stop the preview when you’ve seen the whole clip. This clip was shot with a handheld camera in the late afternoon. A slight breeze rustles the vegetation, and the camera moves unsteadily.
Applying Warp Stabilizer VFX
Warp Stabilizer VFX starts analyzing footage as soon as you apply it. Stabilization is a background process, so you can work on other compositions while it finishes. How long it takes depends on your system. After Effects displays a blue banner while it analyzes the footage and an orange banner while it applies stabilization (see Figure 2).
- Select the flowers.mov layer in the Timeline panel, and choose Animation > Warp Stabilizer VFX. The blue banner appears immediately.
- When Warp Stabilizer VFX has finished stabilizing, and the orange banner has disappeared, create another RAM preview to view the changes.
- Press the spacebar to stop the preview.
The clip is still shaky, but it’s smoother than it was initially. Warp Stabilizer VFX moved and repositioned the footage. To see how it applied changes, view the effects in the Effect Controls panel. For example, the clip’s borders were scaled up (to about 103%) to hide black gaps that occur when the image is repositioned in the stabilization process. You’ll adjust the settings that Warp Stabilizer VFX uses.
Adjusting the Warp Stabilizer VFX Settings
You’ll change the settings in the Effect Controls panel to make the shot smoother.
- In the Effect Controls panel, increase the Smoothness amount to 75%.
Warp Stabilizer VFX immediately begins stabilizing again (see Figure 3). It doesn’t need to analyze the footage, because the initial analysis data is stored in memory.
- When Warp Stabilizer VFX has finished, create another RAM preview to view the changes.
- Press the spacebar to stop playback when you’re done.
It’s better, but still a little rough. The Auto-scale setting in the Effect Controls panel now displays 103.7%; the effect moved the frames more dramatically, requiring more scaling to eliminate black gaps around the edges.
Rather than change the amount Warp Stabilizer VFX smooths the footage, now you’ll change its goal. - In the Effect Controls panel, choose No Motion from the Result menu (see Figure 4).
With this setting, Warp Stabilizer VFX attempts to lock the camera in position. This requires even more scaling. When No Motion is selected, the Smoothness option is dimmed.
Now the camera stays in position, so that the movement you notice is the rustling of the flowers in the wind, not the shakiness of the camera. In order to achieve this effect, Warp Stabilizer VFX had to scale the clip to 112.4% of its original size.
Fine-tuning the results
The default analysis works well most of the time, but sometimes you may need to massage the end results even further. In this project, the clip skews subtly in a few places, most noticeably at about the five-second mark. Casual viewers may not notice the problem, but a keen producer will. You’ll change the method that Warp Stabilizer VFX uses to remove the skew.
- In the Effect Controls panel, choose Position, Scale, Rotation from the Method menu.
- Choose Stabilize Only from the Framing menu.
- Increase the Additional Scale to 114% (see Figure 5).
Note: Scaling a video layer up degrades the image. A good rule of thumb is to keep the Additional Scale value below 115% if possible.
- Create another RAM preview.
Now the shot looks rock-steady. The only movement is that caused by the wind rustling the flowers. - Press the spacebar to stop the playback when you’re done.
- Choose File > Save to save your work.
- Choose File > Close Project.
Open Stabilize.mov included in the sample tutorial files to see how the final, stabilized footage should look.
As you have discovered, stabilizing a shot is not without its drawbacks. To compensate for the movement or rotation data applied to the layer, the frames must be scaled, which could ultimately degrade the footage. If you really need to use the shot in your production, this may be the best compromise.
Warp Stabilizer VFX settings
This is just a summary of the Warp Stabilizer VFX settings to help you get started.
- Result controls the intended result. Smooth Motion makes camera movement smoother, but doesn’t eliminate it; use the Smoothness setting to control how smooth the movement becomes. No Motion attempts to remove all of the camera motion.
- Method specifies the most complex operation the Warp Stabilizer VFX performs on the footage to stabilize it: Position, which is based on position data only; Position, Scale, Rotation, which uses these three types of data; Perspective, which effectively corner-pins the entire frame; or Subspace Warp (the default), which attempts to warp various parts of the frame differently to stabilize the entire frame.
- Borders settings adjust how borders (the moving edges) are treated for footage that is stabilized. Framing controls how the edges appear in a stabilizing result, and determines whether the effect crops, scales, or synthesizes edges using material from other frames.
- Auto-scale displays the current auto-scale amount, and allows you to set limits on the amount of auto-scaling.
- Advanced settings give you even greater control over the actions of the Warp Stabilizer VFX effect.
Tip: You can use Warp Stabilizer VFX advanced settings to achieve more complex effects, too. To learn more, see Adobe After Effects Visual Effects and Compositing Studio Techniques, available from Adobe Press.

Стабилизация видео в программе After Effects с помощью Motion Tracking. Это довольно просто, в тоже время предоставляет полную свободу действий и контроль. Видео урок — ответ на ваши вопросы.
Подписывайтесь на наш канал, вступайте в группу Вконтакте. Не забывайте делиться уроком (значки социальных сетей слева от статьи).
Похожее на сайте

Вывод видео с альфа-каналом из After Effects

Ставим метки на карте в After Effects

Эффект Stop-Motion
Рубрики
Мы в интернете
Рекомендуем:
Метки
Возможно, вы пропустили

Retouch4me
DaVinci Resolve Studio 18.0 b2 (Win/Mac/Linux)
Fusion Studio 18.0 b2 (Win/Mac/Lnx)

Red Giant Universe Suite 6.0.1 Win/Mac

Steinberg Nuendo 12.0.20 Win
Коротко о нас
На сайте публикации, статьи, софт, футажи, проекты. А в группах социальных сетей проводятся обсуждения и задаются вопросы. Все взято в свободном доступе в сети интернет.
Материалы сайта
Многие материалы, выложенные на сайте, взяты из открытых источников сети Интернет, либо присланы посетителями сайта. Все права на программы принадлежат их авторам и предоставлены исключительно для ознакомления.
Администрация сайта не несет ответственности за материалы, выложенные на сайте.
Пользовательское соглашение.
Весь софт на сайте представлен исключительно для ознакомления, после чего должен быть удален. Имейте в виду, что их дальнейшее использование, либо установка на компьютеры клиентов и организаций в коммерческих целях, незаконно.
Хочу поделиться своим рецептом стабилизации видео в Adobe After Effects, который я использую для своих таймлапсов. Разработать этот алгоритм мне пришлось из-за того, что я не смог найти ни одной программы, которая бы справилась с такой задачей. Для стабилизации обычным сдвигом кадра в одной плоскости объектив моей камеры слишком широкоугольный и создаёт слишком большие искажения. Необходимо использовать поворот виртуальной камеры с правильным углом обзора и в 3D пространстве.
Способ крайне прост, и я уверен, что «изобрел» велосипед. Если вы знаете, как сделать то же самое проще – напишите в комментариях, я буду благодарен.
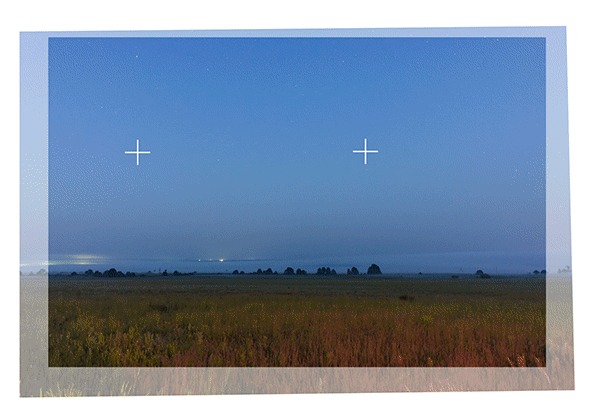
Сперва покажу исходный ролик и ролик, стабилизированный при помощи Warp Stabilizer VFX.

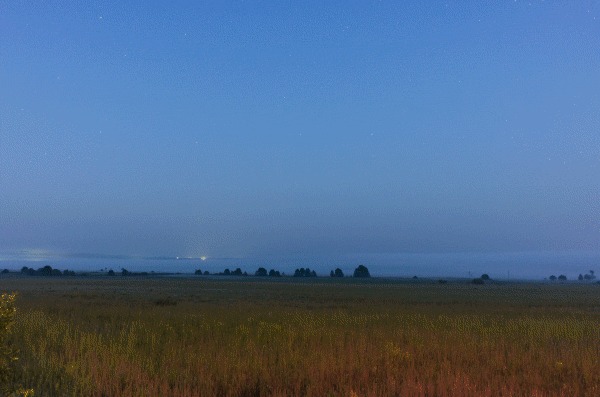
В большом разрешении:
Оставлю результат работы стандартного стабилизатора без комментариев и расскажу, как делаю я. Постараюсь расписать всё максимально подробно, чтобы последовательность этих действий мог повторить человек, не знакомый с интерфейсом AE.
0. Для начала настроим After Effects для работы с сериями снимков. Идем в Edit → Preferences → Import и устанавливаем стандартной длиной импортируемых изображений один кадр.

1. Создаем проект:
1.1. Просто перетаскиваем и кидаем папку с серией кадров или видео-файл.
1.2. Добавляем два Null-объекта и две камеры. Первая камера будет лишь местом крепления для основной, второй.
Фокусное расстояние обеих камер должно соответствовать эквивалентному фокусному расстоянию вашего фотоаппарата (28 мм в моём случае). Важно чтобы правильное значение было установлено при создании камер, а не после, иначе они не окажутся в нужном положении.
Camera 1 должна иметь тип Two-Node Camera, а Camera 2 – One-Node Camera.
1.3. Делаем видеоряд и Null-ы трехмерными с помощью соответствующих чекбоксов и не забываем растянуть временные шкалы всех объектов сцены на всю её длину.


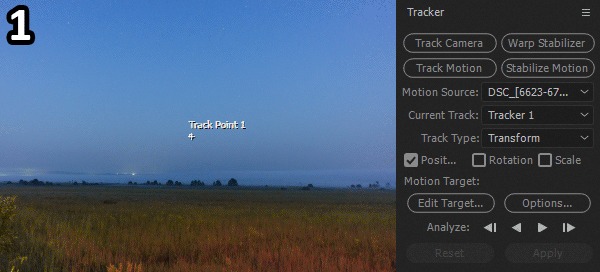
2. Теперь сделаем отслеживание двух точек, звезд в данном случае.
2.0. Кликаем правой кнопкой по видеоряду и выбираем из выпадающего списка Track Motion.
2.1. Выберем самую примечательную звезду поближе к краю кадра, но не исчезающую за ним на протяжении всего ролика, и поставим на неё маркер. Размер внешней рамки маркера выберем, глядя на то, как сильно мотало камеру при съемке.
2.2. Запустим отслеживание и дождемся окончания процесса. Возможно, что-то пойдет не так, и придется останавливать, перемещать маркер вручную, менять размер области отслеживания и запускать дальше.
2.3. После завершения процесса нажимаем Edit target. и выбираем Null 1 и тыкаем OK.
2.4. Нажимаем Apply, оставляем X and Y как есть, OK.
2.5. Повторяем всё с пункта 2.0. по 2.4. для Null 2. Вторую точку лучше выбрать поближе к другому краю кадра. Чем больше расстояние между точками – тем лучше.

Примерно так должен выглядеть предпоказ сцены с двумя Null-объектами и их траекториями после всех описанных выше манипуляций:

3. Далее необходимо привязать Point of Interest камеры 1 к Null 1.
3.0. Нужно раскрыть свойства вышеуказанных объектов как на иллюстрации чтобы было удобно с ними работать.
3.1. Зажимаем Alt и кликаем по значку с часами в строчке Point of Interest., появляется строка expression.
3.2. Из неё тянем кнопку в виде спирали и вешаем связь на строку Position в свойствах Null 1.
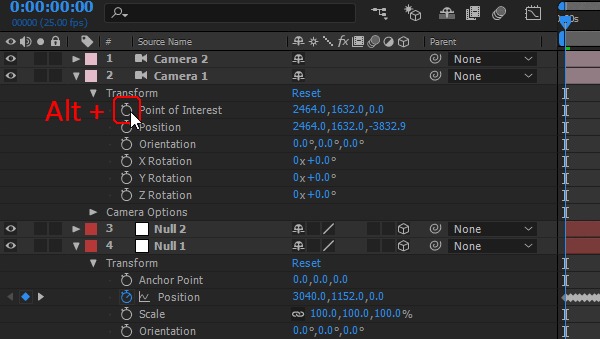
4. Теперь так же, с помощью Alt и клика по иконке часов, открываем окно expression параметра Z Rotation у Camera 1. В этот раз заполняем блок ввода (Ctrl+C, Ctrl+V) следующим кодом, решающим матричное уравнение:
xA = thisComp.layer("Null 1").transform.position[0] - transform.position[0];
yA = thisComp.layer("Null 1").transform.position[1] - transform.position[1];
zA = 0;
xB = thisComp.layer("Null 2").transform.position[0] - transform.position[0];
yB = thisComp.layer("Null 2").transform.position[1] - transform.position[1];
zB = 0;
xC = 0;
yC = 0;
zC = transform.position[2];
xn = xA - xC;
yn = yA - yC;
zn = zA - zC;
A1 = xn;
B1 = yn;
C1 = zn;
D1 = -xC * xn - yC * yn - zC * zn;
A2 = (yB - yA) * (zC - zA) - (zB - zA) * (yC - yA);
B2 = - (xB - xA) * (zC - zA) - (zB - zA) * (xC - xA);
C2 = (xB - xA) * (yC - yA) - (yB - yA) * (xC - xA);
D2 = -xA * ((yB - yA) * (zC - zA) - (zB - zA) * (yC - yA)) + yA * ((xB - xA) * (zC - zA) - (zB - zA) * (xC - xA)) - zA * ((xB - xA) * (yC - yA) - (yB - yA) * (xC - xA));
xD = -D1 / A1;
yD = 0;
zD = 0;
xE = (B2 * D1 / B1 - D2) / (A2 - B2 * A1 / B1);
yE = - (A1 * xE + D1) / B1;
zE = 0;
ED = Math.sqrt(Math.pow(xE - xD, 2) + Math.pow(yE - yD, 2) + Math.pow(zE - zD, 2));
DC = Math.sqrt(Math.pow(xD - xC, 2) + Math.pow(yD - yC, 2) + Math.pow(zD - zC, 2));
CE = Math.sqrt(Math.pow(xC - xE, 2) + Math.pow(yC - yE, 2) + Math.pow(zC - zE, 2));
EDC = Math.acos((Math.pow(DC, 2) + Math.pow(CE, 2) - Math.pow(ED, 2)) / 2 / DC / CE) / Math.PI * 180;
if ((xE > xD && yE > yD) || (xE < xD && yE < yD)) EDC;
else - EDC;

5. Перемотаем время на самое начало и прикрепим камеру 2 к камере 1. Для этого просто выберем Camera 1 из выпадающего меню Parent в строке Camera 2.

Если всё прошло гладко, то теперь камера 2 намертво прибита к звездному небу. Её начальное положение соответствует первому кадру серии, а потом она сваливается куда-то вбок.
6. Настраиваем направление и угол обзора камеры 2. Тут всё делается на глаз.
6.1. Раскроем её свойства и покрутим значения углов поворота (X/Y/Z Rotation или Orientation). Если крутить их с зажатым Ctrl, то значения будут меняться плавнее. Важно не менять расположение камеры, оно должно быть 0, 0, 0.
6.2. Изменим фокусное расстояние и, соответственно, угол обзора камеры так, чтобы в кадре не появлялись черные области фона. Делается это в настройках из, пункта 1., которые появятся по двойному клику по камере. В данном случае фокусное расстояние пришлось увеличить с 28 до 31 мм, угол обзора при этом уменьшился с 65.5° до 60.3°.
Если целью было обездвижить звездное небо, то нужно убедиться, что область обзора вписывается в кадр на всей длине видеоролика.
6.3. Иначе нужно создать точки на временной шкале и покрутить значения на каждой из них.
Adobe представила новый Warp Stabilizer с обновлением CS5.5 до After Effects, которое автоматически стабилизирует дрожащие кадры с рук. Хотя возможность стабилизации таких видеороликов была реализована в After Effects некоторое время, стабилизатор деформации обрабатывает их автоматически. Кроме того, это намного проще, чем использовать Mocha для стабилизации удара. Теперь единственное, что вам нужно сделать, это настроить качество стабилизации. Благодаря тому, что зеркалки все чаще используются для захвата видео, возможность быстрой стабилизации рабочего процесса является ценным инструментом. И, осознавая растущую распространенность цифровых зеркальных фотокамер для захвата, Adobe добавила элементы управления для противодействия эффекту скользящего затвора, который вы получаете с помощью датчиков CMOS.
Реклама
следующий
Предыдущая
Adobe представила новый Warp Stabilizer с обновлением CS5.5 до After Effects, которое автоматически стабилизирует дрожащие кадры с рук. Хотя возможность стабилизации таких видеороликов была реализована в After Effects некоторое время, стабилизатор деформации обрабатывает их автоматически. Кроме того, это намного проще, чем использовать Mocha для стабилизации удара. Теперь единственное, что вам нужно сделать, это настроить качество стабилизации. Благодаря тому, что зеркалки все чаще используются для захвата видео, возможность быстрой стабилизации рабочего процесса является ценным инструментом. И, осознавая растущую распространенность цифровых зеркальных фотокамер для захвата, Adobe добавила элементы управления для противодействия эффекту скользящего затвора, который вы получаете с помощью датчиков CMOS.
Шаг 2 из 16: 1. Импортировать отснятый материал
Импортируйте шаткие кадры в After Effects и разместите их на временной шкале. Стабилизатор деформации можно применить несколькими способами — мы будем использовать меню «Анимация» и выбираем «Стабилизировать движение». В предыдущих версиях After Effects это открывало средство просмотра слоев и предоставляло настройки палитры Tracker для стабилизации.
Шаг 3 из 16: 2. Автопилот
Шаг 4 из 16: 3. Приложение
Шаг 5 из 16: 4. Увеличение
Если вы посмотрите на стабилизированный материал, то заметите, что настройки фильтра по умолчанию увеличили материал, и палитра «Управление стабилизатором» сообщит вам, сколько (посмотрите на автоматическое масштабирование). На этом материале 124,1%, и это может быть неприемлемо.
Шаг 6 из 16: 5. Точная настройка
Каждая стабилизация представляет собой компромисс между расширением и стабилизацией, и настройки в палитре «Управление» предназначены для различных проблем, представленных в видеоматериале. Первый элемент управления — Smoothness, установленный на 50%. Вы можете уменьшить или увеличить это до уровня, когда допустимы как стабилизация, так и увеличение.
Шаг 7 из 16: 6. Дальнейшее уточнение
Если вы откроете дополнительные параметры, ползунок Crop LessSmooth More предоставит вам элементы управления, которые могут уменьшить количество обрезки за счет стабилизации без необходимости применения новой стабилизации; однако, это тонкая настройка, и 100% стабилизация эффективно блокирует выстрел.
Шаг 8 из 16: 7. Клонирование краев
Этот клип поддается функции Synthesize Edges. Выберите это в меню «Обрамление». Сразу же автоматическое масштабирование отключено. В клипе выше стороны и нижние края были успешно синтезированы, но вершина нет — как видно по черному зазору в верхней части.
Шаг 9 из 16: 8. Заполнение пробелов
Чтобы устранить пропуски, откройте дополнительные параметры и поэкспериментируйте с входным диапазоном синтеза, измеренным в секундах в любом направлении от текущего кадра. В этом примере 5 секунд восстановили небо. Edge Crop должен предотвращать выборку плохих краев в аналоговом захвате для синтеза.
Шаг 10 из 16: 9. Метод стабилизации
По умолчанию метод стабилизации — Subspace Warp, который деформирует области по всему клипу на разные величины. Это может привести к нежелательным эффектам, таким как необычное растяжение. В меню «Метод» можно выбрать более простой метод: чем выше меню, тем проще операция.
Шаг 11 из 16: 10. Проблемы с движением
Анализ Warp Stabilizer фокусируется на объектах переднего плана за счет фоновых объектов. На приведенном выше кадре лодка стабилизировалась, но движение противоположного берега реки было преувеличено. Это отвлекает взгляд от лодки, что ставит под угрозу эффект стабилизации.
Шаг 12 из 16: 11. Детальный анализ
Подробный анализ Откройте Расширенные параметры и отметьте флажок Детальный анализ, чтобы решить эти проблемы. И подождите — как долго зависит от мощности вашего Mac. После анализа Стабилизатор попытается компенсировать движение фона и переднего плана. Из-за его скорости сохраните эту опцию как последнее средство.
Шаг 13 из 16: 12. Рольставни
В сценах, где преобладают горизонтальные движения на скорости, могут появляться Роллеты с рольставнями. Это вызвано датчиками CMOS, используемыми в большинстве зеркалок, но не датчиками CCD. Если эффект прокручивающегося затвора объявлен, выберите «Расширенное уменьшение» в дополнительных параметрах.
Шаг 14 из 16: 13. Объединение фильтров
Добавление стабилизатора после других эффектов вызывает окно предупреждения (но только один раз за сеанс), в котором вам советуют добавлять маски и эффекты в предварительную композицию. Поэтому сначала добавьте эффекты и превратите слой в предварительную композицию, выбрав «Предварительная композиция» в меню «Слой».
Шаг 15 из 16: 14. Запирание
В некоторых ситуациях вы можете полностью заблокировать выстрел. Для этого примените стабилизатор деформации и выберите «Без движения» в меню «Стабилизация». Если вы хотите небольшое количество движения, выберите Smooth Motion и увеличьте процент гладкости.
Шаг 16 из 16: 15. Редактирование видеоряда
В быстродействующих рабочих процессах, где отснятый материал будет редактироваться в Premiere Pro, сэкономьте время, создав динамическую ссылку. Вместо того, чтобы визуализировать отснятый материал и затем импортировать его, перейдите в меню «Файл» в Premiere и выберите «Импортировать композицию после создания эффектов» (как показано выше), чтобы вы могли редактировать ее как стандартный видеоряд.
Читайте также: