
Как создать неоновый текстовый эффект при помощи adobe illustrator
Learn to apply a neon glow to text in Adobe Illustrator using multiple strokes and fills on a single object in the Appearance panel.
What you'll need
What you learned: How to work with the Appearance panel to layer multiple strokes and fills on text to achieve a neon text effect
Work with the Appearance panel
The Appearance panel shows the appearance formatting applied to selected artwork. With the text frame selected, you will not see the text formatting, but rather the frame formatting in the Appearance panel.
- In the Appearance panel, click Characters to see the text formatting. You can then see the stroke, fill, and other appearance properties in the panel. With the text selected, you can’t apply another stroke and fill—the text frame needs to be selected.
- To select the text frame again and see its appearance formatting, click Type at the top of the panel.
Add multiple strokes
With the text frame selected, you can now add more strokes and fills. By layering more than one stroke and fill on the text, and applying color, weights, and effects, you can achieve the neon glow effect.
- Click the Add New Fill button at the bottom of the Appearance panel to apply a second fill. The new fill will appear on top of the previous fill.
- To change the appearance of the existing stroke, change the color by clicking the stroke color and then change the stroke weight.
- To add a second stroke, click the Add New Stroke button at the bottom of the Appearance panel.
- To change the appearance of the new stroke so that it is under the original stroke, you can change the ordering. Drag the new stroke below the original stroke so it is behind the new fill and the original stroke.
Apply an effect to a single stroke or fill
You can apply effects to the text object as a whole, or you can apply effects to an individual appearance property like one of the strokes.
- Click the appearance row (the stroke) to select it. This selection targets the appearance so that the effect will only be applied to it.
- Click the Add New Effect button at the bottom of the Appearance panel or choose the effect from the Effect menu.
- Choose Blur > Gaussian Blur.
- Change the radius in the Gaussian Blur dialog box and click OK.
Tip: Add more strokes to the artwork, change the color, reorder the strokes and fills, and apply the glow effect to give the artwork more depth.
Сегодняшний урок мы посвятим как легко и быстро создать эффект неонового свечения. Для выполнения данного урока потребуется минимальные познания графического редактора.
Создаем рабочую область и размещаем на ней прямоугольник произвольного цвета.

Пишем текст выбрав на панели инструментов «Текст» (Т). Делаем заливку отличной от нашего фона что бы видеть саму надпись.

Убираем заливку текста во вкладку оформления, а так же увеличиваем толщину обводки и придаем ей желаемый цвет.

Перейдя во вкладку обводка устанавливаем следующие настройки. Тем самым мы имитируем неоновые лампы из которых состоит текст.

Нужно придать нашей надписи свечения, для этого мы выполняем следующие действия. Копируем нашу надпись после чего вставляем ее позади сочетанием клавиш Ctrl+B. После этого переходим во вкладку эффектов и выбираем «Размытие по Гауссу». Чем больше значение мы укажем тем ярче будет свечение неона.

Что бы предать больше объема надписи выберем не большое значение размытия, после чего сдвинем нашу надпись на несколько пунктов.

Вот так используя простые инструменты и не много времени мы сделали надпись с эффектом неонового свечения.
Данный урок мы посвятим обучению создания эффекта капающей краски на тексте.
Шаг 1.
Пишем текст к которому будем применять эффект капающей краски.

Шаг 2.
Преобразовываем нашу надпись в кривые Shift+Ctrl+O.

Выбрав инструмент прямое выделение перемещаем буквы на разную высоту.

Шаг 3.
Для того что бы нарисовать свисающею краску будем использовать инструмент «Карандаш». Можно так же использовать инструмент «Перо».

Шаг 4.
Приближаем нашу надпись и начинаем рисовать.

Не переживайте что капли не идеальны, в дальнейшем мы это исправим.
Шаг 5.
Для того что бы отредактировать наши капли краски включаем умные направляющие Ctrl+U. Выбираем инструмент прямое выделение, и начинаем редактировать капли.

Так же добавим несколько падающих капель краски. С помощью «Эллипс» рисуем круги под свисающей краской.

Шаг 6.
Выделяем все наши объекты. Открываем панель обработки контуров и нажимаем «Соединение».
Сегодняшний урок научит как придавать тексту эффект вдавленности или выпуклости используя инструменты Illustrator.
Шаг 1.
Создаем рабочую область на которой размещаем прямоугольник залитый серым цветом. Делаем надпись на ваше усмотрение. После чего отключаем заливку и обводку этого текста.
Шаг 2.
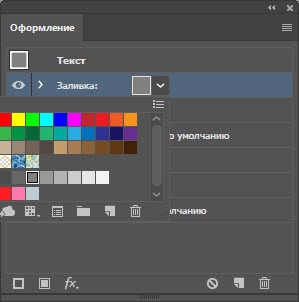
На панели оформления добавляем новую заливку. Меняем цвет с черного на серый и добавляем в панели непрозрачности осветление.

Шаг 3.
Применим к нашей заливки эффект размытие по Гауссу. Для этого на панели выбираем Эффект > Размытие > Размытие по Гауссу. Значение размытия указываем в пределах 2-4 пикселей.

Шаг 4.
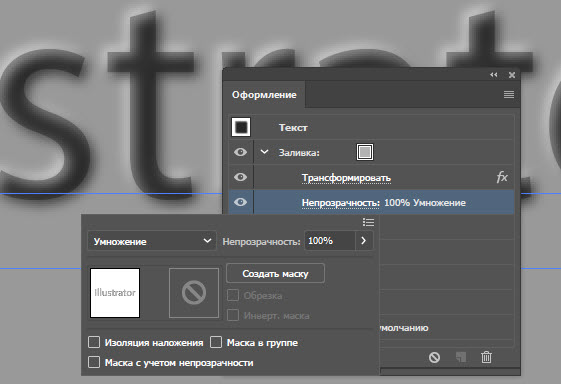
Дублируем заливку. Меняем цвет заливки на более темный, и применяем умножение в панели прозрачности.

Шаг 5.
Применяем к данной заливки эффект Трансформации со значениями приведенными на фото.

Шаг 6.
Создаем новую заливку с цветом фона, а так же применяем к ней трансформацию со значениями указанными ниже.

Шаг 7.
Применим к верхней заливки на панели непрозрачности пункт «умножение», для придания объема нашему тексту.
Теперь приступим к созданию текста с эффектом вдавливания.
Шаг 8.
Дублируем уже существующую надпись. После чего удаляем две верхние заливки. В оставшейся удаляем размытие по Гауссу.

Шаг 9.
Создаем новую заливку с более темным серым фоном. После чего применяем трансформацию с указанными параметрами.
Применяем к верхней заливки эффект внутреннего свечения.


Для усиления эффекта тени создаем новую заливку с более темным цветом, и помещаем ее между двух заливок.
Learn to apply a neon glow to text in Adobe Illustrator using multiple strokes and fills on a single object in the Appearance panel.
What you'll need
What you learned: How to work with the Appearance panel to layer multiple strokes and fills on text to achieve a neon text effect
Work with the Appearance panel
The Appearance panel shows the appearance formatting applied to selected artwork. With the text frame selected, you will not see the text formatting, but rather the frame formatting in the Appearance panel.
- In the Appearance panel, click Characters to see the text formatting. You can then see the stroke, fill, and other appearance properties in the panel. With the text selected, you can’t apply another stroke and fill—the text frame needs to be selected.
- To select the text frame again and see its appearance formatting, click Type at the top of the panel.
Add multiple strokes
With the text frame selected, you can now add more strokes and fills. By layering more than one stroke and fill on the text, and applying color, weights, and effects, you can achieve the neon glow effect.
- Click the Add New Fill button at the bottom of the Appearance panel to apply a second fill. The new fill will appear on top of the previous fill.
- To change the appearance of the existing stroke, change the color by clicking the stroke color and then change the stroke weight.
- To add a second stroke, click the Add New Stroke button at the bottom of the Appearance panel.
- To change the appearance of the new stroke so that it is under the original stroke, you can change the ordering. Drag the new stroke below the original stroke so it is behind the new fill and the original stroke.
Apply an effect to a single stroke or fill
You can apply effects to the text object as a whole, or you can apply effects to an individual appearance property like one of the strokes.
- Click the appearance row (the stroke) to select it. This selection targets the appearance so that the effect will only be applied to it.
- Click the Add New Effect button at the bottom of the Appearance panel or choose the effect from the Effect menu.
- Choose Blur > Gaussian Blur.
- Change the radius in the Gaussian Blur dialog box and click OK.
Tip: Add more strokes to the artwork, change the color, reorder the strokes and fills, and apply the glow effect to give the artwork more depth.
Читайте также: