
Как сделать tape stop в fl studio
The tape stop effect is very common in electronic music and pop today.
The way I hear it in music, it can be used to add fun, and a sense of drama to a track.
As if it to say, the track has stopped – no it hasn’t. And it continues.
There are multiple ways you can reproduce a tape stop effect on fl studio
you can use a tape stop effect in fl studio in multiple ways.
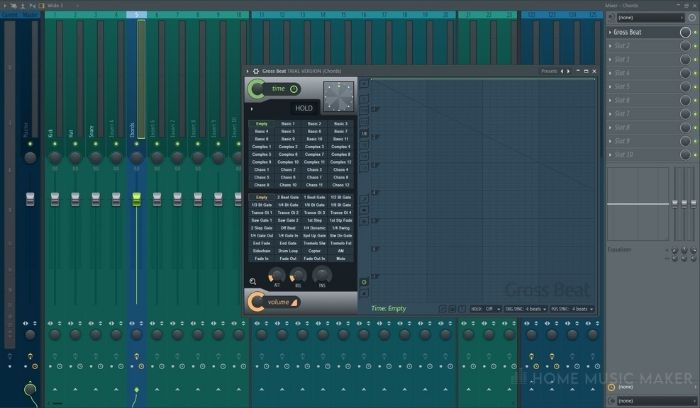
Gross Beat
For the purpose of this, I will reflect on FL Studio’s own Gross Beat, and DBGlitch These to program work similiarly.
Gross beat is perfect for real-time or rendered gating, glitch, repeat, scratching and stutter performances. Gross Beat stores audio in a 2-bar rolling buffer under the control of 36 user definable time and volume envelopes, giving you unlimited creative control.
Here you have a sequence of events. It is very much like the the playlist sequencer. you can change the position and the synchronization between the playlist, the patterns, bars and beats between.

To use gross beat to create a tape stop effect all you have to do is simply Drag the time cursor over the green graph patter. and bend it. The line should bend, as you wish. Stop it as you see fit.
The cool thing about Gross beat is that there are multiple parameters, or “Slots” which you can use to set specific, pre made interesting cues and patterns.
Another manner, I’ve discovered to use the tape stop effect, is by pressing the record button and drag the time off set.
The circle that looks like a clock is actually a turntable that manage the music that plays as a record.
You can automate as you see fit or record the parameters.
Other interesting things you can do with gross beat is stutters, gated effects, swing effects, flanges/wish wash, reverse. If you want to get really creative you can use the preset
“Turntabilist” and organize multiple patterns to scratch the music or whatever insert in your mix.
Video Tutorial
Here’s a good starter via Beat School:
Illformed’s Glitch
Glitch works much in the same way.
Glitch is an audio effect plugin for Windows (VST), Mac (VST and AU) and Linux (VST), available in both 32-bit and 64-bit formats. Featuring a new and improved sequencer which can play multiple effects simultaneously, with the ability to trigger unique scenes from every note on your keyboard, Glitch can be as gentle or as brutal as you like.
Add the occasional splash of retrigger or stretcher to single hits within your drum loop, or fill the entire sequencer with random effect blocks for a totally chaotic trip down the digital rabbit hole… the choice is yours!
However there isnt necessarily a turntablist function which allows you to manipulated the entire output like a record backwards and forwards. It is more simulated to my ears.
You can use the Red or Orange (Depending on your version.)
Tape stop: and drop it in your sequence where you prefer.
Finally, you can affect the parameters that you find under the orange panel.

Check out my in depth view of DB glitch and other neat vsts here.
You can really get carried away with both manners of doing things, there’s always an unlimited supply of creativity!
If you found this useful please help by subscribing and checking out my music. I’d really appreciate it.
We hope you love the products we recommend. We may collect a small commission if you purchase through one of our links. This will not cost you anything extra. Thank you if you do. As an Amazon Associate, I earn from qualifying purchases.
Performing a tape stop effect in FL Studio is a great way to add an exciting element to your track. Luckily it can easily be achieved by using the native FL Studio plugin, ‘Gross Beat,’ and modulating the time parameter.
The Tape Stop Effect
The tape stop effect is a commonly used trick in many modern-day music productions, even if only subtly. It can help add interest and variation to your tracks, and it is also great at subtle building up to a switch-up in a song.
Luckily, FL Studio can achieve this effect, thanks mainly to the native VST plugin ‘Gross Beat,’ which is perfect for emulating this effect style.
This FL Studio tutorial will look at how you can easily use Gross Beat to achieve this effect within your productions.
Step 1 – Opening Gross Beat
First, make sure that the audio you want to apply the effect to is on track within the mixer. You can do this by opening the desired audio track selector and putting it onto a mixer track that you want it to be on.
I am using audio for the clip above, but this technique will work the same for any audio source.
Step 2 – Making The Tape Stop Effect
Once you have placed the audio on a mixer track, you will want to open an instance of Gross Beat on the effect rack for this track.
With Gross Beat open, you can leave it on the default patch, then make a slopping curve within the time modulation section, so the lowest point is at the end of the parameter.
To get a smooth curve, you can right-click on a point and select ‘single curve.’
You can right-click to create more points, allowing you to achieve greater control over the effect.
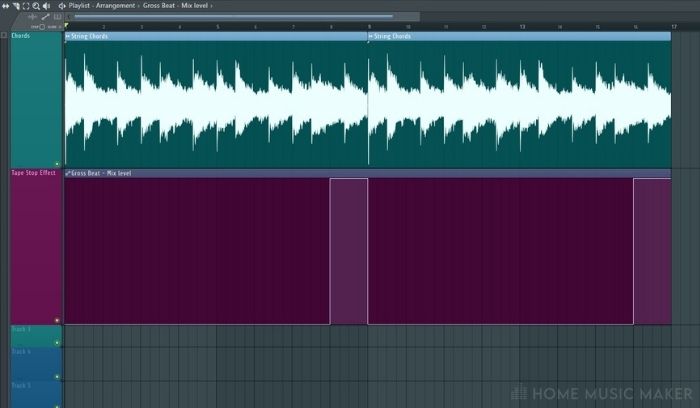
Step 3 – Creating Automation
Now that you have created the tape stop effect, you will want to create an automation that allows you to control when to use it in the track.
To do this, right-click on the mix knob to the right of the Gross Beat effect in the mixer channels effect rack. In this drop-down, you can then select the option to create an automation clip of that parameter.
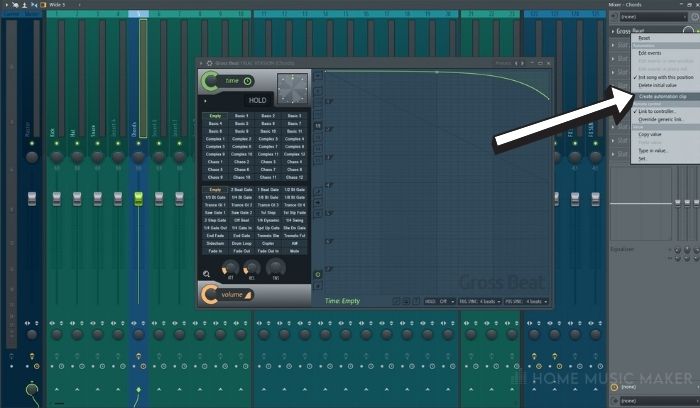
Once selected, the automation clip will appear in the next free playlist track, from where you can adjust it only to be enabled when you want it to.
You can do this by right-clicking to create points within the automation.
To enable the effect, make sure that the automation is 100% on. As seen in the example above, when you want the effect disabled, ensure that the automation is at 0%.
Related Questions
What is the tape stop effect?
The tape stop effect emulates the sound you get when stopping the magnetic tape on a tape deck. When this happens, the audio slowly decreases in pitch and then stops, which you achieve when doing this effect within your DAW.
Can you achieve the tape stop effect without Gross Beat?
The most important thing you have to complete when trying to achieve this effect is reducing the pitch over time.
So this can be achieved in a wide range of methods, such as automating the pitch or using a plugin with a pitch-altering function.
Why is tape stop so popular?
Tape stop is a great way to make it sound as if your track is played through a cassette in a tape machine, which goes well with analog-sounding tracks in particular.
It can also be a great way to add some sonic interest to a track and transition to different song sections.
Can you get Gross Beat for Ableton Live?
Unfortunately, there is no way to get Gross Beat for Ableton, as it is a native FL Studio plugin. That being said, there are some excellent alternatives to it.
Some alternatives include MrRythmizer by Melda and Time Shaper 2 by Cabelguys, which offer various interesting effects for your music production.
Can you apply a tape stop effect to your whole song?
You can easily add the tape stop effect to your entire production simply by applying the Gross Beat effect to your master channel instead of the individual mixer track. If you are not using Gross Beat and can instead automate the global pitch of your project.
How do you undo the tape stop effect?
To undo your tape stop effect, you need to delete the instance of Gross Beat on the mixer track and then delete the automation clip. You can do the same if you have made an automation pitch clip by simply deleting it.
Do all versions of FL Studio have Gross beat?
Unfortunately, only the Signature and All Plugin Edition versions of FL Studio feature a fully unlocked version of Gross Beat.
However, you can still use Gross Beat with the other versions, although you may find that it will remove itself when you try to open up the project again.
Are there any alternatives to Gross Beat?
There are some great effect plugins alternatives to Gross Beat, allowing you to achieve pitch, volume, and filter modulations overtime on different audio sources.
Some of the most popular alternatives include MrRythmizer by Melda and Time Shaper 2 by Cabelguys. Both offer very similar capabilities to that of Gross Beat.
Final Words
You should now know how to create a simple tape stop effect within FL Studio using the native Gross Beat plugin.
Tape stops are a great trick for any producer to have in their arsenal and one that is deceptively easy to achieve once you know how it’s done.
To view this video please enable JavaScript, and consider upgrading to a web browser that supports HTML5 video
In this lesson you’ll learn how to make a tape stop effect in FL Studio. This tape stop tutorial shows you a typical pitch effect, very well suited for hardstyle leads, big room house lead, or actually many EDM leads.
There are many different ways to create a tape stop effect. That’s why I will present you 3 different ways to create that pitch down effect. Always feel free to explore other methods as well.
To put the tape stop effect into action, you need to have a lead and a melody. In this example, I created a Sylenth1 hardstyle lead and a very short melody.
How to make a tape stop effect – method 1
With the first method you need the Effectrix plugin. It’s a third-party VST that can create many cool sound effects. An alternative for Effectrix is the Glitch plugin from dBlue. If you don’t have these plugins, then skip this method.
The Effectrix plugin has a “Vinyl” option that can create the tape stop effect in no time. Just set it to the right timing and draw blocks at the moments the vinyl effect should be active. Then play with the settings at the bottom of the plugin to shape your tape stop effect. Make it slow, fast, long, short or whatever you desire.
Typically, for longer notes I use a gradual slope. For shorter notes I use a steeper slope. You can also “draw” these blocks differently, so the vinyl effect gets activated halfway through the note.
How to make a tape stop effect – method 2
Now the next 2 methods simply revolve around the pitch settings of your synthesizer. The results aren’t exactly the same, but that’s fine. There’s no “good” or “bad” method. It’s just what you want and how you can make it sound the way you like.
Many synthesizers have pitch settings, like the pitch wheel on Sylenth1. When you move that wheel, the pitch of the sound changes. What you can do here is to automate that knob (make an automation clip). Then you can control when and how the pitch of your lead changes. Learn here about How to Make Automation Clips in FL Studio.
In this example, I want a pitch down effect at the end of the “melody”, the last note. So, I created an automation clip of the pitch wheel and I drew a line in that clip (on the Playlist) to tell the wheel to go down.
You can also change the amount of pitch on the synthesizer next to the pitch wheel. It determines how sensitive (or how extreme) the pitch wheel reacts to changes.
How to make a tape stop effect – method 3
The third and final method is actually similar. We’re also going to use the pitch settings, but now the FL Studio “build-in” pitch settings.
Each instrument or sample you have on the channel rack has a pitch setting at the very top of that instrument/sample window. So, when you don’t have a cool plugin or a neat little pitch wheel to play with, there’s always the build-in pitch settings as a final remedy.
The way you go about this, is exactly the same as the previous method. Just create an automation clip and draw the line(s) how and when you want the pitch of your sound to change.
Using the tape stop effect methods
The advantage of using these last 2 methods is that you can also “pitch up” your sound. It’s cool to use on screeches too.
Sometimes it’s a little bit of jiggling to make it sound right. Each method feels slightly different. Just play around with all these options. Before you know it, you have yourself a cool tape stop effect or pitch down effect.
Need more sound effects?
If you want to learn more about cool sound effects, feel free to check out my How to Make a Sweep Effect in FL Studio lesson and How to Make an Explosion Sound Effect lesson.
You can also download my free Hardstyle Sample Pack to get more sound effects, as well as other samples, like kicks, snares, screeches, etc.

There’s actually several ways to create ‘tape stop’ -effect in FL Studio (Grossbeat, WaveTraveller, etc), but I think the easiest route is to use dBlue’s TapeStop VST effect and of course, it’ll work in other DAWs as well.
dBlue TapeStop is a free and easy to use VST effect with adjustable slowdown speed.
I’ll demonstrate the use of this fabulous effect in the video below:
Installation instructions: just unpack it and copy the .dll file to your vstplugins folder.

About Author
Related Posts
How To Master A Song In FL Studio
What is a MIDI Keyboard Controller and Do I Need One?
7 Simple Steps to Make Electronic Music
23 Comments
Good tutorial thanx, respect to your work and your efforts to enlight beginners! 🙂
You can configure it to fit your needs and is very easy to work with. Unless someone invents something fantasic, I’ll never use another Vst-Tapstop-Plug again.
Thanks for the link, Simon, going to check that out as well 🙂
Thanks for the tutorial and the link of the plugin. I just tried this plugin the effect doesn’t seem to affect the bassline. I’ve sidechained kick to bassline. Also the effect is not very neat like the DJs do with their consoles. Any idea why this is happening?
Hi! If you wan’t the effect to affect several sounds, you either need to: 1. Route all the sounds to a one mixer track and load the effect to that mixer track or 2. add the Tapestop effect to the Master mixer track.
To your second questions: what kind of DJ effect are you looking for specifically?
Thanks for the reply Petri. Nevermind, it worked for me 🙂
can you email it to me please in a compressed folder
Awesome tutorial! Thank you!
No problem, enjoy the dBlue quality 8)
If you like TapeStop, check out dB Blue’s Glitch. It includes a whole bunch of glitchy effects including Tapestop in a single audio rack. You also get a step editor type interface for managing which effects come in and when, plus loads of tweak-able settings for each effect. It’s great! 🙂
Yeah Glitch is great for tape stops too! I’m actually using it in my Dubstep tutorial.
Hi,
I noticed the download link has expired. Is there nay other means of obtaining this plugin?
Thanks.
Hi, yeah the website seems to be down. Here’s another download link:
I’m trying to download that vst, but both of the links is expired.
it’s an awesome vst from the looks of it and i really want it 🙂
Please help? 😀
It took some time but i found it!
Thanks for showing that awesome vst 😀
So when i try and save the download link it always comes back with a error message saying file damaged. please help
Nice track dude…and thanks for posting.
HEY!! Petri i just want to thank you for all these tuts you put up. I have learned good stuff from you so far!! thank you very much man. My dream is to be a producer one day 🙂 these tut help out alot since i dont got time for school D: . So i just wanna say thanks! your tuts do help !
I also had a question, for some reason i dont know how to copy and paste from inside a automated clip like you did on this tut. if you can please let me know how to do it would be very appreciated. i bet its so easy i just dont know how. thanks again
Yritin löytää netistä dBluen TapeStop-efektiä, mutta en löytänyt toimivaa linkkiä siihen mistään.
Olisitko voinut lähettää minulle ko. efektin sähköpostiini ? 🙂
Luultavasti .dll tiedosto riittää.
Se löytyy täältä:
Eli kun scrollaat sivua vähän alaspäin, siellä on osio “Older VST Plug-ins” ja sen alta löytyy latauslinkki pakettiin joka sisältää kaikki noi Illformedin vanhat pluginit (mukaanlukien TapeStop).
Is that vst compatible with studio 1?
I really appreciate your work keep it up. very informative.
Leave A Reply Cancel Reply
IN THE SPOTLIGHT
OR2v Great Sounding Free Oberheim 2-Voice Emulator
Elektrostudio rocks! I just downloaded the OR2v, a free VST synth that emulates the Oberheim Two Voice vintage synthesizer and…
1.8GB Of Free Samples By DeepInDub
(EDIT: the website has been shut down. For some amazing FREE sounds, check out Loopcloud where “Free users get 1,825…
How To Make Electronic Music Part 3: Drum Loops, Percussion and Melody
New York house hero Satoshi Tomiie continues his dance music production tutorial series, with another insightful and educational lesson. This…
100 Superb FREE Drum Kick Samples By Markus Hakala!
Markus Hakala is back with a new set of 100 terrific kick drum samples – this time aimed specifically at…

Nowadays it is difficult to envision any melody made without utilizing various impacts in the track. All things considered, it refreshingly flavors them up, and we can’t resist the urge to hear them out again and again. With the passing years, these VST modules wound up cutting edge in its innovation and highlights. There are dwarf modules available through the web, as freeware or paid. No big surprise it is hard to utilize them all and to make sense of which is the most appropriate to your piece. Principally, on the off chance that you take a gander at the VST impact modules fundamentally added to the oomph factor has a broad accumulation. They incorporate reverb, twisting, tape-stop and numerous all the more such modules.
dblue Tapestop Video Tutorial
Tape-stop is a VST effect module, and the capacity doled out is to back off the contributes or to include breaks the track. This impact isn’t something new, and you more likely than not tuned in to it before. Regularly because of the recording device working issues, the music rhythm gets back off, or there are extraordinary breaks. This impact copies a similar thing yet just when you need. DJs and sound makers utilize it in very a few tracks to make it all the more energizing for their audience members.
Dblue Tape-stop is a standout amongst other performing VST effect modules for tape-stop which is accessible only with no cost. Dblue Tape-stop has a streamlined plan and very less demanding to take a shot at with all the sort of music. Be it hip-bounce, popular or any music. As an allowed to utilize VST module, all the DAW which incorporate FL studio additionally bolster it in their framework. Dblue Tape-stop is available in 32-bit form as VST or AU module.
Also Check: dblue Glitch
The most effective method to begin dealing with Dblue Tape-stop
Obviously, the underlying advance to take is introducing the Dblue Tape-stop in your DAW or FL Studio. Download the module from any of the locales on the web. After the download finishes, open up the FL studio, to revive the module list. The Dblue Tape-stop is presently in your module rundown, and you can utilize it now. At the point when to utilize the Dblue Tape-stop, well it doesn’t take after any rules. It is all up to the specialists and DJ. For knowing how to function with this Plugin, you can look down Google or YouTube and locate an appropriate instructional exercise. Additionally, to deal with it isn’t conceptualizing.
At first, select the track and in the midst of its being playing select the module from the rundown including the module. The show indicates just three handles back off, trigger and deferral with each having its particular part. The backoff handle will decrease the speed of the beat while the trigger will keep control over the measure of impact. For example, on the off chance that you keep its setting on 0, at that point there won’t be any impact, yet when you change the setting at one, you will invest full impact to the track.
Moreover, setting robotization in the measure of effect in the whole playlist is likewise conceivable. With this, your activity of kicking trigger handle off will get settled. The defer handle is for producing delays before the event of the impact.
Dblue Tape-stop is the most straightforward approach to include tape-stop impact
In spite of the fact that there are a few strategies to add the tape-stop impact to your track none of them can beat the simplicity of Dblue Tape-stop module. Almost certainly it is easy to add effect to this module which turns out to be more agreeable subsequent to utilizing it a couple of times. Aside from this, it has some different experts like accessible at no cost and outwardly streamlined. With only three handles you have the decision of utilizing tape-stop impact diversely in the track.
Download the dll file and move it to your vst plugins folder, That’s it! Enjoy!
Читайте также: