
Как сделать снэпшот в фотошопе
Facebook Если у вас не работает этот способ авторизации, сконвертируйте свой аккаунт по ссылке ВКонтакте Google RAMBLER&Co ID
Авторизуясь в LiveJournal с помощью стороннего сервиса вы принимаете условия Пользовательского соглашения LiveJournal
шопишь, шопишь, мучаешься. вот он, вроде съедобный результат.
рраз, сохраняешь его этим самым снимком. дальше мучаешься - хистори давно не хватает, а чуешь, что испортил намертво. плюешь, возвращаешься к снимку. щастье.
снимок запоминает промежуточный зельтат. точка отката, можно так сказать.
ау, гуру, я не гоню?
да, не прошли даром курсы фотошопа)))
А еще слева от снэпшота можно переключать — с каким из снэпшотов кисть истории будет работать.
Отсюда есть такой алгоритм, например, ретуши. Блюрим картинку до одурения, делаем снимок, откатываемся назад к исходному состоянию и аккуратненько закрашиваем ею царапины. Ну и еще чего придумать можно
Ну да.
Я, честно говоря, этим способом ретуши не пользуюсь, но когда-то меня заставляли его сдавать на зачет по шопу. Тем не менее, он существует.
Ненужность первая: Image Snapshot.
Я долго размышлял зачем ввели эту опцию. Нет, я понимаю, что существует масса людей, которым сложно держать весь проект целиком в голове и частенько нужно поставить жирную запятую после проделанной работы. Но практика показывает, что из массы опрошенных мной коллег, лишь единицы смутно догадывались о том, зачем вообще это нужно, а уж использовать. в общем, отключаем и отбрасываем в сторону первый камень мешающий нам идти по дороге в светлое завтра. Теперь по существу.
Автоматический Snapshot или "экранный снимок" нужен, чтобы зафиксировать состояние проекта на какой-либо стадии. Например, мы долго и нудно корпели над эффектом и желаем сохранить изменения, чтобы при неудачном действии вернуться к исходной точке. Но помилуйте, дорогой друг, каждый раз, когда вы создаете Snapshot, драгоценная память уменьшается и не проще-ли сделать еще одну копию работы на жестком диске?! Тем более, что имея в памяти копии собственных трудов мы уменьшаем и без того, частенько весьма и весьма, скудные ресурсы. Мало того, существует история работы (History), которая позволяет с легкостью возвращаться на несколько действий назад, а мы так бездумно разбазариваем свободную память.
ой, вы так написали классно, даже такая тупица как я поняла. я, правда, ддаже и не знала про эти снимки и по старинке бэкапила.
Learn how to use the Undo/Redo commands and the History panel to control the state of your images in Adobe Photoshop.
By using the Undo/Redo commands and the History panel, you can easily control the state(s) of your images.
Updated in Photoshop CC 20.0 (October 2018 release)
Beginning with the October 2018 release of Photoshop CC (20.0), you can undo multiple steps in your Photoshop document using Control + Z (Win) / Command + Z (Mac). This new multiple undo mode is enabled by default.
To perform undo or redo operation, do the following:
- Undo: Moves one step back in the undo chain. Choose Edit > Undo or use the keyboard shortcut Control + Z (Win) / Command + Z (Mac).
- Redo: Moves one step forward. Choose Edit > Redo or use the keyboard shortcut Shift + Control + Z (Win) / Shift + Command + Z (Mac).
The Edit menu also displays the name of the step that will be undone next to the Undo and Redo commands. For example, Edit > Undo Edit Type.
(Photoshop)
To switch back to the legacy undo mode in Photoshop, do the following:
- From the menu bar, choose Edit > Keyboards Shortcuts .
- In the Keyboard Shortcuts And Menus dialog, select Use Legacy Undo Shortcuts and click OK .
- Restart Photoshop.
(Adobe Camera Raw)
To switch back to the legacy undo mode in Adobe Camera Raw, do the following:
- From the menu bar in Photoshop, choose Edit > Preferences > File Handling .
- In the File Compatibility section, click Camera Raw Preferences .
- In the Camera Raw Preferences dialog, select Use Legacy Undo Shortcuts and click OK .
- Restart Photoshop.
Revert is added as a history state in the History panel and can be undone.
Use the History Brush tool to paint with the selected state or snapshot on the History panel.
Use the Eraser tool with the Erase To History option selected.
Select the area you want to restore, and choose Edit > Fill. For Use, choose History, and click OK.
To restore the image with a snapshot of the initial state of the document, choose History Options from the Panel menu and make sure that the Automatically Create First Snapshot option is selected.
Hold down Esc until the operation in progress has stopped. In Mac OS, you can also press Command+period.
A progress bar indicates that an operation is being performed. You can interrupt the operation or have the program notify you when it has finished the operation.
Do one of the following: Choose Edit > Preferences > General (Windows) or Photoshop > Preferences > General (Mac OS).
You can use the History panel to jump to any recent state of the image created during the current working session. Each time you apply a change to an image, the new state of that image is added to the panel.
For example, if you select, paint, and rotate part of an image, each of those states is listed separately in the panel. When you select one of the states, the image reverts to how it looked when that change was first applied. You can then work from that state.
You can also use the History panel to delete image states and, in Photoshop, to create a document from a state or snapshot.
To display the History panel, choose Window > History, or click the History panel tab.

A. Sets the source for the history brush B. Thumbnail of a snapshot C. History state D. History state slider
Keep the following in mind when using the History panel:
Program-wide changes, such as changes to panels, color settings, actions, and preferences, are not reflected in the History panel, because they are not changes to a particular image.
By default, the History panel lists the previous 20 states. You can change the number of remembered states by setting a preference under Preferences > Performance. Older states are automatically deleted to free more memory for Photoshop. To keep a particular state throughout your work session, make a snapshot of the state (see Make a snapshot of an image).
Once you close and reopen the document, all states and snapshots from the last working session are cleared from the panel.
By default, a snapshot of the initial state of the document is displayed at the top of the panel.
States are added to the bottom of the list. That is, the oldest state is at the top of the list, the most recent one at the bottom.
Each state is listed with the name of the tool or command used to change the image.
By default, when you select a state, the states below it are dimmed. This way you can easily see which changes will be discarded if you continue working from the selected state.
By default, selecting a state and then changing the image eliminates all states that come after it.
If you select a state and then change the image, eliminating the states that came after, you can use the Undo command to undo the last change and restore the eliminated states.
By default, deleting a state deletes that state and those that came after it. If you choose the Allow Non-Linear History option, deleting a state deletes only that state.
Revert to a previous image state
Click the name of the state.
Choose Step Forward or Step Backward from the History panel menu or the Edit menu to move to the next or previous state.
Delete one or more image states
Click the name of the state, and choose Delete from the History panel menu to delete that change and those that came after it.
Drag the state to the Delete icon to delete that change and those that came after it.
Choose Clear History from the panel menu to delete the list of states from the History panel, without changing the image. This option doesn’t reduce the amount of memory used by Photoshop.
Hold down Alt (Windows) or Option (Mac OS), and choose Clear History from the panel menu to purge the list of states without changing the image. If you get a message that Photoshop is low on memory, purging states is useful, because the command deletes the states from the Undo buffer and frees up memory. You can’t undo the Clear History command.
Choose Edit > Purge > Histories to purge the list of states for all open documents. You can’t undo this action.
Create or replace a document with an image state
Drag a state or snapshot onto the Create A New Document From Current State button in the History panel. The history list for the newly created document contains only the Duplicate State entry.
Select a state or snapshot, and click the Create A New Document From Current State button . The history list for the newly created document contains only the Duplicate State entry.
Select a state or snapshot, and choose New Document from the History panel menu. The history list for the newly created document contains only the Duplicate State entry.
Drag a state onto an existing document.
To save one or more snapshots or image states for use in a later editing session, create a new file for each state you save, and save each in a separate file. When you reopen your original file, plan to open the other saved files also. You can drag each file’s initial snapshot to the original image to access the snapshots again from the original image’s History panel.
Set history options
You can specify the maximum number of items to include in the History panel and set other options to customize the panel.
Automatically Create First Snapshot
Automatically creates a snapshot of the initial state of the image when the document is opened.
Automatically Create New Snapshot When Saving
Generates a snapshot every time you save.
Allow Non-Linear History
Makes changes to a selected state without deleting the states that come after. Normally, when you select a state and change the image, all states that come after the selected one are deleted. In this way, the History panel can display a list of the editing steps in the order that they were made. By recording states in a nonlinear way, you can select a state, make a change to the image, and delete just that state. The change is appended at the end of the list.
Show New Snapshot Dialog By Default
Forces Photoshop to prompt you for snapshot names even when you use the buttons on the panel.
Make Layer Visibility Changes Undoable
This option is selected by default. Turning layer visibility on or off is recorded as a history step. Deselect this option to exclude layer visibility changes in history steps.
Set Edit History Log options
You may need to keep careful track of what’s been done to a file in Photoshop, either for your own records, client records, or legal purposes. The Edit History Log helps you keep a textual history of changes made to an image. You can view the Edit History Log metadata using Adobe Bridge or the File Info dialog box.
You can choose to export the text to an external log file, or you can store the information in the metadata of edited files. Storing many editing operations as file metadata increases file size; such files may take longer than usual to open and save.
If you need to prove that the log file hasn’t been tampered with, keep the edit log in the file’s metadata, and then use Adobe Acrobat to digitally sign the log file.
By default, history log data about each session is saved as metadata embedded in the image file. You can specify where the history log data is saved and the level of detail contained in the history log.
Saves the history log as metadata embedded in each file.
Exports the history log to a text file. You are prompted to name the text file and choose a location in which to store it.
Stores metadata in the file and creates a text file.
If you want to save the text file in a different location or save another text file, click the Choose button, specify where to save the text file, name the file if necessary, and click Save.
Keeps a record of each time you start or quit Photoshop and each time you open and close files (each image’s filename is included). Does not include any information about edits made to the file.
Includes the text that appears in the History panel in addition to the Sessions information.
Includes the text that appears in the Actions panel in addition to the Concise information. If you need a complete history of all changes made to files, choose Detailed.
The Snapshot command lets you make a temporary copy (or snapshot) of any state of the image. The new snapshot is added to the list of snapshots at the top of the History panel. Selecting a snapshot lets you work from that version of the image.
Snapshots are similar to the states listed in the History panel, but they offer additional advantages:
You can name a snapshot to make it easy to identify.
Snapshots can be stored for an entire work session.
You can compare effects easily. For example, you can take a snapshot before and after applying a filter. Then select the first snapshot, and try the same filter with different settings. Switch between the snapshots to find the settings you like best.
With snapshots, you can recover your work easily. When you experiment with a complex technique or apply an action, take a snapshot first. If you’re not satisfied with the results, you can select the snapshot to undo all the steps.
Snapshots are not saved with the image—closing an image deletes its snapshots. Also, unless you select the Allow Non-Linear History option, selecting a snapshot and changing the image deletes all of the states currently listed in the History panel.
Create a snapshot
To automatically create a snapshot, click the Create New Snapshot button on the History panel, or if Automatically Create New Snapshot When Saving is selected in the history options, choose New Snapshot from the History panel menu.
To set options when creating a snapshot, choose New Snapshot from the History panel menu, or Alt-click (Windows) or Option-click (Mac OS) the Create New Snapshot button.
Enter the name of the snapshot in the Name text box.
Makes a snapshot of all layers in the image at that state
Makes a snapshot that merges all layers in the image at that state
Makes a snapshot of only the currently selected layer at that state
Work with snapshots
To select a snapshot, click the name of the snapshot or drag the slider at the left of the snapshot up or down to a different snapshot.
To rename a snapshot, double-click the snapshot and enter a name.
To delete a snapshot, select the snapshot and either choose Delete from the panel menu, click the Delete icon , or drag the snapshot to the Delete icon.
The History Brush tool lets you paint a copy of one image state or snapshot into the current image window. This tool makes a copy, or sample, of the image and then paints with it.
For example, you might make a snapshot of a change you made with a painting tool or filter (with the Full Document option selected when you create the snapshot). After undoing the change to the image, you could use the History Brush tool to apply the change selectively to areas of the image. Unless you select a merged snapshot, the History Brush tool paints from a layer in the selected state to the same layer in another state.
The History Brush tool copies from one state or snapshot to another, but only at the same location. In Photoshop, you can also paint with the Art History Brush tool to create special effects.
1. Скачайте материалы к уроку. Вы увидите одиннадцать файлов с изображением арбуза. Не нужно открывать их по очереди. Вместо этого загрузите все файлы сразу в виде слоев: в Photoshop выберите Файл > Сценарии > Загрузить файлы в стек.
2. Откроется окно Загрузить слои. Нажмите на Обзор, чтобы выбрать изображения на компьютере и загрузить их в Photoshop. Когда в списке отобразятся все необходимые файлы, нажмите OK.
Примечание. Photoshop загружает изображения и создает отдельные слои для каждой фотографии. Этот этап может занять некоторое время.

Создание кадров из слоев
3. Теперь откройте шкалу времени. Выберите Окно > Шкала времени. Photoshop добавляет первый кадр по умолчанию на панель Шкала времени.

4. Нажмите на значок Меню в правом верхнем углу панели Шкала времени и выберите во всплывающем меню пункт Создать кадры из слоев.


6. Для непрерывного воспроизведения анимации нажмите на значок +, чтобы дублировать слои.

7. Не отменяя выбор дублированных кадров, выберите в меню Обратный порядок кадров.

8. В кадрах с 1-го по 11-й арбуз становится меньше, а в кадрах с 12-го по 22-й — снова увеличивается. Поскольку кадры 11 и 12 совпадают, удалите дублированный кадр в середине анимации. Нажмите на 12-й кадр и выберите в меню Удалить кадр.
9. Нажмите на пробел для предварительного просмотра анимации.

Настройка синхронизации
10. Нажмите на первый кадр снизу, где указано 0 секунд и есть миниатюрная стрелка. Измените продолжительность на 0,5 секунды.
11. Выполните то же самое с 11-м кадром. Нажмите на пробел, чтобы проверить настройку: между увеличением и уменьшением арбуза анимация будет ненадолго замирать.

Предоставление доступа к проекту
12. Сохраните анимацию как видео для Instagram. Выберите Файл > Экспорт > Рендеринг видео.
13. В окне Рендеринг видео присвойте файлу имя и выберите местоположение файла.
Установите размеры 1080 x 1080. Это оптимальный размер для Instagram. Сохраните настройки по умолчанию для остальных параметров и нажмите Рендеринг.
Совет. В Instagram не предусмотрено бесконечное воспроизведение видео, поэтому если анимация короткая, то перед экспортом вы можете добавить кадры.

There is nothing more annoying than downloading a new Action for Photoshop and realizing that it is downright destructive! It flattens your image, throws out all that hard work, and runs its course ruining your history palette with unnecessary steps. Before you know it, you can’t go back, you forgot to save your work before the Action, and now you are left with an undesirable effect and hours of work lost.
Okay, I know that was one over dramatized example of why it is important to know what snapshots are, but these things happen and can be avoided with Snapshots. Photoshop is not a camera. It cannot take a picture of anything. It can, however, make a carbon copy of your image and all the work you are doing on it in the layers palette.
There is a little-known tool in the History palette that lets you take a snapshot of your progress. Certainly, every step in your History palette is kind of like a snapshot, but the actual snapshot button allows you to make a copy of your image and the layers palette right in the History window. So, if your history states are set to a low amount (like the default 20) you cannot go back to any steps before the current 20. If you make a snapshot, you can!

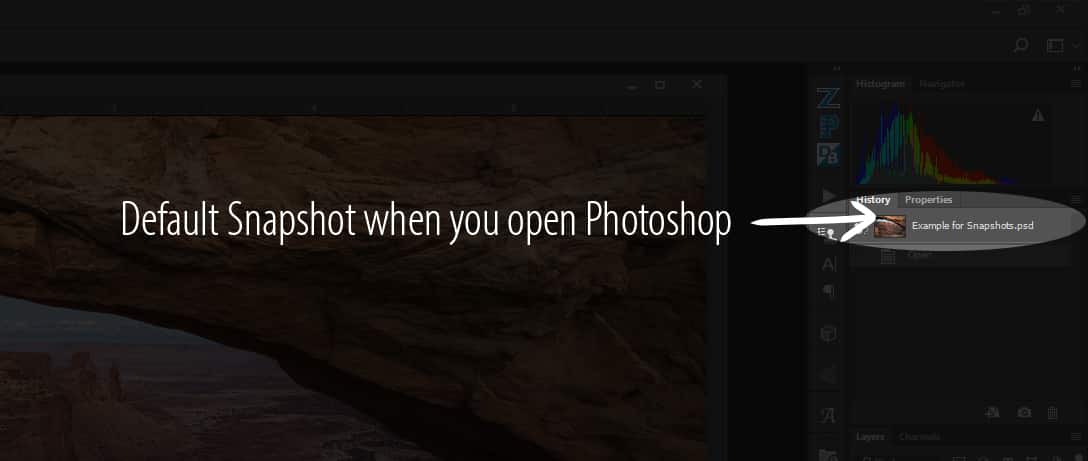
The crazy thing is, you are already working with Snapshots right now, you just may not realize it. By default, every image you open in Photoshop is loaded with a snapshot. Have you ever done a bunch of work on a photo, realized you didn’t like it and clicked the top most layer in the history palette? That is a snapshot!
In this tutorial, I will show you how to make snapshots as you work, so you don’t lose your progress. There are many advantages to using this tool and using it often. You can even set it up so that every time you save your image, it creates a snapshot! How cool is that!
Let’s get into it!

f.64 Academy and f.64 Elite are the brainchildren of Blake Rudis. While he is a landscape photographer he is most passionate about post-processing images in Photoshop and mentoring others.
For Blake, it is less about the art and more about the process. He dives deep into difficult topics and makes them easy to understand through his outside the box thinking.


Appreciated. I just figured out I could use the History panel to create a new document at the current state. Interesting.
No problem! Most of the actions I create that make a new document from your work are using that button. For example, the old custom radiance and color zone system.
This could certainly save some pain. Excellent tip Blake.
It sure does! Thanks for watching.
As always, you have presented an informative and well thought-out tutorial! I love them all! Again, you have demonstrated a useful but not-so-well-published feature of Photoshop.
Keep up the great work!
Thanks, Paul! I like this feature a lot too. It really helps on my longer workflows.
It’s too bad that snapshots are not saved when you close the file.
Yeah all you can really do is right click the snapshot, open it in a new document and save it as a new document. I fear file sizes would be HUGE if they saved the history states and the snapshots. I would venture to say my a7rII files would be 3 gigs a piece if that were the case.
Is there a way to save the snapshots with the document so that when you open the file the next day, you can continue work on the document with the snapshots?
Unfortunately, you cannot. However, you can right click on any Snapshot and save it and its layers at their current state as a new document. I think the file size would get huge if the saves had the snapshots in them.
Иногда хочется поэкспериментировать в Photoshop и намеренно состарить фотографию, чтобы получился эффект старой кинопленки. Как правило, большой популярностью пользуются картинки в стиле старых видеокассет. Фотографии выглядит также, как в фильмах 90-х, на таких кассетах, с аналогичными глитч-эффектами и в характерном стиле. И в сегодняшней статье мы расскажем вам, как добиться такого эффекта.
Эффект старой кинопленки
Сразу скажем, что способ, который мы вам покажем ниже, одинаково хорошо подходит и для созданий старой пленки VHS-кассет, и для создания пленки со старых кинопроекторов. Разница будет всего в одном действии, которое мы вам обязательно покажем.

Для примера мы берем вот такую обычную фотографию обычного дома, которую мы нашли в открытом доступе. Второе, что нам понадобится для создания эффекта старой кинопленки – это соответствующая текстура. Мы нашли отличную текстуру в стиле VHS в открытом доступе.
Именно об этом действии мы и говорили, когда писали, что разница, между VHS и старой пленкой заключается в одном только действии. Это действие – выбор соответствующей текстуры. Собственно, для первого случае просто вбейте запрос в картинках «текстура VHS для photoshop», а во втором – «текстура кинопленки для Photoshop». В любом случае вы просто можете кликнуть по ссылкам и перейти в соответствующие разделы Яндекс Картинок.

Итак, добавили эффект на отдельную картинку, но пока возвращаемся на нашу картинку с домом и немного поработаем с ней. Для этого выбираем пункт «фильтр», и в открывшемся окошке выбираем пункт «размытие», а затем пункт «размытие в движении».

Изображение нужно размыть лишь немного, и то, только в том случае, если оно слишком четкое. Делайте все на глаз, но мы размываем нашу фотографию на 16 градусов и со смещением в 25 пикселей, ибо уж очень четкая получилась фотография.
После этого копируем основной слой. Для этого воспользуемся комбинацией горячих клавиш Ctrl+J. Копию заливаем черным цветом, а для этого переходим в «редактирование», выбираем пункт «заливка» и в «содержании» выбираем черный цвет.
После этого переходим в пункт «фильтр», затем в «галерею фильтров» и применяем эффект зернистость фотопленки с показателями:
- Зерно – 5.
- Область светов – 0.
- Интенсивность – 10.

Переходим в параметры наложения, которые находятся над табличкой со слоями. Параметры наложения меняем на «экран». Как видите, все проделанные действия заметно ухудшили качество нашей картинки и уже вырисовывается нечто похожее.

Теперь выбираем вторую фотографию с текстурой и переносим ее на наше изображение дома. Растягиваем его на всю картинку дома, а режим наложения также выставляем на «экран». В нашем случае эффект получился слишком сильным, поэтому слегка понижаем непрозрачность, чтобы сделать глитч-эффект более умеренным. Однако проблема остается в цвете картинки, ибо старая пленка достаточно плохо передавала цвета.
Пользуемся комбинацией горячих клавиш Ctrl+U и вызываем табличку с настройками цветового тона и насыщенности. Тут мы слегка понижаем насыщенность и яркость.

По сути, картинка готова, но если вы родом из 90-х, то наверняка помните главную фишку старых камер. Это дата съемки, которая отображалась в правом нижнем углу снятого материала. Добавляем число, для этого пользуемся инструментом текст, который находится в левой части рабочего стола Photoshop. Для пущего эффекта можно добавить еще индикатор заряда батареи в верхнюю часть картинки, но это все уже на ваше усмотрение. По итогу получается кадр, который мы хотим вам показать сразу в сравнении с начальной картинкой.

Аналогичным образом вам нужно будет провести работу и с эффектом старой кинопленки, но в этом случае нужно добавить большей желтизны на фотографию и еще больше убрать цвета, либо вообще сделать картинку черно-белой.
На этом наша статья подходит к концу. Надеемся, что урок получился для вас понятным и познавательным. Не забывайте делиться статьей с друзьями и знакомыми в социальных сетях. Мы же на этом прощаемся с вами, всем удачи и до новых встреч.
Читайте также: