
Как сделать slowed reverb в adobe audition
The Automatic Pitch Correction effect is available in both the Waveform and Multitrack editors. In the latter, its parameters can be automated over time using keyframes and external control surfaces.
Choose Effects > Time and Pitch > Automatic Pitch Correction , and set the following options:
Specifies the scale type that best suits the material: Major , Minor , or Chromatic . Major or Minor correct notes to the specific key of the music. Chromatic corrects to the nearest note regardless of key.
Sets the intended key for corrected material. This option is available only if Scale is set to Major or Minor (because the Chromatic scale includes all 12 tones and isn’t key‑specific).
The combination of scale and key determines the key signature.
Controls how quickly Adobe Audition corrects the pitch toward the scale tone. Faster settings are usually best for notes of short duration, such as a fast, staccato passage. An extremely fast attack can achieve a robotic quality, however. Slower settings result in more natural‑sounding correction on longer sustaining notes, such as a vocal line where the singer holds notes and adds vibrato. Because source material can change throughout a musical performance, you can get the best results by separately correcting short musical phrases.
Defines the threshold beyond which notes aren’t corrected. Sensitivity is measured in cents, and there are 100 cents per semitone. For example, a Sensitivity value of 50 cents means a note must be within 50 cents (half a semitone) of the target scale tone before it is corrected automatically.
Choose a source channel in which pitch changes are most clear. The effect analyzes only the channel you choose, but applies the pitch correction equally to all channels.
Sets the Fast Fourier Transform size of each pieces of data that the effect processes. In general, use smaller values for correcting higher frequencies. For voices, a setting of 2048 or 4096 sounds most natural. For short, staccato notes or percussive audio try a setting of 1024.
Specifies the tuning standard for the source audio. In Western music, the standard is A4 at 440 Hz. Source audio, however, may have been recorded using a different standard, so you can specify A4 values from 410 to 470 Hz.
When you preview audio, displays the amount of correction for flat and sharp tones.
The Manual Pitch Correction effect lets you visually adjust pitch with the Spectral Pitch Display . The Spectral Pitch Display shows the fundamental pitch as a bright blue line, and overtones in yellow to red hues. Corrected pitch appears as a bright green line.
You can visually monitor pitch at any time, without using the Manual Pitch Correction effect. Simply click the Spectral Pitch Display icon in the options bar. To customize resolution, decibel range, and gridlines, adjust Pitch Display settings in the Spectral Displays preferences.
Если вы жаждете, чтобы звуковое сопровождение ваших видеороликов было идеальным, если вы мечтаете профессионально работать со звуком, то Adobe Audition – это программа для вас, но только на нашем сайте вы найдете самое полное и, в то же время, самое простое описание всех уроков по этой программе.

Уроки Adobe Audition

Уроки Adobe Audition

Уроки Adobe Audition

Уроки Adobe Audition

Уроки Adobe Audition

Уроки Adobe Audition

Уроки Adobe Audition

Уроки Adobe Audition

Уроки Adobe Audition

Уроки Adobe Audition
In a room, sound bounces off the walls, ceiling, and floor on the way to your ears. All these reflected sounds reach your ears so closely together that you don’t perceive them as separate echoes, but as a sonic ambience that creates an impression of space. This reflected sound is called reverberation, or reverb for short. With Adobe Audition, you can use reverb effects to simulate a variety of room environments.
For the most flexible, efficient use of reverb in the Multitrack Editor, add reverb effects to buses, and set reverb output levels to 100% Wet. Then, route tracks to these buses, and use sends to control the ratio of dry to reverberant sound.
The Reverb > Convolution Reverb effect reproduces rooms ranging from coat closets to concert halls. Convolution-based reverbs use impulse files to simulate acoustic spaces. The results are incredibly realistic and life-like.
Sources of impulse files include audio you’ve recorded of an ambient space, or impulse collections available online. For best results, impulse files should be uncompressed, 16- or 32-bit files matching the sample rate of the current audio file. Impulse length should be no more than 30 seconds. For sound design, try a variety of source audio to produce unique, convolution-based effects.
Because Convolution Reverb requires significant processing, you may hear clicks or pops when previewing it on slower systems. These artifacts disappear after you apply the effect.
Specifies a file that simulates an acoustic space. Click Load to add a custom impulse file in WAV or AIFF format.
Controls the ratio of original to reverberant sound.
Specifies a percentage of the full room defined by the impulse file. The larger the percentage, the longer the reverb.
Reduces low-frequency, bass-heavy components in reverb, avoiding muddiness and producing a clearer, more articulate sound.
Reduces high-frequency, transient components in reverb, avoiding harshness and producing a warmer, lusher sound.
Determines how many milliseconds the reverb takes to build to maximum amplitude. To produce the most natural sound, specify a short pre-delay of 0–10 milliseconds. To produce interesting special effects, specify a long pre-delay of 50 milliseconds or more.
Controls the stereo spread. A setting of 0 produces a mono reverb signal.
Boosts or attenuates amplitude after processing.
The Reverb > Full Reverb effect is convolution‑based, avoiding ringing, metallic, and other artificial sounding artifacts.
This effect offers some unique options, such as Perception, which simulates room irregularities, Left/Right Location, which places the source off‑center, and Room Size and Dimension, which help you realistically simulate rooms that you can customize. To simulate wall surfaces and resonance, you can change the reverb’s frequency absorption by using a three‑band, parametric EQ in the Coloration section.
When you change reverb settings, this effect creates a temporary impulse file, which simulates the acoustic environment you specify. This file can be several megabytes in size, requiring a few seconds to process, so you might have to wait before hearing a preview. The results, however, are incredibly realistic and easy to tailor.
The Full Reverb effect demands significant processing; for real‑time multitrack use, either pre-render this effect or replace it with Studio Reverb. (See Pre-render track effects to improve performance.)
Эффект Studio Reverb как и другие эффекты реверберации имитирует акустическое пространство. В отличии от других эффектов реверберации, этот эффект быстрее и требует меньше ресурсов процессора. Данный плагин менее требователен потому что он основан не на импульсной свертке а на математическом алгоритме. В результате, вы можете использовать его в режиме реального времени, и быстро изменять настройки в многодорожечном режиме, без заморозки трека.
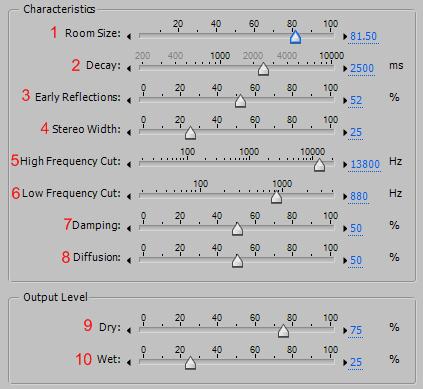
1. Room Size (размер комнаты) — устанавливает размер комнаты.
2. Decay (распад) — регулирует длительность распада реверберации в миллисекундах.
3. Early Reflections (ранние отражения) — управление процентом эха, которые в первую очередь достигнут уха, создавая чувство общего размера комнаты. Слишком высокие значения могут привести к искусственному звуку, в то время как слишком низкие могут потерять размер комнаты. Значение 50 % является хорошей отправной точкой.
4. Stereo Width (стерео ширина) — изменяет ширину реверберационного сигнала между стерео каналами. Значение 0 создаст моно реверберацию.
5. High Frequency Cut (срез высоких частот) — определяет верхнюю границу среза реверберации.
6. Low Frequency Cut (срез низких частот) — определяет нижнюю границу среза реверберации.
7. Damping (затухание) — регулирует скорость затухания высоких частот в реверберации с течением времени. Более высокие значения ускоряют, создавая теплый тембр реверберации.
8. Diffusion (диффузия) — имитирует поглощения отраженного сигнала, как будто он отражается от таких поверхностей, как ковер и занавески. Меньшие значения создают больше эха, в то время как более высокие значения дают более гладкую реверберацию с меньшим количеством эха.
9. Dry (сухой) — громкость необработанного сигнала.
10. Wet (мокрый) — громкость эффекта.
22.2. Использование программы R-STUDIO
22.2. Использование программы R-STUDIO Достаточно интересная и функциональная программа R-STUDIO позволяет восстанавливать данные как с локальных накопителей, так и с сетевых ресурсов, в том числе и на удаленных компьютерах. Программа умеет работать с разными типами файловых
Возможности Visual Studio 2005
Возможности Visual Studio 2005 Как и следует ожидать, Visual Studio 2005 содержит все необходимые средства проектирования, средства доступа к базам данных, утилиты обзора проектов и объектов, а также интегрированную систему справки. Но, в отличие от средств разработки, которые были
Эффект Reverb (Реверберация)
Эффект Reverb (Реверберация) Для базовых эффектов реверберации Sound Forge предоставляет функцию Reverb (Реверберация). Чтобы настроить и применить данный эффект к аудиоданным, необходимо выполнить следующие действия.1. Выделить фрагмент аудиоданных, к которым нужно применить
Установка Pinnacle Studio
Установка Pinnacle Studio Установка Pinnacle Studio, как и любой программы, начинается с вставки носителя, на котором поставляется программа, в привод чтения компакт-дисков и DVD. Обычно программа установки запускается автоматически. Если этого не произошло или автозапуск программы
Эффекты Studio Plus RTFX
Эффекты Studio Plus RTFX Пользователям Pinnacle Studio Plus доступны эффекты, с помощью которых можно выполнять различные задачи: от повышения качества изображения до создания эффектов. Рассмотрим основные эффекты пакета Studio Plus RTFX.Витраж. Этот видеоэффект позволяет создать иллюзию
Меню в проекте Studio
Меню в проекте Studio Итак, рассмотрим меню «изнутри». Меню DVD (это можно наглядно увидеть в Studio) – фрагмент проекта, который воспроизводится проигрывателем по кругу, и в ходе воспроизведения этого фрагмента можно выбрать один из показанных на экране пунктов.Пример того, как
Интерфейс Studio при выводе в файл
Интерфейс Studio при выводе в файл Для начала переключим Studio в режим вывода проекта в файл (вкладка окна Просмотр вывода). Вид окна Просмотр вывода в этом случае показан на рис. 12.2. Рис. 12.2. Вид окна Просмотр вывода при выводе в файлС помощью двух раскрывающихся списков Тип
Интерфейс Studio при выводе на диск
Интерфейс Studio при выводе на диск Для переключения программы в режим вывода на диск нужно перейти на соответствующую вкладку окна Просмотр вывода нажатием кнопки Внешний вид окна Просмотр вывода в режиме вывода на диск приводится на рис. 12.8. Рис. 12.8. Вид окна Просмотр
Multimedia Studio
Multimedia Studio Multimedia Studio – программа, входящая в состав MPT, – позволяет просматривать изображения и мелодии, хранящиеся в телефоне и в папках на компьютере, копировать это содержимое из телефона в компьютер и обратно. Кроме того, Multimedia Studio включает в себя простейший редактор
Программа R-Studio
Программа R-Studio Одна из лучших программ в своей области предоставляет четыре основных метода для восстановления данных:• создание файла-образа диска или раздела;• восстановление удаленных файлов из существующих разделов с сохранными файловыми системами (Basic File
Программа R-Studio
Программа R-Studio Программа R-Studio – универсальный инструмент извлечения информации с поврежденных носителей. Программа способна строить виртуальные массивы или наборы (Virtual Volume Sets) из физических дисков, разделов на них или файлов-образов.1. Откройте предварительно
Convolution Reverb
Convolution Reverb Convolution Reverb эффект реверберации, имитирующий помещения начиная от небольших комнат до концертных залов, с различным покрытием стен. В основе создания эффекта лежит использование файлов импульсных сверток реверберации, имитирующих различные акустические
Full Reverb
Full Reverb Full Reverb это полный эффект реверберации основанный на импульсной свертке, он позволяет избежать звона, металлических призвуков и других искусственных артефактов звучания.Full Reverb предлагает некоторые уникальные возможности, такие как (параметр Perception): нарушения
Reverb
Reverb Эффект Reverb имитируют акустические пространства с помощью импульсной свертки. Он создает ранние отражения и неравномерное эхо, которые так близко расположены, что они воспринимаются как один распадающийся звук.С помощью этого эффекта можно создать широкий спектр
Читайте также: