
Как сделать неоновый текст в after effects
This sample file is an Adobe Stock asset you can use to practice what you learn in this tutorial. If you want to use the sample file beyond this tutorial, you can purchase a license on Adobe Stock. Check out the ReadMe file in the folder for the terms that apply to your use of this sample file. Any reference to “Night Owl Market” is for demonstration purposes only and is not intended to refer to any actual organization, products, services, or creative work.
In this project, you’ll take line art created in Adobe Illustrator and make it look like glowing, flickering tubes of neon against a brick wall in After Effects using a combination of Outer Glow and Inner Glow layer styles, a simple expression, and the Turbulent Noise effect.
Set up your layered artwork in After Effects. Working in the Standard workspace, choose File > Import > File and import your layered Illustrator logo design as Composition - Retain Layer Sizes. Open the comp and choose Composition > Composition Settings. Set a relatively short duration in the Settings dialog box (say, 5:00) to save on render time while testing. Precompose each layer separately except for any layers that act in unison, such as the three Eye layers in our example. Group-select those before choosing Layer > Pre-compose. Since you’ll be making copies of these precomp layers later, give them distinct colors now. Right-click each layer’s color chip and choose a unique color for it from the menu.
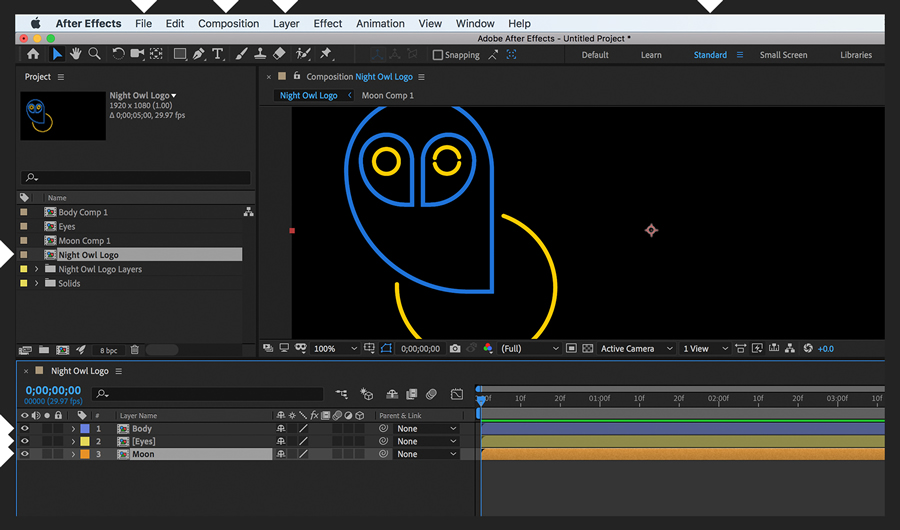
A realistic glow requires three line styles: a wide, feathered outer glow for the illumination effect, another above it for a medium-wide glow, and one on top of that to simulate the tight, halo-like glow that is brightest in the center of the tube and darkest toward the edge. Drag-select all the precomp layers and duplicate them (Edit > Duplicate) twice. Going from top to bottom, append _Tight, _Medium, and _Wide to the grouped layer names. Glows look best against a black solid, so create one (Layer > New > Solid) and place it at the very bottom. Right-click it and select Guide Layer. This ensures you’ll have a black solid for testing purposes that won’t be visible in the final comp when you add the brick wall behind it later.

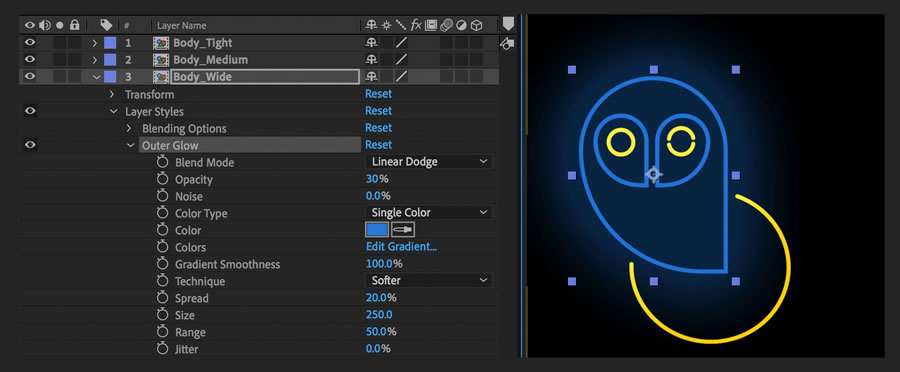
To add the outer glows, right-click Body_Wide and choose Layer Styles > Outer Glow from the menu. Expand the Outer Glow settings in the Timeline panel and, following our example, change the values for Blend Mode, Opacity, Color, Spread, and Size. Select that Outer Glow layer style and copy it to the Clipboard (Edit > Copy). Select the other two Body layers, as well as the other two Wide layers, and choose Edit > Paste to apply the changes. Click away to deselect all. There are too many copies of the exact same glow, so for Body_Tight, lower the Outer Glow size substantially (try 15) and for Body_Medium, reduce the size by about half (try 100). Change the Outer Glow colors for the other Wide layers so they match their respective line art colors. Now copy the Outer Glow settings for Body_Tight and Body_Medium and paste them onto the corresponding layers for Eyes and Moon, updating the colors to match.
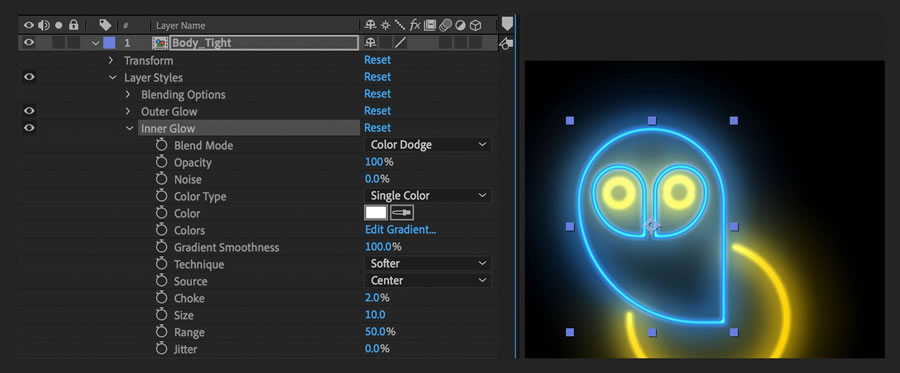
Now add the inner glows. Right-click Body_Tight and choose Layer Styles > Inner Glow. Expand the Inner Glow settings in the Timeline panel and, following our example, change the values for Blend Mode, Opacity, Color (FFFFFF), Source, Choke, and Size. Apply that line style to all Tight layers. It looks better if Moon_Tight uses a Blend Mode of Linear Dodge and a lower opacity. Adjust any inner or outer glows until you are happy with the results. Preview at Full Resolution to see the glows accurately.
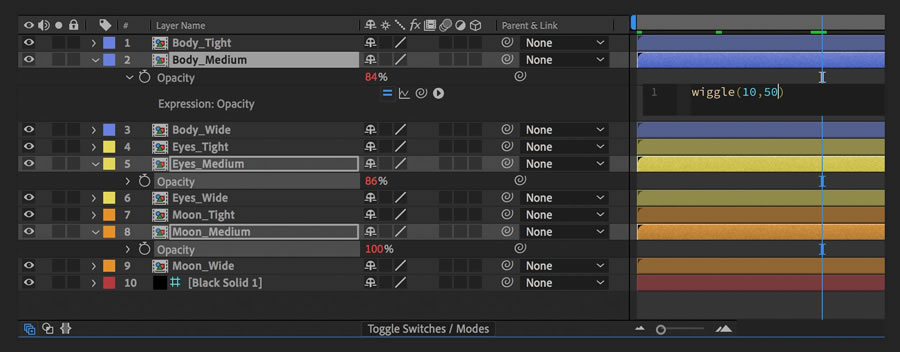
Let’s make the neon flicker. Pick any Medium layer and display the Opacity setting (press T). Option/Alt-click the Opacity stopwatch. In the Expression field, replace “transform.opacity” with wiggle(50,10) and then click away. Copy that Opacity setting to the Clipboard and paste it on the other two Medium layers. As you scrub the playhead, see how the red Opacity value constantly changes, causing the slight flickering effect.
A subtle neon plasma effect enhances the look. Open the Moon precomp and drag the Turbulent Noise effect from the Effects & Presets panel to the Moon layer. Following our example, change the values for Fractal Type, Brightness, Complexity, Opacity, and Blending Mode. Move the playhead to the start of the comp and set a keyframe for Evolution. Move to the end and set a keyframe for Evolution at 36 revolutions (and zero degrees). Preview to see the slight oscillating neon plasma effect added. Deselect the layer, select it again, and copy the Turbulent Noise effect to the Clipboard. Open the other precomps, set the playhead at zero, and paste the effect. For the multilayered Eyes precomp, drag-select each layer before pasting the effect. The Opacity setting copied over from the yellow may be too much for other colors. Lower the opacity for the blue (try 15%).

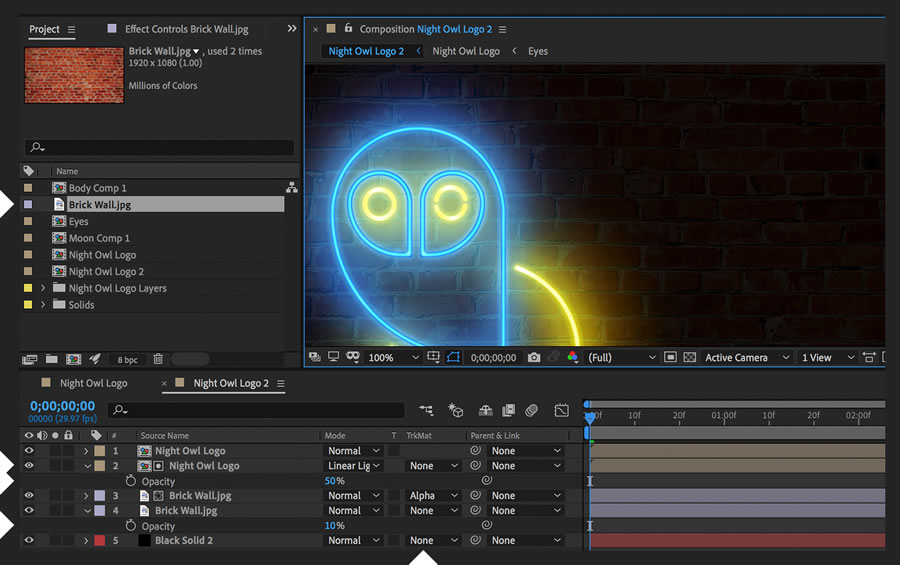
Neon signs look great on a black background, but they often appear against a brick wall. To composite your sign in front of a wall, right-click your main logo comp and choose New Composition from Selection. Duplicate the layer in the new comp and set the Blending Mode of the lower one to Linear Light and Opacity to 50%. Create a new black solid layer and place it at the bottom of the comp. Import the brick wall image, drag it just above the black solid, and duplicate it. Set the upper wall layer’s Track Matte to Alpha Matte and reference the logo layer above it. This automatically turns visibility for that logo layer off, so click the eyeball to restore its visibility. The wall is too saturated, so lower the bottom wall layer’s opacity accordingly (try 10%).
Adding more neon elements to your sign is as simple as importing the artwork, adding it to your master logo comp, and applying the glow, flickering, and neon plasma effects. If your new artwork uses thinner lines, reduce the Inner Glow size. If the Outer Glow on your artwork looks flat, increase the Range setting slightly. This controls the gradient between the core and outer edges of the glow. Finally, give your sign some personality by turning a neon element briefly off or on in its precomp. For example, you could open the Eyes precomp and trim the Right Eye Top layer to a couple dozen frames so the right eye winks rather than remaining lit. Try to make the moon briefly turn off.
With Adobe Stock, you have access to more than 100 million high-quality, royalty-free images including photos, graphics, videos, and templates to jump-start your creative projects. Try Adobe Stock and get 10 free images.
Итак, прежде всего вам понадобится хороший плагин. Называется он Saber, а найти его можно бесплатно, в свободном доступе. Скачиваем, устанавливаем. После этого заходим в программу, загружаем туда наш ролик (ну или картинку), после чего, на верхней панели меню находите значок текста (буква Т). Кликаете по ней и выделяете область, на рабочем экране, где вы хотите этот текст поместить.

После этого, на панели справа, в эффектах, вы ищите только что скачанный плагин. Как вы помните, называется он Saber.

После этого нужно создать новый слой. Для этого кликаем по нашему видео правой кнопкой мышки, выбираем «New», а после «Solid». Слой этот нужен полностью черным. Для этого мы выбираем его цвет, в открывшейся табличке.

Теперь нам нужно наложить эффект Saber на этот слой. Получается примерно вор такая картина. Теперь нужно превратить ее в текст. Для этого выбираем в настройках эффекта пункт «Customize Core». Там находим пункт Core Type, и возле него выбираем Text Layer, а ниже – выбираем наш текст, который мы вписали ранее.

Изначально яркость неона будет слишком высокой и текст не будет читаться. Для этого, в левой части экрана, в верхней части настроек эффекта, немного манипулируем с цифрами, чтобы слегка погасить яркость текста. Получается примерно вот так:

Там же вы можете выбрать тип освещения, его текст и т.д.

Остается только перенести наш текст на видеоролик или картинку. Для этого объединяем все наши слои, кликаем по ним правой кнопкой мышки и выбираем Pre-compose. У вас откроется маленькая табличка. Поставьте точку и галочку так, как показано на скрине ниже, после чего у вас получится крутая неоновая анимационная надпись, на изначальной картинке или видео.

Компактный набор фильтрации информации и борьбы с фейками:
Летящей походкой

Parallax переход между страницами сайта

Photoshop + After Effects

OwlKitty's
Осторожно, бананы ломают матрицу!
Быт на башенном кране

Все, приплыли.
Жрать давай
Парень нашёл 70 фотографий по Гугл-запросу "волки" и сделал этот ролик!
На выходных жители США могли наблюдать эффектное природное явление, вызванное ураганом и грозой
Ожившая работа Alena Aenami
Использовал: Photoshop (отделение слоев) и After Effects (анимация)
Если интересен процесс работы, подписывайтесь, в скором времени выложу пост. И новые оживления классных картин :)
Оригинал, by Alena Aenami:
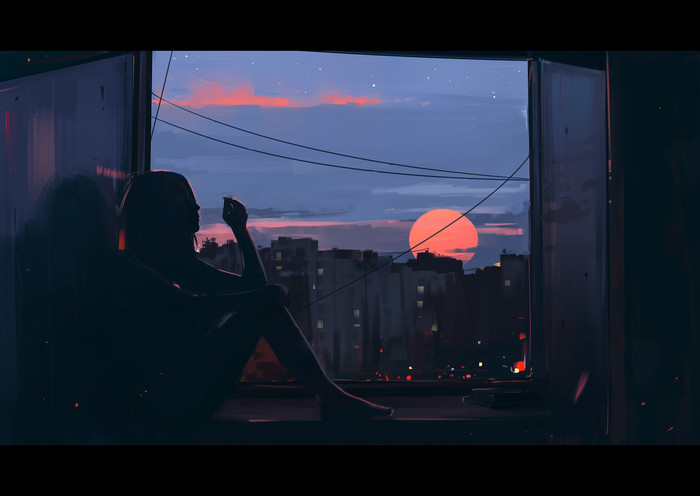
Автор иллюстрации: Alena Aenami
Мой инст: @sviatoslavmrch

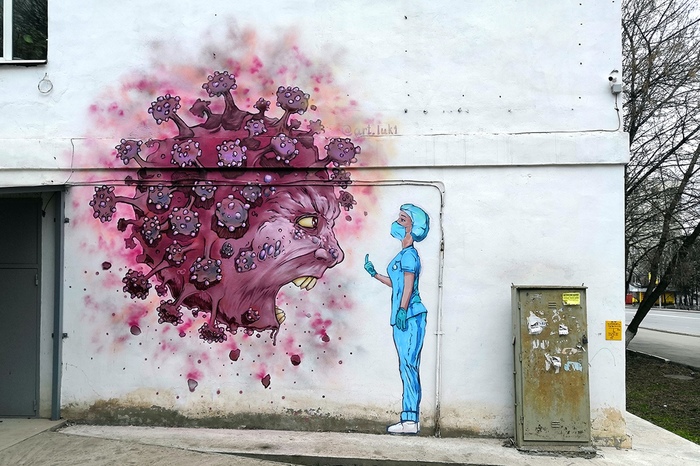
Анимация граффити современным героям
КАК удалить НЕНУЖНОЕ из видео? Content AWARE Fill
Очень часто видеомонтажер сталкивается с задачей: нужно удалить что-либо ненужное, лишнее из видео. Как это сделать на статичном кадре, я рассказывал в одном из прошлых видео-уроков, а сейчас я расскажу и покажу метод клинапа подвижных элементов и частей в видеоролике. Как нельзя кстати пришло обновление After Effects CC 2019 (апрель), в котором у нас появился новый инструмент - Content Aware Fill.
Делаем киношные титры в After Effects!
Продолжаем изучать After Effects! В данном туториале я расскажу вам о том, какие бывают анимации титров, как выбрать стиль титров для видео и покажу как сделать крутые и стильные киношные титры быстро в After Effects 2019.
AFTER EFFECTS для Новичков 2 - ТРЕКИНГ
Всем привет! Во втором видео-уроке из курса "After Effects для новичков" я расскажу вам о трекинге - что это такое, для чего используется и самое главное - как его правильно делать. Покажу как быстро перенести видео из Premiere Pro в After Effects, а также как работать с проблемным трекингом. Этот урок базовый, для новичков, по этому рассматриваем дефолтные способы трекинга!
Youtube
(Указываю ссылки на свои личные соц.страницы, в связи с обновлением правил Пикабу).
Как можно сэкономить время на цветокоррекции?
Всем пикабушникам привет! Моим подписчикам - особый и пламенный :D
Экономить на чем-либо не есть гуд, но если сроки поджимают, то почему бы и не воспользоваться приятными мелочами? Я решил не делать 5 отдельных видео, а собрал пять приёмчиков в одно, с надеждой, что кому-то пригодится и с полной уверенностью, что новичкам будет полезно!
ИСТОЧНИК (Телеграм-канал с полезными ссылками и новыми видео!)
Про видео-переходы - как их сделать круто и органично?
Всем привет! Продолжаем экспресс-курс по монтажу в Премьер Про и сейчас поговорим о переходах в видео - как сделать крутые, интересные и современные видеопереходы. Расскажу какие инструменты я использую, и какие инструменты и эффекты прошлого века юзать не стоит.
Цветокоррекция в Lumetri
Цветокоррекция видео - очень творческий и сокровенный процесс, который каждый видит по-своему. Но с чего начать? Какие инструменты могут дать тот или иной эффект? В этом видео-уроке из экспресс-курса по монтажу в Премьер Про я расскажу о панельке Люметри, и о каждом параметре, что за что отвечает.
Данный урок для начинающих, но в следующих выпусках мы будем красить файлы с профессиональных камер для крупных настоящих! рекламных проектов - RED, BMCC, BM URSA, ALEXA, с Дронов и даже будем придавать киношную картинку видео с телефона!
In this tutorial, you’ll learn how to add neon text in After Effects CC. This text effect is bold and dynamic. Adding it into your next video project can make it really stand out — plus, it’s pretty simple to do. Let’s dive in!
How to Add a Neon Text Effect
Step 1: Make a New Composition
You’ll want to begin by making a new composition that’s 1920×1080 29.97 fps. Inside the new composition, create a new text layer and use your desired copy. For this example, we’ll use the word “Neon” and make the color a light blue. The perfect font for this text is a free font called Beon. With the text layer selected, go to Layer > Pre-compose, and name the new composition something like “Type.”
Step 2: Create the Glow Layers
Duplicate the text comp, and name the duplicate “Glow 1.”
With Glow 1 selected, go to Effect > Blur > Fast Box Blur. In the Fast Box Blur settings change the Blur Radius to 3. Change the Blending Mode of the Glow 1 layer from Normal to Add. This is the first of several glow layers so before duplicating again, parent “Glow 1” to the Text Comp.
Now duplicate “Glow 1” to create a new glow layer, and name it “Glow 2.” In the “Glow 2” Fast Box Blur settings, change the Blur Radius to 15.
Duplicate the Text Comp layer and rename the duplicate “Stroked Text.”
With the Stroked Text layer selected, go to Layer > Layer Styles > Stroke. Set the size of the Stroke to 20 and use the same color as the text for the color. With the Stroked Text layer still selected, go to Layer > Pre-compose. Call the new composition something like “Wide Glow” and check the box for Move all attributes into the new composition.
On the Wide Glow layer, change the blending mode to Lighten and the Opacity to 75%. With the Wide Glow layer still selected go to Effect > Blur & Sharpen > Gaussian Blur. In the Gaussian Blur settings, change the Blurriness to 750 to get a wide glow. Parent the Wide Glow layers to the original Text layer. Drag the Wide Glow layer below the Text Comp. That wraps up all the glows!
Step 3: Create a Glass Tubing Effect
The next step is getting the glass tubing around the letters. To get started, duplicate the Text Comp and name the duplicate something like “Caustics.” Drag this layer below the type.
With the Caustics layer selected, go to Effect > Simulation > Caustics. In the Caustics settings, change the Bottom layer to None. In the Water settings, change the Water Surface to the Type layer, the Surface Opacity to 0, the Wave Height to .200, Water Depth to .200, and the Refractive Index to 1.300. In the Lighting settings, change the Light Intensity to 0. You should really see the neon text look start to take form!
Now, parent the Caustics layer back to the original Text Comp. Drag it below the Text Comp layer, but above the Wide Glow. Nicely done!
Step 4: Add an Animated Light Flicker
To add an animated flicker, select all three glow layers and pull up the Opacity with T on the keyboard.
On the “Glow 1” layer, Option + click the Opacity and use the pick whip to attach it to the Opacity in “Glow 2.” On the Wide Glow layer, do the same thing but add a times 0.75 to the end of the expression, so that the Wide Glow is always 75% of the other glows. Move your playhead to Frame 10 and set a keyframe for 0% Opacity for “Glow 2.”
At Frame 15, set another keyframe for 100%. Continue making adjustments at five frame intervals. At Frame 20, set to 30%, Frame 25 to 100%, Frame 30 to 65%, then change Frame 35 to 100%. Highlight all the keyframes and apply and Easy Ease.
Step 5: Change the Neon Color (Optional)
The last step is optional, but very useful! You can add a color control layer so that you can quickly change the color of the neon with one simple control.
To do this, go to Layer > New > Null Object and call the new null something like “Color Control.”
With the null still selected, go to Effect > Expression Controls > Color Control. Now within the Effect Controls panel, click the Lock button so that it stays there even when you click away from that layer.
Double click to go inside your Type Comp. Twirl down the type layer, and add an Animator > Fill Color > RGB. Now Option + click the stopwatch for Fill Color, and use the pick whip to connect it to Color Control value.
Go back out to the neon text comp. Then, go into the Wide Glow, and twirl that down until you get to the Stroke. From here, Option + click on the color for that stroke. Use the pick whip and drag it up to the Color Control value, as well.
Now all of the colors are attached, you just need to change the color. Just click and drag and the color will be completely adaptive!
Step 6: Add a Background (Optional)
Now all that’s left is to add a background of your choice and you’re good to go!
Neon text can be used in a variety of scenarios. Whether you’re trying to spice up your title, draw attention to a certain piece of text or brighten up a social media video, neon text can be your best friend. And it’s super easy to do! But if you’re short on time, check out our extensive library of neon text effects!
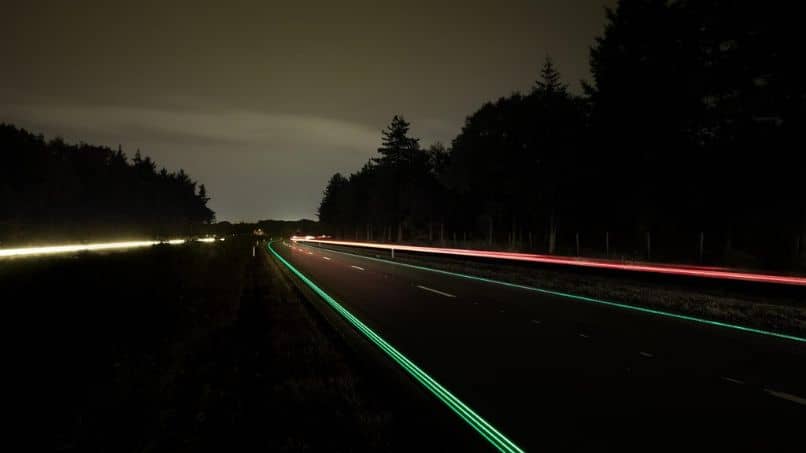
В разных социальных сетях часто встречаются разные видеоролики, которые выглядят как неоновые огни. Этот эффект очень старый, хотя сейчас он в моде. Эффект можно сделать вручную и легко, для этого узнайте, как создавать анимацию с неоновым или световым эффектом в After Effects, так просто как создавать анимацию рисования в стиле Flat Design в After Effects.
Неоновый эффект или также называется светящийся для этого требуется терпение, так как требуется некоторое время, чтобы оживить каждый аспект и настроить его для получения ожидаемого результата.
Как начать создавать неоновую или светящуюся анимацию в After Effects?
Первое, что нужно Faire для создавать анимацию с неоновым эффектом или эффектом свечения в After Effects - открыть видео или объект для работы. После этого вам нужно открыть композицию и дважды щелкнуть по ее панели в промежутке времени.
Вы должны обладать мудростью, чтобы использовать меню параметров, подобное процессу с помощью панели инструментов Adobe Photoshop.
Вверху будут отображаться две вкладки, новая открытая - та, которая позволяет рисовать изображения на видео для выполнения анимации. При входе на вкладку будет выбран инструмент «Кисть», и его свойства и настройки должны появиться справа.
Если они не появляются, вы должны выбрать " Окно «В общих параметрах, расположенных в верхней части интерфейса системы, вы должны нажать на» щетка "Затем на" Живопись ». Таким образом, будет активировано окно управления инструментом «Кисть».
Важно, чтобы опция " Продолжительность В окне настройки кисти отмечен «Уникальная обстановка» . Если он появится в " Постоянная «, Необходимо изменить это, потому что таким образом анимация с неоновым эффектом или свечение не будет работать в After Effects.
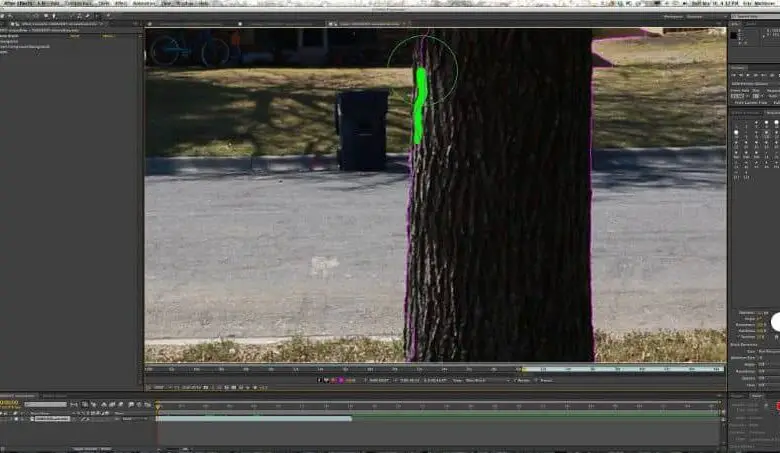
Настроив кисть, приступим к созданию анимированных элементов. Чтобы создать этот эффект движения, который мы регулярно видим в видеороликах со свечением, вы должны делать это кадр за кадром.
Необходимо использовать ключ » Перелистнуть Кнопка на клавиатуре для покадрового продвижения по видео и ускорения процесса, чтобы он не стал утомительным. Если это ясно, процесс будет заключаться в том, чтобы нарисовать короткую линию, затем передать кадр и продолжить линию. Это даст эффект непрерывности воспроизведения видео.
Линии не обязательно должны быть идеальными, потому что в скорость воспроизведения видео, детали будут не так заметны, как если бы они были статичными.
Примените к анимации эффект неона или свечения
Правильно следуя инструкциям, вы можете делать все, что угодно, включая добавление легко другие типы эффектов, такие как переход Liquid Glitch в After Effects.
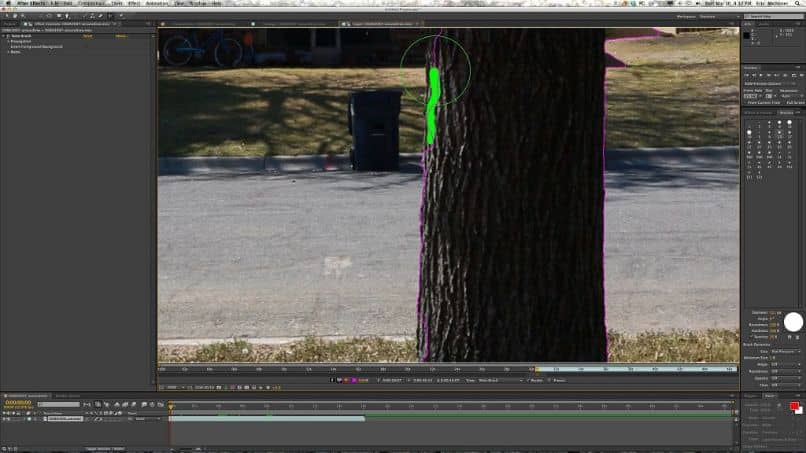
После того, как все линии или элементы готовы, следует создать новое твердое тело. Для этого найдите в верхней панели параметр " калька "И выберите" Модерн " и наконец " Solide ».
Затем появится новое окно твердой конфигурации. Вам нужно разместить имя, а также применить черный цвет, потому что без него эффект не будет работать так, как вы хотите. Затем вам нужно выбрать " Ok ».
Затем в объекте, соответствующем видео, будет выбрана стрелка, которая будет отображать объекты и эффекты, составляющие его. После отображения " эффекты " будет выбранный и " Живопись " будет опубликовал , где будут размещены все рисунки, сделанные на видео.
Вы должны открыть эту вкладку и выбрать все элементы, соответствующие рисункам там. Чтобы облегчить это, выберите первый и нажмите кнопку ключ » Shift » для выберите последний.
Как только все элементы будут отмечены, перейдите к опции » Редактор »В верхней панели программы и нажмите» Ксерокс ». Затем нужно щелкнуть по созданному телу и нажать » паста «Также находится в окне» Тираж ».
Во вкладке " режим "Твердый, он должен быть помещен в" экран »Затем перейдите на вкладку» Эффекты »Вверху нажмите» Стилизовать »И, наконец, выберите "Светиться". Чтобы создавать анимацию с неоновым или световым эффектом в After Effects, не беспокоясь о изменить язык в Adobe After Effects.
Читайте также: