
Как сделать эффект time stop в fl studio
We hope you love the products we recommend. We may collect a small commission if you purchase through one of our links. This will not cost you anything extra. Thank you if you do. As an Amazon Associate, I earn from qualifying purchases.
Performing a tape stop effect in FL Studio is a great way to add an exciting element to your track. Luckily it can easily be achieved by using the native FL Studio plugin, ‘Gross Beat,’ and modulating the time parameter.
The Tape Stop Effect
The tape stop effect is a commonly used trick in many modern-day music productions, even if only subtly. It can help add interest and variation to your tracks, and it is also great at subtle building up to a switch-up in a song.
Luckily, FL Studio can achieve this effect, thanks mainly to the native VST plugin ‘Gross Beat,’ which is perfect for emulating this effect style.
This FL Studio tutorial will look at how you can easily use Gross Beat to achieve this effect within your productions.
Step 1 – Opening Gross Beat
First, make sure that the audio you want to apply the effect to is on track within the mixer. You can do this by opening the desired audio track selector and putting it onto a mixer track that you want it to be on.
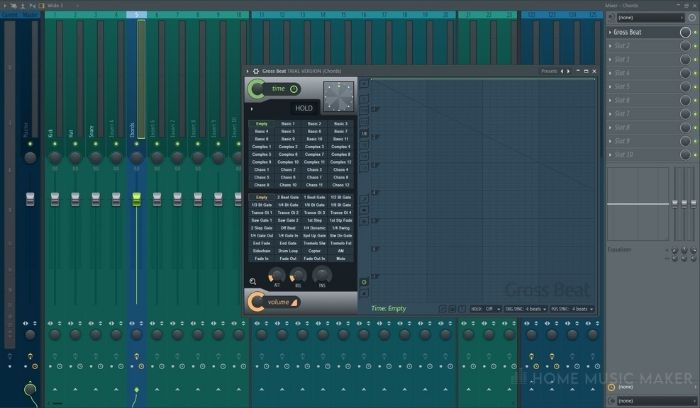
I am using audio for the clip above, but this technique will work the same for any audio source.
Step 2 – Making The Tape Stop Effect
Once you have placed the audio on a mixer track, you will want to open an instance of Gross Beat on the effect rack for this track.
With Gross Beat open, you can leave it on the default patch, then make a slopping curve within the time modulation section, so the lowest point is at the end of the parameter.
To get a smooth curve, you can right-click on a point and select ‘single curve.’
You can right-click to create more points, allowing you to achieve greater control over the effect.
Step 3 – Creating Automation
Now that you have created the tape stop effect, you will want to create an automation that allows you to control when to use it in the track.
To do this, right-click on the mix knob to the right of the Gross Beat effect in the mixer channels effect rack. In this drop-down, you can then select the option to create an automation clip of that parameter.
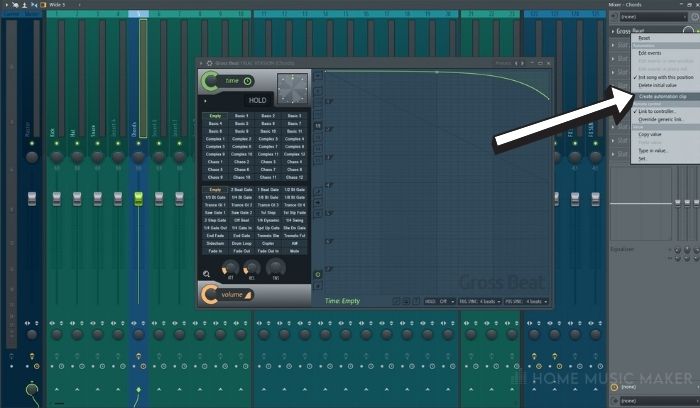
Once selected, the automation clip will appear in the next free playlist track, from where you can adjust it only to be enabled when you want it to.
You can do this by right-clicking to create points within the automation.
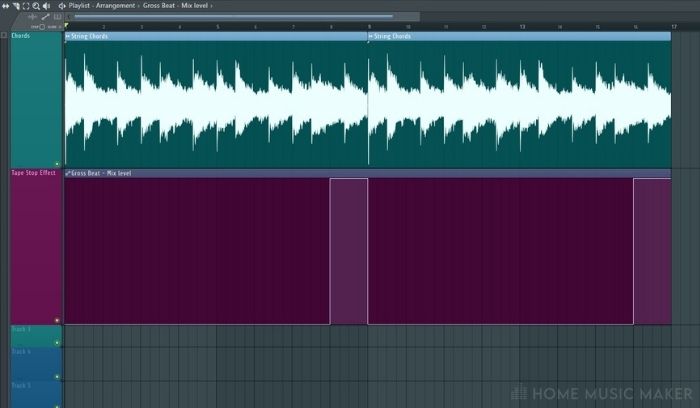
To enable the effect, make sure that the automation is 100% on. As seen in the example above, when you want the effect disabled, ensure that the automation is at 0%.
Related Questions
What is the tape stop effect?
The tape stop effect emulates the sound you get when stopping the magnetic tape on a tape deck. When this happens, the audio slowly decreases in pitch and then stops, which you achieve when doing this effect within your DAW.
Can you achieve the tape stop effect without Gross Beat?
The most important thing you have to complete when trying to achieve this effect is reducing the pitch over time.
So this can be achieved in a wide range of methods, such as automating the pitch or using a plugin with a pitch-altering function.
Why is tape stop so popular?
Tape stop is a great way to make it sound as if your track is played through a cassette in a tape machine, which goes well with analog-sounding tracks in particular.
It can also be a great way to add some sonic interest to a track and transition to different song sections.
Can you get Gross Beat for Ableton Live?
Unfortunately, there is no way to get Gross Beat for Ableton, as it is a native FL Studio plugin. That being said, there are some excellent alternatives to it.
Some alternatives include MrRythmizer by Melda and Time Shaper 2 by Cabelguys, which offer various interesting effects for your music production.
Can you apply a tape stop effect to your whole song?
You can easily add the tape stop effect to your entire production simply by applying the Gross Beat effect to your master channel instead of the individual mixer track. If you are not using Gross Beat and can instead automate the global pitch of your project.
How do you undo the tape stop effect?
To undo your tape stop effect, you need to delete the instance of Gross Beat on the mixer track and then delete the automation clip. You can do the same if you have made an automation pitch clip by simply deleting it.
Do all versions of FL Studio have Gross beat?
Unfortunately, only the Signature and All Plugin Edition versions of FL Studio feature a fully unlocked version of Gross Beat.
However, you can still use Gross Beat with the other versions, although you may find that it will remove itself when you try to open up the project again.
Are there any alternatives to Gross Beat?
There are some great effect plugins alternatives to Gross Beat, allowing you to achieve pitch, volume, and filter modulations overtime on different audio sources.
Some of the most popular alternatives include MrRythmizer by Melda and Time Shaper 2 by Cabelguys. Both offer very similar capabilities to that of Gross Beat.
Final Words
You should now know how to create a simple tape stop effect within FL Studio using the native Gross Beat plugin.
Tape stops are a great trick for any producer to have in their arsenal and one that is deceptively easy to achieve once you know how it’s done.
To view this video please enable JavaScript, and consider upgrading to a web browser that supports HTML5 video
Вы используете устаревший браузер. Этот и другие сайты могут отображаться в нём некорректно.
Вам необходимо обновить браузер или попробовать использовать другой.
DianaC
New Member
Здравствуйте. Подскажите, пожалуйста, можно ли в FL сделать не просто растяжение, а постепенное замедление отрезка? Например, как иногда в конце мелодия замедляется.
Bavar
Well-Known Member
- Realtime stretching (растяжение в реальном времени) - режим растяжения в реальном времени позволяет автоматизировать темп, и тональность аудиоклипов - остаётся в гармонии с проектом. Сэмплеры не затрагиваются.
FL Studio X Realtime Stretching | Forum
DianaC
New Member
DianaC
New Member
А ещё вопрос. Как мне для своего клипа открыть вот такое окно? В учебнике говорится, что нужно щёлкнуть по клипу дважды, но у меня при двойном щелчке пианоролл открывается(
Вложения

vinnipooh1988
Active Member
А ещё вопрос. Как мне для своего клипа открыть вот такое окно? В учебнике говорится, что нужно щёлкнуть по клипу дважды, но у меня при двойном щелчке пианоролл открывается(
DianaC
New Member
Вложения

vinnipooh1988
Active Member
DianaC
New Member
DianaC
New Member
И когда я выбираю меню Realtime stretching, он мне пишет No audioclips was found. Значит, мне надо мои паттерны собрать в кучу и переформатировать? Может, в mp3? И уже тогда замедлить?
Bavar
Well-Known Member
И когда я выбираю меню Realtime stretching, он мне пишет No audioclips was found. Значит, мне надо мои паттерны собрать в кучу и переформатировать? Может, в mp3? И уже тогда замедлить?
In this lesson you’ll learn how to make a tape stop effect in FL Studio. This tape stop tutorial shows you a typical pitch effect, very well suited for hardstyle leads, big room house lead, or actually many EDM leads.
There are many different ways to create a tape stop effect. That’s why I will present you 3 different ways to create that pitch down effect. Always feel free to explore other methods as well.
To put the tape stop effect into action, you need to have a lead and a melody. In this example, I created a Sylenth1 hardstyle lead and a very short melody.
How to make a tape stop effect – method 1
With the first method you need the Effectrix plugin. It’s a third-party VST that can create many cool sound effects. An alternative for Effectrix is the Glitch plugin from dBlue. If you don’t have these plugins, then skip this method.
The Effectrix plugin has a “Vinyl” option that can create the tape stop effect in no time. Just set it to the right timing and draw blocks at the moments the vinyl effect should be active. Then play with the settings at the bottom of the plugin to shape your tape stop effect. Make it slow, fast, long, short or whatever you desire.
Typically, for longer notes I use a gradual slope. For shorter notes I use a steeper slope. You can also “draw” these blocks differently, so the vinyl effect gets activated halfway through the note.
How to make a tape stop effect – method 2
Now the next 2 methods simply revolve around the pitch settings of your synthesizer. The results aren’t exactly the same, but that’s fine. There’s no “good” or “bad” method. It’s just what you want and how you can make it sound the way you like.
Many synthesizers have pitch settings, like the pitch wheel on Sylenth1. When you move that wheel, the pitch of the sound changes. What you can do here is to automate that knob (make an automation clip). Then you can control when and how the pitch of your lead changes. Learn here about How to Make Automation Clips in FL Studio.
In this example, I want a pitch down effect at the end of the “melody”, the last note. So, I created an automation clip of the pitch wheel and I drew a line in that clip (on the Playlist) to tell the wheel to go down.
You can also change the amount of pitch on the synthesizer next to the pitch wheel. It determines how sensitive (or how extreme) the pitch wheel reacts to changes.
How to make a tape stop effect – method 3
The third and final method is actually similar. We’re also going to use the pitch settings, but now the FL Studio “build-in” pitch settings.
Each instrument or sample you have on the channel rack has a pitch setting at the very top of that instrument/sample window. So, when you don’t have a cool plugin or a neat little pitch wheel to play with, there’s always the build-in pitch settings as a final remedy.
The way you go about this, is exactly the same as the previous method. Just create an automation clip and draw the line(s) how and when you want the pitch of your sound to change.
Using the tape stop effect methods
The advantage of using these last 2 methods is that you can also “pitch up” your sound. It’s cool to use on screeches too.
Sometimes it’s a little bit of jiggling to make it sound right. Each method feels slightly different. Just play around with all these options. Before you know it, you have yourself a cool tape stop effect or pitch down effect.
Need more sound effects?
If you want to learn more about cool sound effects, feel free to check out my How to Make a Sweep Effect in FL Studio lesson and How to Make an Explosion Sound Effect lesson.
You can also download my free Hardstyle Sample Pack to get more sound effects, as well as other samples, like kicks, snares, screeches, etc.

VST ЭФФЕКТЫ
Всем привет. В этой статье вы узнаете, что такое эффект delay, а также узнаем про все функции vst плагина Fruity Delay 2.
Что же такое Эффект Delay? Это эффект, который создает задержки звука плюс его последующее копирование. Или его также называют «эффект эхо». Этот эффект имитирует эхо который вы слышите в лесу, когда громко крикните или же на больших концертах. Этот эффект начинает плавно затухать и создает некий остаток после себя, добавляя в композицию пространство делая звук более насыщенным и разнообразным. Функции delay в этом и заключены – создавать эффект «Эхо».
Приступим к настройкам Fruity Delay 2.

Вкладка INPUT.
- Pan – панорамирование звука на лево, на право или по центу.
- Vol – этот регулятор отвечает за силу эффекта дилеи т.е. при регулировке будет меняться общая громкость эффекта Fruity Delay 2.
Вкладка FEEDBACK.
- Normal – переключает в нормальный режим дилея.
- Inverted – переключает в инвертированный режим работы т.е. этот режим инвертирует канал звука. Например, если регулятор Pan переместить в правую сторону, то звук будет преобладать в левой стороне, а если регулятор Pan переместить в левую сторону, звук будет преобладать на правой стороне.
- P. Pong – режим переводится в пин-понг т.е. при включении этого режима звук будет инвертироваться на левый и правый канал по очередности.
- Vol – этот параметр влияет на продолжительность эффекта дилеи. Попробуйте покрутить регулятор и вы услышите как меняется продолжительность эха.
- Cut – это фильтр, который отвечает за срез высоких частот. При максимальном положении регулятора — фильтр бездействует.
Вкладка TIME.
- Time – этот регулятор отвечает за скорость эхо. Чтобы быстро настроить продолжительность эха нажмите правой кнопкой мыши по регулятору и выберите необходимый вариант.

При таком выборе параметра Time из списка set задержка всегда будет соответствовать темпу проекта.
- OFS – отвечает за сдвиг стерео каналов относительно друг друга. Или по другому придает объемность звуку.
Вкладка Dry.
- Vol – отвечает за уровень громкости чистого звука и эффекта delay.
Также вы можете использовать готовые заготовки этого vst плагина. Просто нажмите правой кнопкой мышки в правом углу плагина Fruity Delay 2 и выберите нужный вариант.
И на этом пока все. Подписывайтесь на новые материалы чтобы их не пропустить.
Привет, меня зовут Сергей. Музыка для меня как хобби. Занимаюсь созданием Hip-Hop минусов в Fl Studio уже продолжительное время.
Если вам понравился этот материал, то поделись с ним с другими. Так вы поможете в развитии этого сайта и у меня будет стимул в дальнейшем развивать этот проект.
Автоматизация в FL studio – это возможность изменения значения какого-либо параметра во времени с помощью графика. Автоматизация в FL Studio может значительно оживить ваш трек, сделать его более интересным и разнообразным. Это одновременно и творческий, и технический инструмент. Кроме того, автоматизация используется при динамическом сведении. Ни один популярный трек не обходится без автоматизации.
В программе FL Studio есть несколько способов создать клип автоматизации.
Автоматизация в FL Studio. 4 простых способа
1. Всплывающее меню
Это стандартный способ создания автоматизации какого-либо параметра в FL Studio.
Наведите курсор на необходимый параметр (ручку, фейдер, значение) и нажмите правую кнопку мыши.
Из списка выберите пункт Create automation clip.

В Playlist появиться график изменения выбранного параметра.

Используя мышь его легко можно изменить в зависимости от необходимости.

2. Живая запись
Это режим, в котором вы можете записать автоматизацию в реальном времени.
![]()
В появившемся окне Recording выберите пункт Automation & score.

По окончанию записи, нажмите стоп.

Данный способ позволяет создать автоматизацию в пределах одного цикла. К тому же автоматизация прописывается в окне Edit events, что не очень удобно.
Для редактирования автоматизации вам необходимо навести курсор на необходимый параметр. Нажать правую кнопку мыши и из списка выбрать пункт Edit events.

Откроется окно для редактирования, в котором можно сделать все необходимые изменения.

3. Использование пункта Browse parameters
В том случае если вам необходимо записать автоматизацию параметров сторонних VST плагинов (Sylenth1, Gladiator, Massive, FabFilter Pro и др.), использовать второй пункт не очень удобно. Тем более если учесть тот факт, что автоматизацию удастся прописать только для одного цикла.
В таком случае можно использовать следующий метод.
Открываем выбранный инструмент и в верхнем левом углу нажимаем на значок стрелочки. В выпадающем меню выбираем пункт Browse Parameters.

После чего в браузере FL Studio откроется папка со всеми параметрами инструмента.
Измените значение параметра, который вы хотите автоматизировать (покрутите ручку, подвигайте ползунок). В браузере нужный параметр будет выбран автоматически.
Наведите мышь на выбранный параметр и нажмите правую кнопку. В выпадающем меню выберите пункт Create automation clip. Клип автоматизации будет создан в окне Playlist.

4. Использование меню Tools
Этот способ (также как и третий) позволяет прописывать автоматизацию для сторонних плагинов. Никакой разницы нет, какой из способов (третий или четвёртый) вы будете использовать. Результат будет одинаковым.
Откройте выбранный плагин и покрутите ручку (подвигайте ползунок, измените значение), которую вы хотите автоматизировать. Далее зайдите в меню Tools \ Last tweaked \ Create automation clip.

Пропишите необходимую автоматизацию.

Вот пример того, как работает автоматизация.
Я применил её для изменения параметра Filter Cutoff в синтезаторе Sylenth1.
Для того, чтобы создать клип автоматизации только на выбранном участке, выделите необходимую область и лишь потом автоматизируйте нужный параметр.
Читайте также: