
Как отключить enable editing в excel
Many new usability and security features have come to Microsoft Office 2010 and later versions, which helps protect documents from embedded plugins and viruses, simultaneously keeps users’ computer run smoothly. But it doesn’t mean you cannot disable all the features, such as disable Protected View to edit Office documents.
Protected View is a read-only mode where most editing functions are disabled. But through the article below, you would learn how to disable it to enable editing for Office 2010/2013/2016 documents.
Two ways to disable Protected View for Office 2010/2013/2016
Way 1: Disable Protected View by changing Protected View settings in Office
Now we will take disabling Protected View in Excel 2010 as an example. Actually these steps also apply for Excel 2013/2016. And if you want to disable Protected View in Microsoft Word or PowerPoint 2010-2016, just repeat these steps.
Step 1: Click “File > Options” in MS Excel 2010.
To get to Protected View settings, we should open MS Excel 2010 and go to File and Options.

Step 2: Click Trust Center > Trust Center Settings > Protected View.
On the left column, select “Trust Center” and click “Trust Center Settings” in the right panel.

Step 3: Change Protected View settings.
Click Protected View on the left column and uncheck settings according to the source of excel file, to disable Protected View for documents.
- Enable Protected View for files originating from the internet
- Enable Protected View for files located in potentially unsafe locations
- Enable Protected View for Outlook attachments

Once you uncheck the settings you want, click OK and you can close windows. Through changing Protected View settings in Office 2010-2016 with above steps, you could edit protected-view documents again, but may also expose your computer to possible security threats.
Way 2: Disable Protected View via Registry Editor
If the options in Office do not work for you or you want to be able to automate this setting for multiple computers, you can try this way, setting one or more of these registry values.
Step 1: Go to file location in Registry Editor you want to disable Protected View for.
2. Navigate to following location if you want to disable Protected View for Word/Excel/PowerPoint.

- HKCU\Software\Microsoft\Office\14.0\Word\Security\ProtectedView
- HKCU\Software\Microsoft\Office\14.0\Excel\Security\ProtectedView
- HKCU\Software\Microsoft\Office\14.0\PowerPoint\Security\ProtectedView
Now we take excel 2010 as example, so we go to the second location.

Step 2: Set value for three registry values in that location.
Now in the right panel of registry editor, you can see three values.
- DisableAttachementsInPV
- DisableInternetFilesInPV
- DisableUnsafeLocationsInPV
By setting each value to 1, you will disable Protected View for that file location.


Therefore, Just setting the value data for Word and PowerPoint file location with the same way, you would also successfully disabled Protected View for Microsoft Word and PowerPoint.
![]()
Files that are being opened from locations that are not considered safe by your computer may end up being opened in Protected View. Protected View is a read-only view where most editing functions are disabled until the user enables editing in the file.
Why Does My File Open in Protected View?
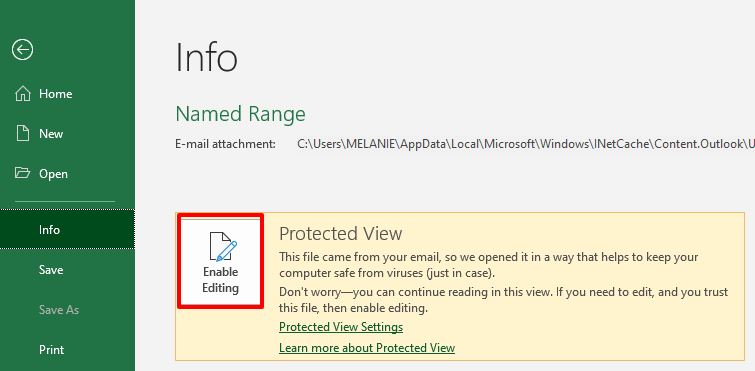
Files that are downloaded from the Internet are usually opened in Protected View, because these files can contain malware or viruses. If you’re confident that the file is safe to edit, click Enable Editing in the message bar that appears.
Files that are sent as Outlook attachments are also usually opened in Protected View.

Files that are opened from an unsafe location will also display a Protected View message. An unsafe location can be the Temporary Internet Files folder, for example.
Files that you choose to open in Protected View will also show a message.

You can open a file in Protected View by selecting File > Open > Open in Protected View.

Enabling Edit Mode
Once you’re confident that the file will not damage your computer, you can enable editing in one of two ways.
1. Click on Enable Editing in the message box that pops up.
2. In the Ribbon, click File > Info > Enable Editing.
Changing Protected View Settings
To switch off Protected View, change the settings in the Excel Trust Center.
1. In the Ribbon, select File > Options > Trust Center.
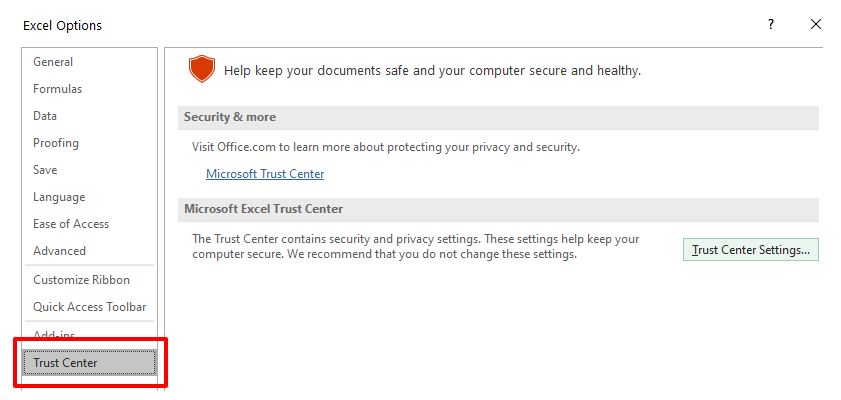
2. Select Trust Center Settings, and then select Protected View.
Если вы уверены в том, что файл является безопасным, нажмите кнопку Разрешить редактирование. Если вы этого не сделаете, то сможете только просмотреть содержимое книги, но не вносить в него какие-либо изменения.
Режим защищенного просмотра включается в том случае, если вы пытаетесь открыть файлы:
- загруженные из Интернета;
- вложенные в письма программы Outlook 2010;
- находящиеся в потенциально небезопасных местах, которым может быть, например, ваша папка Temporary Internet Files;
- блокируемые политикой блокирования файлов (File Block Policy) (данная функции позволяет администраторам определять потенциально опасные файлы);
- имеющие цифровую подпись, срок которой истек.
Кроме того, вы можете специально открыть определенный файл в режиме защищенного просмотра. Для этою в диалоговом окне открытия файла нажмите кнопку Открыть и появившемся списке команд выберите Открыть в режиме защищенного просмотра.
В некоторых случаях вам не нужно работать с документом. Например, вы хотите просто его распечатать. К счастью, для документов, которые были открыты в режиме защищенного просмотра, печать разрешена. Выберите Файл → Печать, а затем нажмите кнопку Печать.
Было бы неплохо, если бы в режиме защищенного просмотра было разрешено копирование, но это не так. Единственный способ копировать информацию из книги в таком режиме — разрешить редактирование. Чтобы открывать файлы в режиме защищенного просмотра, выберите Файл → Открыть для отображения диалогового окна открытия файлов. Выберите нужный файл, а затем щелкните кнопкой мыши на значке со стрелкой справа от кнопки Открыть. Одним из пунктов в списке будет Открыть в режиме защищенного просмотра.
В определенной степени вы можете управлять работой режима защищенного просмотра. Для этого выберите Файл → Параметры и перейдите на вкладку Центр управления безопасностью. Затем нажмите кнопку Параметры центра управления безопасностью и в открывшемся окне перейдите на вкладку Защищенный просмотр. На этой вкладке есть четыре флажка, которые по умолчанию установлены (рис. 3.2).
По умолчанию Excel автоматически пересчитывает все формулы при открытии рабочего листа или при изменении значений, формул или имен в зависимых формулах. Процесс пересчета может длиться от нескольких секунд до нескольких минут в зависимости от количества и сложности формул в рабочей книге.
Пока формулы пересчитываются, указатель мыши меняется на песочные часы, и внести какие-либо изменения на рабочий лист невозможно. Для экономии времени можно временно отключить режим автоматических вычислений в Excel до завершения внесения данных. Сделать это можно без особого труда, и мы покажем Вам как.
Если Вы не хотите отключать режим автоматических вычислений, и Ваш компьютер имеет несколько процессоров, тогда можете применить режим многопоточных вычислений. Он поможет немного ускорить процесс пересчета в зависимости от количества процессоров компьютера. О том, как включить режим многопоточных вычислений в Excel, мы расскажем дальше.
-
Для отключения режима автоматических вычислений откройте Excel и выберите вкладку File (Файл).

Параметры вычислений
Следующий список поясняет опции, которые доступны в разделе Calculation options (Параметры вычислений):
- Automatic (Автоматически) — пересчитывает все зависимые формулы и обновляет все открытые или внедрённые диаграммы при любом изменении значения, формулы или имени. Данная настройка установлена по умолчанию для каждого нового рабочего листа Excel.
- Automatic except for data tables (Автоматически, кроме таблиц данных) — пересчитывает все зависимые формулы и обновляет все открытые или внедрённые диаграммы, за исключением таблиц данных. Для пересчета таблиц данных, когда данная опция выбрана, воспользуйтесь командой Calculate Now (Пересчет), расположенной на вкладке Formulas (Формулы) или клавишей F9.
- Manual (Вручную) — пересчитывает открытые рабочие листы и обновляет открытые или внедрённые диаграммы только при нажатии команды Calculate Now (Пересчет) или клавиши F9, а так же при использовании комбинации клавиши Ctrl+F9 (только для активного листа).
- Recalculate workbook before saving (Пересчитывать книгу перед сохранением) — пересчитывает открытые рабочие листы и обновляет открытые или внедрённые диаграммы при их сохранении даже при включенной опции Manual (Вручную). Если Вы не хотите, чтобы при каждом сохранении зависимые формулы и диаграммы пересчитывались, просто отключите данную опцию.
- Enable iterative calculation (Включить итеративные вычисления) — разрешает итеративные вычисления, т.е. позволяет задавать предельное количество итераций и относительную погрешность вычислений, когда формулы будут пересчитываться при подборе параметра или при использовании циклических ссылок. Более детальную информацию о подборе параметров и использовании циклических ссылок можно найти в справке Microsoft Excel.
- Maximum Iterations (Предельное число итераций) — определяет максимальное количество итераций (по умолчанию — 100).
- Maximum Change (Относительная погрешность) — устанавливает максимально допустимую разницу между результатами пересчета (по умолчанию — 0.001).

Вы также можете переключаться между тремя основными режимами вычислений, используя команду Calculation Options (Параметры вычислений) в разделе Calculation (Вычисление) на вкладке Formulas (Формулы). Однако, если необходимо настроить параметры вычислений, все же придется обратиться к вкладке Formulas (Формулы) диалогового окна Excel Options (Параметры Excel).

Многопоточные вычисления в Excel
Excel 2013 располагает режимом многопоточных вычислений, который позволяет сокращать время пересчета формул. Если Вы предпочитаете не отключать автоматическое вычисление, попробуйте использовать указанную опцию (при наличии у компьютера нескольких процессоров), чтобы сократить время пересчета.
-
Чтобы включить режим многопоточных вычислений, нажмите на вкладку File (Файл) и выберите пункт Options (Параметры), чтобы открыть диалоговое окно Excel Options (Параметры Excel). Затем нажмите Advanced (Дополнительно).


Если на компьютере уже запущены другие программы, Вы можете ограничить число используемых процессоров для пересчета формул электронной таблицы Excel.
What the hell is Protected View and how can I get rid of it?
Have you wondered like 100 million other users what the heck this is?
It’s a grotesque and useless thing called “Protected View”. And until today, nobody knows why Microsoft has introduced this nonsense.
Basically, when you open documents, an ugly yellow dialog box pops up on the top of your Excel or Word document telling you to “Enable Editing” of your document, if you want to be able to edit it. Of course it makes absolutely no sense to ask such a question. Of course I want to edit it you morons. Why would I open it, then?
Anyways, now that is out of the way, let’s see how we can disable this crap.
Microsoft doesn’t make it easy to find it, so you have to go through a couple of steps:
- Go to your menu “File”
- Click “Options”
- Click “Trust Center”
- Click “Trust Center Settings…”
- Click “Protected View”
- Disable all check boxes
If you hate Microsoft as much as I do, please leave your insults below in the comment section.

Top Antivirus Tools 2022


5.0
Norton Antivirus is one of our review winners in 2022. No other antivirus software offers such impressive virus protection in the market right now. This may change in the future as the market is constantly changing.
5.0
In 2022 AVG began offering unlimited install features for their antivirus software. For everyone, but especially families, this is one of the best bargains of the year. The interface couldn't be any easier to use, and the malware protection is solid.

4.9
One of the advantages of Avast 2022 is not just it's reliability and broad antivirus protection but also the price. At only $34.68, it's one of the most affordable deals you can find among reputable antivirus tools.
4.7
Bullguard may not be as famous as the big market players, but it’s unequivocally one of the best antivirus software in the world. It was developed by hackers and computer enthusiasts from a small UK company. As the price suggests, they are driven by passion, not for as much profit as other bigger competitors.
4.7
Panda is not only the cheapest, but is actually one of a kind: They invented the first artificial intelligent virus protection in the world that recognizes unknown viruses. It works so well that they became extremely popular in Europe, and are being praised by hackers.
4.7
With over 400 million users, over 20 years of experience, and 270,000 corporate clients, Kaspersky Lab technologies is a strong cybersecurity company. This company offers an array of powerful products such as Kaspersky Total Security, Kaspersky Anti-Virus, Kaspersky Internet Security and more.
4.4
McAfee has been around for more than 30 years, making them one of the oldest virus protection companies on the market. Due to restructuring of the company over the last years, the company has successfully created a new product fit to satisfy customers in 2022.

3.0
AVIRA Antivirus is one of the most popular virus protection software. They've been famous for years for their free antivirus offering. The paid version is as good as the free version but without ads. For only $0.99, they make switching to the professional version worth it. However, support is not Avira's forte.
Recent Articles About Software

Is your monitor randomly turning on and off? And it happens when you move your mouse and do something on your computer? There is only one simple solution.
No matter how you change the JPG or any other file association, Windows Photos always takes over? We have solved this problem for you.
Having Outlook Problems right now? There is a reason for it. Yes, Microsoft is bad, but also they just caused a worldwide crash today.

When you drag a window to the top of your screen, it maximizes automatically. Finding that annoying? We have the right solution for you!
25 comments for “ How to Remove/Disable Protected View / Enable Editing (Office 365) ”
I have a feeling that someone is paying people at MS and other tech companies to write the new applications in a way, as to make us hate technology. Something that was useful years ago is now increasingly difficult and annoying to work with.
Yes, I do hate MS.
Thank you for your instructions. Very Helpful.
I have spent 5 hours trying to find a way to open this document, a 50 page play that I haven’t opened in 15 years. First I had to buy MS Word 365 because I am using Open Office, but I could n’t open the file. This really pissed me off because it felt like a Mafia shakedown , or a terrorist hostage taking, or kidnapping holding my child for ransom I can barely afford to pay! And I need the sleep so bad, but here it’s nearly 9am, and I haven’t gotten my document open. And I have finally found a songwriter Producer who might know just how to help me get my play produced! But the angel of a songwriter is leaving the country and lives out of state. But traveling during Covid is a perfect time to read a play from an unknown writer…but I might miss this once in a lifetime opportunity to put pages in his hand because this jerk’s captured my intellectual property without my asking and is “protecting” it for me… I do so hate this wretched game of keep away software MS is the only one still playing. Open Source and Block Chain are waiting in the wings to make MS Obsolete… and will leave room for someone to create a software to set free from MS Word Bondage, all our precious work, locked in another dimension of the world where everyone is meaner and inconsiderate.
I am so frustrated. And I am highly strung and analog to the bone!
Cheers Ears
Hated opening a word document and scrolling to the place to type and then having the yellow bar remind me I couldn’t edit, then have to disable and find the place again…
Yes, it’s only a couple of clicks but they add up and suck your life away.
I want to know how to turn off ‘protected view’ for a document I’ve already looked at and decided is safe. How do I do that please?
Читайте также: