
Как настроить visual studio code для c
C/C++ support for Visual Studio Code is provided by a Microsoft C/C++ extension to enable cross-platform C and C++ development on Windows, Linux, and macOS.

Install the extension
- Open VS Code.
- Select the Extensions view icon on the Activity bar or use the keyboard shortcut ( ⇧⌘X (Windows, Linux Ctrl+Shift+X ) ).
- Search for 'C++' .
- Select Install.

After you install the extension, when you open or create a *.cpp file, you will have syntax highlighting (colorization), smart completions and hovers (IntelliSense), and error checking.

Install a compiler
C++ is a compiled language meaning your program's source code must be translated (compiled) before it can be run on your computer. VS Code is first and foremost an editor, and relies on command-line tools to do much of the development workflow. The C/C++ extension does not include a C++ compiler or debugger. You will need to install these tools or use those already installed on your computer.
There may already be a C++ compiler and debugger provided by your academic or work development environment. Check with your instructors or colleagues for guidance on installing the recommended C++ toolset (compiler, debugger, project system, linter).
Some platforms, such as Linux or macOS, have a C++ compiler already installed. Most Linux distributions have the GNU Compiler Collection (GCC) installed and macOS users can get the Clang tools with Xcode.
Check if you have a compiler installed
Make sure your compiler executable is in your platform path ( %PATH on Windows, $PATH on Linux and macOS) so that the C/C++ extension can find it. You can check availability of your C++ tools by opening the Integrated Terminal ( ⌃` (Windows, Linux Ctrl+` ) ) in VS Code and trying to directly run the compiler.
Checking for the GCC compiler g++ :
Checking for the Clang compiler clang :
Note: If you would prefer a full Integrated Development Environment (IDE), with built-in compilation, debugging, and project templates (File > New Project), there are many options available, such as the Visual Studio Community edition.
If you don't have a compiler installed, in the example below, we describe how to install the Minimalist GNU for Windows (MinGW) C++ tools (compiler and debugger). MinGW is a popular, free toolset for Windows. If you are running VS Code on another platform, you can read the C++ tutorials, which cover C++ configurations for Linux and macOS.
Example: Install MinGW-x64
We will install Mingw-w64 via MSYS2, which provides up-to-date native builds of GCC, Mingw-w64, and other helpful C++ tools and libraries. You can download the latest installer from the MSYS2 page or use this link to the installer.
Follow the Installation instructions on the MSYS2 website to install Mingw-w64. Take care to run each required Start menu and pacman command, especially Step 7, when you will install the actual Mingw-w64 toolset ( pacman -S --needed base-devel mingw-w64-x86_64-toolchain ).
Add the MinGW compiler to your path
Add the path to your Mingw-w64 bin folder to the Windows PATH environment variable by using the following steps:
- In the Windows search bar, type 'settings' to open your Windows Settings.
- Search for Edit environment variables for your account.
- Choose the Path variable in your User variables and then select Edit.
- Select New and add the Mingw-w64 destination folder path, with \mingw64\bin appended, to the system path. The exact path depends on which version of Mingw-w64 you have installed and where you installed it. If you used the settings above to install Mingw-w64, then add this to the path: C:\msys64\mingw64\bin .
- Select OK to save the updated PATH. You will need to reopen any console windows for the new PATH location to be available.
Check your MinGW installation
To check that your Mingw-w64 tools are correctly installed and available, open a new Command Prompt and type:
If you don't see the expected output or g++ or gdb is not a recognized command, make sure your PATH entry matches the Mingw-w64 binary location where the compiler tools are located.
Hello World
To make sure the compiler is installed and configured correctly, we'll create the simplest Hello World C++ program.
Create a folder called "HelloWorld" and open VS Code in that folder ( code . opens VS Code in the current folder):
The "code ." command opens VS Code in the current working folder, which becomes your "workspace". Accept the Workspace Trust dialog by selecting Yes, I trust the authors since this is a folder you created.
Now create a new file called helloworld.cpp with the New File button in the File Explorer or File > New File command.


Add Hello World source code
Now paste in this source code:
Now press ⌘S (Windows, Linux Ctrl+S ) to save the file. You can also enable Auto Save to automatically save your file changes, by checking Auto Save in the main File menu.
Build Hello World
Now that we have a simple C++ program, let's build it. Select the Terminal > Run Build Task command ( ⇧⌘B (Windows, Linux Ctrl+Shift+B ) ) from the main menu.

This will display a dropdown with various compiler task options. If you are using a GCC toolset like MinGW, you would choose C/C++: g++.exe build active file.

This will compile helloworld.cpp and create an executable file called helloworld.exe , which will appear in the File Explorer.

Run Hello World
From a command prompt or a new VS Code Integrated Terminal, you can now run your program by typing ".\helloworld".

If everything is set up correctly, you should see the output "Hello World".
This has been a very simple example to help you get started with C++ development in VS Code. The next step is to try one of the tutorials listed below on your platform (Windows, Linux, or macOS) with your preferred toolset (GCC, Clang, Microsoft C++) and learn more about the Microsoft C/C++ extension's language features such as IntelliSense, code navigation, build configuration, and debugging.
Tutorials
Get started with C++ and VS Code with tutorials for your environment:
Documentation
You can find more documentation on using the Microsoft C/C++ extension under the C++ section of the VS Code website, where you'll find topics on:

Remote Development
VS Code and the C++ extension support Remote Development allowing you to work over SSH on a remote machine or VM, inside a Docker container, or in the Windows Subsystem for Linux (WSL).
To install support for Remote Development:
- Install the VS Code Remote Development Extension Pack.
- If the remote source files are hosted in WSL, use the Remote - WSL extension.
- If you are connecting to a remote machine with SSH, use the Remote - SSH extension.
- If the remote source files are hosted in a container (for example, Docker), use the Remote - Containers extension.
Feedback
If you run into any issues or have suggestions for the Microsoft C/C++ extension, please file issues and suggestions on GitHub. If you haven't already provided feedback, please take this quick survey to help shape this extension for your needs.
In this tutorial, you configure Visual Studio Code to use the GCC C++ compiler (g++) and GDB debugger from mingw-w64 to create programs that run on Windows.
After configuring VS Code, you will compile and debug a simple Hello World program in VS Code. This tutorial does not teach you about GCC, GDB, Mingw-w64, or the C++ language. For those subjects, there are many good resources available on the Web.
If you have any problems, feel free to file an issue for this tutorial in the VS Code documentation repository.
Prerequisites
To successfully complete this tutorial, you must do the following steps:
Install the C/C++ extension for VS Code. You can install the C/C++ extension by searching for 'c++' in the Extensions view ( ⇧⌘X (Windows, Linux Ctrl+Shift+X ) ).

Get the latest version of Mingw-w64 via MSYS2, which provides up-to-date native builds of GCC, Mingw-w64, and other helpful C++ tools and libraries. You can download the latest installer from the MSYS2 page or use this link to the installer.
Follow the Installation instructions on the MSYS2 website to install Mingw-w64. Take care to run each required Start menu and pacman command, especially Step 7, when you will install the actual Mingw-w64 toolset ( pacman -S --needed base-devel mingw-w64-x86_64-toolchain ).
Add the path to your Mingw-w64 bin folder to the Windows PATH environment variable by using the following steps:
- In the Windows search bar, type 'settings' to open your Windows Settings.
- Search for Edit environment variables for your account.
- Choose the Path variable in your User variables and then select Edit.
- Select New and add the Mingw-w64 destination folder path to the system path. The exact path depends on which version of Mingw-w64 you have installed and where you installed it. If you used the settings above to install Mingw-w64, then add this to the path: C:\msys64\mingw64\bin .
- Select OK to save the updated PATH. You will need to reopen any console windows for the new PATH location to be available.
Check your MinGW installation
To check that your Mingw-w64 tools are correctly installed and available, open a new Command Prompt and type:
If you don't see the expected output or g++ or gdb is not a recognized command, make sure your PATH entry matches the Mingw-w64 binary location where the compilers are located. If the compilers do not exist at that PATH entry, make sure you followed the instructions on the MSYS2 website to install Mingw-w64.
Create Hello World
From a Windows command prompt, create an empty folder called projects where you can place all your VS Code projects. Then create a sub-folder called helloworld , navigate into it, and open VS Code in that folder by entering the following commands:
The "code ." command opens VS Code in the current working folder, which becomes your "workspace". Accept the Workspace Trust dialog by selecting Yes, I trust the authors since this is a folder you created.
As you go through the tutorial, you will see three files created in a .vscode folder in the workspace:
- tasks.json (build instructions)
- launch.json (debugger settings)
- c_cpp_properties.json (compiler path and IntelliSense settings)
Add a source code file
In the File Explorer title bar, select the New File button and name the file helloworld.cpp .
Add hello world source code
Now paste in this source code:
Now press ⌘S (Windows, Linux Ctrl+S ) to save the file. Notice how the file you just added appears in the File Explorer view ( ⇧⌘E (Windows, Linux Ctrl+Shift+E ) ) in the side bar of VS Code:

You can also enable Auto Save to automatically save your file changes, by checking Auto Save in the main File menu.
The Activity Bar on the far left lets you open different views such as Search, Source Control, and Run. You'll look at the Run view later in this tutorial. You can find out more about the other views in the VS Code User Interface documentation.
Note: When you save or open a C++ file, you may see a notification from the C/C++ extension about the availability of an Insiders version, which lets you test new features and fixes. You can ignore this notification by selecting the X (Clear Notification).
Explore IntelliSense
In your new helloworld.cpp file, hover over vector or string to see type information. After the declaration of the msg variable, start typing msg. as you would when calling a member function. You should immediately see a completion list that shows all the member functions, and a window that shows the type information for the msg object:

You can press the Tab key to insert the selected member; then, when you add the opening parenthesis, you will see information about any arguments that the function requires.
Build helloworld.cpp
Next, you'll create a tasks.json file to tell VS Code how to build (compile) the program. This task will invoke the g++ compiler to create an executable file based on the source code.
From the main menu, choose Terminal > Configure Default Build Task. In the dropdown, which will display a tasks dropdown listing various predefined build tasks for C++ compilers. Choose g++.exe build active file, which will build the file that is currently displayed (active) in the editor.

This will create a tasks.json file in a .vscode folder and open it in the editor.
Your new tasks.json file should look similar to the JSON below:
The command setting specifies the program to run; in this case that is g++. The args array specifies the command-line arguments that will be passed to g++. These arguments must be specified in the order expected by the compiler. This task tells g++ to take the active file ( $ ), compile it, and create an executable file in the current directory ( $ ) with the same name as the active file but with the .exe extension ( $.exe ), resulting in helloworld.exe for our example.
Note: You can learn more about tasks.json variables in the variables reference.
The label value is what you will see in the tasks list; you can name this whatever you like.
The "isDefault": true value in the group object specifies that this task will be run when you press ⇧⌘B (Windows, Linux Ctrl+Shift+B ) . This property is for convenience only; if you set it to false, you can still run it from the Terminal menu with Tasks: Run Build Task.
Running the build
Go back to helloworld.cpp . Your task builds the active file and you want to build helloworld.cpp .
To run the build task defined in tasks.json , press ⇧⌘B (Windows, Linux Ctrl+Shift+B ) or from the Terminal main menu choose Run Build Task.
When the task starts, you should see the Integrated Terminal panel appear below the source code editor. After the task completes, the terminal shows output from the compiler that indicates whether the build succeeded or failed. For a successful g++ build, the output looks something like this:

Create a new terminal using the + button and you'll have a new terminal with the helloworld folder as the working directory. Run dir and you should now see the executable helloworld.exe .

You can run helloworld in the terminal by typing helloworld.exe (or .\helloworld.exe if you use a PowerShell terminal).
Note: You might need to press Enter a couple of times initially to see the PowerShell prompt in the terminal. This issue should be fixed in a future release of Windows.
Modifying tasks.json
You can modify your tasks.json to build multiple C++ files by using an argument like "$\\*.cpp" instead of $ . This will build all .cpp files in your current folder. You can also modify the output filename by replacing "$\\$.exe" with a hard-coded filename (for example "$\\myProgram.exe" ).
Debug helloworld.cpp
Next, you'll create a launch.json file to configure VS Code to launch the GDB debugger when you press F5 to debug the program.
- From the main menu, choose Run >Add Configuration. . VS Code creates an empty launch.json file.
- Copy and paste the following configuration into launch.json :
The program setting specifies the program you want to debug. Here it is set to the active file folder $ and active filename with the .exe extension $.exe , which if helloworld.cpp is the active file will be helloworld.exe .
By default, the C++ extension won't add any breakpoints to your source code and the stopAtEntry value is set to false .
Change the stopAtEntry value to true to cause the debugger to stop on the main method when you start debugging.
Note: The preLaunchTask setting is used to specify task to be executed before launch. Make sure it is consistent with the tasks.json file label setting.
Start a debugging session
- Go back to helloworld.cpp so that it is the active file.
- Press F5 or from the main menu choose Run > Start Debugging. Before you start stepping through the source code, let's take a moment to notice several changes in the user interface:
The Integrated Terminal appears at the bottom of the source code editor. In the Debug Output tab, you see output that indicates the debugger is up and running.
The editor highlights the first statement in the main method. This is a breakpoint that the C++ extension automatically sets for you:

The Run view on the left shows debugging information. You'll see an example later in the tutorial.
At the top of the code editor, a debugging control panel appears. You can move this around the screen by grabbing the dots on the left side.
Step through the code
Now you're ready to start stepping through the code.
Click or press the Step over icon in the debugging control panel.
This will advance program execution to the first line of the for loop, and skip over all the internal function calls within the vector and string classes that are invoked when the msg variable is created and initialized. Notice the change in the Variables window on the left.

In this case, the errors are expected because, although the variable names for the loop are now visible to the debugger, the statement has not executed yet, so there is nothing to read at this point. The contents of msg are visible, however, because that statement has completed.
Press Step over again to advance to the next statement in this program (skipping over all the internal code that is executed to initialize the loop). Now, the Variables window shows information about the loop variables.
Press Step over again to execute the cout statement. (Note that as of the March 2019 release, the C++ extension does not print any output to the Debug Console until the loop exits.)
If you like, you can keep pressing Step over until all the words in the vector have been printed to the console. But if you are curious, try pressing the Step Into button to step through source code in the C++ standard library!

To return to your own code, one way is to keep pressing Step over. Another way is to set a breakpoint in your code by switching to the helloworld.cpp tab in the code editor, putting the insertion point somewhere on the cout statement inside the loop, and pressing F9 . A red dot appears in the gutter on the left to indicate that a breakpoint has been set on this line.

Then press F5 to start execution from the current line in the standard library header. Execution will break on cout . If you like, you can press F9 again to toggle off the breakpoint.
When the loop has completed, you can see the output in the Integrated Terminal, along with some other diagnostic information that is output by GDB.

Set a watch
Sometimes you might want to keep track of the value of a variable as your program executes. You can do this by setting a watch on the variable.
Place the insertion point inside the loop. In the Watch window, click the plus sign and in the text box, type word , which is the name of the loop variable. Now view the Watch window as you step through the loop.

Add another watch by adding this statement before the loop: int i = 0; . Then, inside the loop, add this statement: ++i; . Now add a watch for i as you did in the previous step.
To quickly view the value of any variable while execution is paused on a breakpoint, you can hover over it with the mouse pointer.

C/C++ configurations
If you want more control over the C/C++ extension, you can create a c_cpp_properties.json file, which will allow you to change settings such as the path to the compiler, include paths, C++ standard (default is C++17), and more.
You can view the C/C++ configuration UI by running the command C/C++: Edit Configurations (UI) from the Command Palette ( ⇧⌘P (Windows, Linux Ctrl+Shift+P ) ).

This opens the C/C++ Configurations page. When you make changes here, VS Code writes them to a file called c_cpp_properties.json in the .vscode folder.
Here, we've changed the Configuration name to GCC, set the Compiler path dropdown to the g++ compiler, and the IntelliSense mode to match the compiler (gcc-x64)

Visual Studio Code places these settings in .vscode\c_cpp_properties.json . If you open that file directly, it should look something like this:
You only need to add to the Include path array setting if your program includes header files that are not in your workspace or in the standard library path.
Compiler path
The extension uses the compilerPath setting to infer the path to the C++ standard library header files. When the extension knows where to find those files, it can provide features like smart completions and Go to Definition navigation.
The C/C++ extension attempts to populate compilerPath with the default compiler location based on what it finds on your system. The extension looks in several common compiler locations.
The compilerPath search order is:
- First check for the Microsoft Visual C++ compiler
- Then look for g++ on Windows Subsystem for Linux (WSL)
- Then g++ for Mingw-w64.
If you have Visual Studio or WSL installed, you may need to change compilerPath to match the preferred compiler for your project. For example, if you installed Mingw-w64 version 8.1.0 using the i686 architecture, Win32 threading, and sjlj exception handling install options, the path would look like this: C:\Program Files (x86)\mingw-w64\i686-8.1.0-win32-sjlj-rt_v6-rev0\mingw64\bin\g++.exe .
Troubleshooting
MSYS2 is installed, but g++ and gdb are still not found
You must follow the steps on the MSYS2 website and use the MSYS CLI to install Mingw-w64, which contains those tools.
MinGW 32-bit
If you need a 32-bit version of the MinGW toolset, consult the Downloading section on the MSYS2 wiki. It includes links to both 32-bit and 64-bit installation options.

Visual Studio Code — популярный редактор кода, бесплатный и с открытым исходным кодом. Но я уверен: каждый из нас, кто пытался настроить Visual Studio Code для разработки приложений на C++, Java или Python, прошел через стадию: “О Боже! Почему нельзя как-нибудь попроще?” Я сам пробовал настроить VS Code пару раз и в итоге закончил тем, что использовал CodeBlocks. 🙁
Прочитав много документации, посмотрев ряд роликов на YouTube и потратив несколько дней на саму настройку VS Code, я пишу эту статью, чтобы все это не пришлось проделывать уже вам!
Сегодня я покажу, как настроить среду разработки для спортивного программирования на C++, Java и Python в VS Code с нуля. Мы также посмотрим, какие расширения больше всего пригодятся, чтобы начать работу с VS Code. В конечном счете, ваша среда разработки будет выглядеть примерно так:

1. Устанавливаем Visual Studio Code
Скачайте последнюю версию Visual Studio Code с официального сайта. Рекомендуется загрузить системный установщик (System Installer), но если у вас нет прав администратора, то пользовательский установщик (User Installer) тоже подойдет. Выполните все обычные шаги по установке и обязательно проставьте все следующие чекбоксы:

Если у вас уже установлен VS Code, но вы все равно хотите начать с чистого листа, следуйте этим инструкциям, чтобы полностью удалить VS Code.
2. Настраиваем расширения
Ниже приведен список расширений, которые нам понадобятся для правильной настройки VS Code. Откройте VS Code и перейдите на панель расширений (Ctrl + Shift + X), которая находится на левой панели инструментов, и начните загружать друг за другом следующие расширения:
-
от Microsoft — [Важно] Для корректной работы этого расширения нам понадобится установленный и добавленный в PATH компилятор MinGW. Если у вас его нет, следуйте этому руководству. от austin. от Microsoft — вам нужно будет настроить Python для работы этого расширения. Загрузите и установите последнюю версию отсюда. от Microsoft — [Важно] Перед установкой убедитесь, что в вашей системе настроены Java 8 JDK и JRE и указаны все необходимые переменные среды для Java. Если нет, посмотрите это видео о том, как настроить Java на вашем компьютере. от Jun Han — мы будем использовать это расширение для запуска всех наших программ. Для этого необходимо выполнить некоторые шаги по настройке. Мы увидим эти шаги в следующих разделах.
Расширения, перечисленные ниже, необязательны для дальнейшей настройки, но я рекомендую вам обратить на них внимание, посмотреть, заинтересуют ли они вас, и если нет, то перейти к следующему разделу.
- (Необязательно)Material Theme от Mattia Astronio — это расширение содержит множество приятных глазу тем. Вы можете выбрать любую, какая понравится. Лично я предпочитаю Monokai, которая доступна в VS Code по умолчанию, без каких-либо расширений.
Чтобы выбрать тему, нажмите Ctrl + Shift + P. Откроется палитра команд. Осуществите поиск по слову “theme” и выберите опцию Color Theme. Чтобы настроить иконки, можете выбрать опцию File Icon Theme.

Расширения для тех, кто интересуется FrontEnd-фреймворками для веб-разработки, такими как Angular и React:
- (Необязательно) Angular Language Service от Angular.
- (Необязательно) Angular Snippets от John Papa.
- (Необязательно) ES7 React / Redux / GraphQL / React-Native snippets от dsznajder.
- (Необязательно) React Native Tools от Microsoft.
- (Необязательно) Live Server от Ritwick Dey.
3. Настраиваем внешний вид редактора
Итак, мы уже установили VS Code и несколько расширений. Теперь мы готовы настраивать среду разработки. Я создал шаблон для спортивного программирования в VS Code и загрузил его в свой профиль на Github.
Перейдите по этой ссылке и загрузите шаблон себе на компьютер. Распакуйте его в любое место по вашему выбору. После этого откройте получившуюся папку в VS Code. Вы должны увидеть что-то вроде этого:

Пройдитесь по файлам main.cpp, Main.java и main.py и посмотрите на записанный в них образец кода. По сути, шаблонный код, предоставленный в образцах для каждого из этих трех языков, принимает входящие данные из файла input.txt и обеспечивает вывод в файл output.txt. Для каждой программистской задачи, которую вы хотите решить, просто создайте копию этого шаблона и напишите свой код в функции solve().
Теперь создадим ту разбивку экрана, которую вы могли видеть на самом первом изображении в этой статье. Эта разбивка позволяет сразу видеть как ввод, так и вывод вашего кода, что делает ее очень удобной в использовании.
- Откройте файлы в следующем порядке: main.cpp, input.txt, output.txt. Порядок, в каком были открыты файлы, можно видеть сверху на панели инструментов. Убедитесь, что порядок именно такой, как указано выше.
- Откройте input.txt. Выберите в меню View -> Editor Layout -> Split Right. Вы должны увидеть что-то подобное:

- У вас получится две группы. Перетащите output.txt из левой группы в правую. Закройте тот input.txt, что остался слева. Должно выйти примерно так:

- Далее откройте output.txt в правой группе. Выберите View -> Editor Layout -> Split Down. Уберите output.txt из верхней группы. После этого вы увидите:

Готово! Мы настроили внешний вид редактора. А теперь давайте запускать код.
4. Запускаем код!
Для запуска нашего кода мы будем использовать расширение Code Runner, потому что ручная настройка VS Code для каждого языка — весьма сложная задача и потребует много затрат времени и сил.
Прежде чем использовать это расширение, нам нужно настроить его так, чтобы оно работало через терминал, иначе мы не сможем обеспечить консольный ввод нашего кода. Эти шаги очень важно проделать в точности:
- Выберите File -> Preferences -> Settings.
- Введите “code runner run in terminal” в поле поиска и установите галку в чекбоксе:

По умолчанию Code Runner не добавляет флаг -std=c++14 при компиляции кода. Это ограничивает ваши возможности как программиста. Например, если вы попытаетесь сделать так:
То это вызовет предупреждение: “Расширенные списки инициализаторов доступны только с -std=c++11 или -std=gnu++11”.
Выполните следующие действия, чтобы добавить флаг:
- Выберите File -> Preferences -> Settings.
- Введите в поиске “Run Code Configuration”.
- Определите местонахождение “Code-runner: Executor Map” и выберите “Edit in settings.json”. Это откроет файл settings.json. Добавьте туда следующий код:

Наконец-то всё настроено для запуска ваших программ на C++, Java и Python.
Откройте файл main.cpp. Нажмите правую кнопку мыши и выберите опцию Run Code. Попробуйте напечатать что-нибудь в функции solve(), чтобы проверить, происходит ли у вас вывод в файл output.txt или нет.

Следуйте той же процедуре с файлами Main.java и main.py. Расширение Code Runner возьмет на себя выполнение каждого из них.
Я надеюсь, что эта статья помогла вам настроить Visual Studio Code. Счастливого программирования!
Давайте начистоту, мало кто использует отладчик GDB на Linux в консольном варианте. Но что, если добавить в него красивый интерфейс? Под катом вы найдёте пошаговую инструкцию отладки кода С/С++ на Linux в Visual Studio Code.
Передаю слово автору.
Относительно недавно я переехал на Linux. Разрабатывать на Windows, конечно, удобнее и приятнее, но и здесь я нашел эффективный способ легко и быстро отлаживать код на С/С++, не прибегая к таким методам как «printf-стайл отладки» и так далее.
Итак приступим. Писать в sublime (или gedit/kate/emacs ), а запускать в терминале — так себе решение, ошибку при работе с динамическим распределением памяти вряд ли найдёшь с первого раза. А если проект трудоёмкий? У меня есть более удобное решение. Да и ещё поддержка Git в редакторе, одни плюсы.
Сегодня мы поговорим про Visual Studio Code.
Установка
Ubuntu/Debian
- Качаем версию пакета VS Code с расширением .deb
- Переходим в папку, куда скачался пакет (cd ~/Загрузки или cd ~/Downloads)
- Пишем, где (имя пакета).deb — название файла, который вы только что скачали:
Расширения для С/С++
Чтобы VS Code полностью сопровождал нас при работе с файлами С/С++, нужно установить расширение «cpptools». Также полезным будет поставить один из наборов сниппетов.

Настоятельно рекомендую включить автосохранение редактируемых файлов, это поможет нам в дальнейшем.

Идём дальше. Открываем любую папку (новую или нет, неважно).

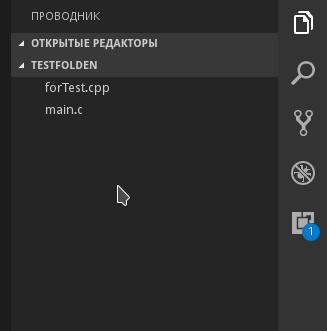
У меня в этой папке уже есть пара файлов для работы с C/C++. Вы можете скопировать одну из своих наработок сюда или создать новый файл.
Осталось всего ничего. Настроить компиляцию в одну клавишу и научиться отлаживать без printf .
Шаг 1. Открываем файл .c/.cpp, который (обязательно) лежит в вашей папке.
Шаг 2. Нажимаем Ctrl+Shift+B. VS Code вам мягко намекнет, что он не знает как собирать ваш проект.

Шаг 3. Поэтому дальше настраиваем задачу сборки: выбираем «Настроить задачу сборки» -> «Others».
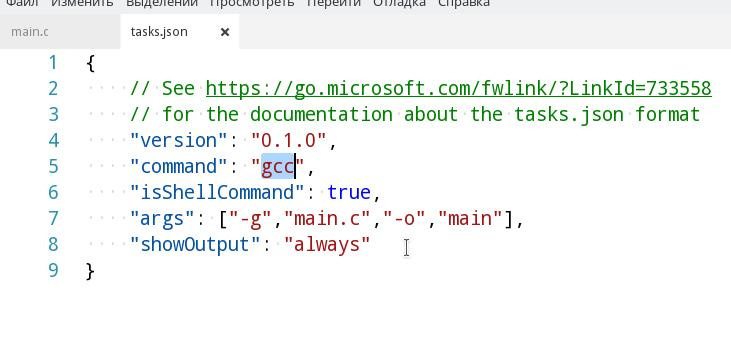
Шаг 4. Прописываем конфигурацию в соответствии с образцом. По сути мы пишем скрипт для консоли, так что всем кто имел дело с ней будет понятно дальнейшее. Прошу заметить, что для сборки исходников в системе должен стоять сам компилятор (gcc или другой, отличаться будет только значение поля command ). Поэтому для компиляции .cpp, понадобится в поле command указать g++ или c++ , а для .c gcc .
Шаг 5. В args прописываем аргументы, которые будут переданы на вход вашему компилятору. Напоминаю, что порядок должен быть примерно таким: -g, .
Внимание: Если в вашей программе используется несколько файлов с исходным кодом, то укажите их в разных аргументах через запятую. Также обязательным является ключ -g (а лучше даже -g3 ). Иначе вы не сможете отладить программу.
Если в проекте для сборки вы используете makefile , то в поле command введите make , а в качестве аргумента передайте директиву для сборки.
Шаг 6. Далее возвращаемся обратно к нашему исходнику. И нажимаем F5 и выбираем C++.

Шаг 7. Осталось только написать путь к файлу программы. По умолчанию это $/a.out , но я в своем файле сборки указал флаг -o и переименовал файл скомпилированной программы, поэтому у меня путь до программы: $/main .

Шаг 8. Всё, больше нам не нужно ничего для начала использования всех благ VS Code. Переходим к основному проекту.
Отладка
Для начала скомпилируем программу (нет, нет, убери терминал, теперь это делается по нажатию Ctrl+Shift+B).

Как вы видите в проводнике появился main , значит все в порядке и сборка прошла без ошибок. У меня не слишком большая программа, но выполняется она моментально. Одним словом, провал чистой воды, потому что отладка идет в отдельном терминале, который закрывается после того, как программа дошла в main() до "return 0;" .

Пришло время для брейкпоинтов. Выберем строчку с "return 0;" и нажимаем F9.
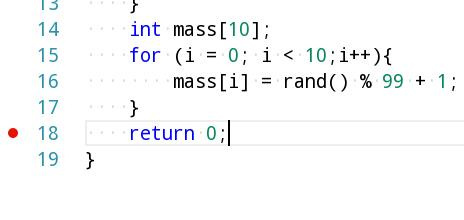
Строчка, помеченная красной точкой слева — место, где остановится программа, при выполнении.
Далее нажимаем F5.

Как я и сказал, программа остановила выполнение. Обратите внимание на окно с локальными переменными.
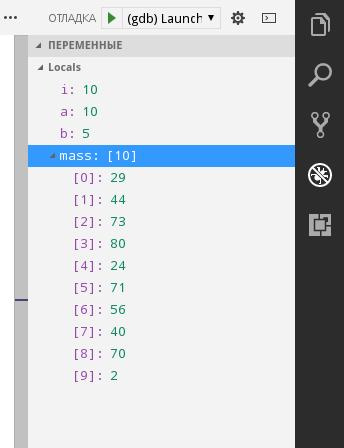
Удобненько. Также при остановке можно наводить мышкой на переменные и структуры в коде и смотреть их значения.

Также, если на каком-то этапе выполнения вам нужно посмотреть пошаговое выполнение той или иной операции, например в цикле, то поставьте брейкпоинт перед ней и нажмите F10 для выполнения текущей строчки без захода в подпрограмму и F11 с заходом.
Также есть случаи, когда считать выражение очень муторно вручную, но для отладки вам нужно знать, например, значение суммы трех элементов массива, или значение большого логического выражения. Для этого существуют контрольные значения. Все это и многое другое могут показать вам Контрольные значения (или «watch»).

- Для каждой папки вам нужно отдельно настроить файлы сборки и путь к программе.
- VS Code не решит ваших проблем, но поможет быстрее с ними разобраться. Причем в разы.
- После каждого изменения программы, ее нужно компилировать заново, нажимая Ctrl+Shift+B.
Об авторе

Удивительно, но до сих пор на Хабре нет хорошей подборки плагинов для Visual Studio Code для тех, кто пишет на С/С++. Microsoft в своем блоге опубликовали только статью, совсем базового уровня с инструкцией по настройке. Но большинство читателей Хабра, тем более из разработчиков, обойдется без такой подробной инструкции. Есть только несколько подборок для веб-разработчиков, но не для С++.
Наверное это связано с тем, что большинство С++ разработчиков использует тяжеловесные IDE, в первую очередь конечно же Visual Studio.
Но в Linux и MacOS с полноценными IDE всё не так просто, да и тяжелая среда разработки не всегда нужна или просто не хочется ее использовать.
Я же хочу обратить ваше внимание на полезные плагины, которые облегчают жизнь и работу, а также рассказать про полезные настройки и особенности VS Code, которые вы могли просто упустить.
Вопрос считать VS Code IDE или только редактором кода весьма холиварный и не является целью этой статьи. Я буду всё-таки считать её IDE, так как минимальными усилиями она предлагает основные сценарии IDE, такие как автодополнение и отладка.
Немного истории
Первая IDE, которую я использовал начиная свой путь разработчиком была, уже историческая, Borland C++ 2.0. Потом я пересел на Visual Studio 6.0 и оставался (да и сейчас остаюсь) фанатом этой IDE. Но в какой-то момент возникла необходимость писать под Linux (это был, наверное, 2006 год). В Linux, первое время, я был шоке от отсутствия серьезных IDE — пробовал Eclipse, мучился и плевался. Не буду вдаваться в историю, но в итоге я разобрался с Make, CMake, научился быстро писать соответствующие файлы, потом были линкер скрипты, gdb, kdb и много всего интересного. В это время я полюбил и активно использовал vim на протяжении лет 5. После чего постепенно переключился на Sublime Text, затем на его вторую версию, а сейчас уже на третью.
Теперь я уже меньше пишу кода, и больше занимаюсь развитием продуктов и процессов, но периодически писать все же приходится — это и личные проекты и помощь нашим партнерам со встраиванием нашего SDK.
А так как SDK у нас не только для Windows, но и для Linux и MacOS, то и код приходится писать в них. В прошлом году я попробовал VS Code, и он стал для меня хорошей альтернативой Sublime Text.
Если коротко их сравнить, то Sublime Text, на мой личный взгляд, даёт больше возможностей по настройке и по работе, но VS Code больше даёт из коробки. И если под рукой нет личной подборки расширений для Sublime Text или если вы вообще никогда этим редактором не пользовались, то Visual Studio Code —отличная штука.
Начну с нескольких очень полезных расширений. Их для С\С++ разработчика в VS Code не так много и главный из них это конечно:
C/C++ for Visual Studio Code
Ссылка на marketplace
Это основное расширения для поддержки С\С++ в VS Code, которое разрабатывается Microsoft. Подробное описание всего, что оно даёт есть на странице в маркете, я же здесь упомяну только самое главное (на мой взгляд конечно):
- Форматирование кода (с помощью clang-format)
- Автодополнение
- Поиск символов по коду
- Go to Definition/Declaration (в том числе Peek)
- Class/Method Navigation
- Signature Help
- Quick Info (Hover)
- Error Squiggles
Надо отметить, что Microsoft большие молодцы и постоянно обновляют это расширение. Причем новые возможности этого расширения публикуются только в dev блоге от Microsoft и не очень заметны. Поэтому я решил рассказать тут о самых новых из них.
Глобальные настройки для IntelliSense
В мае 2018 в VS Code добавили возможность задать любые параметры для IntelliSense в пользовательском settings.json. Эти настройки автоматически применяются ко всем проектам.
Очень полезная штука когда большинство проектов, с которыми вы работаете используют общий набор include, одинаковый компилятор и так далее.

Поддержка встроенного терминала при отладке
В декабре 2018 года Microsoft добавила возможность по отладке С\С++ приложений во встроенном терминале, вместо открытия отдельного окна с терминалом. Управляется эта возможность параметром externalConsole в launch.json.

Пока поддерживается только cppdbg и только на Linux и Windows, но в MacOS тоже обещали завезти в скором времени. Выглядит это так:

Комментарии для документирования
Эту штуку добавили буквально в прошлом месяце. Рассказывать тут особо нечего, поэтому просто приведу пример от Microsoft.
Пишем простой класс Box и добавляем комментарии в стандартном формате:

Комментарий ассоциируется с классами или функциями членам класса и показываются во всплывающих подсказках при наведении на соответствующий объект.
Выглядит это так:
Работа с контейнерами
В последнем обновлении от 6 февраля Microsoft добавила работу с С++ в Docker контейнерах. Теперь вы можете не только собирать код в контейнерах, но и отлаживать его внутри контейнеров. Подробности — в блоге Microsoft.
Сам я контейнерами по работе не пользуюсь — нет необходимости. Но наверняка это многим будет полезно, поэтому я и решил включить это в статью.
Ну а теперь возвращаемся к другим расширениям для VS Code, которые помогут вам при разработке.
cquery
Ещё один достаточно глобальный плагин для С/С++/Objective-C разработчика в VS Code. Основная особенность — расширение было спроектировано и протестировано на очень больших проектах, например, на Chromium. Поэтому пригодится там, где стандартное расширение от Microsoft и его IntelliSense пасует (такое часто случает когда у вас больше 100Мб С++ исходников).
Список всех основных возможностей такой:
Easy C++ projects
Если два предыдущих расширения были глобальные с большим количеством возможностей, то это выполняет простую функцию — создание простого проекта для MSVC, GCC или Clang.
Дополнительно умеет:
- создавать типовой Makefile для проекта
- создавать конфигурации VS Code для сборки и запуска
- создавать конфигурации VS Code для отладки (поддерживается Visual Studio Debugger, GDB и LLDB)
- генерировать новые классы из небольшого списка шаблонов
Работает это так:
CMake Tools
Как очевидно из названия, расширение добавляет поддержку CMake. Как подсказали в комментариях, можно конечно все прописывать руками, но с расширением будет удобнее.
После установки надо будет сделать минимальную настройку. Выбрать toolchain:
После чего выбрать конфигурацию для сборки:
И все. Можно работать.
Расширение также умеет само генерировать для проектов простейшие CMake файлы.
Todo Tree
Результат работы выглядит так:

GitLens
Как следует из названия расширения — оно улучшает работу с git. Надо отметить, что по-умолчанию в VS Code уже встроена некоторая поддержка git, но весьма ограниченная.
Основная фишка GitLens — показ прямо в редактируемой строке кто и в каком коммите менял её последний раз. Расширение также добавляет расширенный поиск по истории файла, поиск по коммитам, удобный вид для сравнения нескольких версий файла и многое другое. Для демонстрации работы я просто вставлю gif со страницы marketа, который наглядно показывает возможности расширения.
Git History
Ещё одно расширение улучшающее работу с git, а именно показ истории. Почему в GitLens мне так и не удалось найти подходящее отображении истории проекта со всеми ветками. Если кто-то знает, как подобный вид (см. ниже) сделать с помощью GitLens обязательно напишите в комментариях, буду очень благодарен.
vscode-icons
Одно из многочисленных расширений, которое добавляет иконки для файлов и каталогов в Explorer панель. Расширений таких в маркете масса, а это является самым популярным. Можете смело выбирать любое другое, мне понравились именно эти иконки.
Settings Sync
Ещё одно полезное расширение, назначение которого очевидно из названия.
Для синхронизации ваших настроек используется GitHub account token и Gist. Лично для меня — одно из самых полезных расширений, так как я использую и Windows, и Linux, и Mac.
Code Spell Checker
Если ваш английский пока далек от идеала или вы хотите предотвратить опечатки, то это расширение определенно не будет лишним. При необходимости можно добавить поддержку русского языка.
Из приятных особенностей — не только подчеркивает ошибочные слова, но и предлагает корректные варианты.
WakaTime
ссылка на marketplace
WakaTime — это сервис, который показывает красивую статистику\графики\метрики по вашему программированию. Штука исключительно эстетическая, но мне очень нравится. Расширение соответственно добавляет поддержку сервиса при работе в VSCode. Про сам сервис можно почитать тут.
Пример красивых графиков:

Основные возможности сервиса бесплатные и подписки не требуют.
На этом с расширениями всё. Хочется также поделится несколькими полезными настройками самого VS Code, которые могут быть полезны сообществу.
Несколько полезных настроек
По умолчанию VSCode отправляет телеметрию при падении, а также некоторые данные и информацию об ошибках в Microsoft. Если вас по каким-то причинам это не устраивает, то смело отключайте в настройках:
- Telemetry: Enable Crash Report
- Telemetry: Enable Telemetry
Следующую настройку я сам обнаружил только при написании статьи. ZenMode позволяет вам скрыть все лишние окна и меню и оставить только текущий файл с кодом. Теперь буду постоянно пользоваться на планшете, когда приходится что-то пробовать в коде. На планшете остальные окна часто не нужны, а полезного пространства очень не хватает. Рекомендую!
Если кто-то хочет поделится своими интересными расширениями для VS Code или обратить внимание на полезные настройки — welcome в комментарии. С удовольствием дополню статью, чтобы она стала ещё полезнее.
Читайте также: