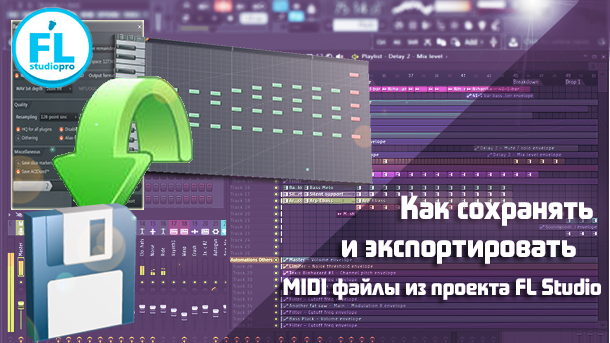
Как конвертировать mp3 в midi в fl studio

УРОКИ FL STUDIO
Привет ребята в этой увлекательной статье мы узнаем как конвертировать из аудио файла в MIDI формат в Fl Studio 20. Это бывает полезно когда вы хотите узнать какие ноты использовал тот или иной исполнитель и для подбора нот под вокал. Но хочу Вас сразу предупредить что он корректно работает только с отдельными аудио инструментами и с вокалом. Поэтому не нужно использовать весь трек целиком для этого метода. Иначе вы получите полный хаус в MIDI исполнении.
Так же я заметил, что более сложно наигранные инструменты также плохо прописываются. Этот метод можно использовать в Fl Studio 11, 12, 20. На более поздних версиях я не проверял. Отпишитесь ниже в комментариях, если у вас версия 10 или ниже. Есть ли там такая функция.
Пошаговые действия:
- Для начала я подготовил инструменты в плейлисте и на каждый инструмент сделал подгруппу для MIDI дорожки. Вот как это выглядит.
- После этого я перехожу в меню сэмпла в левой части аудио файла нажатием левой кнопки мышки и выбираю из выпадающего списка Edit Sample.
- После этого откроется Edison с подгруженным аудио файлом.
- Далее нам нужно в пошаговом сэквенсоре выделить тот инструмент на который будет преобразована MIDI дорожка и выбрать нужный паттерн.
- После опять переходим в Edison и нажимает на значок с гаечным ключем и выбираем из выпадающего списка пункт Convert to score and dump to piano roll.
Некоторые ноты могут не попадать из за таких эффектов как реверберация, дилэи и т.д. в аудио инструменте. Поэтому нужно будет их подкорректировать. Так же и с вокалом.
На этом мы заканчиваем этот урок. Надеюсь было интересно узнать как конвертировать аудио в MIDI в FL Studio 20. Если так то ставьте лайки подписывайтесь на наш сайт и делитесь с этим уроком с друзьями.
Привет, меня зовут Сергей. Музыка для меня как хобби. Занимаюсь созданием Hip-Hop минусов в Fl Studio уже продолжительное время.
Если вам понравился этот материал, то поделись с ним с другими. Так вы поможете в развитии этого сайта и у меня будет стимул в дальнейшем развивать этот проект.

РАБОТА В FL STUDIO
После того, как Вы завершили создание музыки в Fl Studio, проект необходимо сохранить. В Fl Studio можно сохранить проект в несколько форматов, в зависимости, что в дальнейшем Вы будете с ним делать. Все эти форматы мы рассмотрим в этой статье.
На заметку: Сохраняйте свой проект в формате flp как можно чаще, так как может случиться так, что ваш компьютер зависнет или просто отключат свет.
Окно для сохранения проекта в Fl Studio.
Чтобы сохранить проект в Fl Studio необходимо нажать File (посмотрите в верхнем левом углу программы), а затем нажмите на Save as… После этого откроется окно выбора типа файла.

Форматы для сохранения проекта в Fl Studio.
Flp
Если сохранить в этом формате, то сохраняться будут все параметры вашего проекта от положения регулируемых ручек, до нот что были выставлены в пианроле и все другие параметры что были сделаны.
Этот формат относиться к самой программе Fl Studio и поэтому чтобы вернуться к редактированию вашего проекта, необходимо сохранять в flp формате. Ни один другой формат не даст вам этого сделать, кроме zip формата.
Zip
При выборе этого типа сохранения ваш проект сохраниться в архиве. В нем будут содержаться сам flp файл, а также все сэмплы которые вы использовали. Этот формат подойдет для того чтобы вы смогли поделиться проектом с другим человек. При этом это очень удобно, так как он в любом случае сможет открыть ваш проект потому что все сэмплы тоже сохраняются в архиве.
Wav
Этот формат звуковой, т.е. вы сможете прослушать свой проект на любом другом проигрывателе, который воспроизводит данный формат. Сохранение проекта в звуковой формат называется рендеринг. При сохранении в этом формате качество звуков не ухудшается.
Чтобы сохранить всю вашу песню в wav формате, необходимо включить в программе режим песни (ниже картинка справа):

Если вы включите режим паттерна (выше картинка слева), то сохраниться только выбранный паттерн.
Далее при нажатии Сохранить откроется окно с настройками.

Чтобы сохранить файл в максимально хорошем качестве нужно:
- В стрелке под цифрой 1 выберите WAV.
- Под цифрой 2 выберите 24 Bit.
- А под цифрой 4 оставьте 128.
Если хотите сохранить файл для прослушивании в плеере и в интернете:
- В стрелке под цифрой 1 выберите MP3.
- Под цифрой 3 установите 320.
- А под цифрой 4 оставьте 128.
WAV формат не используется для обычного прослушивания. Этот формат используют для сохранения сэмплов или песен которые в дальнейшем будут еще обрабатываться звукорежисером. При сохранении в этот формат сохраняется максимальное качество песни, за счет большого размера файла. MP3 файл предназначен для обычного прослушивания, занимая меньший размер, за счет ухудшения качества.
Mp3
Как я писал выше этот формат используется для обычного прослушивания. Чтобы сохранить в максимальном качестве оставьте такие же настройки как у wav, но в категории Bitrate (3) выберите 320kbps. Выше значения предназначены для формата ogg. В этом формате не стоит сохранять сэмплы.
Ogg
Это такой же формат что и MP3, только он позволяет сохранить более максимальный Bitrate (3) 450kbps.
MIDI
Этот формат позволяет сохранить мелодию, что была прописана в пианроле, чтобы можно было ее использовать в другой похожей на Fl Studio программу или в другом проекте в этой же программе.
Привет, меня зовут Сергей. Музыка для меня как хобби. Занимаюсь созданием Hip-Hop минусов в Fl Studio уже продолжительное время.
Если вам понравился этот материал, то поделись с ним с другими. Так вы поможете в развитии этого сайта и у меня будет стимул в дальнейшем развивать этот проект.
Export .wav or .mp3 audio files to be played in a media player, car stereo or hi-fi. The final mix is exported from FL Studio using the export option in the file menu in a non-real time process called 'rendering'. The time taken will depend on export settings and project complexity. Rendered audio is usually better quality than the live sound from FL Studio.

About Rendering
- Master Mixer Track - By default, the Master Mixer track is rendered, unless you are using 'Split mixer tracks'. This means any Mixer Track not routed directly, or indirectly to the Master won't be included in the render.
- Export formats include:
- Audio - .wav, .mp3, .ogg & .flac formats save an audio mix of your project. By default, the Master Mixer track is rendered, but you can export individual Mixer tracks with the 'Split mixer tracks' option. See the note below on including sounds from external synthesizers and audio hardware.
- MIDI - .mid saves Step Sequencer / Piano roll note data to standard MIDI files. MIDI is not an audio format.
- 'Song mode' - Length is set by this hierarchy: 1. Any time-line selection, 2. The last time-marker beyond the last bar containing data. 3. The end of the last bar containing data AND 4. The Tail setting.
- 'Pattern mode' - Length is set by this hierarchy: 1. The last time-marker beyond the last bar containing data in the Pattern. 2. The end of the last bar containing data in the Pattern AND 3. The Tail setting.
Recording External Hardware
- Make MIDI connections to the device from your computer AND audio connections from the device to your audio device inputs. as it is played by FL Studio (using a MIDI Out plugin to drive the hardware).
- Place the recorded audio as an Audio Clip in the Playlist.
- Render the project to audio as shown below.
Settings
Project type
- Mode - Choose to render the whole Song or the currently selected Pattern. In 'Song' mode, the length of your rendered song rendered is set by this hierarchy: 1. Any time-line selection, 2. The last time-marker beyond the last bar containing data. 3. The end of the last bar containing data AND 4. The Tail setting.
- Leave remainder - Extends the render length to capture decaying sounds. If 'Leave remainder' fails to capture tail audio, add a PlaylistRepeat marker to extend the render end-point. If repeat markers are placed after the last Pattern, Audio or Automation Clip in the Playlist, the project will be rendered up to the position of the Repeat marker.
- Wrap remainder - Wraps any decaying sound at the end of the song back onto the beginning of the render. This is useful when rendering loops with effects to create the smoothest loop. NOTE: This feature works by starting the render at the last bar, then mixing any audio decaying after the last bar back into the start of the song. If the decaying sound comes from notes before the last bar it won't be wrapped.
- Cut remainder - Cuts the render at the end of the last bar, selection or time marker.
Output format
Select the output format/s for the project render. To save in more than one format simply select multiple options.
NOTE: Sample rate - The output (Mixer) sample rate is set in the Audio Settings window.
- WAV - Wave (Lossless Uncompressed Audio). Wave is a lossless audio format and preferred for handling audio in a production environment (use it to save all your samples, sounds and archive material). The drop-down menu contains bit-depth options for the exported wave file.
- WAV bit depth - Bit-depth affects the noise-floor of the sample. This determines the quietest sound that can be captured or smallest changes in loudness that can be resolved. Generally 16 Bits is enough for music distribution. Use 24 or 32 Bit for archiving music production files.
- 16-Bit integer wave is the highest-quality audio file compatible with a wide range of playback devices. It's also the CD audio format so if you want to create audio files compatible with CD format use 44.1 kHz, 16-Bit .wav files make sure to set 44.1 kHz in the Audio Settings window. NOTE: FL Studio does not burn to CD format, it creates audio files ready for burning. Use any VST CD burning program to create the audio CD.
- 24-Bit integer wave is a common bit-depth used by DAW hardware & some older DAW software. Use this bit-depth if 32-Bit (see below) float is not supported by the device or application.
- 32-Bit floating point is the native format of FL Studio's mix engine. Render to 32-Bit float when you intend to continue mixing or editing the file in another application (wave editor or DAW) that supports the 32-Bit float format. 32-Bit float provides more precision for audio processing and so will ensure the highest quality is preserved during post-production activities.
- Sample rate affects the highest frequency that can be captured by the sample. Values between 22000 Hz (22 kHz) and 192000 Hz (192 kHz) are possible. As 44100 Hz (44.1 kHz)is the CD standard and is capable of capturing the entire frequency range humans can hear (20 Hz to 20 kHz), use it. You should have a specific reason for using sample rates above 44.1 kHz. For example, video often uses 48 kHz as the default sample rate for audio. Set the FL Studio sample rate in the Audio Settings.
- Stereo - Two channels for the Left and Right speakers.
- Mono (merged) - One channel where the left and right channels are merged into a single channel.
- Mono (left only) - One channel where the left channel data is saved as a Mono file.
- Mono (right only) - One channel where the right channel data is saved as a Mono file.
- What bit-rate should I use?
- 64 kb/s (or less) is useful for low-quality internet 'demo' tracks. Compression artifacts will be noticeable.
- 128 kb/s is the point where 'acceptable' quality starts for the majority of people. It is useful for web streaming and e-mailing music files.
- 160 kb/s is the point where it becomes difficult for many people to distinguish CD from MP3 (not discerning FL Studio producers, of course). It is a good minimum bit-rate to use for music distribution and listening purposes. Some material may still produce audible compression artifacts. Listen carefully to the entire track with headphones if quality is important and consider a higher bit-rate.
- 224 kb/s (or greater) and mp3/ogg become practically indistinguishable from CD under normal listening conditions. It is a good minimum Bit rate to use for archival of a quality compressed copy of audio. bit-rates of 224, or greater, can be useful when collaborating over the Internet and you need to share audio files that may be impractical in CD .wav format (1400 kb/s).
NOTES: The maximum bit-rate for MP3 is 320 kbps and 450 kbps for ogg. The relationship between kbps setting and the audibility of artifacts will depend on the material being rendered and the listening environment. You should always check your rendered files with a good pair of headphones prior to release. Sample rates - the MP3 standard only supports 3 rates (32000, 44100 and 48000 Hz). Setting the FL Studio sample rate outside these values will result in MP3 rendering errors. The MP3 conversion introduces a small silence at the start of the file in addition to the original audio. For this reason it's not suitable for use where time-alignment of the audio is critical (loops, samples, vocal tracks etc). Where possible use at least 16-Bit .wav format when sharing or saving audio in a production environment.
- Compression Level - This setting determines the effort put into reducing the size of the audio file. The difference in file size between level 0 (least effort) and 8 (most effort) is usually around 10%, a relatively small difference, prepare to be underwhelmed.
- 0 - Fastest compression, slightly larger files.
- 5 - Default setting.
- 8 - Slowest compression, slightly smaller files.
NOTE: FL Studio automatically imports FLAC files and converts them to WAV format, when loaded on the Playlist or in plugins such as Edison or Slicex.
- Make sure to save your project in its current state, the next step will replace Channel instruments.
- Use the macro Prepare for MIDI export on the main Tools menu that replaces all Channels with auto-configured MIDI Out plugins. This is necessary to export project-wide MIDI in the correct multi-channel format. To export individual Piano roll data as MIDI files use the Piano roll menu option 'Export as MIDI file'.
- Select MIDI on the Export Project Dialog and press Start.
- Don't save your project in this state you will lose the original Channel settings. Save to a new project if required.
Quality (Numerical Processing)
These quality settings relate to the computational accuracy of FL Studio synthesizers and effects when exporting. Leaving these at the default settings and you definitely will not ruin any mix. They do not normally play an important role in the Audible quality of the exported files.
- Resampling - Select the waveform interpolation method used for Sampler/Audio-Clip channels. Interpolation is a curve fitting process that computes intermediate sample amplitude data between the known sample points (filling in the gaps). This is required when samples are transposed from their original pitch or sample-rate and the program calls for a sample value out of sync with the source data-points. Without interpolation quantizing (amplitude) errors can create unwanted high-frequency harmonic artifacts (aliasing & quantizing errors). FL Studio provides several methods of increasing computational complexity and therefore accuracy:
- Linear interpolation is the fastest method. It provides basic linear averaging between samples, however it can result in aliasing (high frequency noises) if samples are transposed far from their original pitch.
- 6-point Hermite has been optimized to be a quick curve interpolation method with superior quality to linear interpolation. It is ideal for exporting 'good quality' audio files. Explore the higher settings if you notice aliasing in the render.
- 16, 24. 512-point Sinc methods provide increasingly higher quality interpolation, but they are also very slow. We recommended that you use setting above 64-point Sinc on your final render if you hear aliasing with lower interpolation methods. Or when in doubt, you can always just use 512-point Sinc, but be prepared for longer render times.
What is dithering? Simply, hiss. Yes really. Dithering randomizes the value of the least significant bit when making bit-depth conversions (32 to 16 for example). The least significant bit in the digital audio file represents the smallest possible change in output level. This then is noise added at about -96 dB for 16 Bit export. The purpose of dither is to break up the predictability of rounding errors that happen during the bit-depth conversion. Rounding errors affect only the value of the least significant bit so dithering randomizes this value (0 or 1), according to the dither formula used. If dithering is not used, these rounding errors correlate with the audio signal and so generate alias frequencies. When dithering is used these alias frequencies are replaced by an additional background hiss. Hiss is generally less distracting or noticeable than aliasing and so dithering has become a standard process to apply to the final 16 bit render ready for CD.
Miscellaneous Options
- Save playlist markers - Slice markers will be saved to .wav format files at each Playlist Time Marker.
- Save loop markers - Saves loop markers in .wav files. Useful for creating looped samples for use in Sampler plugins.
- Save note markers - Each Note and Audio Clip (start) in the project adds a slice marker to the exported audio file so exported audio is perfectly sliced, ready for use. Use sliced loops in plugins such as Fruity Slicer and Slicex OR in the Playlist, with the specialty time-stretching options Time stretching > Mode > Slicestretch and map. NOTE: As each note and Audio Clip adds slices, complex projects will quickly get out of hand. Use this option with a few Channel Samplers, FPC or a limited number of note-driven plugins to specifically create sliced loops.
- Save tempo information - Saves project tempo in .wav files meta-data format. Useful for programs that can read this data type. NOTE You can change the tempo using the Edison Sample Properties dialog and the slice/region markers in Edison's wave-edit window.
- This option does not export to flac/mp3/ogg formats.
- If you are using plugins with multiple-outputs to Mixer tracks, make sure the Mixer tracks have been renamed from the default 'Insert N' format. FL Studio uses this to flag they are being used, and will render them.
- Master FX are only included on the Master Track export. To include Master Effects use the Playlist Menu > Tools > Export all playlist tracks feature.
- Muted Mixer tracks, including the Master, will not be exported.
Upload to cloud
Rendering Buttons
- Show file(s) when complete - Opens the file location after the render is completed.
- Background Rendering - Minimizes and renders in background mode, allowing you to work on other applications.
- Start - Starts Rendering. The name will change to Abort once rendering is underway.
Command line export options
-
Windows Rendering audio files - Open a Command Prompt window.
- All projects in a folder (including sub-folders) using a complete path - FL.exe /R /Emp3 /Fc:\src\, where c: is the target drive, src is the path to folder with .flp file and project.flp is the target project to render.
- Single project - FL.exe /Emp3 /R "c:\src\project.flp", where c: is the target drive, src is the path to folder with .flp file and project.flp is the target project to render.
- All projects in a folder (including sub-folders) using a complete path - Open "/Applications/FL Studio.app" --args -R -Emp3 -F"/Applications/FL Studio Mac Beta.app/Contents/Resources/FL/Data/Projects/Demo songs/"
- Single project - Open "/Applications/FL Studio.app" --args -R -Emp3 -F"/Applications/FL Studio Mac Beta.app/Contents/Resources/FL/Data/MyProjects/Target Project.flp"
- /R: - Render project.flp to an audio file. The optional filename parameter (extension is ignored, path not) specifies the output filename. If no filename is specified, it renders to project.wav.
- /E: - specify which format you want to export to, separated by commas. Example: /Emp3,ogg,wav
- /F: - specify a source folder. All .flp files in this folder will be rendered. Example: /F"d:\MyProjects"
- /O: - specify a destination folder. All files specified by /R or /F will be rendered to this folder. Example: /O"d:\MyRenderings"
- /D: - Diagnostics option (will set specific diagnostics rendering defaults)
Syntax (Render MIDI File)
/M: Render all flp files in the folder to a MIDI files.
- /M Example: /M"d:\MyProjects"
- /M Example: /F"d:\MyProjects\ExampleProject.flp"
Export to ZIP file
/Z: Export all flp files in the folder, or the single specified flp file, to zip files.
![kak_sohranit_midi_v_fl_studio]()
MIDI это специальный формат, содержащий цифровую информацию о каналах, в виде параметров их составляющих – высоты тона (Pitch) и длине положению составляющей доли во времени. Проще говоря, MIDI это нотная информация, которая, как многие знают, практически ни чего не занимает на диске (весит мало). И еще стоит сразу подчеркнуть MIDI – это не аудио формат – это цифровые данные.
И в FL Studio, любой версии 12, 11 либо 10, сохранение данных ведется из этого степ секвенсора (Step Sequencer) – и будут сохраняться ноты из Piano Roll каждого отдельного канала:
![midi_chnnels_v_fl_studio]()
Ты можешь сохранить, конечно же, любые нотные данные, в том числе аккорды и мелодии любой длинны и в любом количестве каналов, пример со стандартными Drum элементами возможно слишком скучный).
Но теперь САМОЕ ВАЖНОЕ УСЛОВИЕ! Перед тем как перенести ноты из Piano Roll каналов из степ секвенсоре в файл MIDI, все каналы с инструментами и сэмплерами нужно преобразовать в MIDI каналы – иначе ни чего не получиться, этот шаг обязательный! И вот где и как это сделать и как сохранить или экспортировать ноты с Piano Roll FL Studio в MIDI… Заходим во вкладку Tools – Macros– Prepare for MIDI Export (вот твоя заветная строчка макроса):
![kak_sohranit_midi_v_fl_studio_macros]()
Конечно же операция требует подтверждения, и ВНИМАНИЕ! Обязательно сохрани проект, если он тебе еще пригодиться, так как отменить преобразование инструментов и сэмплов из панели каналов в бездушные MIDI контейнеры потом не получиться. Сохрани проект перед подтверждением и вперед, на этот раз обдуманно жмем Yes (Да):
![kak_preobrazovat_kanally_v_fl_studio]()
Готово преобразование и, как ты можешь пронаблюдать, теперь это просто MIDI каналы с некоторыми настройками, которые нам не очень то и нужны и, конечно, в Piano Roll каждого канала остались ноты, которые уже являются MIDI информацией, которую осталось только лишь сохранить (экспортировать)!
![export_midi_v_fl_studio]()
Команду, производящую экспорт MIDI данных найти несложно и сделать это можно там же, где мы и экспортируем форматы аудио (или воспользоваться горячими клавишами Shift+Ctrl+M):
![kak_exportirovat_midi_v_fl_studio]()
Даем повествовательно-поэтическое имя файлу:
![]()
Вот и все! Вся необходимая нотная информация теперь содержится в MIDI файле, который теперь импортировать в проект FL Studio будет куда легче экспорта, который мы проделали только что.
Что касатеся импорта MIDI файлов в каналы проекта FL Studio 12 и как импортировать MIDI в проект FL Studio
То здесь все логично и обратно пропорционально:
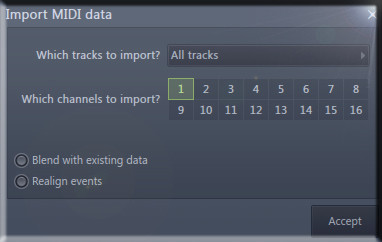
Из папки в Windows, куда ты его экспортировал, просто перетащи его внутрь FL Studio на нужный канал инструмента (Внимание считывать весь файл теперь будет один канал – даже если внутри этого файла MIDI информация с нескольких каналов!). И, пожалуйста, после принятия (Accept) в появившемся диалоговом окне
![import_midi_v_fl_studio]()
ты получишь MIDI данные в нужном канале:
![kak_zasunut_noty_midi_v_fl_studio]()
Разные каналы, как правило, отображаются разным цветом.
Теперь для того, чтобы, например, получить на каждом канале инструмента в проекте FL Studio разные каналы MIDI (Для каждого инструмента своя MIDI дорожка), я обычно просто исключаю из вот этого окна - номера каналов MIDI которые не нужны данному каналу инструмента (всего каналов 16, по-умолчанию они все активны и будут импортироваться в канал инструмента):
![]()
Вот и весь несложный процесс сохранения \ экспорта + импорта MIDI файлов внутри FL Studio 12.
При импорте MIDI файлов появится диалоговое окно, которое содержит ноты и/или автоматизационные данные.
![Fl studio import MIDI.jpg]()
1. FL Studio импортирует только формат .mid не .midi. 2. MIDI это не звук, это ноты и автоматизационные данные. Они должны быть назначены на инструмент прежде чем вы сможете их услышать. Причина, по которой вы можете воспроизводить .mid файлы на своём компьютере, состоит в том, что операционная система назначает MIDI-данные на встроенный синтезатор/сэмплы вашего аудиоустройства вашей звуковой карты (см. раздел о воспроизведении General MIDI файлов ниже).
Опции диалогового окна импорта MIDI будут меняться в зависимости от того как MIDI файл загружается в FL Studio. Возможные варианты:
- Импорт MIDI-файла из главного меню File.
- Импорт MIDI-файла из меню пианоролла.
- Перетаскивание MIDI-файла из браузера в:
- Стойку инструментов.
- Пианоролл.
- Рабочий стол FL Studio.
Importing CC автоматизации (педали удержания, движения контроллера или подобное): Некоторые MIDI-файлы могут включать в себя педаль удержания или подобное CC (Continuous Control) данные. Это должно быть загружено в паттерн содержащий информацию о MIDI-нотах отдельно, следующим образом:
- Выберите в FL Studio паттерн, который содержит данные MIDI-нот (как их загрузить рассказано выше).
- Перейдите в Меню плагина > Browse Parameters.
- Найдите конкретную цель для CC, связанную с CC данными автоматизации, например, CC64 (сустейн). В браузере щёлкните правой кнопкой мыши по CC цели и выберите Edit events (редактировать события).
- В меню Редактора событий > Options > Edit > Import MIDI File.
- Выберите и импортируйте MIDI файл, содержащий CC автоматизационные данные.
Обязательно используйте те же параметры импорта, что и для данных MIDI-нот. В частности, Realign events не должны использоваться, потому как MIDI-ноты, и CC автоматизация, вероятно будут не синхронизированы.
Для этого трюка вам понадобятся инструменты MIDI Out, эффект Fruity LSD и General MIDI файл. Каждый трек MIDI файла будет импортирован в отдельный инструмент MIDI Out, в пианоролл с уникальным цветом группы/MIDI данных канала. Они будут использовать General MIDI инструменты встроенные в вашу звуковую карту (её синтезатор/сэмплер):
Читайте также:
- WAV bit depth - Bit-depth affects the noise-floor of the sample. This determines the quietest sound that can be captured or smallest changes in loudness that can be resolved. Generally 16 Bits is enough for music distribution. Use 24 or 32 Bit for archiving music production files.