
Hawaii bios reader как пользоваться
Generally this editor supports editing BIOS ROMs of the GCN2 generation of GPUs, namely Hawaii and Bonaire.
- R9 390/R9 390X 8GB
- R9 290/R9 290X reference 4GB/8GB
- R9 295X2 reference (no fantable yet)
- R7 360
- R7 260/R7 260X
- HD 7790
- FirePro W9100
- FirePro W8100 - partial support
If you try to load an unsupported ROM there is an option to continue anyway, use at your own risk.
If your card's ROM is not supported, then send me PM or write here on github and I will try to fix it :)
Stock Hawaii XT DPM table
| DPM | Frequency | Voltage |
|---|---|---|
| DPM 0 | 300 Mhz | 0.96875 V |
| DPM 1 | 516 Mhz | 1.01875 V |
| DPM 2 | 727 Mhz | 1.05000 V |
| DPM 3 | 840 Mhz | 1.07500 V |
| DPM 4 | 890 Mhz | 1.10000 V |
| DPM 5 | 936 Mhz | 1.12500 V |
| DPM 6 | 977 Mhz | 1.18750 V |
| DPM 7 | 1000 Mhz | 1.21250 V |
To find your DPM7, please use AIDA64.
HawaiiBiosReader's People
Contributors
Stargazers
Watchers
Forkers
HawaiiBiosReader's Issues
Not very clear how to add more states to bios when there are only two (ie two memory states)
VDDCI states are only TWO, but mem freq table shows 8 DPMs (0-7) where low power consumption modes are three 150MHz and high performance modes are five 1650MHz
Sapphire Radeon R9 290 Vapor-X
Hi,
first, Many thanks for your work!
I have a Problem with your HawaiiBiosReader cant read the Limit Tables, i tryed to set clocks to 1100/1500 with +100mV but dont work. (Only on Sapphire TriXX= Software)
GPU Freq Table: Reading Wrong
MEM Freq Table: Reading Wrong
All 4 Limit Tables: Reading Wrong
i hope u can fix the Limit Tables because DPM 1-7 cant read correctly (DPM 0 is reading correctly)
or u can make me a bios with 1100/1500 and +100mV :-*
Best regards Hagbrain
Extend compatibility?
I figured out there are basically tools to edit BIOS from ati rage series to polaris.. But it's lame having to reinvent the wheel every damn time a new generation comes out, or having to fight for info lost in the dawn of time (thank god, at least we are FOSS now)
This being the latest updated editor on earth, I thought it was a good idea to start from here.
In other news, also, no tool seems to support APU vbioses.
Asus R9290x-DC2-4GD5 support
Unsupported rom
My Asus R7 260X stock bios is unsupported, any help?
Devil 13 slave bios issue
I'm having trouble with the Reader after saving the slave bios (its a dual gpu card). The master is working great. The first picture is of the bios as it looks when I save it, the second is of the bios after opening that saved bios. The addresses and values change on the gpu and mem clocks. Love to have a solution to this!
Thanks for your time/effort
Asus R7 360 Unsupported Rom
Hello , I tried using the tool on my Asus r7 360 and it is listed in the supported gpus however I get the Unsupported rom error.
please add nvidia gtx1070ti fully support?
when open 1070ti ROM . it come up a warning: Unsupported ROM - Continue?
can you please add 1070ti support ?
FirePro W8100
I send you the BIOS of my W8100. the program does not read correctly:

In this forum thread I posted information:
I hope you serve to improve the program.
Thanks and good luck.
Bonaire (R7 260X 2GB) support. Is it possible?
Hi! Firstly I want to congratulate you for the project. It's awesome!
I have two Sapphire R7 260X, bonaire core. One of then have vram issue (sometimes when playing some "red lights" appears lol). To make this useful I'm building a little RIG to Zcash mining. I want to, if possibile, reduce voltage (to reduce power draw) and/or apply overclocked frequencies (to improve the performance). But when I submit the file to Hawaii Bios Editor the ROM is unsupported, with no changeable values. I attached the ROM file. There is hope to support this model?
stop working on windows 10
think this is a bug and i can not find any answers about this
i have windows 10 installed and the program starts
then i open a bios and the program stops working
Just a question
Grenada is supported with this tool? I can't find any information for edit the fans of an Asus 390x Strix.
Thank you!
Wrtie Device ID.
Curious if you can add the ability to change the device ID? This would allow for native ID spoofing for people wanting to run these cards on MacOS. We are currently using software (bootloader approaches to this, SSDT or bootloader integration on PC hardware). A FakeID should allow MacOS to see this a natively supported card, without any modification to the rest of the existing vbios with a forced quick flash.
Recommend Projects
React
A declarative, efficient, and flexible JavaScript library for building user interfaces.
Vue.js
🖖 Vue.js is a progressive, incrementally-adoptable JavaScript framework for building UI on the web.
Typescript
TypeScript is a superset of JavaScript that compiles to clean JavaScript output.
TensorFlow
An Open Source Machine Learning Framework for Everyone
Django
The Web framework for perfectionists with deadlines.
Laravel
A PHP framework for web artisans
Bring data to life with SVG, Canvas and HTML. 📊📈🎉
Recommend Topics
javascript
JavaScript (JS) is a lightweight interpreted programming language with first-class functions.
Some thing interesting about web. New door for the world.
server
A server is a program made to process requests and deliver data to clients.
Machine learning
Machine learning is a way of modeling and interpreting data that allows a piece of software to respond intelligently.
Visualization
Some thing interesting about visualization, use data art
Some thing interesting about game, make everyone happy.
Recommend Org
We are working to build community through open source technology. NB: members must have two-factor auth.

При использовании графических процессоров Hawaii, таких как R9 290 в Linux, aticonfig не предоставляет возможность изменять напряжения. Даже под Windows такие утилиты, как MSI Afterburner, обычно имеют ограничения на то, насколько можно увеличить или уменьшить напряжение графического процессора. Чтобы снизить энергопотребление, я решил создать собственный BIOS с более низким напряжением для своего MSI R9 290X.
Лучший инструмент, который я нашел для модов Hawaii BIOS, — это Hawaii Bios Reader. Для чтения и записи BIOS на карты Hawaii я использую ATIFlash. Он работает из DOS, поэтому я могу использовать образ FreeDOS, включенный в SystemRescueCD.
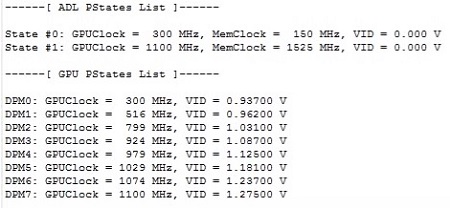
- На снимке экрана выше я обвел два напряжения. Первый, VDDCI, — это напряжение контроллера памяти. Уменьшение его до 950 мВ дает небольшое снижение мощности.
- Второе напряжение — это напряжение ядра GPU DPM0. DPM0 — это состояние с самым низким энергопотреблением, когда графический процессор работает на частоте 300 МГц и питается примерно от 968 мВ. Я говорю приблизительно, потому что фактическое напряжение кажется близким к значению DPM0, но не всегда точным. Это может быть связано с точностью регулятора напряжения на карте, или BIOS может использовать не только таблицу напряжений DPM0 для управления напряжением. Остальные значения DPM — это не напряжения, а индексы в таблице, в которой есть формула для BIOS для расчета увеличения напряжения на основе характеристик утечки графического процессора. Я их не меняю.
По причинам, которые я еще не выяснил, напряжение DPM0 в каждой из таблиц пределов должно соответствовать таблице PowerPlay. После изменения четырех таблиц пределов BIOS можно сохранить и записать на карту.
Я создал модифицированные файлы BIOS для карты MSI R9 290X 4 ГБ с напряжениями DM0 868, 825 и 775. С помощью BIOS 775 мВ мне удалось снизить энергопотребление более чем на 20% по сравнению с 968 мВ.
Примечание. Любое модифицированное ПЗУ, даже с модулем UEFI/GOP в нем, технически не является UEFI. В унаследованном разделе ПЗУесть подпись BIOS, которая представляет собой хеш хэшей защищенных таблиц в ПЗУ. Поскольку моды, которые мы делаем, находятся в защищенных таблицах, и мы не можем обновить подпись в устаревшем ПЗУ, чтобы отразить изменения, которые не пройдут проверки UEFI, поэтому вам нужна поддержка CSM в BIOS материнской платы, чтобы использовать модифицированное ПЗУ.
Я использовал все программы, связанные с немецкой веткой sTOrM41, и успешно отредактировал свою биографию Vapor X 290X STD edition так, как я хотел.
Перепрошивка проводилась с использованием метода и файлов в ветке OCN 290 -> 290X Unlock, просмотрите под заголовком R9 290 Руководство по разблокировке в посте 1 и используйте шаги 1-7, пропуская шаг 3.
Прежде чем нажимать на спойлеры ниже, прочтите приведенные ниже правила и следуйте им.
- Сделайте резервную копию оригинального BIOS на видеокарте для каждого положения переключателя.
- Отредактируйте копии своей исходной биографии, чтобы у вас всегда была оригинальная неотредактированная биография на случай, если что-то пойдет не так.
- Не прошивайте обе позиции BIOS, по крайней мере, у вас будет возможность загрузиться с другого, если что-то пойдет не так.
- Когда вы изменили BIOS, сделайте его копию, и как только контрольная сумма будет зафиксирована на одном из них, используя HawaiReader или HD7xxx Series UEFI Patch Tool BETA. Сравните 2 копии, используя функцию сравнения в шестнадцатеричном редакторе, чтобы узнать только контрольную сумму, измененную перед прошивкой.
Предупреждение: использование этого руководства для редактирования вашей биографии приведет к аннулированию гарантии (если она есть на карте). Это руководство предоставляется при условии, что пользователь знает о последствиях того, что он делает. Я не несу ответственности за ущерб от использования этой информации. Прилагаются все усилия для двойной проверки информации, но возможны ошибки.
Чего я добился повышения производительности с помощью модов BIOS
Чего я добился, вручную установив VID для каждого состояния DPM и EVV
Что нужно объяснить:
- VID — это напряжение, на которое установлен графический процессор, VDDC — это то, что он получает.
- Даже когда VID установлен вручную, разные приложения / нагрузки означают другой сообщаемый VDDC в приложениях для мониторинга, этого нельзя избежать из-за того, как работает «PowerTune» / технология.
- Если вы не установите напряжение DPM7 вручную и не отрегулируете частоту графического процессора в ПЗУ, VID в настройке EVV будет уменьшаться по мере увеличения тактовой частоты графического процессора. Поэтому, если вы применяете глобальное смещение напряжения GPU в ПЗУ, оно будет выше, чем то, что вы можете использовать при применении смещения в приложении OC со стандартным ПЗУ.
Следующее, что следует отметить в моем конкретном сравнении: в моем ПЗУ нет глобального смещения напряжения графического процессора, но есть микросхема напряжения на печатной плате (IR3567B).
Справа — стандартная ПЗУ (1), затем стандартная ПЗУ с часами OC (2), но только DPM7, установленная вручную, следующая — 1090/1475 ПЗУ (3) и 1100/1525 ПЗУ (4), установленные вручную для всех DPM.
Теперь 1 против 2, DPM 2-6 оказывается ниже при EVV, поэтому вероятность того, что карта, возможно, будет артефактом, скажем, при достижении этих частот DPM графического процессора (диапазона). Снижение происходит из-за увеличения частоты GPU во всем диапазоне DPM.
Сравнивая 2 и 3, мы видим, что DPM 5 и 6 нуждаются в более высоком VID, чем тот, который был установлен EVV, для отсутствия артефактов на тех частотах (диапазоне) DPM графического процессора при тестировании. DPM 4 и 2 оказались ниже, а DPM 3 без изменений, я установил DPM 1 ниже, и пока никаких побочных эффектов.
Сравнивая 3 и 4, мы видим рост по всем направлениям, но частота DPM графического процессора увеличилась, как и объем оперативной памяти.
Моя основная цель этого теста состояла в том, чтобы зарегистрировать VDDC в стандартном ROM (1) и посмотреть, когда OC’ing (установка более высокой частоты GPU на DPM) добавлял больше напряжения. Если сравнить 1 и 3, DPM 7 равен, DPM6 вырос (но выше частота графического процессора), DPM5 почти такой же (но более высокая частота графического процессора), DPM 4, 3, 2, 0 все в итоге ниже плюс 1 ниже, даже если не проверяется в rom 3.
Как я вижу, это стандартный ROM (1) по сравнению с 1090/1475 (3). В итоге я получил более высокие тактовые частоты на DPM для почти того же / более низкого напряжения, что и стандартный ROM под EVV. Даже 1 против 4 кажется лучше, поскольку каждый DPM выше стандартного для действительно небольшого отклонения напряжения.
Мои файлы журнала HML, файл HMLGPU-Z.zip 33k .zip
Примечание. При выполнении теста выше я использовал тест рендеринга GPU-Z в качестве графической нагрузки для регистрации зависшего VDDC от VID, это дает более линейное контролируемое значение VDDC по сравнению с другими приложениями. Я использовал MSI AB для мониторинга, как и файл журнала HML, плюс установил частоту DPM для тестирования с его помощью. Моя карта чувствительна к тесту 1 графики 3DMark FS, поэтому тестирование артефактов проводилось с помощью этой петли плюс прогон Heaven, а затем Valley.
When using Hawaii GPUs like the R9 290 on Linux, aticonfig does not provide the ability to change voltages. Even on Windows, utilities such as MSI Afterburner usually have limitations on how much you can increase or decrease GPU voltage. In order to reduce power consumption, I decided to create my own lower voltage BIOS for my MSI R9 290X.
The best tool I have found for Hawaii BIOS mods is Hawaii Bios Reader. To read and write BIOS to Hawaii cards, I use ATIFlash. It runs from DOS, so I can use the FreeDOS image included with SystemRescueCD.
- In the screenshot above, I’ve circled two voltages. The first, VDDCI, is the voltage of the memory controller. Reducing it to 950 mV gives a slight decrease in power.
- The second voltage is the GPU DPM0 core voltage. DPM0 is the lowest power state when the GPU is running at 300 MHz and powered by approximately 968 mV. I am speaking approximately because the actual voltage appears to be close to the DPM0 value, but not always accurate. This could be due to the accuracy of the voltage regulator on the card, or the BIOS could use more than just the DPM0 voltage table to control the voltage. The rest of the DPM values are not voltages, but indices in a table that has a formula for the BIOS to calculate the voltage increase based on GPU leakage characteristics. I don’t change them.
For reasons I haven’t figured out yet, the DPM0 voltage in each of the limit tables must match the PowerPlay table. After modifying the four limit tables, the BIOS can be saved and written to the card.
I created modified BIOS files for MSI R9 290X 4GB card with DM0 voltages 868, 825 and 775. With 775mV BIOS, I was able to reduce power consumption by more than 20% compared to 968mV.
Note. Any modified ROM, even with a UEFI / GOP module in it, is technically not UEFI. The legacy ROM partition contains a BIOS signature, which is a hash of hashes of protected tables in ROM. Since the mods we make are in secure tables and we cannot update the signature in the legacy ROM to reflect changes that will fail UEFI checks, so you need CSM support in the motherboard BIOS to use the modified ROM.

I have used all programs related to the German sTOrM41 branch and have successfully edited my Vapor X 290X STD edition biography just the way I wanted.
The flashing was done using the method and files in the OCN 290 -> 290X Unlock branch, look under the R9 290 heading for the Unlock Guide in post 1 and use steps 1-7, skipping step 3.
Before clicking on the spoilers below, please read and follow the rules below.
- Make a backup copy of the original BIOS on the video card for each switch position.
- Edit copies of your original bio so you always have your original, unedited bio in case something goes wrong.
- Do not flash both BIOS positions, at least you will be able to boot from the other if something goes wrong.
- When you have changed the BIOS, make a copy of it, and once the checksum is fixed on one of them, using HawaiReader or HD7xxx Series UEFI Patch Tool BETA. Compare 2 copies using the compare function in a hex editor to find out only the checksum changed before flashing.
Warning: using this guide to edit your bio will void your warranty (if any on your card). This guide is provided on the condition that the user is aware of the consequences of what he is doing. I am not responsible for damages from the use of this information. Every effort is made to double check the information, but errors are possible.
What I have achieved to improve performance with BIOS mods
What I have achieved by manually setting the VID for each DPM and EVV status
Things to explain:
- VID is the voltage the GPU is set to, VDDC is what it gets.
- Even when VID is manually set, different applications / loads mean different reported VDDC in monitoring applications, this cannot be avoided due to the way PowerTune / technology works.
- Unless you manually set the DPM7 voltage and adjust the GPU clock in ROM, the VID in the EVV setting will decrease as the GPU clock speed increases. Therefore, if you apply the GPU global ROM voltage offset, it will be higher than what you can use when applying the offset in the OC application with the standard ROM.
The next thing to note in my particular comparison is there is no GPU Global Offset in my ROM, but there is a PCB Voltage IC (IR3567B).
On the right is Standard ROM (1), then Standard Clock ROM (2), but only DPM7 manually installed, next is 1090/1475 ROMs (3) and 1100/1525 ROMs (4) manually installed for all DPMs.
Now 1 versus 2, DPM 2-6 is lower at EVV, so the chances of the card possibly being an artifact, say, when reaching these DPM frequencies of the GPU (range). The decrease is due to the increase in GPU frequency over the entire DPM range.
Comparing 2 and 3, we can see that DPM 5 and 6 need a higher VID than the one set by EVV to be free of artifacts at those DPM GPU frequencies (range) when tested. DPM 4 and 2 are lower and DPM 3 is unchanged, I set DPM 1 lower and no side effects so far.
Comparing 3 and 4, we see growth across the board, but the DPM frequency of the GPU has increased, as has the amount of RAM.
My main purpose for this test was to register the VDDC in standard ROM (1) and see when OC’ing (setting a higher GPU frequency on the DPM) added more voltage. If you compare 1 and 3, DPM 7 is equal, DPM6 is up (but higher GPU frequency), DPM5 is almost the same (but higher GPU frequency), DPM 4, 3, 2, 0 all end up lower plus 1 lower, even if not checked in rom 3.
As I can see, this is the standard ROM (1) versus 1090/1475 (3). I ended up with higher clock speeds on the DPM for almost the same / lower voltage as the standard EVV ROM. Even 1 versus 4 seems better as each DPM is higher than standard for really small voltage deviation.
My HML log files, file HMLGPU-Z.zip 33k .zip
Note: In the test above, I used the GPU-Z render test as a graphics load to register a stuck VDDC from a VID, this gives a more linear controlled VDDC value compared to other applications. I used MSI AB to monitor, as did the HML log file, plus set DPM frequency to test with it. My card is sensitive to 3DMark FS graphics test 1, so artifact testing was done with this loop plus Heaven and then Valley run.
Перед вами рассказ об нескольких экспериментах, упоминания о которых можно было встретить в разделе «Персональные страницы». Ну а сами они состоялись благодаря желанию попробовать что-то новое, возникшему при общении с коллегами на форумах. Мы не только обновим систему охлаждения, но и выясним, есть ли толк от оптимизации BIOS видеокарты, и к чему это может привести в совокупности.
Тестовый стенд
Тестирование видеокарты Radeon R9 290X вкупе с системой охлаждения Thermalright Shaman проходило в составе следующей конфигурации:
- Материнская плата: MSI Z87 MPower;
- Процессор: Intel Core i5-4670K 4000 МГц (100 х 40, 1.176 В);
- Система охлаждения процессора: Thermalright Macho;
- Термоинтерфейс: Gelid GC-Extreme;
- Оперативная память: Kingston PC3-10600 (DDR3-2133, 11-12-11-30, 2 x 8 Гбайта, двухканальный режим);
- Накопитель SSD: KingFast F8 256 Гбайт;
- Блок питания: Corsair CS650M, 650 Ватт;
- Корпус: Zalman Z9 U3 Black;
- Монитор: LG UltraWide 34UB67-B, 2560 x 1080.
- Операционная система: Windows 7 x64 SP1 Ultimate;
- Драйвер видеокарты: AMD Catalyst 16.1.
реклама
Инструментарий и методика тестирования
Для разгона видеокарт, а также мониторинга температур и оборотов вентилятора использовалась фирменная утилита MSI Afterburner v4.2.0.
Проверка стабильности работы ускорителей в процессе разгона производилась утилитой MSI Kombustor 3.5 (режим GPU Burn-in, 1920 x 1080). Полученные частоты дополнительно проверялись прогонами теста Heaven Benchmark v 4.0 c экстремальным уровнем тесселяции и графических тестов из пакетов 3DMark 2013, 3DMark 11 и 3DMark Vantage.
Для проверки температурного режима видеокарт в условиях, приближенных к повседневным, использовался Heaven BenchMark v4.0 (quality: ultra, tessellation: extreme, AA8x, 1920 х 1080).
Температура воздуха в помещении составляла 26 градусов по Цельсию. Дополнительно снимались показания потребляемой мощности с помощью ваттметра Robiton PM-2 и температуры печатной платы ИК термометром Fluke 59 MAX.
Скорость вращения вентилятора Thermalright TY-140 в режиме бездействия фиксировалась на отметке 400 об/мин, под нагрузкой – 900 об/мин.
Результаты тестирования
После работы по материалам, посвященным Radeon HD 7870, изучению всевозможных параметров, влияющих на производительность и нагрев, было решено повторить все то же самое с тестовой Radeon R9 290X.
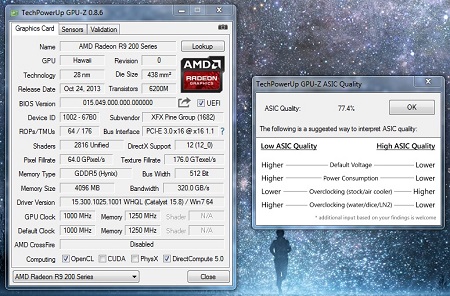
Приведем скриншот характеристик популярной утилиты GPU-Z.
реклама
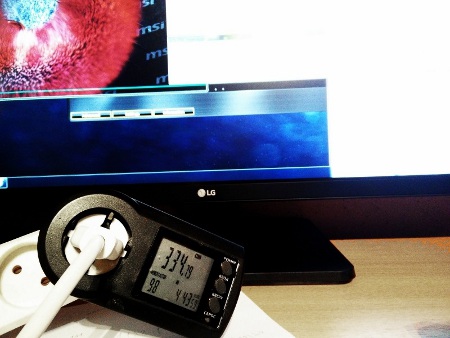
Начнем с графика потребляемого электричества всего стенда в зависимости от версии микропрограммного обеспечения.
Энергопотребление системы, Вт
На выходе блока питания
GPU 1000 МГц; GDDR5 1250 (5000) МГц; напряжение 1.25 В
Включите JavaScript, чтобы видеть графики
Результаты довольно интересные, особенно в стресс-нагрузке FurMark. И стоит отметить подобные результаты достигнуты перепрошивкой BIOS и только.
Далее решено было заняться downvolting'ом - это понижением напряжения на GPU с целью уменьшения нагрева основных элементов, а также снижением энергопотребления видеокарты и ПК в целом.
Я пользовался утилитой Hawaii Bios Reader.
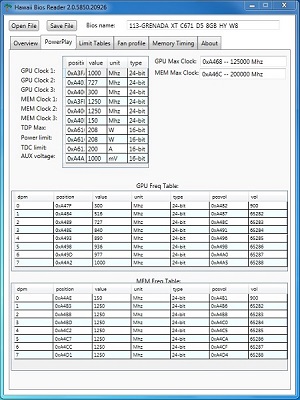

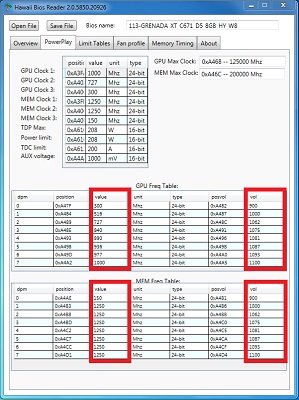
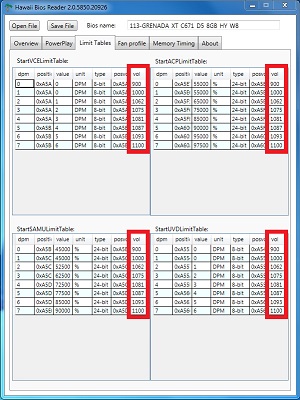
На видеокартах серии 290(Х)/390(Х) разработчиками использован механизм динамического изменения частоты и напряжения, которые поделены на 8 зон: DPM0-7. Все частоты ядра и видеопамяти прописаны, они разделены еще на шесть секций:
- Частота ядра (GPU Freq. Table) и напряжение;
- Частота памяти (MEM Freq. Table) и напряжение;
- Блок кодирования/декодирования видео (VCE) и напряжение;
- Универсальный видео-декодер (UVD) и напряжение;
- Блок безопасного управления активами (SAMU) и напряжение;
- Блок пересчета среднего энергопотребления (ACP) и напряжение.
Нас интересуют два столбца – «value» и «vol». Первый отвечает за частоту ядра и памяти в разделах «GPU Freq Table» и «MEM Freq Table» соответственно, второй – за выставление конкретного значения напряжения, его надо указывать уже во всех шести секциях. Они делятся на следующие режимы:
- DPM0 активируется в простое видеокарты, 2D;
- DPM1-DPM6 – low3D;
- DPM7 – значение для 3D.
Если мы хотим прописать определенное напряжение, к примеру, для режима 2D, то во всех шести секциях DPM0 указываем нужное значение, к примеру 900, что будет соответствовать 0.9 В или 900 мВ. В остальных случаях стоят ASIC-значения 65282-65288, которые указывают определенную ячейку BIOS, где хранятся конкретные значения напряжений. Их можно посмотреть программой AIDA64: для этого на нижней строке состояния кликаем правой кнопкой мыши:
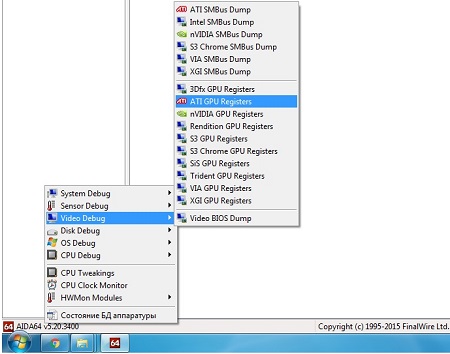
После чего утилита считает дамп и продемонстрирует конкретные результаты по каждой зоне. Они и есть наша отправная точка.
ШИМ-контроллер построен таким образом, что меняет напряжения с определенным шагом. В качестве значения можно указывать и свои цифры, однако лучше обратиться к таблице напряжений, взяв оттуда искомое.
реклама
В итоге после нескольких тестов и проверки стабильности утилитой OCCT 4.4.1 (вкладка GPU: 3D, сложность шейдеров – 7) удалось добиться полной работоспособности. В качестве собственного примера привожу получившиеся результаты.
Многие модели R9 290(X) и 390(X) работают при номинальном напряжении 1.231-1.250 Вольт, что очень много, как говорится, с запасом. Благодаря современным технологиям оно динамически меняется и в среднем по показаниям программ мелькает в диапазоне 1.150-1.212 В. Что же дальше? Как показывает практика, его можно понизить до приемлемых значений, к примеру, один мой экземпляр смог стабильно работать при 1.150 В, другой – 1.1 В, и все при эталонной частоте 1000/1250 МГц по ядру и памяти соответственно. В последнем случае речь идет как раз о тестируемом сэмпле.
График потребляемого электричества всего стенда в зависимости от версии микропрограммного обеспечения и напряжения.
Энергопотребление системы, Вт
На выходе блока питания
GPU 1000 МГц; GDDR5 1250 (5000) МГц
Включите JavaScript, чтобы видеть графики
В конечном итоге это привело к уменьшению энергопотребления всей системы на 70-100 Вт, что просто превосходный результат! Более того, системе охлаждения самой видеокарты придется значительно легче в нагрузке, и в корпусе будет прохладнее.
Теперь посмотрим, как это сказалось на температурных показателях Radeon R9 290X с референсной пластиной и кулером Thermalright Shaman.
GPU 300 МГц; GDDR5 150 МГц
Температуры GPU, VRM1, VRM2, °C
Меньше – лучше
Включите JavaScript, чтобы видеть графики
Ведьмак 3, версия игры 1.11
GPU 1000 МГц; GDDR5 1250 (5000) МГц
Температуры GPU, VRM1, VRM2, °C
Меньше – лучше
Включите JavaScript, чтобы видеть графики
GPU 1000 МГц; GDDR5 1250 (5000) МГц
Температуры GPU, VRM1, VRM2, °C
Меньше – лучше
Включите JavaScript, чтобы видеть графики
Подпишитесь на наш канал в Яндекс.Дзен или telegram-канал @overclockers_news - это удобные способы следить за новыми материалами на сайте. С картинками, расширенными описаниями и без рекламы.
![]()
As always, no responsibility for what you decide to do! Be careful with your voltages!
I found that that guide was hard to understand quite what was going on sometimes (especially with the voltages). It's definitely geared towards taking the cards to the limit (RAM timing mods, 390 mods, etc.). I just wanted the basics.
Check back with the guide though - almost everything is hidden there, somewhere.
Goal here is to apply your GPU OC you've got in MSI Afterburner in the vBIOS directly. Why? Because, for me, the software was pretty unstable (voltage not applied on wake from sleep or on cold boot on lock screen. ). 16.12.1's Wattman broke it even farther, sad days.
Thing's you'll want: A Hawaii-based card such as the R9 290/R9 290X/R9 390/R9 390X.
HawaiiReader bios modification utility tab's Hawaii BIOS Reader
AtomBiosReader for Windows by @kizwan tab's ATOMBIOSReader (only if you want to confirm Hawaii Reader is reading the right stuff)
HxD Hex editor from the bottom under Useful Links (only if you want to confirm Hawaii Reader is reading the right stuff)
GPU-Z to get your vBIOS to mess with.
ONLY DO THIS IF YOU
HAVE A DUAL BIOS GPU (it's got a switch)
HAVE A DUAL BIOS GPU and a computer with an iGPU ~extra steps way~
OR you have a secondary GPU you can boot from temporarily to flash within the main computer (dual bios GPU not req - can flash it directly in another computer without switching)
OR you can put your GPU in another computer to flash to it
IF YOU ARE USING ANOTHER COMPUTER METHOD MAKE SURE YOU COPY THE ORIGINAL VBIOS FILE TO IT FIRST! The original computer will not be operable while the GPU is down.
Flash a GPU OC you are CONFIDENT in stability. If you're not confident slap off 15 MHz - crashing mid game is always sad.
Let's bring it
GOAL: Get vBIOS & reader to rock.
Open the vBIOS file with Hawaii BIOS Reader
GPU Clocks First
GOAL: Get stock clocks (8 of them), convert stock clocks to OC clocks based on stock clock ratios, put OC clocks (8 of them) into Hawaii BIOS Reader.
Put DPM0-7 into the spreadsheet under "STOCK GPU MHZ VDDC TBL" into the green blocks. That will break the green/orange cell functions but that is OK.
DPM0 should be 300 MHz always, if it's not then maybe Hawaii BIOS Reader is not reading your vBIOS file correctly (see below for direct hex reading).
Type into C7 in the speadsheet your target GPU OC clock in MHz.
Cruise to "OC GPU MHZ VDDC TBL" in the spreadsheet. It should have your max OC in it for DPM7. Now adjust DPM2-6 based on the estimated value in the EST.DPM column. The IS%COR? column will turn green if you are within rounding of the decimal estimated. Integers only. DPM1 and DPM0 should stay the same clocks as stock.
This will keep your card working at the same frequency ratios as stock - I'm not sure the purpose of the same frequency ratios but the original guide was adamant about them - so probably needed to work.
Replace DPM2-7 in Hawaii BIOS Reader with your new integer values. DPM0 and DPM1 should stay what they were.
Put DPM7 (max GPU clock) value into the GPU Clock 1 value block at the top of the PowerPlay tab.
Done with GPU clock modding!
RAM Clocks Second
GOAL: Change RAM clocks to the OC clocks. Much easier to do.
For DPM1-7 type in your OC RAM frequency in MHz. DPM0 should always stay at 150 MHz. If DPM0 is not 150 then Hawaii BIOS Reader may not be reading your file correctly.
In the VDDCI States table change that DPM0 state to your OC RAM frequency as well.
Finally, in the MEM Clock 1: line at the top change that value to your OC RAM frequency.
Done with RAM clock modding!
Power Limits Third
GOAL: Change Power Limits to be whatever you want them to be. Power limits throttle the GPU when it is using too much power instantaneously, it spikes around a lot. Higher limit prevents throttling in the most demanding scenarios at the cost of heat and temps.
At the bottom of the table get the 3 numbers in the TDP Max, Power Limit, and TDC blocks.
You can put them into the spreadsheet in "STOCK PWR SETTINGS" green blocks. It will break the cell functions there but that is OK because we don't care. OR calculate by hand.
Spreadsheet will increase the power limits by the percentage given. Already in there is 50%. Example for doing it yourself: 236W -> 50% increase -> 354W. 50% is the limit in Wattman/Afterburner so I just go for it.
Put those new 3 numbers into the TDP Max, Power Limit, and TDC blocks.
Done with power limit modding!
Memory Controller Voltage Fourth
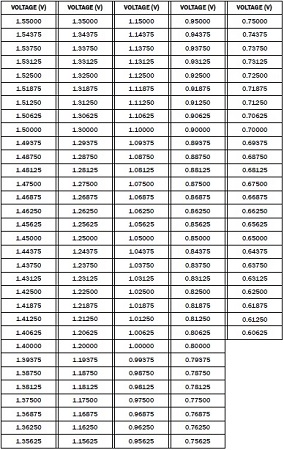
GOAL: Change memory controller voltage (called AUX voltage in MSI Afterburner). What this does is not exactly clear, it may help and too much may hurt. I've seen 1.05V listed as the maximum. I used 1.035V. Note that technically that should not work as 1.035V is not an allowed voltage (1.037 is the closest - see the table http://www.overclock.net/t/1561372/hawaii-bios-editing-290-290x-295x2-390-390x called "SVI 2 Compliant Voltages" subsection under "Setting/editing GPU core voltages in the 6 tables" section). Oh well I don't feel like changing it. Could be that the AUX Voltage operates on a different scale than the rest.
Change the Voltage value to what you want.
Done with memory controller voltage modding!
GPU Voltage Fifth
GOAL: Change the GPU voltage. First step is to figure out if your GPU uses a voltage offset or not. A super easy way to tell is open MSI Afterburner with stock settings (uninstall and reinstall with profiles deleted). If it shows a voltage offset with Unlocked Voltage Control and Unofficial Overclocking Mode on powerplay then you definitely have a voltage offset that you can just work with. Apparently some GPUs do not support voltage offsets idk.
VOLTAGE OFFSET MODE IS TOTES GOOD TO GO
Now, check GPU-Z's VDDC reading with your software OC applied. Stress the GPU with something like Heaven 4.0 and see the average VDDC values. Note them. Bonus MSI Afterburner will also show your stock offset voltage, if there is one. It's more accurate to the real thing I suspect - I had a stock offset voltage of 8 so theoretically 8*6.25mV = 50 mV, but MSI Afterburner said it was 23 mV. Trust the software reading, I guess.
After applying the new vBIOS, restress the GPU with something like Heaven 4.0 and see the average VDDC values. I found that (8+16)6.25mV was producing far above +100 mV, so I reduced it to (8+13) (can see before/after pics of HawaiiBIOSReader below). It still is more than +100 mV, but only slightly more. Card has been stable with this method for months now - I would go back and lower till it matched by hand if I cared to prevent heat and such. Don't tho, so. Bonus MSI Afterburner will show your offset voltage again if you have no OC's set. I applied a total of (8+13) = 21 and MSI Afterburner shows 131 mV which is theoretically correct - don't know why there was a mismatch before. Cranked it down to 166.25 mV = 100 mV and the card is perfectly stable as when I was using software OC - so the offset is true and accurate.
Done with GPU voltage modding!
VOLTAGE OFFSET IS NOT GOOD TO GO
You will need to figure out what the 6528X in the voltage columns are. Use AIDA64 and follow the video on the site under the "GPU Voltage adjustment" section and "Setting/editing GPU core voltages in the 6 tables" subsection to see how to use it.
Then add like +100 mV to what the 65288 (DPM7) number is for a 100 mV offset. You should increase the other values (DPM2-6) slightly up as the frequencies all increased in the GPU clock step. The offset method takes care of this somehow I guess? You can also leave them at their defaults (the 6528X) might be OK!
Make sure the values you want are in the table shown in "GPU Voltage adjustment" -> "SVI 2 Compliant Voltages" -> "SVI 2 Voltages Table" and follow the guide for typing them in below it.
Type your new voltages in ALL tables and make sure they match. In the PowerPlay tab, the GPU Freq Table + MEM Freq Table voltage columns. In the Limit Tables tab, all of those tables' voltage columns.
Theoretically done! Double check with the guide.
Save the Modded vBIOS - DO NOT OVERWRITE YOUR ORIGINAL
Flash that vBIOS with ATIFlash
Flash the vBIOS, it will be applied when your computer restarts.
Make sure you turn off MSI Afterburner or Wattman beforehand. The voltage offsets can add and get toasty.
Run the same benchmark and look for the VDDC values you noted before. They should be about the same! If they are sig fig more you could lower the voltage in offset/direct mode and reflash OR use software like MSI Afterburner to see what OC you can hit now. and then flash ;)
Did you do a bad job at clocks and voltages?
Computer will black screen before you get anywhere useful probably. If it's unstable in games you can fix that by doing above and readjusting.
1 - IF you have a dual BIOS switch, turn off the computer, switch to the alternate vBIOS.
Boot into Windows. Press the switch to change back to your original vBIOS. Nothing will visibly change.
Run ATIFlash and flash your original vBIOS back on - switching within Windows does work accordion to forums!
Reboot and get back to modding that vBIOS, got this far damnit.
2 - IF you have a dual BIOS switch and are feeling more verbose - we will use the alternate vBIOS and the iGPU. Turn off the computer, switch to the alternate vBIOS.
Boot to the computer's BIOS and force it to use the iGPU (Intel only or why do you have an AMD APU with an R9 290+?). Plug the monitor cord into the motherboard's crap to see the screen from the iGPU.
Turn off the computer. Switch back to the original vBIOS.
Boot into Windows, run ATIFlash and flash your original vBIOS back on.
Boot to the computer's BIOS and force it to use the GPU again.
Back to having a great time - try again, you got this far damnit.
3 - IF you do NOT have a dual BIOS switch but have a backup GPU, turn off the computer.
Put the backup GPU in and switch the video cable to it.
Boot into Windows, drivers are probably mad about the GPU switch - that is fine.
Run ATIFlash, specify your GPU you are working on, and flash your original vBIOS back on.
You're good to go, try again.
4 - IF you do NOT have a dual BIOS switch but have another computer you can put the GPU into, turn off the computer.
Make sure you load up the original vBIOS to the extra computer beforehand.
Put the GPU into the extra computer. Boot the extra computer.
Run ATIFlash, specify your GPU you are working on, and flash your original vBIOS back on.
BONUS: Hawaii BIOS Editor Examples Before and After
BONUS: Hex Editoring
See the guide again. It deals heavily with direct hex editing. You will need to open the vBIOS file in Hawaii BIOS Editor when done to make sure the checksum is adjusted to be correct again.
Use ATOMBIOSReader on your stock BIOS to get the locations of things for the hex editor. Follow the ATOMBIOSReader section in the guide to use it and go to the right sections in the vBIOS. It provides the locations and lengths of the different sections. See the guide for the two sections you need.
BONUS: R9 290 Vapor-X 4 GB w/ H5GC2H24BFR memory chips
Download MemoryInfo from techpowerup to see if you have the same chip - matching is important
You can change clocks using HawaiiBIOSReader and reading above (or the main article linked)
You can make your own timings mods by going to the main article and watching the video attached to the 390 timing to 290 section - it's long but it does everything you need for the 390 -> 290 switch. See the memory timings section for actual moving memory timings around (we can't make our own apparently, but can use tighter ones for lower memory speeds on our higher memory speeds)
Theoretically the last one will net the most performance since it's got 390 timings that are tite
Читайте также: