
Github extension for visual studio как установить
В ней будет коротко рассмотрено что это за вещи, зачем нужны, и простой способ работы – из среды Visual Studio. То есть Bash или GitHub клиент использоваться не будут.
Внимание:
На Хабре уже есть похожая статья – [вот она]. В своей публикации я дополню слова Алексея и расскажу метод проще.
Для кого:
Статья направлена в помощь людям которые не работали с Git, GitHub, и хотят освоить в общих чертах как можно быстрее и без сложностей начать работу с ними.
О тексте:
Старался писать проще и с большим количеством скриншотов и пояснений. Ведь лучше, когда они есть чем, когда их нет и о чем-то приходится догадываться.
Итак, немного теории чтоб понять, что делать дальше:
- Visual Studio 2015 года или новее
- Подключение к интернету
- Несколько гигабайт памяти на жестком диске
Инструкция:
-
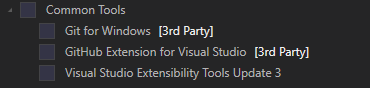
Переходим в меню Tools → Extensions and Updates → откроется вкладка Installed → если в расширениях отсутствует «GitHub Extension for Visual Studio» идем дальше, иначе перейдите к пункту следующему пункту инструкции → вкладка Online → ищем в поиске наше расширение → скачиваем и устанавливаем.


После, с GitHub копируем ссылку:
-
Может возникнуть вопрос – Что значат другие иконки?
Ответ:
Карандаш для того чтоб фиксировать изменения локально (commit). Используйте когда есть что сохранить, то есть код или файлы изменились.
Дополнительно:
Чтоб GitHub верно отображал русские комментарии (если есть) при просмотре кода через сайт нужно сделать следующее:
Cоветую всё-таки изучить Git Bash.
Я старался писать как можно понятнее, если что-то не так, то поправьте в комментариях!
На этом все. Спасибо за внимание!
This commit does not belong to any branch on this repository, and may belong to a fork outside of the repository.
2 contributors
Users who have contributed to this file
- Open with Desktop
- View raw
- Copy raw contents Copy raw contents
Copy raw contents
Copy raw contents
Installing the GitHub Extension for Visual Studio
GitHub for Visual Studio is an extension for Microsoft Visual Studio 2015 and later. It is not supported on Visual Studio Code, Visual Studio Express or Visual Studio for Mac.
Installing for all versions of Visual Studio 2015 and higher
If you already have Visual Studio 2015 or higher installed, you can install the extension into all your versions of Visual Studio with the following steps:
- Visit the GitHub for Visual Studio site.
- Click the Download GitHub Extension for Visual Studio button.
- In your computer's Downloads folder, double-click GitHub.VisualStudio.vsix.
- In the pop-up window, click Install.
- After the installation is completed, run Visual Studio.
Installing from the Visual Studio gallery
If you're currently running Visual Studio 2015 or higher, you can install the extension from the Visual Studio gallery.
In Visual Studio, open the Tools menu and click Extensions and Updates
On the left side of the Extensions and Updates dialog, select Online - Visual Studio gallery
In the search box on the top right side, type GitHub
Select the GitHub Extension for Visual Studio entry and click Download

After installation is completed, restart Visual Studio.
If you do not have Visual Studio installed yet
When you install Visual Studio, you can include the GitHub Extension for Visual Studio for installation, as it is available in the Visual Studio installer.
Visual Studio 2015
Note: The Visual Studio 2015 installer is not guaranteed to install the latest version of the extension. Once the Visual Studio installation is complete, update the extension from the Visual Studio gallery, or run the installer from our website.
Visual Studio 2017
Note: The Visual Studio 2017 installer is not guaranteed to install the latest version of the extension. Once the Visual Studio installation is complete, update the extension from the Visual Studio gallery, or run the installer from our website.
Start the Visual Studio 2017 installer.
Select the Individual components tab at the top.
Scroll down to Code tools and check GitHub Extension for Visual Studio.

Click the Modify button.
Once installation is complete, run Visual Studio 2017 and update the extension
Updating the extension
Note: If you're currently running Visual Studio 2015 or higher and the extension is already installed, Visual Studio will check for and install updates automatically every 24 hours. For this update process to run, Visual Studio must not be running.
Visual Studio 2017 will not run automatic updates until you update the extension at least once.

- In Visual Studio, open the Tools menu and click Extensions and Updates
- On the left side of the Extensions and Updates dialog, select Updates - Visual Studio gallery
- If there are updates available, an entry titled GitHub Extension for Visual Studio will appear on the list. Select it and click Update
- After installation is completed, restart Visual Studio.
To get started with the GitHub in VS Code, you'll need to create a GitHub account and install the GitHub Pull Requests and Issues extension. In this topic, we'll demonstrate how you can use some of your favorite parts of GitHub without leaving VS Code.
If you're new to source control or want to learn more about VS Code's basic Git support, you can start with the Version Control topic.
Getting started with GitHub Pull Requests and Issues
Once you've installed the GitHub Pull Requests and Issues extension, you'll need to sign in. Follow the prompts to authenticate with GitHub in the browser and return to VS Code.

Setting up a repository
Cloning a repository
You can search for and clone a repository from GitHub using the Git: Clone command in the Command Palette ( ⇧⌘P (Windows, Linux Ctrl+Shift+P ) ) or by using the Clone Repository button in the Source Control view (available when you have no folder open).
From the GitHub repository dropdown you can filter and pick the repository you want to clone locally.

Authenticating with an existing repository
Enabling authentication through GitHub happens when you run any Git action in VS Code that requires GitHub authentication, such as pushing to a repository that you're a member of or cloning a private repository. You don't need to have any special extensions installed for authentication; it is built into VS Code so that you can efficiently manage your repository.
When you do something that requires GitHub authentication, you'll see a prompt to sign in:

Follow the steps to sign into GitHub and return to VS Code. If authenticating with an existing repository doesn't work automatically, you may need to manually provide a personal access token. See Personal Access Token authentication for more information.
Note that there are several ways to authenticate to GitHub, including using your username and password with two-factor authentication (2FA), a personal access token, or an SSH key. See About authentication to GitHub for more information and details about each option.
Note: If you'd like to work on a repository without cloning the contents to your local machine, you can install the GitHub Repositories extension to browse and edit directly on GitHub. You can learn more below in the GitHub Repositories extension section.
Editor integration
Hovers
When you have a repository open and a user is @-mentioned, you can hover over that username and see a GitHub-style hover.


Suggestions
The issues that appear in the suggestion can be configured with the GitHub Issues: Queries ( githubIssues.queries ) setting. The queries use the GitHub search syntax.
You can also configure which files show these suggestions using the settings GitHub Issues: Ignore Completion Trigger ( githubIssues.ignoreCompletionTrigger ) and GitHub Issues: Ignore User Completion Trigger ( githubIssues.ignoreUserCompletionTrigger ). These settings take an array of language identifiers to specify the file types.
Pull requests
From the Pull Requests view you can view, manage, and create pull requests.

The queries used to display pull requests can be configured with the GitHub Pull Requests: Queries ( githubPullRequests.queries ) setting and use the GitHub search syntax.
Creating Pull Requests
Once you have committed changes to your fork or branch, you can use the GitHub Pull Requests: Create Pull Request command or the Create Pull Request button in the Pull Requests view to create a pull request.
A new Create Pull Request view will be displayed where you can select the repository and branch you'd like your pull request to target as well as fill in details such as the title, description, and whether it is a draft PR. If your repository has a pull request template, this will automatically be used for the description.

Once you select Create, if you have not already pushed your branch to a GitHub remote, the extension will ask if you'd like to publish the branch and provides a dropdown to select the specific remote.
The Create Pull Request view now enters Review Mode, where you can review the details of the PR, add comments, reviewers, and labels, and merge the PR once it's ready.
After the PR is merged, you'll have the option to delete both the remote and local branch.
Reviewing
Pull requests can be reviewed from the Pull Requests view. You can assign reviewers and labels, add comments, approve, close, and merge all from the pull request Description.

From the Description page, you can also easily checkout the pull request locally using the Checkout button. This will switch VS Code to open the fork and branch of the pull request (visible in the Status bar) in Review Mode and add a new Changes in Pull Request view from which you can view diffs of the current changes as well as all commits and the changes within these commits. Files that have been commented on are decorated with a diamond icon. To view the file on disk, you can use the Open File inline action.

The diff editors from this view use the local file, so file navigation, IntelliSense, and editing work as normal. You can add comments within the editor on these diffs. Both adding single comments and creating a whole review is supported.
When you are done reviewing the pull request changes you can merge the PR or select Exit Review Mode to go back to the previous branch you were working on.
Issues
Creating issues
Issues can be created from the + button in the Issues view and by using the GitHub Issues: Create Issue from Selection and GitHub Issues: Create Issue from Clipboard commands. They can also be created using a Code Action for "TODO" comments. When creating issues, you can take the default description or select the Edit Description pencil icon in the upper right to bring up an editor for the issue body.
You can configure the trigger for the Code Action using the GitHub Issues: Create Issue Triggers ( githubIssues.createIssueTriggers ) setting.
Working on issues
From the Issues view, you can see your issues and work on them.

By default, when you start working on an issue (Start Working on Issue context menu item), a branch will be created for you, as shown in the Status bar in the image below.

The Status bar also shows the active issue and if you select that item, a list of issue actions are available such as opening the issue on the GitHub website or creating a pull request.

Once you are done working on the issue and want to commit a change, the commit message input box in the Source Control view will be populated with a message, which can be configured with GitHub Issues: Working Issue Format SCM ( githubIssues.workingIssueFormatScm ).
GitHub Repositories extension
The GitHub Repositories extension lets you quickly browse, search, edit, and commit to any remote GitHub repository directly from within Visual Studio Code, without needing to clone the repository locally. This can be fast and convenient for many scenarios, where you just need to review source code or make a small change to a file or asset.

Opening a repository
Once you have installed the GitHub Repositories extension, you can open a repository with the GitHub Repositories: Open Repository. command from the Command Palette ( ⇧⌘P (Windows, Linux Ctrl+Shift+P ) ) or by clicking the Remote indicator in the lower left of the Status bar.

When you run the Open Repository command, you then choose whether to open a repository from GitHub, open a Pull Request from GitHub, or reopen a repository that you had previously connected to.
If you haven't logged into GitHub from VS Code before, you'll be prompted to authenticate with your GitHub account.

You can provide the repository URL directly or search GitHub for the repository you want by typing in the text box.
Once you have selected a repository or Pull Request, the VS Code window will reload and you will see the repository contents in the File Explorer. You can then open files (with full syntax highlighting and bracket matching), make edits, and commit changes, just like you would working on a local clone of a repository.
One difference from working with a local repository is that when you commit a change with the GitHub Repository extension, the changes are pushed directly to the remote repository, similar to if you were working in the GitHub web interface.
Another feature of the GitHub Repositories extension is that every time you open a repository or branch, you get the up-to-date sources available from GitHub. You don't need to remember to pull to refresh as you would with a local repository.
Switching branches
You can easily switch between branches by clicking on the branch indicator in the Status bar. One great feature of the GitHub Repositories extension is that you can switch branches without needing to stash uncommitted changes. The extension remembers your changes and reapplies them when you switch branches.

Remote Explorer
You can quickly reopen remote repositories with the Remote Explorer available on the Activity bar. This view shows you the previously opened repositories and branches.

Create Pull Requests
If your workflow uses Pull Requests, rather than direct commits to a repository, you can create a new PR from the Source Control view. You'll be prompted to provide a title and create a new branch.

Once you have created a Pull Request, you can use the GitHub Pull Request and Issues extension to review, edit, and merge your PR as described earlier in this topic.
Virtual file system
Without a repository's files on your local machine, the GitHub Repositories extension creates a virtual file system in memory so you can view file contents and make edits. Using a virtual file system means that some operations and extensions which assume local files are not enabled or have limited functionality. Features such as tasks, debugging, and integrated terminals are not enabled and you can learn about the level of support for the virtual file system via the features are not available link in the Remote indicator hover.

Extension authors can learn more about running in a virtual file system and workspace in the Virtual Workspaces extension author's guide.
Continue Working on.
Sometimes you'll want to switch to working on a repository in a development environment with support for a local file system and full language and development tooling. The GitHub Repositories extension makes it easy for you to clone the repository locally or into a Docker container (if you have Docker and the Microsoft Docker extension installed) with the GitHub Repositories: Continue Working on. command available from the Command Palette ( ⇧⌘P (Windows, Linux Ctrl+Shift+P ) ) or by clicking on the Remote indicator in the Status bar.

If you are using the browser-based editor, the "Continue Working On. " command has the options to open the repository locally or within a cloud-hosted environment in GitHub Codespaces.
В ней будет коротко рассмотрено что это за вещи, зачем нужны, и простой способ работы – из среды Visual Studio. То есть Bash или GitHub клиент использоваться не будут.
Внимание:
На Хабре уже есть похожая статья – [вот она]. В своей публикации я дополню слова Алексея и расскажу метод проще.
Для кого:
Статья направлена в помощь людям которые не работали с Git, GitHub, и хотят освоить в общих чертах как можно быстрее и без сложностей начать работу с ними.
О тексте:
Старался писать проще и с большим количеством скриншотов и пояснений. Ведь лучше, когда они есть чем, когда их нет и о чем-то приходится догадываться.
Итак, немного теории чтоб понять, что делать дальше:
- Visual Studio 2015 года или новее
- Подключение к интернету
- Несколько гигабайт памяти на жестком диске
Инструкция:
-
Переходим в меню Tools → Extensions and Updates → откроется вкладка Installed → если в расширениях отсутствует «GitHub Extension for Visual Studio» идем дальше, иначе перейдите к пункту следующему пункту инструкции → вкладка Online → ищем в поиске наше расширение → скачиваем и устанавливаем.
После, с GitHub копируем ссылку:
-
Может возникнуть вопрос – Что значат другие иконки?
Ответ:
Карандаш для того чтоб фиксировать изменения локально (commit). Используйте когда есть что сохранить, то есть код или файлы изменились.
Дополнительно:
Чтоб GitHub верно отображал русские комментарии (если есть) при просмотре кода через сайт нужно сделать следующее:
Cоветую всё-таки изучить Git Bash.
Я старался писать как можно понятнее, если что-то не так, то поправьте в комментариях!
На этом все. Спасибо за внимание!

Если ваш проект хранится только у вас на диске, то с поломкой диска вас ожидают неприятности. Даже регулярный бэкап не всегда сможет вас спасти.
Некоторые разработчики могут наворотить в проекте столько всего, что сами в шоке. А вспомнить, что и где делалось, затруднительно. Та еще неприятность.
Система контроля версий поможет вам избежать этих проблем. В случае необходимости можно совершить восстановление или откат изменений. Просмотреть и подтвердить или отменить правки. Ну а командная работа без системы контроля версий просто немыслима.
Установить расширение можно и при установке Visual Studio:
Перед тем как продолжить, нужно выучить немного терминов. Если вы их знаете, то проматывайте вниз.
Push – отправка изменений из локального репозитория в удаленный репозиторий (в нашем случае он будет расположен на GitHub).
Fetch – получение изменений из удаленного репозитория для сравнения и возможного последующего слияния.
Merge – слияние. Применение изменений совершенных в другом репозитории текущим репозиторием. Что-то вроде объединения двух репозиториев.
Pull – комбинация fetching и merging. Сперва из удаленного репозитория получается список изменений, а затем изменения применяются к текущему репозиторию.
То есть, если кто-то кроме вас поработал и совершил изменения в репозитории GitHub, то вы можете последовательно совершить 2 действия: Fetch, а затем Merge. Или же вы можете сразу выполнить Pull. После этого в вашем локальном репозитории отобразятся совершенные изменения.
После установки GitHub Extension for Visual Studio, панель Team Explorer будет выглядеть так:

Если панель Team Explorer скрыта, то отобразить ее можно через меню «View» / «Вид». Подключившись к GitHub (нажав Connect… и введя логин с паролем) получим возможность склонировать репозиторий GitHub или создать новый (кнопочки Clone и Create):

При клонировании будут выведен список репозиториев к которым у вас есть доступ:

При создании репозитория, вы сможете ввести его название, описание и выбрать лицензию, в соответствии с которой разрешено использование кода:
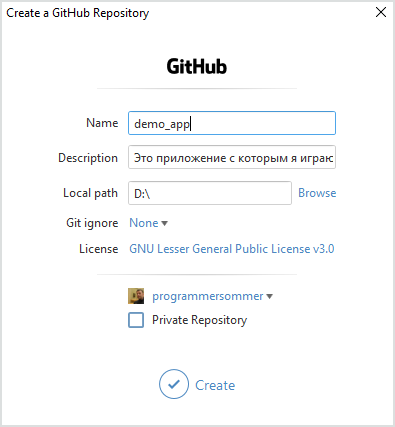
В данном случае Git ignore содержит предустановки для проектов различного типа. А так этот файлик формата .gitignore предназначен для того, чтобы указать в нем какие директории и файлы требуется исключить из системы управления версиями.
Для студентов GitHub предлагает специальное предложение — Student Developer Pack, которое в частности включает в себя бесплатное неограниченное количество приватных репозиториев.
После создания репозитория необходимо создать проект. Лично я предпочитаю наоборот, сначала создать проект и только затем его добавить в Git. Можно при создании проекта создать и репозиторий Git. Для этого достаточно поставить галочку.

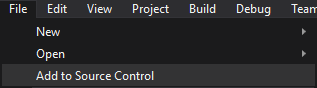
Если эту галочку при создании проекта не поставить, а просто открыть проект в VS, то в меню Файл станет доступен пункт «Add to Source Control» / «Добавить в систему управления версиями»
После его нажатия, проект будет добавлен в систему управления версиями Git, и внутри папки с проектом будет создана локальная папка .git. В Team Explorer это будет выглядеть так:

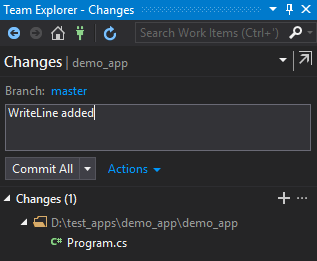
Переключившись между Team Explorer и Solution Explorer можем совершить какие-то изменения в проекте. После любых изменений можно совершить коммит — своеобразную точку восстановления. Для этого вернемся в Team Explorer, в меню которого имеется кнопка с нарисованным на ней домиком. Нажатие на нее приведет вас в главное меню:

Кнопка «Changes» / «Изменения» позволит зафиксировать изменения (при этом обязательно необходимо указать комментарий с описанием изменений). Но все действия пока что будут совершены только с локальным репозиторием git.
При создании проекта иногда создается так называемый «Initial commit», в котором пишется что-то вроде «Проект был создан за три дня». Если вы только что создали проект, то изменений в нем пока что еще нет. А если изменений нет, то коммит создать не получится. Я добавлял строку с текстом, поэтому в комментарии постарался описать это коротко, но понятно:
Можно просмотреть совершенные изменения. Для этого на интересующем нас файле нужно вызвать контекстное меню и выбрать «Compare with Unmodified. » / «Сравнить с неизмененной…»

Получим примерно такое вот сравнение:

В данном случае было добавлено всего 2 строки кода. Через то же самое контекстное меню все изменения, произошедшие со времени последнего коммита можно отменить. Очень удобная фича.

Так как наш проект еще не был опубликован на GitHub, то нам предложат это сделать:

Кстати, .git вполне можно опубликовать не только на GitHub, но и на Visual Studio Team Services.
Если мы публиковали проект ранее, то в списке исходящих фиксаций будет расположен наш коммит:
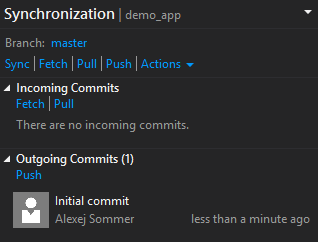
Нажатие Push приведет к отправке изменений в репозиторий, расположенный на сервере GitHub.
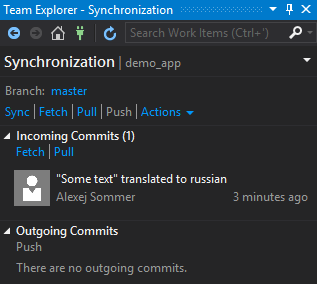
Совершив для пробы некоторые изменения прямо через браузер в репозитории, расположенном на GitHub (да, так тоже можно), я снова зашел в синхронизацию и нажал Fetch:
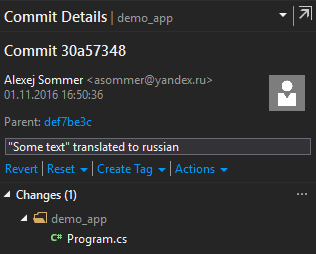
Здесь двойным кликом можно открыть информацию о коммите:
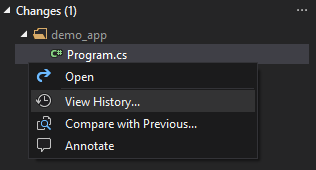
И кликнув уже на файл просмотреть изменения:

В том же самом окне синхронизации можно просмотреть историю:
Историю можно просматривать в простом представлении и в подробном:


Теперь, давайте представим, что мы работаем в команде и кто-то другой уже совершил какие-то изменения в своем локальном репозитории и отправил из в GitHub. И вы тоже совершили изменения в том же самом файле и в той же самой строке. В таком случае при синхронизации с GitHub у вас возникнет конфликт:
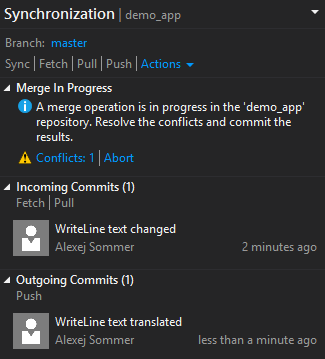
Кликнув на Conflicts получим такое вот окошко в котором после клика на файле откроется меню с кнопкой Merge:


После внесения изменения нужно нажать Accept Merge (в верхнем левом углу), после чего сделать коммит:

Github Desktop и PowerShell environment for Git

Утилита доступна для пользователей Mac и Windows. Вместе с ней устанавливается и командная строка Git Shell. Фактически это PowerShell с набором скриптов для интеграции с Git. Называется PowerShell environment for Git. Сокращенно posh-git.
На GitHub страничке проекта posh-git можно найти краткую инструкцию о том, как установить командную строку posh для git вручную.
Интерфейс самой утилиты и работу с ней я рассматривать не буду. Думаю, что он не сложный и с ним вы сможете разобраться сами. Давайте лучше немного поиграем с командной строкой. В отличие от GUI командная строка, как правило, предоставляет гораздо больше возможностей. Но мы рассмотрим только основные команды.
Чтобы просмотреть текущую конфигурацию и убедится, что Git присутствует, можно выполнить команду:
Для того чтобы склонировать репозиторий достаточно выполнить команду git clone. Например:
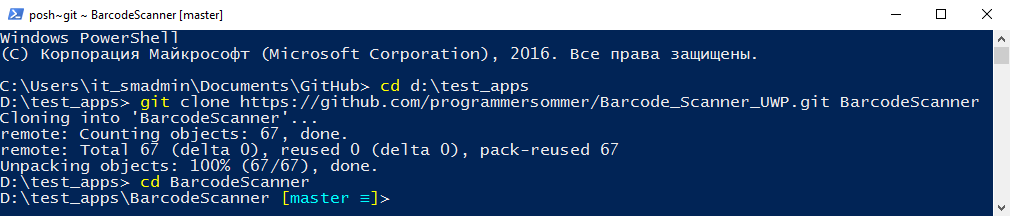
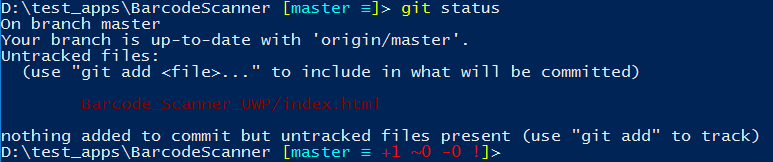
Строка статуса PowerShell отобразит текст posh~git, что обозначает, что вы попали в среду PowerShell для Git. Можно выполнить команду git status, чтобы узнать, не требуется ли синхронизировать локальный репозиторий. Ответ может быть таким:

Самые популярные команды это те, которые мы уже рассматривали в рамках интерфейса расширения VS: git fetch, git merge, git push. Если вы зайдете в директорию (наименование PortableGit_xxx директории, я так полагаю, может быть несколько иным):
то вы обнаружите в ней множество исполняемых файлов, которые эмулируют команды. Как уже было сказано, справкой git можно пользоваться, но, давайте опробуем несколько команд для примера.
Например, если в директории проекта появится новый файл, то команда git status выдаст:

На этом позвольте завершить описание возможностей работы с GitHub для пользователей Windows. Если хотите продолжить изучение, то на MVA вы можете посмотреть курс GitHub for Windows Users
Читайте также: