
G1 assassin прошивка bios
Description: Marvell Preinstall Driver for Gigabyte G1.Assassin (rev. 1.0)
Type: SATA RAID/AHCI
Note: Press F6 during Windows setup to read from floppy. Download Gigabyte G1.Assassin (rev. 1.0) Marvell Preinstall Driver v.1.2.0.1010
Description: Marvell SATA Controller Driver for Gigabyte G1.Assassin (rev. 1.0)
Type: SATA RAID/AHCI Download Gigabyte G1.Assassin (rev. 1.0) Marvell SATA Controller Driver v.1.2.0.1010
Description: BigFoot LAN driver for Gigabyte G1.Assassin (rev. 1.0)
Type: LAN
BigFoot LAN driver Download Gigabyte G1.Assassin (rev. 1.0) BigFoot LAN driver v.6.0.0.23
Download Gigabyte G1.Assassin (rev. 1.0) BIOS v.F4a
Description: XHD driver for Gigabyte G1.Assassin (rev. 1.0)
Support Intel Z68/P67/H67/X58A/P55/H57 & AMD
A75/A55/SB950/SB850 series MB. (eXtreme HardDrive) Download Gigabyte G1.Assassin (rev. 1.0) XHD v.B12.0509.1 driver
Description: AutoGreen driver for Gigabyte G1.Assassin (rev. 1.0)
Support Intel Z68/P67/H67/H61/X58A/P55/H55/H57 and AMD
AM3+/AM3/AM2+/AM2 series MB (support may vary by model). Download Gigabyte G1.Assassin (rev. 1.0) AutoGreen v.B12.1220.1 driver
Description: Smart6 driver for Gigabyte G1.Assassin (rev. 1.0)
Support Intel Z68/P67/H67/H61/X58A/P55/H55/H57 series MB. Whether
SMART QuickBoost is supported depends on the motherboard model. Download Gigabyte G1.Assassin (rev. 1.0) Smart6 v.B11.1124.1 driver
Description: Dynamic Energy Saver™ 2 driver for Gigabyte G1.Assassin (rev. 1.0)
Support Intel Z68/P67/H67/X58/P55/H55/H57 series MB. Please remove
your current Dynamic Energy Saver Advanced Utility before install
this. Download Gigabyte G1.Assassin (rev. 1.0) Dynamic Energy Saver™ 2 v.B11.0916.1 driver
Description: Cloud OC driver for Gigabyte G1.Assassin (rev. 1.0)
Support Intel Z68/P67/H67/H61/P55/H55/H57/X58/P45/P43/G45/G43/G41
and AMD 900/800series MB(support may vary by model). Only support
Smart Phone Download Gigabyte G1.Assassin (rev. 1.0) Cloud OC v.B11.0815.1 driver
System: Windows 8 Windows 8 64-bit Windows 7 Windows 7 64-bit Windows Vista Windows Vista 64-bit Windows XP Windows XP 64-bit
Description: Easy Tune6 driver for Gigabyte G1.Assassin (rev. 1.0)
Please remove current/ earlier version of EasyTune6 and GWUM Tools
before install this. (Intel) Download Gigabyte G1.Assassin (rev. 1.0) Easy Tune6 v.B12.1122.1 driver
Description: On/Off Charge driver for Gigabyte G1.Assassin (rev. 1.0)
Support Intel X58/P55/H55/H57/P45/P43/G41 series (support may vary
by model). Please update the latest BIOS version. Download Gigabyte G1.Assassin (rev. 1.0) On/Off Charge v.B11.0110.1 driver
System: Windows 7 Windows 7 64-bit Windows Vista Windows Vista 64-bit Windows XP Windows XP 64-bit Windows 2000 Windows 98 Windows ME
Description: BIOS for Gigabyte G1.Assassin (rev. 1.0)
Support Intel 5 series & earlier MB(support may vary by model)
Support AMD 800/700 series & earlier MB(support may vary by
model) Download Gigabyte G1.Assassin (rev. 1.0) BIOS v.B11.1004.1
Description: Creative Audio driver for Gigabyte G1.Assassin (rev. 1.0)
Creative Audio driver for Windows XP 32bit, Windows Vista 32bit, Windows Vista 64bit, Windows 7 32bit, Windows 7 64bit Download Gigabyte G1.Assassin (rev. 1.0) Creative Audio driver v.6.0.01.1327

Marvell Preinstall Driver
Note: Press F6 during Windows setup to read from floppy.
- Beta BIOS
- Improve ISRT+MARVELL RAID compatibility
AutoGreen
(Note) Support Intel Z68/P67/H67/H61/X58A/P55/H55/H57 and AMD AM3+/AM3/AM2+/AM2 series MB (support may vary by model).
OS : Windows XP 64bit,Windows XP 32bit,Windows Vista 64bit,Windows Vista 32bit,Windows 7 64bit,Windows 7 32bit
Easy Tune6 (Intel)
(Note) Please remove current/ earlier version of EasyTune6 and GWUM Tools before install this.
OS : Windows XP 64bit,Windows XP 32bit,Windows Vista 64bit,Windows Vista 32bit,Windows 8 64bit,Windows 8 32bit,Windows 7 64bit,Windows 7 32bit
G1-Killer™ CPU-Z
(Note) Support GIGABYTE G1-Killer™ series motherboards.
OS : Windows XP 64bit,Windows XP 32bit,Windows Vista 64bit,Windows Vista 32bit,Windows 8 64bit,Windows 8 32bit,Windows 7 64bit,Windows 7 32bit
XHD (eXtreme HardDrive)
(Note) Support Intel Z68/P67/H67/X58A/P55/H57 & AMD A75/A55/SB950/SB850 series MB.
OS : Windows XP 64bit,Windows XP 32bit,Windows Vista 64bit,Windows Vista 32bit,Windows 7 64bit,Windows 7 32bit
Smart6
(Note) Support Intel Z68/P67/H67/H61/X58A/P55/H55/H57 series MB.
(Note) Whether SMART QuickBoost is supported depends on the motherboard model.
OS : Windows XP 64bit,Windows XP 32bit,Windows Vista 64bit,Windows Vista 32bit,Windows 7 64bit,Windows 7 32bit
Dynamic Energy Saver™ 2
(Note) Support Intel Z68/P67/H67/X58/P55/H55/H57 series MB.
(Note) Please remove your current Dynamic Energy Saver Advanced Utility before install this.
OS : Windows XP 64bit,Windows XP 32bit,Windows Vista 64bit,Windows Vista 32bit,Windows 7 64bit,Windows 7 32bit
@BIOS
(Note) Support Intel 5 series & earlier MB(support may vary by model)
(Note) Support AMD 800/700 series & earlier MB(support may vary by model)
OS : Windows XP 64bit,Windows XP 32bit,Windows Vista 64bit,Windows Vista 32bit,Windows Me,Windows 98,Windows 7 64bit,Windows 7 32bit,Windows 2000
Cloud OC
(Note) Support Intel Z68/P67/H67/H61/P55/H55/H57/X58/P45/P43/G45/G43/G41 and AMD 900/800series MB(support may vary by model).
(Note) Only support Smart Phone
OS : Windows XP 64bit,Windows XP 32bit,Windows Vista 64bit,Windows Vista 32bit,Windows 7 64bit,Windows 7 32bit
On/Off Charge
(Note) Support Intel X58/P55/H55/H57/P45/P43/G41 series (support may vary by model).
(Note) Please update the latest BIOS version.
OS : Windows XP 64bit,Windows XP 32bit,Windows Vista 64bit,Windows Vista 32bit,Windows 7 64bit,Windows 7 32bit
Arabic, English, Indonesian, Japanese, Korean, Simplified Chinese, Thai, Traditional Chinese, Vietnamese
1. Due to different Linux support condition provided by chipset vendors, please download Linux driver from chipset vendors' website or 3rd party website.
2. Most hardware/software vendors may no longer offer drivers to support Win9X/ME/2000/XP SP1/SP2. If drivers are available from the vendors, we will update them on the GIGABYTE website.
Warning:
Because BIOS flashing is potentially risky, if you do not encounter problems using the current version of BIOS, it is recommended that you not flash the BIOS. To flash the BIOS, do it with caution. Inadequate BIOS flashing may result in system malfunction.
Update CPU ID/Micro codes in new BIOS means?
[1] To support new series of CPUs, or [2] To support the same CPU but with new stepping. CPU support of motherboard is consist of BIOS and hardware design, detail CPU support information please see CPU support list.
Hot fix
(Note) After installed Intel Rapid Storage Technology driver, please install Hot fix.
OS : Windows 8.1 64bit,Windows 8.1 32bit,Windows 8 64bit,Windows 8 32bit,Windows 7 64bit,Windows 7 32bit
OS : Windows Vista 64bit,Windows Vista 32bit,Windows 8.1 64bit,Windows 8.1 32bit,Windows 8 64bit,Windows 8 32bit,Windows 7 64bit,Windows 7 32bit
Intel SATA Preinstall driver
(For AHCI / RAID Mode)
Note: Press F6 during Windows setup to read from floppy.
Intel SATA Preinstall driver
(For AHCI / RAID Mode)
Note: Press F6 during Windows setup to read from floppy.
Intel SATA Preinstall driver
(For AHCI / RAID Mode)
Note: Press F6 during Windows setup to read from floppy.
Intel SATA Preinstall driver
(For AHCI / RAID Mode)
Note: Press F6 during Windows setup to read from floppy.
OS : Windows XP 64bit,Windows XP 32bit,Windows 8.1 64bit,Windows 8.1 32bit,Windows 8 64bit,Windows 8 32bit,Windows 7 64bit,Windows 7 32bit
Marvell Storage Utility
OS : Windows XP 64bit,Windows XP 32bit,Windows 8.1 64bit,Windows 8.1 32bit,Windows 8 64bit,Windows 8 32bit,Windows 7 64bit,Windows 7 32bit
Marvell Preinstall Driver
Note: Press F6 during Windows setup to read from floppy.
Marvell Preinstall Driver
Note: Press F6 during Windows setup to read from floppy.
OS : Windows 8.1 64bit,Windows 8.1 32bit,Windows 8 64bit,Windows 8 32bit,Windows 7 64bit,Windows 7 32bit
OS : Windows XP 64bit,Windows XP 32bit,Windows Vista 64bit,Windows Vista 32bit,Windows 8.1 64bit,Windows 8.1 32bit,Windows 8 64bit,Windows 8 32bit,Windows 7 64bit,Windows 7 32bit
- Beta BIOS
- Add iRST v11.6 with Smart Response support
- Update CPU Microcode (improve system stability)
- Improve LAN Performance
- Improve DDR3 2400 Compatibility
@BIOS
(Note) Support Intel X79 chipset motherboards.
Smart Recovery2
(Note) Support Intel X79 chipset motherboards.
Easy Tune6
(Note) Support Intel X79 chipset motherboards.
(Note) Please remove current/ earlier version of EasyTune6 and GWUM Tools before install this.
DMI Viewer
(Note) Support Intel X79 chipset motherboards.
Facewizard
(Note) Support Intel X79 chipset motherboards.
Q-Share
(Note) Support Intel X79 chipset motherboards.
Update Manager
(Note) Support Intel X79 chipset motherboards.
3TB+ Unlock
(Note) Support Intel X79 chipset motherboards.
Arabic, English, Indonesian, Japanese, Korean, Simplified Chinese, Thai, Traditional Chinese, Vietnamese
1. Due to different Linux support condition provided by chipset vendors, please download Linux driver from chipset vendors' website or 3rd party website.
2. Most hardware/software vendors may no longer offer drivers to support Win9X/ME/2000/XP SP1/SP2. If drivers are available from the vendors, we will update them on the GIGABYTE website.
Warning:
Because BIOS flashing is potentially risky, if you do not encounter problems using the current version of BIOS, it is recommended that you not flash the BIOS. To flash the BIOS, do it with caution. Inadequate BIOS flashing may result in system malfunction.
Update CPU ID/Micro codes in new BIOS means?
[1] To support new series of CPUs, or [2] To support the same CPU but with new stepping. CPU support of motherboard is consist of BIOS and hardware design, detail CPU support information please see CPU support list.


G1.Assassin Makes Clean Sweep at Computex 2011 Awards

First Ever Motherboard to Receive this Honor
The ability to see clearly through the fog of war can often tip the balance between the winning or losing force. That is why GIGABYTE has equipped the G1.Assassin motherboard to offer utmost graphics flexibility and upgradeability. With multiple GPU support, GIGABYTE G1.Assassin motherboard delivers maximum FPS (Frames Per Second), allowing gamers to see more clearly, aim faster, and move more quickly.
Onboard Creative Soundblaster X-Fi Digital Audio Processor (20K2) with X-Fi Xtreme Fidelity™ and EAX ® AHD 5.0™ Technologies

Being able to hear where your enemy is located before you see them can put you at a distinct advantage in most gaming situations. That is why GIGABYTE has rigged the G1.Assassin motherboard with the industry’s most advanced audio solutions all onboard; giving you the highest caliber audio experience. GIGABYTE G1.Assassin is the world's only gaming motherboard to feature Creative's top-of-the-line Soundblaster Digital Audio Processor (20K2) onboard with X-Fi Xtreme Fidelity ® and EAX ® Advanced HD™ 5.0 technologies, allowing you to experience sound in your gaming world exactly as you would in real life.
Enjoy audio from your PC through your home theater with Dolby ® Digital Live. A real-time encoding technology, Dolby Digital Live converts any audio signal into a Dolby Digital bitstream for transport and playback through a home theater system. With it, your PC can be hooked up to your Dolby Digital-equipped audio/video receiver or digital speaker system via a single digital connection, eliminating the confusion of multiple cables and ensuring the integrity of the audio signal.
DTS™ Connect
DTS Connect is the perfect solution to enhance your entertainment experience using your home theater's Audio/Video Receiver. DTS Connect is comprised of two DTS technologies including DTS Neo: PC™ which takes 2-channel (stereo) audio and transforms it into a full-bandwidth matrix of your speaker layout (up to 7.1 channels) and DTS Interactive™ which encodes digital audio sources into DTS Digital Surround, which can then stream out to your Audio/Video Receiver using a S/PDIF connection.
Built-in Front Audio Headphone Amplifier
Specially designed for gamers, GIGABYTE G1.Assassin utilize a high capacity amplifier which is able to drive 150Ω loads, allowing gamers to enjoy a fuller range of dynamic sound with crisper details and less distortion when using high quality professional headphones. The amplifier also features wide band-width, low noise, high slew rate and low distortion, making it ideal for professional audio usage. In addition, GIGABYTE has equipped G1.Assassin motherboard with 4 additional amplifiers onboard for the center/sub woofer, rear speaker, side surround and line out.
Nichicon High-end Audio Capacitors
GIGABYTE G1.Assassin motherboard utilizes the highest quality Nichicon MUSE ES series and MW series Bi-Polarized audio capacitors at each channel layout. These professional audio capacitors deliver the highest quality sound resolution and sound expansion to create the most realistic sound effects for professional gamers.
Specially designed for gamers, GIGABYTE G1.Assassin utilize a high capacity amplifier which is able to drive 150Ω loads, allowing gamers to enjoy a fuller range of dynamic sound with crisper details and less distortion when using high quality professional headphones. The amplifier also features wide band-width, low noise, high slew rate and low distortion, making it ideal for professional audio usage. In addition, GIGABYTE has equipped G1.Assassin motherboard with 4 additional amplifiers onboard for the center/sub woofer, rear speaker, side surround and line out.
GIGABYTE G1.Assassin motherboard utilizes the highest quality Nichicon MUSE ES series and MW series Bi-Polarized audio capacitors at each channel layout. These professional audio capacitors deliver the highest quality sound resolution and sound expansion to create the most realistic sound effects for professional gamers.
GIGABYTE is the only motherboard manufacturer to seriously address online gaming network lag issues by implementing the Bigfoot Networks Killer™ E2100 Game Networking Platform directly onboard the G1-Killer series motherboards. Utilizing a unique combination of dedicated Network Processing Unit (NPU) and exclusive Game Networking DNA™ technology, the Bigfoot Networks Killer™ E2100 Game Networking Platform was designed to give the best online gaming experience possible.
Killer™ E2100 Dedicated NPU
Dedicated Network Processing Unit (NPU) with 1Gb of dedicated DDR2 memory helps offload network traffic from the CPU, freeing it up to do other important computing tasks.
Game Networking DNA™
Bigfoot Network's exclusive Game Networking DNA™ software offloads gaming data directly to the NPU by bypassing the Windows Network Stack, delivering tremendous speed benefits which allow you to move quicker, shoot faster and win bigger.
Up to 10X Faster
Whether you're playing MMOs or first-person shooters, the Bigfoot Networks Killer™ E2100 game networking platform delivers up to 10X faster networking performance for a whole new level of online gaming performance.
As part of its box kit, the G1.Assissin motherboard features a convenient Front Access Control Panel that allows quick and easy access to 2 USB 3.0 ports and Power eSATA. The Front Access Control Panel also features a Quick Boost button that allows gamers to instantaneously overclock their system with a single press of a button. Imagine being in the thick of battle and being able to get a super charged on-the-fly performance boost without the need for a system reboot.
SATA 3.0 (6Gbps) and USB 3.0
When you're behind enemy lines, intelligence data latency can get you killed. That is why GIGABYTE G1.Assassin motherboard provides ultra fast data transfer performance with onboard integration of the latest SuperSpeed USB 3.0 for up to 8 ports (4 front panel, 4 back panel), SATA Revision 3.0 (6Gbps) technologies from Marvell, and an unprecedented 3x USB power boost on all USB ports for the most power hungry USB devices.
When you're behind enemy lines, intelligence data latency can get you killed. That is why GIGABYTE G1.Assassin motherboard provides ultra fast data transfer performance with onboard integration of the latest SuperSpeed USB 3.0 for up to 8 ports (4 front panel, 4 back panel), SATA Revision 3.0 (6Gbps) technologies from Marvell, and an unprecedented 3x USB power boost on all USB ports for the most power hungry USB devices.
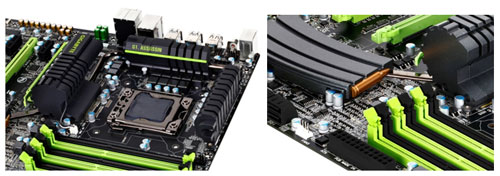
The GIGABYTE G1.Assassin features a brand new heatpipe that was designed to be as deadly to heat as it looks. By effectively spreading the heat from the critical areas of the motherboard such as the CPU VRM zone and quickly dissipating it, GIGABYTE G1.Assassin motherboard remain cool, even when the battle heats up.
Modeled after the common firearms issued to soldiers deployed to a warzone including pistol, rifle and ammo clip, the Locked and Loaded heatpipe design utilizes a unique fluting technology similar to a rifle barrel fluting, which allows for maximum heat dispersion.
Further helping to eliminate heat are the 5 strategically placed Smart Fan pin headers which allow for more precise control of system and CPU fans. Equipped with their own individual thermal sensors, the Smart Fans can be easily controlled via GIGABYTE’s EasyTune™ 6 utility as well as in the BIOS.
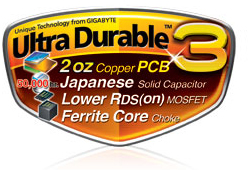
The GIGABYTE Ultra Durable™ 3 design features twice the copper for both the power and ground layers of the PCB, dramatically lowering system temperature by efficiently spreading heat from critical areas of the motherboard (such as the CPU power zone) throughout the entire PCB. GIGABYTE's Ultra Durable™ 3 also lowers the PCB impedance by 50%, which helps to reduce electrical waste and further lowers component temperatures. A 2x Copper layer design also provides improved signal quality and lower EMI (Electromagnetic Interference), providing better system stability and allowing for greater margins for overclocking. more
Like the pistons and cylinders of a car engine, the design of the motherboard Voltage Regulator Module (VRM), component quality and number of power phases greatly affects motherboard performance. GIGABYTE engineers were first to realize not only the importance of using the best quality components for this critical area, but also that with more power phases, there can be more power available to your CPU. With 16 phase power design, Dual CPU Power and Driver MOSFETs, GIGABYTE G1.Assassin motherboard delivers the best-in-class system performance and power stability required for elite gaming systems.
GIGABYTE's proprietary Dual CPU Power Technology allows CPU VRM power phases to split evenly into 2 sets of power engines that operate in tandem. This allows 1 set of power phases to rest while the other is active as opposed to a traditional power design where all the power phases are always active. As such, GIGABYTE Dual CPU Power effectively halves the amount of work done by each set of power phases to significantly increase motherboard durability and reliability.
By incorporating the MOSFETs and driver IC in accordance with the Intel ® Driver MOSFET specification, GIGABYTE G1-Killer series motherboards allows higher power transfer and increased efficiency at higher switching frequencies to satisfy the power requirements of modern processors. Driver MOSFETs also help to reduce VRM real estate requirements for a cleaner, less cluttered CPU zone.
Hybrid EFI Technology combines the benefits of GIGABYTE's mature BIOS platform including stability and compatibility with 3rd party products with 3TB+ HDD support from EFI technology, allowing GIGABYTE to offer the best of both worlds through a quick and easy BIOS update using GIGABYTE's @BIOS utility that is freely available from the GIGABYTE website.
GIGABYTE DualBIOS™ is a patented technology that automatically recovers BIOS data when the main BIOS has crashed or failed. Featuring 2 physical BIOS ROMs integrated onboard, GIGABYTE DualBIOS™ allows quick and seamless recovery from BIOS damage or failure due to viruses or improper BIOS updating. In addition, GIGABYTE DualBIOS™ now supports 3TB+ (terabyte) hard drive booting without the need for partitioning, and enables more data storage on a single hard drive.
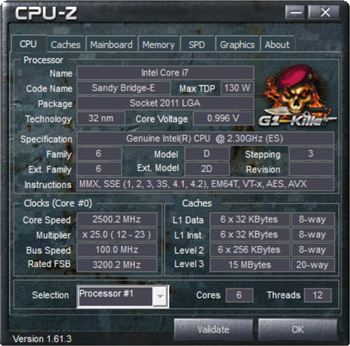
G1-Killer™ CPU-Z is a specially 'Weaponized' GIGABYTE G1-Killer version of the popular CPU-Z hardware detection app, providing details about your system's CPU, memory and mainboard configurations, wrapped in a user interface that is more suited to your killer instincts. Click here to download.
* The entire materials provided herein are for reference only. GIGABYTE reserves the right to modify or revise the content at anytime without prior notice.
* Advertised performance is based on maximum theoretical interface values from respective Chipset vendors or organization who defined the interface specification. Actual performance may vary by system configuration.
* All trademarks and logos are the properties of their respective holders.
* Due to standard PC architecture, a certain amount of memory is reserved for system usage and therefore the actual memory size is less than the stated amount.
Друзья. Если долго не отвечаю в комментариях и если нужен биос срочно на материнскую плату которой нет в списке, пишите в мне в телеграм @autya .
Вашему вниманию представляю готовые биосы с поддержкой NVME SSD для прошивки материнских плат на базе UEFI биосов.
Всю ответственность за действия описанные в статье вы берёте на себя, я не гарантирую, что после выполненных действий и модифицированных биосов ваш накопитель будет работать через PCI-E, я лишь предоставляю готовые биосы модифицированные стандартным способом и предоставляю информацию о прошивке накопленную в этой теме.
Обязательно перед прошивкой прочитайте пункты выделенные красным.
Инструкции для ASUS
1. Модифицированный биос на материнских платах ASUS гарантированно можно прошить только через USB-Flashback если такакая функция есть на вашей МП.
Для того, что-бы обновить биос первым способом, отформатируйте флешку в FAT32, закиньте на неё файл прошивки (без папки), вставьте флешку в специальный разъём USB на вашей материнской плате и удерживайте кнопку прошивки пока она не начнёт моргать, дождитесь, пока перестанет моргать лампочка на кнопке, биос прошит.
2. Прошивка биоса через AFUWin64, Подробнее тут.
- Запустить Easy Update для BIOS Update в Windows, выбрать оригинальный биос.
- Перед началом прошивки удалить исходный файл и заменить его на модифицированный с тем же именем и месторасположением.
- Начать обновлять биос.
4. Некоторые пользователи смогли прошиваться через биос через EZ Flash, это происходит редко, но попробовать стоит, это происходит потому-что в старом биосе нет защиты от перепрошивки.
Если при данном способе прошивки у вас появилась ошибка security error или Security verification failed, значит способ не подходит. Инструкция.
Внимание владельцам материнских плат GIGABYTE - перед прошивком материнской платы уточните ревизию вашей материнской платы (написано на самой плате, например R1.0 или R2.1 и т.д и т.п) Не прошивайте вашу материнскую плату, биосом от другой ревизии, это может привести к непредсказуемым последствиям.
Если у вас на плате установлен Award (синий скучный) биос а на сайте производителе появился UEFI (красивый с картинками и мышкой) биос то обновить обычным способом через Q-Flash не получится, что-бы обновиться на UEFI биос следуйте этой инструкции.
*Если у вас материнская плата Gigabyte то за модифицированным биосом (для большей уверенности) вы можете обратиться в поддержку на сайте Gigabyte. (как сделал посетитель нашего сайта) Но и я вам не откажу если попросите в комментариях).
Данный способ протестирован только на Windows 10 из оригинального образа Microsoft. Установку сборок Windows 10, оригинальных образов, сборок Windows 7, 8 и других OC, на ваш NVME накопитель не гарантирую.
После прошивки биоса важно:
Если не выполнить этот пункт, то в биосе после прошивки PATA диск может не появиться.
В биосе во вкладке Boot должен быть включен CSM
Boot Device Control должен быть UEFI
Для материнских плат Gigabyte:
В биосе в пункте CSM Support нужно включить Always
Boot mode selection должен быть UEFI
Storage Boot Option Control должен быть UEFI
Other PCI Device ROM Priority должен быть UEFI
Если не включить эти пункты, то это может привести к ошибкам:
"Установка Windows на данный диск невозможна. Выбранный диск имеет стиль разделов GPT. Возможно, оборудование данного компьютера не поддерживает загрузку с данного диска. Убедитесь, что контроллер данного диска включен в меню BIOS компьютера"
Смотрите скришоты с настройками биоса в облаке.
Для установки лицензионной или оригинальной версии Wondows 10 рекомендую использовать утилиту для создания флешек от Microsoft
При выборе флешки или DVD диска с которой(ого) будет устанавливаться Windows, обязательно выбираем UEFI.

"Установка Windows на данный диск невозможна. Возможно оборудование данного компьютера не поддерживает загрузку с данного диска. Убедитесь, что контроллер данного диска включен в меню BIOS компьтера."
*Владельцы материнских плат ASUS серии P8Z77 у которых в меню биоса отсутствуют пункты CSM и UEFI, у которых при установки Windows появляется ошибка "Установка Windows на данный диск невозможна. Возможно оборудование данного компьютера не поддерживает загрузку с данного диска. Убедитесь, что контроллер данного диска включен в меню BIOS компьютера.". Для установки ОС во время записи загрузочной флешки в RUFUS'e "Схема раздела" Должна быть установлена GPT а так-же в биосе в меню "Secure boot menu" Должен быть установлен пункт Other OS.
Вопросы и ответы:
1. Можно ли прошивать биос от другой материнской платы похожей на мою?
Нет! Этим вы можете окирпичить вашу плату.
2. Какие биосы можно прошить?
Award биосы.
UEFI биосы, это такие красивые биоса с картинками, в некоторых из них можно даже управлять мышкой.
Если у вас Сине голубой стандартный, то нельзя, единственным способом загрузки винды из NVME будет запуск загрузчика с флешке, сделать можно по инструкции.
3. Нужно ли устанавливать последний биос с сайта, перед установкой модифицированного?
Нет можно сразу ставить модифицированный
4. Если на материнских платах появляется такая ошибка при установке Windows:
Установка Windows на данный диск невозможна. На выбранном диске находится таблица MBR-разделов. В системах EFI Windows можно установить только на GPT-диск.
Нужно перевести ваш диск в GPT по инструкции
5. Если на материнской плате Gigabyte при прошивке из по биоса появляется ошибка:
The current flash utility is outdated ask your vendor or visit gigabyte website.
Прошивать нужно из под Windows через утилиту @BIOS которую можно скачать в разделе утилиты в разделе поддержка для вашей материнской платы.
7. Что делать если при установке Windows 10 появляется ошибка: "Windows не удается установить необходимые файлы. Убедитесь, что имеются все файлы, необходимые для установки, и перезапустите установку. Код ошибки 0x8007025D.
Для этого заходим в "Управление дисками" (правой кнопкой по кнопке пуск и выбрать соответствующий пункт) Там должен быть накопитель на котором написано "Не распределена" Что-бы диск появился в системе нажимаем правой кнопкой мыши по этому накопителю и нажимаем создать простой том и далее далее далее далее готово. После чего накопитель должен появиться в "Моём компьютере"
9. После установки NVME накопителя не работает видео-карта или наоборот работает накопитель но не работает видео-карта.
Вероятнее всего это происходит потому-что PCI линий процессора не хватает для того что-бы работали оба устройства одновременно, например i7 2600k имеет всего 16 линий pci, но ещё бывают чипсетные линии и мы можем освободить их отключив встроенную видео-карту в биосе, тогда запустится накопитель и видео-карта одновременно, но вероятнее всего скорость накопителя будет ограничена.
Что-бы проверить успешность прошивки следуйте по этой инструкции.
Для своей материнской плате я использовал такой переходник:


Купить переходник на 2 слота. Второй слот для подключения низкоскоростных SATA M.2 SSD.
И накопитель:


Внимание! Владельцам материнских плат с PCI 2.0 нет смысла покупать дорогой Samsung т.к пропускная способность PCI 2.0 - 2000мб. Поэтому рекомендую взять проверенный Asgard с пропускной способностью 2100-1800мб

Так же я себе прикупил для 970 EVO PLUS шикарный радиатор с тепловыми трубками, который опускает температуру накопителя на 40. градусов в стрес тесте.


Внимание покупателям радиаторов с активным охлаждением! Не повторяйте моей ошибки, не покупайте активный радиатор в вентилятором, почему? Читать тут.
Читайте также: