
Foxconn h55mxv прошивка bios
This package contains the files needed for installing the BIOS. If it has been installed, updating (overwrite-installing) may fix problems, add new functions, or expand existing ones. Even though other OSes might be compatible as well, we do not recommend applying this release on platforms other than the ones specified.
About OS Independent BIOS:
Although installing a newer BIOS version might add new features, update various components, or improve the device's usability, this process is very risky, so the upgrade is recommended to be performed only when it is really needed.
In addition to that, this task should be performed by someone who has the knowledge to successfully complete the installation; regular users may fulfill it at their own risk.
When it comes to applying a new version without taking into account the computer's operating system, the most commonly used method to flash the BIOS is by creating a bootable USB or CD containing the update file, and running it from DOS.
Still, regardless of the method used or whether the upgrade is performed by a regular or power user, it's recommended that the new BIOS be applied in a steady power environment such as the one ensured by a UPS unit.
The Basic Input/Output System (BIOS) is a very important software that loads the currently installed OS, and tests all of the system's hardware components – so make sure you flash it correctly.
Bear in mind that failing to perform a successful installation could seriously damage your device, and the faulty BIOS resulted from the process might even render it unusable.
So, if this release includes useful changes, hit the download button, get the package, and update your BIOS version. Otherwise, check with our website as often as possible, so that you don't miss the release that you need.
It is highly recommended to always use the most recent driver version available.
Try to set a system restore point before installing a device driver. This will help if you installed an incorrect or mismatched driver. Problems can arise when your hardware device is too old or not supported any longer.
The following files are found inside the driver download file.
| Name | Size | Date |
|---|---|---|
| 8M/9A1F1P06.bin | 8.4 MB | 11 Nov 2011 |
| 8M/9A1F1P06_MAP.txt | 2.1 KB | 11 Nov 2011 |
| 8M/flash.bat | 19 bytes | 11 Nov 2011 |
| 8M/fparts.txt | 2.1 KB | 23 Feb 2010 |
| 8M/fpt.exe | 261.2 KB | 12 Aug 2010 |
| 8M/fptcfg.ini | 4.9 KB | 12 Aug 2010 |
How to Update BIOS H55MXV Device Drivers Quickly & Easily
Step 1 - Download Your Driver
To get the BIOS H55MXV driver, click the green download button above. After you complete your download, move on to Step 2.
If the driver listed is not the right version or operating system, search our driver archive for the correct version. Enter BIOS H55MXV into the search box above and then submit. In the results, choose the best match for your PC and operating system.
Tech Tip: If you are having trouble deciding which is the right driver, try the Driver Update Utility for BIOS H55MXV. It is a software utility which automatically finds and downloads the right driver.
Step 2 - Install Your Driver
Once you have downloaded your new driver, you'll need to install it. In Windows, use a built-in utility called Device Manager, which allows you to see all of the devices recognized by your system, and the drivers associated with them.
How to Open Device Manager
In Windows 10 & Windows 8.1, right-click the Start menu and select Device Manager
In Windows 8, swipe up from the bottom, or right-click anywhere on the desktop and choose "All Apps" -> swipe or scroll right and choose "Control Panel" (under Windows System section) -> Hardware and Sound -> Device Manager
In Windows 7, click Start -> Control Panel -> Hardware and Sound -> Device Manager
In Windows Vista, click Start -> Control Panel -> System and Maintenance -> Device Manager
In Windows XP, click Start -> Control Panel -> Performance and Maintenance -> System -> Hardware tab -> Device Manager button
How to Install a driver from Device Manager
Locate the device and model that is having the issue and double-click on it to open the Properties dialog box.
Select the Driver tab.
Click the Update Driver button and follow the instructions.
In most cases, you will need to reboot your computer in order for the driver update to take effect.
Tech Tip: Driver downloads and updates come in a variety of file formats with different file extensions. For example, you may have downloaded an EXE, INF, ZIP, or SYS file. Each file type has a slighty different installation procedure to follow.
For more help, visit our Driver Support Page for step-by-step videos on how to install drivers for every file type.
If you have had recent power outages, viruses or other computer problems, it is likely that the drivers have become damaged. Browse the list above to find the driver that matches your hardware and operating system. To see more matches, use our custom driver search engine to find the exact driver.
Tech Tip: If you are having trouble deciding which is the right driver, try the Driver Update Utility for Foxconn BIOS H55MXV. It is a software utility that will find the right driver for you - automatically.
DriverGuide maintains an extensive archive of Windows drivers available for free download. We employ a team from around the world which adds hundreds of new drivers to our site every day.
How to Install Drivers
Once you download your new driver, then you need to install it. To install a driver in Windows, you will need to use a built-in utility called Device Manager. It allows you to see all of the devices recognized by your system, and the drivers associated with them.
Open Device Manager
In strong>Windows 11, Windows 10 & Windows 8.1, right-click the Start menu and select Device Manager
In Windows 8, swipe up from the bottom, or right-click anywhere on the desktop and choose "All Apps" -> swipe or scroll right and choose "Control Panel" (under Windows System section) -> Hardware and Sound -> Device Manager
In Windows 7, click Start -> Control Panel -> Hardware and Sound -> Device Manager
In Windows Vista, click Start -> Control Panel -> System and Maintenance -> Device Manager
In Windows XP, click Start -> Control Panel -> Performance and Maintenance -> System -> Hardware tab -> Device Manager button
Install Drivers With Device Manager
Locate the device and model that is having the issue and double-click on it to open the Properties dialog box.
Select the Driver tab.
Click the Update Driver button and follow the instructions.
In most cases, you will need to reboot your computer in order for the driver update to take effect.
Visit our Driver Support Page for helpful step-by-step videos
Install Drivers Automatically
If you are having trouble finding the right driver, stop searching and fix driver problems faster with the Automatic Driver Update Utility. Automatic updates could save you hours of time.
The Driver Update Utility automatically finds, downloads and installs the right driver for your hardware and operating system. It will Update all of your drivers in just a few clicks, and even backup your drivers before making any changes.
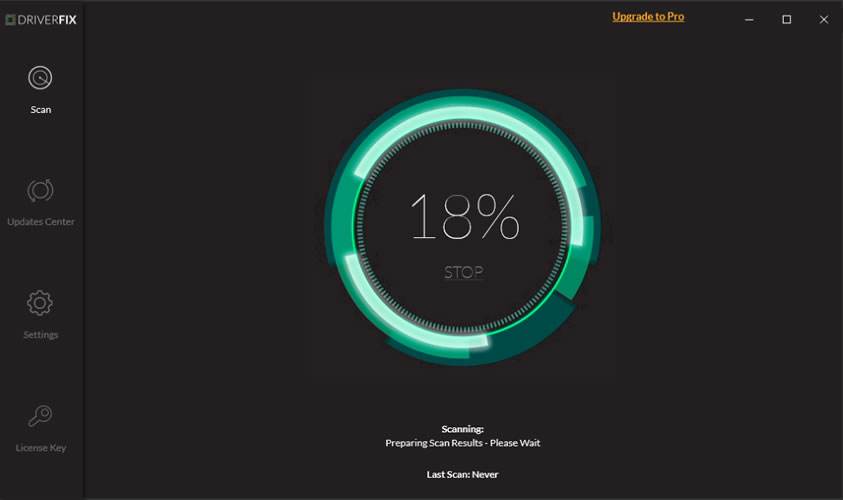
Once you download and run the utility, it will scan for out-of-date or missing drivers:
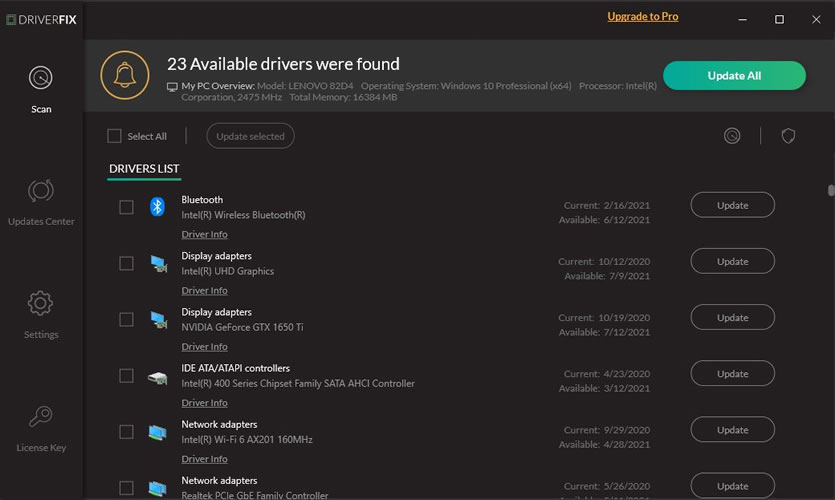
When the scan is complete, the driver update utility will display a results page showing which drivers are missing or out-of-date:
Next, update individual drivers or all of the necessary drivers with one click.
Benefits of Updated Drivers
Many computer problems are caused by missing or outdated device drivers, especially in Windows 11. If your desktop or laptop is running slow, or keeps crashing or hanging, there is a good chance that updating your drivers will fix the problem.
Ensures your hardware runs at peak performance.
Fixes bugs so your system will have fewer crashes.
Unlocks new features and configuration options in your devices, especially with video cards and gaming devices.
If you have had recent power outages, viruses or other computer problems, it is likely that the drivers have become damaged. Browse the list above to find the driver that matches your hardware and operating system. To see more matches, use our custom driver search engine to find the exact driver.
Tech Tip: If you are having trouble deciding which is the right driver, try the Driver Update Utility for Foxconn BIOS H55MXV LE. It is a software utility that will find the right driver for you - automatically.
DriverGuide maintains an extensive archive of Windows drivers available for free download. We employ a team from around the world which adds hundreds of new drivers to our site every day.
How to Install Drivers
Once you download your new driver, then you need to install it. To install a driver in Windows, you will need to use a built-in utility called Device Manager. It allows you to see all of the devices recognized by your system, and the drivers associated with them.
Open Device Manager
In strong>Windows 11, Windows 10 & Windows 8.1, right-click the Start menu and select Device Manager
In Windows 8, swipe up from the bottom, or right-click anywhere on the desktop and choose "All Apps" -> swipe or scroll right and choose "Control Panel" (under Windows System section) -> Hardware and Sound -> Device Manager
In Windows 7, click Start -> Control Panel -> Hardware and Sound -> Device Manager
In Windows Vista, click Start -> Control Panel -> System and Maintenance -> Device Manager
In Windows XP, click Start -> Control Panel -> Performance and Maintenance -> System -> Hardware tab -> Device Manager button
Install Drivers With Device Manager
Locate the device and model that is having the issue and double-click on it to open the Properties dialog box.
Select the Driver tab.
Click the Update Driver button and follow the instructions.
In most cases, you will need to reboot your computer in order for the driver update to take effect.
Visit our Driver Support Page for helpful step-by-step videos
Install Drivers Automatically
If you are having trouble finding the right driver, stop searching and fix driver problems faster with the Automatic Driver Update Utility. Automatic updates could save you hours of time.
The Driver Update Utility automatically finds, downloads and installs the right driver for your hardware and operating system. It will Update all of your drivers in just a few clicks, and even backup your drivers before making any changes.
Once you download and run the utility, it will scan for out-of-date or missing drivers:
When the scan is complete, the driver update utility will display a results page showing which drivers are missing or out-of-date:
Next, update individual drivers or all of the necessary drivers with one click.
Benefits of Updated Drivers
Many computer problems are caused by missing or outdated device drivers, especially in Windows 11. If your desktop or laptop is running slow, or keeps crashing or hanging, there is a good chance that updating your drivers will fix the problem.
Ensures your hardware runs at peak performance.
Fixes bugs so your system will have fewer crashes.
Unlocks new features and configuration options in your devices, especially with video cards and gaming devices.
Русская страничка
Страничка загрузки драйверов, прошивок, мануалов и т.п.
Поэтому в розыске дампы прошивок обоих микросхем BIOS, слитые программатором.
Версия BIOS не важна - лишь бы плата стартанула. В любом случае BIOS будет обновлен на последнюю версию.
Поэтому в розыске дампы прошивок обоих микросхем BIOS, слитые программатором.
отвечаю сам себе
1. качается BIOS с офсайта по модели материнской платы.
2. в комплекте с утилитой-прошивальщиком имеется сам файл bios с расширением .bin
3. .bin файл в хексредакторе режется строго пополам.
4. первая половина файла прошивается программатором в микросхему SPI_1, вторая половина - в микросхему SPI_2.

С компом проблемы, тормозит. Ни одна программа температуру правильно не показывает.
Новая версия Аиды хоть показал датчики, но определяется как одно ядро.
При сравнении получается, что и все другие программы ошибаются примерно одинаково.
Якобы у Мамки 90 градус сразу после запуска и больше не повышается. Это с Аиды:
P.S. Сейчас запустил на своем компьютере Аиду, он показывает где "+12 V" значение "1,712 V"
Теперь же. черт, чудо какое то. Все нормализовалось. Запустил родную, возился по разным вкладкам, не поверил.
Аиду запустил, то же нормально (кроме конечно ядер - только одно).
Спеедфан - тоже нормально. Везде по температуре более менее правдоподобно и в норме.
Тест в Аиде запустил тест стрес FPU температура проца повысилась до 47, и кроме еще видеоплаты другие особо не подымались. Остановил тест и температура проца упаладо 38 почти сразу.
Не понимаю отчего нормализовалось?
И тут я вспомнил, что еще сделал. Из-за сомнений по вольтажу, решил выяснить, что-то блок питания стоит - какой мощности. Снял с системника, даже провода не стал отключать, глянул, пришлось переворачивать где то на 200-220 градусов. Прочел что нужно, установил на место.
И вот думаю, возможно все же, в блоке питания что-то лежало и мешало или замкнуло какую цепочку? Иначе другие действия уж точно ничего не должны были изменять.
Дальше буду заниматься завтра. Если так и дальше будет - это просто супер, хрен с ним что только одно ядро показывает. Вдруг дальше нормально будет работать?
Если нет, то и так мысли появились нужно попробовать по мощнее блок питание, т.е. кроме уже добавленных винтиляторов, хочу еще повесить (куда придумаю вариат), чтобы видеоплата меньше нагревалась.
Читайте также: