
Excel vba columns несколько столбцов
I would like to select multiple columns.
Eg. I want to select column a, b, d, e, g, h
I get error message: Type mismatch .
99% of the time you never need to select cells to work with them. What are you actually trying to do?
5 Answers 5
Range("A:B,D:E,G:H").Select can help
Edit note: I just saw you have used different column sequence, I have updated my answer
The title states non sequential, your method would select all columns between C and H , I do not think this is what the OP is after.
@HRgiger How can i get the values in those cells to an array? is this query possible? someArray = Range("B4:B9,S4:S9").Value
Some things of top of my head.
Method 1.
Method 2.
Method 3.
Method 3 is my preference as I find it is also the best solution for working with already defined and named ranges rather than entire columns. Application.Union.(range1, range2, range3).select is great. I think this solution (for copying and pasting purposes) would require that the ranges be identically sized.
Some of the code looks a bit complex to me. This is very simple code to select only the used rows in two discontiguous columns D and H. It presumes the columns are of unequal length and thus more flexible vs if the columns were of equal length.
As you most likely surmised 4=column D and 8=column H
Hope you find useful - DON'T FORGET THAT COMMA BEFORE THE SECOND COLUMN, AS I DID, OR IT WILL BOMB!!
Working on a project I was stuck for some time on this concept - I ended up with a similar answer to Method 1 by @GSerg that worked great. Essentially I defined two formula ranges (using a few variables) and then used the Union concept. My example is from a larger project that I'm working on but hopefully the portion of code below can help some other people who might not know how to use the Union concept in conjunction with defined ranges and variables. I didn't include the entire code because at this point it's fairly long - if anyone wants more insight feel free to let me know.
First I declared all my variables as Public
Then I defined/set each variable
Lastly I set a new variable "SelectRanges" as the Union between the two other FormulaRanges
As a recorded macro.
Not the answer you're looking for? Browse other questions tagged excel vba or ask your own question.
Linked
Related
Hot Network Questions
To subscribe to this RSS feed, copy and paste this URL into your RSS reader.
Site design / logo © 2022 Stack Exchange Inc; user contributions licensed under cc by-sa. rev 2022.5.11.42086
Чтобы переменной присвоить диапазон ячеек, она должна быть объявлена как Variant, Object или Range:
Чтобы было понятнее, для чего переменная создана, объявляйте ее как Range.
Присваивается переменной диапазон ячеек с помощью оператора Set:
В выражении Range(Cells(3, 4), Cells(26, 18)) вместо чисел можно использовать переменные.
Для присвоения диапазона ячеек переменной можно использовать встроенное диалоговое окно Application.InputBox, которое позволяет выбрать диапазон на рабочем листе для дальнейшей работы с ним.
Адресация ячеек в диапазоне
К ячейкам присвоенного диапазона можно обращаться по их индексам, а также по индексам строк и столбцов, на пересечении которых они находятся.
Индексация ячеек в присвоенном диапазоне осуществляется слева направо и сверху вниз, например, для диапазона размерностью 5х5:
| 1 | 2 | 3 | 4 | 5 |
| 6 | 7 | 8 | 9 | 10 |
| 11 | 12 | 13 | 14 | 15 |
| 16 | 17 | 18 | 19 | 20 |
| 21 | 22 | 23 | 24 | 25 |
Индексация строк и столбцов начинается с левой верхней ячейки. В диапазоне этого примера содержится 5 строк и 5 столбцов. На пересечении 2 строки и 4 столбца находится ячейка с индексом 9. Обратиться к ней можно так:
VBA Columns property is used to refer to columns in the worksheet. Using this property we can use any column in the specified worksheet and work with it.
When we want to refer to the cell, we use either the Range object or Cells property. Similarly, how do you refer to columns in VBA? We can refer to columns by using the “Columns” property. Look at the syntax of COLUMNS property.
![]()
We need to mention the column number or header alphabet to reference the column.
For example, if we want to refer to the second column, we can write the code in three ways.
Examples
If you want to select the second column in the worksheet, then first, we need to mention the column number we need to select.
Code:
Now put a dot (.) to choose the “Select” method.
One of the problems with this property is we don’t get to see the IntelliSense list of VBA.
Code:
Instead of mentioning the column number, we can also use the column header alphabet “B” to select the second column.
Code:
Both the above codes will select column B, i.e., second column.
We can also use the variable to select the column number. Look at the below code now.
Code:
In the above, I have declared the variable as Integer and assigned the value of 4 to this variable.
For the Column’s property, I have supplied this variable instead of the column number. Since the variable holds the value of 4, it will select the 4 th column.
We have seen how to select the column based on variable value now; we will see how we can select the column based on cell value number. In cell A1 I have entered the number 3.
Now below code will select the column based on the number in the cell A1.
Code:
The above code is the same as the previous one, but the only thing I have changed here is instead of assigning the direct number to the variable, I have given variable value as “whatever the number is there in the cell A1”.
Since we have a value of 3 in cell A1, it will select the third column.
We can also use Columns property with Range object as well. Using the Range object, we can specify the specific range. For example, look at the below code.
Code:
In the above example, I have specified the range of cells as C1 to D5, then using columns property, I have specified the column number as 2 to select.
Now, in general, our second column is B, and the code has to select the “B” column but see what happens when I run the code.
It has selected the cells from D1 to D5.
In our perception, it should have selected the second column, i.e., column B. But now it has selected the cells from D1 to D5.
The reason why it has selected these cells because before using the COLUMNS property, I have specified the range by using the RANGE object as C1 to D5. Now property thinks within this range as the columns and selects the second column in the range C1 to D5. D is the second column, and specified cells are D1 to D5.
Using the Range object and Columns property, we can select multiple columns. Look at the below code.
Code:
The code will select the column from the second column to the fifth column, i.e., from column B to E.
We can also write the code in this way as well.
Code:
The above is too exactly the same as the previous one and selects the columns from B to E.
Like this, we can use COLUMNS property to work with the worksheet.
Recommended Articles
This has been a guide to VBA Columns. Here we discuss examples of columns property in excel VBA and select multiple columns with range object and downloadable excel templates. Below are some useful articles related to VBA –
Normally in excel worksheet we have two different methods to add or insert columns one being the keyboard shortcut and another by using the right-click and insert method but in VBA we have to use insert command and entire column statement to add any column together, the trick to this is that if we need to insert a single column we give a single column reference but for the multiple columns we give multiple column references.
Insert Columns in Excel using VBA
As part of the VBA code VBA Code VBA code refers to a set of instructions written by the user in the Visual Basic Applications programming language on a Visual Basic Editor (VBE) to perform a specific task. read more , we may need to insert a few columns in our datasheet to fit our needs. Inserting column is the easy shortcut key in the worksheet by pressing Ctrl + but how about inserting a new column through VBA code. In this article on “VBA Insert Column,” we will show you the process of adding columns in excel Adding Columns In Excel Adding a column in excel means inserting a new column to the existing dataset. read more and will show you different scenarios examples.

How to Insert Columns in Excel Worksheet using VBA?
To insert a new column, we need to identify after which column we need to insert, without telling, after which column we need to insert how VBA can understand the logic.
For example, if you want to insert the column after column B, then you can construct the code like this.
Columns(“C”)
Note: The reason why I have used C to insert a column after because the selected cell will be shifted to the right side.
After the columns are specified, we need to access the “Entire Column” property.
Columns(“C”).EntireColumn
Then we need to choose the “Insert” method.
Columns(“C”).EntireColumn.Insert
This will insert the column after column C, and the existing column C will be moved to D.
Now, look at the way of inserting the column using the RANGE object. For this, consider the below data for an example.
Now I want to VBA insert the column after the A column, follow the below steps to construct the code.
Step 1: Start off the Sub Procedure.
Step 2: Open Range object.
Code:

Step 3: Now mention the column in double-quotes.
Code:

Step 4: Now choose the Entire Column property.
Code:

Step 5: After selecting the Entire Column property, choose the “Insert” method.
Code:

Now your code looks like this.
Code:
Run the code. It will insert the new B column.
For example, if you want to insert two new columns after column A, then we need to mention two column addresses.
Code:
The above code will insert two columns after column A.
We can insert a new column by using “Insert” the only method without accessing the Entire Column property. For this, let’s understand the “insert” method syntax.
[Shift]: When we insert the new column, whether we need the columns to shift to the right side or to shift to the downside in case of rows. Here we can use two options, “xlToRight” and “xlDownTo”
[Copy Origin]: This will specify the format for the newly inserted column. Whether you need the format from the left side of the column or from the above cells. Here we can use two options “xlFormatFromLeftOrAbove” and “xlFormatFromRightOrBelow”.
Below is the example code for you.
We have seen how to VBA insert columns using the RANGE object; now, we will show we can insert columns using the “COLUMNS” property.
Open the COLUMNS property.
Code:

We can specify the column in two ways here. One is using as usual alphabetic references, and another one is using column numbers.
If you want to insert the column after column A, then the code will be COLUMNS(“B”). If you are using numerical reference, then the code will be COLUMNS(2).
Code:

Now the problem for you arises because when we use COLUMNS property, we don’t get to access the IntelliSense list.
Code:

Here we need to sure of what we are doing. So this is the reason I have showed you the RANGE object first.
Code:
Assume you have the data like the below image.

If you want to insert new columns after every alternate row, then we need to use VBA loops Use VBA Loops A VBA loop in excel is an instruction to run a code or repeat an action multiple times. read more . The below code it tailor-made the code for you.
Code:
This will insert the column like this.
We can also insert a column based on cell value as well. For example, look at the below data.

Here I want to insert the column if the first-row cell value is “Year,” and my data should like this after inserting new columns.
Use the below code to perform this task.
Code:
You can download this VBA Insert Columns Excel here. VBA Insert Columns Excel Template
Recommended Articles
This has been a Guide to VBA Insert Columns. Here we will show you how to insert a single/multiple columns under different scenarios along with examples and a downloadable excel template. Below are some useful excel articles related to VBA –
Normally in excel worksheet we have two different methods to delete columns one being the keyboard shortcut and another by using the right-click and insert method but in VBA we have to use delete command and entire column statement to delete any column together, the trick to this is that if we need to delete a single column we give a single column reference but for the multiple columns we give multiple column references.
Excel VBA Delete Column
We perform many actions in excel like cut, copy, paste, add, delete, insert, and many such things we do on a regular basis. We can use all of these actions using VBA Coding. One of the important concepts we need to learn is in VBA is the “deleting column.” In this article, we will show you how to use this Delete Column option in VBA.
What Does Delete Column Do in Excel VBA?
As the name says, it will delete the specified column. To perform this task, we need to first identify which column we need to delete. The selection of columns to delete is different from one scenario to another, so we will cover some of the important and often faced scenarios in this article.
Deleting the columns is easy. First, we need to use the COLUMNS property to select the column, so below is the syntax of the Column Delete method in VBA.
Columns (Column Reference).Delete
So we can construct the code like this:
This will delete column number 2, i.e., Column B.
If we want to delete multiple columns, we cannot enter columns. We need to reference the columns by column headers, i.e., alphabets.
This will delete the column from A to D, i.e., the first 4 columns.
Like this, we can use the “Delete Column” method in VBA to delete the particular columns. In the below section, we will see more examples to understand it better. Read on.
Examples of Excel VBA Delete Column Method
Below are the examples to delete columns using VBA.
Assume you have the datasheet, something like the below.

If we want to delete the column month “Mar,” first select the columns property.
Code:

Mention the column number or alphabet. In this case, it is either 3 or C.
Code:

Use the Delete method.
Code:

Or you can enter the column address like this.
Code:

Run this Code using the F5 key, or you can run manually and see the result.
Both the codes will do the same job of deleting the mentioned column.

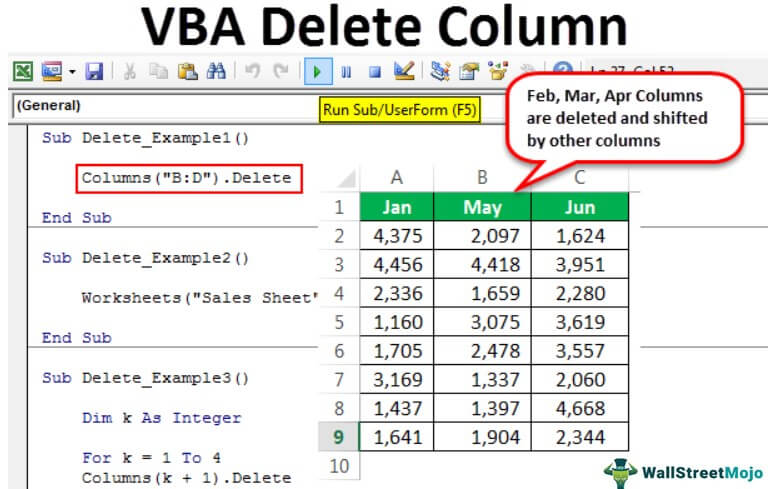
If we want to delete multiple columns, we need to mention them in the alphabet. We cannot use column numbers here.
If we want to delete the columns 2 to 4, we can pass the code like the below.
Code:

Run this code manually through the run option or press the F5 key. This will delete the columns “Feb,” “Mar,” and “Apr.”
The above is an overview of how to delete columns using VBA code. However, that is not the good practice of deleting columns. Without referring the worksheet name, it is dangerous to blindly delete the column.
If you have not mentioned the worksheet name, then whichever sheet is active, it will delete columns of that sheet.
First, we need to select the worksheet by its name.
Code:

Code:

This will delete the columns B to D of the worksheet “Sales Sheet.” For this code, it doesn’t matter which is active. Still, it will delete the mentioned columns of that sheet only.
Code:

This also deletes the columns “B to D” without selecting the worksheet “Sales Sheet.”
Assume you have data that has alternative blank columns like the below.

So, delete every alternative column we can use the below code.
Code:

Run this code using the F5 key or manually. Then, it will delete all the alternative blank columns, and our data will look like this.
Now, look at this example. There are certain situations where we need to delete the entire column if any of the blank cells are found in the data range. Consider the below data for an example.

All the yellow-colored cells are blank. So here, my requirement is to delete all the blank cells columns. The below code will do that.
Code:

Let me explain this code line by line for you.
Our data is there from A1 to F9, so first, I need to select that range, and the below code will that.
In this selected range of cells, I need to select the cells which are blank. So to select a blank cell, we need to special cells property, and in that property, we have used cell type as blank.
Next, it will select all the blank cells, and in the selection, we are deleting the entire column of the selection.
So our end result will look like this.

Wherever it has found the blank cell, it has deleted those blank cells entire column.
You can download this Excel VBA Delete Column here – VBA Delete Column Template
Recommended Articles
This has been a guide to VBA Delete Column. Here we learn 4 different methods to delete columns using Excel VBA code along with practical examples and downloadable codes . Below are some useful excel articles related to VBA –
Читайте также: