
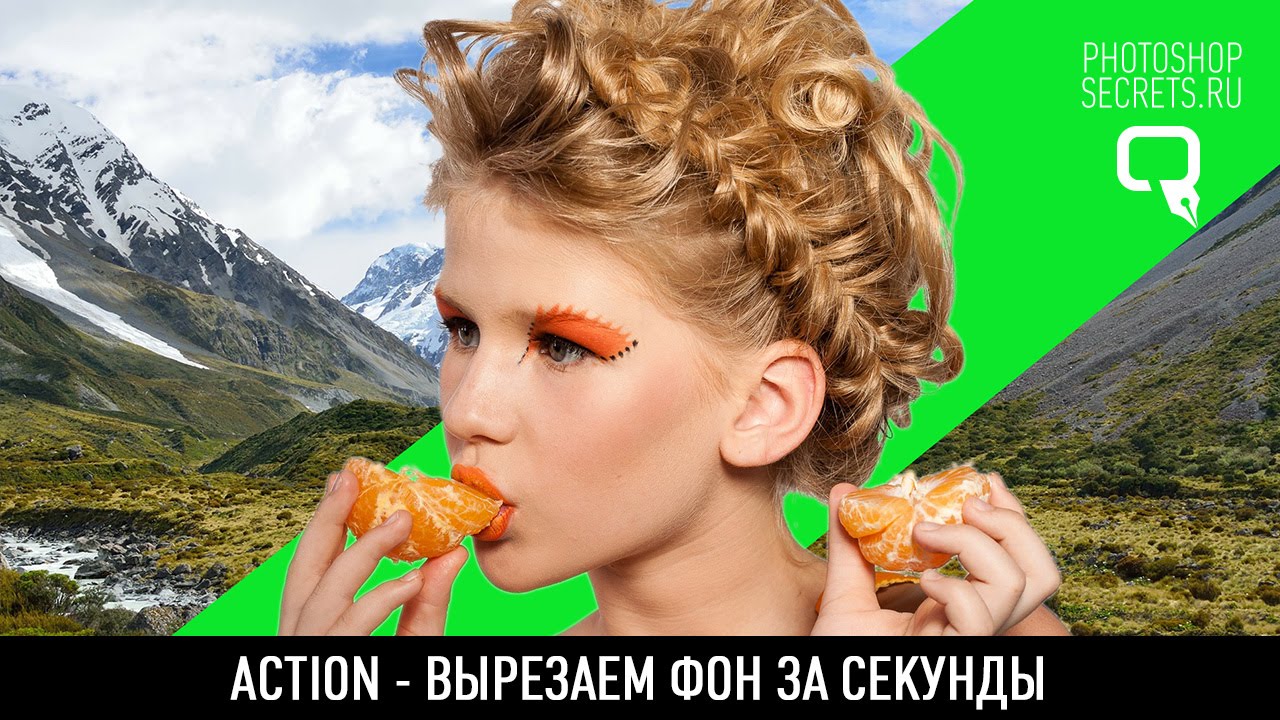
Экшен удаление фона для фотошопа
Remove background from any image with our Photoshop plugin. Say goodbye to fiddling with Photoshop's complex tools just to remove a background. Download the remove.bg plugin and use it anytime you need to delete image backgrounds fast and easy.
New! Roll out across your organization with speed and ease with version 2.0.6.
Benefits of using the Photoshop background remover plugin
Making the remove.bg plugin for Photoshop part of your work routine brings in plenty of advantages:
Productivity boost - spend less time doing repetitive tasks like manually picking pixels and spend more time challenging your creativity and improving your work.
Stunning results - speed up your workflow without cutting corners when it comes to quality. Our Adobe Photoshop background removal plugin provides top-quality results even for the most challenging conditions, such as hair.
Easy to adjust layer mask editing - use the layer mask to remove or restore areas of an image - as you usually would, but with a one-click starting point.
How to remove background from an image with the Photoshop plugin
Go to Plugins → remove.bg for Adobe Photoshop → Remove Background.
Click Remove Background.
The remove.bg API will now automatically process your photo.
Frequently asked questions
Go to Adobe Exchange and click the Free button to install the plugin. Make sure you have the Creative Cloud Desktop App installed. Note that the installation can take a few seconds and there is no progress display, but you should see a notification once it is finished.
Adobe has changed the software architecture of plugins. With version 2.0, the remove.bg Photoshop plugin uses the new architecture. To have the best experience, please install the latest version, but before that, you need to uninstall the old one. If you have installed the extension through Adobe Exchange, follow the steps below:
Go to MyExchange and select Manage.
In Creative Cloud, find remove.bg for Adobe Photoshop, then select *** and click Uninstall.
The extension should be uninstalled in a few seconds.
If you have installed the extension through an Adobe compatible Extension Install Utility, the steps depend on the specific tool. Please consult the manual of the Install Utility you used.For Anastasiy’s Extension Manager follow these steps:
Open Anastasiy's Extension Manager.
Select remove.bg for Adobe Photoshop.
Now you can install the latest version of the plugin. Follow the next steps here.
remove.bg for Photoshop is an Adobe Photoshop plugin. Once you've installed it, a new menu option will be available at Plugins → remove.bg for Adobe Photoshop → Remove Background, along with a new button.
Click that button anytime you want to remove the background from a currently opened image (or selection) in Photoshop. All images are processed through the remove.bg API, which is why you need to make sure you are logged in to your remove.bg account first.
Downloading remove.bg for Photoshop is free! To process images you need credits, which can be used for all remove.bg products and integrations. You can find the pricing for credits here.
As a remove.bg user you get 1 free credit for signing up, and 50 free API calls for preview images each month. Since remove.bg for Windows/Mac/Linux utilizes the API that means you can process 50 preview images (up to 0.25 megapixels, e.g. 625x400) with it for free each month.
The extension supports Adobe Photoshop CC (2021) 22.0, for Mac and Windows.
A quick migration is now supported. Read our Help Center article to learn how.
Created by Kaleido Latest Version 2.0.6 Last updated 7 декабря 2021 Problems? Report a problem Share this
Здравствуйте! Не нахожу кнопки Материалы и ничего похожего.
Спасибо, вот такой экшен
Спасибо за то,что делитесь наработками) Везде по чуть-чуть информации и уже работаю лучше мужа)))
Максим, спасибо за экшен! очень удобно, быстро и просто! Главное – очень вовремя, пытался сам без экшена убирать фон — замучился! Спасибо! Отличная работа!
Попробовала отделить простенький фон этим экшеном. Получилось просто КЛАСС, и главное очень быстро. Мне ежедневно приходится отделять фоны для клипартов и кластеров. С этой новинкой работа значительно ускорится. Максим, спасибо ПРЕБОЛЬШУШЕЕ за эту фишку!
Полезный экшен. Спасибо автору.
не качается экшн, увы
Спасибо большое. скачала установила теперь буду учиться)))
Спасибо за урок. Скачала экшен и открыла его в фотошоп. Надеюсь поможет мне в работе.
Спасибо, быстро и хорошо. Был бы еще такой экшен на сложное фото.
Максим, большое спасибо и за урок и за экшен! Для простого фона – супер! Быстро и просто!
Максим, спасибо за Вашу кропотливую работу. Ваши уроки нравятся всё больше. Давно подписана на Вашу рассылку и вижу , как вырос уровень подачи информации. Ещё раз спасибо!
Спасибо Максим,попробовал получается,хотелось бы больше таких экшенов
Хороший урок! Спасибо
Благодарю за экшен! Пригодится в экстренных ситуациях .
Этот подарок ограничен на несколько раз ?
Спасибо, Максим. Для начала очень познавательный урок.
Есть звук …нет видео …. Перезагрузка не помогает (
Обновите ваш браузер и ваш кодек видеокарты. Скорее всего проблема в этом.
всё открылось. спасибо
привет, у меня почему то изменилась основная картинка, я ожидала что получу неизменную картинку но при этом окно дополнительной черно белой маски,….
Классно! Спасибо за скрипт, Максим!
Все очень здорово! Большое спасибо. облегчаете нам жизнь.
Я скачала ваш экшен, но не поняла, как его включить, чтобы он работал? Если я нажимаю на него мышкой, у меня просто включается мой фотошоп, как он есть, кнопочки внизу экрана с треугольником на нём, с помощью которого вы включаете экшен на видеоролике у меня нет.
Нужно открыть через меню Окно – Операции
Там будет экшен папка с названием “Вырезаем фон за секунды” ее открываем и запускам экшены как в видео
папку нашла, а как её открыть и как запуститьэкшен? у меня ничего не открывается и не запускается.
Здравствуйте,Максим!
Просмотрел Ваш видео урок. Большое спасибо!Кажется всё просто и быстро.Скачал экшен.А где он находится в фотошопе, не знаю.
У меня Adobe Photoshop CC, кнопку операции,которой Вы пользуетесь, не вижу.По этому не смог ничего сделать.
Классно! Спасибо за скрипт, Максим, я как раз начинаю осваивать фотошоп…
На белом фоне получилось прекрасно, а вот из цветного фото как вырезать одну фигуру( человека )?
Или это уже другим скриптом?
Если фон сложный то данный скрипт уже не поможет. Тут нужно сложнее маски использовать.
Easily remove the background from photos, then edit them in Adobe Express where you can add new backgrounds, graphics, and more.
Powered by Adobe Photoshop
How to use the photo background remover.

1. Select.
For best results, choose an image where the subject has clear edges with nothing overlapping.

2. Remove.
Upload your image to automatically remove the background in an instant.

3. Download.
Download your new image as a PNG file with a transparent background to save, share, or keep editing.

Create transparent cutout backgrounds for your photos.
This background remover app allows you to highlight the subject of your photo and create a transparent background, so that way you can place your new image into a variety of new designs and destinations. Place it on a colored backdrop or add a new background to put your subject in a completely new environment.
Remove the background from your picture and download instantly.
Take the background out of a picture faster than ever. It’s as easy as selecting your image, uploading it to our free photo background remover, and your image will be ready to download and share in an instant. Publish your image for your audiences to enjoy across your social channels, or continue to edit it to perfection within Adobe Express.


Do more with your image.
Removing the background of your image for a bigger project? Unleash your creativity with the photo editing capabilities and design tools from Adobe Express. Add a shape crop to frame your newly cropped photo, apply filters, or add GIFs and animation for a dynamic design. There are countless ways to create a compelling image for any printed or digital format.
Over 100,000 templates & assets to start from.
Turn your newly edited image into a stunning flyer, social post, album cover, profile photo, and unlimited other designs. Explore our template library to get started. Then, add other pre-loaded design assets, fonts, icons, or GIFs to personalize your image. There are endless creative opportunities to elevate your designs.


Я несколько усовершенствовал данный метод. Это касается выбора фильтров для размытия. Можно выбирать Размытие по Гауссу (Gaussian Blur), Размытие по поверхности (Surface Blur) и Медиану (Median). Это позволяет использовать различные методы для фильтрации разных пространственных частот.
Например, метод с Размытием по Гауссу, на мой взгляд, подходит для мелкой и средней текстуры кожи, но не подходит для работы вблизи контрастных границ. Для этого лучше использовать фильтрыРазмытие по поверхности или Медиана.
Принцип работы с экшеном:
1. Сначала удаляем явные дефекты с помощью обычной восстанавливающей кисти (Healing Brush). Это нужно сделать на пустом слое. Если вы не знаете, как это делается, лучше сначала изучить основы работы в программе, например, с помощью видеокурса «Photoshop CS5 от А до Я».


2. Далее запускаем экшен из палитры Операции. Отличительной особенностью работы экшена является то, что он использует информацию со всех предыдущих слоев изображения, то есть, создает слой на основе всех предыдущих и выполняет операцию частотного разложения с заранее выбранным фильтром. Нужный фильтр можно выбирать путем его включения в экшене. Это нужно сделать ДО запуска экшена.

Можно также включать два или все три фильтра. Попробуйте сами, возможно, вам понравится использовать один фильтр или два.
3. После того, как вы подобрали необходимые параметры фильтров (это потребует некоторой практики), экшен выполняет несколько операций и создает структуру слоев.

4. Теперь выбираем мягкую белую кисть, непрозрачность кисти регулируем в процессе работы, в зависимости от нужной степени подавления дефектов. Кистью работаем по маске слоя. При фильтрации дефектов больших размеров кистью можно работать «по площадям».
5. Поработав с крупными дефектами, запускаем экшен еще раз. Перед этим можно переключиться на другой фильтр. При удалении средних и мелких дефектов кистью нужно работать точечно, иначе результатом работы будет «пластиковая» кожа с излишне мелкой текстурой.
Следует также помнить, что данный экшен является всего лишь инструментом для ускорения работы. Как и всякий «ускоритель», он имеет свои достоинства, недостатки и область применения. Используя только его, вам не удастся сделать ретушь High-End качества, но никто не запрещает применять его для отдельных этапов работы.

1. Photoshop Remove Background tool
This is the simplest way to remove the background of your image in Photoshop. This method is most suitable if you are not too fussy about getting clean edges on your subject.
First, open your image in Photoshop and go to the right-hand Layer panel. Duplicate the current layer by pressing Command+J on macOS or CTRL+J on Windows.

Duplicate the layer in Photoshop by pressing Cmd+J or Ctrl+J
For the final step, go to the Quick Actions panel and click on the Remove Background button, which should then finalize the process of removing the background in Photoshop.

Click on the ‚Remove Background‘ button on the right-hand side

Zooming in on the Photoshop Remove Background Button under Quick Actions
2. remove.bg’s Photoshop plugin
remove.bg’s plugin for Photoshop is the best way to separate the background from the subject.
The plugin is better than the software in isolating complicated elements and edges such as hair. You can also use the layer mask to remove or restore regions of the image – but you still only need to click one button.
Get started by following these steps:
Download the plugin. Downloading remove.bg’s plugin for Photoshop is free of charge. You can also buy credits to process images – which you can use in all remove.bg products and integrations. Once you have installed remove.bg, you will find it in the Plugins drop-down menu.

You can find the plugin under ‚Plugins‘ -> ‚remove.bg for Adobe Photoshop‘
Log in to your remove.bg account and click the Remove Background button anytime you want to remove the background from the currently opened image (or selection) in Photoshop. Bear in mind, the image is processed through the remove.bg API so you need an active internet connection and an API key (which you can find in your account’s dashboard).

Click on the ‚Remove Background‘ button to remove the background of the currently opened image
Signing up gives you one free credit, and 50 free API calls for preview (lower resolution) images each month.
For more in-depth installation instructions, check out our help page and for more info about the remove.bg pricing, click here.
3. The Quick Selection tool
Photoshop’s Quick Selection Tool uses artificial intelligence to decide in real-time where the edges of the subject and the beginning of the background fall.
The tool works best when there is a clear difference between your foreground selection and your background. If there is too much similarity in the pixels, it will get confused and you will spend hours adding and subtracting elements.
Once you’ve carried out the initial selection, you can toggle between adding to the selection and subtracting from the selection in the menu.
How to use the Quick Selection Tool
- Open your image in Photoshop.
- Find the Quick Selection Tool in the left-hand menu (Photoshop Toolbox). It could be nestled in Magic Wand Tool.

Click on the ‚Quick Selection Tool‘ in the Photoshop Toolbox
- Check Enhance Edge in the Options bar, which should give you smoother, higher-quality selection edges.
- Click the button and move the pointer over the area you want to select. Quick Selection will find tones that match the selection until it thinks it’s found an edge.
- You might find you want to add to the selection. If so, just click and drag over another area.
- If the Tool has been over-enthusiastic, you can subtract from the selection. To do that, press the Option key (macOS) or Alt key (Windows) and move over to the section you want to deselect.
- Or you can change the Tool to deselect (minus) in the menu bar to deselect anything you mouseover.

Click this button to deselect anything you mouseover
4. The Background Eraser tool
This tool is used to remove backgrounds in images with more than a certain amount of fine detail between subject and background.
It works by taking a sample of the hue at the center of the brush and selecting the same or similar colored pixels as you move the mouse.
How to use the Background Eraser tool
- Open your image in Photoshop.
- Find the Background Eraser Tool in the Photoshop Toolbox. It might be hidden within the Eraser submenu, so click and hold that or press E to highlight it.

Click on the ‚Background Eraser Tool‘ within the Eraser submenu
- Make sure the brush is the right size. You can use the [ and ] bracket keys or adjust it in the menu bar. A larger brush is quicker but you need precision if you are working in tight spaces. You can and should zoom in, as well.
- You want the brush to be nice and hard on the slider, as well. If you have fuzzy edges, you will leave behind artifacts. Shift [ and ] will reduce or increase hardness.
- Set Limits on the menu to Find Edges.
- Place the center of your brush over the color you want to remove and click. You will get rid of any matching hue within your tolerance (see below) and leave behind other colors – like this.

Place the brush over the color you want to remove and click
- Tolerance is how wide the bracket of color is that the circle will remove. If you were going to remove this grass from behind the legs, you would want a high tolerance because there are yellowish stalks and brownish leaves. Obviously, if someone was wearing green leggings, you might be in trouble. Start with it set to 25 and see how you go.
- Bear in mind that the Background Eraser Tool will erase any matching color its crosshairs are over, so you need to keep those on the background color.
- Background Eraser is set to Continuous Sampling by default.

Background Eraser is set to ‚Continuous Sampling‘
That means it will delete any matching color those crosshairs hit upon. If you have many different hues in your background you will need to keep sampling and deleting them. However, if you only have one hue (or a narrow bracket of hues) such as a blue sky, you can change to Once.

If you have many different hues in your background you will need to keep sampling and deleting them
In that case, even if you mouse over a different color, it will only sample and delete the color you started on. You are less likely to delete part of the subject by mistake.
- If there’s too close a match between the background color and subject and you keep finding your subject being wiped out, here’s another trick. Click Protect Foreground Colour (far right of the Tool menu). Press and hold Alt (Win) / Option (Mac) key and use the eyedropper tool which pops up to sample the hue you want to protect from destruction.
5. The Pen tool
The Pen Tool is the furthest from AI selection you can get without going freehand. (Freehand is, of course, an option you can use–in Layer and Mask– especially if fuzzy edges are OK, such as a light sea against a light sky.)
Anyway, the Pen Tool allows you to draw around an area using a combination of straight lines and flexing curves. You can toggle between the two by mousing over a node and pressing the Control/ CTRL-key.

The Pen Tool allows you to draw around an area using a combination of straight lines and flexing curves.
Because the tool is so intuitive, it’s quite hard to describe how to use it in words! The best thing to do is to watch this video by Phlearn and then feel your way into using it. It’s pretty fun.
You want to use the Pen Tool to create a Path (on the far left in the layer panel). Then right-click on the selection and press ‚Make Selection…‘ to change a Path into a selection.

Right-click on selection and click on ‚Make Selection…‘
If you are working with a selection, you might want to increase the feathering of edges a little bit because hard edges can look unnatural, especially against a bright background.

Increase Feather Radius within the Make Selection Menu
Refining your selection
We’ve shown you a variety of ways on how to remove the background of an image in Photoshop.
You have probably already discovered that no one way is perfect (you might get left with areas of color in between hairs, you might find parts of your subject get cut off).
Luckily, you can combine methods, especially if you work in Paths, meaning you can alter the outline of a selection as you go along.
You could select the subject with the Quick Selection Tool and then use the Background Eraser Tool to eliminate background colors left behind by that method.
Another way of going about things is to make your initial selection and then click the Select and Mask button.
This will bring up a whole new set of options that allow you to alter the edges of your selection or change the nature of the edge (for example, you can feather it to make it softer or increase the contrast to make it harder).
You will recognize some of the tools from the main Photoshop menu.
From top to bottom, here are the edge-changing tools:

The four edge-changing tools within the Photoshop toolbox
- Lasso Tool giving you the ability to create a freehand selection.
- Quick Selection, which we have already covered.
- Object Selection Tool. Choose this option and Photoshop will try to identify the boundaries of discrete objects or shapes within the mask.
- Brush Tool, allowing you to directly paint onto your selection to add to it. (Don’t forget to zoom right into your image and adjust the size of your brush with ‚[‚ and ‚]‘ keys.
Learning how to remove the background of an image in Photoshop opens a door to many new creative endeavors such as collage, collateral design and greetings cards and other bespoke items for your family and friends.
The practice of removing backgrounds can be straightforward or complex. Our guide gives you everything you need to create the images you want combining speed and precision.
Now, if you are looking for a more straightforward way to remove image backgrounds, you can always use remove.bg. Your background will be removed in 5 seconds and you’ll be left with a flawless image even in the most challenging of corners. But don’t take our word for it. Give it a try and see it for yourself.
Читайте также: